Chapter 7
Finding the Lost
IN THIS CHAPTER
![]() Finding currently running apps and programs
Finding currently running apps and programs
![]() Finding lost desktop windows and files
Finding lost desktop windows and files
![]() Finding lost programs, emails, songs, photos, and documents
Finding lost programs, emails, songs, photos, and documents
![]() Finding other computers on a network
Finding other computers on a network
Sooner or later, Windows gives you that head-scratching feeling. “Gosh,” you say as you drum nervous fingers, “that stuff was right there a second ago. Where did it go?”
When Windows starts playing hide-and-seek, this chapter tells you where to search and how to make it stop playing foolish games.
Finding Currently Running Apps and Programs
The Windows desktop lets you run apps and programs in windows, keeping everything neatly self-contained. But even then, those windows tend to overlap, hiding the ones beneath.
How do you find and return to an app or program you just used? How do you easily jump between them, perhaps glancing at a report while creating a spreadsheet?
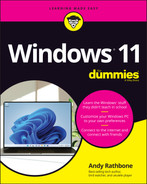
Windows offers a quick solution to the problem: It can clear the screen, shrink all your running apps and programs into miniature windows, and show you the lineup, as displayed in Figure 7-1. Click the app or program you want, and it returns to active duty at its normal size.
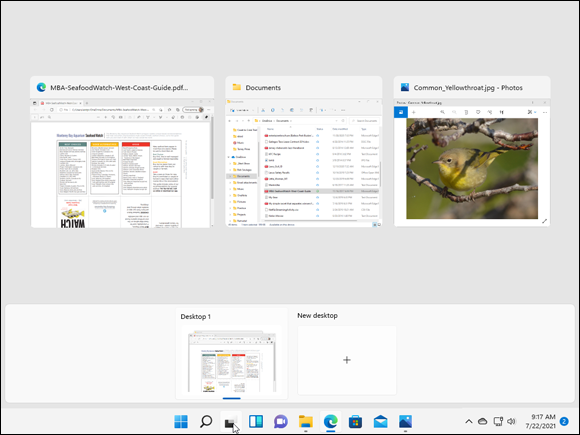
FIGURE 7-1: Click the Task View icon to see all your currently running apps and programs.
To see the list of your recently used apps and programs (and to close unwanted ones, if desired), employ any of these tricks:
 Mouse: Click the taskbar’s Task View icon (shown in the margin) to see miniature windows of all your open apps. To switch to an app, click its miniature window. To close an app, right-click its thumbnail and choose Close. (You can also click the X in the thumbnail’s upper-right corner.)
- Keyboard: Press
 +Tab to see the list of your most recently used apps, as shown in Figure 7-1. Press the left- or right-arrow keys to select different miniature windows. When you’ve selected your desired window, press Enter, and the app fills the screen.
 Windows 11 no longer allows touchscreen owners to slide their finger gently inward from the screen’s left edge to see all their open apps. Well, you can still slide your finger inward, but you’ll only see a monthly calendar and any waiting notifications.
The Task View icon shows your currently running apps and desktop programs, making it easy to return to work.
Clicking the Task View icon also lets you create a virtual desktop, an odd concept that gives you more than one desktop, that I cover in Chapter 3.
Finding Lost Windows on the Desktop
The Windows desktop works much like a spike memo holder. Every time you open a new window or program, you toss another piece of information onto the spike. The window on top is easy to spot, but how do you reach the windows lying beneath it?
If you can see any part of a buried window’s edge or corner, a well-placed click fetches it, bringing it to the top.
When your window is completely buried, look at the desktop’s taskbar — that strip along your screen’s bottom edge. Spot your missing window’s icon on the taskbar? Click it to dredge the window back to the top. (See Chapter 3 for details about the taskbar.)
Still can’t get at that missing window? Hold down the Alt key and press Tab. Shown in Figure 7-2, Windows shows thumbnails of all your open windows, programs, and apps in a strip across the screen’s center. While holding down the Alt key, repeatedly press Tab, and Windows highlights a different app or window with each press of the Tab key. When your window is highlighted, let go of the Alt key, and that window appears atop your desktop.
 Pressing the Task View icon, described in the preceding section, also lets you see miniature views of every open window. When you spot the window you want to bring back to the forefront, return to it with a click.
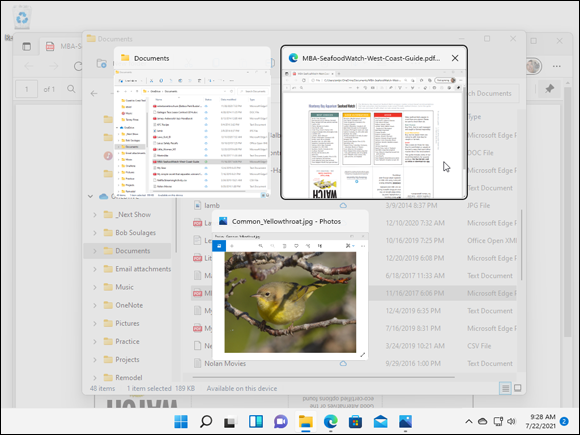
FIGURE 7-2: Hold down the Alt key and press Tab repeatedly to cycle through your open windows.
Locating a Missing App, Program, Setting, or File
The preceding two sections explain how to find currently running apps and programs. But what about things that you haven’t looked at for a while?
![]() That’s the job of the Search box, which now lives atop the Start menu. To jump immediately to the Search box, click the little magnifying glass icon, shown in the margin. (It lives next to the Start button on the taskbar.)
That’s the job of the Search box, which now lives atop the Start menu. To jump immediately to the Search box, click the little magnifying glass icon, shown in the margin. (It lives next to the Start button on the taskbar.)
But whether you reach the Search box from the Start menu or from the magnifying glass icon, the Search box searches through everything, both on your PC and the internet. That lets you help you find wandering files, hidden settings, and informational tidbits, all with one search.
To search for missing things, follow these steps:
 Click the taskbar’s Search icon to summon the Search window, and then type what you’d like to find.
The Search box accepts typing as soon as you click or tap its icon. As you type, Windows immediately begins searching for matches.
Click the taskbar’s Search icon to summon the Search window, and then type what you’d like to find.
The Search box accepts typing as soon as you click or tap its icon. As you type, Windows immediately begins searching for matches.For example, here’s what happens when searching for Lester Young: As you begin typing letters, Windows begins listing files with matching names, as shown in Figure 7-3. After typing Lester You on my computer, for example, Windows found several matches and organized them in the Search window in these categories:
- Best Match: The Search box lists all matching terms, with the best match at the top, in this case, a folder on my PC with the music of saxophone player Lester Young.
- Search the Web: Beneath the best match, the Search window shows internet links to other potential matches, including a doctor with the same name.
- Folders: Six folders contain the term Lester Young.
- Music: My computer holds 13 music files with Lester Young.
As you begin typing, the Search box concentrates on speed, so it searches only for matching filenames stored on your computer and OneDrive, as well as doing a quick internet search.
If you spot your missing item, jump ahead to Step 3.
If you finish typing your complete search term but don’t see your sought-after item on the Search list, move on to Step 2. You need to define your search more thoroughly.
Limit your search to a specific category.
To route your search to a specific area, click one of the words just below the Search box. Choose Apps, for example, and the window lists a link to search for matching apps from the Microsoft Store, as shown in Figure 7-4.
No matter which category you choose, Windows immediately shows any available matches. Changed your mind about a search category? Click a different word to route your search to that category, instead.
Choose a matching item to open it, bringing it to the screen.
Click a song, for example, and it begins playing. Click a setting, and the Control Panel or Settings app appears, open to that particular setting. Click a folder, and it opens in a new window.
FIGURE 7-3: The Search box searches for items both on your computer and the internet.

FIGURE 7-4: Narrow your search further by limiting it to certain areas.
These tips can help you wring the most out of the Search feature:
- In its emphasis on speed, the Search window lists only files with names that match your search term. While this strategy sometimes helps you find quick matches, it may not find your shopping list if you search for oranges. When you don’t spot a sure match, finish typing your search term and click one of the icons along the top of the pane to route your search to the appropriate spot.
- Don’t press the Enter key after typing in your Search. If you do that, Windows calls up the first match, which may not be what you want. Wait to see what matches turn up and then click the desired match.
- The Search box scours every file in your
Documents,Music,Pictures, andVideosfolders. That feature makes storing your files in those folders more important than ever. - The Search box also scours every file you store on your OneDrive space, even if those files aren't also stored on your PC.
- Windows doesn’t search for files stored in removable devices, such as flash drives, CDs, DVDs, or portable hard drives.
- If you’re searching for a common word and the Search box finds too many files, limit your search by typing a short phrase from your sought-after file: Shortly after the cat nibbled the bamboo, for example. The more words you type, the better your chances of pinpointing a particular file.
- The Search box ignores capital letters. It considers Bee and bee to be the same insect.
Finding a Missing File inside a Folder
The Start menu’s Search box can be overkill when you’re poking around inside a single desktop folder, looking for a missing file. To solve the “sea of files in a folder” problem, Windows includes a Search box in every folder’s upper-right corner. That Search box limits your search to files within that particular folder.
To find a missing file within a specific folder, click inside that folder’s Search box and begin typing a word or short phrase from your missing file. As you type letters and words, Windows begins filtering out files that are missing your sought-after word or phrase. It keeps narrowing down the candidates until the folder displays only a few files, including, I hope, your runaway file.
When a folder’s Search box locates too many possible matches, bring in some other helping hands: the headers above each column. For best results, click the word View along the folder’s top edge and select Details from the drop-down menu. That lines up your filenames in one column, as shown in Figure 7-5. The first column, Name, lists the name of each file, and the adjacent columns list specific details about each file.
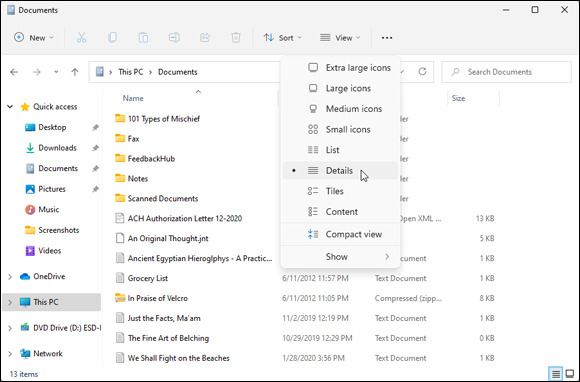
FIGURE 7-5: Details view lets you sort your files by name, making them easier to find.
See the column headers, such as Name, Date Modified, and Type, atop each column? Click any of those headers to sort your files by that term. Here’s how to sort by some of the column headers you may see in your Documents folder:
- Name: Know the first letter of your file’s name? Then click here to sort your files alphabetically. You can then pluck your file from the list. (Click Name again to reverse the sort order.)
- Date Modified: When you remember the approximate date you last changed a document, click the Date Modified header. That places your newest files atop the list, making them easy to locate. (Clicking Date Modified again reverses the order, a handy way to weed out old files you may no longer need.)
- Type: This header sorts files by their contents. All your photos group together, for example, as do all your Word documents. It’s a handy way to find a few stray photos swimming in a sea of text files.
- Size: Sorting here places your 45-page thesis on one end and your grocery list on the other.
- Authors: Microsoft Word and some other programs tack your name onto your work. A click on this label sorts the files alphabetically by their creators’ names.
- Tags: Windows often lets you assign tags to your documents and photos, a task I describe later in this chapter. Adding the tag “Moldy Cheese” to that pungent photo session lets you retrieve those pictures by either typing the tag or sorting a folder’s files by their tags.
Folders usually display about five columns of details, but you can add more columns. In fact, you can sort files by their word count, song length, photo size, creation date, and dozens of other details. To see a list of available detail columns, right-click an existing label along a column’s top. When the drop-down menu appears, select More to see the Choose Details window. Click to put check marks next to the new detail columns you’d like to see, and then click OK.
Finding Lost Photos
Windows indexes your email down to the last word, but it can’t tell the difference between photos of your cat and photos of your office party. When it comes to photos, the ID work lies in your hands, and these tips make the chore as easy as possible:
- Store shooting sessions in separate folders. The Windows Photo importing feature automatically creates a new folder to store each session, named after the current date. But if you’re using some other program to dump photos, be sure to create a new folder for each session. Then name the folder with a short description of your session: Dog Walk, Kite Surfing, or Truffle Hunt. (Windows indexes the folder names, making them easier to find down the road.)
- Sort by date. Have you stumbled onto a massive folder that’s a mishmash of digital photos? Try this quick sorting trick: Click the word View along the folder’s upper edge, and choose Large Icons to make the photos morph into identifiable thumbnails. Then, from the adjacent Sort menu, choose More from the drop-down menu. From there, you can choose Date Taken. Windows sorts the photos by the date you snapped them, turning chaos into organization.
- Rename your photos. Instead of leaving your Tunisian vacation photos with their boring camera-given names like
DSC_2421,DSC_2422, and so on, give them meaningful names: Select all the files in your Tunisia folder by clicking the Home tab on the Ribbon and clicking the Select All button. Then right-click the first picture, choose Rename, and type Tunisia. Windows names them asTunisia,Tunisia (2),Tunisia (3), and so on. (If you messed up, immediately press Ctrl+Z to undo the renaming.)
Following those simple rules helps keep your photo collection from becoming a jumble of files.
 Be sure to back up your digital photos to a portable hard drive, CDs, DVDs, or another backup method I describe in Chapter 13. If they’re not backed up, you’ll lose your family history when your PC’s hard drive eventually crashes.
Finding Other Computers on a Network
A network is simply a group of connected PCs that can share things, such as your internet connection, files, or a printer. Most people use a public network every day without knowing it: Every time you check your email, your PC connects to another computer on the internet to grab your waiting messages.
Much of the time, you needn’t care about the other PCs on your private network. But when you want to find a connected PC, perhaps to grab files from the PC in your family room, Windows is happy to help.
To find a PC on your network, open any folder and click Network on the Navigation pane along the folder’s left edge, as shown in Figure 7-6.
Clicking Network lists every PC that’s connected to your own PC in a traditional network. To browse files on any of those PCs, just double-click their names.
I walk through the steps of creating your own home network in Chapter 15.
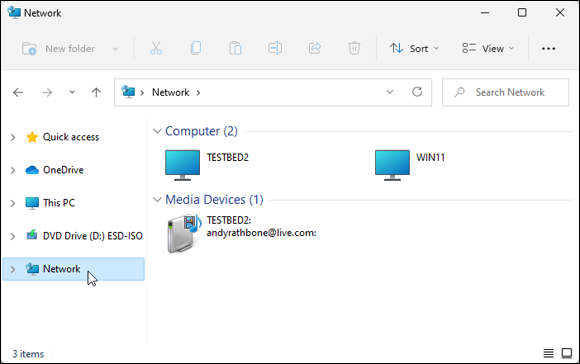
FIGURE 7-6: To find computers connected to your PC through a network, click the Navigation pane’s Network category.