Chapter 6
Playing with Programs, Apps, and Documents
IN THIS CHAPTER
![]() Opening a program, an app, or a document
Opening a program, an app, or a document
![]() Changing which program opens which document
Changing which program opens which document
![]() Installing, uninstalling, and updating apps
Installing, uninstalling, and updating apps
![]() Creating a shortcut
Creating a shortcut
![]() Cutting, copying, and pasting
Cutting, copying, and pasting
In Windows, apps and programs are your tools: Load a program or an app, and you can add numbers, arrange words, and shoot spaceships.
Documents, by contrast, are the things you create with apps and programs, such as tax forms, heartfelt apologies, and lists of high scores.
This chapter explains the basics of opening apps and programs from the Start menu in Windows. It explains how to find, download, and install a new app from the Start menu’s Microsoft Store app. It also shows you where to find an app’s menus. (Microsoft mysteriously hid most of them.)
As you flip through this chapter’s pages, you figure out how to make your preferred program open your files. You also create desktop shortcuts — buttons that let you quickly load favorite files, folders, and programs.
The chapter ends with the section “Absolutely Essential Guide to Cutting, Copying, and Pasting.” Put this one trick under your belt, and you’ll know how to manipulate words in a word processor, move files between folders, copy files from your camera to your PC, and send files to and from flash drives.
Starting an App or Program
![]() Windows 11 moves the Start button and menu to the center of the taskbar, that icon-filled strip along the bottom of your screen. A click of the Start button (shown in the margin) brings you the Start menu’s latest incarnation.
Windows 11 moves the Start button and menu to the center of the taskbar, that icon-filled strip along the bottom of your screen. A click of the Start button (shown in the margin) brings you the Start menu’s latest incarnation.
I explain the new Start menu, shown in Figure 6-1, in Chapter 2; head there for tips on how to customize the menu by adding, moving, or removing icons to ensure you find things more easily.
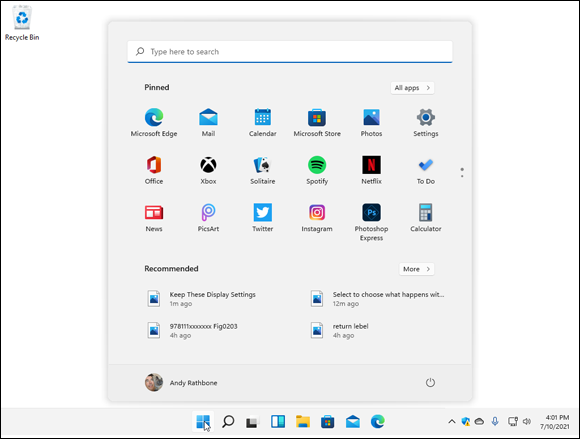
FIGURE 6-1: On the Start menu, click the icon for the program you want to open.
If you just want to launch a program or app, follow these steps:
Open the Start menu.
 Summon the Start menu by clicking or tapping the Start button near the middle of the taskbar. If your hands are already on the keyboard, just press the Windows key (
 ).
).The Start menu appears, as shown previously in Figure 6-1, bringing a list of your apps and programs. In fact, the Start menu automatically updates itself to display the names of your most recently used programs, apps, or files. (To return to one, just click its name.)
 Windows 11 no longer has a Tablet mode, so the Start menu no longer fills the entire screen on tablets and touchscreen monitors. Instead, Windows 11 automatically expands the space between icons, making them easier targets for fumbling fingers. Other than that, Windows 11 looks identical on tablets, laptops, and desktop PCs.
If you spot the icon for your app or program, choose it with a mouse click or, on a touchscreen, a tap of a finger.
Don’t see an icon for your sought-after app on the Start menu’s list? Move to the next step.
Page down the Start screen’s right side to see more icons.
 Nestled along the Start menu’s right edge are two buttons, stacked on top of each other. Click the lower button, shown in the margin, and the Start menu reveals another page of icons. Repeat to see more pages; when no more icons appear, you’re seeing the Start menu’s last row of icons. Similarly, clicking the top button moves up a page.
 On touchscreens, you can view the icons hidden below the screen’s edge by sliding your finger up the screen over the icons.
Still don’t see your program or app listed? Head for Step 4.
View all your apps by clicking the All Apps button.
To keep its list of apps and programs manageable, the Start menu’s icon-filled section doesn’t list every program or app on your computer.
 To reveal them all, click the All Apps button in the upper-right corner of the Start menu. All your installed apps and programs suddenly appear, sorted alphabetically.
If you still can’t find your program on the admittedly crowded Start menu, follow these tips for other ways to open an app or a program:
- Click inside the Search box, located along the top edge of the Start menu. As you type the first letter, the Search box expands into its own window and begins presenting a list of names containing that letter. Type a second or third letter, and the list of matches shrinks accordingly to match that sequence. When the window lists your desired app or program, open it with a click (or a tap on a touchscreen). I explain the new Search box in Chapter 7.
- Double-click a shortcut to the program. Shortcuts, which often sit on your desktop, are handy, disposable buttons for launching files and folders. (I explain more about shortcuts in this chapter’s “Taking the Lazy Way with a Desktop Shortcut” section.)
- While you’re on the desktop, you may spot the program’s icon on the taskbar — a handy strip of icons lazily lounging along your desktop’s bottom edge. If so, click the taskbar icon, and the program leaps into action. (I cover the desktop’s taskbar, including how to customize its row of icons, in Chapter 3.)
- Right-click on a blank portion of the Windows desktop, choose New, and select the type of document you want to create. Windows loads the correct program for the job.
Windows offers other ways to open an app or program, but the preceding methods usually get the job done. (I cover the Start menu more extensively in Chapter 2, and the desktop is the star of Chapter 3.)
Opening a Document
Like Tupperware, the Windows desktop is a big fan of standardization. Almost all Windows programs load their documents — often called files — the same way:
Click the word File on the program’s menu bar, that row of staid words along the program’s top.
If your program hides its menu bar, pressing the Alt key often reveals it.
Still no menu bar? Then your program might have a Ribbon, a thick strip of multicolored icons along the window’s top. If you spot the Ribbon, click the tab or button in its leftmost corner to let the File menu tumble down.
When the File menu drops down, choose Open.
Windows gives you a sense of déjà vu with the Open window, shown in Figure 6-2. It looks (and works) just like your
Documentsfolder, which I cover in Chapter 5.There's one big difference, however: This time, your folder displays only files that your particular program knows how to open — it filters out all the others.
Hover the mouse pointer on the document you want to open (shown in Figure 6-2), click the mouse button, and click the Open button.
On a touchscreen, tap the document to open it. The program opens the file and displays it on the screen.
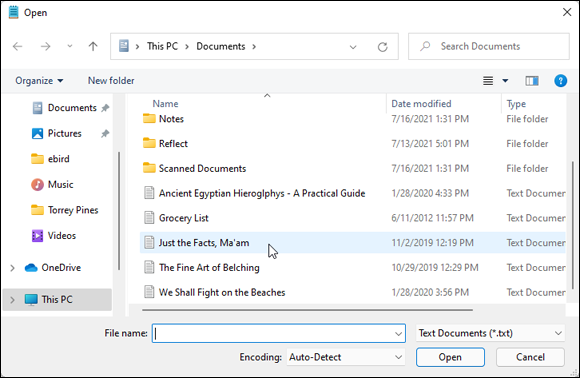
FIGURE 6-2: Double-click the filename you want to open.
Opening a file works this way in most Windows programs, whether written by Microsoft, its corporate partners, or the teenager down the street.
- To speed things up, double-click a desired file’s name; that opens it immediately, automatically closing the Open window.
- Humans store things in the garage, but computers store their files in neatly labeled compartments called folders. (Double-click a folder to see what’s stored inside. If you spot your file, open it with a double-click.) If browsing folders gives you trouble, the folders section in Chapter 5 offers a refresher.
- If your file isn’t listed by name, start browsing by clicking the buttons or words shown along the left side of Figure 6-2. Click the words
OneDriveorThis PC, for example, to search the folders and their files stored inside those places. - When you open a file and change it, even by accident, Windows usually assumes that you've changed the file for the better. If you try to close the file, Windows cautiously asks whether you want to save your changes. If you updated the file with masterful wit, click Yes. If you made a mess or opened the wrong file, click No or Cancel.
- Confused about any icons or commands along the Open window’s top or left side? Rest your mouse pointer over the icons, and a little box announces their occupations.
Saving a Document
Saving means to send the work you just created to a place for safekeeping. Unless you specifically save your work, your computer thinks that you’ve just been fiddling around for the past four hours. You must specifically tell the computer to save your work before it will safely store it.
Thanks to Microsoft snapping leather whips, a Save command appears in nearly every Windows program no matter which programmer wrote it. Here are a few ways to save a file:
- Click File on the top menu, and choose Save. (Pressing the Alt key, followed by the F key and the S key, does the same thing.)
 Click the Save icon (shown in the margin).
- Hold down Ctrl and press the S key. (S stands for Save.)
If you’re saving something for the first time, Windows asks you to think up a name for your document. Type something descriptive using only letters, numbers, and spaces between the words. (If you try to use one of the “illegal” characters I describe in Chapter 5, the Windows Police step in, politely requesting that you use a different name.)
 You can save files to any folder, recordable CD or DVD, or even a flash drive. But files are much easier to find down the road when they stay in one of your four main folders:
 Documents,Music,Pictures, orVideos. (Those folders are listed on the left edge of every folder — in the Navigation pane — making it easy to place files inside them.)- Choose descriptive filenames for your work. Windows gives you 255 characters to work with. A file named January 2022 Fidget Spinner Sales is easier to relocate than one named Stuff.
- If you want to access your current file from other devices, perhaps your phone, tablet, or another PC, save it to the
Documentsfolder on OneDrive: Choose OneDrive from the Save window's left edge, and then choose the OneDriveDocumentsfolder. Then click the Save button. - Most programs can save files directly to a recordable CD or DVD. Choose Save from the File menu, and choose your preferred drive from the right pane’s This PC section. Put a disc (preferably one that’s not already filled) into your disc-writing drive to start the process.
- A few newer programs spare you the chore of clicking the Save button: They save your work automatically as you type. Microsoft’s OneNote note-taking program and many Start menu apps save your work automatically, so they lack a Save button.
- If you’re working on something important (and most things are important), click the program’s Save command every few minutes. Or use the Ctrl+S keyboard shortcut. (While holding down the Ctrl key, press the S key.) Programs make you choose a name and location for a file when you first save it; subsequent saves are much speedier.
Choosing Which Program Should Open Which File
Most of the time, Windows automatically knows which program should open which file. Open a file, and Windows tells the correct program to jump in and let you view its contents.
But sometimes Windows doesn’t choose your preferred program. For example, the new app-loving Windows tells the Start menu’s Groove Music app to play your music. You may prefer that the desktop’s Windows Media Player handle the music-playing chores instead.
When the wrong program opens your file, here’s how to make the right program open it instead:
Right-click your problematic file, and choose Open With from the pop-up menu.
As shown in Figure 6-3, Windows lists a few capable programs, including ones you’ve used to open that file in the past.
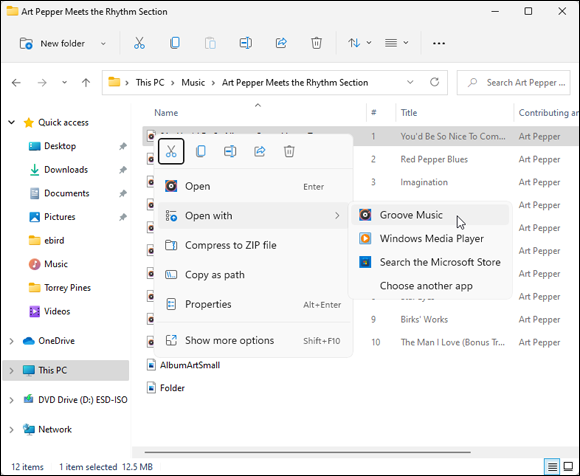
FIGURE 6-3: Windows lists some programs that opened that type of file in the past.
Click the Choose Another App option.
The window that appears, as shown in Figure 6-4, lists more apps, and the currently assigned apps appears at the top of the list. If you spot your favorite apps, double-click to tell it to open your file. (Make sure the Always Use This App to Open Files check box is selected so you don’t need to repeat these steps.) Then click OK. You’re done!
Don’t see the apps you want or need to open the file? Move to Step 3.
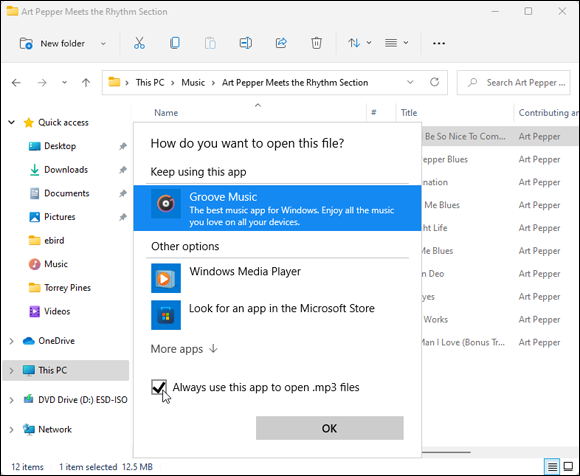
FIGURE 6-4: Choose the app you want, and select the check box at the bottom.
Click the words Look for An App in the Microsoft Store, and click the OK button.
The Microsoft Store app appears, leaving you at a virtual shelf stocked with apps capable of opening the file.
If you install a new app or program to open a particular file, the newcomer usually assigns itself the rights to open that type of file in the future. If it doesn’t, head back to Step 1. This time, however, your newly installed app or program appears on the list. Choose it, and you’ve finally finished.
- In a bit of revisionist history, Windows now uses the term app when referring to both traditional desktop programs and Start menu apps. Be mindful of the Windows terminology when on the desktop. If Windows says an action will affect your apps, it will also affect your desktop programs.
 Windows lets you choose your default app from the Start menu as well. From the Start menu, click the Settings icon, shown in the margin. When the Settings app appears, click the Apps icon from the left pane. From the Apps window, choose Default Apps from the right pane. Click any app’s name, and a list appears for you to hand the reins to a different program.
- Sometimes you’ll want to alternate between different apps or programs when working on the same file. To do so, right-click the file, choose Open With, and select the program you need at that time. Just be sure to leave the Always Open with this App box unchecked.
- Occasionally, you can’t make your favorite program open a particular file because it simply doesn’t know how. For example, Windows 11 can’t play DVD movies. Your only solution is to install a DVD playing program or app from the Microsoft Store.
- If somebody says something about “file associations,” feel free to browse the technical sidebar “The awkward world of file associations,” which explains that awful subject.
Navigating the Microsoft Store
![]() Apps, which are mini-programs specialized for single tasks, come from the world of smartphones (computerized cellphones). And, like the apps from smartphones, apps come only from an App store. In Windows, they come from the Microsoft Store app, available with a click on the taskbar’s Microsoft Store icon (shown in the margin). (Earlier versions of Windows called the store the Windows Store.)
Apps, which are mini-programs specialized for single tasks, come from the world of smartphones (computerized cellphones). And, like the apps from smartphones, apps come only from an App store. In Windows, they come from the Microsoft Store app, available with a click on the taskbar’s Microsoft Store icon (shown in the margin). (Earlier versions of Windows called the store the Windows Store.)
Although the terms “app” and “program” are often interchangeable, apps differ from traditional desktop programs in several ways:
- Windows allows apps to run within desktop windows rather than consuming the entire screen as they did in some earlier Windows versions.
- Apps are tied to your Microsoft account. That means you need a Microsoft account to download a free or paid app from the Store app.
- When you buy an app from the Microsoft Store app, you can usually run it on up to ten PCs or devices — as long as you’re signed in to those PCs or devices with your Windows account. (Some apps may raise or lower that number.)
- Newly installed apps consume just one Start menu icon. Newly installed programs, by contrast, often sprinkle several icons onto your Start menu.
Apps and programs can be created and sold both by large companies and hobbyists working in their spare time. It’s difficult to tell beforehand which one will give you the most support should things go wrong.
Although programs and apps look and behave differently, Microsoft unfortunately refers to both as apps. You might run across this terminology quirk when dealing with older programs, as well as newer programs created by companies not hip to Microsoft’s new lingo.
Adding new apps from the Microsoft Store app
When you’re tired of the apps bundled with Windows or you need a new app to fill a special need, follow these steps to bring one into your computer.
If you miss the OneNote app bundled with Windows 10 but left behind in Windows 11, here’s your chance to get it back. Plus, it gives you some practice in downloading an app.
Click the Start button, and click the Microsoft Store app from the Start menu.
 The Microsoft Store app jumps to the screen, as shown in Figure 6-5. If you prefer, you can also click the Microsoft Store app (shown in the margin) from the taskbar that always runs along the bottom of your screen.
Although the Microsoft Store changes its layout frequently, it usually opens to show its Spotlight category along the top edge, where Microsoft highlights a few chosen apps. Keep scrolling down the window to see links to popular apps, as well as apps that are trending, or rising in popularity.
To see more, point near the Microsoft Store app’s left edge to see the top few apps in each category: Apps, Gaming, and Entertainment. (You can also buy or rent movies and computer gadgets from the Microsoft Store app.)
To narrow your search, choose a category by clicking its name.
The Store lists its offerings based on your chosen category.
Save some time by scrolling down to the “Top Free Apps” section, if you spot one. If you spot an interesting free app, click it. When the Install button appears, click the button to install the app and get the hang of the process. (Similarly, to buy a paid app, click the button that lists its price.)Didn’t find the right app? Head to the next step.
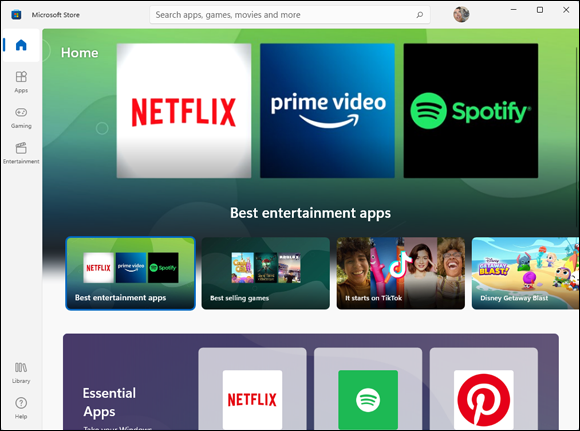
FIGURE 6-5: The Microsoft Store app lets you download free, trial, or paid apps to launch from your Start menu.
Search for a particular app by typing a keyword into the Search box across the upper edge and pressing Enter.
The Search box lives across the store’s upper edge. Shown in Figure 6-6, the Search box narrows down the apps by a keyword.
Like the Microsoft Store app, almost all searchable apps include a built-in Search box.When you press Enter, the Microsoft Store app lists all matching apps, games, artists, albums, movies, and TV shows.
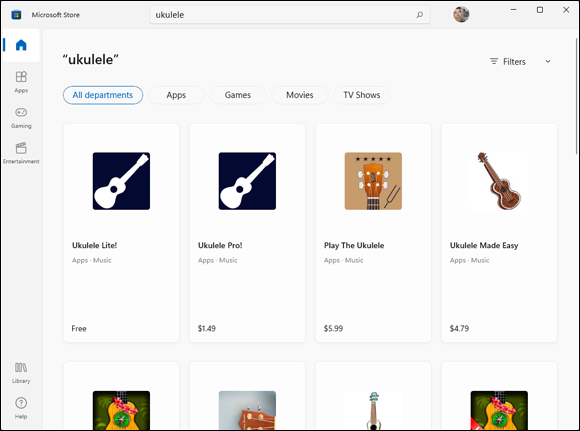
FIGURE 6-6: Type a keyword in the Search box and press Enter to see relevant apps.
Sort the listed apps.
The buttons along the search results top let you fine-tune your app search with a click of a button. Click the Apps button, for example, to further sort your search by only apps; similarly, the Gaming, Movies, and TV Shows buttons limit your search to those categories.
Click any app to read a more detailed description.
A page opens to show more detailed information, including its price tag, pictures, reviews left by previous customers, and more technical information.
Click the Get or Price button.
When you find a free app that you can’t live without, grab it with a click on its adjacent Get button. To buy a paid app, click the button that lists its price. The price will be charged to the credit card linked to your Microsoft account. If you haven’t yet entered a card, Microsoft walks you through the process.
 The Microsoft Store may ask you to choose which drive to use for installing your app. Most people choose their C: drive; owners of tablets with limited storage may prefer to choose their memory card, instead, which is usually the D: drive. (Tiny tablets traditionally come with tiny C: drives.)
No matter what you download from the Microsoft Store, the new item appears on your Start menu’s alphabetical All Apps list as quickly as your internet connection speed allows.
To copy an app from the All Apps list to a front-page Start menu icon, right-click the app’s name and choose Pin to Start. I explain how to customize your Start menu further in Chapter 2.
Microsoft plans to offer Android apps from the Microsoft Store sometime in 2022. Supposedly, the Android apps will run in onscreen windows.
Uninstalling apps
Downloaded a dud app? To uninstall any app from the Start menu, right-click its icon. When the pop-up menu appears, click Uninstall.
Uninstalling an app removes that app only from your account’s Start menu. Your action won’t affect other account holders on your PC who may have installed the app.
Uninstalling an app also won’t give you a refund on apps you’ve purchased, but decided they were duds.
Taking the Lazy Way with a Desktop Shortcut
As you work, you’ll constantly find yourself traveling between the desktop and the Start menu. When you grow tired of meandering through the woods to find a program, folder, disc drive, document, or even a website, create a desktop shortcut — an icon that takes you directly to the object of your desires.
![]() Because a shortcut is a mere icon that launches something else, shortcuts are safe, convenient, and disposable. And they’re easy to tell apart from the original because they have a little arrow lodged in their lower-left corner, as you can see on the folder shortcut shown in the margin.
Because a shortcut is a mere icon that launches something else, shortcuts are safe, convenient, and disposable. And they’re easy to tell apart from the original because they have a little arrow lodged in their lower-left corner, as you can see on the folder shortcut shown in the margin.
To skip the Start menu, follow these instructions to create desktop shortcuts to your oft-used items:
- Folders or Documents: From within File Explorer, right-click a favorite folder or document, and choose Show More Options. When the pop-up menu appears, choose Send To, and select the Desktop (Create Shortcut) option. The shortcut appears on your desktop.
- Websites: When viewing a website in Microsoft Edge, look for the little icon in front of the website’s address in the browser’s Address bar. Drag and drop that little icon to your desktop for quick access later.
 Storage areas: Open File Explorer with a click of its icon on the desktop’s taskbar. Then, while holding down your right mouse button, drag and drop nearly anything you want to the desktop. Release the mouse button and choose Create Shortcut Here from the pop-up menu. (This works for drives, folders, files, and even network locations.)
Here are some more tips for desktop shortcuts:
- For quick CD or DVD burning, put a shortcut to your disc drive on your desktop. Burning files to disc becomes as simple as dragging and dropping them onto the disc drive’s new shortcut. (Insert a blank disc into the disc drive’s tray, confirm the settings, and begin burning your disc.)
- Want to send a desktop shortcut to the Start menu? Right-click the desktop shortcut and choose Pin to Start.
 Feel free to move shortcuts from place to place, but don’t move the items they launch. If you do, the shortcut won’t be able to find the item, causing Windows to panic and search (usually in vain) for the relocated goods.
- Want to see what program a shortcut will launch? Right-click the shortcut, and click Open File Location. The shortcut quickly takes you to its leader.
Absolutely Essential Guide to Cutting, Copying, and Pasting
Windows took a tip from the kindergartners and made cut and paste an integral part of computing life. You can electronically cut or copy just about anything and then paste it just about anyplace else with little fuss and even less mess.
For example, you can copy a photo and paste it onto your party invitation flyers. You can move files by cutting them from one folder and pasting them into another. You can cut and paste your digital camera’s photos into a folder inside your Pictures folder. And you can easily cut and paste paragraphs to different locations within a word processor.
The beauty of the Windows desktop is that, with all those windows onscreen at the same time, you can easily grab bits and pieces from any of them and paste all the parts into a brand-new window.
Don’t overlook copying and pasting for the small stuff. Copying a name and an address is much faster and more accurate than typing them into your letter by hand. Or, when somebody emails you a web address, copy and paste it directly into your browser’s Address bar. It’s easy to copy most items displayed on websites too (much to the dismay of many professional photographers).
The quick ’n’ dirty guide to cut ’n’ paste
In compliance with the Don’t Bore Me with Details Department, here’s a quick guide to the three basic steps used for cutting, copying, and pasting:
- Select the item to cut or copy: a few words, a paragraph, or an entire page; a file or a group of files; a web address; or just about any other item on your computer.
Right-click your selection, and choose the Cut or Copy icons from the top of the pop-up menu, depending on your needs.
Use Cut when you want to move something. Use Copy when you want to duplicate something, leaving the original intact.
Keyboard shortcut: Hold down Ctrl, and press X to cut or C to copy.
Right-click the item’s destination, and choose Paste.
You can right-click inside a document, folder, another program, or some other place in your computer.
Keyboard shortcut: Hold down Ctrl and press V to paste.
The next three sections explain each of these three steps in more detail.
Selecting things to cut or copy
Before you can shuttle pieces of information to new places, you have to tell Windows exactly what you want to grab. The easiest way to tell it is to select the information with a mouse. In most cases, selecting involves one swift trick with the mouse, which then highlights whatever you’ve selected.
To select text in a document, website, or spreadsheet: Put the mouse pointer or cursor at the beginning of the information you want and hold down the mouse button. Then move the mouse to the end of the information and release the button. That’s it! That lassoing action selects all the stuff lying between where you clicked and released, as shown in Figure 6-7.
On a touchscreen, double-tap one word to select it. To select more than one word, double-tap the first word, but keep your finger pressed on the glass with your second tap. Then slide your finger along the glass until you’ve reached the area where the highlighting should stop. Done? Remove your finger to select that portion of text. Be careful after you highlight a bunch of text. If you accidentally press the K key, for example, the program replaces your highlighted text with the letter k. To reverse that calamity, choose Undo from the program’s Edit menu (or press Ctrl+Z, which is the magical keyboard shortcut for Undo).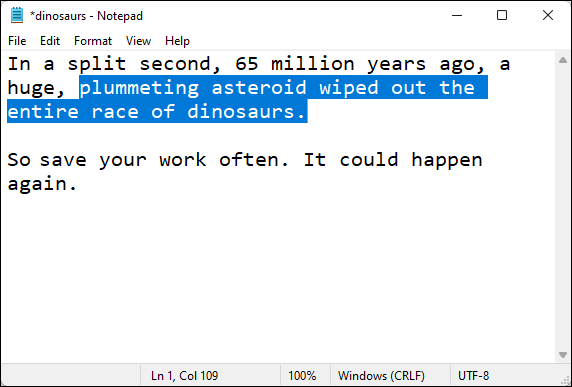
FIGURE 6-7: Windows highlights the selected text, changing its color for easy visibility.
- To select any files or folders: Simply click a file or folder to select it. To select several items, try these tricks:
- If all the files are in a row: Click the first item in the bunch, hold down the Shift key, and then select the last item. Windows highlights the first and last items as well as everything in between.
- If the files aren’t in a row: Hold down the Ctrl key while clicking each file or folder you want to select.
The next section explains how to cut or copy a selected item.
- After you select something, cut it or copy it immediately. If you absentmindedly click the mouse someplace else, your highlighted text or file reverts to its boring self, and you’re forced to start over.
- To delete any selected item, be it a file, paragraph, or picture, press the Delete key. Alternatively, right-click the item and choose Delete from the pop-up menu.
Cutting or copying your selected goods
After you select some information (which I describe in the preceding section, in case you just arrived), you’re ready to start playing with it. You can cut it or copy it. (Or just press Delete to delete it.)
This bears repeating. After selecting something, right-click it. (On a touchscreen, touch it and hold down your finger to fetch the pop-up menu.) When the menu appears, choose Cut or Copy, depending on your needs, as shown in Figure 6-8. Then right-click your destination and choose Paste.
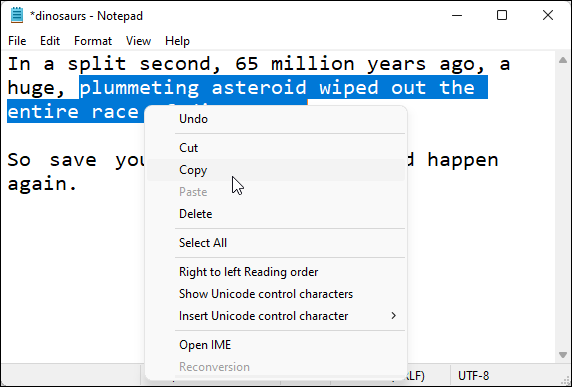
FIGURE 6-8: To copy information into another window, right-click your selection and choose Copy.
The Cut and Copy options differ drastically. How do you know which one to choose?
 Choose Cut to move information. Cutting wipes the selected information off the screen, but you haven’t lost anything: Windows stores the cut information in a hidden Windows storage tank called the Clipboard, waiting for you to paste it. (Windows 11 adds a new icon, shown in the margin, for the Cut command.)
Feel free to cut and paste entire files to different folders. When you cut a file from a folder, the icon dims until you paste it. (Making the icon disappear would be too scary.) Changed your mind in mid-cut? Press Esc to cancel the cut, and the icon reverts to normal.
Choose Cut to move information. Cutting wipes the selected information off the screen, but you haven’t lost anything: Windows stores the cut information in a hidden Windows storage tank called the Clipboard, waiting for you to paste it. (Windows 11 adds a new icon, shown in the margin, for the Cut command.)
Feel free to cut and paste entire files to different folders. When you cut a file from a folder, the icon dims until you paste it. (Making the icon disappear would be too scary.) Changed your mind in mid-cut? Press Esc to cancel the cut, and the icon reverts to normal. Choose Copy to make a copy of the information. Compared with cutting, copying information is quite anticlimactic. Whereas cutting removes the item from view, copying the selected item leaves it in the window, seemingly untouched. Copied information also goes to the Clipboard until you paste it. (Windows 11 places a new icon, shown in the margin, for the Copy command.)
To save a picture of your entire screen, press ![]() +PrtScr. (Some keyboards call that key Print Screen or PrintScr.) Windows quickly saves the image in a file called Screenshot inside your
+PrtScr. (Some keyboards call that key Print Screen or PrintScr.) Windows quickly saves the image in a file called Screenshot inside your Pictures folder. Do it again, and the screenshot is named Screenshot (2). (You get the idea.)
Pasting information to another place
After you cut or copy information to the Windows Clipboard, it’s checked in and ready for travel. You can paste that information nearly anyplace else.
Pasting is relatively straightforward:
- Open the destination window, and move the mouse pointer or cursor to the spot where you want the stuff to appear.
Right-click the mouse, and choose Paste from the pop-up menu.
Presto! The item you just cut or copied immediately leaps into its new spot.
![]() Or, if you want to paste a file onto the desktop, right-click on the desktop and choose Paste. The cut or copied file appears where you’ve right-clicked. (Windows 11 adds a new icon for Paste, shown in the margin, to the right-click menu.)
Or, if you want to paste a file onto the desktop, right-click on the desktop and choose Paste. The cut or copied file appears where you’ve right-clicked. (Windows 11 adds a new icon for Paste, shown in the margin, to the right-click menu.)
- The Paste command inserts a copy of the information that’s sitting on the Clipboard. The information stays on the Clipboard, so you can keep pasting the same thing into other places if you want.
- To paste on a touchscreen, hold down your finger where you’d like to paste the information. When the menu pops up, tap Paste.
- Some programs, including File Explorer, have toolbars along their tops, offering additional one-click access to the versatile Cut, Copy, and Paste buttons, as shown in Figure 6-9. (To keep you from having to move you hand too much, they also appear along the bottom of some pop-up menus.)
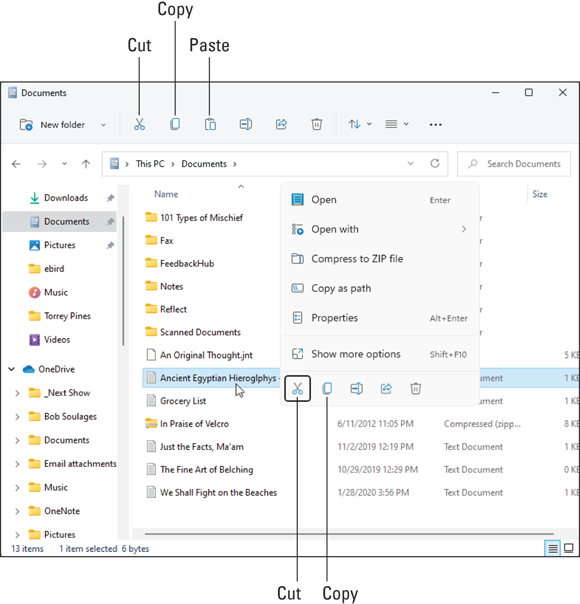
FIGURE 6-9: Throughout Windows 11, look for the new Cut, Copy, and Paste icons along the bottom of its many pop-up menus.