Chapter 2
Starting with the Start Menu
IN THIS CHAPTER
![]() Starting Windows
Starting Windows
![]() Signing in to Windows
Signing in to Windows
![]() Understanding the Start menu
Understanding the Start menu
![]() Switching among apps
Switching among apps
![]() Seeing all your apps and programs
Seeing all your apps and programs
![]() Customizing the Start menu
Customizing the Start menu
![]() Turning off your computer
Turning off your computer
The Windows 11 Start menu doesn’t look much like the Start menu in older versions of Windows. Instead of living in the bottom-left corner, it lives in the bottom center of your screen. But although its position and design have changed, the Start menu’s basic mechanics remain the same.
Click the Start button, and the Start menu rises, listing the apps and programs installed on your PC. Click an app or program, and it leaps to the screen, ready for action.
In this chapter, I explain how to figure out this odd new Start menu. Whether you’re using a tablet or desktop PC, this chapter shows how to make the Start menu do its main job: launch your apps and programs.
 If you’re using a touchscreen computer, substitute the word tap when you read the word click. Tapping twice works like double-clicking. And when you see the term right-click, touch and hold your finger on the glass; lift your finger when the right-click menu appears.
Being Welcomed to the World of Windows
Starting Windows is as easy as turning on your computer — Windows leaps onto the screen automatically with a flourish. But before you can begin working, Windows stops you cold: It displays what’s called a lock screen, shown in Figure 2-1, with no entrance key dangling nearby.

FIGURE 2-1: To move past this lock screen, press a key on the keyboard or drag up on the screen with your mouse or finger.
Introduced back in Windows 8, the lock screen appears before you can sign in to your computer with your account name.
How do you unlock the lock screen? The answer depends on whether you’re using a mouse, keyboard, or touchscreen:
- Mouse: On a desktop PC or laptop, click any mouse button.
- Keyboard: Press any key, and the lock screen slides away. Easy!
- Touch: Touch the screen with your finger and then slide your finger up the glass. A quick flick of the finger will do.
When you’re in the door, Windows wants you to sign in, as shown in Figure 2-2, by clicking your name and passing the security check.
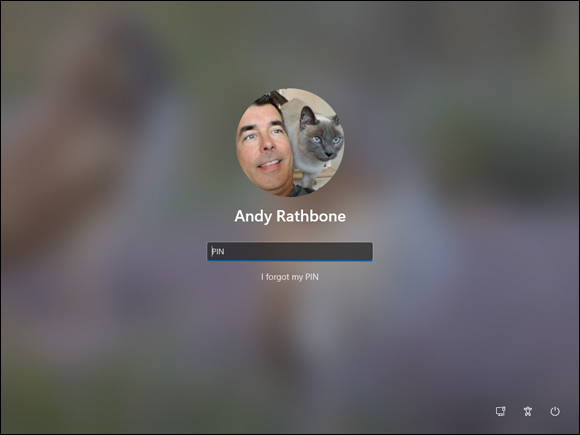
FIGURE 2-2: Click your user account name and then type your password or PIN on the next screen.
When facing the Sign In screen, you have several options:
- If you see your name or email address listed, type your password or PIN, or use a Windows Hello fingerprint reader or camera. After verifying your identity, Windows lets you in and displays your Start menu, just as you last left it. (I describe how to set up Windows Hello in Chapter 14.)
- If you don’t see your name, but you have an account on the computer, look in the screen’s lower-left corner. There, Windows displays a list of all the account holders. You may see the computer owner’s name.
- If you bought a new computer, use the account you created when turning on your computer for the first time. As part of its setup process, Windows guides you through creating a Microsoft account on your computer.
- No account? Then find out who owns the computer and beg that person to set up an account for you.
If you need more information about user accounts, including creating new ones, managing old ones, flip ahead to Chapter 14.
Don’t want to sign in at the Sign In screen? Two of the screen’s bottom-corner buttons offer these other options:
 The little figurine, shown in Figure 2-2 and the margin, customizes Windows for people with physical challenges in hearing, sight, or manual dexterity, all covered in Chapter 12. If you choose this button by mistake, click or touch on a different part of the screen to avoid changing any settings.
 The little round button, shown in Figure 2-2 and the margin, lets you shut down or restart your PC, as well as put it to sleep — a power-saving state that quickly awakes. (If you’ve accidentally clicked the button and shut down your PC, don’t panic. Press the power button on your PC’s case, and your PC returns to this screen.)
Even while locked, as shown earlier in Figure 2-1, your computer’s screen displays current information in its lower-right corner. Depending on how your PC is configured, you may see the time and date; your wireless internet signal strength (the more radio waves in the icon, the better your connection); battery strength (the more colorful the icon, the better); your next scheduled appointment; a count of unread email; and other items.
Understanding user accounts
Windows allows several people to work on the same computer, yet it keeps everybody’s work separate. To do that, it needs to know who’s currently sitting in front of the keyboard. When you sign in — introduce yourself — by clicking your username and typing your password, as shown in Figure 2-2, the Windows Start menu and desktop appear as you left them, ready for you to make your own personalized mess.
When you’re done working or just feel like taking a break, sign out (explained later in this chapter, in the “Exiting Windows” section) so that somebody else can use the computer. Later, when you sign back in, your own files will be waiting for you.
 Although you may turn your work area into a mess, it’s your own mess. When you return to the computer, your letters will be just as you saved them. Sue hasn’t accidentally deleted your files or folders while playing Words with Friends. Bob’s Start menu still contains links to his favorite ukulele websites. And nobody will be able to read your email.
Until you customize your username picture, you’ll be a silhouette. To add a photo to your user account, open the Start menu and click your username. (It’s the icon directly over the Start button.) Choose Change Account Settings from the pop-up menu. When the Settings menu’s Your Info page appears, click the Open Camera button to take a quick shot with your computer’s built-in camera. Still wearing your pajamas? Then choose the Browse Files button to choose a photo already stored in your Pictures folder.
Keeping your account private and secure
Because Windows lets many people use the same computer, how do you stop Diane from reading Rob’s love letters to Miley Cyrus? How can Grace keep Josh from deleting her Star Wars movie trailers? Using a password solves some of those problems, and Windows offers other security solutions, as well.
In fact, security is more important than ever in Windows because some accounts can be tied to a credit card. By typing a secret password when signing in, you enable your computer to recognize you and nobody else. When you protect your account, nobody can access your files. And nobody can rack up charges for computer games while you’re away from home.
Also, if your computer is stolen, a strong password keeps the thieves from logging in to your account and stealing your files.
To change a password on a Microsoft account, visit your account’s website at https://account.microsoft.com. After signing in, choose the Change Password option near your account name.
Holders of Local accounts, by contrast, can follow these steps on their own PC to set up or change the password:
Click the Start button and then click the Settings icon.
 When the Start menu appears, click the Settings icon (shown in the margin) near the menu’s top-left corner. The Settings app appears.
 Click the Accounts icon (shown in the margin). When the Accounts pane appears, click the words Sign-in Options along the pane’s left edge.
Options for signing in to your computer appear.
Click the Password button, shown in Figure 2-3. Then click the Change button.
You may need to type your existing password to gain entrance. Don’t see a Password or Change button? Then you have a Microsoft account, and need to change your password online at
https://account.microsoft.com.Type a password that will be easy to remember.
Choose something like the name of your favorite vegetable, for example, or your dental floss brand. To beef up its security level, capitalize some letters and embed a number or two in the password, like iH8Turnips or Floss2BKleen. (Don’t use these exact two examples, though, because they’ve probably been added to every password cracker’s arsenal by now.)- If asked, type that same password into the Retype Password text box so Windows knows you’re spelling it correctly.
In the Password Hint box, type a hint that reminds you — and only you — of your password.
Windows won’t let you type in your exact password as a hint. You have to be a bit more creative.
Click the Next button and click Finish.
Do you suspect you’ve botched something during this process? Click Cancel to return to Step 3 and either start over or exit.
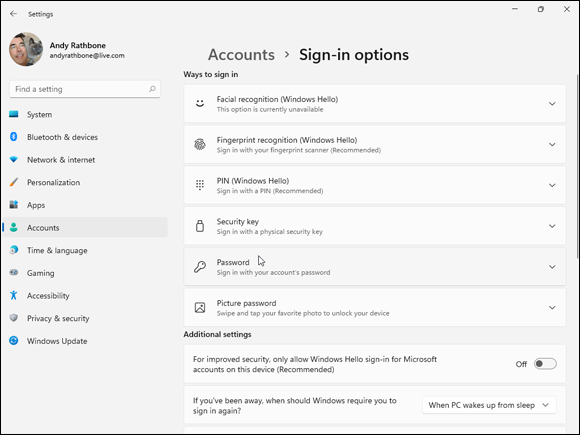
FIGURE 2-3: Click the Password section and then click the Change button when it appears.
After you’ve created the password, Windows begins asking for your password whenever you sign in.
- Passwords are case-sensitive. When typed in as passwords, the words Caviar and caviar are considered different.
- Afraid that you’ll forget your password someday? Protect yourself now: Flip ahead to Chapter 14, where I describe how to make a Password Reset Disk, which is a special way of resetting forgotten passwords for local accounts.
- When you change your Microsoft account password on your PC, you also change it on your Xbox, your Windows tablet, and every other device where you sign in with a Microsoft account. (I cover Microsoft accounts in this chapter’s next section.)
- Windows also allows you to create a picture password in Step 4, where you drag a finger or mouse pointer over an onscreen photo in a certain sequence. Then, instead of entering a password, you redraw that sequence on the sign-in picture. (Picture passwords work much better on touchscreen tablets than desktop monitors.)
- Another option that you may see in Step 4 is to create a PIN. A PIN is a four-or-more character code like the ones you punch into Automated Teller Machines (ATMs). The disadvantage of a PIN? There’s no password hint. Unlike Microsoft accounts, your PIN only works on the computer where it was created; it’s not stored online, where hackers may find it.
- Tired of constantly entering your password? Connect a Windows 11 compatible fingerprint reader or camera to your PC. (Some laptops, tablets, and keyboards have them built in.) Your computer quickly lets you in after you either scan your fingertip or gaze into your PC’s camera. I describe how to sign in with Windows Hello in Chapter 14.
- Forgotten your password already? When you type a password that doesn’t work, Windows automatically displays your hint (if you created one), which should help to remind you of your password. Careful, though — anybody can read your hint, so make sure it’s something that makes sense only to you. As a last resort, insert your Password Reset Disk, a job I cover in Chapter 14.
I explain much more about user accounts in Chapter 14.
Signing up for a Microsoft account
Whether you’re signing in to Windows for the first time, trying to access some apps, or just trying to change a setting, you’ll eventually see a screen similar to the one in Figure 2-4.

FIGURE 2-4: You need a Microsoft account to access many Windows features.
You can sign in to your computer with either a Microsoft account or a Local account. Although a Microsoft account makes Windows much easier to work with, each type of account serves different needs:
- Local account: This account works fine for people using traditional Windows programs on the Windows desktop. However, Local account holders can’t store files on OneDrive, where they’re available from other PCs and devices. Local account holders can’t buy apps from the Microsoft Store app, either.
- Microsoft account: Required to access many of Microsoft’s services, a Microsoft account consists of simply an email address and a password. Microsoft account holders can store files on the internet with OneDrive, download apps from the Microsoft Store, and monitor their children’s online activities. When you log in online to any PC with your Microsoft account, you find your email, browser favorites, OneDrive files, and settings automatically waiting for you.
You can sign in with a Microsoft account in one of these two ways; I’ve listed the simplest method first:
- Use an existing Microsoft account. If you already have an account with Hotmail, MSN, Xbox Live, Outlook.com, or Windows Messenger, you already have a Microsoft account and password. Type in that email address and password at the screen shown in Figure 2-4, and then click the Sign In button.
- Sign up for a new Microsoft account. Click the words Microsoft Account, shown in Figure 2-4, and Microsoft takes you to a website where you can create your own Microsoft account. You can use any email address for a Microsoft account. You simply enter that email address, create a new password to go with it, and wham: You’ve created a Microsoft account.
Until you sign in with a Microsoft account, the nag screen in Figure 2-4 will haunt you whenever you try to access a Windows feature that requires a Microsoft account. (I explain how to convert a Local account into a Microsoft account in Chapter 14.)
When you first sign in to your new account, Windows may ask whether you want to find other PCs, devices, and content on your network. If you’re using a home or work network, click the Yes button. (That lets you print to network printers, for example, as well as share files with other networked computers.) If you’re connecting to a public network, perhaps at a hotel, coffee shop, or airport, click the No button.
Figuring Out the Windows 11 Start Menu
![]() In Windows, everything starts with the Start button and its Start menu. Whether you’re ready to blow up spaceships, do your taxes, or check your email, you start by clicking the Start button (shown in the margin) along the bottom edge of your screen: The Start menu leaps up with a list of your apps and programs, shown in Figure 2-5.
In Windows, everything starts with the Start button and its Start menu. Whether you’re ready to blow up spaceships, do your taxes, or check your email, you start by clicking the Start button (shown in the margin) along the bottom edge of your screen: The Start menu leaps up with a list of your apps and programs, shown in Figure 2-5.
In theory, you spot the name or icon for your desired app or program and click it; the app launches, and you’re off to work. In reality, finding what you want on the Windows 11 Start menu can be a little more confusing, especially if you’ve grown accustomed to the Windows 10 Start menu.
In Windows 11, the Start menu contains the following four parts:
- Search box: This box lives across the top of the Start menu. Type what you’re searching for — a name of a file, folder, or even some words contained in that file — into the Search box, and Windows will try to find it, whether it’s on your PC or the internet.
- Pinned: Windows displays a selective list of “pinned” apps in this section. To see all your apps, click the All Apps icon in the section’s upper-right corner. I explain how to pin your own favorite apps here in this chapter’s “Adding or removing Start menu items” section.
- Recommended: Here, Windows lists your recently opened files, whether they be documents, photos, or videos.
- User Account name and Power: The Start menu’s bottom section lists your user account name. Opposite the name, the power button awaits. Click it to put your computer to sleep, restart it, or shut it down for the day.
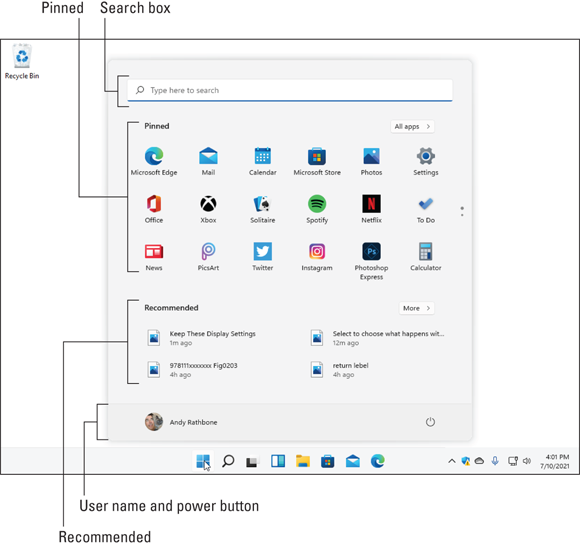
FIGURE 2-5: The Start button is always the left-most icon on your taskbar, which lives along the bottom of the screen.
Try the following tricks to make the Start menu feel a little more like home:
- Keyboard fans can fetch the Start menu by pressing the
 key on their keyboard.
 - To launch a program or app, or to retrieve a recently used file, click or tap its name or icon. The program leaps to the screen.
 If you are unable to spot your desired program or app listed on the Start menu, click the All Apps button that lives across from the word Pinned. The Start menu changes to show all your apps sorted alphabetically.
- On a touchscreen, navigate the Start menu with your finger: Tap an icon, and Windows launches the corresponding app or program.
The Start menu in Windows 11 looks quite different from the one found in previous versions of Windows. But it functions in a similar way: It lets you launch your programs and open your files.
Launching a Start menu program or app
![]() Windows stocks your Start menu’s upper edge with apps, which are small programs for performing simple tasks. In fact, Windows now refers to all Windows programs as apps. To see all the apps and programs installed on your PC, click the All Apps button near the Start menu’s upper-right corner. An alphabetical list of every installed program and app appears, ready for a mouse click or finger tap.
Windows stocks your Start menu’s upper edge with apps, which are small programs for performing simple tasks. In fact, Windows now refers to all Windows programs as apps. To see all the apps and programs installed on your PC, click the All Apps button near the Start menu’s upper-right corner. An alphabetical list of every installed program and app appears, ready for a mouse click or finger tap.
Each name on the Start menu is a button for starting an app or a traditional Windows program. Of course, Windows complicates things by offering several ways to launch an app or a program:
- Mouse: Move the mouse pointer over the icon, and click the left mouse button.
- Keyboard: Press the arrow keys until a box surrounds the desired icon. Then press the Enter key. (Press the Tab key to jump between different sections of the Start menu.)
- Touchscreen: Tap the icon with your finger.
No matter which app you’ve chosen, it jumps onto the screen, ready to inform you, entertain you, or, if you’re lucky, do both.
I explain the Start menu’s built-in apps later in this chapter. If you feel like digging in, you can begin downloading and installing your own by clicking the Start menu’s Microsoft Store icon. (I explain how to download apps in Chapter 6.)
Finding something on the Start menu
You can scour the Start menu until your eagle eyes spot the program, app, or icon you need, and then you can pounce on it with a quick mouse click or finger tap. But when the thrill of the hunt wanes, Windows offers several shortcuts for finding apps and programs hidden inside a crowded Start menu.
In particular, look for these Start menu sections:
- Pinned: Windows stocks the Start menu’s Pinned area with icons for popular apps and programs, as well as ads for new ones. I explain how to add or remove pinned items later in this chapter’s “Adding or removing Start menu items” section.
- Recommended: When you open the Start menu, the menu automatically stocks the list’s bottom edge with your most recently installed apps or documents. Click one to launch it and start working.
- All Apps: The Start menu’s top section lists apps that have been pinned to the section, much like pinning things to a map. However, Microsoft pinned the apps there, not you, so you might not see what you want. To see all the apps on your PC, click the All Apps button (shown in the margin) to see an alphabetical list of every app and program on your PC.
Chances are good that you’ll spot your desired item on the Start menu without much digging. But when an app or program proves to be particularly elusive, try these tricks:
- After opening the Start menu, keyboard owners can simply begin typing the name of their desired app or program, like this: facebook. As you type, Windows lists all the apps matching what you’ve typed so far, eventually narrowing down the search to the runaway.
- If the apps you see don’t reflect the way you work, it’s time to customize the Start menu to meet your needs. Head for this chapter’s upcoming “Customizing the Start menu” section for a heads up.
Viewing, closing, or returning to open apps
It’s fairly easy to move from one open app to another. Because they’re all open in windows on your desktop, you just click the app you want: It pops to the forefront, ready for work. (For more details about the desktop, flip ahead to Chapter 3.)
But what if the windows overlap, and you can’t spot the one you want?
Whether you’re running Windows on a PC, laptop, or tablet, you can bring any missing app to the forefront by following these two quick steps:
 Click or tap the Task View button.
The screen clears, and Windows displays miniature views of your open apps and programs, as shown in Figure 2-6.
- Tap or click any thumbnail to return the app or program to full size.
These three tips can help you keep track of your running apps as well as close the ones you no longer want open:
- Currently running apps and programs also appear as icons on the taskbar, the narrow strip along the bottom of the screen. (I cover the taskbar in Chapter 3.) Icons for apps that are open on the desktop have a little line or dot beneath them.
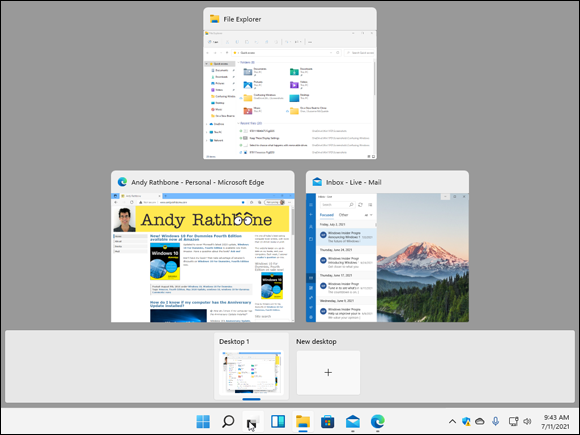
FIGURE 2-6: Click the Task View button to see thumbnail views of each of your currently running apps and programs.
 To close an unwanted app shown in thumbnail view, click or tap the X that appears in its upper-right corner. (The X only appears when your mouse pointer hovers over the thumbnail.) With a mouse, you can also right-click the app’s thumbnail, and choose Close from the pop-up menu.
- After you close an app, the miniature views of the other running apps remain onscreen, letting you either switch to them or close them. Or to leave the Task View mode, click or tap the desktop, away from the windows.
Getting to know your free apps
The Windows Start menu comes stocked with several free apps, each represented by an icon. Every icon sports a label beneath it, helping you know what’s what.
 Windows 11 only shows icons on the Start menu. It no longer shows the animated “live tiles” found in Windows 10.
Here are some of the most popular Windows 11 apps, ready to be launched at the click of a mouse or touch of a finger:
- Alarms & Clock: This offers a world clock, timer, and stopwatch, but you’ll probably visit for the alarm clock. It lets you set different wakeup times for every day of the week.
- Calculator: With a toggle among standard, scientific, and a variety of converter modes, this app will please grade schoolers, math majors, chefs, and physicists.
- Calendar: This app lets you add your appointments or grab them automatically from calendars you’ve already created through your online accounts. It works in tandem with the Mail app, and I cover them both in Chapter 10.
- Camera: Covered in Chapter 17, the Camera app lets you snap photos with the camera built into most laptops, tablets, and some desktop PCs.
- File Explorer: This app helps you manage your files by moving, copying, deleting, or searching for them. I cover all those tasks in Chapter 5.
- Get Help: Click here to begin your journey through Microsoft’s official technical support channels, all covered in Chapter 21.
- Get Started: This program walks you through Windows 11, but also introduces Microsoft’s paid services, like OneDrive.
- Groove Music: Covered in Chapter 16, this app plays music stored on your PC and on OneDrive, Microsoft’s built-in online storage service.
- Mail: Covered in Chapter 10, the Mail app lets you send and receive email from most email accounts, including. Windows Live, Outlook, Yahoo!, and Google. When you enter your account’s name and password, the Mail app sets itself up and automatically adds your contacts.
- Maps: Handy for trip planning, the Maps app brings up a version of Microsoft Bing Maps.
- Microsoft Edge: The browser in Windows 11, Microsoft Edge, replaces Internet Explorer. (Internet Explorer no longer appears in Windows 11.) I cover Microsoft Edge and web browsing in Chapter 9.
- Microsoft Solitaire Collection: This collection of irresistible time wasters includes FreeCell and other games.
- Microsoft Store: Covered in Chapter 6, the Microsoft Store is the only way to add more apps on your Start menu. The Microsoft Store also carries some programs you can install on your Windows desktop and Android phone, covered in Chapter 3.
- Mixed Reality Portal: This app lets people wear funny-looking expensive headsets and pretend they’re living in a 3D movie.
- Movies & TV: Microsoft’s video storefront lets you rent or buy movies and TV shows, as covered in Chapter 17. The app also lets you watch videos you’ve taken with your camera or smartphone.
- Office: Click this advertisement to sign up for Microsoft’s online version of Office. Called Office 365, it offers online versions of Word, Excel, PowerPoint, and others, all available through an annual fee.
- OneDrive: This term describes the Microsoft internet cubbyhole where you can store your files. By storing them online in OneDrive, covered in Chapter 5, you can access them from nearly any internet-connected computer, phone (both Android and Apple), or tablet.
- Photos: Covered in Chapter 17, the Photos app displays photos stored in your computer, as well as on OneDrive, your internet storage space.
- Scan: This delightfully simple program bypasses the complicated software bundled with most scanners to do one thing well: Scan your document.
- Settings: This takes you to the Windows 11 Settings app, which contains almost all the settings found in the Control Panel from earlier Windows versions. (I cover the Settings app in Chapter 12.)
- Teams Chat: This subset of Teams runs inside the Microsoft Edge browser so you can send messages and hold video chats with friends or coworkers.
- Tips: Drop by here to see flashcards listing steps for performing simple tasks in Windows 11.
- Video Editor: This simple video editor lets you crop videos or stitch photos and videos together with music to create slideshows.
- Voice Recorder: The name says it all. When the app appears, click the Microphone icon to begin recording; click the icon again to stop. The app lists your recordings, named by recording date and time, along its left edge for easy retrieval. (Right-click any recording’s name to share, delete, or rename it, as well as to see its location in File Explorer.)
- Weather: This weather station forecasts a week’s worth of weather in your area, but only if you grant it permission to access your location information. (Unless your computer has a GPS — Global Positioning System — the app narrows down your location by closest major city rather than street address.)
- Windows Security: Click this to access the built-in antivirus program. Flip ahead to Chapter 11 for more details.
- Your Phone: This newly revamped app helps you link your newer model Android phone with Windows to send and receive texts, access your contacts, make phone calls, see notifications, and even see your phone’s screen on your PC. I cover the Your Phone app in Chapter 12.
I explain in Chapter 3 how to choose which apps and programs handle which tasks, but here’s a temporary hint: Right-click a file and choose Open With. A menu appears, letting you choose which program should handle the job. The change takes place immediately.
Your Start menu may offer icons for programs that aren’t already on your PC. Click the app to install it, and Microsoft receives a commission.
Adding or removing Start menu items
Microsoft dumped a random assortment of icons on the Windows 11 Start menu’s Pinned area — the rows of icons that fill the top half of the Start menu. The resulting jumble consumes lots of real estate, includes advertisements, and is probably not tailored to your personal interests or work habits. This section shows how you can fix that shortcoming by removing, or unpinning, the extra icons from the Pinned area of the Start menu, and adding, or pinning, the ones you use most often.
Removing icons from the Start menu is easy, so you can begin there. To remove an unwanted or unused icons from the Start menu, right-click it and choose Unpin from Start from the pop-up menu. The unloved icon vanishes without fuss, freeing up some prime real estate. (This doesn’t uninstall the app or program, mind you; any unpinned items can still be found in the Start menu’s All Apps area.)
On a touchscreen, hold down your finger on the unwanted icon. When the pop-up menu appears, choose Unpin From Start to remove the icon.
After removing the unwanted items, spend some time adding items to the Start menu, making them as easy to reach as a pencil holder on an office desk.
To add programs or apps to the Start menu, follow these steps:
- Click the Start button and when the Start menu appears, click the All Apps button, shown in the margin.
The Start menu presents an alphabetical list of all your installed apps and programs, even those you’ve just unpinned from the Start menu.
Right-click the item you want to appear on the Pinned area of the Start menu; then choose Pin to Start.
Each selected item appears as a new Start menu icon. Repeat until you’ve added all the items you want. Unfortunately, you must right-click and pin each item separately. Windows doesn’t let you select and add several items simultaneously.
From the desktop, right-click desired items and choose Pin to Start.
The Start menu icons aren’t limited to apps and programs. From the desktop or even within File Manager, right-click any oft-used folder, file, or other item you want added to the Start menu and then choose Pin to Start from the pop-up menu.
When you’re through, the Pinned area of your Start menu will have grown considerably with all your newly added destinations.
Can’t find a newly installed app? Chances are good that it’s hiding in the Start menu’s All Apps area. If you want it visible in the Pinned area near the Start menu’s top edge, you need to pin it there yourself.
After you’ve stuffed your Start menu’s Pinned area with your favorite desktop destinations, head to this chapter’s “Customizing the Start menu” section to finish organizing. When you finish, you’ll have created a Start menu that meets your needs.
Customizing the Start menu
The Start menu contains mostly icons — little pictures that represent apps on your PC. The icons consume a lot of space, but they’re not very organized. How can you find your favorite stuff?
Give yourself a fighting chance by organizing your Start menu. The following steps begin with a small dose of organization: removing unwanted apps and adding your own favorite apps to the Start menu’s Pinned area. These steps won’t uninstall any apps; they all remain safely on your PC. However, the Start menu’s Pinned area will be full of apps that match your own interests.
But no matter how organized you want to be, follow these steps to begin turning that haphazard Start menu into your own organized list:
Remove icons you don’t need from the Pinned area.
Spot an icon you don’t need? Right-click it and choose Unpin from Start from the pop-up menu. Repeat until you’ve removed all the icons you don’t use. (On a touchscreen, hold down your finger on an unwanted app and then tap Unpin from Start from the pop-up menu.)
Choosing Unpin from Start doesn’t uninstall the app or program; removing the icon merely removes that item’s “start” button from the Start menu’s Pinned area. In fact, if you accidentally remove the icon for a favorite app or program, you can easily put it back in Step 3.In the Start menu’s Pinned area, move related icons next to each other.
As an example, you might want to keep your people-oriented apps — Mail and Calendar — next to each other, and perhaps on the top row, as shown in Figure 2-7. To move an icon to a new location, move the mouse pointer over the icon, and then hold down the left mouse button as you drag the icon to the desired spot. As you drag the icon, other icons automatically move out of the way to make room for the newcomer.
On a touchscreen, hold down your finger on the app; when the pop-up menu appears, drag the app to its new position.When you’ve dragged an app’s icon to the desired spot, lift your finger or release the mouse button to set the icon into its new place.
Windows 11 no longer lets you change an icon’s size on the Start menu. It also lacks the ability to place icons into groups of folders.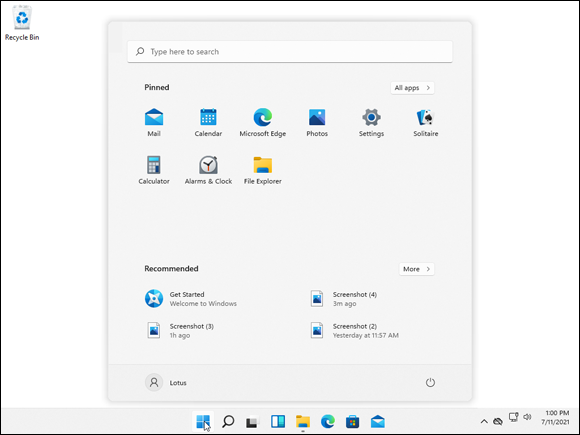
FIGURE 2-7: Your Start menu may be easier to work with when the Pinned area only shows your own favorite icons.
Add icons for apps, programs, folders, and files you need.
I explain how to add icons for apps, programs, folders, and files earlier, in this chapter’s “Adding or removing Start menu items” section.
Newly added items appear at the bottom of the Start menu’s Pinned area. To move an icon quickly to the top, right-click it and choose Move to Top from the pop-up menu.After you purge any unwanted icons, rearrange the remaining icons, and add new icons for items you need, your Start menu may meet your needs. If so, stop. You’re done!
Exiting from Windows
Ah! The most pleasant thing you’ll do with Windows all day could very well be to stop using it. Exiting Windows brings a hurdle to the process, however: You must decide whether to Sleep, Shutdown, or Restart your computer.
The answer depends on how long you’re abandoning your computer. Are you simply stepping away from the computer for a few moments, or are you through working for the day?
I cover both scenarios — a temporary sojourn and leaving your computer for the day — in the next two sections.
If you don’t want to trudge through a manual to figure out how to turn off your PC, here’s the quickest way to turn it off:
- Click the Start button and then click the Power icon (shown in the margin) near the Start menu’s lower-right corner.
- Choose Shut Down from the pop-up menu.
- If the computer protests, saying you’ll lose unsaved work, choose Sleep instead.
The following two sections deal with the finer points of what’s become a complex chore.
Power users enjoy this quick shut down trick after they’ve saved their work: Right-click the Start button, choose Shut Down or Sign Out from the pop-up menu, and choose Shut Down from the pop-up menu.
Temporarily leaving your computer
Windows offers three options when you’re leaving your computer temporarily, perhaps to reheat some fish in the office microwave and sneak back to your cubicle before anybody notices. To make the right choice among the various “temporary leave” scenarios in Windows, follow these steps:
 Click the Start button to fetch the Start menu.
Click your user account picture from the Start menu’s lower-left corner.
From the menu that appears, shown in Figure 2-8, you can choose one of these options:
- Change Account Settings: This option whisks you straight to the Settings app, where you can tweak your account’s settings. You can change your user account photo, for example, or change an account password.
- Lock: Meant to add privacy while you take short trips to the water cooler, this option locks your PC, veiling your screen with the lock screen picture. When you return, unlock the screen by pressing any key and then typing your password. Windows quickly displays your work, just as you left it. To lock your computer quickly, press + L.
- Sign Out: Choose this option when you’re through working at the PC and somebody else wants to have a go at it. Windows saves your work and your settings and then returns to the lock screen, ready for the next person to log on.
- Another account: Below your name, as shown in Figure 2-8, Windows lists names of any other accounts on the computer. If one of those people wants to borrow the computer for a few minutes while you’re grabbing some coffee, let them choose their name from the list. When they type in their password, their customized screen appears, ready for them to work. When they sign out and you log back in, all your work reappears, just as you left it.
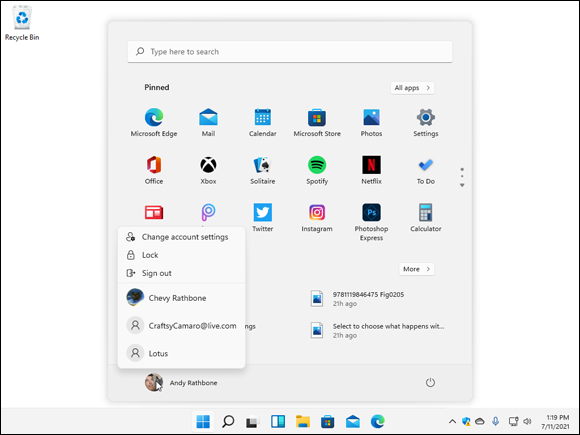
FIGURE 2-8: Click your account name near the Start menu’s lower-left corner to choose from these options.
Each of these options lets you give up your computer for a little while, but leaves it waiting for your return.
If you’re finished for the day, though, you’re ready for the next section.
Leaving your computer for the day
When you’re done computing for the day — or perhaps you just want to shut down the laptop while on the subway or that flight to Rome — Windows offers three ways to handle the situation.
Follow this step to choose from the available options:
![]() Click the Start button and click the Power icon (shown in the margin).
Click the Start button and click the Power icon (shown in the margin).
The Power icon’s pop-up menu offers three settings, as shown in Figure 2-9.
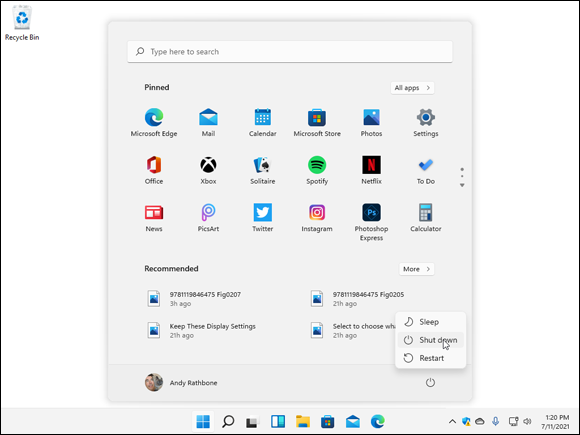
FIGURE 2-9: The Power icon’s pop-up menu options include Sleep, Shut Down, and Restart.
Here’s the rundown on your options:
- Sleep: The most popular choice, this saves your work in your PC’s memory and on its hard drive and then lets your PC slumber in a low-power state. Later, when you return to your PC, Windows quickly presents everything — even your unsaved work — as if you’d never left. And if the power goes out, your PC will still wake up with everything saved, but it will take a few more seconds.
- Shut Down: This option turns off your computer completely. It’s just like Restart but without turning back on again. And if you’re worried about preserving battery life on a laptop or tablet, it’s your best choice.
- Restart: Choose this option as a first cure when something weird happens (a program crashes, for example, or Windows seems dazed and confused). Windows turns off your computer and then starts itself anew, hopefully feeling better. (Patches from Windows Update, as well as newly installed programs, occasionally ask you to restart your PC.)
That should be enough to wade through. But if you have a little more time, here are some other facts to consider:
You don’t have to shut down your computer each night. In fact, some experts leave their computers turned on all the time, saying it’s better for their computer’s health. Other experts say that their computers are healthier if they’re turned off each day. Still others say the Sleep mode gives them the best of both worlds. However, everybody says to turn off your monitor when you’re done working. Monitors definitely enjoy cooling down when not in use.
To avoid overheating issues, turn off tablets and laptops before storing them in their bags for more than an hour or two.
To turn off your computer as quickly as possible, right-click the Start button, choose “Shut Down or Sign Out” from the pop-up menu, and then choose Shut Down from the pop-out menu.