Chapter 21
Help on the Windows Help System
IN THIS CHAPTER
![]() Finding helpful hints quickly
Finding helpful hints quickly
![]() Understanding Microsoft’s support policies
Understanding Microsoft’s support policies
![]() Finding help for a particular problem or program
Finding help for a particular problem or program
Don’t bother plowing through this whole chapter for the nitty-gritty. What you find here are the quickest ways to make Windows dish out helpful information when something on the desktop leaves you stumped:
- Press F1 when on the desktop: Press the F1 key from within Windows or any desktop program.
- Start menu: Click the Start button, and click the Get Help icon.
 Question mark: If you spot a little question mark icon within a window’s upper-right corner, pounce on it with a quick click.
In each case, Windows fetches help, either by going online, fetching built-in instructions, or leading you to a built-in tutorial.
This chapter explains how to take advantage of the help Windows 11 has to offer.
Getting Started with Windows 11
The bundled Tips app offers a short guided tour to Windows 11. It appeals mostly to the same people who enjoy reading book introductions that set the mood for what’s coming.
![]() To open the app, click the Start button and click the Tips icon (shown in the margin) from the Start menu. The app appears, as shown in Figure 21-1.
To open the app, click the Start button and click the Tips icon (shown in the margin) from the Start menu. The app appears, as shown in Figure 21-1.

FIGURE 21-1: The new Tips app offers a short introduction to Windows 11.
The Tips app presents a grid of large tiles, each offering tips about a different subject. Click the See What’s New button, shown in Figure 21-1, to see a quick explanation of the biggest additions to Windows 11.
Feel free to click any of the other categories and browse the offered tips. However, the Tips app serves as a very brief introductory guide to Windows 11. It’s definitely not a problem solver.
Contacting Support
Windows 11 comes with an app that hopes to simplify finding the type of help you need for your particular problem. Called simply Get Help, the app works much like those phone robots that make you press different numbers on your phone until you’re finally routed to the proper department.
In fact, the Get Help app needs some help of its own: It works only when you’re connected to the internet. If you’re not connected, the app simply displays an error message.
To summon the Get Help app and begin routing yourself to somebody or something that can help you with your computer’s particular problem, follow these steps:
 Click the Start button, click the All Apps icon, and click Get Help (the icon is in the margin).
The Get Help program appears, shown in Figure 21-2, and fetches a Virtual Assistant (a robot) to answer your problem.
Type your question into the box along the app’s bottom edge.
The robot searches Microsoft’s online stash of answers for any matches and presents the results. If any of the results answers your question, you’re through!
If you still have questions, though, the next two sections explain your options.
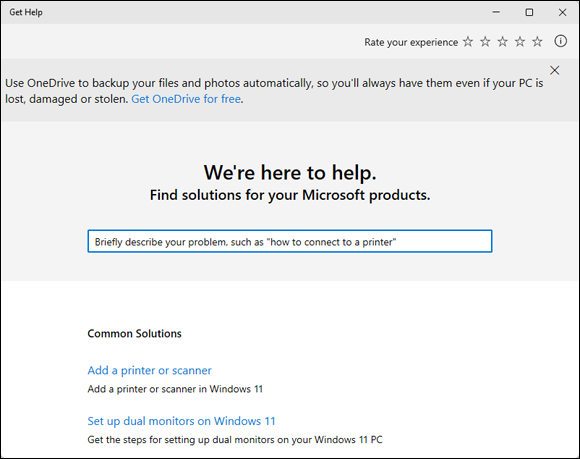
FIGURE 21-2: The Windows 11 Get Help program tries to guide you to an answer.
Microsoft’s support options
If you’ve purchased your computers directly from Microsoft’s online or retail stores, Microsoft offers extended service and warranty plans. By paying in advance, you can take advantage of Microsoft’s support plans without having to pay extra down the road.
Microsoft changes its support plans often, though, so to hear the latest on Microsoft’s paid support plans, open the Get Help app, choose Chat, and ask what support plans Microsoft currently offers.
Note: Microsoft closed all its Microsoft Store retail locations in June 2020. Microsoft now offers only online support.
Microsoft’s free support options
For free support, your best bet is the Microsoft Community website. It’s an online gathering place for confused owners, knowledgeable tech enthusiasts, and an occasional Microsoft employee.
You visit the website, choose your category, type your question, and wait. Sometimes a Microsoft employee will answer, but more often than not, somebody with a similar problem will chime in. The more people who respond, the more likely everybody will find a solution to a common problem.
Remember, though: The forums are for Microsoft products. If you’re having problems with software from another company, you’re limited to that other company’s technical support.
To visit the free Microsoft Answers forum, follow these steps:
- Visit the Microsoft Community website at
https://answers.microsoft.com, and sign in with your Microsoft account, if prompted. Choose your product from the first page, then choose your Windows version and your topic from the drop-down boxes.
You may even be able to narrow down your search by subtopic, as shown in Figure 21-3.
Search the forum for previously answered questions.
If something about your computer isn’t working correctly, it probably isn’t working for others either. To search, click the little magnifying glass icon in the screen’s upper-right corner, type a few key words describing your problem into the Search box, and press Enter.
When the website lists the results, spend some time browsing them to see if any solutions work for your computer’s particular problem. If not, move to Step 4.
Click the
Ask a Questionlink at the page's top. When the form appears, type your question, and fill out a title, problem description, and category. Then click the Submit button.To ask a question, click the
Ask a Questionlink. The website presents a form, shown in Figure 21-4, for you to fill in a subject and details about your computer’s problem.Don’t forget to fill out the Category drop-down lists at the bottom of the form. They let you choose your Windows version, as well as narrow down your question by topic. Those little chores help others find your question, and possibly provide answers, when they visit later on.

FIGURE 21-3: The Microsoft Answers online forum provides free tech support.
And then you wait. When somebody responds, a notice appears in your email with a link to your posted message and the response. Click the emailed link to revisit the forum, where you can begin a correspondence that may solve your problem.
The Microsoft Community website is free, and although it’s not guaranteed to provide an answer, it’s definitely worth a try. I’ve found quite a few solutions just by browsing the answers to previously asked questions.

FIGURE 21-4: Type a subject for your question.
 For the best results, keep these tips in mind when posting a message on the Microsoft Community website:
- Don’t rant. Remember, most website visitors aren’t paid. Many of them are confused souls trying to piece together solutions, just like you. Many computer nerds also hang out there. They’re actually interested in solving problems, and they’re persuaded more by logic than emotions.
- To attract the best responses, be as descriptive as possible. If you see an error message, list it in its entirety, without typographical errors. Type your computer’s exact make and model.
- If possible, list the exact steps you take on your computer to reproduce the problem. If your problem is reproducible on other people’s computers, it’s always much easier to solve.
- Most of the best answers don’t come from Microsoft’s paid technicians. They come from strangers who have your same problem, perhaps even the same make and model of computer, and who want to swap tips to make things better for you both.
- Keep an eye on your email Inbox, and respond to people who try to help. The information you’re exchanging will live on inside the forum for years. Even if you’re not able to solve your immediate problem, you’re leaving a trail that can help others solve that problem down the road.