Chapter 20
Moving from an Old PC to a New Windows 11 PC
IN THIS CHAPTER
![]() Copying your old PC’s files and settings into your new PC
Copying your old PC’s files and settings into your new PC
![]() Transferring files and settings with a program or technician
Transferring files and settings with a program or technician
![]() Transferring files and settings yourself with a portable hard drive
Transferring files and settings yourself with a portable hard drive
When you bring home your exciting new Windows 11 computer, it lacks the most important thing of all: the stuff from your old computer. How do you copy your files from that dusty old PC to that shiny new Windows PC? How do you even find everything you want to move?
This chapter explores your options, and compares their degrees of difficulty.
 Here’s a timesaver: If you’re just upgrading your relatively new Windows 10 PC to Windows 11, you can skip this chapter. When you upgrade, Windows 11 leaves your personal files, apps, and desktop programs in place. Older versions of Windows are probably running on older PCs; those PCs won’t be powerful enough to upgrade to Windows 11, unfortunately.
Moving to Windows 11 the Microsoft Way
The reason Microsoft removed and hid backup programs from Windows 11 boils down to one word: OneDrive, the built-in storage space on the internet that comes baked into Windows 11.
Windows makes it easier than ever to store all your files on OneDrive. As soon as you create a file or import a digital photo, Windows practically begs you to begin saving it in your 5GB of OneDrive space. Throughout Windows 11, pop-up ads and suggestions all tout OneDrive’s benefits.
Actually, OneDrive works really well as a backup plan. If you store the contents of your PC’s Documents, Music, Pictures, and Videos folders on OneDrive, they'll automatically be waiting for you on your new Windows 11 PC.
When you step over to your new computer and sign in with your Microsoft account, all your files, folders, and settings automatically travel to your new PC. Any apps you downloaded from the Microsoft Store automatically pour into your new PC, as well.
In short, there’s no work on your part. You don’t need to pick and choose what to back up, nor do you need to spend hours finding and copying all your data into a backup. If you told Windows to use OneDrive, it automatically backed up everything on your old PC while you worked. Just as effortlessly, it will automatically drop that information into your new Windows 11 PC.
OneDrive warrants a few caveats, though:
- OneDrive works only with PCs running Windows 8, Windows 8.1, or Windows 10. Windows 7 PCs couldn’t use apps, and most Windows 7 PC owners didn’t use OneDrive.
- Restoring all those files and folders from OneDrive to your new PC can take time. That’s why it’s faster to keep them on OneDrive and just grab them as you need them.
- Windows offers only 5GB of free OneDrive storage space, which isn’t enough to back up most PCs. To bump that online shoebox size to 100GB, you must pay Microsoft $1.99 each month. If your PC has a large collection of music, videos, or photos, you may need 1TB (1,000GB) of space, available for $6.99 a month or $70 a year.
In short, OneDrive is the easiest way to transfer your files, apps, and settings to your new Windows 11 PC. But unless you barely use your PC, you’ll be paying a monthly or yearly fee for that convenience.
Hiring a Third Party to Make the Move
For years, Windows came with the Windows Easy Transfer program that simplified moving your files from one PC to another. Unfortunately, Microsoft discontinued the program.
Microsoft may have walked out on the automated PC file transfer business, but third-party vendors are happy to do the job. You basically have two options: using computer upgrade software or taking your PC to a professional.
The following sections cover the pros and cons of each.
Buying Laplink’s PCmover program
The PCmover software suite of programs from Laplink (www.laplink.com) transfers not only your old PC’s files and settings but some of its programs as well. That’s more work than Microsoft’s old Easy Transfer program ever attempted. The PCmover suite works on every Windows version from Windows XP to Windows 11.
However, the powerful transfer programs come with a staggering array of potential complications, which isn’t surprising: Moving from one PC to another is fraught with possible mishaps. (On the positive side, Laplink helps you move by offering free, 24-hour tech support in the United States, Canada, Australia, New Zealand, and the United Kingdom.)
The free PCmover Windows Store Edition is available from the Microsoft Store app, but it only transfers 500MB of files (and no settings, apps, programs, or user profiles), and then lets you know you should buy the Home or Professional versions to finish the job.
Instead, you should choose between PCmover Home or PCmover Professional. Both let you transfer information only from one old PC to one new PC. That’s usually not a problem, but keep in mind that you can’t give the program to a friend after you’ve transferred your files.
- PCmover Home: This minimalist package moves files, settings, and user profiles to your new PC. However, it won’t move apps and programs.
- PCmover Professional: The more popular (and more expensive) option, this software copies apps and programs to the new PC, as well as your files, settings, and user profiles.
Both programs copy your old PC’s files, settings, and some programs to your new PC, as shown in Figure 20-1. However, neither package guarantees to copy all your programs. Because of technical reasons, some programs can transfer, but others won’t. (The reasons behind those potential problems come with their own fine-print section too detailed to list here.)
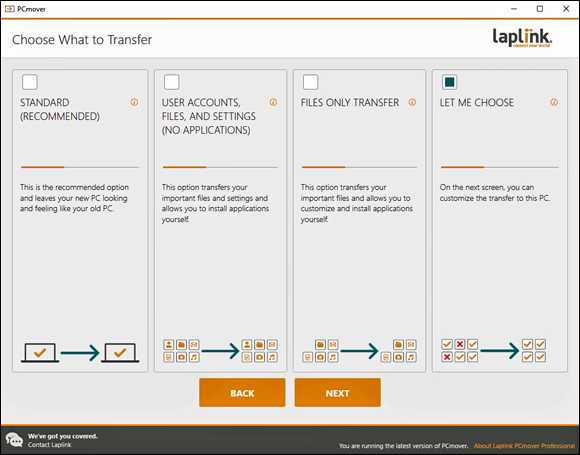
FIGURE 20-1: Laplink’s PCmover helps you move from an old PC to a new one.
If you plan to transfer your files over a network, you can buy and download your chosen PCmover program from Laplink’s website. Most people, however, find a better deal by buying the PCmover Ultimate boxed program from Amazon (www.amazon.com). That package includes PCmover Professional and a transfer cable, and it costs less than the version on Laplink’s website.
The PCmover programs are copy-protected, so you need a working internet connection before you can begin using them. Also, depending on the amount of information on your old PC — and the way you connect your two computers — the transfer process can take several hours.
In short, the PCmover software works best for somebody who’s not only patient but also experienced enough with computers to know how to talk with tech support people if something goes wrong. (Tech support people usually speak very, well, technically.)
Visiting a repair shop
Most local computer repair shops can move your old PC’s information to your new PC. (Call first to see whether they want the PC alone, or the PC, monitor, keyboard, and mouse.) Repair shops that make house calls are even better because you won’t have to unplug any cables and drop off your PCs at the shop.
Check with your neighbors — they’ve probably already found a favorite local computer shop or technician.
The prices at local computer repair shops vary widely, and they probably charge more than the price of buying file-transfer software. But if something goes wrong, they’re the ones talking to tech support, not you.
A repair shop can probably transfer your files even if your old computer no longer turns on or has trouble running. Chances are good that your old computer’s hard drive still works, and it still has all your files. Techies at the repair shop can usually transfer your files from your old computer’s hard drive directly to your new PC.
Even if you hate throwing in the towel and calling a professional, remember, you need to transfer your old PC’s information only once. And, if the techie who does the job seems friendly and competent enough, grab a business card. It may come in handy down the road.
Transferring Files Yourself
You can transfer files yourself if you’re moving from a Windows 8, 8.1, or 10 PC. You can do this with a combination of a Microsoft account and the built-in File History backup program in Windows. You tell the program to back up the files on your old PC, and then you tell File History on your new Windows 11 PC to restore those files.
However, you need a portable hard drive for this to work. Portable hard drives are fairly inexpensive, usually costing less than $100. And there’s a bonus: When you’re through transferring the files, the drive works perfectly for backing up your new computer.
To transfer files from an old Windows 8, 8.1, or 10 computer to a new Windows 11 computer, follow these steps:
- If you’ve already been using File History on your old PC, jump to Step 5. Otherwise, move to Step 2.
Sign in with your Microsoft account on your old PC.
When you sign in with a Microsoft account, Microsoft remembers many of your settings and services so it can duplicate them on other PCs you sign in to.
If you’ve been using a local account on your old Windows PC, convert it to a Microsoft account, a fairly simple chore I describe in Chapter 14.
Plug the portable hard drive into your old PC, and set up File History to save your files onto the portable hard drive.
File History comes built in to Windows 8, 8.1, and 10. I describe how to set it up and turn it on in Chapter 13. Figure 20-2 shows how to tell Windows 11 about your new backup drive. Once Windows finds the drive, it could take anywhere from a few minutes to a few hours to back up your files for the first time.
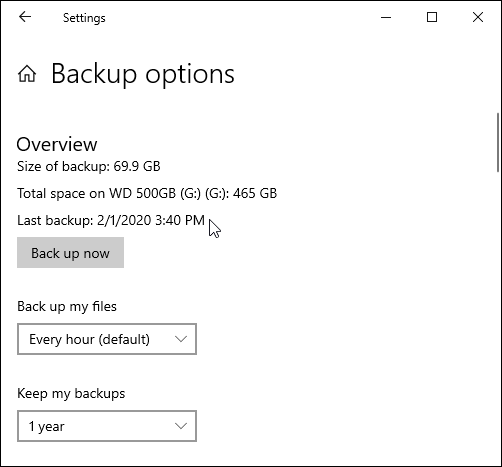
FIGURE 20-2: Tell Windows to use your new drive to back up your files.
While File History backs up your files, it shows the statement,
Backing up your data.When File History has finished backing up your files to the portable drive, those words change to say,
Last Backup, followed by the date and time it finished backing up your files. At that point, move to Step 4.Sign in to your new Windows 11 PC with the same Microsoft account you used on your old PC. Then plug the portable hard drive into your new computer.
By signing in with your Microsoft account, your settings automatically transfer to your new PC. Any files you've stored on OneDrive will be available, too.
Sign in with your Microsoft account on your new PC, open File History, and direct your new Windows 11 PC toward your old File History backup.
On your new Windows 11 PC, click the Start button and type file history into the Search box. Then click Restore Your Files with File History. When the File History window appears, click Configure File History Settings.
The Settings app’s File History window appears, as shown in Figure 20-3.
If you spot a checkbox labeled I Want to Use a Previous Backup on this File History Drive, click it. A window drops down, listing the backup you’ve made on your old PC. Click its name, and click the Turn On button.
Your new PC begins backing up its files for the first time, but these incoming files won’t damage your old PC’s backup.
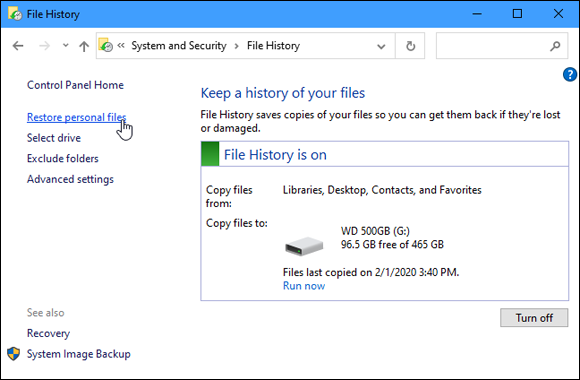
FIGURE 20-3: Choose the backup you'd like to restore.
Choose Restore Personal Files from the File History window’s left pane.
The window shown in Figure 20-4 appears.
Choose the files and folders to restore, and click the green Restore button.
Click the Forward or Back arrows next to the big green button along the window’s bottom until you find the date and time of the files you’d like to restore.
For example, if you used File History on your old PC for the first time in Step 4, click the Back arrow (on the left) until you’re at the Number 1 backup.
If you’ve been using File History on your old PC all along, click the Forward arrow (on the right) to move to your most recent backup.
When you’re viewing the files or folders you want to restore, click the green button found on the window’s bottom edge, shown in Figure 20-4. File History begins copying your old PC’s files and folders onto your new PC.
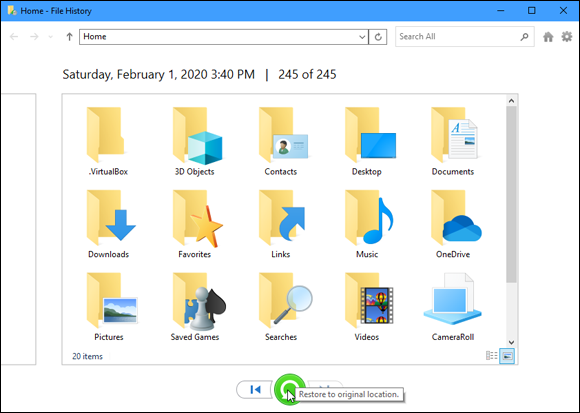
FIGURE 20-4: Click the green button to restore the files and folders.
If there are no complications and your new PC has enough storage space, your new PC should soon have the files and folders from your old PC.
- If you’ve already been using File History on your old PC, all your old PC’s backups should still be available to you on your new PC.
- Your new PC will continue to back up your new computer’s files to your portable hard drive. Keep the hard drive plugged in permanently. (Or, if you bought a new laptop or tablet, plug it in frequently so your computer can keep your backups current.)
- If you’ve just borrowed a friend’s portable hard drive, you can unplug it at this point and give it back. But you should really have your own portable hard drive so you can begin backing up your new Windows 11 PC.
- Your Microsoft account and File History can transport your settings and files to your new PC. However, you must still install all your old desktop programs onto your new PC.
- If you’re moving to Windows 11 from a Windows 10, 8.1, or 8 PC, you can find your apps waiting for you in the Microsoft Store app: Click your icon near the Microsoft Store app’s upper-right corner, and choose My Library from the drop-down menu. There you can find and download your old apps to your new PC.
- Microsoft no longer updates the File History program, so if these instructions no longer work, then File History may have been pushed aside to make way for OneDrive’s backup system.