Chapter 14
Sharing One Computer with Several People
IN THIS CHAPTER
![]() Understanding user accounts
Understanding user accounts
![]() Adding, deleting, or changing user accounts
Adding, deleting, or changing user accounts
![]() Signing in at the Sign In screen
Signing in at the Sign In screen
![]() Switching between users
Switching between users
![]() Understanding passwords
Understanding passwords
Windows allows several people to share one computer, laptop, or tablet without letting anybody peek into anybody else’s personal files.
The secret? Windows grants each person their own user account, which neatly isolates that person’s files. When a person types in their user account name and password, the computer looks tailor-made just for them: It displays their personalized desktop background, menu choices, programs, and files — and it forbids them from seeing items belonging to other users.
This chapter explains how to set up a separate user account for everybody in your home, including the computer’s owner, family members, and roommates.
It also explains how to create accounts for children, which allows you to monitor their computer activity and set limits where you feel necessary.
Understanding User Accounts
Windows wants you to set up a user account for everybody who uses your PC. A user account works like a cocktail-party name tag that helps Windows recognize who’s sitting at the keyboard. Windows offers two types of user accounts: Administrator and Standard. (It also offers a special Standard account for children.)
To begin playing with the PC, people click their account’s name when the Windows Sign In screen first appears, as shown in Figure 14-1.
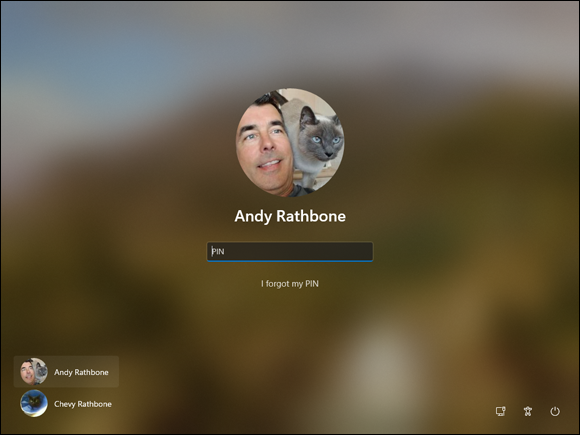
FIGURE 14-1: Windows lets users sign in under their own accounts.
Who cares? Well, Windows gives each type of account permission to do different things on the computer. If the computer were a hotel, the Administrator account would belong to the desk clerk, and each tenant would have a Standard account. Here’s how the different accounts translate into computer lingo:
- Administrator: The administrator controls the entire computer, deciding who gets to play with it and what each user may do on it. On a computer running Windows, the owner usually holds the almighty Administrator account. He or she then sets up accounts for each household member and decides what they can and can’t do with the PC.
- Standard: Standard account holders can access most of the computer, but they can’t make any big changes to it. They can’t run or install new programs, for example, but they can run existing programs.
- Child: The Child account setting is actually just a Standard account with the Microsoft Family Safety settings automatically turned on. I cover Microsoft family controls in Chapter 11.
- Guest: Like Windows 10, Windows 11 no longer offers guest accounts. Microsoft removed them because most visitors now arrive toting their own smartphones, tablets, laptops, or all three.
Here are some ways accounts are typically assigned when you’re sharing the same computer under one roof:
- In a family, the parents usually hold Administrator accounts, and the kids usually have Standard accounts.
- In a dorm or shared apartment, the computer’s owner holds the Administrator account, and the roommates have Standard accounts, depending on their trustworthiness level (and perhaps how clean they’ve left the kitchen that week).
To keep others from signing in under your user account, you must protect it with a password. (I describe how to choose a password for your account in this chapter’s later “Setting Up Passwords and Security” section.)
 Sometimes somebody will be signed in to their account, but the computer will go to sleep if they haven’t touched the keyboard for a while. When the computer wakes back up, only that person’s user account and photo will show up onscreen. Windows lists the other account holders’ names in the screen’s lower-left corner, though, letting them sign in with a click on their names.
 You may run across a reference for a Local account. A Local account is simply an Administrator or Standard account that isn’t a Microsoft account. Local accounts are tied to a specific computer. They don’t require an email address, and they lack the perks of a Microsoft account.
Changing or Adding User Accounts
Windows offers two slightly different ways to add user accounts. It separates them into the two types of people you’re most likely to add to your computer:
- Family members: By choosing this type of account, you can automatically set up controls on your children’s accounts. Any adults you add here can automatically monitor your children’s computer usage. All family members must have Microsoft accounts; if they don’t already have them, the process helps you create them.
- Other members: This type of account works best for roommates or other long-term guests who will use your computer but don’t need monitoring or the ability to monitor children.
The next two sections describe how to create both types of accounts, as well as how to change existing accounts.
 Only Administrator accounts can add new user accounts to a computer. If you don’t have an Administrator account, ask the computer’s owner to upgrade your account from Standard to Administrator.
Adding an account for a family member or friend
Adding a family member adds an important distinction to the account. If you add a child, the child’s activity is curtailed according to the limits you set. And if you add an adult, that person also has the ability to monitor the activity of any added children.
If you want to add an account that’s not involved in these family matters, choose the other option, called Adding an Account for Someone Else. There, you can create an account for a roommate or long-term guest.
Administrator account holders can create either type of account by following these steps:
 Click the Start button, and click the Settings icon.
When the Settings app appears, click the Accounts icon.
The Accounts screen appears, as shown in Figure 14-2, offering ways to change your own account, as well as add accounts for other people.
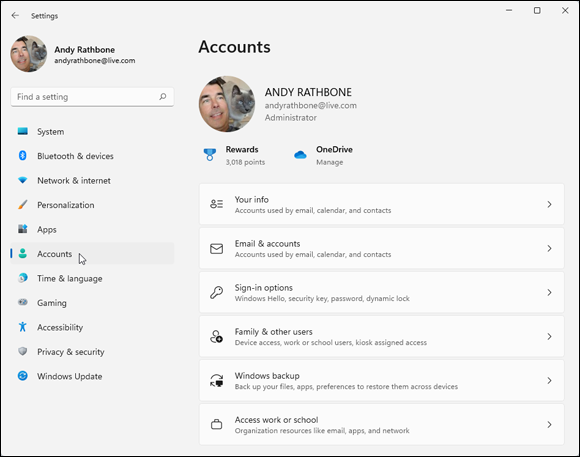
FIGURE 14-2: Click the words Family and Other Users to begin creating a new user account.
- Click the words
Family & Other Usersfrom the right pane.The right pane of the Family and Other Users screen lets you create either of two accounts: one for a family member, or one for someone else. If you're creating an account for a family member, move to Step 4. If you’re not adding a relative, jump ahead to Step 5.
In the Add a Family Member section, click the Add Account button, and follow the steps to send the person an invitation.
A window appears, shown in Figure 14-3, asking for you to enter the person’s email address. You have several options:
- If you already know the person’s email address, type it into the Enter Their Email Address box and click Next. (If the email address isn’t already a Microsoft account, it will be turned into one.)
- If the person doesn’t have an email account, Microsoft assumes you’re adding a child as a family member. In that case, click the Create One For a Child link. That takes you to a page where you can sign them up for an email address that also serves as a Microsoft account.
No matter which option you choose, your invited family member, either a child or adult, will receive an email saying they’ve been invited to have a family account on your computer. After they accept the offer, they automatically appear as an account on your computer.
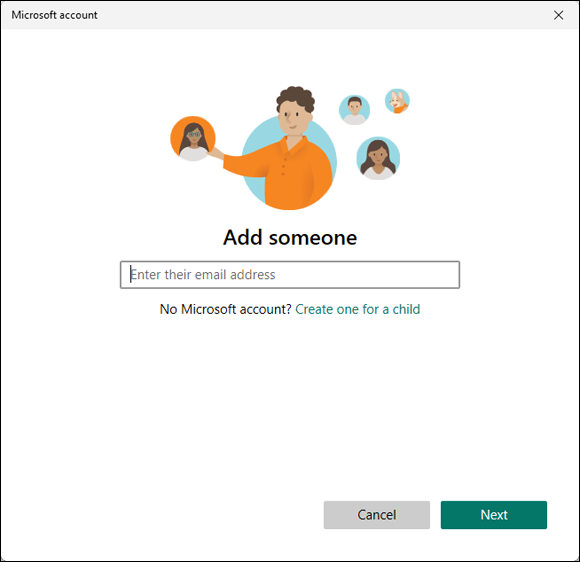
FIGURE 14-3: Choose whether you’re adding a child or adult family member.
At this point, you’ve finished adding a family member. To add somebody who’s not a relative, move to Step 5.
Choose Add Someone Else to This PC.
Microsoft immediately complicates matters by displaying the How Will This Person Sign In window, shown in Figure 14-4, which asks for the new account holder’s email address.
Microsoft is trying to say that you can choose either of two types of accounts for your new account holder:
- Microsoft account: A Microsoft account is required for many Windows tasks and features. Described in Chapter 2, a Microsoft account is simply an email address that links to Microsoft, its computers, and its billing department. Only Microsoft account holders can download apps from the Microsoft Store app, store and retrieve files on an internet storage space called OneDrive, and access other perks offered by a Microsoft account. To create a Microsoft account, go to Step 6.
- Local account: Select this option for people not interested in Microsoft accounts and their perks. It lets the person use your computer with an account tied only to your computer. To create a Local account, jump to Step 7.
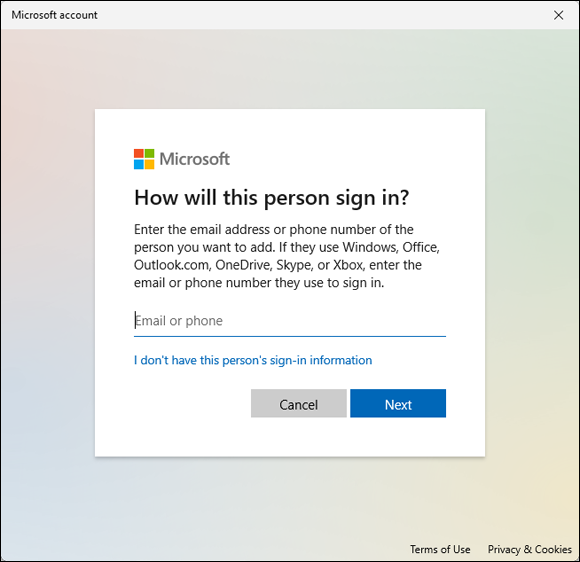
FIGURE 14-4: Enter the email address of the person you want to add.
Can’t decide which type of account to create? Creating a Local account is always a safe bet. (Local account holders who want or need the advantages of a Microsoft account can upgrade to one at any time.)Type the email address of the new account holder’s Microsoft account into the Email Address text box, click Next, and then click Finish.
The account will be waiting on the Sign In screen shown back in Figure 14-1.
When the person wants to use the computer, he chooses the account bearing his email address and then types in his Microsoft account password. Windows visits the internet, and if the email address and password match, the account is ready for action. You’ve finished.
Click the words I Don’t Have This Person’s Sign-In Information, shown at the bottom of Figure 14-4.
Alarmed that you’d consider choosing a lowly Local account over the wondrous Microsoft account, Microsoft tries to make you create a Microsoft account for the new account.
Click the Add a User Without a Microsoft Account link.
This tells Microsoft that yes, you really do want a Local account. (After all, Local account holders can always turn their account into a Microsoft account at any time.)
A new screen appears, asking for a name for the account (username), the account’s password, and a password hint in case you forget the password.
Enter a username, password, and password hint, and then click Next.
Use the person’s first name or nickname for the username. Choose a simple password and hint; the user can change them after they sign in.
Before you forget, tell the person their new username and password. (Or write them down and keep them in a secure place.) Their username will be waiting at the Sign In screen’s lower-left corner for them to begin using the computer.
Windows normally creates Standard accounts for all new users whether or not they’ve signed in with a Microsoft or Local account. If at a later time you want to change this, you can upgrade the Standard account to an Administrator account, as described in the next section.
Changing existing accounts
The Windows Settings app lets you create a new account for a friend or family member, as described in the previous section. And it lets you tweak your own account, changing your account password or switching between a Microsoft or a Local account.
Administrators can even modify other accounts, changing them to Standard or Administrator accounts, or even deleting them completely.
But if you want to have more control than that — the ability to change an existing Local account’s name or password — you need the power of the desktop’s Control Panel.
You can’t change or reset Microsoft accounts with these steps — those account holders must go online to do that — but you can change a Local account.
To change an existing user’s Local account, follow these steps:
- Click the Start button on the left side of the taskbar, type Control Panel in the Search box, and press the Enter key.
-
 Click to open the Control Panel’s User Accounts category.
 Click the User Accounts link, and then click the Manage Another Account link.
The Manage Accounts window appears, as shown in Figure 14-5, listing all the accounts on your computer.
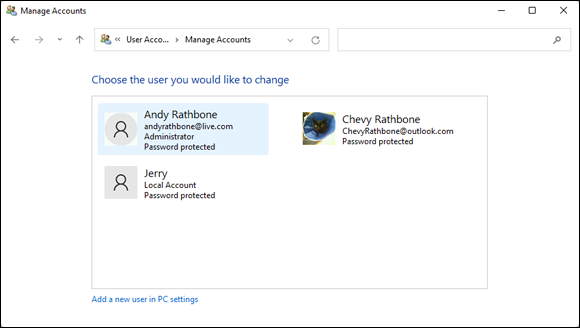
FIGURE 14-5: The Manage Accounts window lets you change the settings of other account holders on the computer.
Click the account you’d like to change.
Windows displays a page with the account’s photo and lets you tweak the account’s settings in any of these ways:
- Change the Account Name: Here’s your chance to correct a misspelled name on a Local account. Or feel free to jazz up your own Local account name, changing Jane Smith to Crystal Powers.
- Create a Password: Every Local account should have a password to keep out other users. Here’s your chance to add one. If the account already has a password, this link changes to Change the Password, giving you a chance to change it.
- Change the Account Type: Head here to promote a Standard user of high moral character to an Administrator account or bump a naughty administrator down to Standard.
 Delete the Account: Don’t choose this option hastily, because deleting somebody’s account also deletes all of that person’s files. If you do choose it, also choose the subsequent option that appears: Keep Files. That option places all of that person’s files in a folder on your desktop for safekeeping.
- Manage Another Account: Save your current crop of changes and begin tweaking somebody else’s account.
When you’re through, close the window by clicking the X in its upper-right corner.
Any changes made to a user’s account take place immediately.
Switching Quickly between Users
Windows enables an entire family, roommates, or employees in a small office to share a single computer or tablet. The computer keeps track of everybody’s programs while different people use the computer. Mom can be playing chess and then let Jerry sign in to check his email. When Mom signs back in a few minutes later, her chess match is right where she left it, pondering the sacrifice of her rook.
Known as Fast User Switching, switching between users works quickly and easily. When somebody else wants to sign in to their account for a moment, perhaps to check email, follow these steps:
Open the Start menu.
 To open the Start menu, click (or tap) the Start button or press the keyboard’s Windows key (
 ).
).Click your user account photo from along the screen’s left edge.
A menu pops up, as shown in Figure 14-6.
Choose the name of the user account holder who wants to sign in.
Windows leaves you signed in but immediately fetches the other person’s account, letting them type in their password.

FIGURE 14-6: The menu lists the names of all user accounts authorized to use the computer.
When that person finishes with the computer, they can sign out just as you did in Step 2 — by clicking their user account photo in the Start menu’s left pane. This time, however, they’ll choose Sign Out. Windows closes down their session, letting you sign back in with your own password. And when Windows reappears, so does your work, just as you left it.
Keep these tips in mind when juggling several people’s accounts on a single PC:
- With all this user switching, you may forget whose account you’re actually using. To check, open the Start menu. The current account holder’s picture appears in the menu’s bottom left pane. (Hover your mouse over the picture to see the name.)
- To see other accounts currently signed in, open the Start menu and click the current account holder’s name. A pop-up menu lists the other user accounts but places the words
Signed Inbeneath the name of each account holder who’s currently signed in. - Don’t restart the PC while another person is still signed in, or that person will lose any work they haven’t saved. (Windows warns you before restarting the PC, giving you a chance to ask the other person to sign back in and save their work.)
- If a Standard account owner tries to change an important setting or install software, a window appears, asking for Administrator permission. If you want to approve the action, just step over to the PC and type your password into the approval window. Windows lets you approve the change, just as if you’d done it while signed in with your own account.
Changing a User Account’s Picture
Okay, now the important stuff: changing the boring picture that Windows automatically assigns to your user account. For every newly created user account, Windows chooses a generic silhouette. Feel free to change the picture to something more reflective of the Real You: You can snap a photo with your computer’s webcam or choose any photo in your Pictures folder.
To change your user account’s picture, head for the Start menu and click your picture along the menu’s left edge. When the menu drops down, choose Change Account Settings. Windows presents the screen shown in Figure 14-7.
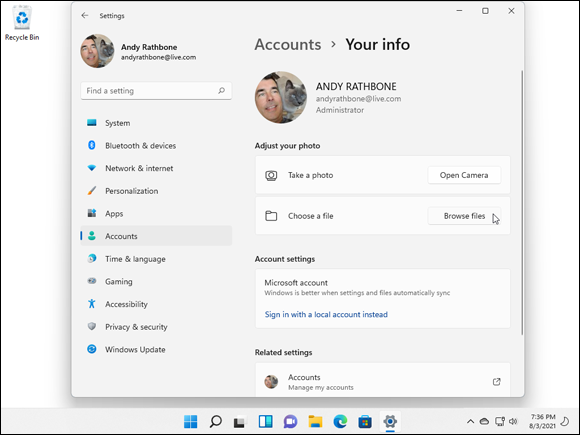
FIGURE 14-7: Windows lets each user choose an account picture.
The Accounts page lets you change your picture two main ways:
- Take a Photo: Click the adjacent Open Camera button, shown only for people with a camera connected to their laptops, tablets, or computers, to take a quick selfie, slang for a self-shot portrait, for your account photo.
- Choose a File: To assign a picture already on your computer, click the Browse Files button. A new window appears, showing photos in your Pictures folder. Click a desired picture, and click the Choose Picture button. Windows quickly slaps that picture atop your Start menu.
Here are a few more tips for choosing your all-important account photo:
- After you’ve chosen an account photo, it attaches to your Microsoft account and anything you sign in to with that account: Microsoft websites, programs, and apps, as well as any Windows computer you sign in to with your Microsoft account.
- You can grab any picture off the internet and save it to your
Picturesfolder. Then click the Browse Files button in the Choose a File section, mentioned earlier in this section, to locate the picture and assign it as your account photo. (Right-click the internet picture and, depending on your web browser, choose Save Image As or a similar menu option.) - Don't worry about choosing a picture that’s too large or too small. Windows automatically shrinks or expands the image to fit the circular space.
Setting Up Passwords and Security
There’s not much point to having a user account if you don’t have a password. Without one, a snoop from the neighboring cubicle or even another family member can click your account on the Sign In screen and peek through your files.
People with administrator accounts, especially, should have passwords. If they don’t, they’re automatically letting anybody wreak havoc with the PC: When a permission’s screen appears, asking for a protective password, anybody can just press Enter to gain entrance.
Microsoft account holders must change their passwords online by visiting https://account.microsoft.com. Local account holders can create or change a password by following these steps:
- Click the Start button, and click the Settings icon from the Start menu.
 When the Settings app appears, click the Accounts icon.
The familiar Accounts window appears, shown earlier in Figure 14-2, where you can add other accounts, change your own, and perform other account-related chores.
Choose the Sign-in Options link from the Accounts window’s right edge.
The Sign-In Options screen appears, listing all the ways you may log into your computer.
Click the Password option on the window’s right side; when the menu drops down, click the Change button.
People who haven’t created a password should instead click the Create a Password button.
Make up an easy-to-remember password, and type it into the New Password text box. Then retype the same characters into the Retype Password text box below it, and click Next.
Retyping the password eliminates the chance of typos.
Changing an existing password works slightly differently: The screen shows a Current Password box where you must first type your existing password. (That keeps pranksters from sneaking over and changing your password during lunch hours.)
You can find out more about passwords in Chapter 2.
Signing in with Windows Hello
Password-protected accounts help keep your account secure, both from seedy strangers on the internet and from people nearby. But very few people enjoy stopping their flow to type in a password — if they can even remember it.
Windows tries to solve that problem with its Windows Hello technology. Windows Hello lets you skip bothersome passwords and log in securely in less than a second. By attaching either a compatible camera or a fingerprint reader to your computer, you can log in with the swipe of a finger or a glance at the camera.
Many new laptops and PCs now include built-in Windows Hello compatible readers and cameras; if yours doesn’t, you can buy one that plugs in to your computer’s USB port.
To set up Windows Hello, follow these steps:
- Click the Start button, click the Settings icon (shown in the margin), and choose Accounts.
The Settings app’s Accounts page appears.
Click Sign-In Options from the left pane.
The screen shows your options for signing in to your account, shown in Figure 14-8. If you don’t see an option to set up Windows Hello, make sure your compatible fingerprint reader or camera is plugged in to your computer and fully installed.
Click the Set Up button for either the fingerprint reader or camera, and follow the instructions.
Windows walks you through scanning either your fingerprint (any finger will do, as long as you use that finger consistently when you want to sign in to your account), iris, or face. You may need to create a PIN, a four-digit number that adds an additional layer of security for special circumstances.
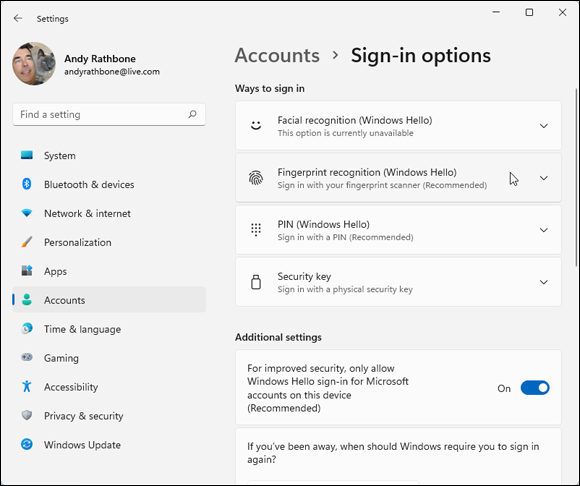
FIGURE 14-8: Choose an option from Windows Hello to sign in without a password.
Windows Hello may seem more like science fiction than reality, but don’t write it off too quickly. You’ll appreciate Windows Hello for several reasons:
- Fingerprint readers are fairly inexpensive and easy to install. You can find several models selling on Amazon for around $30, and they work amazingly well. I love mine.
- Many new laptops come with fingerprint readers already installed near the keyboard area. Some tablets, too, include built-in fingerprint readers.
- Windows recognizes most compatible fingerprint readers as soon as they’re plugged in to your computer’s USB port. You rarely need to install any bundled software.
- Whenever Windows asks you to sign in, just slide your finger across the reader. The screen quickly clears, and you’re ready for work. You don’t need to remember or type in a complicated password. There’s nothing to forget.
- Windows Hello not only lets you sign in to your device, but lets you buy things in the Microsoft Store, all without typing in a password.
- As the Windows Hello technology grows, Windows Hello may eventually let you enter your favorite password-protected websites, as well.