Chapter 11
Safe Computing
IN THIS CHAPTER
![]() Dealing with permission warnings
Dealing with permission warnings
![]() Staying safe on the internet
Staying safe on the internet
![]() Avoiding phishing scams
Avoiding phishing scams
![]() Setting up controls for children
Setting up controls for children
Like driving a car, working with Windows is reasonably safe as long as you avoid bad neighborhoods, obey traffic signals, and don’t try to steer with your feet.
But in the world of Windows and the internet, there’s no easy way to recognize a bad neighborhood, find a traffic signal, or even know what’s dangerous. Something that appears to be fun, innocent, or important — a friend’s email, a downloaded app or program, or a message from a bank — may be a virus that infects your computer.
This chapter helps you recognize the bad streets in virtual neighborhoods and explains the steps you can take to protect yourself from harm and minimize any damage. Along the way, it introduces you to the new Windows Security section and its suite of tools that help identify and avert threats.
Understanding Those Annoying Permission Messages
After more than 20 years of development, Windows is still pretty naive. Sometimes when you run an app or program or try to change a setting on your PC, Windows can’t tell whether you’re doing the work or a virus is trying to move in behind your back.
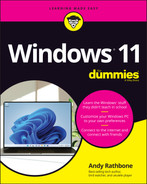
The Windows solution? When Windows notices anybody (or anything) trying to change something that can potentially harm Windows or your PC, it darkens the screen and flashes a security message asking for permission, like the one shown in Figure 11-1.
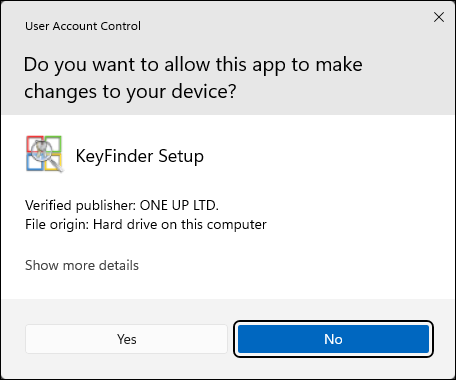
FIGURE 11-1: Click Don’t Install, Cancel, or No if a message similar to this one appears unexpectedly.
If one of these User Account Control security messages appears out of the blue, Windows may be warning you about a bit of nastiness trying to sneak in. So click Cancel, No, or Don’t Install to deny it permission. But if you’re trying to install a trusted app or program onto your PC and Windows puts up its boxing gloves, click OK, Yes, or Install instead. Windows drops its guard and lets you proceed.
If you don’t hold an Administrator account, however, you can’t simply approve the deed. You must track down an Administrator account holder (usually the PC’s owner) and ask them to type their password.
Yes, a rather dimwitted security robot guards the front door to Windows, but it’s also an extra challenge for the people who write the viruses.
Staying Safe with Windows Security
Windows Security isn’t simply an antivirus app, although it includes one. It’s also a handy repository for the seven biggest security features in Windows. Hopefully, though, you won’t need to visit any of them: The security features all work automatically and come preset to keep you safe. In fact, if an inadvertent settings change leaves you unsafe, the app quickly notifies you and shows you which toggle switch needs to be flipped to the safer position.
To launch Windows Security, click the Start button. When the Start menu appears, click the All Apps button in the Start menu’s upper-right corner. Finally, choose Windows Security from the alphabetical list of apps that appear. The app appears, shown in Figure 11-2.
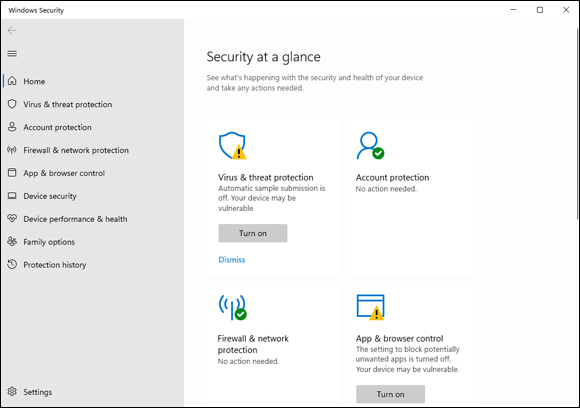
FIGURE 11-2: The Windows Security suite of apps helps to keep your computer safe.
When you spot a green check mark next to each icon, your computer’s defenses are all turned on. If you spot a red X or a yellow exclamation point, by contrast, open that icon with a click. Windows guides you directly to the switch that needs to be flipped.
Windows Security offers these categories:
- Virus and Threat Protection: Covered in this chapter’s next section, this area lets you access settings for Microsoft Defender Antivirus. The app runs automatically, constantly scanning your PC for threats. But you may want to visit here to run a quick, unscheduled scan if you suspect foul play.
- Account Protection: Visit here to check on the security of your user account. You can also set up a fingerprint reader: A swipe of your fingertip lets you into your PC without having to type in a password.
- Firewall and Network Protection: Hidden in here are settings for the Windows built-in firewall, which helps stop hackers from breaking into your computer through the internet. It’s turned on automatically, so you’ll probably never need to visit here.
- App and Browser Control: These settings tell Microsoft Defender to warn you if you try to download an unsafe app or file, or if the Microsoft Edge browser visits an unsafe website. I cover this subject in the “Avoiding phishing scams” section later in this chapter.
- Device Security: This lets you check on the security measures built directly into your PC’s hardware, including its memory chips and central processing unit (CPU).
- Device Performance and Health: If Windows doesn’t seem to be running correctly, visit this section. It lets you know whether your PC is running low on storage room and notifies you of any problems with drivers: pieces of software that let your PC talk with devices like mice, keyboards, and other computer parts. This section also alerts you to trouble with any of your apps or programs. (I devote Chapter 18 to troubleshooting Windows 11.)
- Family Options: This takes you online to set up ways to control and monitor how your children use their PCs and other Windows devices. (I cover this subject in the “Setting up controls for children” section later in this chapter.)
 Protection History: New to Windows 11, this section lists all the times Windows Security has found and thwarted something unsafe on your PC. It also recommends actions you should take to make your PC more secure.
If you’ve installed third-party antivirus or firewall apps, Windows Security provides updates on those as well.
 When everything is running smoothly, the icons in Windows Security bear a green check mark. The check mark turns into a red X or yellow exclamation point when something is amiss, alerting you that you should visit that category and take the recommended action.
Avoiding and removing viruses
When it comes to viruses, everything is suspect. Viruses travel not only through email messages, websites, apps and programs, files, networks, and flash drives, but also in screen savers, themes, toolbars, and other Windows add-ons.
To combat the problem, Windows Security includes the free Microsoft Defender Antivirus app.
Microsoft Defender Antivirus scans everything that enters your computer, whether through downloads, email, networks, messaging apps and programs, flash drives, or discs. Unless you tell it not to, the app casts a watchful eye on your OneDrive files as well.
When Microsoft Defender Antivirus notices something evil trying to enter your computer, it lets you know with a message in your screen’s lower-right corner, as shown in Figure 11-3. Then the antivirus app quickly quarantines the virus before it has a chance to infect your computer. Whew!
FIGURE 11-3: Microsoft Defender Antivirus detects and removes an intruder.
Microsoft Defender Antivirus automatically updates itself to recognize new viruses, and it constantly scans your PC for threats in the background. But if your PC acts strangely, tell Microsoft Defender Antivirus to scan your PC immediately by following these steps:
 Click the taskbar’s Windows Security icon (shown in the margin) near the clock.
The Windows Security suite of apps appears, shown earlier in Figure 11-2. Don’t spot the app’s icon on the taskbar? Then click the little upward-pointing arrow near the taskbar’s right edge; a pop-up menu appears, showing the Windows Security icon.
You can also launch Windows Security from the Settings app’s Privacy and Security section. (I cover the newly updated Settings app in Chapter 12.)
Click the Windows Security Virus and Threat Protection icon from the left column.
The Virus and Threat protection window appears.
Click the app’s Quick Scan button.
Microsoft Defender Antivirus immediately performs a quick scan of your PC.
To perform a full scan, which takes longer but scans more files, click the Scan Options link beneath the Scan Now button. When the Scan Options window appears, click the Full Scan option and then click the Scan Now button.
 To run a quick scan from the desktop, right-click the Windows Security icon on your taskbar and choose Run Quick Scan from the pop-up menu.
Even with Windows Security’s suite of apps watching your back, follow these rules to reduce your risk of infection:
- Open only attachments that you’re expecting. If you receive something unexpected from a friend, don’t open it. Instead, email or phone that person to ask whether they really sent you something. Your friend’s computer might be infected and trying to infect your computer as well.
- Be wary of items arriving in email that ask for a click. For example, if you receive a message saying somebody wants to be a Facebook friend, don’t click it. Instead, visit Facebook from your browser and look to see whether the person is listed on your Friend Request list. The more emailed links you can avoid, the safer you’ll be.
- If you receive an important-looking email from a financial institution that asks you to click a link and type in your name and password, don’t do it. Instead, visit your financial institution’s website through your web browser and log in there. Chances are good that there’s nothing wrong with your account, and that email was only trying to steal your username and password. (This type of scam is often called phishing, and I describe it further in the next section.)
- Updates for Microsoft Defender Antivirus arrive automatically through Windows Update. Windows keeps Windows Update running constantly, so you don’t need to worry about keeping Microsoft Defender Antivirus updated.
 If you prefer running a third-party antivirus app, you’re welcome to do so. It will turn off Microsoft Defender Antivirus automatically as part of its install process. But don’t try to keep two third-party antivirus apps running together, because they often quarrel.
Avoiding phishing scams
Eventually you’ll receive an email from a bank, eBay, PayPal, or a similar website announcing a problem with your account. Invariably, the email offers a handy link to click, saying that you must enter your username and password to set things in order.
Don’t do it, no matter how realistic the email and website may appear. You’re seeing an ugly industry called phishing: Fraudsters send millions of these messages worldwide, hoping to convince a few frightened souls into typing their precious account name and password.
How do you tell the real emails from the fake ones? It’s easy, actually, because all these emails are fake. Finance-related sites may send you legitimate history statements, receipts, or confirmation notices, but they will never, ever email you an unexpected link for you to click and enter your password.
If you’re suspicious, visit the company’s real website by typing the web address by hand into your web browser’s Address bar. Chances are good that the real site won’t list anything as being wrong with your account.
Microsoft Edge uses Microsoft SmartScreen Filter technology that compares a website’s address with a list of known phishing sites. If it finds a match, the SmartScreen filter keeps you from entering, as shown in Figure 11-4. Should you ever spot that screen, close the web page by clicking the words Go Back listed on the warning message.

FIGURE 11-4: Microsoft Edge warns you when you visit a suspected phishing site.
So why can’t the authorities simply arrest those people responsible? Because internet thieves are notoriously difficult to track down and prosecute. The reach of the internet lets them work from any place in the world, hidden beneath a global maze of networks.
If you mistakenly enter information and then realize you shouldn’t have, take these actions:
- If you’ve already entered your name and password into a phishing site, act immediately: Visit the real website, and change your password. Then contact the company involved and ask it for help. It may be able to stop the thieves before they wrap their electronic fingers around your account.
- If you’ve entered credit card information, call the card’s issuer immediately. You can almost always find a toll-free, 24-hour phone number on the back of your credit card.
Setting up controls for children
A feature much-welcomed by parents and much-booed by their children, Microsoft’s Family Options area in Windows Security offers several ways to monitor how children can access the computer as well as the internet.
Rather than running as a app on your computer, Microsoft’s family options now work online through a Microsoft website called Family Safety. By tracking your children’s activity through their Microsoft account usage, you can monitor their online activity wherever they log in to a Windows PC. The online, password-protected records stay online, where you can access them from any PC, tablet, or smartphone.
Microsoft’s family options work only if both you and your children have Microsoft accounts.
To set up Microsoft’s family options, follow these steps:
Add your children and any adults who want to monitor the children as family members when creating their user accounts.
I describe how to add family members when creating user accounts in Chapter 14. When you add family members to your PC’s list of user accounts, each member receives an email inviting them to join your family network; when they accept, their accounts automatically appear on your computer.
Visit Microsoft’s Family Safety website.
Open any browser and visit the website at
https://account.microsoft.com/family. Log in with your Microsoft Account, if asked, and the site opens to show your list of family members who have accepted their invitations. Click the name of a family member, and the website, shown in Figure 11-5, lets you set limits on that child’s computer behavior, as well as monitor their activity.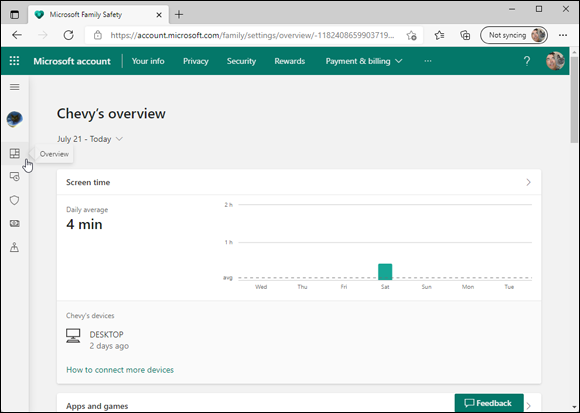
FIGURE 11-5: Microsoft’s Family Safety website lets you set limits on your children’s computer activity.
You can also visit the online settings by visiting Windows Security, covered earlier in this chapter, choosing Family Options, and choosing the View Family Settings link.
Turn on the categories you’d like to enforce, and set the limits.
Microsoft’s family area contains a variety of categories that let you monitor or control different areas of behavior. Visit any of the categories described below, and each opens a new page with a toggle control at the top. Turn the toggle to either On or Off, and fine-tune the offered settings. (You can also turn categories Off to temporarily suspend monitoring in those areas.)
Microsoft’s Family Safety website offers these categories, which apply whenever your child uses their Microsoft account to sign in to any Windows computer or tablet:
- Overview: A haven for time-stressed parents, the Activity area offers a quick rundown of your child’s computer activity, along with an option to have the information emailed to you each week.
- Screen Time: Visit here to set time and day-of-the-week limits on when your child may access their PC or Xbox game system. Click the Turn Limits On button, and a grid appears for you to choose the exact hours your child is allowed to access the device.
- Content Filters: Visit here to control whether your child needs adult approval for spending money, as well as to block access to inappropriate apps, games, media, and websites.
- App and Game Limits: Set time and day-of-the-week limits on when your child may open apps and games.
- Spending: Want your child to be able to purchase items from the Microsoft Store app? Head here and click the button corresponding to the amount. It’s withdrawn from the credit card attached to your Microsoft account and added to your child’s account.
- Find Child on a Map: If your child has an Android smartphone with the Microsoft Family Safety app installed, this toggle switch lets you locate the device — and, hopefully, your child — on a map. (You can download the Microsoft Family Safety app from Google’s App Store.)
When you’re done, close the window in your browser.
Your changes take place immediately. When you’re finished, just close your web browser.
Although Microsoft’s family options work well, few things in the computer world are foolproof. If you’re worried about your children’s computer use, cast an occasional eye their way. Also, some of these options monitor your child only when they log in with their Microsoft account and use Microsoft Edge. If you spot an unfamiliar account (or a different browser) on the PC, it’s time to ask some questions.