Chapter 10
Being Social: Mail, Calendar, and Teams Chat
IN THIS CHAPTER
![]() Adding your accounts
Adding your accounts
![]() Setting up email
Setting up email
![]() Sending and receiving files and photos
Sending and receiving files and photos
![]() Managing your contacts
Managing your contacts
![]() Managing your calendar
Managing your calendar
![]() Meeting online with Teams Chat
Meeting online with Teams Chat
Thanks to the internet’s never-fading memory, your friends and acquaintances never disappear. Old college chums, business pals, and even those elementary school bullies are all waiting for you online. Toss in a few strangers you may have swapped messages with on websites, and the internet has created a huge social network.
Windows helps you stay in touch with friends you enjoy and avoid those you don’t. To manage your online social life, Windows includes two intertwined social apps: Mail and Calendar. You can pretty much guess which app handles what job.
Microsoft has improved the Mail and Calendar apps since their debut in Windows 10, and they work together quite well, vastly simplifying the chore of tracking your contacts and appointments.
 The newcomer to the Windows 11 party is Teams Chat, a light version of Microsoft’s Teams app. Like Zoom, a familiar video conferencing tool during the pandemic, Teams Chat lets you exchange text messages and hold video chats with friends, family, and coworkers.
This chapter describes the Windows suite of social apps, as well as how to set them up and put them to work managing your daily flow.
Adding Your Accounts to Windows
For years, you’ve heard people say, “Never tell anybody your user account name and password.” Now, it seems Windows wants you to break that rule.
When you first open your Mail or Calendar apps, Windows may ask you to enter your account names and passwords from your email services, as well as services such as Google or Apple’s iCloud.
It’s not as scary as you think, though. Microsoft and the other networks have agreed to share your information only if you approve it. And should you approve it, Windows connects to all your added accounts and imports information about your contacts, email, and calendar.
And frankly, approving the information swap is a huge timesaver. When you link those accounts to Windows, your computer automatically signs in to each service, imports your friends’ contact information, and stocks your apps.
To fill in Windows about your life online, follow these steps:
Click the Start button. When the Start menu appears, open the Mail app.
 Click the Mail icon, usually found in the Start menu’s top row, and the app opens.
The Mail app may be listed on your taskbar, that strip along the bottom of the screen. A click on the taskbar’s Mail icon spares you a trip to the Start menu. If it’s not there, I explain how to put any icon onto the taskbar in Chapter 3.
Enter your accounts into the Mail app.
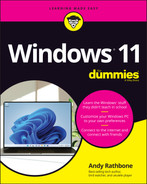
When you first open the Mail app, it prompts you to add your email account or accounts, as shown in Figure 10-1. If you signed up with a Microsoft account that also serves as a Microsoft email address — one ending in Live, Hotmail, or Outlook, for example — that email address should already be listed at the top and set up. If that’s your only email address, click it, and you’re through!
To add other email accounts, click your account from the list, which includes email accounts from Google, Yahoo!, iCloud (for Apple), or Other Account (which usually means accounts from your internet service provider that use POP or IMAP for access).
To add a Google account, for example, click the word
Google. Windows takes you to a secure area on Google's website, where you can authorize the transaction by entering your Gmail email address and password and then clicking Accept or Connect.To add new email accounts later while inside the Mail app, click the Settings icon (it looks like a gear) and choose Accounts from the Settings pane.
Repeat these steps for any of your other listed accounts, authorizing each of them, if required, to share information with your Windows account.
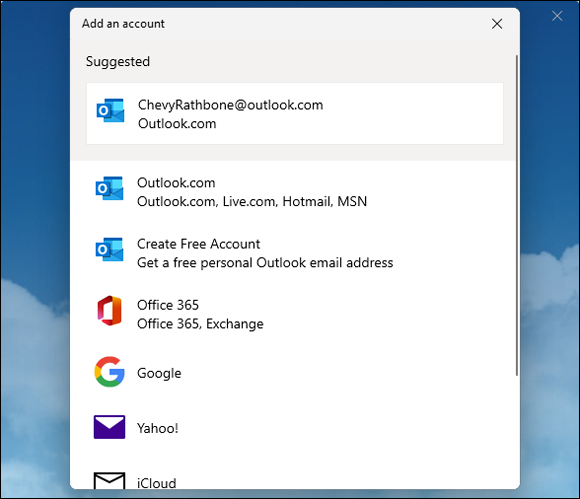
FIGURE 10-1: The Mail app lets you enter email accounts like Gmail, Hotmail, Outlook, Yahoo!, and others.
After you enter your accounts, Windows automatically fetches your email through your Mail app, fills the People app with your friends’ contact information, and adds any appointments in your Calendar app.
Although it might seem frightening to give Windows your coveted usernames and passwords, it enriches Windows in many ways:
- Instead of typing in your contacts by hand, they’re waiting for you automatically, whether they’re from your Google, Hotmail, Outlook, Apple, or Windows Live account.
- Windows apps work well with apps and programs from other companies. Your friends’ birthdays from your Google calendar, for example, show up on the Calendar app without your having to enter them.
 Don’t like these newfangled Windows apps? Then ignore them. You can always spend your time on the Windows desktop instead. There, you can visit Facebook and your other accounts from your web browser the same way you’ve always done.
- If you’re already accustomed to firing up your browser and reading your mail on Google, Yahoo!, or any other online watering hole, you don’t have to use the Mail app. You can still send and receive your mail the old-fashioned way. Or you can use a combination of both, depending on your mood, or whichever PC you happen to be using.
Understanding the Mail App
Microsoft constantly tweaks Windows 11 and its apps. It updates Windows 11 once a year, and it updates the Mail app much more frequently. Don’t be surprised to see the Mail app (or any app) change subtly as Microsoft adds new features and drops old ones.
The People app, found in Windows 10, no longer lives as separate program in Windows 11. Instead, it’s built directly into the Mail and Calendar app. To launch it, just click the People app icon within either of those apps. (The icon remains unchanged.)
The following sections explain how to make sense of the Mail app’s menus, as well as how to compose, send, and read email. (If you haven’t already imported your email accounts, skip back to this chapter’s first section.)
Switching among the Mail app’s views, menus, and accounts
![]() To load the Windows Mail app, open the Start menu (by clicking the Start button on the taskbar’s left edge) and then click the Mail app icon (shown in the margin).
To load the Windows Mail app, open the Start menu (by clicking the Start button on the taskbar’s left edge) and then click the Mail app icon (shown in the margin).
The Mail app appears, shown in Figure 10-2, displaying email received from your primary email account — the first account you entered when setting up the app. (Chances are, it’s your Microsoft account, which I describe in Chapter 2.) Figure 10-2, for example, shows the currently viewed Microsoft Live account at the pane’s top. To see your mail from a different account, click that account’s name along the left pane.

FIGURE 10-2: Email accounts and folders appear on the left, emails appear in the center, and an email’s contents appear on the right.
The Mail app separates your mail into two categories: Focused and Other.
The Focused category only shows mail from people in your contacts list. The Other category, by contrast, usually contains mass-mailed newsletters and other mail from people you’ve never contacted. Don’t forget to look in the Other category, though; you may find important messages from doctors, contractors, pet sitters, old school chums, or other people entering your life.
 If you find it easier to see every piece of email in one place — your Inbox — visit the Mail app’s Settings area, choose Focused Inbox, and turn off the toggle switch named Sort Messages into Focused and Other.
Beneath the name of your currently viewed email account, the Mail app lists its folders:
 Inbox: Shown when you first load the Mail app, the Inbox folder lists your waiting email, with your newest email at the top. The Mail app automatically checks for new email every few minutes, but if you tire of waiting, click the Sync button (shown in the margin) atop that account’s list of received emails. That action immediately grabs any waiting mail.
- Drafts: If you write a message but don’t send it for some reason, it waits here, ready for your further attention.
- Sent Items: Click here to see the messages you’ve sent rather than received from others.
- Archive: To remove an email from your Inbox, but save it for later reference, right-click the unwanted mail and choose Archive. (A click on the Archive folder lets you retrieve previously archived messages.)
- More: If you don’t see all your account’s folders, click More to find them. A pop-out menu appears, listing them all. (In particular, peek in here to find your Deleted folder, where you can retrieve accidentally deleted emails.)
The icons along the bottom of the left pane let you switch among the Calendar app, the Mail app, the People app (your contacts), the optional To Do list, and the Mail app’s settings.
Click the Settings icon, for example, and a pane appears along the right, offering all the things you can tweak inside the Mail app. The Feedback app, found in several Microsoft apps, lets you play armchair critic, advising Microsoft on how to improve its apps.
The Mail app, like most apps, changes its width depending on the size of your display and the size of the Mail window itself. On smaller monitors, or when running in a smaller window, the Mail app’s left pane shrinks to a small strip showing icons instead of words, as shown in Figure 10-3. Click the Expand icon in the app’s upper-left corner, and the tiny left strip expands, showing you the same left pane shown in Figure 10-2, earlier.

FIGURE 10-3: The Mail app resizes to adjust to different sized screens and windows.
Composing and sending email
When you’re ready to send an email, follow these steps to compose your letter and drop it in the electronic mailbox, sending it through virtual space to the recipient’s computer:
- From the Start menu, open the Mail app’s icon (shown in the margin) and click the New Mail icon (it’s a plus sign icon) in the app’s upper-left corner.
A new and blank email appears, awaiting your words.
 If you’ve added more than one email account to the Mail app, first choose your return address by clicking your desired account name from the All Accounts section along the Mail app’s right pane. Then click the New Mail icon in the program’s upper-left corner.
 Type your friend’s email address into the To box.
As you begin typing, the Mail app scans your contacts for both names and email addresses, listing potential matches below the To box. Spot a match on the list? Click it, and the Mail app automatically fills in the rest of the email address.
To add another person to the list, begin typing their name in the To box as well. Unfortunately, the Mail app won’t let create and save groups for emailing the same bunch of people in future mailings. Instead, you must retype everybody’s name. (That’s Microsoft way of forcing you to pay for Office 365, which does offer that feature.)
Click in the Subject line, and type a subject.
Click in the line labeled Subject, and type your subject. In Figure 10-3, for example, I added the subject “Phone suggestion.” Although technically optional, the Subject line helps your friends sort their mail.
Type your message into the large box beneath the Subject line.
Type as many words as you want. As you type, the Mail app automatically corrects any noticed misspellings.
If you want, add any formatting, tables, files, or photos to your email.
The menu directly above your composed email offers four menus, each with different options:
- Format: This option lets you change your email’s formatting by selecting portions of your email and then clicking the bold, italic, underline, or font color icons along the window’s top edge. To change the font size, click the tiny downward-pointing arrow next to the underlined U icon. A menu drops down, letting you change the font and font size, as well as add or clear the formatting from any selected item.
- Insert: Click here to attach files, as I describe in this chapter’s later section, “Sending and receiving files through email.” This tab also lets you insert tables, pictures, hyperlinks, and emojis — little symbols ranging from smiley faces to vegetables.
- Draw: Used mainly by owners of a tablet and stylus, this option lets you add drawings to your mail.
- Options: Click here after composing your email to give it a final spellcheck.
Most ISPs won’t send attached files totaling more than 10 to 25MB. That lets you send a song or two, a few digital photos, and most documents. It’s not enough room to send any but the tiniest videos.
Check your spelling, if desired.
The Mail app does a pretty good job of correcting your spelling as you type. But to proofread more closely before sending your mail, click the Options button along the Mail app’s top edge. Then choose Spelling from the drop-down menu.
The Mail app jumps to each error it finds. When it finds a problem, it highlights the word and places a drop-down menu where you can choose from potential replacements.
If the spellchecker constantly flags a correctly spelled word as being misspelled, choose Ignore All from the drop-down menu. That keeps the program from bugging you about a word it doesn’t understand.Click the Send button along the Mail app’s upper-right corner.
 Whoosh! The Mail app whisks your message through the internet to your friend’s mailbox. Depending on the speed of your internet connection, mail can arrive anywhere from a few seconds to a few hours later, with a few minutes being the average.
![]() Don’t want to send the message? Then delete it with a click of the Discard button in the Mail app’s upper-right corner.
Don’t want to send the message? Then delete it with a click of the Discard button in the Mail app’s upper-right corner.
Reading a received email
When your computer is connected to the internet, the Mail app heralds the arrival of a newly received email with an announcement in the Action Center, the pane that periodically appears along the screen’s right edge.
You can click that little announcement to fire up the Mail app and see the message. But if the announcement disappears before you can pounce on it with a click, follow these steps to read or respond to the message:
- Click the Start menu’s Mail icon.
Mail opens to show the messages in your Inbox, as shown earlier in Figure 10-3. Each subject is listed, one by one, with the newest subject at the top.
To find a particular email quickly, click the Magnifying Glass icon at the top of the email column. A search box appears alongside the icon where you can type the sender’s name or a keyword into the search box. Press the Enter key to see all the matching emails. Click the subject of any message you want to read.
The Mail app spills that message’s contents into the pane along the window’s right side.
- From here, the Mail app leaves you with several options, each accessed from the buttons along the email’s top edge:
- Nothing: Undecided? Don’t do anything, and the message simply lingers in your Inbox folder.
 Reply: Click the Reply button, and a new window appears, ready for you to type your response. The window is just like the one that appears when you first compose a message but with a handy difference: This window is already addressed with the recipient’s name and the subject. Also, the original message usually appears at the bottom of your reply for reference.
 Reply All: Some people address emails to several people simultaneously. If you see several other people listed on an email’s To line, you can reply to all of them by clicking Reply All.
 Forward: Receive something that a friend simply must see? Click Forward to kick a copy of the email to your friend’s Inbox.
 Archive: Copy the message to the Archive folder for later retrieval, handy when you want to save a read mail for later reference.
 Delete: Click the Delete button to toss the message into your Trash or Deleted Items folder. (Different email accounts use different words for that folder.)
 Actions: Clicking this fetches a drop-down menu that lists any menu items above that didn’t fit on your particular screen. The menu’s Move option, for example, lets you move an item out of your Inbox and into a different folder. (Save and Print options appear on the Actions drop-down menu, as well.)
Some email accounts lack the Archive button, which removes a piece of mail from your Inbox and stashes it in a folder named Archive. That keeps the email out of sight, but ready for retrieval later, if desired.
The Mail app works well for basic email needs, but it has its limitations. If you’re struggling to find a missing feature, it’s probably not included. If you need more, Microsoft encourages you to purchase its Microsoft Office suite of programs or to pay a subscription fee to join its Office 365 mail service.
If you don’t want to pay extra, you may be able to open your web browser and manage your email online, such as at Outlook (www.outlook.com), Google (www.google.com/gmail), or your ISP’s own website.
 If you ever receive an unexpected email from a bank, social security, your credit card company, or any other money-related website, don’t click any of the email’s web links. A criminal industry called phishing sends emails that try to trick you into entering your name and password on a phony website. That gives your coveted information to the evil folk, who promptly steal your money. I write more about phishing schemes and how to avoid them in Chapter 11.
Sending and receiving files through email
Like a gift card slipped into the envelope of a thank-you note, an attachment is a file that piggybacks onto an email message. You can send or receive any type of file as an attachment.
The following sections describe how to both send and receive a file through the Mail app.
Saving a received attachment
When an attachment arrives in an email, you’ll recognize it: A paperclip icon rests next to the email’s subject. And when you open the email, you see a photo thumbnail or a message saying, “Download Message and Pictures.”
Saving the attached file or files takes just a few steps:
Right-click the attached file, and choose Open or Save.
The Mail app usually doesn’t download the file or files until you specifically give it the command. Instead, the Mail app shows small thumbnails — placeholders for attached files — along the email’s top edge.
Choose Open from the pop-up menu, and the Mail app opens the file for viewing. If you choose to open an attached photo, for example, the Photos app appears, with the displayed photo in tow.
To save the file, choose Save from the pop-up menu and move to Step 2.
Choose a storage area to receive the saved file.
File Explorer’s Save As window appears, shown in Figure 10-4, ready for you to save the file in your
Documentsfolder. To save it someplace else, choose any folder listed along the Save As window's left edge. Or click the words This PC, also on the window’s left edge, and begin browsing to the folder that should receive the file.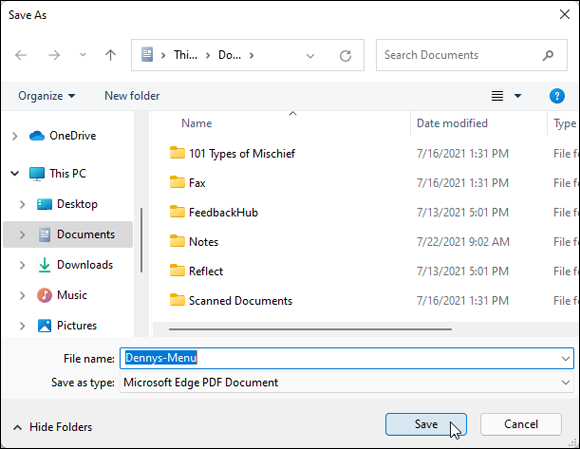
FIGURE 10-4: Choose a folder, and click Save.
Saving the file inside one of your four main folders — Documents,Pictures,Videos, orMusic— is the easiest way to ensure you'll be able to find it later. (I describe files and folders in Chapter 5.) When you choose a folder, you see a list of existing folders where you can stash your new file.To create a new folder inside your currently viewed folder, click the New Folder button from the menu along the folder’s top and, when the new folder appears, type in a name for the folder.
Click the Save button in the Save As window’s lower-right corner.
The Mail app saves the file in the folder you choose.
After you’ve saved the file, the attachment remains inside the email. That’s because saving attachments always saves a copy of the sent file. If you accidentally delete or botch an edit on your saved file, you can return to the original email and save the attached file again.
Windows Security, the built-in virus checker in Windows, automatically scans your incoming email for evil file attachments. I explain more about Microsoft Security in Chapter 11. Still, if you feel suspicious about the attachment, or it arrives unexpectedly, don’t download it. (Just delete the entire email.)
Sending a file as an attachment
Sending a file through the Mail app works much like saving an attached file, although in reverse: Instead of grabbing a file from an email and saving it into a folder, you’re grabbing a file from a folder and saving it in an email, a process known as “attaching a file.”
To send a file as an attachment in the Mail app, follow these steps:
- Open the Mail app, and create a new email.
I describe creating a new email in this chapter’s earlier “Composing and sending email” section.
Click the Insert tab from the Mail app’s top menu, and then choose Files from the drop-down menu.
When you choose Files from the drop-down menu, File Explorer’s Open window appears, showing the contents of your
Documentsfolder.If the
Documentsfolder contains the file you'd like to send, jump to Step 4. To send something from a different folder, move to Step 3.Navigate to the folder and file you want to send.
Click the words This PC along any folder’s left edge, and a menu appears listing your storage areas. Most files are stored in your
Documents,Pictures,Music, andVideosfolders. Click a folder’s name to open it and see the files lurking inside. Not the correct folder? Click the Up Arrow icon (shown in the margin) to move back out of the folder and try again.
Click the file you want to send, and click the Open button.
Click a file to select it. To select several files, hold down the Ctrl key while selecting them. Selected too many files? Deselect unwanted files by clicking their names again. When you click the Attach button, the Mail app adds the file or files to your email.
- Click the Send button.
The Mail app whisks off your mail and its attachment to the recipient.
When you send an attached file, you’re only sending a copy. Your original stays safely on your computer. Also, most ISPs limit attachment size to 10 to 25MB. That’s enough to send a few photos, but rarely enough for videos. (Share those on YouTube or Facebook.)
Managing Your Contacts in the People App
When you enter your own email addresses into the Mail app when first setting it up, Windows also grabs email addresses for all your friends that it can find. That means the embedded People app may already be stocked with your friends’ email addresses. Think of the People app as a simple address book that lists your contacts and their contact information.
![]() Unlike earlier Windows versions, the People app doesn’t live on the Start menu or taskbar. Instead, launch the People app by opening either Mail or Calendar and click the People icon, shown in the margin. The People app appears, presenting all your online friends in an alphabetical list, as shown in Figure 10-5.
Unlike earlier Windows versions, the People app doesn’t live on the Start menu or taskbar. Instead, launch the People app by opening either Mail or Calendar and click the People icon, shown in the margin. The People app appears, presenting all your online friends in an alphabetical list, as shown in Figure 10-5.
FIGURE 10-5: The People app automatically stocks itself with contacts from your email accounts.
The People app contains two main panes: your list of contacts, and the details about the contact you’ve currently clicked on. Here’s what you’ll see:
- Contacts: The app presents an alphabetical list of your friends. When you click a contact’s name, their details spill across the adjacent pane to the right, which offers three main options:
- Profile: The default view for the second pane, Profile lists your selected friend’s photo and contact information.
- Events: Click Events to send the People app racing to the Calendar app, where it prepares a dossier of your scheduled meetings. That person’s appointments then appear as clickable links to provide quick access.
- Conversations: Click this to see a list of clickable emails involving that person.
- Pushpin: When you spot a popular contact, click the pushpin icon atop the pane and choose Pin to Start to place their smiling face on a Start menu icon for easy access. Or choose Pin to Taskbar to place their face on your taskbar along the screen’s bottom edge, where’s it’s always visible.
- Edit: To edit a contact’s details — change a phone number, perhaps — click the Edit link that’s next to the pencil icon. (Clicking this link also lets you add a photo to a faceless contact.)
- Share: Click this option to forward your contact’s information to others, hopefully with your contact’s approval.
The People app handles much of its upkeep automatically, updating itself with any changes you make to your online contacts, usually gathered from iCloud, Google, or your Microsoft account. That means that updates you make to contacts on your iPhone or Android phone automatically appear in the People app and vice versa.
Occasionally, though, you need to add or edit some People entries manually. The following sections explain the occasional pruning needed to keep up with your constantly evolving contacts list.
Adding contacts
Although the People app loves to add contacts automatically, you can easily add people the old-fashioned way, typing them in by hand. However, the app forces you to choose which of your online accounts should accept the new entry.
The People app will also ask permission to access your calendar and email, so it can show those items to you.
To add somebody to the People app, which makes that person available in your Mail and Calendar apps, follow these steps:
 Click the People icon from either the Mail or Calendar app.
The People app appears onscreen.
- Click the See More icon (shown in the margin), and choose New Contact from the drop-down menu.
If asked, choose which account to use for saving new contacts.
If you have more than two email accounts, the People app asks you to decide which account should receive the new contact. The answer hinges mainly on which smartphone you own:
- Choose your Google account if you use an Android phone so that your newly added contact appears in your Gmail contacts. From there, it also appears in your Android phone’s contacts list. Similarly, iPhone owners should choose iCloud.
- Choose the Outlook account if you run the Outlook app on your iPhone or Android smartphone.
- Choose the iCloud account if you use your iPhone’s built-in mail program.
Fill out the New Contact form.
Shown in Figure 10-6, most of the choices are self-explanatory fields such as Name, Phone, Email, Address, and Other. (The Other field lets you add details such as a job title, website, significant other, or notes.)
To add a photo, click the Add Photo button; the Photo app appears, letting you choose from a previously shot photo.
- Click the Save button along the window’s bottom edge.
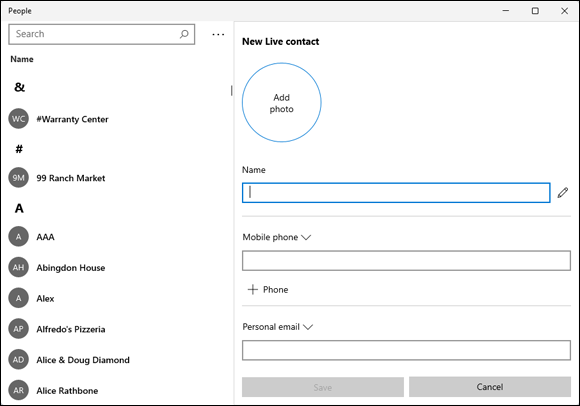
FIGURE 10-6: Fill in contact information, and click the Save button.
The People app dutifully saves your new contact. If you spot a mistake, don’t worry; you can go back and edit the information as described in the next section.
Deleting or editing contacts
Has somebody fallen from your social graces? Or perhaps someone just changed a phone number? Either way, you can delete or edit a contact manually by following these steps:
Open the Mail or Calendar app and click the People icon on the Start menu.
The People app appears, as shown earlier in Figure 10-5.
To delete a contact, right-click their name and choose Delete from the pop-up menu.
The person disappears from both the People app and the email account that held that contact.
To edit a contact, right-click the contact’s name and choose Edit from the pop-up menu.
The person’s contact information appears for you to edit (refer to Figure 10-6).
Click the Save button along the window’s bottom edge.
The People app updates your contacts list, both in the app itself and in the online account where that contact is stored. Edit a Gmail contact in the People app, for example, and Gmail also reflects the changes.
Managing Appointments in Calendar
After you enter your online accounts such as Gmail, Outlook, Live.com, and others, as described in this chapter’s first section, you’ve already stocked the Calendar app with your existing online appointments.
![]() To see your appointments, click the Start menu’s Calendar icon, shown in the margin. Or, if you’re working in the Mail app, click the Calendar icon from the Mail app’s lower-left corner.
To see your appointments, click the Start menu’s Calendar icon, shown in the margin. Or, if you’re working in the Mail app, click the Calendar icon from the Mail app’s lower-left corner.
When first opened, the Calendar app asks you to add your email accounts. If you previously entered your accounts into the Mail app, they already show up here.
The Calendar app opens to show any appointments associated with your linked email accounts, such as Google, iCloud, or Outlook.com. To see more or fewer days displayed, click the Day, Week, Month, or Year button along the top. If you click Week, for example, the Calendar app appears as shown in Figure 10-7.
Unless you keep all your appointments online, you’ll need to edit some entries, add new ones, or delete those you can no longer attend. This section explains how to keep your appointments up to date.
No matter which view the Calendar app displays, you can flip through the appointments by clicking the little arrows near the listed month in the screen’s upper-left corner. Click the right arrow to move forward in time; click the left arrow to move backward.
To add an appointment to your Calendar app, follow these steps:
 Click the Calendar icon on the Start menu.
The Calendar app appears, as shown in Figure 10-7.
If you’re in the Mail app, you can also click the Calendar app’s icon in the Mail app’s lower-left corner.
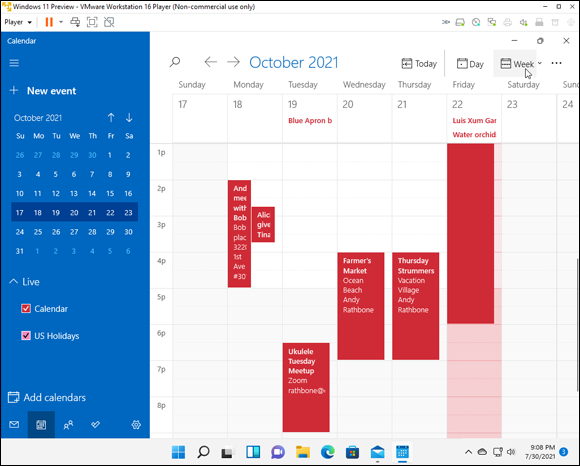
FIGURE 10-7: The Calendar app displays appointments you add manually and from your online calendars.
Click the New Event link from the Calendar app’s upper-left corner.
A blank event template appears, ready for you to fill in the time and place, and invite people.
Fill out the Details form.
Shown in Figure 10-8, most of the choices are self-explanatory fields.
The biggest challenge comes with the Details field’s drop-down menu, which appears only if you’ve entered more than one email account into your Mail app. Which email account should receive the new calendar appointment? Again, the answer depends on your phone:
- Choose Gmail to send appointments to Gmail’s calendar, where they appear on your Android phone.
- Choose iCloud for your iPhone.
Or you can choose Outlook. You can then download and install the Outlook app, available on both Android and iPhones. The Outlook app can sync the Calendar app’s appointments with your phone.
Click the Save & Close button.
The Calendar app adds your new appointment to its own calendar, as well as to whichever account you chose in Step 3.
![]() To edit or delete an appointment, open it from the Calendar app. Click the Delete button (shown in the margin) from the top menu. To edit it, open it from the Calendar app, make your changes, and save your changes by clicking the Save button.
To edit or delete an appointment, open it from the Calendar app. Click the Delete button (shown in the margin) from the top menu. To edit it, open it from the Calendar app, make your changes, and save your changes by clicking the Save button.
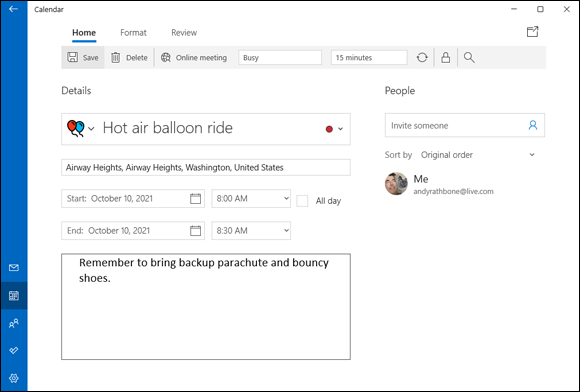
FIGURE 10-8: Add your appointment’s date, start time, duration, and other details.
Meeting Online with Teams Chat
Designed for businesses, Microsoft Teams lets workers exchange messages, hold video chats, and exchange files. It’s designed to work well with other popular Microsoft products, like Word and Excel. Many office managers love how it lets them track office-related details with precision. Other employees, though, see Teams as yet another form of robotic micromanaging.
But no matter how you feel about the full-featured Teams program, Windows 11 includes what could be called “Teams Lite.” Alternatively called “Teams Chat” or simply “Chat,” the app includes Teams’ text messaging and video chat features, but leaves out the other features found the more full-featured Teams app.
All you need to fire up the Teams Chat app in Windows 11 are a video camera, microphone, and speakers; those are standard equipment on most of today’s PCs, laptops, and tablets.
This section explains how to start Teams Chat on your PC, connect with your friends, family, or even coworkers, and begin chatting, either through text messages or video.
Starting Teams Chat
![]() The Teams Chat icon (shown in the margin) sits on the taskbar, that strip along the bottom of your screen. To load Teams Chat, follow these steps:
The Teams Chat icon (shown in the margin) sits on the taskbar, that strip along the bottom of your screen. To load Teams Chat, follow these steps:
Click the Teams Chat icon found on the taskbar, and click Get Started.
 If your computer already has the full-featured Teams program, you may see that app’s icon, instead (shown in the margin). If you have the full-featured version of Teams, you may want the full-featured book, Microsoft Teams For Dummies, Second Edition, by Rosemarie Withee; these steps probably won’t work for you.
The Teams Chat app from Windows 11 jumps to the screen, shown in Figure 10-9.
If asked, choose the account you’d like to use for Teams Chat, enter its password, and click the Sign In button.
A Welcome window appears. If you’re already logged on with a Microsoft account, that account appears at the top of the window; click the account name to start.
No Microsoft account? Choose Use Another Account to be guided through the process of creating one.
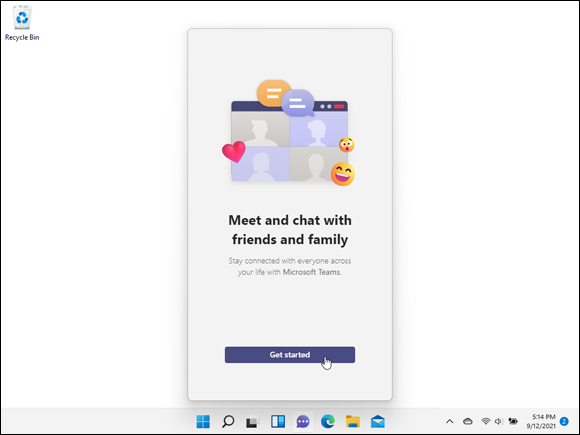
FIGURE 10-9: Click Get Started to load Teams Chat and begin chatting with friends.
If asked, add your phone number, and, when you receive the confirmation code as a text message, enter the code into the Enter Code window. Then click Next.
Enter your cell phone number, and be sure it’s the correct one: Teams Chat will send you a text message to verify your identify and your account. Enter the code you receive and click Next.
If asked, tell Teams Chat to sync your contacts.
This allows Teams Chat to automatically stock itself with your contacts’ information from your email program or Skype, making them easier to find for online meetings.
- Click the Let’s Go button.
When the Teams Chat window appears, shown in Figure 10-10, you’re done and ready to start chatting and holding video chats, as described in the next two sections.

FIGURE 10-10: Once you set up and validate your account, you can begin using Teams Chat.
Sending text messages
Sending text messages in Teams Chat works much like sending text messages on your phone, Facebook, or most other places on the internet. Here’s how to load Teams Chat, find your contact, and begin chatting through text messages.
If you’ve never loaded Teams Chat before, jump back to the Starting Teams Chat section. You need to set up an email account and/or a phone number to start the process.
 Click the Teams Chat icon on the taskbar.
A pop-up window appears, shown earlier in Figure 10-10, with two buttons on the top:
- Meet: Click the Meet button to start a video chat: a way to see and hear each other through your computer’s camera.
- Chat: Click this button to exchange text messages with somebody on Teams Chat.
- Click the Chat button, and, when the New Chat window appears, enter the person’s name, email, or phone number in the To: box in the window’s upper-left corner.
When the box appears at lower-edge of the New Chat window, type your message and press the Enter key.
The recipient sees your message in their Teams Chat app. When they type a message in response, it appears in your Teams Chat app window, and you can begin typing messages to each other.
The Teams Chat app looks and behaves much like the text messages you’ve already been sending on your smartphone, Facebook Messenger, and similar “instant messaging” programs.
Here are a few of its quirks to keep in mind:
- If you try to send a message to somebody new, that person sees an onscreen message allowing them to either accept or block your chat request. That helps weed out stalkers, weirdos, and bored teenagers.
- Before starting a video chat, as described in the next section, you may want to use the app’s Chat portion first, just to make sure they’re awake and ready to chat face to face.
- To end your chat, close the Teams Chat app window by clicking the X in its upper-right corner.
Holding video chats
Video chats, as opposed to text chats, send a live video of your face to the app of the other person. That lets you see each other as you talk, handy for face-to-face meetings where text messages can lose their nuance or become too long to type.
If you’ve never loaded Teams Chat before, jump back to this chapter’s “Starting Teams Chat” section. You need to set up an email account and/or a phone number to begin the process.
Here’s how to load Teams Chat, find your contact, and begin video chatting through your computers’ cameras.
- Click the Teams Chat icon on the taskbar.
A pop-up window appears, shown earlier in Figure 10-11, with two buttons on the top:
- Meet: Click the Meet button to start a video chat: a way to see and hear each other through your computer’s camera.
- Chat: Covered in the previous section, click this button to simply exchange text messages with somebody.
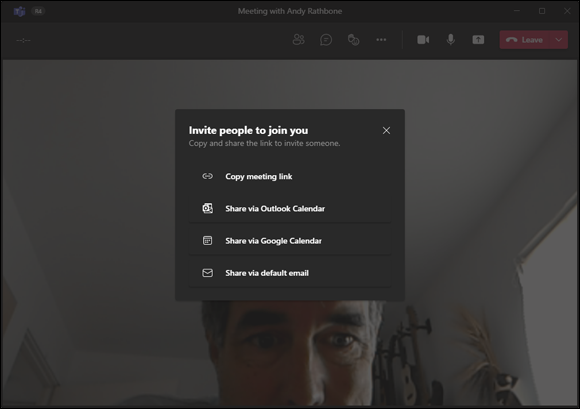
FIGURE 10-11: Choose how to invite people to your meeting.
Click the Meet button, and, when the Meeting window appears, click the Join Now button.
At this point, the Meeting window shows only your own smiling face. When you click the Join Now button, the Invite People to Join You window appears, shown in Figure 10-11. The window lets you invite people to your lonely video chat in four ways:
- Copy Meeting Link: Often the easiest option, this copies a link to your Clipboard, where you can send the link to the person you’d like to see. You can email it to them, send it to them as an instant message with your phone, or write it down on paper and hand it to them. When the recipient visits that link with their web browser, they can join your meeting and begin talking.
- Share via Outlook Calendar: Outlook Calendar owners can use this option to share the meeting’s link through Outlook Calendar.
- Share via Google Calendar: Similarly, Google Calendar owners can use this option to share the meeting’s link through Google Calendar.
- Share via default email: This fetches whatever program you currently use for email. Then it opens a new mail, places the link inside, and lets you fill in the recipient’s email address, ready for you to mail the video chat invitation.
At this point, you wait until somebody clicks the link you’ve sent. When Teams Chat appears on their screen, they click the Join Now button to start joining the meeting.
When a pop-up messages appears on your screen, saying that your invited guest is “waiting in the lobby,” click the Admit button to let them join your meeting.
The other person (or people, if you’ve invited more than one) then appears onscreen, shown in Figure 10-12, and you can begin talking to each other.
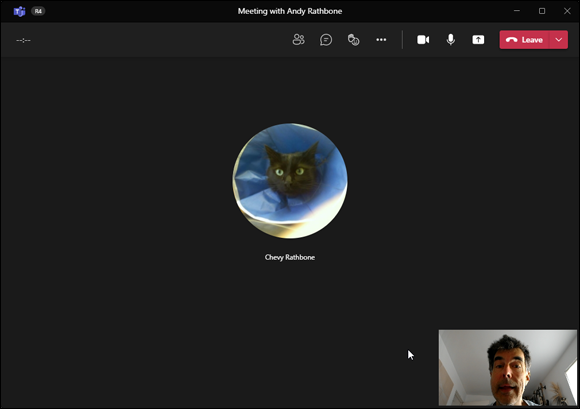
FIGURE 10-12: When video chatting, your own face is reduced to a small square in the screen’s lower-right corner.
Video chatting has a few more intricacies than simply swapping text messages, as described in the previous section. Keep these things in mind for the best video chat experience:
- Near the upper-right edge of the Teams Chat video window, icons for both a microphone and a video camera can be toggled on or off with a click. If nobody can hear you, click the microphone icon to turn it on. Similarly, if nobody can see you — click the video camera icon to start sending video.
- The face of your invited guest fills the screen on your PC, and your own face is reduced to the small square in the screen’s lower-right corner. These are reversed on screen of the guest you’ve invited to the meeting.
- If you don’t want somebody to see you while wearing your hair curlers or tooth whitening strips, feel free to click the video camera icon to turn it off. Then people will only see the photo attached to your email address, as shown earlier in Figure 10-12.
- When starting a meeting, you need to wait for everybody to receive the link and join the meeting. This is why scheduling video chats for a certain time and day works better than waiting until somebody receives your email or text message.
- When attending a group meeting being led by somebody giving a presentation, it’s common courtesy to mute your microphone by clicking the microphone icon at the screen’s top edge. If you want to speak to everybody or ask a question, click the microphone icon again to unmute it.
- When you’re through chatting, leave the meeting by clicking the Leave button the upper-right corner of the Teams Chat window.
- Be sure to feed the cat before you begin a work chat. Otherwise, your cat may become an unwitting participant at the board meeting.