Chapter 9
Cruising the Web
IN THIS CHAPTER
![]() Finding out about internet service providers
Finding out about internet service providers
![]() Connecting to the internet wirelessly
Connecting to the internet wirelessly
![]() Navigating the web with Microsoft Edge
Navigating the web with Microsoft Edge
![]() Finding information on the internet
Finding information on the internet
![]() Understanding plug-ins
Understanding plug-ins
![]() Saving information from the internet
Saving information from the internet
![]() Troubleshooting problems
Troubleshooting problems
Even when being installed, Windows starts reaching for the internet, hungry for any hint of a connection. After connecting, Windows quickly downloads updates to make your PC run more smoothly. Other motives are less pure: Windows also checks in with Microsoft to make sure that you’re not installing a pirated copy.
To help you visit the internet, Windows 11 includes a web browser named Microsoft Edge, a familiar sight for Windows 10 upgraders. Fast, sleek, and recently updated with a new look, Microsoft Edge helps you move in and out of today’s internet-dependent world.
This chapter explains how to find and fire up Microsoft Edge, connect with the internet, visit websites, and find what you’re seeking online.
For ways to keep out the bad stuff, be sure to flip ahead to Chapter 11. It’s a primer on safe computing that explains how to avoid the web’s bad neighborhoods, which harbor viruses, spyware, hijackers, and other internet parasites.
What’s an ISP, and Why Do I Need One?
Everybody needs three things to connect with the internet and visit websites: a computer, web browser software, and an Internet Service Provider (ISP).
You already have the computer, be it a tablet, laptop, or desktop PC. And the newly enhanced browser, Microsoft Edge, handles the software side.
That means most people need to find only an ISP. Most coffee shops, airports, and hotels let you connect wirelessly, and often for free. At home, though, you must pay an ISP for the privilege of surfing the web. When your computer connects to your ISP’s computers, Windows automatically finds the internet, and you’re ready to surf the web.
Choosing an ISP is fairly easy because you’re often stuck with whichever ISPs serve your particular geographic area. Ask your friends and neighbors how they connect and whether they recommend their ISP. Call several ISPs serving your area for a rate quote and then compare rates. Most bill on a monthly basis, so if you’re not happy, you can always switch.
- Although ISPs charge for internet access, you don’t always have to pay. More and more public businesses share their internet access for free, usually through a wireless connection. If your phone, laptop, or tablet includes wireless support, and most do, you can browse the internet whenever you’re within range of a free wireless signal. (I cover wireless in the next section.)
- Although a handful of ISPs charge for each minute you’re connected, most charge from $30 to $100 a month for service. (Some also offer faster connection speeds for more money.) Make sure that you know your rate before hopping aboard, or you may be unpleasantly surprised at the month’s end. Some ISPs offer bundled plans that include not only internet access, but television channels and telephone service.
- ISPs let you connect to the internet in a variety of ways. The slowest ISPs require a dialup modem and an ordinary phone line; they’re still a lifeline for some rural areas. (Satellite access also works well in rural areas.) Faster and the most popular are broadband connections: special DSL or ISDN lines provided by some phone companies, and the even faster cable modems supplied by your cable television company. Some providers offer speedy fiber optic cable. You’re only limited by what’s offered in your geographic area.
 You need to pay an ISP for only one internet connection. You can share that single connection with any other computers, cellphones, smart TVs, refrigerators, thermostats, lightbulbs, personal assistants like Amazon’s Alexa, and other internet-aware gadgetry in your home, office, or kitchen. (I explain how to share an internet connection by creating your own wired or wireless network in Chapter 15.)
Connecting Wirelessly to the Internet
Windows constantly searches for a working internet connection, whether your computer connects through a cable or scans the airwaves for a Wi-Fi (wireless) connection. If your computer finds a Wi-Fi connection that you’ve previously connected with, you’re set: Windows quickly connects to it, passes the news along to Microsoft Edge, and you’re ready to visit the web.
When you’re traveling, however, the wireless networks around are often new, forcing you to find and authorize these new connections.
To connect to a nearby wireless network for the first time (whether it’s one in your own home or in a public place), follow these steps:
 Click the taskbar’s Wi-Fi icon (shown in the margin) near the clock.
 Don’t see the Wi-Fi icon? If you’re not connected to the internet, you see the sad looking No internet Access icon (shown in the margin). Click that icon, instead.
No matter which icon you click, a cluttered menu pops up listing your wireless network status in its upper-left corner, shown in Figure 9-1.
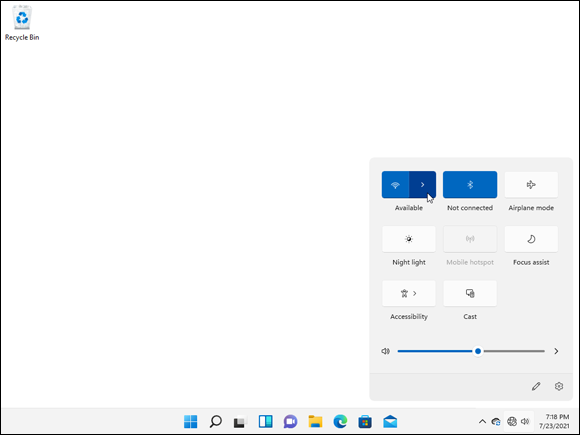
FIGURE 9-1: Click the Wi-Fi (or No Network) icon to see the pop-up menu.
Click the right arrow next to the pop-up menu’s Wi-Fi icon.
Windows lists all the nearby wireless networks, as shown in Figure 9-2.
The networks are ranked by signal strength, with the strongest network listed at the top.
Choose to connect to a network by clicking its name and clicking the Connect button that appears.
If you’re connecting to an unsecured network — a network that doesn’t require a password — you’re finished. Windows warns you about connecting to an unsecured network, but a click or tap of the Connect button lets you connect anyway. (Don’t do anything involving money or entering passwords on an unsecured connection.)
For a more secure connection, skip the unsecured networks. Instead, ask your hotel staff, coffee shop barista, or airport staff for the password to their secure network. Then head to the next step.
Unless you specifically don’t want to connect to that network automatically, leave the adjacent Connect Automatically check box checked. This tells Windows to connect automatically to that network whenever you’re within range, sparing you from following these steps each time.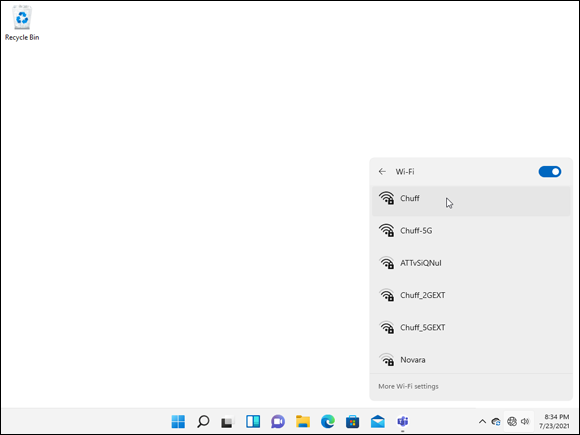
FIGURE 9-2: Windows shows the wireless networks within your range.
Enter a password if needed.
If you try to connect to a security-enabled wireless connection, Windows asks you to enter a network security key — technospeak for password. If you’re at home, here’s where you type in the same password you entered into your router when setting up your wireless network.
If you’re connecting to somebody else’s password-protected wireless network, ask the network’s owner for the password. You may need to pull out your credit card at the front counter in some hotels and coffee shops; sometimes they charge for access.
If connecting for the first time, choose whether you want to share your files with other people on the network.
If you’re connecting on your own home or office network, choose “Yes, turn on sharing and connect to devices.” Windows makes your network private, meaning you may safely share files with others on your private network, as well as connect to shared devices, such as printers.
If you’re connecting in a public area, by contrast, always choose “No, don’t turn on sharing or connect to devices.” Windows makes your network Public, meaning that you can connect with the internet, but other networked computers can’t connect to your computer to view or access your files. This helps keep out snoops.
If you’re still having problems connecting, try the following tips:
- When Windows says that it can’t connect to your wireless network, it offers to bring up the Network Troubleshooter. The Network Troubleshooter mulls over the problem and then usually says something about the signal being weak. It’s really telling you this: “Move your computer closer to the wireless transmitter.”
- At some businesses, your browser will open to a Terms of Services agreement. There, you must agree to the company’s terms before being allowed to browse further.
- If you’re in a hotel room, moving your computer closer to a window may help you find a stronger wireless signal. (It might even pick up a wider variety of available wireless networks.) If you don’t mind moving outside your room, then wander down to the lobby or hotel coffee shop to find a better connection.
- If you can’t connect to the secured network you want, try connecting to one of the unsecured networks. Unsecured networks work fine for casual browsing on the internet.
Browsing the Web with Microsoft Edge
Built for speedy browsing of modern websites, Microsoft Edge loads quickly and displays web pages as quickly as your connection allows. Part of its speed and clean look comes from its limitations though. The browser hides its menus in order to showcase every website’s content. This makes navigation challenging.
![]() To open Microsoft Edge, click its icon (shown in the margin) on the taskbar along the bottom of your screen. The browser opens, as shown in Figure 9-3, filling the screen with either your last-viewed site or a launch screen that shows the top news, weather, and links to popular sites.
To open Microsoft Edge, click its icon (shown in the margin) on the taskbar along the bottom of your screen. The browser opens, as shown in Figure 9-3, filling the screen with either your last-viewed site or a launch screen that shows the top news, weather, and links to popular sites.
The browser hides most of its menus behind cryptic icons, so I’ve called them all out in Figure 9-3 and neatly labeled them here:
 Tab actions: This new icon offers three tricks from a drop-down menu. You can choose between these three things:
 - Place your tabs vertically along the left edge instead of the top edge.
- Retrieve recently closed tabs.
- Add your current group of open tabs to a collection, a name for a group of tabs that can be opened with one click.
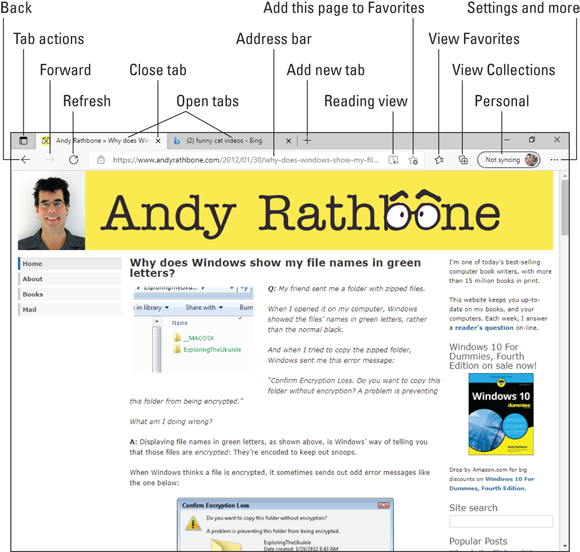
FIGURE 9-3: Microsoft Edge lets you view several websites, each in its own tab.
 Back: This back-arrow icon near the upper-left corner lets you revisit the page you just visited.
 Forward: A click on this icon lets you return to the page you just left.
 Refresh: Handy when viewing sites with breaking news, this icon reloads the currently viewed page, gathering the latest material available.
- Tabs: Your currently open sites appear as tabs along the window’s top edge, letting you revisit them with a click. (Or you can close them by clicking the X in their tab’s right corner.)
- Address bar: Click the name of the currently displayed site, which usually appears along the site’s top edge, and the Address bar appears, letting you type the address of a website you’d like to visit. Don’t know where to go? Type a few descriptive words, and the browser searches for and displays possible matches. Click any match to visit the site.
 Add New Tab: Clicking the plus sign icon, which lives just to the right of your currently open tab or tabs, fetches a blank window with an Address bar along the top. There, you can type either the address of a coveted website or a few search terms for the browser to fetch.
 Reading view: When available, this icon changes the current website’s layout to resemble a page of a book. How? When you click the icon, Microsoft Edge ditches lots of the ads and formatting, leaving only text and pertinent photos. (It’s a handy way to print a website, too.)
 Add to Favorites: Click the star icon to place your currently viewed page onto your list of Favorites, a collection of your frequently visited sites.
 Favorites: This icon lets you revisit websites you’ve marked as Favorites.
 Collections: When you save a group of tabs as a collection with the Tab Actions icon, described earlier in this list, the groups can be recalled with a click on this icon.
 Personal: When this little box says, “Not Syncing,” your favorite websites are saved on Microsoft Edge, but they aren’t linked to your Microsoft account. To make your favorites to appear whenever you sign into any PC with your Microsoft account, click this button and choose Turn On Sync from the drop-down menu. (This option works best for people who own more than one desktop PC, laptop, or tablet.)
 Settings and more: Clicking this icon with three dots fetches a drop-down list with options for opening a new window, changing the current website’s text size, sharing a site with friends, searching for a word on the current page, printing the page, pinning the page to the Start menu, and a slew of other settings.
When you’re on the go and looking for quick information, Microsoft Edge’s speedy browser and its simple menus might be all you need. (If you’re looking to push Microsoft Edge to its edge, click the Settings and More icon; you may be surprised at all the options.)
If you’ve clicked or tapped the wrong button but haven’t yet lifted your finger, stop! Commands don’t take effect until you complete the click on a button by releasing your finger. Keep holding down your finger or mouse button but slide the pointer or finger away from the wrong button. Move safely away from the button and then lift your finger.
Moving from one web page to another
Web pages come with specific addresses, just like homes do. Any web browser lets you move among those addresses. No matter which browser you use, they all let you move from one page to another in any of three ways:
- By pointing and clicking a button or link that automatically whisks you away to another page
- By typing a complicated string of code words (the web address) into the Address bar of the web browser and pressing Enter
- By clicking the navigation buttons on the browser’s toolbar, which is usually at the top of the screen
Clicking links
The first way to navigate the web is by far the easiest. Look for links — highlighted words or pictures on a page — and click them.
![]() For example, see how the mouse pointer turned into a hand (shown in the margin) as it pointed at the word Books in Figure 9-4? That hand means the thing you’re pointing at (be it a word, button, or picture) is clickable. In this instance, I can click the word Books to see a web page with more information about that subject. The mouse pointer morphs into a hand whenever it’s over a link. Click any linked word to see pages dealing with that link’s particular subject.
For example, see how the mouse pointer turned into a hand (shown in the margin) as it pointed at the word Books in Figure 9-4? That hand means the thing you’re pointing at (be it a word, button, or picture) is clickable. In this instance, I can click the word Books to see a web page with more information about that subject. The mouse pointer morphs into a hand whenever it’s over a link. Click any linked word to see pages dealing with that link’s particular subject.
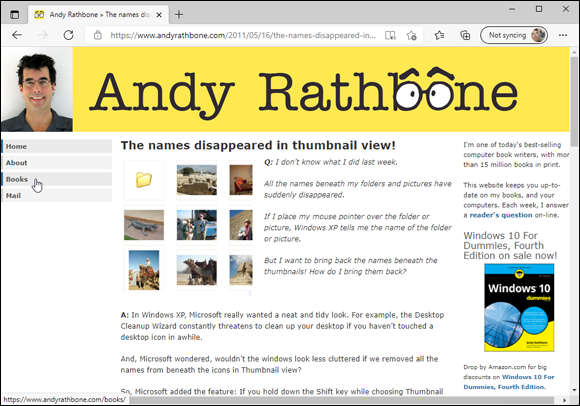
FIGURE 9-4: When the mouse pointer becomes a hand, click the word or picture to go to a web page with more information about that item.
Typing web addresses in the Address bar
The second method of web surfing is more difficult. If a friend gives you a napkin with a cool website’s address written on it, you need to type the website’s address into your browser’s Address bar — the text-filled bar near the top of the browser window. You’ll do fine as long as you don’t misspell anything.
See the address for my website along the top of Figure 9-3? I typed andyrathbone.com into the Address bar. When I pressed Enter, Microsoft Edge scooted me to my website. (You don’t need to type the http://www part, thank goodness.)
Using the Microsoft Edge menu icons
Finally, you can maneuver through the internet by clicking various icons on Microsoft Edge’s stripped-down menus, as described in the previous section and Figure 9-3. Click the browser’s Back arrow icon, for example, to return to a page you just visited.
Hover your mouse pointer over a confusing item in any program, and a pop-up usually appears, explaining that icon’s purpose in life.
Making Microsoft Edge open to your favorite site
When you open the desktop’s web browser, it needs to show you something right away. Well, that something can be any website you want. In computer terms, that’s called your home page, and you can tell Microsoft Edge to use any site you want.
Naturally, Microsoft wants Microsoft Edge to open to a Microsoft website. To make Microsoft Edge open to your own favorite site, you need to jump through these convoluted hoops:
Visit your favorite website or websites.
Choose any sites you like. If you choose Google News (
http://news.google.com), for example, Microsoft Edge always opens with the latest headlines from the Google News site. Feel free to open more than one favorite site in other tabs.- Click the Settings and More icon in Microsoft Edge, and choose Settings from the drop-down menu.
The Settings pane appears, listing your options.
In the When Edge Starts section, click the Use All Open Tabs button, as shown in Figure 9-5.
Choosing this option tells Microsoft Edge to remember your currently open tabs and reopen them the next time you launch the browser. To leave this page, close the tab by clicking the X in the top of the tab named Settings. Your changes take place immediately.

FIGURE 9-5: Click the Use All Open Tabs button.
After Microsoft Edge opens with your chosen home page or pages, you can still browse the internet, searching for topics by typing them into the Address bar or by simply pointing and clicking different links.
Just as your browser’s home page is the site you see when your browser opens, a website’s home page is its “cover,” like the cover of a magazine. Whenever you navigate to a website, you usually start at the site’s home page and begin browsing from there.
Revisiting favorite places
Sooner or later, you’ll stumble across a web page that’s indescribably delicious. To make sure that you can find it again later, add it to your list of favorite pages. To add the page you’re currently viewing to your Favorites list, follow these steps:
- Click the Add to Favorites icon (shown in the margin) at the end of the site’s address along the top of your Microsoft Edge browser.
The Favorite Added box appears, listing the site’s name. (Feel free to edit the name to make it more descriptive.)
Click the Done button.
Click the Done button, and the name is added to your Favorites list.
![]() To return to a favorite page, click Microsoft Edge’s Favorites icon (shown in the margin). Your list of added sites appears, letting you return to one with a click on its name.
To return to a favorite page, click Microsoft Edge’s Favorites icon (shown in the margin). Your list of added sites appears, letting you return to one with a click on its name.
To remove a disappointing site from your list of favorites, click Microsoft Edge’s Favorites icon. When the list of favorite sites drops down, right-click the disappointing site’s name and choose Delete from the drop-down menu.
Finding things on the internet
When looking for something in a text book, you usually flip back to the index and start searching. The same holds true for the internet because you need an index to ferret out that piece of information you’re after.
To help you out, Microsoft Edge lets you consult a search engine, a service that contains a vast index of internet sites. To search for something, head for the Address bar — that space where you normally type in the address of the website you want to visit.
Instead, though, type your search term — exotic orchids, for example — directly into the Address bar, and press Enter.
Microsoft Edge fires your search off to Bing, Microsoft’s own search engine, and spits out names of websites dealing in exotic orchids. Click a website’s name to drop by.
Don’t like Bing handling your search needs? You can change that search engine to Google (www.google.com), DuckDuckGo (www.duckduckgo.com), or any other search engine you like.
Sometimes, just visiting another search engine triggers a pop-up message on your screen asking if you’d like to make that your default search engine. Click the Yes or Okay button if it’s your favorite search engine. Otherwise, follow these complicated steps to change Microsoft Edge’s Bing to your own favorite search engine:
- Click the Settings and More icon (shown in the margin), located in Microsoft Edge’s upper-right corner, and choose Settings from the drop-down menu that appears.
The Settings window appears as a new tab in Microsoft Edge.
From the Settings tab’s left edge, click the Privacy, Search, and Services entry.
Yet another menu full of settings appears.
In the Services section of the new settings menu, click the Address Bar and Search category.
The Address Bar and Search menu appears.
Click the drop-down menu adjacent to the words
Search Engine Used in Address Bar, and choose your preferred search engine from the drop-down menu.Your change takes place immediately. To close the Settings tab, click the little X on the tab. (It's the same as closing a tab that shows a website.)
Microsoft Edge then replaces Bing with your newly selected search provider.
Finding More Information on a Website
Clicking a website’s links lets you jump easily to other places online. But what if you want to know more about something that doesn’t have a clickable link? For example, what if you spot an address for a paleo-diet-friendly donut shop and want to see it on a map? What if you see a term you don’t understand, and you simply want more information about it?
Microsoft Edge helps you find extra information about things you find online.
Here’s how it works:
When visiting a web page in Microsoft Edge, select the terms you want to explore.
Double-click a word or term, for example, to select it; Microsoft Edge highlights your chosen selection. Or point at the beginning of a phrase, hold down the mouse button, and — while holding down the mouse button — point at the end of a phrase. Release the mouse button, and you’ve highlighted the entire phrase.
I provide more detail on how to select items in Chapter 6.
Right-click the highlighted information, and choose Search the Web For from the pop-up menu.
Microsoft Edge sends your highlighted term to your chosen search engine, searches the internet for pertinent information, and then displays it, as shown in Figure 9-6.

FIGURE 9-6: Microsoft Edge lets you find information about terms found online.
Saving Information from the Internet
The internet places a full-service library inside your house, with no long checkout lines. And just as every library comes with a copy machine, Microsoft Edge provides several ways for you to save interesting tidbits of information for your personal use.
This section explains how to copy something from the internet onto your computer, whether it’s an entire web page, a single picture, a sound or movie, or a program.
I explain how to print a web page (or a snippet of information it contains) in Chapter 8. But for those who hate flipping pages, try to turn on Microsoft Edge’s Reader View, right-click a blank portion of the web page, and then choose Print from the pop-up menu.
Saving a web page
Hankering for a handy Fahrenheit/Centigrade conversion chart? Need that Sushi Identification Chart for dinner? Want to save the itinerary for next month’s trip to Norway? When you find a web page with indispensable information, sometimes you can’t resist saving a copy onto your computer for further viewing, perusal, or even printing at a later date.
To save a web page, right-click a blank portion of the page, choose Save As from the pop-up menu, and click the Save button.
![]() Microsoft Edge saves a copy of the coveted web page in your
Microsoft Edge saves a copy of the coveted web page in your Downloads folder. To visit your Downloads folder, open File Explorer with a click on its taskbar icon, and click Downloads from File Explorer's left pane. (I explain how to navigate File Explorer in Chapter 5.)
Be aware, however, that your saved page won’t change, even if the actual page on the internet is updated. That’s why saving pages is best for things that won’t change, like charts, or finalized itineraries. If you want consistently up-to-date information, just add the site to your Favorites list, covered earlier in this chapter.
Saving text
To save just a little of a web page’s text, select the text you want to grab, right-click it, and choose Copy. (I explain how to select, copy, and paste text in Chapter 6.) Open your word processor, paste the text into a new document, and save it in your Documents folder with a descriptive name.
Saving a picture
As you browse through web pages and spot a picture that’s too good to pass up, save it to your computer: Right-click the picture, and choose Save Image As, as shown in Figure 9-7.

FIGURE 9-7: Right-click the coveted picture, and choose Save Image As from the pop-up menu.
The Save As window appears, letting you enter a new filename for the picture, if desired. Click Save to place your pilfered picture in the folder of your choice, usually Downloads or Pictures.
The crowded pop-up menu shown in Figure 9-7 offers other handy options, letting you choose to open just that image in a new tab, copy the image to the Windows Clipboard for pasting into another program, or search the web for other versions of the image.
Remember the little picture by your name on the Windows Start menu? Feel free to use any picture from the internet. Right-click the new picture, and save it to your Pictures folder. Then use the Settings app (see Chapter 2) to transform that picture into your new user account picture.
Downloading a program, song, or other type of file
Microsoft Edge makes it a little easier to download files from the internet. Best yet, it's easier than ever to find the files after you download them.
To download something from a website, click the link to the item or click an adjacent Download button (if one is available). Microsoft Edge downloads the item and automatically places it into your Downloads folder for easy retrieval. The file usually arrives within a few seconds.
 When choosing the Download button, take some extra time to make sure you’re clicking the correct button. Many sites deliberately try to confuse you into downloading something else, either spyware, a virus, or something else that gives the website a payback.
You can find your downloaded item in either of two ways:
 Downloads folder: Downloaded items flow into your
 Downloadsfolder. To find them, open File Explorer (shown in the margin) from the taskbar. When File Explorer opens, click theDownloadsfolder listed in the program's left pane. TheDownloadsfolder appears, showing all your downloaded items.- Microsoft Edge’s download queue: Click the Settings and More icon (shown in the margin) in Microsoft Edge. When the Settings menu drops down, click the Downloads button. The Downloads tab appears, listing all your downloaded files for one-click access. You can also click the menu’s Open Downloads Folder link to head straight for the
Downloadsfolder mentioned in the preceding bullet.
![]() Many downloaded files come packaged in a tidy folder with a zipper on it, known as a ZIP file. Windows treats them like normal folders, so you can just double-click them to see inside them. (The files are actually compressed inside that folder to save download time, if you care about the engineering involved.) To extract copies of the zipped files, right-click the zipped file and choose Extract All.
Many downloaded files come packaged in a tidy folder with a zipper on it, known as a ZIP file. Windows treats them like normal folders, so you can just double-click them to see inside them. (The files are actually compressed inside that folder to save download time, if you care about the engineering involved.) To extract copies of the zipped files, right-click the zipped file and choose Extract All.