Chapter 8
Printing and Scanning Your Work
IN THIS CHAPTER
![]() Printing and scanning from the Start menu’s apps
Printing and scanning from the Start menu’s apps
![]() Printing files, envelopes, and web pages from the desktop
Printing files, envelopes, and web pages from the desktop
![]() Adjusting how your work fits on a page
Adjusting how your work fits on a page
![]() Troubleshooting printer problems
Troubleshooting printer problems
Occasionally you’ll want to take text or an image away from your PC’s whirling electrons and place it onto something more permanent: a piece of paper. This chapter tackles that job by explaining all you need to know about printing.
I explain how to print just the relevant portions of a website — without the other pages, the ads, the menus, and the printer-ink-wasting images.
You discover how to print from the Start menu’s gang of apps as well as from the desktop’s programs.
And should you find yourself near a printer spitting out 17 pages of the wrong thing, flip ahead to this chapter’s coverage of the mysterious print queue. It’s a little-known area that lets you cancel documents before they waste all your paper. (I explain how to set up a printer in Chapter 12.)
When you need to turn a piece of paper or printed photo into a file on your PC, check out the last section of this chapter. It provides a rundown on the Windows Scan app. When combined with a scanner, this app transforms maps, receipts, photos, and any other paper items into digital files that you can store on your PC.
Printing from a Start Menu App
Although Microsoft now tries to pretend that Start menu apps and desktop programs are the same, apps often behave quite differently than traditional desktop programs.
Many of the apps can’t print, and those that do allow printing don’t offer many ways to tinker with your printer’s settings. Nevertheless, when you must print something from a Windows app, following these steps ensures the best chance of success:
From the Start menu, load the app containing information you want to print.
Cross your fingers in the hopes that your app is one of the few that can print.
Click the app’s icon for either Settings, Print, or More to see the drop-down menus, and click the Print option.
 A click on these three striped lines, known informally as the hamburger menu, fetches a drop-down menu.
 Similarly, a click on an icon of three dots (shown in the margin) found in some apps also fetches a drop-down menu. (The three dots menu is sometimes called a More or Expand menu, because clicking it expands a menu to display more options.)
 Just to confuse things, some apps offer a dedicated Print icon, shown in the margin.
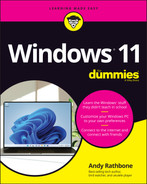
Whether you click the three striped lines, the three dots, or click the Print icon, the app’s Print menu appears, shown in Figure 8-1. (If the word Print isn’t listed on the drop-down menu or is grayed out, that app probably isn’t able to print.)
When you spot your printer from the list that appears, click its name to route your work to that printer.
Click the Printer box, and a drop-down menu appears, listing any printers available to your computer. Click the name of the printer you want to handle the job.
 Windows 11 lets you “print” your work to a new PDF file, a file format that’s accessible from a wide variety of phones, computers, tablets, and other devices. To print your work to a PDF file, click the name of the currently listed printer, and choose Microsoft Print to PDF from the drop-down menu.
Make any final adjustments.
The Print window sometimes offers a preview of what you’re printing, with the total number of pages listed above. To browse the pages you’re about to print, click the Forward or Backward arrows above the preview.
Not enough options? Then click the More Settings link at the bottom of the left pane to see options offered by your particular printer model.
Click the Print button.
Windows shuffles your work to the printer of your choice, using the settings you chose in Step 4.
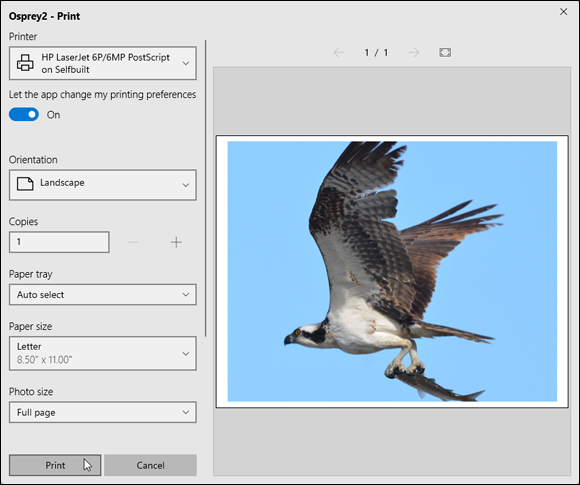
FIGURE 8-1: Choose your print options, or click the More Settings link for additional options.
Although you can print from a few apps, you’ll eventually run into limitations:
 Most apps don’t offer many printing options. You can’t print a blank monthly calendar from your Calendar app, for example, but you can print a daily, weekly, or monthly itinerary.
- The More Settings link, described previously in Step 4, lets you choose between Portrait and Landscape mode, as well as choose a printer tray. However, you usually won’t find more detailed adjustments, such as choosing margins or adding headers and footers.
In short, although you can print from a few apps, your results will be quick and dirty. Desktop programs, described in the rest of this chapter, usually offer much more control over printing jobs.
Printing Your Masterpiece from the Desktop
Built for power and control, the desktop offers many more options when it comes to printing your work. But that power and control often mean wading through a sea of menus.
When working from the desktop, Windows shuttles your work to the printer in any of a half-dozen ways. Chances are good that you’ll be using these methods most often:
- Choose Print from your program’s File menu.
- Click the program’s Print icon, usually a tiny printer.
- Right-click your unopened document’s icon, and choose Print.
- Click the Print button on a program’s toolbar.
- Drag and drop a document’s icon onto your printer’s icon.
If a window appears, click the OK or Print button, and Windows immediately begins sending your pages to the printer. Take a minute or so to refresh your coffee. If the printer is turned on (and still has paper and ink), Windows handles everything automatically, printing in the background while you do other things.
If the printed pages don’t look quite right — perhaps the information doesn’t fit on the paper correctly or it looks faded — then you need to fiddle around with the print settings or perhaps change the paper quality, as described in the next sections.
- To print a bunch of documents quickly, select all their icons. Then right-click the selected icons, and choose Print. Windows quickly shuttles all of them to the printer, where they emerge on paper, one after the other.
- When printing with an inkjet printer, faded colors usually mean you need to replace your printer’s color inkjet cartridge. You can buy replacement cartridges both online and at most office supply stores.
- Still haven’t installed a printer? Flip to Chapter 12, where I explain how to plug one into your computer and make Windows notice it.
Adjusting how your work fits on the page
In theory, Windows always displays your work as if it were printed on paper. Microsoft’s marketing department calls it What You See Is What You Get, forever disgraced with the awful acronym WYSIWYG and its awkward pronunciation: “wizzy-wig.” If what you see onscreen isn’t what you want to see on paper, a trip to the program’s Page Setup window, shown in Figure 8-2, usually sets things straight.
On desktop programs, the Page Setup window offers many formatting options; on apps, by contrast, the similar Print window offers a more limited version (refer to Figure 8-1). But they both offer several ways to flow your work across a printed page (and subsequently your screen). Page Setup windows differ among programs and printer models, but the following list describes the options that you’ll find most often and the settings that usually work best:
- Paper Size: This option lets your program know what size of paper currently lives inside your printer. Leave this option set to Letter for printing on standard, 8.5-x-11-inch sheets of paper. Change this setting only if you’re using legal-size paper (8.5 x 14), envelopes, or other paper sizes. (The nearby sidebar, “Printing envelopes without fuss,” contains more information about printing envelopes.)
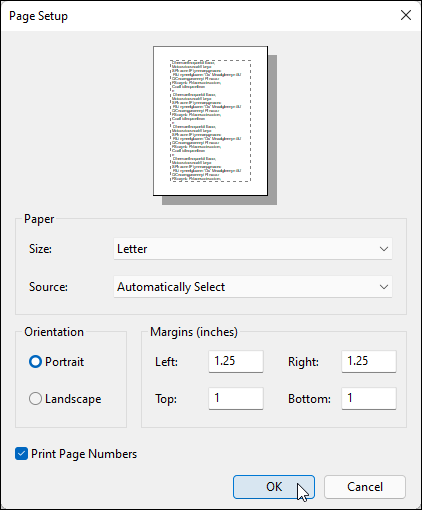
FIGURE 8-2: The Page Setup window allows you to adjust the way your work fits onto a piece of paper.
- Source: Choose Automatically Select or Sheet Feeder unless you’re using a fancy printer that accepts paper from more than one printer tray. People who have printers with two or more printer trays can select the tray containing the correct paper size. Some printers offer Manual Paper Feed, making the printer wait until you slide in that single sheet of paper.
- Header/Footer: Type secret codes in these boxes to customize what the printer places along the top and bottom of your pages: page numbers, titles, and dates, for example, as well as their spacing. Unfortunately, different programs use different codes for their header and footer. If you spot a little question mark in the Page Setup window’s upper-right corner, click it and then click inside the Header or Footer box for clues to the secret codes.
- Orientation: Leave this option set to Portrait to print normal pages that read vertically like a letter. Choose Landscape only when you want to print sideways, which is a handy way to print large photos and wide spreadsheets. (If you choose Landscape, the printer automatically prints the page sideways; you don’t need to slide the paper sideways into your printer.)
- Margins: Feel free to reduce the margins to fit everything on a single sheet of paper. Or enlarge the margins to turn your six-page term paper into the required seven pages.
- Printer: If you have more than one printer installed on your computer or network, click this button to choose which printer should handle the job. Click here to change that printer’s settings as well, a job discussed in the next section.
When you’re finished adjusting settings, click the OK button to save your changes. (Click the Print Preview button, if it’s offered, to make sure that everything looks right.)
To find the Page Setup box in some apps and programs, click the little arrow next to the program’s Printer icon and choose Page Setup from the menu that drops down.
Adjusting your printer’s settings
When you choose Print from many programs, Windows offers one last chance to spruce up your printed page. The Print window, shown in Figure 8-3, lets you route your work to any printer installed on your computer or network. While there, you can adjust the printer’s settings, choose your paper quality, and select the pages (and quantities) you’d like to print.
FIGURE 8-3: The Print window lets you choose your printer and adjust its settings.
You’re likely to find these settings waiting in the Print window:
Select Printer: Ignore this option if you have only one printer, as Windows will choose it automatically. If your computer has access to several printers, click the one that should receive the job. If you have a fax built into your printer, computer, or network, click Fax to send your work as a fax.
The mysterious printer called Microsoft XPS Document Writer sends your work to a specially formatted file, usually to be professionally printed or distributed. Chances are good that you’ll never use it.- Page Range: Select All to print your entire document. To print just a few of its pages, select the Pages option and enter the page numbers you want to print. For example, enter 1-4, 6 to leave out page 5 of a 6-page document. If you’ve highlighted a paragraph, choose Selection to print that particular paragraph — a great way to print the important part of a web page and leave out the rest.
- Number of Copies: Most people leave this set to 1 copy, unless everybody in the boardroom wants their own copy. You can choose Collate only if your printer offers that option. (Most don’t, leaving you to sort the pages yourself.)
- Preferences: Click this button to see a window like the one in Figure 8-4, where you can choose options specific to your own printer model. The Printing Preferences window’s Layout and Paper/Quality tabs let you select different grades of paper, choose between color and black and white, set the printing quality, and make last-minute corrections to the page layout. (This option varies greatly according to your printer model, so yours may look different.)
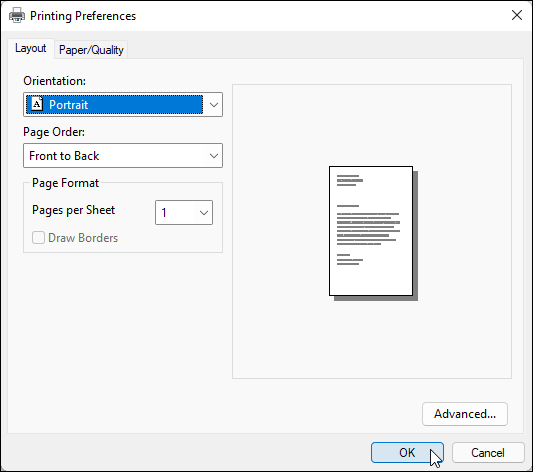
FIGURE 8-4: The Printing Preferences window lets you change settings specific to your printer model.
Canceling a print job
Just realized you sent the wrong 26-page document to the printer? So you panic and hit the printer’s Off button. Unfortunately, many printers automatically pick up where they left off when you turn them back on, leaving you or your co-workers to deal with the mess.
To purge the mistake from your printer’s memory, follow these steps:
From the desktop’s taskbar, right-click your printer’s icon and choose your printer’s name from the pop-up menu.
To see your printer’s icon, you may need to click the little upward-pointing arrow to the left of the taskbar’s icons next to the clock.
When you choose your printer’s name, the handy print queue window appears, as shown in Figure 8-5.
- Right-click your mistaken document, and choose Cancel to end the job. If asked to confirm, click the Yes button. Repeat with any other listed unwanted documents.
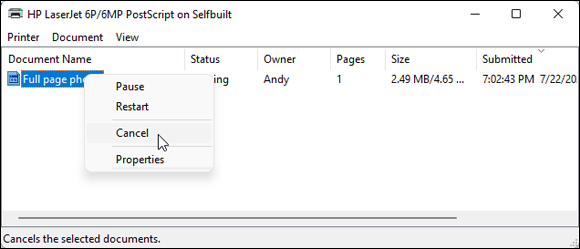
FIGURE 8-5: Use the print queue to cancel a print job.
The print queue can take a minute or two to clear itself. (To speed things up, click the View menu and choose Refresh.) When the print queue is clear, turn your printer back on; it won’t keep printing that same darn document.
- The print queue, also known as the print spooler, lists every document waiting patiently to reach your printer. Feel free to change the printing order by dragging and dropping documents up or down the list. (You can’t move anything in front of the currently printing document though.)
- Sharing your printer on the network? Print jobs sent from other PCs sometimes end up in your computer’s print queue, so you’ll need to cancel the botched ones. (And networked folks who share their printer may need to delete your botched print jobs as well.)
- If your printer runs out of paper during a job and stubbornly halts, add more paper. Then to start things flowing again, open the print queue, right-click your document, and choose Restart. (Some printers have an Online button that you push to begin printing again.)
- You can send items to the printer even when you’re working in the coffee shop with your laptop. Later, when you connect the laptop to your printer, the print queue notices and begins sending your files. (Beware: When they’re in the print queue, documents are formatted for your specific printer model. If you subsequently connect your laptop to a different printer model, the print queue’s waiting documents won’t print correctly.)
Printing a web page
Although information-stuffed web pages look awfully tempting, printing those web pages is rarely satisfying because they look so awful on paper. When sent to the printer, web pages often run off the page’s right side, consume zillions of additional pages, or appear much too small to read.
To make matters worse, all those colorful advertisements can suck your printer’s color cartridges dry fairly quickly. Only four things make for successfully printed web pages, and I rank them in order of probable success rate:
- Use the web page’s built-in Print option. Some websites, but not all, offer a tiny menu option called Print This Page, Text Version, Printer-Friendly Version, or something similar. That option tells the website to strip out its garbage and reformat the page so that it fits neatly onto a sheet of paper. This option is the most reliable way to print a web page.
- Choose Print Preview from your browser’s File or Print menu. After 20 years, some web page designers noticed that people want to print their pages, so they tweaked the settings, making their pages automatically reformat themselves when printed. If you’re lucky, a clean look in the Print Preview window confirms that you’ve stumbled onto one of those printer-friendly sites.
- Copy the portion you want, and paste it into a word processor. Try selecting the desired text from the web page, copying it, and pasting it into a word processor. Delete any unwanted remnants, adjust the margins, and print the portion you want. I explain how to select, copy, and paste in Chapter 6.
- Copy the entire page, and paste it into a word processor. Although it’s lots of work, it’s an option. Right-click a blank portion of the web page, and choose Select All. Right-click again, and choose Copy. Next, open Microsoft Word or another full-featured word processor, and paste the web page inside a new document. By hacking away at the unwanted portions, you can sometimes end up with something printable.
These tips may also come in handy for moving a web page from screen to paper:
- The Microsoft Edge web browser can print. To print what you’re viewing in Edge, click the browser’s Settings and More icon (three dots in the upper-right corner), and choose Print from the drop-down menu.
 For best results in the Edge browser, turn on the Reading View mode by clicking the Reading View icon (shown in the margin). Reading View strips away ads and other detritus, leaving you with a clean page to send to the printer. Unfortunately, Reading View is not available for all websites. But if it’s available, you can also enable it with this shortcut key: Ctrl+Shift+R.
- If you spot an Email option but no Print option, email the page to yourself. Depending on your email program, you may have better success printing it as an email message.
- To print just a few paragraphs of a web page, use the mouse to select the portion you’re after. (I cover the act of selecting things in Chapter 6.) Then choose Print from Edge’s Tools menu (shown in the margin) to open the Print window, shown previously in Figure 8-3. Finally, in the Page Range box, choose the Selection option.
- If a web page’s table or photo insists on vanishing off the paper’s right edge, try printing the page in Landscape mode rather than Portrait. See the “Adjusting how your work fits on the page” section, previously in this chapter, for details on Landscape mode.
Troubleshooting your printer
When you can’t print something, start with the basics: Are you sure that the printer is turned on, plugged into the wall, full of paper, and connected securely to your computer with a cable?
If so, try plugging the printer into different outlets, turning it on, and seeing whether its power light comes on. If the light stays off, your printer’s power supply is probably blown.
Printers are almost always cheaper to replace than repair. Printer companies make their money on ink cartridges, so they often sell printers at a loss.
If the printer’s power light beams brightly, check these things before giving up:
- Make sure that a sheet of paper hasn’t jammed itself inside the printer. (A slow, steady pull usually extricates jammed paper. Sometimes opening and closing the printer’s lid starts things moving again.)
- Does your inkjet printer still have ink in its cartridges? Does your laser printer have toner? Try printing a test page: Click the taskbar’s Search icon (the little magnifying glass), type Control Panel, and press Enter. From the Hardware and Sound category, choose Devices and Printers. Right-click your printer’s icon, choose Printer Properties, and click the Print Test Page button to see whether the computer and printer can talk to each other.
- If you’re using a wireless printer, try connecting it to your PC with a cable. That helps you see whether the problem is your wireless connection, or the printer itself.
- Try updating the printer’s driver, the little program that helps it talk with Windows. Visit the printer manufacturer’s website, download the newest Windows driver for your particular printer model, and run its installation program. (I cover drivers in Chapter 13.)
Finally, here are a couple of tips to help you protect your printer and cartridges:
- Turn off your printer when you’re not using it. Older inkjet printers, especially, should be turned off when they’re not in use. The heat tends to dry the cartridges, shortening their life.
 Don’t unplug your inkjet printer to turn it off. Always use the On/Off switch. The switch ensures that the cartridges slide back to their home positions, keeping them from drying out or clogging.
Scanning from the Start Menu
Windows 10 removed the Scan app that came with Windows 8 and 8.1. However, you can still download it for free from the Microsoft Store. Look for the app by its new name, Windows Scan. (I explain how to get apps from the Microsoft Store in Chapter 6.)
I can’t give you step-by-steps for your particular scanner because they all work slightly differently. The Windows Scan app doesn’t work with some older scanners. But if your scanner is relatively new, you may find Windows Scan to be a refreshing change from the complicated software bundled with most scanners.
Setting up a new scanner for the first time? Be sure to unlock it by sliding a lever or turning a dial on the scanner to the unlock position. That lock protects the scanner during shipping, but you must turn it off before use.
After installing the Windows Scan app from the Microsoft Store and connecting your scanner, follow these steps to scan something into your computer:
From the Start menu, open the Windows Scan app.
If you don’t spot the Windows Scan app on the Start menu, click All Apps in the Start menu’s upper-right corner. The Start menu lists all of its apps alphabetically. Note: If you don’t find the Windows Scan app on your computer, you can download it for free from the Microsoft Store.
Although the Microsoft Store calls the app “Windows Scan,” the app renames itself to simply Scan when it installs on your PC. Thanks, Microsoft.
 Click the Scan app, shown in the margin, and the Scan app appears on the screen. If it complains that your scanner isn’t connected, make sure you’ve connected the USB cable between your computer’s USB port and the scanner and that the scanner is turned on.
If your scanner is plugged in and turned on, the Scan app lists your scanner’s name, shown in Figure 8-6, and the file type used for saving your files. (The PNG file type is widely accepted by most programs.)
If the app doesn’t recognize your scanner, your scanner is too old. You’re stuck with your scanner’s bundled software — if it works — or, unfortunately, buying a new scanner.
(Optional) To change the Scan app’s settings, click the Show More link.
The app’s default settings work fine for most jobs. The Show More link offers these options for specific types of scans:
- File Type: PNG works fine for most scans. But to create smaller, lower-resolution scans for emailing, choose JPG from this pull-down menu.
- Color mode: Choose Color for color items, including photos and glossy magazine pages. Choose Grayscale for nearly everything else, and choose Black and White only for line drawings or black-and-white clip art.
- Resolution (DPI): For most work, the default 300 works fine. Higher resolution scans (larger numbers) bring more detail but consume more space, making them difficult to email. Lower resolution scans show less detail but create smaller file sizes. You may need to experiment to find the settings that meet your needs.
- Save File To: The Scan app creates a
Scanfolder in your PC'sPicturesfolder, where it stores your newly scanned images. If you want, you can change theScanfolder's name or even create a different folder for each scanning session.
Click the Preview button to make sure your scan appears correct.
 Click the Preview icon, shown in the margin, and the Scan app makes a first pass, letting you preview a scan made with your chosen settings.
If the preview doesn’t look right, make sure you’ve made the right choice for your job in Color Mode, described in the preceding step. If the preview shows a blank white page, make sure you’ve unlocked the scanner as described in the scanner’s bundled instruction sheets.
If you’re scanning a smaller item that doesn’t fill the entire scanner bed, look for the circle markers in each corner of the preview scan. Drag each circle inward to surround the area you want to copy.
 Click the Scan button. When the scan finishes, click the View button to see your scan.
The Scan app scans your image with the settings you’ve chosen in the previous steps and then saves your image in your
Picturesfolder’sScanfolder.
The Scan app works well for fast, easy scans. But because it relies on the simple, built-in Windows software, your scanner’s built-in control buttons won’t work.
If you want your scanner’s buttons to work or you need finer control over your scans, skip the Scan app and install your scanner’s bundled software. (For some scanner models, Windows Update installs the scanner’s bundled software automatically as soon as you plug in the scanner.)
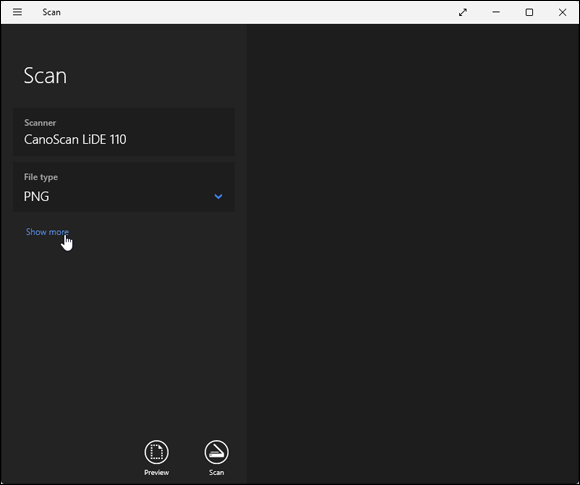
FIGURE 8-6: Click the Show More link for additional options, or click Preview to test a scan.
For quick-and-dirty scans, just take a picture of the document with the camera built into your phone or tablet. That won’t work well for photos, but it’s an easy way to keep track of receipts and invoices.
If you need more features than the Scan app offers, check out the desktop’s venerable Windows Fax and Scan program. It’s more complicated and requires special equipment for faxing, but it offers more features than the Scan app.