Chapter 16
Playing and Copying Music
IN THIS CHAPTER
![]() Playing music, video, and CDs
Playing music, video, and CDs
![]() Creating, saving, and editing playlists
Creating, saving, and editing playlists
![]() Copying CDs to your hard drive or another disc
Copying CDs to your hard drive or another disc
Built for minimalists, the Windows Groove Music app sticks to the essentials. With a few clicks, it plays music stored on your computer.
For some, that’s plenty. But the Groove Music app lacks more robust features. Stuck in a world of digital music files, the Groove Music app can’t copy music CDs onto your computer. It can’t create CDs from your music files. It can’t even play a music CD you’ve slipped into your PC’s disc drive. And it can’t play music stored on OneDrive unless that music is also downloaded to your PC.
In short, Groove Music is now a bare-bones player for music stored on your own computer. That’s fine for Windows tablets and many new laptops; they lack disc drives, so their owners naturally embrace digital music.
On a desktop PC, however, you may want to stick with the music program from yesteryear, Windows Media Player. Windows Media Player works much like it did in earlier Windows versions with one big exception: It can no longer play DVDs. (It can still play CDs, however.)
This chapter explains how and when to jump between the Groove Music app and Windows Media Player. It also explains when you might want to jump ship with the standard Windows offerings and download a more full-featured app to meet your music needs.
Playing Music with the Groove Music App
In keeping with the music of today’s youth, the Windows Groove Music app recognizes music files only if they’re stored on either your PC, or, when told, a flash drive you’ve pushed into your computer’s USB port. The Groove Music app turns up its nose at playing those old-fashioned CDs or DVDs, so don’t even try.
But if you simply want to play your own digital music collection, the Groove Music app handles the job fairly simply and easily. When first opened, as shown in Figure 16-1, the program shows the music stored on your own PC. (You’ll only see your OneDrive music if you’ve told OneDrive to store your music on your PC as well as on OneDrive, a chore I cover in Chapter 5.)
To launch the Groove Music app and begin listening to music, follow these steps:
 Click the Start menu’s Groove Music icon.
Fetch the Start menu with a click of the Start button on the left edge of the taskbar, the strip that runs along the bottom of your screen. When the Start menu appears, click the Groove Music app’s icon, shown in the margin.
If you don’t spot the Groove Music app’s icon, click the Start menu’s All Apps button to see all your installed apps. Then choose Groove Music from the list of alphabetically sorted apps.
When launched, the Groove Music app appears onscreen, as shown in Figure 16-1, showing tiles representing your albums, artists, or songs. (When opened for the first time, you may need to click through some welcome screens.)
View your music by album, song, or artist.
The Navigation pane along the left edge of the Groove Music app offers these options for viewing your music:
- Search: Type an artist’s name, song, or album title into this box, and the app reveals any matches stored on your PC.
- My Music: Click My Music from the Navigation pane, and the app displays your music. Click the Songs, Artists, or Albums links beneath the words My Music, on the app’s right pane, to see your music grouped by song, artist, or album.
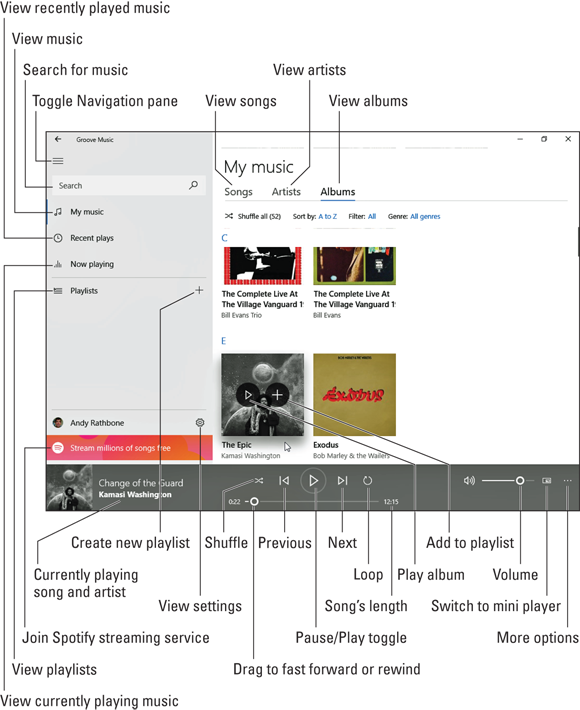
FIGURE 16-1: The Groove Music app plays music stored on your PC.
- Recent Plays: Recently played music appears here, making it easy to hear a replay.
- Now Playing: Choose this to see your currently played song, as well as a list of songs that are queued to play next.
- Playlists: Playlists you create appear here, ready to be played again with a click of their names. Or create your own playlist by clicking the adjacent plus sign icon.
Tell the app what music to play.
 From the app’s right side, click the Songs, Artists, or Albums tabs to view your music sorted by those categories.
Hover your mouse over any album cover, and a Play icon appears. Click it to start playing everything contained in the tile, be it a single album or an artist’s entire work.
An adjacent plus sign icon lets you quickly add that item to the current playlist or a new playlist. By hovering over items and clicking the plus sign, you can quickly create a playlist that will keep you listening to music for hours.
Adjust the music while it plays.
The App bar, shown along the bottom of Figure 16-1, offers you several icons to control your music: Shuffle, Loop, Previous (to move to the previous song), Pause/Play, and Next (to move to the next song).
To adjust the volume, click the little speaker on the App bar in the screen’s bottom-right corner. Or, from the desktop, click the little speaker icon next to the clock on the taskbar, that strip along the desktop’s bottom edge.
Most touchscreen tablets include a volume rocker switch along one of their edges.
The Groove Music app keeps playing music even if you begin working with other apps or switch to the desktop. To pause or move between tracks, hover your mouse pointer over the Groove Music app’s icon on the taskbar; a pop-up menu appears, with controls for playing, pausing, or skipping tracks.
Handing Music-Playing Chores Back to Windows Media Player
Microsoft hopes that the Groove Music app will meet all your musical needs. Accordingly, Windows tries to shoehorn you into using the Groove Music app. Open a music file from your desktop’s Music folder, for example, and the Groove Music app automatically jumps in to play the file.
With its large and simple controls, the Groove Music app works fine on touchscreen tablets. However, when you switch to the desktop, you may prefer a more full-featured music program. Luckily, Windows 11 still includes Windows Media Player, a Windows desktop staple for more than a decade.
Follow the steps in this section to hand your music-playing chores back to Windows Media Player and to make the program easier to find.
Click the Start button, and type windows media player into the Search box, located at the top edge of the Start menu.
The Start menu’s Search window lists Windows Media Player.
 Choose Pin to Start from the list of options on the right side of the Search window.
This places the Windows Media Player icon on your Start menu for easy access. (The same menu lets you select Pin to Taskbar; that places a second link to Windows Media Player on your taskbar, the strip that runs along the bottom of the screen.)
Open your
Musicfolder, and right-click a song you want Windows Media Player to play.A pop-up menu appears.
Click Open With, and then, when the second pop-up menu appears, click Choose Another App.
You may see Windows Media Player listed on the first pop-up menu, but don't click it. If you do, Windows Media Player will only play that one song, but Groove Music will still play all of the others.
When the How Do You Want to Open this File window appears, shown in Figure 16-2, choose Windows Media Player and click the checkbox called Always Use This App to Open MP3 Files.
This step tells Windows Media Player to play your music instead of the Start menu’s Groove Music app. If you store your music in file formats besides MP3, you may need to repeat these steps for those other files.
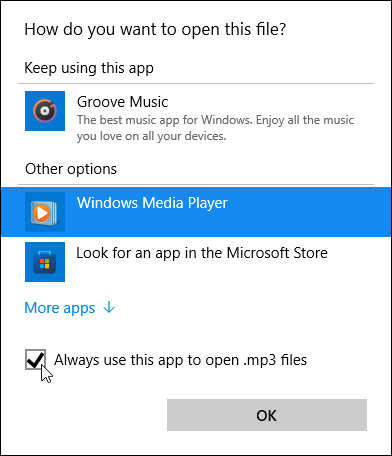
FIGURE 16-2: Choose Windows Media Player to let it play your music.
![]() After you follow these steps, Windows Media Player jumps into action whenever you double-click a music file on the desktop. You can also launch Windows Media Player directly by clicking its icon (shown in the margin) on the Start menu or on your taskbar.
After you follow these steps, Windows Media Player jumps into action whenever you double-click a music file on the desktop. You can also launch Windows Media Player directly by clicking its icon (shown in the margin) on the Start menu or on your taskbar.
 These steps don’t permanently disable or uninstall the Start menu’s Groove Music app; it still works fine. To open the Groove Music app, just click its icon from the Start menu. When the Groove Music app appears, it still displays and plays all your music.
However, when you click a song from the desktop’s File Explorer program, Windows Media Player pops up and begins playing your song.
Follow these same steps to choose which other programs should open your favorite files. You’re not limited to the choices Microsoft set up with Windows 11.
Stocking the Windows Media Player Library
![]() You can load Windows Media Player by clicking its icon in the Start menu or taskbar, that strip along the desktop’s bottom edge. No icon in the Start menu or taskbar? The previous section explains how to put it there.
You can load Windows Media Player by clicking its icon in the Start menu or taskbar, that strip along the desktop’s bottom edge. No icon in the Start menu or taskbar? The previous section explains how to put it there.
When you run Windows Media Player, the program automatically sorts through your computer’s stash of digital music, pictures, and videos, automatically cataloging everything it finds.
But if you’ve noticed that some of your PC’s media is missing from the Windows Media Player Library, you can tell the player where to find those items by following these steps:
Click Windows Media Player’s Organize button (in the program’s upper-left corner), and choose Manage Libraries from the drop-down menu to reveal a pop-out menu.
The pop-out menu lists the four types of media that Windows Media Player can handle: Music, Videos, Pictures, and Recorded TV.
From the pop-out menu, choose the name of the type of files you’re missing.
A window appears, as shown in Figure 16-3, listing your monitored folders. For example, the player normally monitors the contents of your Music folder, so anything you add to your Music folder automatically appears in the Media Player Library as well.
But if you’re storing items elsewhere — perhaps on a portable hard drive, flash drive, or network location — here’s your chance to give the player directions to that other media stash.
Click the Add button, select the folder or drive containing your files, click the Include Folder button, and click OK.
Clicking the Add button brings the Include Folder in Music window to the screen. Navigate to the folder you’d like to add — the folder on your portable hard drive, for example — and click the Include Folder button. Windows Media Player immediately begins monitoring that folder, adding the folder’s music to its library.

FIGURE 16-3: Click the Add button and browse to a new folder you want Windows Media Player to monitor.
To add music from even more folders or drives — perhaps a folder on another networked PC or a flash drive — repeat these steps until you’ve added all the places Windows Media Player should search for media.
To stop the player from monitoring a folder, follow these steps, but in Step 3, click the folder you no longer want monitored and then click the Remove button shown in Figure 16-3.
When you run Windows Media Player, the program shows the media it has collected (shown in Figure 16-4), and it continues to stock its library in the following ways:
- Monitoring your folders: Windows Media Player constantly monitors your
Music,Pictures, andVideosfolders, as well as any other locations you've added. Windows Media Player automatically updates its library whenever you add or remove files from your folders. (You can change what folders Windows Media Player monitors by following the three preceding steps.) - Adding played items: Anytime you play a music file on your PC or from the internet, Windows Media Player adds the song or its internet location to its library so you can find it to play again later. Unless specifically told to, Windows Media Player doesn’t add recently played items residing on other people’s PCs, USB flash drives, or memory cards.
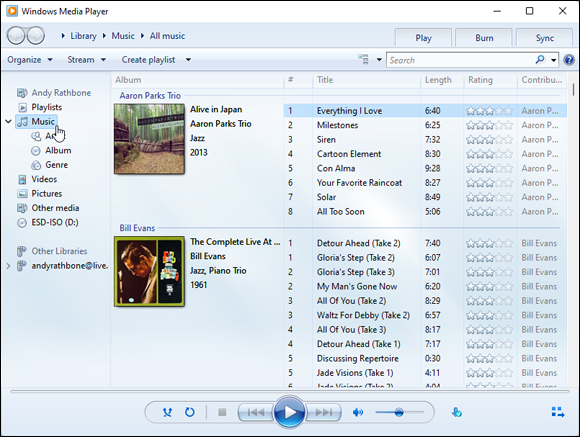
FIGURE 16-4: Click an item from the left to see its contents on the right.
- Ripped music from CD: When you insert a music CD into your CD drive, Windows may offer to rip it. That’s computerese for copying the CD’s music to your PC, a task described in the “Ripping (Copying) CDs to Your PC” section, later in this chapter. Any ripped music automatically appears in your Windows Media Player Library. (Windows Media Player won’t copy DVD movies to your library, unfortunately, nor does it play the discs.)
- Downloaded music from online stores: When you buy a song and place it in your Music folder, Windows Media Player automatically stocks its library with your latest purchase.
Feel free to repeat the steps in this section to search for files whenever you want. Windows Media Player ignores the files it has already cataloged and adds any new ones.
 Windows Media Player doesn’t offer an advanced editor for changing a song’s tags, which are described in the nearby sidebar. Instead, the player edits them for you automatically from an online database.
Browsing the Windows Media Player Libraries
The Windows Media Player Libraries are where the behind-the-scenes action takes place. There, you organize files, create playlists, burn or copy CDs, and choose what to play.
When first loaded, Windows Media Player displays your Music folder’s contents, appropriately enough. But Windows Media Player actually holds several libraries, designed to showcase not only your music but also photos, video, and recorded TV shows.
All your playable items appear in the Navigation pane along the window’s left edge, shown in Figure 16-5, where they can be accessed with a click. The pane’s top half shows your own media collection, appropriately listed with your name at the top.
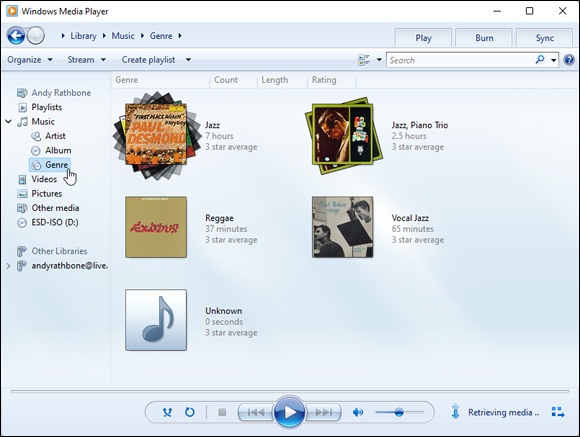
FIGURE 16-5: Click the type of media you’re interested in browsing from the Navigation pane along the left.
Windows Media Player organizes your media into these categories:
- Playlists: Do you enjoy playing albums or songs in a certain order? Click the Save List button atop your list of songs to save it as a playlist that shows up in this category. (I cover playlists in this chapter’s later “Creating, Saving, and Editing Playlists” section.)
- Music: All your digital music appears here. Windows Media Player recognizes most major music formats, including MP3, WMA, and WAV. (It even recognizes non-copy-protected AAC files, sold by iTunes.) And Windows 11 also includes support for FLAC, a format that compresses the music without losing any sound quality.)
- Videos: Look here for videos you’ve saved from a camcorder or digital camera, smartphone, or for videos you’ve downloaded from the internet. Windows Media Player recognizes AVI, MPG, WMV, ASF, DivX, some MOV files, and a few other formats. Windows 11 also adds support for MKV files, a relatively new video format used by some smartphones for taking high-definition videos.
- Pictures: Windows Media Player can display photos individually or in a simple slideshow, but your
Picturesfolder and Photos app, both covered in Chapter 17, handle photos better. (Windows Media Player can't correct upside-down photos, for example, a feat done easily from within your Pictures folder of the Photos app.) - Other Libraries: Here you can find media appearing on other PCs in your home network — a private way of connecting PCs that I describe in Chapter 15.
After you click a category, Windows Media Player’s Navigation pane lets you view the files in several different ways. Click Artist in the Navigation pane’s Music category, for example, and the pane shows the music arranged alphabetically by artists’ first names.
Similarly, clicking Genre in the Music category separates songs and albums by different types of music, shown earlier in Figure 16-5. Instead of just showing a name to click — blues, for example — the player arranges your music into piles of covers, just as if you’d sorted your albums or CDs on your living room floor.
To play anything in Windows Media Player, right-click it and choose Play. Or, to play all your music from one artist or genre, right-click the pile and choose Play All.
Playing Music Files in a Playlist
Windows Media Player plays several types of digital music files, but they all have one thing in common: When you tell Windows Media Player to play a song or an album, Windows Media Player immediately places that item on your Now Playing list — a list of items queued up for playing one after the other.
You can start playing music through Windows Media Player in a number of ways, even if Windows Media Player isn't currently running:
 Click the File Explorer icon (shown in the margin) on your taskbar, right-click an album or a music-filled folder, and click Play with Windows Media Player. The player jumps to the screen and begins playing your choice.
- While you’re still viewing your own
Musicfolder, right-click items and choose Add to Windows Media Player List. Your computer queues them up in Windows Media Player, ready to be played after you've heard your currently playing music. - Place a music CD in your computer’s CD drive tray, and push the tray into your computer. Click the Select to Choose What Happens with Audio CDs pop-up message. When the second pop-up menu appears, choose Play Audio CD, and Windows automatically plays future audio CDs as soon as you insert them.
- Double-click a song file, whether it’s sitting on your desktop or in any folder. Windows Media Player begins playing it immediately.
To play songs listed within Windows Media Player’s own library, right-click the song’s name and choose Play. Windows Media Player begins playing it immediately, and the song appears in the Now Playing list.
Here are other ways to play songs within Windows Media Player:
- To play an entire album in Windows Media Player’s library, right-click the album from the library’s Album category and choose Play.
- Want to hear several files or albums, one after the other? Right-click the first one, and choose Play. Right-click the next one, and choose Add to Now Playing List. Repeat until you’re done. Windows Media Player queues them all up in the Now Playing list.
- To return to a recently played item, right-click Windows Media Player’s icon in the taskbar. When the list of recently played items appears, click your item’s name.
- No decent music in your music folder? Then start copying your favorite CDs to your computer — a process called ripping, which I explain in the “Ripping (Copying) CDs to Your Computer” section, later in this chapter.
Controlling Your Now Playing Items
You can play music directly from the Windows Media Player Library: Just right-click a file, album, artist, or genre, and choose Play. Windows Media Player begins playing the music, but the program stays put, often filling the screen.
![]() To summon a smaller, more manageable player, click the Library/Player toggle button shown in the margin and summon the Now Playing window shown in Figure 16-6. (The Library/Player toggle button lives in the library’s lower-right corner.) Don’t see the controls? Hover your mouse pointer over the Media Player window, and the controls appear along the window’s bottom edge.
To summon a smaller, more manageable player, click the Library/Player toggle button shown in the margin and summon the Now Playing window shown in Figure 16-6. (The Library/Player toggle button lives in the library’s lower-right corner.) Don’t see the controls? Hover your mouse pointer over the Media Player window, and the controls appear along the window’s bottom edge.
The minimalist Now Playing window shows what’s currently playing, be it a video or artwork from your currently playing song. Onscreen controls let you adjust the volume, skip between listed songs or videos, or pause the action.
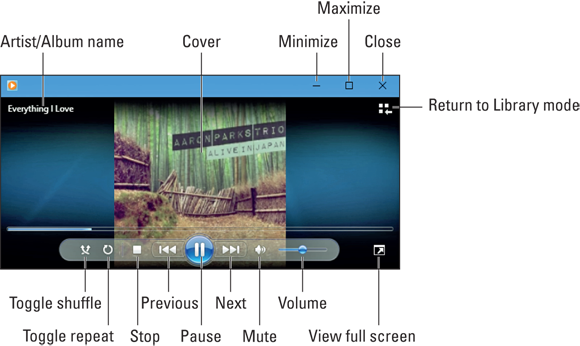
FIGURE 16-6: The window’s bottom buttons work much like the buttons on a CD player.
Windows Media Player offers the same basic controls when playing any type of file, be it a song, video, CD, or photo slideshow. Figure 16-6 shows Windows Media Player open to its Now Playing window as it plays an album. The labels in the figure explain each button’s function. Or rest your mouse pointer over an especially mysterious button, and Windows Media Player displays a pop-up explanation.
The buttons along the bottom work like those found on any CD player, letting you play, stop, rewind, fast-forward, and mute the current song or movie. For even more controls, right-click anywhere in the Now Playing window. A menu appears, offering to perform these common tasks:
- Show List: This shows the playlist along the right side, which is handy for jumping directly to different songs.
- Full Screen: This enlarges the window to fill the screen.
- Shuffle: This plays songs randomly.
- Repeat: This loops the same song.
- Visualizations: Choose between showing the album cover, wavy lines, groovy spirals, dancing waves, or other freaky eye games.
- Enhancements: This opens an equalizer, balance adjuster, playback speed, volume balancer, and other sound options.
- Lyrics, Captions, or Subtitles: Display these items, if they’re available, which come in handy when practicing for Karaoke night.
- Always Show Now Playing on Top: This keeps the window above your other windows on the desktop.
- More Options: This brings up the Options page, where you can tweak Windows Media Player’s habits when ripping CDs, stocking your Windows Media Player Library, and other tasks.
- Help with Playback: This fetches the Help program to deal with head-scratchers.
The Now Playing controls disappear from the screen when you haven’t moved the mouse for a while. To bring them back, move your mouse pointer over the Now Playing window.
![]() To return to the Windows Media Player Library, click the Library/Player toggle icon in the window’s upper-right corner.
To return to the Windows Media Player Library, click the Library/Player toggle icon in the window’s upper-right corner.
When you minimize Windows Media Player to the desktop’s taskbar, hover your mouse pointer over the player’s icon: A control pops up, letting you pause or jump between songs.
Playing CDs
As long as you insert the CD in the CD drive correctly (usually label-side up), playing a music CD is one of Windows Media Player’s easiest tasks. Start by pushing the drive’s Eject button, a rarely labelled button that lives next to or on the disc drive on the front of your computer.
When the drive tray emerges, drop the CD (label-side up) into your CD drive and push the tray back into the drive. Windows Media Player jumps to the screen to play it, usually identifying the CD and its artist immediately. In many cases, it even tosses a picture of the cover art on the screen.
The controls along the bottom, shown previously in Figure 16-6, let you jump from track to track, adjust the volume, and fine-tune your listening experience.
If for some odd reason Windows Media Player doesn’t start playing your CD, look at the Library item in Windows Media Player’s Navigation pane along the left side of the window. You should spot either the CD’s name or the words Unknown Album. When you spot the listing, click it and then click the Play button to start listening.
Press F7 to mute Windows Media Player’s sound and pick up that phone call. Pressing Ctrl+P toggles the pause/play mode.
Want to copy that CD to your PC? That’s called ripping, and I cover ripping in the “Ripping (Copying) CDs to Your PC” section, later in this chapter.
Playing DVDs
And now for a bit of bad news: Windows Media Player can’t play DVDs. That news comes as a bit of a shock, considering that the Media Player in Windows 7 could play DVDs. What gives?
According to Microsoft, DVDs are old-school technology that’s no longer needed. Today’s ultrathin laptops and tablets don’t even have DVD drives. Most people watch movies by streaming them to their computers over the internet, Microsoft says. Or they watch their discs on a DVD player or gaming console connected to a TV.
Also, Microsoft no longer wanted to pay licensing fees to the companies owning the patents required for playing DVDs.
But although Windows Media Player can no longer play DVDs, Windows can still play DVDs if you buy some DVD-playing software. Microsoft and other companies sell DVD-playing software through the Microsoft Store app. (I cover the Microsoft Store app and its digital shelves full of apps in Chapter 6.)
Playing Videos and TV Shows
Many digital cameras and smartphones can capture short videos as well as photos, so don’t be surprised if you find several videos in the Video library of Windows Media Player.
Playing videos works much like playing a digital song. Click Videos in the Navigation pane along Windows Media Player’s left side. Double-click the video you want to see, and start enjoying the action, as shown in Figure 16-7.
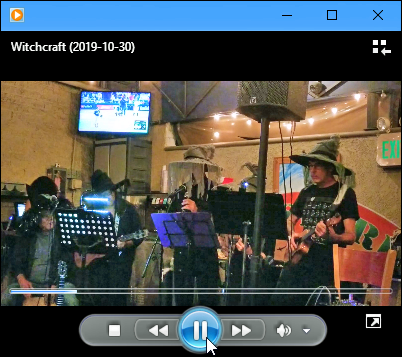
FIGURE 16-7: Move the mouse over the video to make the controls appear along the bottom.
Windows Media Player lets you watch videos in several sizes. Make it fill the screen by holding down Alt and pressing Enter, for example. (Repeat those keystrokes to return to the original size.)
- To make the video adjust itself automatically to the size of your Windows Media Player window, right-click the video as it plays, choose Video from the pop-up menu, and select Fit Video to Player on Resize.
 You can also toggle full-screen mode by clicking the Full Screen toggle in the video’s lower-right corner, shown in Figure 16-7.
- When choosing video to watch on the internet, your connection speed determines its quality. Broadband connections can usually handle high-definition videos, but slower connections and slower computers often have problems. You won’t damage your computer by choosing the wrong quality of video; the video just skips and pauses while playing.
Creating, Saving, and Editing Playlists
A playlist is simply a list of songs (and/or videos) that play in a certain order. So what? Well, the beauty of a playlist comes with what you can do with it. Save a playlist of your favorite songs, for example, and they’re always available for playback with a single click.
You can create specially themed playlists to liven up long-distance drives, parties, special dinners, workouts, and other events.
To create a playlist, follow these steps:
Open Windows Media Player, and find the Playlist pane.
Don’t see a playlist hugging Windows Media Player’s right edge? Click the Play tab near the upper-right corner. Or, when the player is in Now Playing mode, right-click a blank part of the Windows Media Player window and choose Show List from the pop-up menu: The list of currently playing items appears along Windows Media Player’s right edge.Right-click the album or songs you want, choose Add To, and select Play List.
Alternatively, you can drag and drop albums and songs onto the Playlist pane along Windows Media Player’s right edge, as shown in Figure 16-8. Either way, Windows Media Player begins playing your playlist as soon as you add the first song. Your song choices appear in the right pane in the order you’ve selected them.
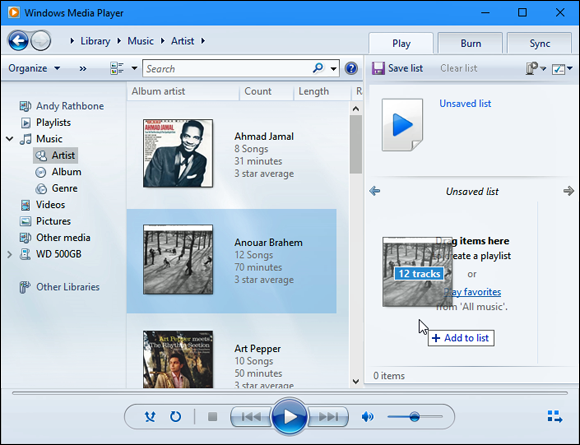
FIGURE 16-8: Drag and drop albums and songs onto the Playlist pane.
Fine-tune your playlist to change the order or remove songs.
Added something by mistake? Right-click that item in the playlist, and choose Remove from List. Feel free to rearrange your playlist by dragging and dropping items up or down the list.
Check the line at the bottom of the playlist to see how many items you’ve added to the playlist as well as your playlist’s duration in minutes.
When you’re happy with your playlist, click the Save List button at the list’s top, type a name in the highlighted box, and press Enter.
Windows Media Player lists your new playlist in the library’s Playlists section, ready to be heard when you double-click it.
After you save a playlist, you can burn it to a CD with one click, as described in the next tip.
Make your own Desert Island Disc or Greatest Hits playlists, and then burn them to a CD to play in your car or on your home stereo. After you create a playlist of less than 80 minutes, insert a blank CD into your CD burner and click the Burn tab. Take up the player’s offer to import your current playlist, and click the Start Burn button.
To edit a previously created playlist, double-click the playlist’s name in the Library’s Playlists area. Rearrange, add, or delete items in the playlist, and click the Save List button.
Ripping (Copying) CDs to Your PC
In a process known as ripping, Windows Media Player can copy your CDs to your PC as MP3 files, the industry standard for digital music. But until you tell the player that you want MP3 files, it creates WMA files — a format that won’t play on iPads, most smartphones, nor many other music players.
To make Windows Media Player create songs with the more versatile MP3 format instead of WMA, click the Organize button in the upper-left corner, choose Options, and click the Rip Music tab. Choose MP3 instead of WMA from the Format drop-down menu, and nudge the audio quality over a tad from 128 to 256 or even 320 for better sound. (For even better sound, choose FLAC instead of WMA or MP3; however, the files will consume much more storage space.) If you plan to move the music to a portable music player, be sure to choose a format that player supports. When in doubt, choose MP3.
To copy CDs to your PC’s hard drive, follow these instructions:
Open Windows Media Player, insert a music CD, and click the Rip CD button.
You may need to push a button on the front or side of your computer’s disc drive to make the tray eject.
Windows Media Player connects to the internet; identifies your CD; and fills in the album’s name, artist, and song titles. Then the program begins copying the CD’s songs to your PC and listing their titles in the Windows Media Player Library. You’re through.
If Windows Media Player can’t find the songs’ titles automatically, however, move ahead to Step 2.
Right-click the first track, and choose Find Album Info, if necessary.
If Windows Media Player comes up empty-handed, right-click the first track and choose Find Album Info.
If you’re connected to the internet, type the album’s name into the Search box and then click Search. If the Search box finds your album, click its name, choose Next, and click Finish.
If you’re not connected to the internet, or if the Search box comes up empty, right-click the first song, click Edit, and manually fill in the song title. Repeat for the other titles, as well as the album, artist, genre, and year tags.
Here are some tips for ripping CDs to your computer:
- Normally Windows Media Player copies every song on the CD. To leave Tiny Tim off your ukulele music compilation, however, remove the check mark from the box next to Tiny Tim’s name. If Windows Media Player has already copied the song to your PC, feel free to delete it from within Windows Media Player. Click the Library button, right-click the song sung by the offending yodeler, and choose Delete.
- Windows Media Player automatically places your ripped CDs into your
Musicfolder. You can also find your newly ripped music there, as well as in the Windows Media Player Library.
Burning (Creating) Music CDs
To create a music CD with your favorite songs, create a playlist containing the CD’s songs, listed in the order you want to play them; then burn the playlist to a CD. I explain how to do that in the “Creating, Saving, and Editing Playlists” section, earlier in this chapter.
But what if you want to duplicate a CD, perhaps to create a disposable copy of your favorite CD to play in your car? No sense scratching up your original. You’ll want to make copies of your kids’ CDs, too, before they create pizzas out of them.
Unfortunately, neither Windows Media Player nor Windows 11 offers a Duplicate CD option. Instead, you must jump through the following five hoops to create a new CD with the same songs in the same fidelity as the original CD:
Rip (copy) the music to your hard drive.
Before ripping your CD, change your burning quality to the highest quality: Click Organize, choose Options, click the Rip Music tab, and change the Format box to a lossless format like WAV, ALAC, or FLAC. Click OK.
- Insert a blank CD into your computer’s disc drive.
- In Windows Media Player’s Navigation pane, click the Music category and choose Album to see your saved CDs.
Right-click the newly ripped album in your library, choose Add To, and choose Burn List.
If your Burn List already had some listed music, click the Clear List button to clear it; then add your CD’s music to the Burn List.
- Click the Start Burn button.
Now for the fine print. Unless you change the quality to a lossless format when copying the CD to your PC, Windows Media Player compresses your songs as it saves them on your hard drive, throwing out some audio quality in the process. Burning them back to CD won’t replace that lost quality. If you want the most accurate duplicates Windows Media Player can handle, change the Ripping Format to WAV (Lossless).
If you do change the format to WAV (Lossless) in order to duplicate a CD, remember to change it back to MP3 afterward, or else your hard drive will run out of room when you begin ripping lots of CDs.
A simpler solution might be to buy CD-burning software from Amazon or your local office supply or computer store. Unlike Windows Media Player, most CD-burning programs have a Duplicate CD button for one-click convenience.