
Chapter 17
Fiddling with Photos, Videos, and Phones
IN THIS CHAPTER
![]() Copying your photos and videos from your camera or phone to your computer
Copying your photos and videos from your camera or phone to your computer
![]() Taking photos with your computer’s camera
Taking photos with your computer’s camera
![]() Connecting your phone with the Your Phone app
Connecting your phone with the Your Phone app
![]() Viewing photos in your Pictures folder
Viewing photos in your Pictures folder
For years, Windows graciously offered to import your photos as soon as you plugged in your camera. When Windows 10 arrived, though, that feature fell by the wayside. To make up for past mistakes, Windows 11 now offers at least five ways to import photos from your camera and smartphone.
This chapter walks you through the easiest ways to copy your digital photos and videos from your phone or camera to your computer. From there, you can show them off to friends and family, email them to distant relatives, and save them in places where you can easily relocate them.
One final note: After you’ve begun creating a digital family album on your computer, please take steps to back it up properly by turning on File History or OneDrive, the automatic backup features in Windows that I describe in Chapter 13. Computers come and go, but your family memories can’t be replaced.
Dumping Photos from a Phone or Camera to Your Computer
Most digital cameras come with software that grabs your camera’s photos and places them onto your computer. That software can be complicated and unwieldy, though. Thankfully, Windows can easily fetch photos from nearly any make and model of digital camera, as well as most phones. In keeping with the Windows march away from desktop programs, Windows now lets the Photos app handle the job of importing and organizing your photos.
These steps work for most digital cameras and smartphones; iPhone owners may have better luck going through iTunes to copy their photos to their computer.
To import photos from your camera or phone into your computer, follow these steps:
Plug the phone or camera’s cable into your computer.
Many cameras come with two cables: one that plugs into your TV set for viewing and another that plugs into your computer. You need to find the one that plugs into your computer for transferring photos. (With phones, your USB charging cable usually handles the job.)
 Plug the transfer cable’s small end into your camera or phone, and plug the larger end (shown in the margin) into your computer’s USB port, a rectangular-looking hole about ½-inch long and ¼-inch high. USB ports live on the back of the older computers, along the front of newer computers, and along the sides of laptops and tablets.
 If the USB plug doesn’t want to fit into the port, turn over the plug and try again.
If you plug in an Android phone, be sure to tell it to connect in “Camera Mode” mode rather than “Media Device” mode. That lets Windows recognize your phone as a simple camera rather than a complicated phone.
If Windows doesn’t recognize your digital camera, make sure that the camera is set to display mode — the mode where you can see your photos on the camera’s display. If you still have problems, unplug the cable from your computer, wait a few seconds, and then plug it back in.
Turn on your phone or camera (if it’s not already turned on), click the Start menu, and open the Photos app with a click on its icon.
The Photos app appears onscreen. If by chance you have two devices containing photos, perhaps your smartphone with a memory card, choose your camera from the pop-up menu.
Click the Import button on the Photos app’s upper-right corner, and choose From a Connected Device from the pop-up menu.
The pop-up menu, shown in Figure 17-1, offers two options depending on what you’ve plugged into your USB port:
- From a Folder: Choose this to import photos from a folder. That folder may be on a portable hard drive or flash drive you’ve plugged into your PC, or perhaps a folder from another PC you’ve connected through a network. You need to choose this only once; when opened, the Photos app will subsequently import any photos it finds in that folder. The photos will quickly appear in the Photos app.
- From a Connected Device: Choose this to import photos stored on a camera or phone that you’ve plugged into your USB port in the prior two steps. (If a pop-up menu appears, choose your camera’s name from the pop-up menu.)
If you prefer importing photos through File Explorer, you still can. Open File Explorer, and click This PC from the pane along File Explorer’s left edge. When you spot your camera’s name listed on File Explorer’s right side, right-click the camera’s icon. When the pop-up menu appears, choose Import Pictures and Videos. The old Import Pictures and Videos program appears, ready to import your photos, just as it did in previous Windows versions.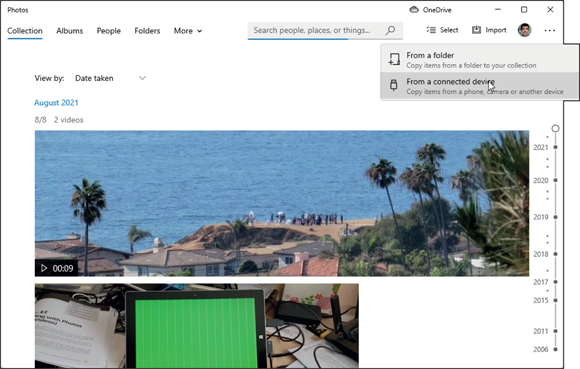
FIGURE 17-1: When Windows recognizes your camera, it offers to copy its photos to your computer.
Click the Select menu and decide which photos to import.
The Photos app immediately searches your camera for new digital photos and videos, and then displays them, shown in Figure 17-2. The app sorts your photos by the month you snapped them.
Click the Select menu, and a drop-down menu lists three options:
- None: Click this only if you’ve changed your mind about importing, perhaps because you’ve connected the wrong camera.
- All Items: Choose this to import all your camera’s photos, even if they’ve been imported before.
- Items Since Last Import: Select this option to import only your new photos. Windows quickly selects only the photos you haven’t yet imported.
You can also cherry-pick just a few photos; just click the box in the thumbnail of the photos you want to import.
If you don’t want to import a selected photo, click to remove the check mark from the unwanted photo’s upper-right corner. To see more photos, use the scroll bar shown along the right edge of Figure 17-2. (I cover scroll bars in Chapter 4.)

FIGURE 17-2: The Photos app displays groups of pictures based on the time and date you took them.
Review your selected photos, and click the Import Selected button.
Windows begins importing your selected photos, leaving the original copies on your camera. Windows places copies of your photos into your computer’s
Picturesfolder, separating the photos into groups named after their year and month. For example, photos snapped in January 2020 appear in a folder named2020-01.
When Windows finishes importing your photos, the Photos app remains onscreen to display your newest pictures. Your newest photos always appear at the top of the app. As you scroll down the app's list of photos, you go back in time, seeing older photos organized by month and day. I walk you through the rest of the Photos app later in this chapter.
Making Photos and Videos with the Camera App
Most tablets, laptops, and some desktop computers come with built-in cameras, sometimes called webcams. These tiny cameras can’t take high-resolution close-ups of that rare bird in the neighbor’s tree, but they work fine for their main purpose: snapping a quick headshot photo for use as an account photo on your computer, Facebook, or other websites.
The cameras can also shoot video, making them perfect for holding internet video chats through Zoom or the built-in Teams Chat app covered in Chapter 10.
To snap a photo or shoot video through your computer’s camera with the Camera app, follow these steps:
 From the Start menu, click the Camera icon to open the app.
If you don’t spot the Camera icon on the Start menu, click the Start menu’s All Apps button to see an alphabetical list of every app on your computer.
If the app asks permission to use your camera and microphone or location, decide whether to click Yes or No.
As a security precaution, Windows may ask permission to turn on your camera. That helps prevent sneaky apps from spying on you without your knowing. If you’re using the camera app, click the Yes button to give it permission.
The program might also ask for permission to access your precise location. That lets the program stamp your photo with its location information. That’s handy to have when traveling, but it can be an invasion of privacy when at your house or that of a friend.
After you decide whether to allow access to your location, the camera window turns into a giant viewfinder, showing you exactly what the camera sees: your face.
If your computer or tablet includes two cameras (usually one in front and one in back), you can toggle between them by clicking the Change Camera icon, shown in the upper-right corner of Figure 17-3.
- Click the Camera icon to snap a photo, or click the Video icon to begin recording a movie. (Click the Video icon again to stop recording.)
When the camera detects a face, it places a square around the face, letting you know where the camera will focus. Yes, it’s a little creepy.
The Camera app saves all your snapped photos and videos in a folder named Camera Roll inside your Pictures folder. That folder is backed up by File History, which I cover in Chapter 13.
Planning to chat with friends or coworkers through Zoom or Teams Chat? Fire up the camera app, and you can see your background, as well as your lighting, before the meeting. That lets you spend some time decluttering your space and adjusting the lights before going “live” with friends or coworkers.

FIGURE 17-3: Choose your camera’s options, and click the Camera icon for a snapshot or the Video icon for a movie.
Grabbing Photos from Your Android Phone through the Your Phone App
 Most cameras don't have Wi-Fi, so their photos can move to your computer only through cables or memory cards. Today’s smartphones, by contrast, live and die by the airwaves. That makes it much easier to copy their photos and videos onto your computer:
- To grab a quick photo or two from your phone, email them to yourself or your friends.
- To grab all your phone’s photos and videos automatically, install Microsoft’s OneDrive app, available for both Android and Apple phones. The app automatically uploads your phone’s latest photos and videos onto OneDrive whenever you connect to a Wi-Fi connection. To see them, click OneDrive in the File Manager app, as I describe in Chapter 5; your phone’s photos and videos await in a folder called
Camera Rollinside OneDrive’sPicturesfolder.
To fill in the middle ground between all or a few, Microsoft recently updated its old Your Phone Companion app. It now lets you browse through two thousand of your phone's latest photos, and then grab only the ones you want.
With Windows 11 and a fairly new Android phone, though, the newly updated app does a lot more than that. As I describe in Chapter 12, the app lets you send and receive your phone’s text messages from your PC, run your phone’s apps in an onscreen window, view your phone’s notifications, and, with a microphone and speaker, send and receive phone calls. It’s an easy way to harness the power of your phone from your laptop or desktop PC. (Currently, the app only lets you view and copy photos, not videos.)
To copy photos from your phone with the app, follow these steps:
Install the Microsoft Your Phone app onto your Android smartphone, and link the phone with your PC.
From your phone, visit the Microsoft Store app, and install the Your Phone app by Microsoft. Run the app on your phone, and follow the instructions to link it with your Windows PC.
I describe the process of connecting your Android smartphone with your PC in more detail in Chapter 12.
From your PC, open the Your Phone app.
Click the Start button, and click the Your Phone app near the bottom of the Start menu’s list. The app appears onscreen and displays your photos, as shown in Figure 17-4.

FIGURE 17-4: When linked with your PC, the Your Phone app opens to display your phone’s latest 2,000 photos.
To grab a photo, right-click it and choose from the pop-up menu’s options.
The pop-up menu offers these options:
- Open: The most-used option, this opens the photo for viewing with your default photo viewing app, usually Photos.
- Open With: This lets you choose which app should open that photo, handy when you want to open a photo editor rather than a viewer.
- Copy: Choose this to copy the photo to the clipboard for pasting later, handy for pasting it into an email or graphics-editing program.
- Save As: Choose this to save the photo to your PC for later reference.
- Share: This setting fetches your email program with the photo attached, ready for emailing to a friend.
- Delete: Weed out bad photos by choosing this option and quickly deleting them.
When you’re through viewing or grabbed the photos you need, close the app by clicking the
Xin its upper-right corner.
The Your Phone app offers several other features as well, as described in the sidebar, “Seeing your phone on your PC.” Microsoft seems to be actively adding new features, so don’t be surprised to see the app grow more powerful in the months to come.
Viewing Photos with the Photos App
Microsoft constantly updates Windows to add new features. But some features also disappear: The desktop’s Photo Viewer, a Windows staple for nearly a decade, no longer appears on the Start menu.
When you want to view photos and videos, Microsoft clearly plans for you to reach for the newer Photos app, shown previously in Figure 17-1. It’s a quick way to view your memories in different ways:
Collection: When opened from the Start menu, the Photos app appears in Collection mode. It displays all your photos and videos, sorted by the order you shot them. Although it leaves nothing out, it’s often overkill unless you’re ready to sit down and weed out the bad ones. (Right-click an unwanted photo and click Delete from the pop-up menu to ditch it for good.)
To quickly change the size of the displayed photo thumbnails, click one of the three little grid icons near the app’s upper-right corner.- Albums: The Photos app takes a more curated approach here, automatically breaking down your photos into groups named after the day they were shot. It automatically weeds out duplicates, making for a short but sweet way to show off your highlights. To create your own album, select some photos, right-click any one of them, and choose Add to Album from the pop-up menu. Then you can add those photos to an existing album or create your own new album.
- People: If you click Accept when first opening this category, the Photos app constantly scans your incoming photos for faces. A click on the People link displays a headshot of every face it recognizes, grouped by person. Click that person’s headshot to see every photo featuring their face. (If this sounds creepy, turn it off by clicking the Photo app’s More icon, choosing Settings, and clicking the toggle switch in the People section.)
- Folders: This simply lets you view your photos by their folders, which can be a handy way to view photos stored on a newly inserted thumb drive.
- Video Editor: This switches to the Video Editor app, where you can trim existing videos or create your own.
The next four sections explain how to make the most of the Photos app.
Viewing your photo collection
When opened, the Photos app automatically grabs your computer’s photos and videos and places them on the screen in large thumbnails, sorted by the date you took them. That makes it easy to show off the latest vacation photos on a tablet, phone, or even a computer that’s hooked up to a TV or large monitor.
To launch the Photos app and start showing off your photos, follow these steps:
From the Start menu, click the Photos icon.
The Photos app quickly appears, shown in Figure 17-5. The Photos app searches for photos and videos in your computer’s
Picturesfolder, as well as your OneDrive folders, and displays them as one group, all in the order they were taken.The Photos app also appears when you open a photo from the desktop's File Explorer. (I explain how to browse your files with File Explorer in Chapter 5.)
Scroll down to the photo you want to view or edit.
The Photos app displays your photos in one long stream, without folders. Called simply Collection, the scrolling display places your most recently shot photos at the top, with the oldest ones at the bottom.
Scroll down with a mouse by using the scroll bar along the app’s right edge. On a touchscreen, just slide your finger up or down the screen to see newer or older photos.
The app shows a scrollable list of years next to the scrollbar, letting you slide down quickly to see photos taken in a particular year.Click a photo to see it fullscreen, and choose any menu option to view, navigate, manipulate, or share your pictures.
When a photo fills the screen, shown and labelled in Figure 17-6, the menus appear along the top. Each menu option lets you control the app and photos in a different way:
 Next/Previous photo: Move your mouse to the photo’s left or right edge, and arrows appear along the edge. Click the right arrow to see older photos, or click the left arrow to see newer photos.
 Zoom: Click this button, and a sliding control appears, letting you zoom in or out of the photo.
 Delete: If you spot a blurred photo, click this icon to delete it immediately. Weeding out the bad photos makes it easier to relocate the good ones.
 Add to favorites: Click here to add the photo to an album called Favorites, making it easier to find again later.
 Rotate: Clicking this icon rotates your photo clockwise by 90 degrees; to rotate in the opposite direction, click it three times.
 Crop: A click on this icon places a resizable square around your photo. Drag the square’s edges in or out to frame the photo so it looks its best.
 Edit and Create: This fetches a large drop-down menu with options for editing, adding effects, adding text, turning it into a video, and using other photo manipulation tools.
 Share: A click here lets you share your photo through any means your PC has to offer, including mail and Near Sharing, a convenient way to pass files to other PCs described in Chapter 15.
 Print: A click on this icon sends your photo to your printer.
 Return to previous view: Return to viewing thumbnails of your photos by clicking the left-pointing arrow in the photo’s upper-left corner. (You may need to click or tap the currently displayed photo before the little arrow appears.)
 See More: A click on these three dots fetches a new drop-down menu. This menu lets you start a slideshow, copy the photo, save it in a new format, open it in a new program, set it as your computer’s lock screen or background, and see details such as the photo’s name, size, date taken, and resolution. (It also holds any extra menu items that don’t fit along the top, like Print.)
To exit the Photos app, click the
Xin its upper-right corner.The app clears itself from the screen.

FIGURE 17-5: The Photos app displays photos stored on your computer and on OneDrive.

FIGURE 17-6: Click any of these places to do different tasks while viewing a photo.
Viewing photo albums
Everybody likes to take pictures, but only a meticulous few like to spend hours organizing them, weeding out the bad ones, and sorting them into easily accessible folders.
That’s where the Photos app’s robotically curated Albums view comes in handy. When you switch to Album view, the Photos app turns its robotic eye on all your photos (including those on OneDrive), weeds out the duplicates, finds a splashy one for the cover, and names it by the date of the photo session. When you open the Albums view, the app automatically turns your photos into a slideshow.
To view the Photos app’s albums, follow these steps:
From the Start menu, click the Photos icon.
The Photos app quickly appears, shown previously in Figure 17-5, to show its Collection mode: a string of photos sorted by the order you shot them.
From the Photos app’s top menu, choose Albums.
The Photos app sorts your photos into albums that represent the best of your session and displays them, shown in Figure 17-7.
The app sorts each collection of photos by date or name. Click an album, and the Photos app shows you the best of that session’s photos, shown in Figure 17-8.
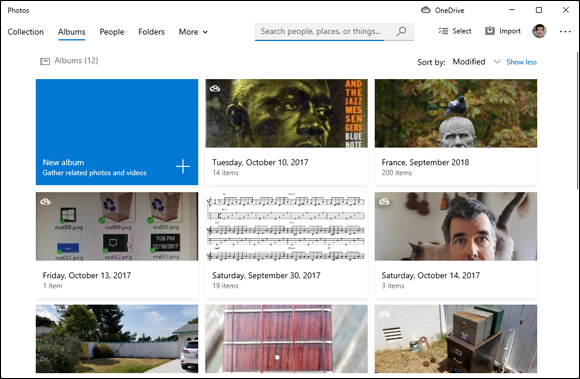
FIGURE 17-7: Click Albums to see your photos sorted by session.
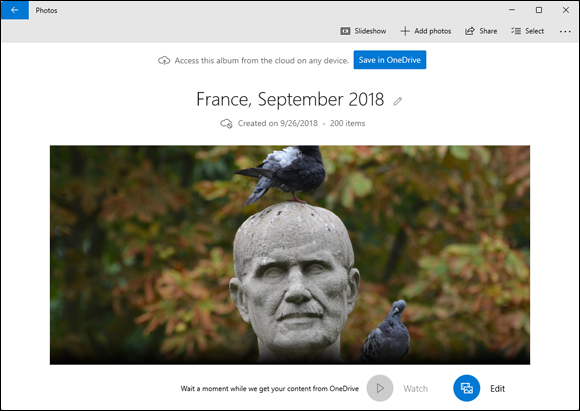
FIGURE 17-8: Click a date to see your best photos from that day’s photo-shooting session.
Click any photo to view it, or click the Watch button to view an automated slideshow.
The Photos app fills the screen with the photo; to see more, click the Next or Previous arrows along the photo’s left and right edges.
The Photos app takes its best guess as to which photos work best for each session. Taking mercy on the vacation-photo-saturated relatives sitting on your couch, the app leaves out some of your photos. That’s usually a good thing, as it’s smart enough to remove duplicates and blurry photos.
You can also click the Save in OneDrive button to save your album to OneDrive, where you can view it with any of your devices with a OneDrive app. (That includes most popular phones, tablets, and some smart TVs these days.)
Clicking the Watch button, shown in the bottom of Figure 17-8, plays a slideshow with music and a splashy title page. You can change the music and adjust the slideshow by clicking the adjacent Edit button, which drops you into the Video Editor to make the changes.
Viewing a slideshow
Windows offers several ways to display your photos as a slideshow. They’re a great way to show photos to friends crowding around your computer screen.
![]() To see a slideshow of all the pictures in a File Manager folder, open one of the folder’s photos. When the photo opens in the Photos app, click the app’s More icon and choose Slideshow from the drop-down menu: The Photos app will display a slideshow with all the photos in that folder.
To see a slideshow of all the pictures in a File Manager folder, open one of the folder’s photos. When the photo opens in the Photos app, click the app’s More icon and choose Slideshow from the drop-down menu: The Photos app will display a slideshow with all the photos in that folder.
Here are more tips for successful on-the-fly slideshows:
- Before starting the slideshow, rotate any sideways pictures, if necessary, so they all appear right-side up.
- The slideshow includes only photos in your currently viewed folder or that you’ve selected. It doesn’t dip into folders inside that folder and show their photos too.