Chapter 4
Basic Desktop Window Mechanics
IN THIS CHAPTER
![]() Understanding a window’s parts
Understanding a window’s parts
![]() Manipulating buttons, bars, and boxes
Manipulating buttons, bars, and boxes
![]() Finding commands on the folder menus
Finding commands on the folder menus
![]() Understanding the Navigation pane
Understanding the Navigation pane
![]() Moving windows and changing their size
Moving windows and changing their size
The Windows Start menu simply contains icons and an occasional button. It’s easy to see what you’re poking at with a finger or mouse.
The Windows desktop, by contrast, includes lots of movable windows, each with miniscule, monochrome buttons, tiny lettering, unlabeled buttons, and pencil-thin borders. The windows come with way too many parts, many with confusing names that programs expect you to remember. To give you a hand, this chapter provides a lesson in basic windows anatomy and navigation.
You eventually need to know this stuff because windows tend to overlap on the desktop; you need to manually push and prod them into view. And if you think you already know this stuff from Windows 10, think again: Windows 11 brings drastic changes to File Explorer.
I’ve dissected each part of a window so you know what happens when you click or touch each portion. By all means, use this book’s margins to scribble notes as you move from the fairly simple Start menu to the powerful yet complicated Windows desktop.
Dissecting a Typical Desktop Window
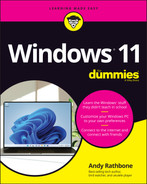
Figure 4-1 places a typical window on the slab, with all its parts labeled. You might recognize the window as File Explorer’s Quick Access section, the first area that appears when you open File Explorer.
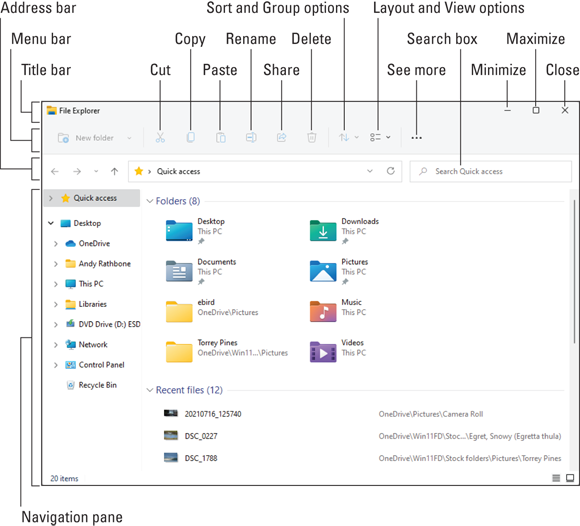
FIGURE 4-1: Here’s how the ever-precise computer nerds address the different parts of a window.
Just as boxers grimace differently depending on where they’ve been punched, windows behave differently depending on where they’ve been clicked. The next few sections describe the main parts of the File Explorer window in Figure 4-1, how to click them, and how Windows jerks in response.
- Windows veterans remember their My Documents folder, that stash for almost all their files. Windows now calls it simply the Documents folder. (No matter what it’s called, you’re still supposed to stash your files inside it.) Similarly, Microsoft dropped the “My” from the Music, Videos, and other oft-used folders.
 In Windows 10, a thick, control-filled panel called the Ribbon lives atop every folder. Windows 11 replaces the Ribbon with dimly lit, gray icons with no names. Most of the cryptic new icons don’t even reveal their name when you hover a mouse pointer over them. Luckily, I’ve labeled them all in Figure 4-1.
 Windows no longer shows libraries in the Navigation pane. Most people won’t miss them. If you do, put them back: Right-click a blank place inside the Navigation pane and choose Show Libraries from the pop-up menu.
- Windows no longer shows Homegroups in the Navigation pane, either. There’s no way to put them back. I cover alternative networking and file-sharing solutions in Chapter 15.
- Windows is full of little oddly shaped buttons, borders, and boxes. You don’t need to remember all their names, although that would give you a leg up on figuring out the scholarly Windows Help menus. When you spot an odd portion of a window, just return to this chapter, look up its name in Figure 4-1, and read its explanation.
- You can deal with most things in Windows by clicking, double-clicking, or right-clicking. Hint: When in doubt, always right-click.
 Navigating desktop windows on a touchscreen computer? For some touching tips, drop by the sidebar in Chapter 3 on touching desktop programs on a Windows tablet.
- After you click a few windows a few times, you realize how easy it is to boss them around. The hard part is finding the right controls for the first time, like figuring out the dashboard on that rental car.
Tugging on a window’s title bar
Found atop nearly every window (see examples in Figure 4-2), the title bar usually lists the program name and, if applicable, the file, folder, or section that it’s currently displaying. For example, Figure 4-2 shows the title bars living atop File Explorer (top) and the Settings app (bottom).
Although mild-mannered, the mundane title bar holds hidden powers, described in the following tips:
- To find the window you’re currently working on, look at the title bar along the window’s top edge. One title bar will usually be slightly darker than the other, and its window casts a gray shadow over the other windows. See how File Explorer (Figure 4-2, top) casts a slight shadow over the Settings app’s title bar (Figure 4-2, bottom)? That distinguishes that window from windows you aren’t working on. By glancing at all the title bars on the desktop, you can tell which window is awake and accepting anything you type.
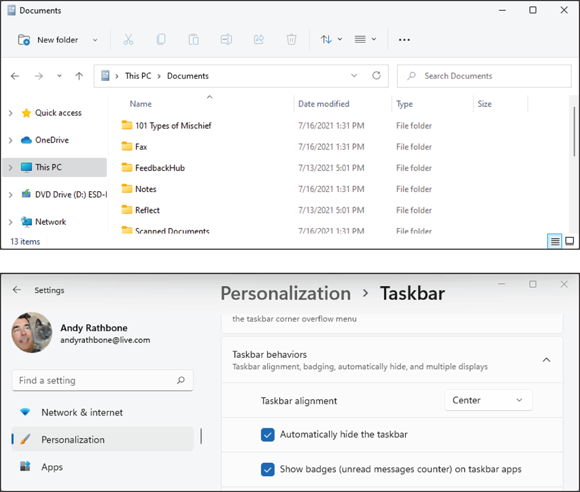
FIGURE 4-2: A title bar across the top of File Explorer (top) and the Settings app (bottom).
- Windows 11 isn’t consistent with its title bars. Most programs have them, but some apps don’t show title bars at all, much less show them in different colors. Windows 11 continues that trend toward monotone confusion.
- On the positive side, title bars make convenient handles for moving windows around your desktop. Move the mouse pointer to a blank part of the title bar, hold down the mouse button, and move the mouse around: The window follows along as you move your mouse. Found the right location? Let go of the mouse button, and the window sets up camp in its new spot.
- Don’t see a title bar across a window’s top edge? Microsoft still put it there, but sneakily made it invisible. To reposition that window, aim the mouse pointer at the window’s top, where the title bar should be, and drag the window to its new place on your desktop.
- Double-click a blank portion of the title bar, and the window leaps to fill the entire desktop. Double-click it again, and the window retreats to its previous size.
- All programs and apps place three buttons on the right end of every title bar. From left to right, they let you Minimize, Restore (or Maximize), or Close a window, topics all covered in the “Maneuvering Windows Around the Desktop” section, later in this chapter.
- Don’t see those three buttons at the top of the title bar? In another odd move, Microsoft sometimes makes them invisible. They’ll appear if you point the mouse where the buttons should be, which is the window’s upper-right corner.
Navigating folders with a window’s Address bar
Directly beneath every open folder’s title bar or menu bar lives the Address bar, shown near the top of the folder in Figure 4-3. Web surfers will experience déjà vu: The Windows Address bar is lifted straight from the top edge of web browsers and glued atop every open folder.

FIGURE 4-3: An Address bar.
The Address bar’s four main parts, described from left to right in the following list, perform four different duties:
- Backward and Forward buttons: These two arrows track your path as you forage through your PC’s folders. The Backward button backtracks to the folder you just visited. The Forward button brings you back.
- Down Arrow button: Click this extraordinarily tiny arrow to see a drop-down list of folders you’ve visited previously. You can click any listed folder for a quick revisit.
- Up Arrow button: Click the Up Arrow button to move up one folder from your current folder. For example, if you’ve been sorting files in your Documents folder’s “Stuff” folder, click the Up arrow to return to your Documents folder.
- Address: Just as a web browser’s Address bar lists a website’s address, the Windows Address bar displays your current folder’s address — its location inside your PC. For example, the Address bar shown in Figure 4-3 shows two words: This PC, and Documents. Those words tell you that you’re looking inside the Documents folder on This PC. (That’s your PC, as opposed to somebody else’s PC.) Yes, addresses are complicated enough to warrant an entire chapter: Chapter 5.
- Search box: Every Windows folder sports a Search box. Instead of searching the internet, though, it rummages through your current folder’s contents. For example, if you type the word carrot into a folder’s Search box, Windows digs through that folder’s contents and retrieves every file or folder mentioning carrot. (For more tips on finding things, flip ahead to Chapter 7.)
In the Address bar, notice the little arrows between the words This PC and Documents. The arrows offer quick trips to other folders. Click any arrow — the one to the right of the word Documents, for example. A little menu drops down from the arrow, letting you jump to any other folder inside your Documents folder.
Figuring out your folder’s new Menu bars
Desktop windows have more menu items than an Asian restaurant. To keep everybody’s minds on computer commands instead of a tasty seaweed salad, Windows places menus and icons on a strip that lives atop every folder. (See Figure 4-4.)
In Windows 11, these new menus and icons replace the Ribbon, a menu-filled strip found in earlier Windows versions.

FIGURE 4-4: The Pictures folder’s Menu bar.
The menus change depending on the window’s contents, as well as the items you select in that folder. Click on a photo in a folder, for example, and the far right option changes to Set as Background: a quick way to splash that photo across your desktop.
Just as restaurants sometimes run out of specials, a window sometimes isn’t capable of offering all its menu items. Any unavailable options are grayed out, like the Paste option in Figure 4-4. But if you click on the More icon — the three dots on the bar’s far right edge in Figure 4-5 — you can see additional items that don’t fit on the menu.

FIGURE 4-5: Click the More icon to see additional options.
Make the window wider by stretching its edges outward, and more options appear on the Menu bar, described later in this chapter’s “Boring borders” section.
You needn’t know much about the Menu bar because Windows automatically places the correct buttons atop each program’s window. Open a photo, for example, and the Menu bar quickly spouts a new icons for rotating upside-down photos.
If a button’s meaning isn’t immediately obvious, hover your mouse pointer over it; a little message usually explains the button’s purpose.
Quick shortcuts with the Navigation pane
Look at most “real” desktops, and you’ll see the most-used items sitting within arm’s reach: the coffee cup, the stapler, and perhaps a few crumbs from the coffee room snacks. Similarly, Windows gathers your PC’s most frequently used items and places them in the Navigation pane, shown in Figure 4-6.
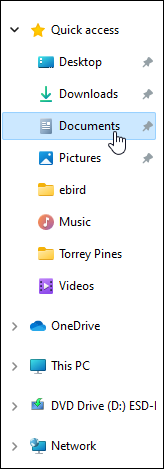
FIGURE 4-6: The Navigation pane offers shortcuts to places you visit most frequently.
Found along the left edge of every folder, the Navigation pane contains several main sections: Quick Access, OneDrive, and This PC. (On PCs connected through a network, you’ll see an entry for Network, as well.) Click any of those sections — Quick Access, for example — and the window’s right side quickly shows you the contents of what you’ve clicked.
Here’s a more detailed description of each part of the Navigation pane:
- Quick Access: Formerly called Favorites, these locations serve as clickable shortcuts to your most frequently accessed locations in Windows. The little “pin” icon next to their name means they’re pinned to that area, and they won’t disappear.
- Desktop: A quick click here brings you right back to your desktop, where most people store their favorite files and folders.
- Downloads: Click this shortcut to find the files you’ve downloaded while browsing the internet. Ah, that’s where they ended up!
- Documents: A perennial favorite, this folder stores most of your work: spreadsheets, reports, letters, and other things you’ve created.
- Pictures: Another popular destination, this takes you to photos you’ve shot yourself or saved from the internet.
- Recently accessed areas: The Quick Access area automatically places links to your most frequently accessed folders. Since they lack pins next to them, they’re temporary. If Windows notices that you visit other places more often, those new places will replace the older ones.
- OneDrive: This online storage space was handed to you by Microsoft when you created a Microsoft account. (Without a Microsoft account, it’s simply another folder on your PC.) Because OneDrive is password-protected and online, it’s tempting to fill it with favorite files for access from any PC, phone, or other internet-connected device. But when your stored files exceed your 5GB free storage limit, Microsoft asks for your credit card to pay for the extra space. I cover OneDrive at the end of Chapter 5.
- This PC: This section lets you browse through your PC’s folders and hard drives. (Many of these commonly used storage areas live in the Quick Access area of the Navigation pane, as well.) The This PC section holds these areas:
- Desktop: Click this to see the files and folders stored on your desktop.
- Documents: This opens the Documents folder, a convenient repository for letters, forms, and reports.
- Downloads: Downloaded a file from a website? Then look in here to be reintroduced.
- Music: Yep, this shortcut jumps straight to your Music folder, where a double-click on a song starts it playing through your PC’s speakers.
- Pictures: This shortcut opens your Pictures folder, the living quarters for all your digital photos.
- Videos: Click here to visit your Videos folder, where a double-click on a video opens it for immediate viewing.
- Local Disk (C:): A holdover for old techies, this entry lets you crawl through the hundreds of folders on your PC. Unless you know specifically what item you’re seeking, though, you probably won’t find it. Stick with the other destinations instead.
- Disc Drives: If your PC includes extra disc drives, like DVD drives, icons for those appear here. Insert a flash drive into your USB port, and its icon appears here, as well.
- Network: After you create a network from the PCs in your home, their names appear here. I cover networks in Chapter 15.
Here are a few tips for making the most of your Navigation pane:
- To avoid treks back to the Start menu, add your own favorite places to the Navigation pane’s Quick Access area: Right-click a favorite folder and choose Pin To Quick Access from the pop-up menu. (Similarly, right-click any unwanted listing in the Quick Access area and remove it by choosing Unpin From Quick Access.)
- If you’ve connected to a network at home or work, the pane’s This PC section may include those other computers’ music, video, and photos (which are sometimes referred to as media). Click those computers’ icons to access those goodies as if they were stored on your own computer.
- Old-time Windows owners may notice that Windows 11 doesn’t show libraries in the Navigation pane. Libraries still exist, but they’re hidden in the background. To bring them back into view, click a blank portion of the Navigation pane and choose Show Libraries from the pop-up menu. (You must also manually add the Public folders to each library to return them to the glory days of Windows 7.)
Moving inside a window with its scroll bar
The scroll bar, which resembles a cutaway of an elevator shaft (see Figure 4-7), rests along the edge of all overstuffed windows. And in Windows 11, those elevator shafts are narrower than ever. Sometimes they don’t appear until you hover your mouse pointer over a window’s border.
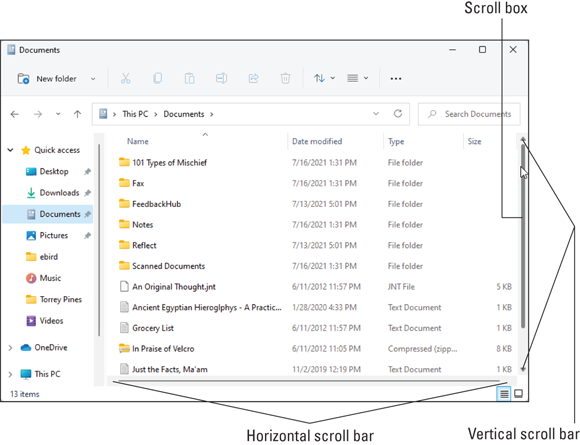
FIGURE 4-7: Horizontal and vertical scroll bars.
Inside the shaft, a little elevator (technically, the scroll box) rides along as you move through the window’s contents. In fact, by glancing at the box’s position in the scroll bar, you can tell whether you’re viewing items in the window’s beginning, middle, or end.
By clicking in various places on the scroll bar, you can quickly view different parts of things. Here’s the dirt:
- Click inside the scroll bar in the direction you want to view. On a vertical scroll bar, for example, click above the scroll box to move your view up one page. Similarly, click below the scroll box to move your view down a page.
- Many apps hide their scroll bars until you point at where they should be. The scroll bar is nearly invisible, but it magically pops into view when the mouse pointer is nearby. Welcome to Microsoft’s new secret club of invisible items!
- Don’t see a scroll bar or a box in the bar, even when you point your mouse at the screen’s border? Then you’re already seeing everything that the window has to offer; there’s nothing to scroll.
- To move around in a hurry, drag the scroll box inside the scroll bar. As you drag, you see the window’s contents race past. When you see the spot you want, let go of the mouse button to stay at that viewing position.
 Are you using a mouse that has a little wheel embedded in the poor critter’s back? Spin the wheel, and the elevator moves inside the scroll bar, shifting your view accordingly. It’s a handy way to explore an icon-packed folder or long document.
Boring borders
A border is that thin edge surrounding a window, including desktop windows containing apps. Compared with a scroll bar, it’s really tiny. And since it’s usually light gray in Windows 11, it’s often difficult to see.
To change a window’s size, drag the border in or out. (When the mouse pointer turns into a two-headed arrow, you’re in the right place to start dragging.) Some windows, oddly enough, don’t have borders. Stuck in limbo, their size can’t be changed — even if they’re an awkward size.
Except for tugging on them with the mouse, you don’t use borders much.
Maneuvering Windows Around the Desktop
A terrible dealer at the poker table, Windows tosses windows around your desktop in a seemingly random way. Programs cover each other or sometimes dangle off the desktop. The following sections show you how to gather all your windows into a neat pile, placing your favorite window on the top of the stack. If you prefer, lay them all down like a poker hand. As an added bonus, you can change their size, making them open to any size you want, automatically.
Moving a window to the top of the pile
Windows says the window atop the pile that’s getting all the attention is called the active window. Being the active window means that it receives any keystrokes you or your cat happen to type.
You can move a window to the top of the pile so that it’s active in any of several ways:
- Move the mouse pointer until it hovers over any portion of your desired window; then click the mouse button. Windows immediately brings the window to the top of the pile.
- On the taskbar (located along the bottom of the desktop), click the icon for the window you want. Chapter 3 explains what the taskbar can do in more detail.
- Hold down the Alt key while tapping and releasing the Tab key. With each tap of the Tab key, a small window pops up, displaying a thumbnail of each open window on your desktop. (You also see thumbnails of open Start menu apps.) When your press of the Tab key highlights your favorite window, let go of the Alt key, and your window leaps to the forefront.
 A click of the Task View button (shown in the margin) also places miniature views of each window on the screen, even if they’re on different virtual desktops. Click the desired miniature window, and it rises to the top, ready for action. I cover the Task View button and virtual desktops in Chapter 3.
Windows 10 offered a solution for cluttered desktops: You could hold down your mouse pointer on your desired window’s title bar and give it a few quick shakes; Windows drops the other windows down to the taskbar, leaving your main window resting alone on an empty desktop. Windows 11 dropped that feature, for some shaky reason.
Moving a window from here to there
Sometimes you want to move a window to a different place on the desktop. Perhaps part of the window hangs off the edge, and you want it centered. Or maybe you want one window closer to another.
In either case, you can move a window by dragging and dropping its title bar, that thick bar along its top. (If you’re not sure how dragging and dropping works, see the sidebar “Dragging, dropping, and running,” earlier in this chapter.) When you drop the window in place, the window not only remains where you’ve dragged and dropped it, but it also stays on top of the pile — until you click another window, that is, which brings that window to the pile’s top.
Here’s a historical tidbit: Title bars used to always contain the title of the app or program, hence, the name title bar. Now, many apps leave out the title. Nevertheless, you can still tug those apps around by dragging their title bar, just as before.
Making a window fill the whole desktop
Sooner or later, you’ll grow tired of all this multiwindow mumbo jumbo. Why can’t you just make one window fill the screen? Well, you can.
To make any desktop window grow as large as possible, double-click its title bar, that bar along the window’s topmost edge. The window leaps up to fill the entire desktop, covering up all the other windows.
To reduce the pumped-up window back to its former size, double-click its title bar once again. The window quickly shrinks to its former size, and you can see things that it covered.
 If you’re morally opposed to double-clicking a window’s title bar to expand it, you can click the Maximize button. Shown in the margin, it’s the middle of the three buttons in the upper-right corner of every window.
 When a window is maximized to fill the desktop, the Maximize button turns into a Restore button, shown in the margin. Click the Restore button, and the window returns to its smaller size.
Need a brute force method? Then drag a window’s top edge until it butts against the top edge of your desktop. The shadow of the window’s borders will expand to fill the desktop; let go of the mouse button, and the window’s borders fill the desktop. (Yes, simply double-clicking the title bar is faster, but this method impresses any onlookers from neighboring cubicles.)
Too busy to reach for the mouse? Maximize the current window by holding down the  key and pressing the up-arrow key. (Hold down the key and press the down-arrow key to return to normal size.)
Closing a window
![]() When you’re through working in a window, close it: Click the little X in its upper-right corner. Zap! You’re back to an empty desktop.
When you’re through working in a window, close it: Click the little X in its upper-right corner. Zap! You’re back to an empty desktop.
If you try to close your window before finishing your work, be it a game of Solitaire or a report for the boss, Windows cautiously asks whether you’d like to save your work. Take it up on its offer by clicking Yes and, if necessary, typing in a filename so that you can find your work later.
Making a window bigger or smaller
Like big lazy dogs, windows tend to flop on top of one another. To space your windows more evenly, you can resize them by dragging and dropping their edges inward or outward. It works like this:
- Point at any corner with the mouse arrow. When the arrow turns into a two-headed arrow, you can hold down the mouse button and drag the corner in or out to change the window’s size.
When you’re happy with the window’s new size, release the mouse button.
The window settles down into its new position.
Neatly placing windows side by side
The longer you use Windows, the more likely you are to want to see two windows side by side. For example, you may want to copy things from one window into another or compare two versions of the same file. By spending a few hours with the mouse, you can drag and drop the windows’ corners until they’re in perfect juxtaposition.
If you’re impatient, Windows lets you speed up this handy side-by-side placement in several ways:
- For the quickest solution, drag a window’s title bar against one side of your desktop; when your mouse pointer touches the edge of the desktop, let go of the mouse button. Repeat these same steps with the second window, dragging it to the opposite side of the desktop.
- If you drag a window to fill one edge of the screen, Windows immediately shows thumbnails of your minimized windows. Click the thumbnail of the window you’d like to see fill the screen’s other half.
- To place four windows onscreen simultaneously, drag the title bar of each window to a different corner of the screen. Each window resizes itself to grab its own quarter of the screen.
- To make the current window fill the desktop’s right half, hold the key and press the right-arrow key. To fill the desktop’s left half, hold the key and press the left-arrow key.
- Windows 11 adds yet another way to organize open windows. Hover your mouse pointer over the window’s Maximize button and a grid appears, shown in Figure 4-8. The grid shows different ways to organize your windows. Click a spot on the grid; it lights up, and you’re set: Your window quickly resizes itself and jumps there. This works best for people with large monitors with a lot of space for windows. The more space on your desktop, the more spaces you see on the grid.
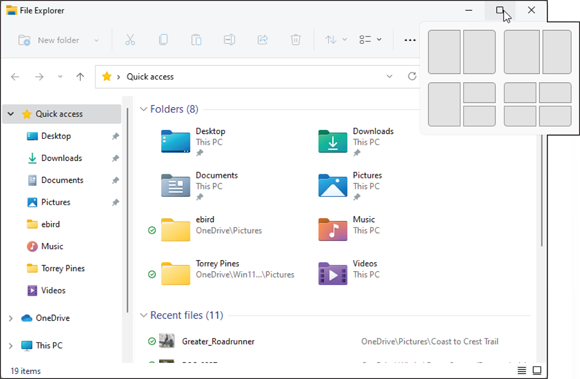
FIGURE 4-8: Click the spot on the grid where the window should position itself.
Making windows open to the same darn size
Sometimes a window opens to a small square; other times, it opens to fill the entire desktop. But windows rarely open to the exact size you want. Until you discover this trick, that is: When you manually adjust the size and placement of a window, Windows remembers that size and always reopens the window to that same size. Follow these three steps to see how it works:
Open your window.
The window opens to its usual unwanted size.
Drag the window’s corners until the window is the exact size and in the exact location you want. Let go of the mouse to drop the corner into its new position.
Be sure to resize the window manually by dragging its corners or edges with the mouse. Simply clicking the Maximize button won’t work.
Immediately close the window.
Windows memorizes the size and placement of a window at the time it was last closed. When you open that window again, it should open to the same size you last left it. But the changes you made apply only to the program you made them in. For example, changes made to the File Explorer window will be remembered only for File Explorer, not for other programs you open.
Most windows follow these sizing rules, but a few renegades may misbehave, unfortunately.