Chapter 5
Storing and Organizing Files
IN THIS CHAPTER
![]() Managing files with the desktop’s File Explorer
Managing files with the desktop’s File Explorer
![]() Navigating drives, folders, and flash drives
Navigating drives, folders, and flash drives
![]() Creating and naming folders
Creating and naming folders
![]() Selecting and deselecting items
Selecting and deselecting items
![]() Copying and moving files and folders
Copying and moving files and folders
![]() Writing to CDs and memory cards
Writing to CDs and memory cards
![]() Understanding Windows OneDrive
Understanding Windows OneDrive
By leaving their paper-strewn oak desktops and moving to computers, people hoped things would be much easier. Important papers would no longer slide behind the desk or languish in dusty drawers. Thirty years later, though, we know the truth: Computers come with just as many nooks, crannies, and hiding places as did the desks they replaced … maybe even more.
In Windows, File Explorer serves as your computerized file cabinet. Plug a flash drive or portable hard drive into your computer, and File Explorer appears, ready for you to start rustling through folders.
You’re stuck with File Explorer whenever you need to find folders inside your computer, outside your computer on plug-in drives and digital cameras, and even in some storage spots on the internet called clouds.
Whether you’re using a touchscreen tablet, a laptop, or a desktop PC, files and folders still rule the computing world. And unless you grasp the Windows folder metaphor, you may not find your information very easily.
This chapter explains how to put File Explorer to work. (You may recognize it as Windows Explorer, its name from older Windows versions.) This chapter also explains how to use OneDrive, your cloud storage space, to store files away from your computer and on the internet, instead.
Along the way, you ingest just enough Windows file management skills for you to save and retrieve your work without too much discomfort.
Browsing the File Explorer File Cabinets
To keep your programs and files neatly arranged, Windows cleaned up the squeaky old file cabinet metaphor with whisper-quiet Windows icons. Inside File Explorer, the icons represent your computer’s storage areas, allowing you to copy, move, rename, or delete your files before the investigators arrive.
![]() To open File Explorer, shown in Figure 5-1, and begin rummaging around inside your computer, click the File Explorer icon. Shown in the margin, it’s near the middle of the taskbar’s row of icons along the bottom of your screen.
To open File Explorer, shown in Figure 5-1, and begin rummaging around inside your computer, click the File Explorer icon. Shown in the margin, it’s near the middle of the taskbar’s row of icons along the bottom of your screen.
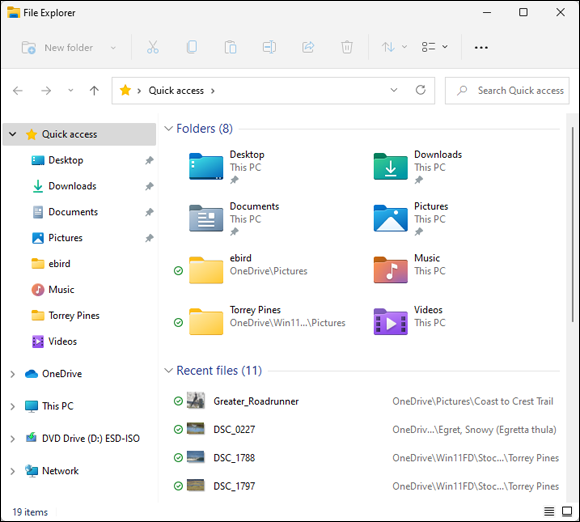
FIGURE 5-1: The File Explorer window displays popular storage areas and your most recently opened files.
In previous versions of Windows, File Explorer opened to show your computer’s largest file cabinets, called drives or disks in computer lingo. Windows 11 goes one step further.
 Instead of dropping you off at the drives and forcing you to dig for your files, the Windows 11 File Explorer tries to be more helpful. It simply lists your most popular folders along the top, in its Folders section. For example, it shows
 Documents, where you store most of your files, and Downloads, the holding tank for everything you download from the internet. (You also see shortcuts to your Music, Videos, and Pictures folders, as well as your Desktop.)
Below those main folders, in the Recent Files section, File Explorer may list shortcuts to the items you've opened most recently. If you worked on a spreadsheet yesterday, for example, find it again by opening File Explorer: A link to that spreadsheet lives in the Recent Files section, ready to be reopened with a double-click.
Seeing your main storage folders and recently opened files may be all you need to start working. But if you need to see all your computer’s storage areas, click the words This PC in the pane along the left edge. File Explorer opens to a similar view, but with your computer’s storage areas — hard drives, disk drives, flash drives, and similar holding tanks — listed below them, shown in Figure 5-2.
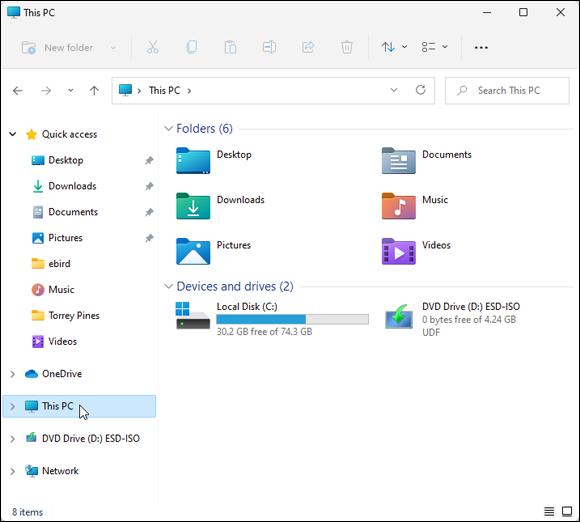
FIGURE 5-2: Click This PC to see your computer’s storage areas, which you can open to find your files.
The File Explorer images shown in Figure 5-2 will look slightly different from the ones on your PC, but you should still see the same basic sections:
- Navigation pane: The handy Navigation pane, that strip along every folder’s left edge, lists shortcuts to different storage spaces on your PC, on OneDrive, and on any other connected computers. (I cover the Navigation pane in Chapter 4.)
- Folders: When opened, File Explorer lists shortcuts to your main storage folders, as well as your computing history, a list of recently accessed folders and files. Unless you’re starting a brand-new project, you can probably find your most recent work here.
 Devices and Drives: Shown in Figure 5-2, this area lists your PC’s storage areas and devices. (The term devices usually refers to gadgets plugged into your PC.) Every computer has at least one hard drive. Double-clicking a hard drive icon displays its files and folders, but you can rarely find much useful information when probing that way. No, your most important files live in your
 Documents,Music,Pictures, andVideosfolders, which appear near the top of Figure 5-2. Notice the hard drive bearing the little Windows icon (shown in the margin)? That means that Windows 11 lives on that drive. If you click the Layout and View icon from the top menu and select Tiles, a multicolored line appears next to each drive's icon. The more colored space you see in the line, the more files you’ve stuffed onto your drive. When the line turns red, your drive is almost full, and you should think about deleting some unwanted files, uninstalling some unused programs, or upgrading to a larger drive.
You may also see some detachable gadgetry attached to your computer. Here are some of the more common items:
 CD, DVD, and Blu-ray drives: As shown in Figure 5-2, Windows places a short description next to each drive’s icon. For example, CD-RW means the drive can store files on CDs but not DVDs. DVD-RW means that it can both read and store files onto DVDs and CDs. A BD-ROM drive can read Blu-ray discs, but it can store files only to CDs and DVDs. And the ever-so-versatile BD-RE and BD-R drives can read and store files onto Blu-ray discs, DVDs, and CDs.
Writing information to a disc is called burning. Copying information from a disc is called ripping.
- Flash drives: The icon for some flash drive brands resembles the actual flash drive. Most flash drives simply show a generic icon like the one in the margin.
 Windows doesn’t usually display icons for your computer’s memory card readers until you’ve inserted a card into them. To see icons for your empty card readers, open File Explorer, click the Layout and View Options icon, and click Show from the drop down menu. Finally, select the Hidden Items option from the drop-down menu. To hide them again, take a few breaths, and then repeat these steps.
  iPads, phones, and MP3 players: Android phones, iPads, and iPhones usually receive a generic icon of a hard drive, tablet, or MP3 player. Some let you copy photos to and from the device; others don’t. If you own an iPhone or iPad, you need the Apple iTunes software (
www.apple.com/itunes) that runs on the Windows desktop. Windows can’t copy songs to and from an iPhone or iPad by itself. (I cover MP3 players in Chapter 16.) Cameras: When plugged into your computer’s USB port, digital cameras usually appear as camera icons in the File Explorer window. To import your camera’s photos, turn on your camera and set it to its View Photos mode rather than its Take Photos mode. Then right-click the camera’s icon in File Explorer and choose Import Pictures and Videos from the pop-up menu. After Windows walks you through the process of extracting the images (see Chapter 17), it places the photos in either your Pictures folder or OneDrive’s Picture folder.
If you plug a digital camcorder, phone, or other gadget into your PC, the File Explorer window often sprouts a new icon representing your gadget. If Windows neglects to ask what you’d like to do with your newly plugged-in gadget, right-click the icon to open a list of everything you can do with that item. No icon? Then you need to install a driver for your gadget, a precipitous journey detailed in Chapter 13.
![]() To see the contents of an item listed in File Explorer, perhaps a flash drive or your digital camera, double-click it. To back out of that view, click the left-pointing arrow (shown in the margin) above the Navigation pane.
To see the contents of an item listed in File Explorer, perhaps a flash drive or your digital camera, double-click it. To back out of that view, click the left-pointing arrow (shown in the margin) above the Navigation pane.
Tip for tablets: When you read the word click, substitute tap. Similarly, right-click means touch and hold. And the term drag and drop means slide your finger along the screen as if your finger is the mouse pointer and then lift the finger to drop the item.
Getting the Lowdown on Folders
This stuff is dreadfully boring, but if you don’t read it, you’ll be just as lost as your files.
A folder is a storage area, just like a real folder in a file cabinet. Windows divides your computer’s hard drives into many folders to separate your many projects. For example, you store all your music in your Music folder and your pictures in your Pictures folder. That lets both you and your programs find them easily.
Windows gives you several main folders for storing your files. For easy access, they live in the This PC section of the Navigation pane along the left side of every folder. Shown earlier, Figure 5-2 shows your main storage areas: Desktop, Documents, Downloads, Music, Pictures, and Videos. (Microsoft removed the 3D Objects folder, a head-scratcher found in Windows 10.)
Keep these folder facts in mind when shuffling files in Windows:
- You can ignore folders and dump all your files onto the Windows desktop. But that’s like tossing everything into your car’s back seat and pawing around to find your sunglasses a month later. Organized stuff is much easier to find.
- If you’re eager to create a folder or two (and it’s pretty easy), page ahead to this chapter’s “Creating a New Folder” section.
- The Windows 11 web browser, Microsoft Edge, conveniently drops all your downloaded files into your Downloads folder. Until you delete them, every file you download from the internet lives on inside that folder.
 File Explorer folders use a tree metaphor. File Explorer shows an icon for a drive which, when clicked on, branches out into folders. Click on a folder, and it branches out into even more folders. Keep clicking inside those folders, and eventually, you reach files, which represent the leaves on your computerized tree.
Peering into Your Drives, Folders, and Other Media
Knowing all this folder stuff not only impresses computer store employees but also helps you find the files you want. (See the preceding section for a lowdown on which folder holds what.) Put on your hard hat and get ready to go spelunking among your computer’s drives and folders as well as your CDs, DVDs, and smartphones. The following sections are your guide.
Seeing the files on a drive
Like everything else in Windows, disk drives are represented by buttons or icons. File Explorer also shows information stored in other areas, such as phones, digital cameras, networked gadgetry, portable hard drives, flash drives, and scanners. (I explain these icons in the section “Browsing the File Explorer File Cabinets,” earlier in this chapter.)
Opening an icon usually lets you access the device’s contents and move files back and forth, just as with any other folders in Windows.
When you double-click a hard drive icon in File Explorer, for example, Windows promptly opens the drive to show you the folders packed inside. But how should Windows react when you insert something new into your computer, such as a CD, DVD, or flash drive?
Earlier versions of Windows tried to second-guess you. When you inserted a music CD, for example, Windows automatically began playing the music. Today’s newer, politer Windows, by contrast, asks how you prefer it to handle the situation, as shown by the pop-up notification in the lower-right corner of Figure 5-3.
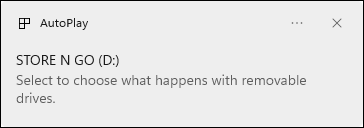
FIGURE 5-3: Windows asks how it should handle newly inserted items.
When that message appears, choose it with a click of the mouse. A second message appears, as shown in Figure 5-4, listing every way your PC and its gang of apps and programs can handle that item.
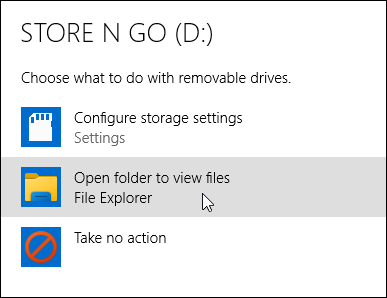
FIGURE 5-4: Choose how Windows should react the next time you insert that item.
Choose an option — Open Folder To View Files, for example — and Windows fires up File Explorer to display your newly inserted drive’s contents. The next time you plug that drive into your PC, your computer won’t bother asking; it will automatically summon File Explorer and display your drive’s folders.
But what if you change your mind about how Windows should treat a newly inserted item? Then you need to change how Windows reacts: In the This PC section of File Explorer, right-click the inserted item’s icon, choose Show More Options, and choose Open AutoPlay. Once again, Windows shows the message from Figure 5-4 and asks you to plot the future course.
Adjusting the AutoPlay settings comes in particularly handy for USB thumb drives. If your flash drive carries a few songs, Windows may want to play them, slowing your access to your flash drive’s other files. To prevent that, select the AutoPlay option, Open Folder to View Files.
 When in doubt as to what you can do with an icon in File Explorer, right-click it. Windows presents a menu of all the things you can do to that object. (You can choose Open, for example, to see the files on a flash drive, making it simpler to copy them to your computer.)
- If you double-click an icon for a CD, DVD, or Blu-ray drive when no disk is in the drive, Windows stops you, gently suggesting that you insert a disk before proceeding further.
- Spot an icon under the heading Network Location? That’s a little doorway for peering into other computers linked to your computer — if there are any. You find more network stuff in Chapter 15.
Seeing what’s inside a folder
![]() Because folders are really little storage compartments, Windows uses a picture of a little folder to represent a place for storing files.
Because folders are really little storage compartments, Windows uses a picture of a little folder to represent a place for storing files.
To see what’s inside a folder, either in File Explorer or on the Windows desktop, just double-click that folder’s picture. A new window pops up, showing that folder’s contents. Spot another folder inside that folder? Double-click that one to see what’s inside. Keep clicking until you find what you want or reach a dead end.
![]() Reached a dead end? If you mistakenly end up in the wrong folder, back your way out as if you’re browsing the web. Click the tiny Back arrow (shown in the margin) at the window’s top-left corner. That shows you the contents of the folder you just left. If you keep clicking the Back arrow, you end up right where you started.
Reached a dead end? If you mistakenly end up in the wrong folder, back your way out as if you’re browsing the web. Click the tiny Back arrow (shown in the margin) at the window’s top-left corner. That shows you the contents of the folder you just left. If you keep clicking the Back arrow, you end up right where you started.
The Address bar provides another quick way to jump to different places in your PC. As you move from folder to folder, the folder’s Address bar — that wide word-filled box at the folder’s top — constantly keeps track of your trek.
Notice the little arrows between the folder names. Those little arrows provide quick shortcuts to other folders and windows. If you try clicking any of the arrows, menus appear, listing the places you can jump to from that point. For example, click the arrow after Music, shown in Figure 5-5, and a menu drops down, letting you jump quickly to your other folders.
Here are some more tips for finding your way in and out of folders:
- Sometimes a folder contains too many files or folders to fit in the window. To see more files, click that window's scroll bars along a window’s bottom or right edges. (I cover scroll bars in your field guide, Chapter 4.)
- While burrowing deeply into folders, take note of the little arrows in File Explorer’s upper-left corner, just to the left of the Address bar. Click the little downward-pointing arrow, and a menu drops down, listing the folders you’ve plowed past on your journey. Click any name to jump quickly to that folder.
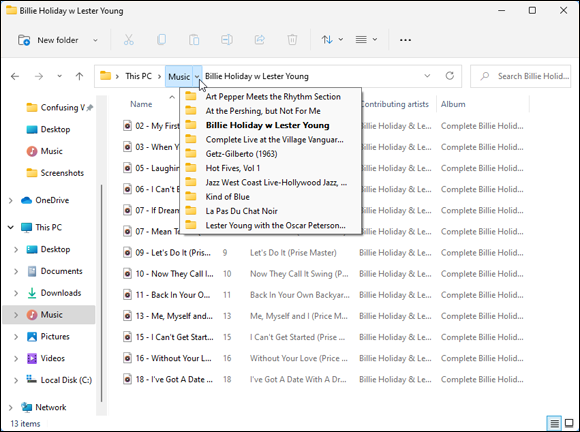
FIGURE 5-5: Click the little arrow after
Musicto jump to any place that appears in theMusicfolder.  Click the Up Arrow button, located just to the left of the Address bar, to move your view up one folder. Keep clicking it, and you’ll eventually wind up at someplace recognizable: your desktop.
- Can’t find a particular file or folder? Instead of aimlessly rummaging through folders, check out the Start menu’s Search box, which I describe in Chapter 7. The Search box can automatically find your lost files, folders, email, and nearly anything else hiding in your PC, as well as on the internet.
- When faced with a long list of alphabetically sorted files, click anywhere on the list. Then quickly type the first letter or two of the filename you’re looking for. Windows immediately jumps up or down the list to the first name beginning with those letters.
- Libraries, a sort of super folder introduced in Windows 7, vanished in Windows 8.1: Microsoft dropped them from the Navigation pane, and they’re still missing from Windows 11. If you miss them, add them back by right-clicking a blank portion of the Navigation pane and choosing Show Libraries from the pop-up menu.
Creating a New Folder
To store new information in a file cabinet, you grab a manila folder, scrawl a name across the top, and start stuffing it with information. To store new information in Windows — notes for your autobiography, for example — you create a new folder, type in a name for the new folder, and start stuffing it with files.
To create a new folder quickly, click New from any folder’s upper-left corner, and choose Folder from the drop-down menu: A new folder appears, ready for you to type its name.
You can also create a new folder with this quick and foolproof method:
Right-click on a blank spot inside your folder (or on the desktop) and choose New.
The all-powerful right-click shoots a menu out the side.
Choose Folder.
When you choose Folder, shown in Figure 5-6, a new folder quickly appears, waiting for you to type a new name.
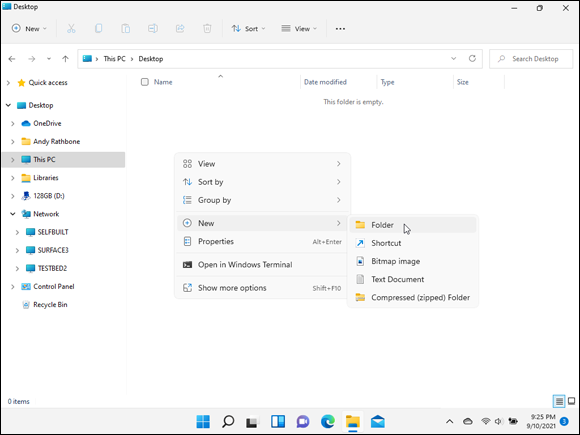
FIGURE 5-6: Right-click where you want a new folder to appear, choose New, and select Folder from the menu.
Type a new name for the folder.
A newly created folder bears the boring name of
New Folder. When you begin typing, Windows quickly erases the old name and fills in your new name. Done? Save the new name by either pressing Enter or clicking somewhere away from the name you just typed.
![]() If you mess up the name and want to try again, right-click the misnamed folder, choose the unlabeled Rename icon (shown in the margin) along File Explorer’s top edge, and start over.
If you mess up the name and want to try again, right-click the misnamed folder, choose the unlabeled Rename icon (shown in the margin) along File Explorer’s top edge, and start over.
- Certain symbols are banned from folder (and file) names. The “Using legal folder names and filenames” sidebar spells out the details, but you never have trouble when using plain old letters and numbers for names.
- Shrewd observers notice that in Figure 5-6, Windows offers to create many more things than just a folder when you click the New button. Right-click inside a folder anytime you want to create a new shortcut or other common item.
- Cautious observers may remark that their right-click menu looks different than the one shown in Figure 5-6. There’s nothing wrong; programs and apps often add their own items to the right-click menus, making the menu look different on different PCs.
Renaming a File or Folder
![]() Sick of a filename or folder name? Then change it. Just right-click the offending icon and choose the Rename icon (shown in the margin) from the top edge of the pop-up menu. Windows highlights the file’s old name, which disappears as you begin typing the new one. Press Enter or click the desktop when you’re done, and you’re off.
Sick of a filename or folder name? Then change it. Just right-click the offending icon and choose the Rename icon (shown in the margin) from the top edge of the pop-up menu. Windows highlights the file’s old name, which disappears as you begin typing the new one. Press Enter or click the desktop when you’re done, and you’re off.
Or you can click the filename or folder name to select it, wait a second, and click the name again to change it. Some people click the name and press F2; either way, Windows automatically lets you rename the file or folder.
- When you rename a file, only its name changes. The contents are still the same, the file is still the same size, and the file is still in the same place.
- To rename large groups of files simultaneously, select them all, right-click the first one, and click the Rename icon. Type in the new name and press Enter, and Windows renames that file. However, it also renames all your other selected files to the new name, adding numbers as it goes: cat, cat(2), cat(3), cat(4), and so on. It’s a handy way to rename a group of photographs after a special event.
- Renaming some folders confuses Windows, especially if those folders contain programs. And please don’t rename your main folders: Downloads, Documents, Pictures, Music, or Videos. (That can cause under-the-hood problems that you don’t want to deal with.)
- Windows won’t let you rename a file or folder if one of your programs currently uses it. Sometimes closing the program fixes the problem. Other times, you need to restart your PC. This releases the program’s clutches so that you can rename the file or folder.
Selecting Bunches of Files or Folders
Although selecting a file, folder, or other object may seem particularly boring, it swings the doors wide open for further tasks: deleting, renaming, moving, copying, and performing other file-juggling tricks discussed in the rest of this chapter.
To select a single item, just click it. To select several files and folders, hold down the Ctrl key when you click the names or icons. Each name or icon stays highlighted when you click the next one.
To gather several files or folders sitting next to each other in a list, click the first one. Then hold down the Shift key as you click the last one. Those two items are highlighted, along with every file and folder sitting between them.
Windows lets you lasso desktop files and folders, as well. Point slightly above the first file or folder you want and then, while holding down the mouse button, point at the last file or folder. The mouse creates a colored lasso to surround your files. Let go of the mouse button, and the lasso disappears, leaving all the surrounded files highlighted.
Here are a few things you can do with a bunch of files you’ve selected:
- You can drag and drop armfuls of files in the same way that you drag a single file.
- You can also simultaneously cut or copy and paste these armfuls into new locations using any of the methods described in the “Copying or Moving Files and Folders” section, later in this chapter.
- You can delete these armfuls of goods, too, with a press of the Delete key. (They all drop into the Recycle Bin and are available for emergency retrieval.)
To quickly select all the files in a folder, choose Select All from the folder’s See More menu: three dots in the folder’s upper-right corner. (No menu? Then select them by pressing Ctrl+A.) Here’s another nifty trick: To grab all but a few files, press Ctrl+A, and while still holding down Ctrl, click the ones you don’t want.
Getting Rid of a File or Folder
![]() Sooner or later, you’ll want to delete a file that’s no longer important — yesterday’s lottery picks, for example, or a particularly embarrassing digital photo. To delete a file or folder, right-click its name or icon. Then click the Delete icon (shown in the margin) from the top edge of the pop-up menu. This surprisingly simple trick works for files, folders, shortcuts, and just about anything else in Windows.
Sooner or later, you’ll want to delete a file that’s no longer important — yesterday’s lottery picks, for example, or a particularly embarrassing digital photo. To delete a file or folder, right-click its name or icon. Then click the Delete icon (shown in the margin) from the top edge of the pop-up menu. This surprisingly simple trick works for files, folders, shortcuts, and just about anything else in Windows.
To delete in a hurry, click the offending object and press the Delete key. Dragging and dropping a file or folder to the Recycle Bin does the same thing.
 You can delete entire folders, including any files or folders stuffed inside those folders. Just be sure you select the correct folder before you delete it and all its contents. Deleted something by mistake? It’s waiting to be recovered in the Recycle Bin.
- Unlike earlier Windows versions, Windows 11 doesn’t toss a box in your face, asking whether you’re sure you want to delete the file. If you prefer being asked, right-click the Recycle Bin, choose Properties, and place a check mark next to Display Delete Confirmation Dialog, then click the OK button to save your change.
- Be extra sure that you know what you’re doing when deleting any file that depicts a little gear in its icon. These files are usually sensitive hidden files that belong to apps or programs, and the computer wants you to leave them alone. (Other than that, they’re not particularly exciting, despite the action-oriented gears.)
 Icons with little arrows in their corners (like the one in the margin) are shortcuts, which are push buttons that merely load other files. (I cover shortcuts in Chapter 6.) Deleting shortcuts deletes only a button that loads a file or program. The file or program itself remains undamaged and still lives inside your computer.
- As soon as you find out how to delete files, trot off to Chapter 3, which explains several ways to undelete them. (Hint for the desperate: Open the Recycle Bin, right-click your file’s name, and choose Restore.)
Copying or Moving Files and Folders
To copy or move files to different folders on your hard drive, it’s sometimes easiest to use your mouse to drag them there. For example, here’s how to move a file to a different folder on your desktop. In this case, I’m moving the Traveler file from the House folder to the Morocco folder.
Align the two windows next to each other.
I explain this in Chapter 4. If you skipped that chapter, try this: Click the first window and then hold the
 + key and press the right-arrow key. To fill the screen's left half, click the other window, hold the + key, and press the left-arrow key.
Hover the mouse pointer over the file or folder you want to move.
In my example, I hover the mouse pointer over the
Travelerfile.While holding down the right mouse button, move the mouse until it points at the destination folder.
As you see in Figure 5-7, I’m dragging the
Travelerfile from theHousefolder to theMoroccofolder.Moving the mouse drags the file along with it, and Windows explains that you're moving the file, as shown in Figure 5-7. (Be sure to hold down the right mouse button the entire time.)
Always drag icons while holding down the right mouse button. Windows is then gracious enough to give you a menu of options when you position the icon, and you can choose to copy, move, or create a shortcut. If you hold down the left mouse button, Windows sometimes doesn’t know whether you want to copy or move.- Release the mouse button and choose Copy Here, Move Here, or Create Shortcuts Here from the pop-up menu.
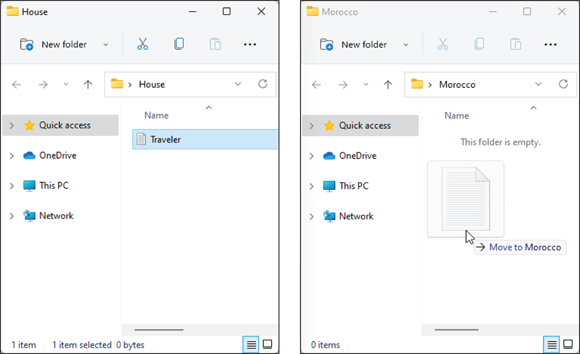
FIGURE 5-7: To move a file or folder from one window to another, drag it there while holding down the right mouse button.
When dragging and dropping takes too much work, Windows offers a few other ways to copy or move files. Depending on your screen’s current layout, some of the following onscreen tools may work more easily:
- Right-click menus: Right-click a file or folder and choose either the Cut or Copy icons, depending on whether you want to move or copy it. Then right-click inside your destination folder and click the Paste icon. It’s simple, it always works, and you needn’t bother placing any windows side by side.
- File Explorer commands: In File Explorer, click your file or folder, and then click either the Copy or Move icon from the top of File Explorer. Then click inside that item’s destination and click the Paste icon to neatly deposit the item into its new location.
- Navigation pane: Described in Chapter 4, this panel along File Explorer’s left edge lists popular locations: drives, networks, OneDrive, and oft-used folders. That lets you drag and drop items into a folder on the Navigation pane, sparing you the hassle of opening a destination folder.
After you install a program on your computer, don’t ever move that program’s folder. Programs wedge themselves deeply into Windows. Moving the program may break it, and you’ll have to reinstall it. However, feel free to move a program’s shortcut. (Shortcut icons contain a little arrow in their lower-left corner.) If you no longer need the program, head to the Start menu, right-click the unloved app, and choose Uninstall from the pop-up menu.
Seeing More Information about Files and Folders
Whenever you create a file or folder, Windows scrawls a bunch of secret hidden information on it, such as the date you created it, its size, and even more trivial stuff. Sometimes Windows even lets you add your own secret information, including reviews for your music files or thumbnail pictures for any of your folders.
You can safely ignore most of the information. Other times, tweaking that information is the only way to solve a problem.
To see what Windows is calling your files and folders behind your back, right-click the item and choose Properties from the pop-up menu. Choosing Properties on a song, for example, brings up bunches of details, as shown in Figure 5-8. Here’s what each tab means:
General: This first tab (far left in Figure 5-8) shows the file’s type (an MP3 file of the song “Gut Bucket Blues”), its size (6.54MB), the program that opens it (in this case, the Groove Music app), and the file’s location.
Want a different program to open your file? Right-click the file, choose Properties, and click the Change button on the General tab, shown in Figure 5-8. A list of your computer’s available music players appears, letting you choose your preferred program.- Security: On this tab, you control permissions, which are rules determining who may access the file and what they may do with it. System administrators earn high wages mostly for understanding this type of stuff.
- Details: True to its name, this tab reveals arcane details about a file. On digital photos, for example, this tab lists EXIF (Exchangeable Image File Format) data: the camera model, f-stop, aperture, focal length, and other items loved by photographers. On songs, this tab displays the song’s ID3 tag (IDentify MP3), which includes the artist, album title, year, track number, genre, length, and similar information.
- Previous Versions: After you set up the Windows File History backup system, this tab lists all the previously saved versions of this file, ready for retrieval with a click. I cover File History in Chapter 13.

FIGURE 5-8: A file’s Properties window shows which program automatically opens it, the file’s size, and other details.
Normally, these tidbits of information remain hidden unless you right-click a file or folder and choose Properties. But what if you want to see details about all the files in a folder, perhaps to find pictures taken on a certain day? For that, switch your folder’s view to Details by following these steps:
Click the Layout and View Options tab along the folder’s top edge.
A menu drops down, listing the umpteen ways a folder can display your files.
In the Layout group, select Details, as shown in Figure 5-9.
The screen changes to show your files’ names, with details about them stretching to the right in orderly columns. A small dot appears next to your folder’s current view, in this case, Details, shown in Figure 5-9.
Try all the views to see which view you prefer. (Windows remembers which views you prefer for different folders.)
- If you can’t remember what a folder’s toolbar buttons do, rest your mouse pointer over a button. Windows usually displays a helpful box summing up the button’s mission.
- Feel free to switch among the different views until you find the one that fits what you’re trying to accomplish, be it to see a particular photo’s creation date or see thumbnails of every photo in a folder. Different views work better for different folders; there’s no “right” view. Experiment, and choose the one you most prefer.
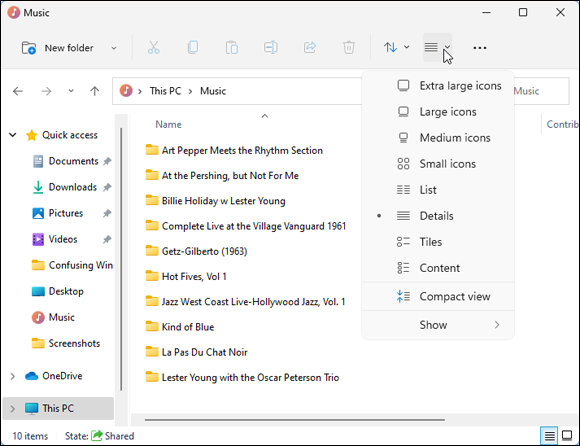
FIGURE 5-9: To see details about files in a folder, click the Layout and View Options icon and select Details.
 Folders usually display files sorted alphabetically. To sort them differently, right-click a blank spot inside the folder and choose Sort By. A pop-up menu lets you choose to sort items by size, name, type, and other details. Or click the Sort and Group Options button (shown in the margin) that lives atop every folder to see the same options.
- When the excitement of the Sort By menu wears off, try clicking the words at the top of each sorted column. Click Size, for example, to reverse the order, placing the largest files at the list’s top.
- Feel free to add your own columns to Details view: Right-click a column header you don’t need, and a drop-down menu appears, letting you choose a different criterion. (I always add a Date Taken column to my photos, so I can sort my photos by the date I snapped them.)
Writing to CDs and DVDs
Most computers today write information to CDs and DVDs by using a flameless approach known as burning. To see whether you’re stuck with an older drive that can’t burn discs, first remove any discs from inside the drive. Then from the desktop, click the taskbar’s File Explorer icon and look at the icon for your CD or DVD drive.
Because computers always speak in secret code, here’s what you can do with the disc drives in your computer:
- DVD-RW: These drives both read and write to CDs and DVDs.
 BD-ROM: These can read and write to CDs and DVDs, plus they can read Blu-ray discs.
- BD-RE: Although these have the same icon as BD-ROM drives, they can read and write to CDs, DVDs, and Blu-ray discs.
If your PC has two CD or DVD burners, tell Windows which drive you want to handle your disc-burning chores: Right-click the drive, choose Properties, and click the Recording tab. Then choose your favorite drive in the top box.
Buying the right kind of blank CDs and DVDs for burning
Stores sell two types of CDs: CD-R (short for CD-Recordable) and CD-RW (short for CD-ReWritable). Here’s the difference:
- CD-R: Most people buy CD-Rs because they’re very cheap and they work fine for storing music or files. You can write to them until they fill up; then you can’t write to them anymore. But that’s no problem because most people don’t want to erase their CDs and start over. They want to stick their burned disc into the car’s stereo or stash it as a backup.
- CD-RW: Techies sometimes buy CD-RWs for making temporary backups of data. You can write information to them, just as you can with CD-Rs. But when a CD-RW fills up, you can erase it and start over with a clean slate — something not possible with a CD-R. However, CD-RWs cost more money, so most people stick with the cheaper and faster CD-Rs.
DVDs come in both R and RW formats, just like CDs, so the preceding R and RW rules apply to them, as well. Most DVD burners sold in the past few years can write to any type of blank CD or DVD.
Buying blank DVDs for older drives is chaos: The manufacturers fought over which storage format to use, confusing things for everybody. To buy the right blank DVD, check your computer’s specifications sheet to see what formats its DVD burner needs: DVD-R, DVD-RW, DVD+R, or DVD+RW.
- Discs come rated by their speed. For faster disc burning, buy the largest number “x” speed you can find, usually 52x for CDs and 16x for DVDs.
- Blank CDs and DVDs are cheap; borrow one from a neighbor’s kid to see whether it works in your drive. If it works fine, buy some of the same type.
- Blank Blu-ray discs cost much more than CDs or DVDs. Luckily, Blu-ray drives aren’t very picky, and just about any blank Blu-ray disc will work.
- For some odd reason, Compact Discs and Digital Video Discs are spelled as discs, not disks.
- Although Windows can handle simple disc-burning tasks, it’s extraordinarily awkward at duplicating discs. Most people give up quickly and buy third-party disc-burning software. I explain how Windows creates music CDs in Chapter 16.
- It’s currently illegal to make duplicates of movie DVDs in the United States — even to make a backup copy in case the kids scratch up the new Disney DVD. Windows can’t copy DVDs on its own, but some programs on websites from other countries can handle the job. They can even copy the DVD’s contents to your PC, so you can watch the movie without needing the DVD itself.
Copying files to or from a CD or DVD
Very few people copy information to or from CDs or DVDs these days. It’s much more convenient to use flash drives, covered in the next section. Still, for those people who still use those old-school discs, this section may come in handy.
CDs and DVDs once hailed from the school of simplicity: You simply slid them into your CD player or DVD player, and they played. But as soon as those discs graduated to PCs, the problems started. When you create a CD or DVD, you must tell your PC what you’re copying and where you intend to play it: Music for a CD player? Photo slideshows for a TV’s DVD player? Or files to store on your computer?
If you choose the wrong answer, your disc won’t work, and you’ve created yet another coaster.
Here are the Disc Creation rules:
- Music: To create a CD that plays music in your CD player or car stereo, flip ahead to Chapter 16. You need to fire up the age-old Windows Media Player program and burn an audio CD.
- Photo slideshows: Windows doesn’t include the Windows DVD Maker bundled with Windows Vista and Windows 7. To create photo slideshows on a DVD, you need a third-party program. If one didn’t come with your computer, you need to purchase one.
If you just want to copy files to a CD or DVD, perhaps to save as a backup or to give to a friend, stick around.
Follow these steps to write files to a new blank CD or DVD. (If you’re writing files to a CD or DVD that you’ve written to before, jump ahead to Step 4.)
- Insert the blank disc into your disc burner and push in the tray. Then click or tap the Notification box that appears in the screen’s lower-right corner.
When the Notification box asks how you’d like to proceed, click the box’s Burn Files to a Disc option.
Windows displays a Burn a Disc window and asks you to create a title for the disc.
If the Notification box disappeared before you could click on it, eject your disc, push it back in, and have your hand ready on the mouse. (Alternatively, you can bring back the Notification box by right-clicking the disc drive’s icon in File Explorer and choosing the Open Autoplay option.)
Type a name for the disc, describe how you want to use the disc, and click Next.
Unfortunately, Windows limits your CD’s or DVD’s title to 16 characters. Instead of typing Family Picnic atop Orizaba in 2021, stick to the facts: Orizaba 2021. Or just click Next to use the default name for the disc: the current date.
Windows can burn the files to the disc two different ways. To help you decide which method will work best for you, the Windows menu offers two options:
- Like a USB flash drive: This method lets you read and write files to the disc many times, a handy way to use discs as portable file carriers. Unfortunately, that method isn’t compatible with some CD or DVD players connected to home stereos or TVs.
- With a CD/DVD player: If you plan to play your disc on a fairly new home stereo disc player that’s smart enough to read files stored in several different formats, select this method.
Armed with the disc’s name, Windows prepares the disc for incoming files.
Tell Windows which files to write to disc.
Now that your disc is ready to accept the files, tell Windows what information to send its way. You can do this in any of several ways:
- Drag and drop your files and/or folders into the drive’s File Explorer window.
- Right-click the item you want to copy, be it a single file, folder, or selected files and folders. When the pop-up menu appears, choose Send To and select your disc burner from the menu. (The pop-up menu lists the disc’s title you chose in Step 3.)
- Drag and drop files and/or folders on top of the burner’s icon in File Explorer.
- Tell your current program to save the information to the disc rather than to your hard drive.
No matter which method you choose, Windows dutifully looks over the information and copies it to the disc you inserted in the first step. A progress window appears, showing the disc burner’s progress. When the progress window disappears, Windows has finished burning the disc.
Close your disc-burning session by ejecting the disc.
When you’re through copying files to the disc, push your drive’s Eject button (or right-click the drive’s icon in File Explorer and choose Eject). Windows closes the session, adding a finishing touch to the disc that lets other PCs read it.
If you try to copy a large batch of files to a disc — more than will fit — Windows complains immediately. Copy fewer files at a time, perhaps spacing them out over two discs.
Most programs let you save files directly to disc. Choose Save from the File menu, and select your CD burner. Put a disc (preferably one that’s not already filled) into your disc drive to start the process.
Working with Flash Drives and Memory Cards
Digital camera owners eventually become acquainted with memory cards — those little plastic squares that replaced the awkward rolls of film. Windows can read digital photos directly from the camera after you find its cable and plug it into your PC. But Windows can also grab photos straight off the memory card, a method praised by those who’ve lost their camera’s cables.
The same holds true for smartphones, which also use the cards, as well as some audio recorders and digital gaming devices.
The secret is a memory card reader — a little slot-filled box that stays plugged into your PC. Slide your memory card into the slot, and your PC can read the card’s files, just like reading files from any other folder. Some tablets, laptops, and PCs include built-in memory card readers.
Most office supply and electronics stores sell memory card readers that accept most popular memory card formats: Compact Flash, SecureDigital High Capacity (SDHC), Micro-SecureDigital High Capacity (SDHC), Micro-SecureDigital Extended Capacity (SDXC), and a host of other tongue twisters. Some computers even come with built-in memory card readers on the front of their case.
The beauty of card readers is that there’s nothing new to figure out: Windows treats your inserted card just like an ordinary folder. Insert your card, and a folder appears on your screen to show your digital camera photos. The same drag-and-drop and cut-and-paste rules covered earlier in this chapter still apply, letting you move the pictures or other files off the card and into your Pictures folder.
![]() Flash drives — also known as thumb drives — work just like memory card readers. Plug the flash drive into one of your PC’s USB ports, and the drive appears as an icon (shown in the margin) in File Explorer, ready to be opened with a double-click. Skip back to this chapter’s “Copying or Moving Files and Folders” section for step-by-step instructions on transferring the flash drive’s contents to your PC.
Flash drives — also known as thumb drives — work just like memory card readers. Plug the flash drive into one of your PC’s USB ports, and the drive appears as an icon (shown in the margin) in File Explorer, ready to be opened with a double-click. Skip back to this chapter’s “Copying or Moving Files and Folders” section for step-by-step instructions on transferring the flash drive’s contents to your PC.
- First, the warning: Formatting a card or flash drive wipes out all its information. Never format a card or flash drive unless you don’t care about the information it currently holds.
- Now the procedure: If Windows complains that a newly inserted card isn’t formatted, right-click its drive and choose Format. (This problem happens most often with brand-new or damaged cards.)
- Most smartphones and tablets contain memory card slots, as well. Their cards work the same as the ones found in digital cameras.
OneDrive: Your Cubbyhole in the Clouds
When you’re sitting in front of your computer, you naturally store your files inside your computer. It’s the easiest place to put them. When you leave your computer, you can bring along important files by stashing them on flash drives, CDs, DVDs, and portable hard drives — if you remember to grab them on the way out.
But how can you access your files from your computers if you’ve forgotten to bring along the files? How can you grab your home files from work, and vice versa? How can you view an important document or hear some favorite tunes while traveling? How can you grab your PC’s files with your smartphone?
Microsoft’s answer to those questions is called OneDrive. It’s your own private file storage space on the internet, and it’s built into Windows. With OneDrive, your files are available from any computer with an internet connection. You can even grab them from phones or tablets from Apple or that run Android: Microsoft offers a free OneDrive app for both operating systems.
If you change a file stored on OneDrive, that updated file is available on all your computers and devices. OneDrive automatically keeps everything in sync. You only need the following things in order to put OneDrive to work:
- Microsoft account: You need a Microsoft account in order to upload, view, or retrieve your files from OneDrive. Chances are good that you created a Microsoft account when you first created your account on your Windows PC. (I describe Microsoft accounts in Chapter 2.)
- An internet connection: Without an internet signal, either wireless or wired, your web-stashed files remain floating in the clouds, away from you and your computer. (You can avoid that problem by choosing to keep all your OneDrive files stored on your computer as well as the cloud.)
- Patience: Uploading files takes longer than downloading files. Although you can upload small files fairly quickly, larger files such as digital photos or movies take much longer to upload.
For some people, OneDrive offers a safe internet haven, sometimes called the cloud, where they can always find their most important files. For others, OneDrive brings another layer of complication, as well as another possible hiding place for that missing file.
The following sections explain how to access OneDrive from within Windows, as well as from a web browser on any other PC or device. They also explain how to tweak OneDrive’s many settings so it works perfectly on both desktop PCs, laptops, and small tablets with limited storage space.
Setting up OneDrive
Windows places a link to OneDrive in every folder’s Navigation pane, where it’s easily accessible. There, OneDrive works like any other folder but with one exception: Files and folders you place inside your OneDrive folder are also copied to your OneDrive storage space on the internet.
That can create a problem: Today’s smaller phones, tablets, and laptops don’t include much storage space. OneDrive, by contrast, can hold lots of files. Some smaller computers, usually small tablets, don’t have enough room to keep a copy of everything you’ve packed away on your desktop PC’s OneDrive folder.
To meet everybody’s needs, OneDrive can work in these three ways:
- All files: The simplest option, and the one chosen by most desktop PC owners, this puts all your OneDrive files on both the internet and your PC. Then it keeps them all in sync: Update a file on your PC, and it’s updated on the internet, and vice versa. It’s a convenient way to keep your most important files instantly accessible and always backed up.
- Some files: Designed for devices with limited amounts of storage like some tablets and laptops, this lets you pick and choose which folders should live only on OneDrive and which should also be stored on your computer, too.
- Files On Demand: The best option for people with limited storage space, this lets your PC display names of all your OneDrive files and folders. Then, when you open a file or folder, Windows quickly downloads it to your device for you to display its contents. It requires an internet connection, and it’s a little slower, but it lets you access any of your OneDrive files without them all hogging your PC’s storage space.
When you first click the OneDrive folder on a new PC, Windows begins the setup process, described in the steps listed below. If you’ve already set up OneDrive, but want to change its settings, skip ahead to the next section, “Changing your OneDrive settings.”
To set up OneDrive on a new PC, follow these steps:
From the taskbar, click the File Explorer icon and click the OneDrive icon in the folder’s left edge.
Since this is the first time you’ve set up OneDrive on the computer, OneDrive displays an opening screen.
If asked, sign in with your Microsoft account and password.
Only Local account holders need to sign in; Microsoft account holders already sign in when they sign into their user account. (I describe how to convert a Local account into a Microsoft account in Chapter 14.)
Local account holders can sign in with any Microsoft account. They don’t need to convert their account to a Microsoft account.After you enter a Microsoft account name and password, a window appears, pointing out the location of your OneDrive folder.
If you want to change where to store your OneDrive files, click the Change Location button. Otherwise, click the Next button.
If you’re using a desktop PC with plenty of storage space, just click the Next button. OneDrive will store all your OneDrive files on your C: drive, which normally has plenty of room.
Inexpensive tablets and laptops, by contrast, contain very limited storage space. To add more storage, many tablet owners buy a memory card and slide it into their tablet’s memory slot. If you’ve bought and inserted a memory card into your tiny tablet, click this window’s Change Location button and tell OneDrive to save its files on your tablet’s memory card instead of the default C: drive. (The memory card is often called the D: drive.)
If an advertisement appears, asking you to increase your storage for a monthly fee, click the words Not Now. (You can always change your mind later.)
If asked, choose which folders to sync to your PC.
OneDrive lists your existing OneDrive folders, if you have any, as shown in Figure 5-10.
Select the files and folders you’d like to keep synced between your PC and OneDrive, and click the Next button.
OneDrive gives you two options, which you can change later:
- Sync All Files and Folders in my OneDrive: Unless you have a reason not to, select this option to keep all your OneDrive files mirrored on your PC’s or tablet’s memory card. Most desktop PCs won’t have a problem with this option, and it’s the most trouble-free way to access OneDrive.
- Sync Only These Folders: Select this option on tablets or PCs with very little storage. If you select this option, place a check mark next to the folders you consider to be essential enough to warrant storage both on your PC and OneDrive.
Click Next to save your changes.
OneDrive leaves you with an Open my OneDrive Folder button, which you can click to see the results of your file syncing decisions.
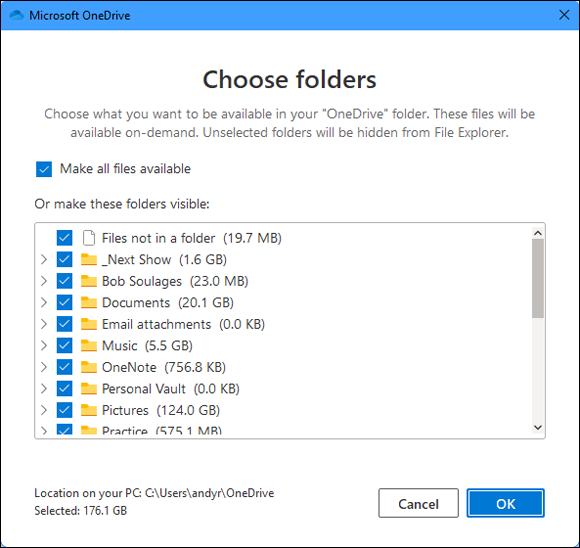
FIGURE 5-10: Place a check mark next to the folders you want to stay on both your computer and OneDrive.
Feel free to sync different folders on different computers. For example, you can choose to sync only the essentials on your small tablet — perhaps just your photos. On a desktop PC with large storage, you can choose to sync everything.
Changing your OneDrive settings
Windows usually guesses your correct settings when you first set up OneDrive. To revisit your OneDrive settings and ensure that they’re set correctly for your particular computer or other device, follow these steps:
From the taskbar’s notification area, right-click the OneDrive icon and choose Help & Settings, and then choose Settings from the pop-up menu.
 You may need to click the little upward-pointing arrow in the notification area to see the OneDrive icon (shown in the margin). I cover the taskbar’s notification area — the tiny icon-filled area to the taskbar’s far right — in Chapter 3.
OneDrive’s Settings window appears, as shown in Figure 5-11, open to the Account tab.
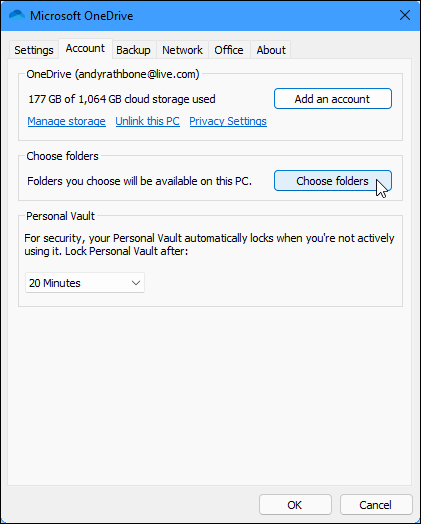
FIGURE 5-11: The Microsoft OneDrive Settings window lets you change how OneDrive communicates with your computer.
To change which files should live both on your PC and on OneDrive, click the Choose Folders button.
The Sync Your OneDrive Files to This PC window opens, listing all your OneDrive folders, as shown previously in Figure 5-10.
Make any changes, and click the OK button.
This area lets you adjust which of your PC’s folders live only on your PC, only on the internet, or on both.
The Microsoft OneDrive Settings window opens to the Account tab, shown in Figure 5-11, but all the tabs are worth exploring:
- Settings: A check box here lets you tell OneDrive to start syncing automatically when you log in to Windows. This area also lets you turn on the OneDrive Files On Demand, a feature I cover in this chapter’s next section. (I keep all these check boxes turned on.)
- Account: This tab lets you choose which OneDrive folders should be available to your PC, as well as how much space OneDrive is consuming. (If you go over 5GB, you’ve hit the storage limit, and Microsoft asks you to subscribe to one of its paid plans.)
- Backup: This backs up your most important folders: Desktop, Documents, and Pictures. It also offers to store your camera’s or phone’s photos to OneDrive whenever you connect those devices to your PC. It’s quite handy, but it fills OneDrive quickly, so you’ll eventually run out of storage and have to pay. (I did.)
- Network: Designed for people without speedy internet connections, this lets you control how quickly OneDrive should sync. Unless you have good reason, keep this set to Don’t Limit.
- Office: This tab lets you control how OneDrive interacts with documents created in Office, Microsoft’s suite of software that includes Outlook, Word, Excel, and other popular programs.
- About: Probably tossed in by the legal department, this offers links to Microsoft’s pages of boring legalese: Its Terms of Use and its Privacy and Cookies policies. For OneDrive troubleshooting information, click the Get Help with OneDrive link.
When you click the window’s OK button, OneDrive begins syncing your files and folders according to your changes.
Microsoft gives everybody 5GB of free OneDrive storage space, but you can increase that amount by paying a monthly fee. Microsoft begins reminding you of that unfortunate fact as your storage limit nears.
The Account tab shown in Figure 5-11 also shows your amount of available OneDrive storage space and offers a Manager Storage link in case you’re running low on space.
Opening and saving files from OneDrive
When you first sign into Windows 11 with a new Microsoft Account, Windows stocks your OneDrive with two empty folders: Documents and Photos.
![]() To see the two folders, open any folder. Don’t have a folder open? Then click the File Explorer icon (shown in the margin) on the taskbar. OneDrive is listed in the folder’s Navigation pane along the left edge. Click the word OneDrive, and OneDrive’s contents spill out into the folder’s right side. You can see the two empty folders, named Documents and Photos. If you already have a OneDrive account, you see your existing OneDrive folders instead. You have nothing new to learn with OneDrive; its folders work like any other folder on your computer:
To see the two folders, open any folder. Don’t have a folder open? Then click the File Explorer icon (shown in the margin) on the taskbar. OneDrive is listed in the folder’s Navigation pane along the left edge. Click the word OneDrive, and OneDrive’s contents spill out into the folder’s right side. You can see the two empty folders, named Documents and Photos. If you already have a OneDrive account, you see your existing OneDrive folders instead. You have nothing new to learn with OneDrive; its folders work like any other folder on your computer:
- To view the contents of a OneDrive folder, double-click it. The folder opens to show its contents.
- To edit a file stored in a OneDrive folder, double-click it. The file opens in the program that created it.
- To save something new inside a OneDrive folder, save it to a folder inside OneDrive — its Documents folder, for example. Don’t just save it to the Documents folder on your PC.
- To delete something from OneDrive, right-click it and choose Delete. The item moves to your desktop’s Recycle Bin, where it can be retrieved later if necessary.
No matter what changes you make to your files and folders in your computer’s OneDrive folder, Windows automatically changes the internet’s copies to match as soon as your computer finds an internet connection.
Later, when you visit OneDrive through anything with a web browser — your smartphone, tablet, or even another PC — your up-to-date files are waiting for you to peruse.
OneDrive also comes in handy in situations like these:
- By storing a shopping list on OneDrive, you can add needed grocery items while sitting at your PC. Then, when you’re at the store, you can view that up-to-date shopping list on your smartphone. (Microsoft makes OneDrive apps for iPhones and Android phones.)
- Want to copy a few favorites to your OneDrive folder? I describe how to copy and move files between folders earlier in this chapter.
- To share a OneDrive file or folder with friends, right-click it, choose Show More Options from the pop-up menu, and choose Share from the next menu. A window appears, where you can enter the email addresses of the friends. When your friends receive and click the emailed link, they’ll have access to your OneDrive-stored file or folder.
- Many people keep a few desert island discs on OneDrive. Whenever you have an internet connection, the Groove Music app, covered in Chapter 16, automatically lists and plays any music you store on OneDrive. (The old school Media Player program, by contrast, plays only the music stored physically on your PC.)
Understanding which files live on OneDrive, your PC, or both places
Windows lets you see the names of every file and folder you’ve stored on OneDrive. Then you can quickly open a OneDrive file or folder even if it’s not stored locally on your PC. OneDrive simply grabs the file from the internet and places it onto your computer. (This depends on your having a working internet connection at the time, of course.)
OneDrive’s Files On Demand feature lets you see all your files on all your devices. Yet it lets you save space on devices that don’t have much storage space. For example, you can sync your entire music collection only on devices with lots of storage spaces. But your device that lacks storage can still see the music and, if you have an internet connection, play it whenever you like.
You can even see thumbnails of more than 300 different file types — even if they’re not stored on your computer.
To turn on OneDrive Files On Demand, follow these steps:
From the taskbar’s notification area, right-click the OneDrive icon, choose Help & Settings from the pop-up menu, and choose Settings from the next menu.
You may need to click the little upward-pointing arrow in the notification area to see the OneDrive icon (shown in the margin). I cover the taskbar’s notification area — the tiny icon-filled area to the taskbar’s far right — in Chapter 3.OneDrive’s Settings window appears, as shown earlier in Figure 5-11, open to the Account tab.
- Click the Settings tab, and in the Files On Demand section, select the Save Space and Download Files as You Use Them check box.
- Click the OK button to close the window.
Now, even though your OneDrive files aren’t saved on your PC, you can see their names, as shown in Figure 5-12.
The key to understanding OneDrive Files On Demand is to look at the three little icons next to each file’s name, shown in Figure 5-12. Here is what each icon means:
 Online only: This file is available online only; you need an internet connection to access it.
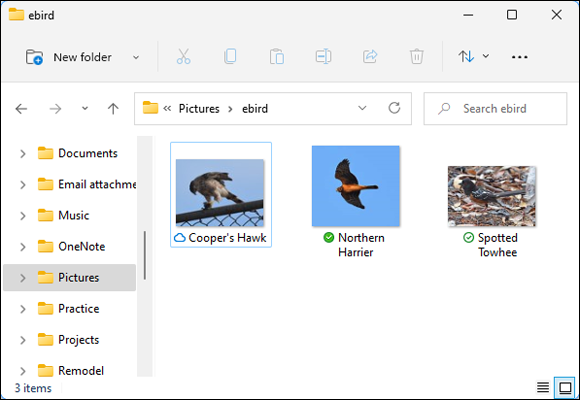
FIGURE 5-12: OneDrive Files On Demand shows the name of every stored file and folder, as well as its status.
 Locally available: You’ve opened an online only file, so now it’s available on your PC. Any edits you make also change the copy stored on OneDrive. If you need to free up space and remove it from your PC, right-click it and choose Free Up Space. (A copy remains on OneDrive, and the file’s icon on your PC changes to Online Only.)
 Always keep on this device: Files and folders with this icon are always available on your PC, even without an internet connection.
To change the status of a file or folder, right-click it. There, you can choose between these three settings:
- View Online: This downloads your file or folder to your PC and opens it for you to view or edit.
- Always Keep On This Device: This also downloads the file or folder to your PC. However, it doesn’t open it. It’s handy mostly for grabbing folders that you always want to have available, even without an internet connection.
- Free Up Space: This deletes the file from your device, which frees up storage space. It keeps that file stored on OneDrive though, where you can fetch it again whenever you have an internet connection.
These tips will help you discover whether OneDrive Files On Demand is worth turning on and how to use it on different devices:
- If your device has plenty of storage space, as do most desktop PCs, don’t bother with Files On Demand. Simply choose Make All Files Available, described earlier in this chapter’s “Setting up OneDrive” section.
- If your device doesn’t have much storage, but you want to see the names of all your OneDrive files and folders, turn on OneDrive Files On Demand. Then, when you have an internet connection and need a file or folder, just open it, as if it lived on your PC. Windows quickly downloads and opens it.
- If you store a few Desert Island Discs of music on OneDrive, turn on OneDrive Files On Demand, but set those particular folders to be Always Keep on This Device. That way you can see every file and access them when you have an internet connection, but you still play your favorite music without an internet connection.
By assessing your needs, your device’s storage limits, and the availability of your internet connection, you can customize OneDrive’s Files On Demand feature to meet the storage capacity of all your devices.
Accessing OneDrive from the internet
Sometimes you may need to access OneDrive when you’re not sitting in front of your computer. Or you may need to reach a OneDrive file that’s not synced on your PC. To help you in either situation, Microsoft offers OneDrive access from any web browser.
When you need your files, drop by any computer, visit the OneDrive website at https://OneDrive.live.com, and, if asked, sign in with your Microsoft account name and password. The OneDrive website appears, shown in Figure 5-13.
After you sign in to the OneDrive website, you can add, delete, move, and rename files, as well as create folders and move files between folders. You can even edit some files directly online. (OneDrive even contains a Recycle Bin for retrieving mistakenly deleted OneDrive files, whether they were deleted online or on your phone, PC, or other device.)
It’s much easier to manage your files directly from the folder on your computer. But if you’re away from your computer, the OneDrive website provides a handy fallback zone.
The OneDrive website also lets you share files by emailing people links to them, making it a handy way to share folders.
You can also share OneDrive files with friends directly from your PC: Right-click the file or folder you want to share, and choose OneDrive, then choose Share from the pop-up menu. A window appears, where you can enter the email address of who should receive a link to the shared item. When the recipient clicks the link in the email, they’re taken online to view the file or folder’s contents.
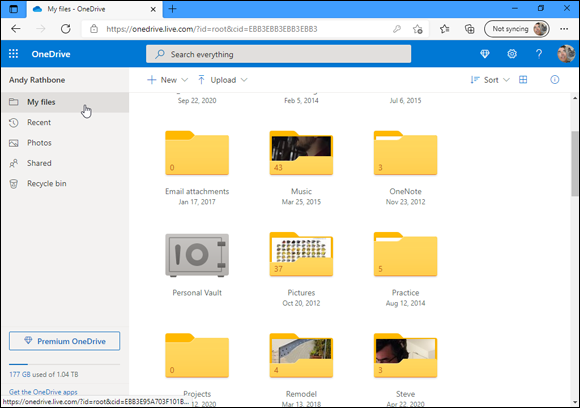
FIGURE 5-13: You can access your OneDrive files from any computer or device with a web browser.
If you find yourself using OneDrive regularly, take note that Microsoft offers free OneDrive apps for Apple, and Android smartphones and tablets. OneDrive simplifies file sharing among all your gadgets.