Chapter 3
Dabbling in DeFi: Getting Your Hands Dirty
IN THIS CHAPTER
![]() Introducing the MetaMask browser extension
Introducing the MetaMask browser extension
![]() Connecting to the Ethereum blockchain
Connecting to the Ethereum blockchain
![]() Funding your account with ETH (or test ETH)
Funding your account with ETH (or test ETH)
To meaningfully navigate the DeFi-verse, you first need to set up a Web3 wallet that can submit transactions and access smart contracts on a public blockchain (see Chapter 2 for key DeFi terms and concepts). Because so much of the DeFi ecosystem has been built on Ethereum, this chapter shows you how to get started with MetaMask, an application that connects you to the Ethereum blockchain. I don’t dive into all the bells and whistles in this chapter. My main purpose here is to get you up and running so that you can make your first DeFi transactions as quickly as possible.
 If you already have the MetaMask browser extension installed and connected to a funded account (with ETH and/or test ETH), you can skip straight ahead to Chapter 4 to begin making your first DeFi transactions.
Setting Up Your Wallet
This section shows you how to install and set up a Web3 wallet. I focus on MetaMask, which is one of the most well-known and widely supported noncustodial crypto wallets connecting you to the Ethereum blockchain. Other popular contenders include WalletConnect and the Coinbase Wallet (not to be confused with the custodial Coinbase.com wallet).
Unmasking MetaMask
MetaMask is an amazingly simple yet powerful application that allows you to manage your Ethereum accounts and to interact with the Ethereum network. With this wallet app, you can create new accounts, import existing accounts, and submit transactions. In addition to handling ether (ETH), the token native to Ethereum, this wallet application is also compatible with ERC-20 fungible tokens and ERC-721 non-fungible tokens (NFTs).
 MetaMask operates as a browser extension, which makes it easy for you to connect to web-based Ethereum dApps (decentralized applications), the vast majority of which have integrated MetaMask functionality in their websites. More ambitious readers may be glad to discover in Chapter 11 that Remix — a web-based integrated development environment (IDE) — is integrated with MetaMask to allow you to seamlessly launch smart contracts on Ethereum without having to download additional software or run a full node on your computer (something I explain further in Chapter 9).
 Exercise caution when interacting with dApps, just as you would when engaging with any application coming from an unknown or untrusted source.
Installing MetaMask
MetaMask currently supports the Chrome, Firefox, Brave, and Edge browsers. I’ve chosen to proceed in Chrome because it’s the most commonly used desktop internet browser in the U.S.
If you’re feeling a bit adventurous and want a full DeFi immersion, I recommend getting comfortable with the Brave browser, which you can download from https://www.brave.com.
 Keep in mind that your visual and textual prompts may differ slightly from what’s shown in the following steps, depending on your chosen browser. You can use these steps to download and install the MetaMask browser extension:
- Go to
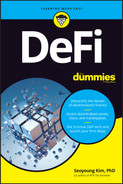
www.metamask.ioand click the Download Now button, as shown in Figure 3-1. Click the Install MetaMask for Chrome button, as shown in Figure 3-2.
You’re rerouted to the MetaMask page of the Chrome web store, as shown in Figure 3-3.
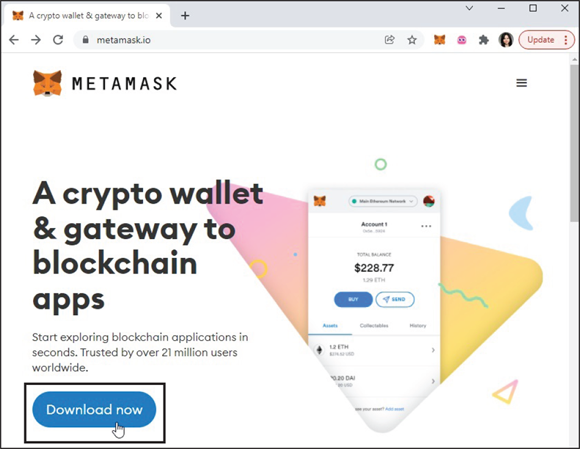
FIGURE 3-1: The MetaMask main page.

FIGURE 3-2: Installing MetaMask on the Chrome browser.
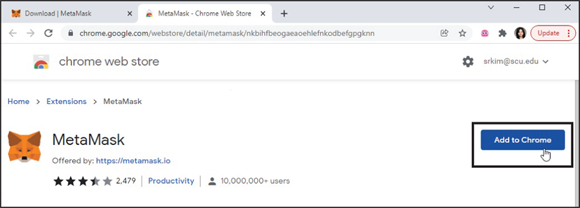
FIGURE 3-3: The MetaMask page within the Chrome web store.
Of course, if you’re using a different browser, the prompts will look slightly different, as shown in Figure 3-4.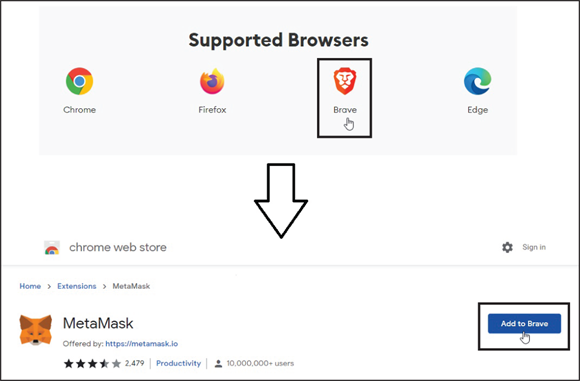
FIGURE 3-4: Installing MetaMask on the Brave browser.
Click the Add to Chrome button.
A pop-up window appears, as shown in Figure 3-5.
Click the Add Extension button.
After the installation is complete, a pop-up window momentarily appears to inform you that MetaMask has been added to your browser.
You should now see a small fox icon in the upper-right corner of your browser window (to the right of the address bar), as shown in Figure 3-6.
If the fox icon doesn’t automatically appear in your browser’s toolbar, follow these additional steps:

FIGURE 3-5: Pop-up window to add MetaMask browser extension.
Click the puzzle-piece-shaped icon in the upper-right corner of your browser window (to the right of the address bar).
A drop-down menu appears, as shown in Figure 3-7.
Click the pin icon to the right of the MetaMask fox icon.
The pin icon turns blue, and you see the fox icon pinned to your browser’s toolbar.
Yay, you’re now ready to set up your MetaMask wallet!

FIGURE 3-6: The MetaMask fox icon in the browser toolbar.

FIGURE 3-7: The browser extensions drop-down menu.
Setting up MetaMask
After you’ve successfully installed the MetaMask browser extension, you can follow these steps to set up your wallet:
Click the MetaMask fox icon in your browser’s toolbar. (In my case, I am continuing to use the Chrome browser.)
A new browser window appears, with a Get Started button displayed at the bottom of the page.
Click the Get Started button.
The page that opens shows an Import Wallet and a Create a Wallet button, as shown in Figure 3-8. The Import Wallet button on this page is what you’ll use if you ever need to reinstall MetaMask and recover a MetaMask wallet that you’ve already set up.
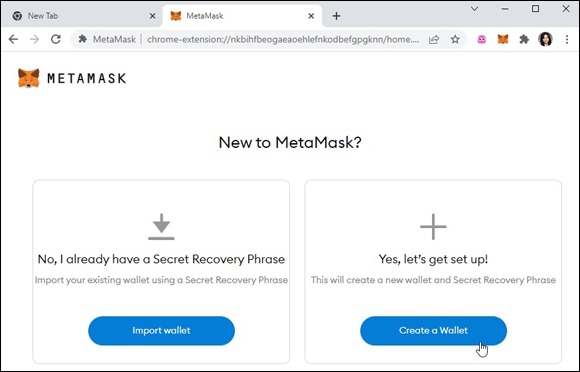
FIGURE 3-8: Creating a new MetaMask wallet.
Click the Create a Wallet button.
On the Help Us Improve MetaMask page that opens, you can click either the No Thanks or I Agree button, depending on whether you want to share your usage data with the MetaMask development team.
The next page opens, prompting you to create a password, as shown in Figure 3-9.
- Create and confirm your new password.

FIGURE 3-9: Setting your MetaMask wallet password.
Click the check box to confirm that you’ve read and agree to the terms of usage, and then click the Create button.
A page appears that features instructions and a brief video explaining the importance of your Secret Recovery Phrase. Watch this video and read the instructions carefully.
When you’re ready, click the Next button, which takes you to your Secret Recovery Phrase.
- Click the lock icon to reveal your private 12-word phrase, as shown in Figure 3-10.
Write down this phrase and store it for safe keeping.
This Secret Recovery Phrase represents the digital keys that provide access to your crypto wallet and its contents. Do not share this phrase with anyone.
Do not skip this critical step! You’ll need your Secret Recovery Phrase if you ever need to reinstall the MetaMask browser extension or if you want to access your MetaMask wallet on a different browser or different computer.In fact, even the MetaMask Support team cannot recover your MetaMask account for you. Specifically, MetaMask’s “Basic Safety and Security Tips” state that:
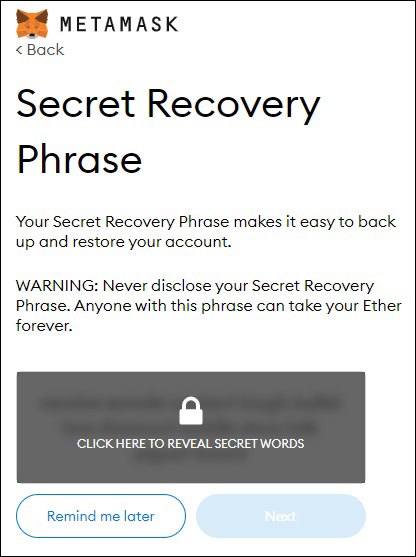
FIGURE 3-10: Obtaining your MetaMask Secret Recovery Phrase.
“MetaMask is not a cloud-based solution. If your device breaks, is lost, or has data corruption, there is no way for the MetaMask Support Team to recover this for you. This Secret Recovery Phrase is the only way to recover your MetaMask accounts.” (See
https://metamask.zendesk.com/hc/en-us/articles/4404722782107-User-guide-Secret-Recovery-Phrase-password-and-private-keysfor more details).After you’ve secured your Secret Recovery Phrase, click the Next button.
The next page requires you to confirm your Secret Recovery Phrase by selecting the correct words in the correct order, as shown in Figure 3-11.
Do not share this unordered word matrix with anyone, as I’ve (foolishly!) done here for demonstrative purposes. Using this word matrix, a hacker can easily create a program to regenerate my Secret Recovery Phrase. In fact, this hypothetical hacker could guess my secret phrase within 12! = 12 x 11 x 10 x …. X 2 x 1 =479,001,600attempts, which represents the total number of possible permutations of the words presented in Figure 3-11. Although 479,001,600 distinct guesses would be quite onerous to attempt manually, a computerized algorithm can glide through this guessing game.
FIGURE 3-11: Confirming Your Secret Recovery Phrase.
After you've clicked each word in the correct order to produce the correct word sequence, click the Confirm button.
Congratulations! Your browser takes you to your initial MetaMask Account 1 Page, as shown in Figure 3-12.
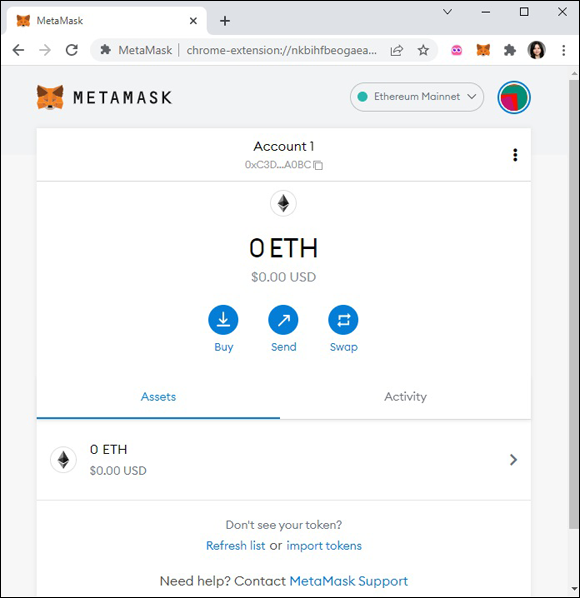
FIGURE 3-12: A newly initiated MetaMask wallet.
Going forward, you can simply access your MetaMask wallet by clicking the MetaMask fox icon in your browser’s toolbar, which reveals a drop-down window, as shown in Figure 3-13. (Revisit Steps 5 and 6 from the previous “Installing MetaMask” section if you need to re-pin the MetaMask fox icon to your browser’s toolbar.)

FIGURE 3-13: Accessing the MetaMask wallet drop-down window from your browser’s toolbar.
Renaming your account
If you’d like to rename your account, proceed as follows:
- From the MetaMask drop-down window, click the vertical ellipsis to the right of the account name and public address, as shown in Figure 3-14.
From the drop-down menu that appears, select Account Details.
A new window appears with the account name above a QR code that contains your public address, as shown in Figure 3-15.
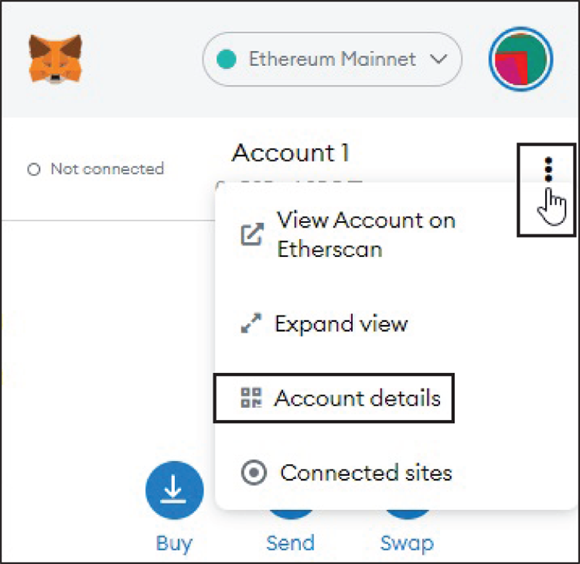
FIGURE 3-14: Navigating account options on MetaMask.

FIGURE 3-15: Account-specific details on MetaMask.
Click the pencil icon next to the account name.
A text input box appears, as shown in Figure 3-16.
- Rename the account as you see fit, and then click the check box to the right of the text input box to confirm the change.
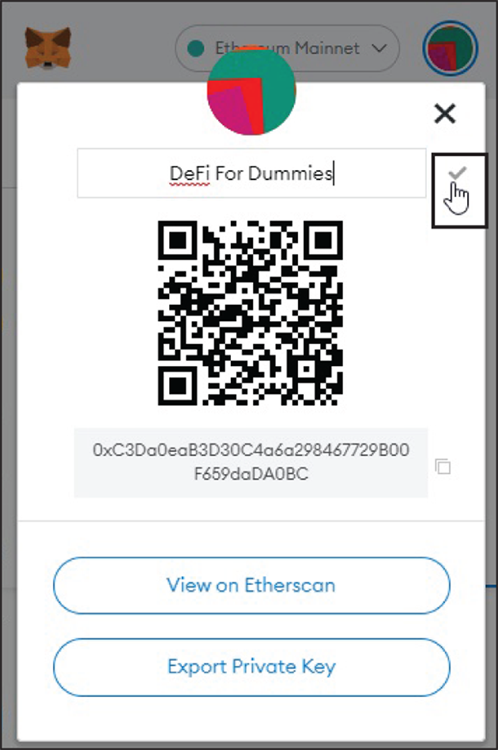
FIGURE 3-16: Renaming an account in your MetaMask wallet.
Great, now you’re ready to fund your account! Feel free to skip the following section, “Working with MetaMask on your mobile device,” if you’re eager to keep the momentum going.
Working with MetaMask on your mobile device
For added mobility, MetaMask is also available on iOS and Android devices. Much of what I demonstrate throughout the rest of this chapter can also be executed from MetaMask’s in-app browser on a smartphone or other mobile device, such as an iPad. However, if you plan to ultimately deploy a smart contract on Ethereum (described in Chapter 11), you’ll still need to have the MetaMask browser extension on your desktop machine.
Installing MetaMask on your mobile device
Follow these steps to download and install the MetaMask app on your iOS or Android device.
As before, keep in mind that your visual and textual prompts may differ slightly from what I present below depending on your chosen mobile device.
- From your phone’s browser, go to
https://metamask.io. - Follow the series of prompts to ultimately download and install the MetaMask app, as shown in Figure 3-17.

FIGURE 3-17: Installing the MetaMask app on your mobile device.
From the MetaMask app, tap the Get Started button; then select the Import Using Secret Recovery Phrase option.
On the Help Us Improve MetaMask page that opens, you can click either the No Thanks or I Agree button, depending on whether you want to share your usage data with the MetaMask development team.
A new screen appears prompting you for your Secret Recovery Phrase, as shown in Figure 3-18.

FIGURE 3-18: Importing your wallet from the MetaMask mobile app.
Enter the Secret Recovery Phrase you saved from Steps 6 and 7 of the earlier section, “Setting up MetaMask”; then select and confirm your new password and then tap the Import button.
The screen that appears displays your imported wallet, as shown in Figure 3-19. Notice that the public address here — located below the account name — matches the public address shown previously in Figure 3-13.
Also notice that the new account name you specified in the earlier section “Renaming your account” doesn’t get carried over in the import process.
Long-press the account name to rename your account.
I’ve renamed mine to “DeFi For Dummies,” as shown in Figure 3-20, to remain consistent with how I named this same account from the MetaMask desktop browser extension in the previous “Renaming your account” section.

FIGURE 3-19: MetaMask on your mobile device.

FIGURE 3-20: My renamed account in the MetaMask mobile app.
Getting around in MetaMask on your mobile device
Here are a few tips for navigating the MetaMask app features from your mobile device:
- To copy the public address, tap the partial address located below the account name and balance.
- To switch accounts or create new ones, tap the colorful orb above the account name.
- To toggle networks, tap the option that currently reads as Ethereum Main Network (located above the colorful orb).
For additional options, tap the menu icon in the upper-left corner. A drop-down menu appears, as shown in Figure 3-21.
This drop-down menu allows you to toggle between the wallet and the in-app browser, and enables you to connect to web-based dApps.
The remaining instructions and figures in this chapter apply to the MetaMask browser extension installed on a desktop.

FIGURE 3-21: The MetaMask mobile app drop-down menu.
Funding Your Account
To transact within the Ethereum network, also known as Mainnet, you need some ETH, which is Ethereum’s native token. However, you can also use public testnets, which are test networks that provide a practice environment designed to mimic the Ethereum Mainnet. Test networks allow you to play around and make transactions as you would on Mainnet without having to spend actual (expensive!) ETH. After you’re comfortable with how certain transactions work on a testnet, you can confidently execute those transactions on Mainnet.
So unless you’re really antsy to throw down some actual money, you can skip ahead to a later section, “Getting test ETH,” to prepare to practice on a test network first.
Getting (Real) ETH
You can easily buy some ETH via the MetaMask wallet by clicking the Buy button from the MetaMask drop-down window, as shown in Figure 3-22. A new window appears, as shown in Figure 3-23, providing options to buy ETH via Wyre or Transak (if you scroll down).

FIGURE 3-22: Buying ETH via the MetaMask wallet.
With these options, you can use your debit card to quickly purchase up to $1,000 and $1,500 worth of ETH, respectively, without providing additional information to satisfy requirements for KYC (know your customer) compliance. If you don’t mind the extra steps, you can set up an account on one of the following reputable, U.S.-based crypto exchanges:
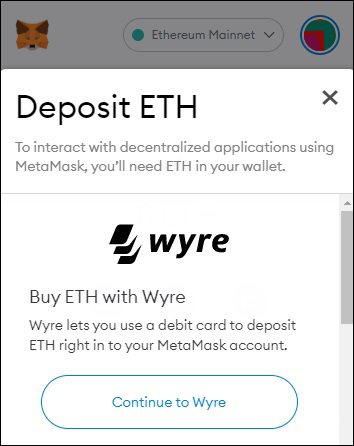
FIGURE 3-23: Quick options for buying ETH for your account.
- Coinbase, at
www.coinbase.com - Gemini, at
www.gemini.com - Kraken, at
www.kraken.com
After you’ve purchased ETH through one of these exchanges, you can transfer it to the account you set up in your MetaMask wallet in the prior section.
Getting test ETH
Just as you need ETH to transact on Mainnet, you need test ETH to transact on a test network. Thankfully, plenty of sources provide free test ETH for you to play around on any of the Ethereum testnets. In general, testnet faucets serve to provide test tokens that allow developers and curious dabblers to play around before spending any real money.
In this book, I focus on the Ropsten test network, which has historically operated as a public proof-of-work (PoW)–based blockchain that most closely follows the protocol of the Ethereum Mainnet. In anticipation of The Merge, Ethereum’s long-anticipated move from PoW to proof-of-stake (PoS), the Ropsten test network underwent a merge of its own to PoS in June 2022. For more details on PoW, PoS, and other consensus protocols, see Chapter 9.
Keep in mind that the Ropsten test network may be deprecated by the time you read this book. All the provided instructions remain the same, but you may prefer to use a different test network, and accordingly, access different test faucets. Refer to the Introduction for more details.
First, follow these steps to connect to the Ropsten test network:
- From the main MetaMask drop-down window, click the central drop-down menu, shown in Figure 3-24.
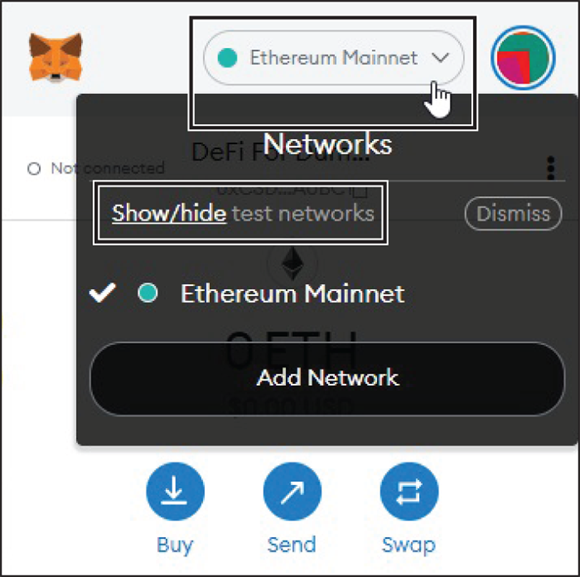
FIGURE 3-24: Networks drop-down menu on MetaMask.
From the Networks drop-down menu, click the Show/Hide link.
A new menu of Advanced options appears, as shown in Figure 3-25.
- Toggle the button under Show Test Networks from Off to On.
Click the Networks drop-down menu again.
The drop-down menu now lists the test networks, as shown in Figure 3-26.
- Select the Ropsten Test Network.

FIGURE 3-25: Advanced options on MetaMask.

FIGURE 3-26: The Networks drop-down menu on MetaMask now includes test networks.
Now that you’ve enabled and toggled to the Ropsten Testnet, follow these steps to get some rETH for your account:
From the main window, click the Buy button, as shown in Figure 3-27.
A new scroll-down menu appears, as shown in Figure 3-28.
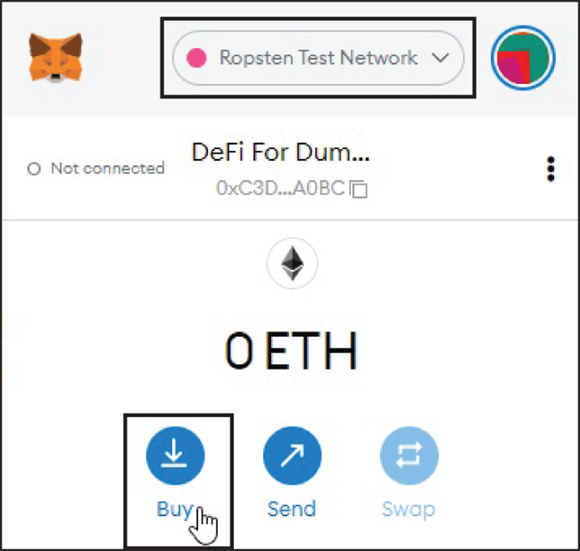
FIGURE 3-27: The MetaMask main window, now under the Ropsten test network.
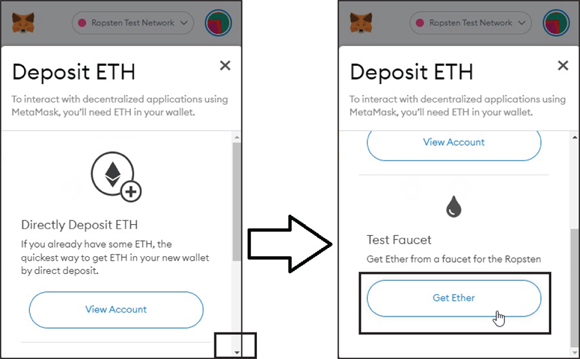
FIGURE 3-28: The Deposit ETH scroll-down menu under the Ropsten test network.
Scroll to the bottom and then click the Get Ether button.
You’re taken to the MetaMask Ether Faucet site, accessed at
faucet.metamask.io, as shown in Figure 3-29.Click the green Request 1 Ether from Faucet button.
A MetaMask Notification pops up, as shown in Figure 3-30.
If the pop-up doesn’t automatically appear, click the fox icon in your browser toolbar to follow the steps to connect.- Click the Next button followed by the Connect button to connect your account with the faucet site.
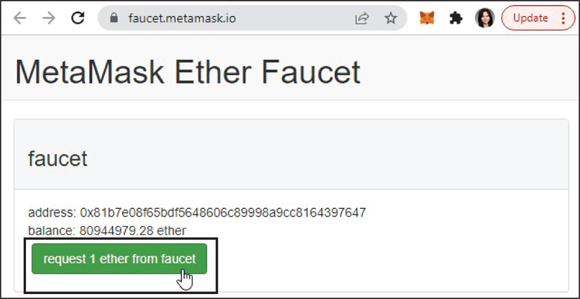
FIGURE 3-29: The MetaMask Ether Faucet.
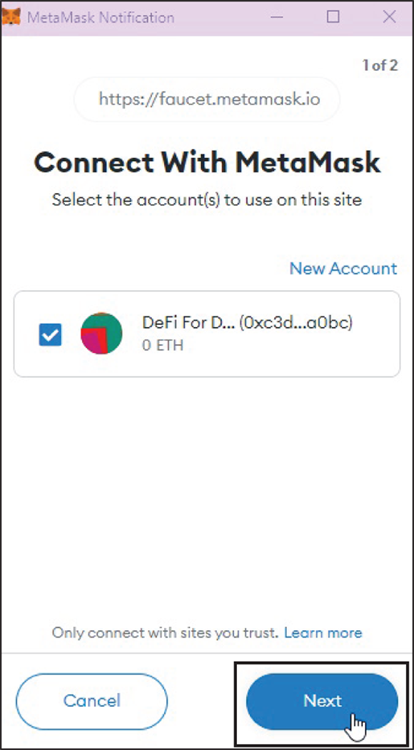
FIGURE 3-30: Connecting an account to a site with MetaMask.
Wait approximately 1 minute.
Be patient — the process might complete within 15 seconds or, in rare instances of high network congestion, could take around 30 minutes. Repeatedly clicking the button to request rETH will only result in a rate-limit error.Test faucets typically rate limit requests based on your IP address, account address, and account balance. Most faucets require a 24- to 48-hour cooling period between requests, and don’t provide funds to accounts above a certain balance.
Keep in mind that test faucets may dry out over time. Thankfully, alternative test faucets can easily be found. Simply point your browser to www.google.com, and type in ropsten faucet.Check your account balance on MetaMask, as shown in Figure 3-31.
If you’ve waited longer than 30 minutes and still don’t see the rETH in your account, make sure you’re on the Ropsten test network within your MetaMask wallet.

FIGURE 3-31: The Ropsten test ETH (rETH) balance.
Congratulations! You are now the proud owner of 1 rETH and ready to make your first DeFi transactions on the Ropsten test network.
Although 1 rETH is plenty to complete the next set of exercises in Chapter 4, if you desire more rETH, you can run a quick Google search to find plenty of other test faucets to draw from.
Finally, keep in mind that your wallet won’t reflect your rETH balance when you toggle to different networks, as demonstrated in Figure 3-32, where I’ve temporarily toggled back to Ethereum Mainnet for demonstrative purposes.

FIGURE 3-32: “Disappearing” rETH balance when toggling to other networks.