
Chapter 4
Making Your First DeFi Transactions
IN THIS CHAPTER
![]() Making a decentralized loan
Making a decentralized loan
![]() Borrowing against your collateral
Borrowing against your collateral
![]() Executing a trade on a decentralized exchange
Executing a trade on a decentralized exchange
This chapter walks you through the steps to lend, borrow, and execute a trade, all without relying on a CeFi intermediary such as Coinbase (www.coinbase.com) or Gemini (www.gemini.com). Specifically, I show you how to use the Compound and Uniswap DeFi protocols developed on the Ethereum blockchain. Both protocols are available on the Ropsten Testnet in addition to the Ethereum Mainnet. I don’t dive into too many details as to how decentralized lending or borrowing (via Compound) or decentralized trading (via Uniswap) actually works. The point is to get your hands dirty with some initial DeFi experience, so I defer more detailed discussions of the underlying mechanics until Chapter 6 and Chapter 7, respectively.
 To work through this chapter, you need to have installed the MetaMask browser extension (see “Setting Up Your Wallet” in Chapter 3) and set up your wallet with a funded account (see “Funding Your Account” in Chapter 3).
 The step-by-step instructions run more smoothly if you are logged into MetaMask and connected to your desired network (a testnet or Mainnet) before you begin the instructional guides. For the DeFi transactions I demonstrate in this section, I’ve chosen to proceed on the Ropsten Testnet from my desktop machine. For the purposes of this chapter, I assume you’re also logged in to your MetaMask browser extension, connected to Ropsten, and have some rETH (see “Getting Test ETH” in Chapter 3).
You can choose to proceed on Mainnet if you don’t mind using (and wasting!) some actual ETH as you play around. You can also try out these protocols from your mobile device if you’ve installed MetaMask there also (see “Working with MetaMask on your mobile device” in Chapter 3). The same instructions apply, but the visual and textual prompts may differ.
Keep in mind, though, that the market conditions you may observe on the Ropsten Testnet (or any testnet for that matter) are not indicative of what may be available on the actual Ethereum Mainnet. For instance, the token supply and liquidity can differ dramatically from what you observe on a test network, as can the quoted rates charged for borrowing capital and the quoted yields proffered for lending capital.
Also keep in mind that the Ropsten test network may be deprecated by the time you read this book. All the provided instructions remain the same, but you may prefer to use a different test network. Refer to the Introduction for more details.
Time to get started!
Decentralized Lending
Follow these steps to make a decentralized loan:
Point your browser to
https://app.compound.finance.A pop-up window appears with wallet options, as shown in Figure 4-1.

FIGURE 4-1: The pop-up window to connect Compound with MetaMask.
- Select the MetaMask option.
Follow the pop-up window prompts, as shown in Figure 4-2.
If the pop-up doesn’t automatically appear, click the fox icon in your browser toolbar and follow the steps to connect.After the connection is established, your screen displays a dashboard, as shown in Figure 4-3.
If your browser has difficulty in stabilizing, simply click the Refresh button to the left of the browser’s input bar.
From the “Supply Markets” side, click to toggle the collateral button for Ether from off to on (see Figure 4-3).
The Enable as Collateral pop-up window appears, as shown in Figure 4-4.
Follow the prompts to allow Compound to access the ETH in your account as collateral.
Wait for the permissions to be granted.
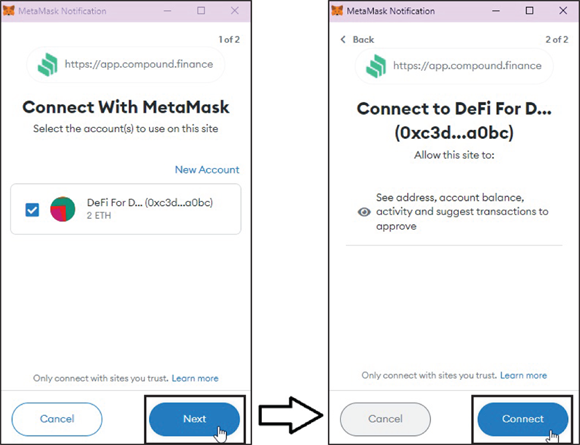
FIGURE 4-2: Connecting to Compound with MetaMask.

FIGURE 4-3: The Compound main dashboard.
Back at the main Compound dashboard, click the Ether icon located on the “Supply Markets” side (refer to Figure 4-3).
The Ether pop-up window appears, as shown in Figure 4-5.

FIGURE 4-4: Allowing Compound to access the ETH in your account.

FIGURE 4-5: Supplying ETH to the Ether lending pool on Compound.
- Staying on the Supply tab of the Ether pop-up window (refer to Figure 4-5), click MAX to supply all ETH in your account, and then click the Supply button at the bottom.
Follow the subsequent MetaMask pop-up prompts to confirm the request.
Keep in mind that you may need to scroll down to get to the Confirm button on the pop-up prompts.
After the transaction completes, you’ll notice an updated Compound dashboard reflecting this change, as shown in Figure 4-6.
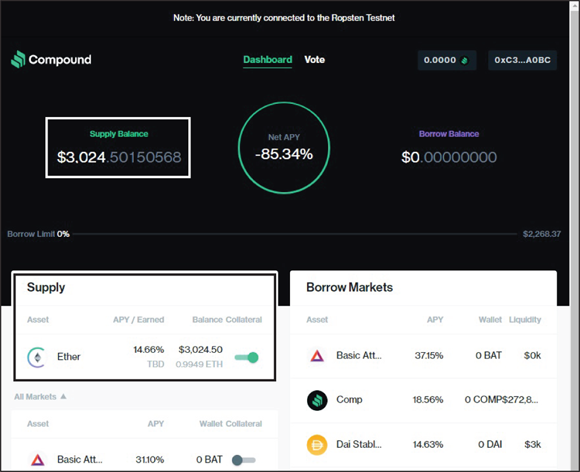
FIGURE 4-6: The updated Compound dashboard with lending supply.
Congratulations, you have now officially contributed ETH to a decentralized lending pool!
A few things to keep in mind:
- Your ETH is now locked in a smart-contract account to provide lending capital to others who may wish to borrow ETH. This means you no longer have the ETH in your account (and you can check your account balance from the MetaMask wallet to verify this).
- In exchange, you earn the quoted APY, which stands for annual percentage yield, on the amount of ETH locked for the duration you keep it in the lending pool.
- You can withdraw your ETH from the lending pool at any time (assuming the entire lending pool isn’t locked up in outstanding loans). This means the ETH will be returned to your account, and you will no longer earn a yield on your ETH balance.
For now, keep your ETH locked in the lending pool so that you can proceed to borrow against it. Notice that the Compound platform supports numerous assets, each forming their own distinct lending pools. Thus, you can contribute ETH to the Ether lending pool and use that collateral to borrow, say, DAI from the DAI lending pool! (For more information on DAI, see details about stablecoins in Chapter 5 and the section about DAI and collateralized loans in Chapter 7.)
Decentralized Borrowing
After contributing to a lending pool, as explained in the preceding section, you can tap into other collateral pools on Compound to borrow funds. Follow these steps to borrow against your locked collateral:
From the main Compound dashboard, click the Dai Stablecoin icon located on the Borrow Markets side (refer to Figure 4-6).
The Dai Stablecoin pop-up window appears, as shown in Figure 4-7.
 You may need to select another asset to borrow, based on the available liquidity in each of the lending pools at the time you implement this step. Refer to Figure 4-6 and note the right-most Liquidity field of each asset under the Borrow Markets side. I chose DAI because at the time I created this example, there was sufficient liquidity in the DAI lending pool for me to borrow from.
Staying on the Borrow tab of the “Dai Stablecoin” pop-up window (see Figure 4-7), click the 80% LIMIT option; then click the Borrow button at the bottom.
The 80% Limit option calculates 80 percent of the maximum possible DAI you can borrow based on what your collateral is worth at the time you attempt to borrow.

FIGURE 4-7: Borrowing DAI from the DAI lending pool on Compound.
Follow the subsequent MetaMask pop-up prompts to confirm the request.
After the transaction completes, you’ll notice an updated Compound dashboard reflecting this change, as shown in Figure 4-8.

FIGURE 4-8: The updated Compound dashboard with lending supply and loan balance.
Great work! You’ve now borrowed DAI against your locked ETH collateral.
 Notice that the Borrow Limit meter on your Compound dashboard has jumped from 0% (see Figure 4-6) to 80% (see Figure 4-8). To ensure repayment, Compound limits your borrowing based on the value and type of collateral you’ve locked across all lending pools on Compound. You’ll need to monitor your Borrow Limit, because this meter fluctuates with the value of your collateral relative to the value of your borrowed assets. If your meter reaches 100%, your collateral will be automatically liquidated at a discount to repay your loan. (See “Understanding the Compound lending protocol” in Chapter 7 for more details on how overcollateralized DeFi loans work.)
The next section shows you how to use that borrowed DAI to get more ETH.
Executing a Trade on a Decentralized Exchange
Now, armed with borrowed DAI or another borrowed token (from the preceding “Decentralized Borrowing” section), you can exchange your tokens for other tokens on a decentralized exchange (DEX).
Follow these steps to execute a trade on Uniswap, a popular DEX:
- Point your browser to
https://app.uniswap.org. - Click the Connect Wallet button in the upper-right corner, as shown in Figure 4-9.
Follow the pop-up window prompts to select and connect MetaMask with Uniswap, as shown in Figure 4-10.
Wait for the connection to be established. The pop-up window disappears, and you’re back (or, more accurately, still) at the main Uniswap page.

FIGURE 4-9: The Uniswap DEX main page.
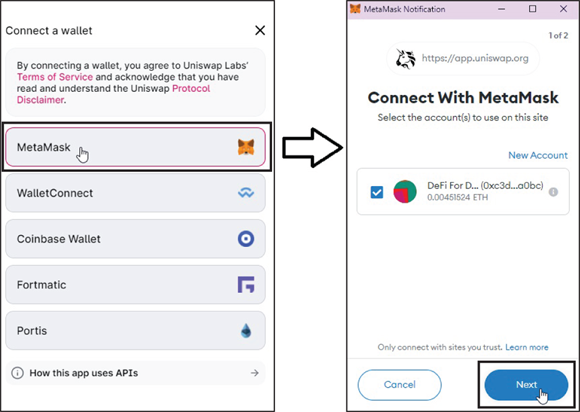
FIGURE 4-10: Connecting Uniswap with MetaMask.
From the main Uniswap page, click the drop-down menu (which initially says “ETH”) in the top half of the Swap box, as shown in Figure 4-11.
A pop-up window appears that allows you to select a token to trade, as shown in Figure 4-12.
If you’re on a testnet (instead of Mainnet), Steps 5 and 6 are absolutely critical to ensure that you select the correct token type, even if you see what appears to be your desired token type. For instance, Figure 4-12 shows DAI on the left side as a possible token to proffer. Nonetheless, it’s critical to continue onto the (seemingly silly!) search in the next step.In the Search text prompt, type DAI.
Additional DAI-related options automatically appear below your search prompt (see Figure 4-12).
Click the Import button next to the Dai Stablecoin option that’s accompanied by the yellow DAI icon (refer to Figure 4-12).
The “via Compound” subscript displayed below this option indicates that this selection corresponds to Compound-compatible DAI on your chosen testnet.
Confirm your input request on the pop-up window that follows, as shown in Figure 4-13.
The pop-up window disappears, and you’re back (or, more accurately, still) at the main Uniswap page.

FIGURE 4-11: The Uniswap DEX, now connected to account.

FIGURE 4-12: Adding a token to the Uniswap trading options.

FIGURE 4-13: Importing a token to trade on the Uniswap DEX.
From the main Uniswap page, click the Select a Token drop-down menu in the lower half of the Swap box, as shown in Figure 4-14.
A pop-up window appears that allows you to select the token you want to receive in exchange, as shown in Figure 4-15.
- Select ETH.
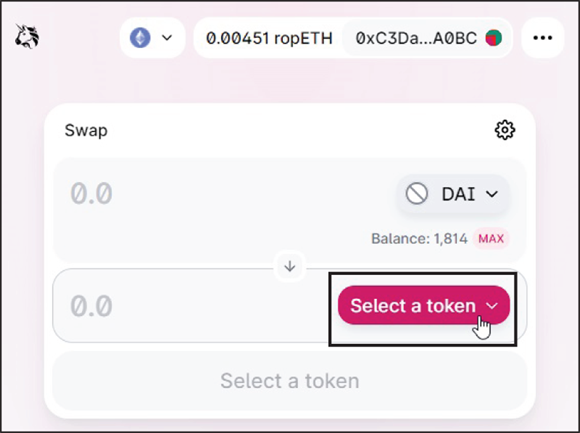
FIGURE 4-14: Selecting a target token on Uniswap.

FIGURE 4-15: Selecting ETH as the target token on Uniswap.
- Back at the main Uniswap page, enter the quantity 50 in the top half of the Swap box (to trade in 50 DAI), as shown in Figure 4-16.
- Click the Allow the Uniswap Protocol to Use Your DAI button that appears (refer to Figure 4-16).
Follow the MetaMask pop-up prompts to give Uniswap permission to access your DAI.
You’ll notice a Pending status circle as you wait for the permissions to be granted, as shown in Figure 4-17.
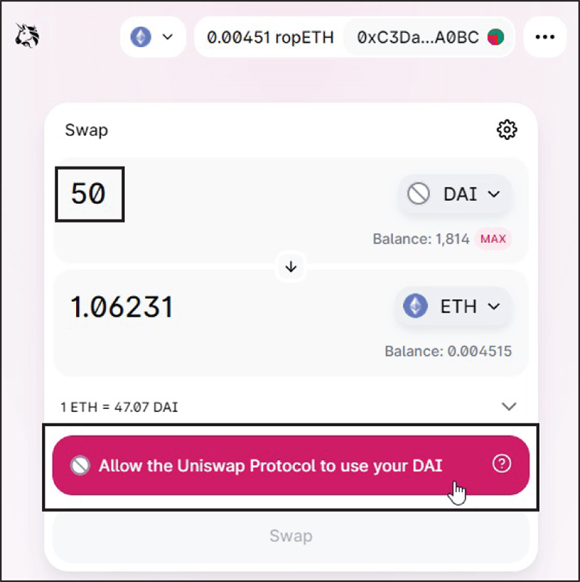
FIGURE 4-16: Allowing Uniswap to access the DAI in your account.

FIGURE 4-17: Waiting for Uniswap’s access permission to be granted.
After Uniswap is allowed access to your DAI, click the Swap button, as shown in Figure 4-18.
A pop-up window appears to confirm your request, as shown in Figure 4-19.
Click the Confirm Swap button and then follow the MetaMask pop-up prompts to complete the transaction.
Another pop-up window appears to confirm that your transaction has been submitted, as shown in Figure 4-20.
After the transaction is complete, you’ll notice that you have 50 fewer DAI and 1.06231 more ETH, as shown in Figure 4-21.

FIGURE 4-18: Trading DAI for ETH on Uniswap.

FIGURE 4-19: Confirming the request to trade DAI for ETH on Uniswap.
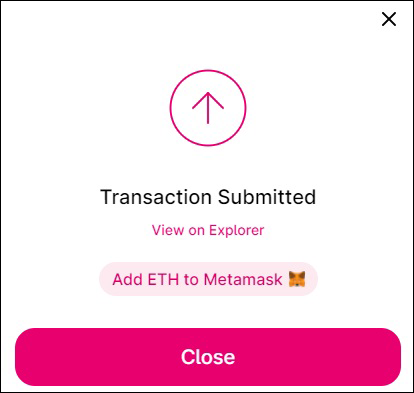
FIGURE 4-20: The pop-up window confirming the transaction in progress.
Don’t focus too much on the (quite low!) DAI/ETH exchange rate here. As mentioned earlier, market conditions on the Ropsten Testnet are not indicative of what you would see on the actual Ethereum Mainnet. The important part is that the same instructions apply whether you’re on a testnet or on Mainnet itself.
At this point, you can imagine how this sequence of steps can be repeated to ramp up a leveraged position in ETH. Specifically, using the ETH you just purchased on Uniswap with your borrowed DAI, you can return to the Compound protocol and proceed to lock up this ETH to borrow more DAI, and then return to the Uniswap protocol to buy more ETH, and so on.

FIGURE 4-21: The Uniswap main page after completion of the trade.
For now, you can practice how to close out your open positions. Recall that you have outstanding debt as well as locked collateral (from the earlier “Decentralized Borrowing” section). The next section provides instructions on how to reverse and unwind.
Unwinding and Closing Out
Continue these steps to swap back your ETH for DAI (on Uniswap) and then repay your DAI loan and reclaim your ETH collateral (on Compound).
Back at the main Uniswap page, click the downward arrow in the Swap box to switch the direction of the trade (refer to Figure 4-21).
You’ll notice that ETH is now in the top portion of the Swap box and DAI is in the bottom portion, as shown in Figure 4-22.
Click the MAX option in the top portion of the Swap box to trade all ETH in your account (refer to Figure 4-22).
Uniswap calculates and presents the amount of DAI you can receive for your ETH, as shown in Figure 4-23.
Click the Swap button that appears at the bottom, and follow the MetaMask pop-up prompts to complete the transaction.
Now that you have (most of) your DAI back, you can head back to the Compound protocol.

FIGURE 4-22: Trading ETH for DAI on Uniswap.

FIGURE 4-23: Requesting ETH to DAI trade on Uniswap.
- Return to
app.compound.finance, as shown in Figure 4-24. Click the Dai Stablecoin icon under the Borrowing box on the right side.
The Dai Stablecoin pop-up window appears, as shown in Figure 4-25.
- Select the Repay tab and then click the Enable button (refer to Figure 4-25).

FIGURE 4-24: Returning to the Compound dashboard.

FIGURE 4-25: Allowing Compound to access the DAI in your account.
Follow the MetaMask pop-up prompts to confirm and allow Compound to access the DAI in your account.
Wait for the permissions to be granted.
- After Compound is allowed to access your DAI, stay on the Repay tab and click the MAX option; then click the Repay button, as shown in Figure 4-26.
- Follow the MetaMask pop-up prompts to confirm, and wait patiently. After the transaction is complete, click the X in the upper-right corner to close out the Dai Stablecoin pop-up window.

FIGURE 4-26: Repaying a DAI loan on Compound.
Back at the main Compound dashboard, click the Ether icon under the Supply box on the left side, as shown in Figure 4-27.
The Ether pop-up window appears, as shown in Figure 4-28.
- Select the Withdraw tab, click the 80% LIMIT option, and then click the Withdraw button (refer to Figure 4-28).
Follow the MetaMask pop-up prompts to confirm, and wait patiently. After the transaction is complete, click the X in the upper-right corner to close out the Ether pop-up window.
Congrats! Except for some slippage and transaction fees along the way, you’ve now successfully opened and closed out your DeFi positions. As a final step:
- Click the MetaMask fox icon in your browser toolbar to review the final rETH balance back in your control.

FIGURE 4-27: Assets locked and supplied on Compound.
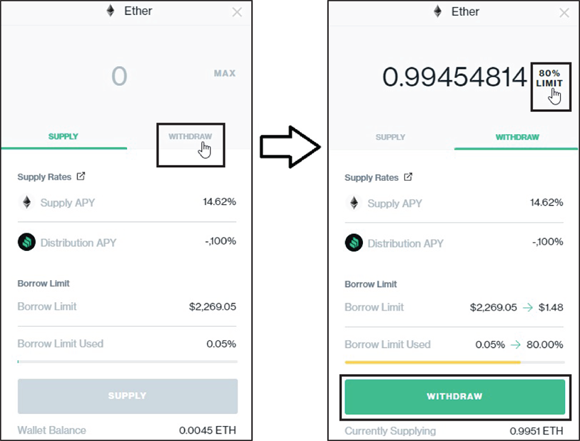
FIGURE 4-28: Unlocking and withdrawing loan collateral on Compound.