
p.71
Microphone Guide and Their Uses. Hey, Is This Thing On?
In This Chapter:
Where to Place the Microphone?
Four Fundamental Styles of Mic Placement According to Distance
MICROPHONE BASICS
Microphones, or mics, are used to capture a sound much like our ears. Microphones are one of an audio engineer’s finest tools. If you were an artist, microphones would be analogous to your color palette. Every microphone choice is like a stroke of the brush adding texture, tone, and color. Which microphones you choose can influence whether a recording is bright or dark, edgy or mellow, or muddy or clear. Three steps are involved in recording: capturing the sound, storing the sound, and listening back to the sound. The microphone represents the first step, capturing the sound. Getting to know how a microphone captures a particular instrument or sound takes time and experience. So what differentiates one microphone from another? Besides cost and aesthetics, there are many other factors.
When choosing a microphone, there are three major categories to consider:
■ Transducer/element type
■ Directional characteristic
■ Frequency response
What is a transducer? A transducer converts one form of energy into another. Speakers, our ears, and microphones are all transducers. A speaker converts electrical energy into acoustic energy. Our ears convert acoustic energy into mechanical energy and then finally into electrical energy, which is sent to our brains. A mic converts acoustic energy into electrical energy.
p.72
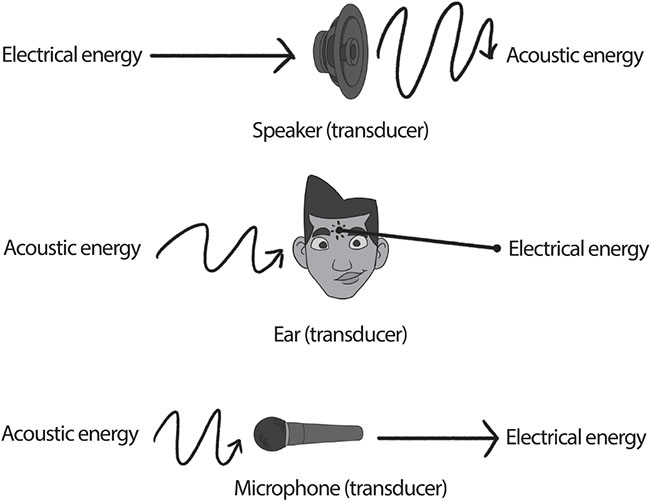
FIGURE 6.1
Transducers are often considered the weakest link in the recording chain. This is because they exist in almost every stage of the signal path. For instance, there are quite a few transducers involved in recording an electric guitar plugged into an amplifier. First, the pickup in the electric guitar is a transducer. This transducer takes the acoustic vibrations from the guitar strings and converts them into the electrical equivalent. This electrical signal is sent to the amplifier and converted back to acoustic energy through the amp’s speaker. The mic placed in front of the amplifier converts the acoustic energy from the speaker back into electrical energy. The signal is then sent to headphones or monitor speakers and converted back to acoustic energy. Finally, acoustic energy travels to our ears where it is converted back to electrical energy, and then sent to our brains to be processed as sound. In this particular scenario, we have identified five transducers in the signal path of an electric guitar recording: the guitar pickup, the amp’s speaker, the mic placed in front of the amp, headphones/studio monitors, and our ears. If any one of these transducers is flawed or inadequate, the end result of capturing a quality guitar sound could be jeopardized.
Basic Vocabulary
Transient – A short, quick burst of energy that is non-repeating. Commonly associated with the attack of percussive instruments. However, all music contains transients. In speech, transients are associated with consonants. Transients are typically weak in energy and associated with the higher frequency range.
p.73
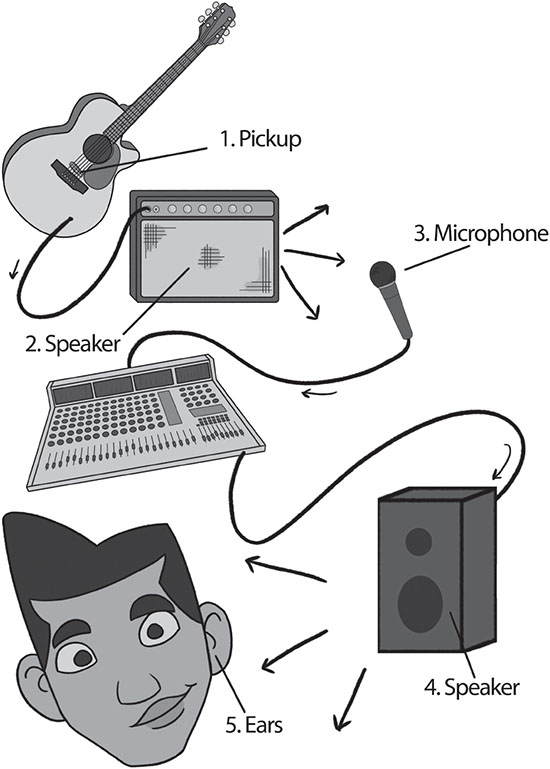
FIGURE 6.2
Transient response – How quickly the microphone reacts to a sound wave and specifically to those transients just described. This differentiates one mic sound from another. Condenser mics typically have the best transient response.
Preamp – A control used to boost an audio signal’s level. Microphones are plugged into preamps. The preamp knob is turned up to a usable and desired signal level. This level is generally sent to a recorder or a set of speakers (Figure 6.3).
Leakage aka bleed-over – The amount of sound that bleeds into the source being recorded. Leakage could be anything from room ambience to another instrument sound. This is common when a full band performs together with all the instruments in the same room or on stage. Microphones with tighter pickup patterns provide less leakage from other sources and the environment. A mic with a hypercardioid pickup pattern provides the best isolation and prevents the most bleed-over from other sounds.
p.74

FIGURE 6.3
Pop filter – A nylon screen around a hoop, or a perforated metal disk placed in front of the microphone in order to avoid plosive “b,” “p,” and “t” sounds that create destructive air movement. Pop filters are usually mounted on the mic stand with the mic or on a separate mic stand and are placed a few inches away from the mic. Pop filters are typically used when miking vocals. Some mics have built-in screens but an external filter is still needed. Filters also keep saliva off the actual microphone.
Shock mounts – Helps isolate the mic from traffic, thumps, and microphone stand transmission of sound. Included with many microphones, especially condenser mics.
Common switches found on microphones:
dB pad – Used to attenuate gain on a mic. Typically found on condenser mics. Usually specifies the amount of gain cut in dB: −10, −15, −20. Use this when miking louder sounds. Many mic preamps also have this function. This pad can identify a condenser mic, although not all condensers mics have dB pads.
Low-cut or high-pass – Used to roll off low frequencies and pass highs. Typically found on mics with cardioid pickup patterns. The user can select where the cut takes place, such as 20, 75, and 100 Hz. Great for non-bass instruments. Can help clear up a sound, cut out mud, and reduce low frequencies.
p.75
Pickup pattern selector – Allows the user to choose the directional characteristic of the microphone.
![]() VIDEO 6.1 COMMON SWITCHES ON A MICROPHONE
VIDEO 6.1 COMMON SWITCHES ON A MICROPHONE

Transducer Types
The first category to consider when choosing a microphone is the transducer type.
Dynamic mics are built tough and can handle loud sound pressure levels. General characteristics and uses of a dynamic mic:
■ Very rugged, which makes it the main microphone type utilized in live sound.
■ Great for loud things such as amplifiers, kick and snare drums, toms, and horns.
■ Generally used in conjunction with close miking. This makes sense, considering that they are extremely rugged (they may be hit by a drumstick or two) and good with high sound pressure levels (a cranked amplifier).
■ General frequency response is between 40 Hz and 15 kHz.
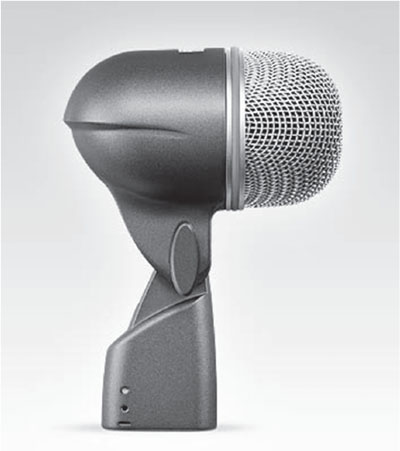
■ Common dynamic microphones: Shure SM57 or SM58, AKG D 112, Sennheiser MD 421, Electrovoice RE 20, Audix D1 – D6.
Condenser microphones are best at reproducing transients and generally provide greater clarity. General characteristics and uses of a condenser mic:
■ Excellent transient response; therefore, great for reproducing higher frequencies and quiet sounds. Adds “air” to a sound. Because the transducer is lighter, it reacts better to weaker sounds (highs).
■ Most require external power, known as phantom power. Phantom power is usually located near the microphone preamp. It is often labeled +48 V. Engaging this button will supply a condenser microphone with its required charge. Some condenser mics can use 9 V or AA batteries to supply the charge.
■ Fragile. Condenser mics, unlike dynamic mics, are considered fairly fragile. Hitting a condenser mic with a drumstick or dropping it could be the end of this mic’s life.
■ Often have a dB pad. A dB pad, used to attenuate input into the microphone, can help identify a mic as a condenser microphone.
■ Available as a large-diaphragm condenser (LDC) or small-diaphragm condenser (SDC).
p.76
■ Small-diaphragm condensers (SDC) are best at reproducing transients. Great for recording acoustic instruments, hi-hat, overheads on drums, room mics, flute, and shaker. Sometimes referred to as pencil condensers. Common SDC microphones: AKG C 451 B, Shure SM81, Rode NT5, Neumann KM184, and MXL 603S.
■ Large-diaphragm condensers (LDC) are typically my choice for recording vocals. They add presence to vocals and usually help vocals sit in the right place. An LDC also exhibits better response to low frequencies and can help to fatten up an instrument or voice. It should be mentioned that ribbon mics and dynamic mics can also record vocals quite effectively.
■ General frequency response – 20 Hz–20 kHz.
■ Common LDC microphones: AKG C414, Neumann U 47 or U 67, Audio-Technica AT4050, and Shure KSM27, 32, or 44.
Ribbon microphones are often used to take the “edge” off an instrument’s tone. General characteristics and uses of a ribbon mic:
■ Extremely fragile.
■ Great for digital recording!
■ Usually darkens and makes a sound appear smoother.
■ Great for room sounds, acoustic instruments, drum overheads.
■ Not meant for outdoor application (they don’t like wind) although there are models that can be used in live sound or outdoor situations.
■ Can often provide a “retro” type sound.
■ Typically excel in the low-mid frequency range.
■ General frequency response is between 40 Hz and 15 kHz.
■ Common ribbon microphones: Royer R-121 or R-122, RCA 44, Beyerdynamic M 160, and Cascade Fat Head.
![]() VIDEO 6.2 TRANSDUCER TYPES
VIDEO 6.2 TRANSDUCER TYPES

![]() TIP
TIP
Try setting up three mics: one dynamic, one condenser, and one ribbon. If you don’t have all the three available to you, just use what you have. Mic a tambourine or shaker from about one foot away. These instruments produce a lot of transients and have very weak energy. Note the results. Which mic changed the source the most? Which one darkened the sound? Brightened the sound? Sounded most like the source? The lightest, most sensitive transducer will likely reproduce more highs. Note the results for future sessions.
p.77
Directional Characteristics
Pickup Patterns
The next category to consider when choosing a microphone is the directional characteristic of the microphone, also referred to as a mic’s pickup or polar pattern. The directional characteristic of the mic determines the direction from which the mic will be able to pick up the sound. When the mic is positioned as designed, this is called “on axis.”
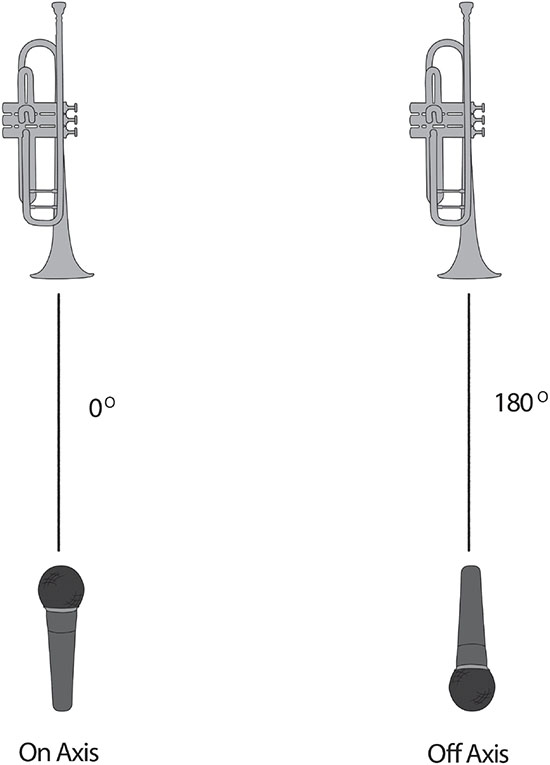
FIGURE 6.4
p.78

FIGURE 6.5

FIGURE 6.6
The pickup pattern also determines how well the recorded sound is isolated. Determining whether the microphone is a side or top address is also important.
Cardioid pickup patterns are the most common. Their pickup pattern is heart-shaped. Cardioid mics are sometimes referred to as unidirectional. With a top address microphone the sound is rejected from the rear of the microphone. Lots of cardioid pattern mics are used with live sound. This is because the mic rejects sound from the monitor and decreases the chance of a feedback loop.
Supercardioid has a pattern that is tighter than a cardioid pickup pattern. It rejects more from the sides, but picks up a small amount of sound from the rear. Most beta series mics have a supercardioid pickup pattern, such as a Shure Beta 57.
Hypercardioid is the tightest pickup pattern of all. It provides the most isolation for an instrument and virtually excludes the environment.
Subcardioid has a pickup pattern that is a cross between omnidirectional and cardioid. It rejects some sound from the rear of the mic.
Microphones with cardioid pickup patterns exhibit proximity effect. Proximity effect is a low-end boost of 100 Hz + 6 dB when you get within a quarter-inch of the diaphragm. Basically, you get a bassier tone as you place the mic closer to the source.
There are three ways to avoid proximity effect.
1. Back away from the mic.
2. Use a low-cut filter or roll-off. Low-cut filters are located on the microphone itself or near the preamp section.
3. Use a microphone with an omnidirectional pickup pattern. Mics with an omnidirectional pickup pattern do not exhibit proximity effect.
p.79
![]() TIP
TIP
Take advantage of proximity. A beefier, bassier tone can be achieved by placing a cardioid pickup pattern mic right next to the source. But beware, this can also make sounds muddy and overly bassy.
Directional characteristics determine how isolated a sound will be from other sounds and how much environment will be heard in the recorded sound.
Bi-directional or Figure 8 pattern picks up sound from the front and the back of the mic and rejects sound from the sides. Ribbon microphones tend to be bi-directional, although they come in all pickup patterns.
Omnidirectional pattern picks up sound pressure equally from all directions. It does not exhibit proximity effect and tends to have more “environment” in the sound and a flatter frequency response. It is often used when a reference mic is needed. Most lavalier mics are omnidirectional.
Ambisonic is the newest addition to microphone pickup pattern technology. These mics usually have four to eight capsules and are mainly used to capture three-dimensional spaces for VR (virtual reality) and surround sound.
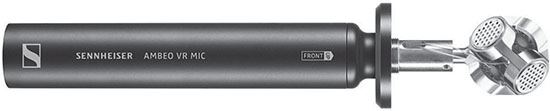
FIGURE 6.7 Sennheiser Ambeo VR mic
It is worthwhile to mention that mics can be a combination of transducer types and directional characteristics. Any transducer can have any pickup pattern. Some microphones will have a pickup pattern selector switch where you can select different patterns. These switches are found on multi-pattern mics such as the AKG C 414, AT 4050, and Cascade Elroy.
The transducer type influences the coverage area the mic picks up. If a condenser, dynamic, and ribbon mic with the same pickup patterns are placed in the same room, a condenser mic will pick up a much larger area.
Frequency Response
The last category to consider when choosing a microphone is the frequency response. Frequency response refers to how well a particular mic is able to respond to all the frequencies that strike it. Put simply, does the final result sound like the original source or does it darken or brighten the original source?
Frequency response can be divided into two categories: linear and non-linear. Since a microphone is used to reproduce the source of a sound, the concern is how the microphone will represent and capture the original sound. A microphone with a non-linear frequency response will affect the source and alter the original sound. Will it make the original sound brighter or edgier? A microphone with a non-linear frequency response will have peaks and valleys in its frequency response. Some engineers refer to this as “coloring” the sound.
p.80
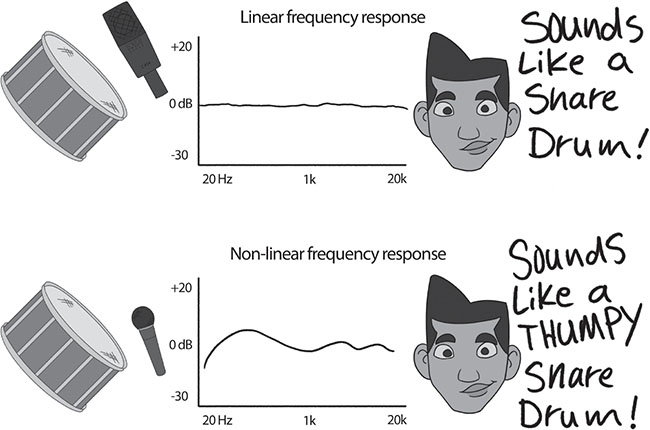
FIGURE 6.8
![]() TIP
TIP
For example, you are miking a guitar amp that is very bright, with a lot of high-mids and highs in the sound. Your intention is to darken the sound, or at least not accentuate the higher frequencies. In these circumstances, you might choose a microphone that has a frequency response to boost the lows or reduces the higher frequencies, most likely using a dynamic or ribbon mic to help color the sound. If you had chosen a mic with a brighter frequency response, like a condenser, the result would have been an extremely bright recording. Coloring a sound can be good or bad, depending on just what you are trying to achieve.
A microphone with a linear frequency response is said to have flat frequency response. That means that it reproduces the sound in a much more transparent way. A mic with a flatter frequency response will be the best choice if the source does not require any tone alterations. Most mics come with a frequency response chart or at least specifications. You can also find additional technical information on the manufacturer’s website.
p.81
A microphone with a non-linear frequency response will color or alter the way the source sounds and will not capture the source in a transparent way.
A microphone with a linear response will capture the sound in a much more transparent way altering the tone little, if at all.
MICROPHONE PLACEMENT
Where to Place the Microphone?
Now that you know a little more about how microphones work, it is time to discuss where to place them.
Mic placement is an art and is one of the engineer’s most important tools. Mic placement is as important as mic selection. A cheap mic placed in the right place can be as effective as an expensive mic placed in a wrong place.
Before you determine a microphone’s placement, consider where the performers will be placed according to sight, feel, and acoustics. Don’t overlook the importance of sight and feel, because both can heavily influence a musician’s performance. Musicians use non-verbal cues to communicate when they are performing. Make sure the musicians have a line of sight between them in the studio. It is also important for the musicians to feel comfortable where they are placed. For instance, placing a musician who is claustrophobic in a small isolation booth probably will not result in a good performance, no matter what mic is used. Finally, have the musicians play their instruments in different locations and hear where they sound best. Many instruments will jump out when placed in the optimum spot in a room.
Next, before deciding mic placement, it needs to be determined where the majority of the sound is coming from and the direction it is being projected. Note: some instruments’ bodies have a single area from which the sound is being projected (a trumpet), while others may have several areas from which the sound is being projected (a saxophone).
The easiest thing to do is simply listen to the instrument to find out where it sounds best and start by placing a mic there. After all, a microphone is being used to represent our ears. Be aware that moving a mic even a small distance can dramatically change the sound. It is often hard to determine how good something sounds without comparing it with another sound. Don’t be afraid to move the mic around and compare it with other mic positions. Recording these positions and comparing them can be helpful.
Keep in mind that sound is divided into three successively occurring categories: direct path, early reflections, and reverberation. The direct path is the quickest path to the listener and it helps determine where the sound is coming from and provides a clear sound. Early reflections occur right after the direct path and clue us in to the surface(s) of the environment. Finally, the reverberant field is the last part of a sound heard and helps us identify the size of the space or environment. This is especially important when deciding where to place a mic. The term “reverb” is described in more detail in Chapter 7.
p.82
Four Fundamental Styles of Mic Placement According to Distance
Here are some great starting points for miking instruments. Note that each position yields a different result and each position accentuates either the sound’s direct path, its early reflections, its reverberant field, or any combination of the three.
1. Close miking – placing the mic from 0 to 1 feet from the source. This provides the best isolation for the source and reduces the environment in the sound the most. Picks up the “direct path” primarily with little or no early reflections or reverberation present in the sound. Provides an “in-your-face” that can be described as tight and clear. Ultimately, it isn’t very natural (how many times have you stuck your head in a kick drum?); that is why it is common to combine close miking with other techniques or to add artificial reverb to the sound. Watch for proximity effect when close miking.
2. Accent miking – 1 to 3 feet. Common with live sound. As the name suggests, it helps accent a sound. Great for soloists and ensembles. This miking technique captures both the direct path and early reflections, with a small amount of reverberation in the sound.
3. Room or distant miking – 3 feet – Critical distance. Critical distance is the point where the sound’s direct path and reverberant field are equal. I would consider this the most natural miking technique. This is the distance we would listen to someone playing drums or playing a guitar through an amplifier. This technique is often combined with close miking. Room miking doesn’t provide much isolation and will have a good amount of the environment present in the sound. When miking this way, the sound will be made up of the direct path, early reflections, and reverberant field more evenly.
![]() TIP
TIP
Try miking drums with a single large-diaphragm condenser from 3 to 6 feet away. Drums will sound big and likely won’t interfere spatially with close mics used on other instruments. Because the drums cannot be individually balanced, a good or an interesting sounding environment is essential with this method as well as good-sounding drums.
4. Ambient miking – Miking beyond the critical distance. Like room miking, it is often combined with close miking to retain clarity. With ambient miking the reverberant field is dominant and the source is usually less intelligible and clear.
p.83
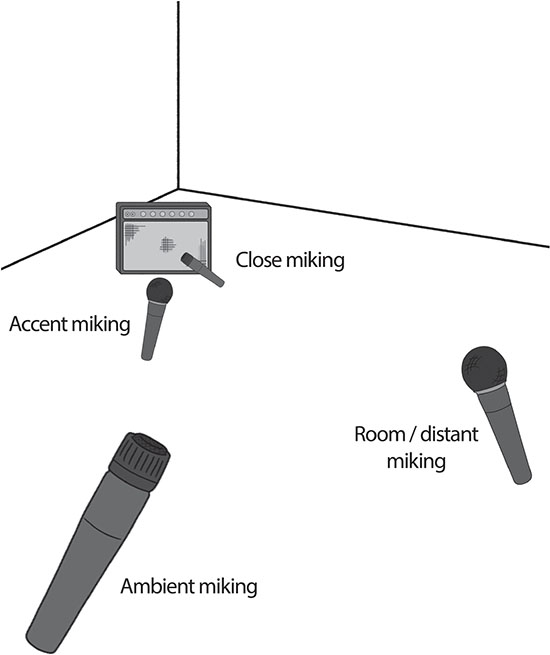
FIGURE 6.9
![]() AUDIO CLIP 6.1
AUDIO CLIP 6.1

Two Great Stereo Miking Techniques to Know
Phase
What is stereo miking? Why would I use it?
Stereo miking involves using two or more microphones to represent an image. It makes a sound wider, bigger, and thicker. Actual stereo miking provides greater localization than taking a mono mic and applying a stereo reverb/effect to the sound. In the age of digital recording, stereo miking will make an MP3 sound a lot more interesting and the sound will have more depth and character to it.
p.84
With stereo miking you will record each mic to a separate track or to a stereo track. You can then pan each track to opposite directions or anywhere in between. Make sure you hit the MONO button on your console, audio interface, or software application to insure that the mics are in phase.
XY is a great technique to use when miking yourself playing an instrument. This technique is considered coincident miking, meaning that the transducers are placed in the same place. XY provides a pretty good stereo image with few or no phase issues. Because time is not an issue between the transducers, phase is not an issue. This technique translates well in mono. Typically, two like microphones are used for this technique. SDC mics are often utilized in this technique, such as a pair of SM81s.
Spaced pair is a common stereo miking technique involving two mics spaced apart to capture a sound. Unlike XY, spaced pair can have some phase issues. This is due to the fact that time does become an issue with the spaced pair setup. Again, whenever there is a time difference between two or more microphones, you will likely have some phase issues. This technique typically provides a more extreme stereo image than XY but doesn’t translate as well in mono. Make sure that the two mics are placed three times the distance from each other that they are placed from the source. This will help with phase issues. Keep in mind the 3:1 rule when using multiple microphones.
![]() VIDEO 6.3 SPACED PAIR MIKING
VIDEO 6.3 SPACED PAIR MIKING

![]() TIP
TIP
When I am not sure where to mic an instrument, I usually ask the musician where it has been miked before or if they have a preference. When you are unfamiliar with an instrument, this is a good starting point. Besides that, it will also make the musician feel included in the recording.
Direct Box
In some cases, you may use a direct box, or DI, instead of miking up an instrument. A direct box is most often used with bass guitar and electric keyboards. Direct boxes are also used with stringed instruments that use pickups such as violin, cello, and acoustic guitar. It eliminates the need for a mic by taking the instrument’s line out and converting it into a mic input. This direct signal is supplied by the instrument pickup or line out. Direct boxes can be either passive or active and some require phantom power.
p.85
![]() VIDEO 6.4 HOW TO USE A DIRECT BOX
VIDEO 6.4 HOW TO USE A DIRECT BOX

Quick Mic Setups
How to Mic a Drumset
Unless you have an unlimited amount of time, keep it simple when miking a drumset. Many classic drum sounds used only a few mics. Of course, that technique won’t work for all styles of music but it works for most. Dynamic mics are typically used for close miking of drums and overheads, and room sounds are represented with condenser or ribbon mics.
Here are some easy ways to mic up a drumset:
Try using a single large-diaphragm condenser or ribbon mic and placing it about waist high three feet from the kick drum, facing toward the drumset. Raise the mic up if you want less kick and you desire more snare drum.
Close miking a kit takes time but it can result in a tight, dry sound. Place a dynamic mic a few inches away from each drumhead at an angle of 45 to 60 degrees. Place a stereo pair of condenser or ribbon mics in the room or over the drumset. Remember that if you use a spaced pair, don’t forget to apply the 3:1 rule discussed earlier in this chapter.
A simple way to get a quick and decent drumset sound is by placing one mic over the center of the kit to capture the snare, toms, and cymbals. Try using a condenser or ribbon mic for this. For the kick drum, try placing a dynamic mic inside the drum and adjusting it until you get the desired tone.
A great stereo drum sound can be achieved easily with the top/side miking technique. With this method place two mics equal distance from the snare (a mic cable is handy to measure the distance), one mic is placed over the drummer’s shoulder and the other mic is placed lower on the floor tom side. Pan the mics in opposite directions. Since the two mics are an equal distance from the snare, the snare will be in phase and no mic will be needed to hear the snare drum. Place a mic inside the kick drum for the low end.
![]() VIDEO 6.5 MIKING DRUMS
VIDEO 6.5 MIKING DRUMS
How to Mic a Bass
The most common practice is to use the direct sound from the bass and avoid using a mic. Try a direct box or a direct output from the bass head. If you do mic the bass amp, try a dynamic mic up close and/or a condenser mic in the room. To get tricky, you could blend all the three sounds: the direct signal, the close mic, and the room sound.
p.86
How to Mic a Guitar Amp
The fastest way to mic up a guitar amp is to place a close mic on the speaker. If you want a brighter, tighter sound, position the mic close to the center of the speaker. A darker, looser tone is achieved by placing the mic more to the outer edge of the speaker. If you have more than one track for guitar at your disposal, try combining the close mic with a ribbon mic that is placed 1 to 3 feet away from the amp. Some engineers like to record a DI signal from the guitar at the same time as the microphones. Although you may not use it in the final mix, it will be invaluable later on if you need to reamp.
![]() VIDEO 6.6 HOW TO MIC A GUITAR AMP
VIDEO 6.6 HOW TO MIC A GUITAR AMP

How to Mic an Acoustic Guitar
The easiest and fastest way to get a good acoustic guitar sound is to place a mic about five inches away from the twelfth fret (the double dots on a guitar).
![]() VIDEO 6.7 HOW TO MIC AN ACOUSTIC GUITAR
VIDEO 6.7 HOW TO MIC AN ACOUSTIC GUITAR

How to Mic a Vocal
Every voice is unique. Once you figure out what mic sounds best on the singer, place the mic about six inches away from the singer. To determine what mic sounds best, set up two mics at a time, side by side, and compare the results. Repeat this until you are satisfied.
![]() VIDEO 6.8 HOW TO PICK THE RIGHT VOCAL MIC
VIDEO 6.8 HOW TO PICK THE RIGHT VOCAL MIC

p.87
How to Mic Backing Vocals
Try placing an omnidirectional mic in the room and have the musicians circle around the mic. Move the singers around until you have your desired blend. Try doubling the backup vocals and panning the two tracks for an even bigger, thicker sound.
For more on microphone techniques check out Practical Recording Techniques, 7th Edition, by Bruce and Jenny Bartlett (Focal Press, 2016).
MICROPHONE GUIDE AND USES
There are more microphone choices than ever before. There could be a whole book on just microphones and their uses. The following section will feature common mics and touch on a cross section of what is out there. I have incorporated mics that a home recordist could afford as well as a fewer high-end mics that you may encounter in a professional recording studio. This is only a taste of what is out there.
The guide below provides a picture to help identify the mic, a price guide, the microphone’s transducer type and pickup pattern, specifically what the mic was designed for, and what instrument to try it on.
Price key:
$ – under $200
$$ – $200–$500
$$$ – $500–$1000
$$$$ – over $1000
Dynamic Mics
AKG D 12
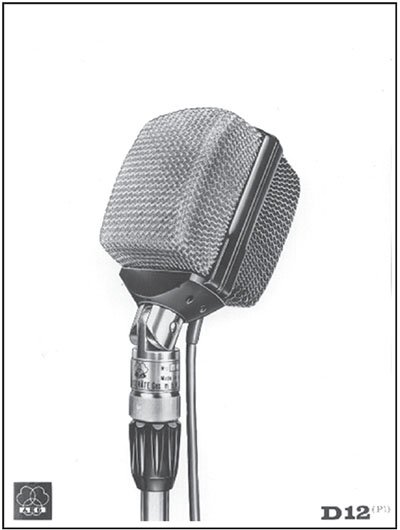
FIGURE 6.10
$$
Dynamic
Cardioid
30 Hz–15 kHz
Designed with a special “bass chamber” that gives this large-diaphragm mic great bass response. Exhibits a slight boost at 60 and 120 Hz. Introduced in 1953.
Try on: trombone, tuba, acoustic bass, and kick drum.
p.88
AKG D 112
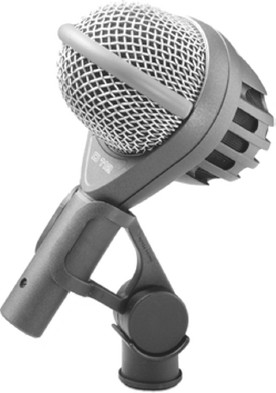
$/$$
Dynamic
Cardioid
20 Hz–17 kHz
Designed for kick drum.
Try on: kick drum, trombone, and bass amp.
AUDIX D6

$
Dynamic
Cardioid
30 Hz–15 kHz
Designed for kick drum.
Try on: kick drum, floor tom, bass amp, and Leslie speaker bottom.
p.89
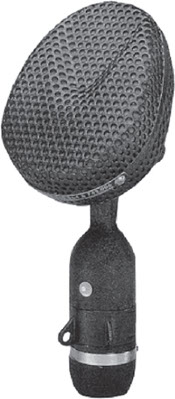
BEYER M 201
![]()
$$
Dynamic
Hypercardioid
40 Hz–18 kHz
Designed to work well with both live and recording sound on hi-hats, snare drums, rack toms, and percussion.
Try on: snare drum, hi-hat, drum overhead, piano, acoustic guitar, and strings.
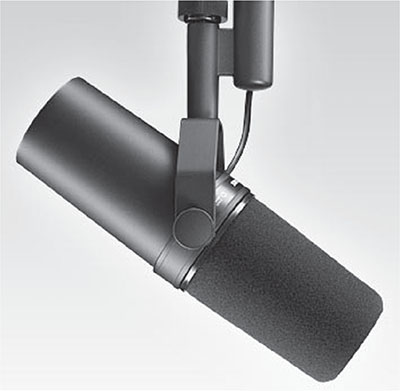
ELECTROVOICE RE20 VARIABLE-D
![]()
$$
Dynamic
Cardioid
45 Hz–18 kHz
Designed for radio and television broadcast announcers.
Try on: kick drum, bass amp, vocals, horns, and guitar amp.
SENNHEISER E 609

$$
Dynamic
Supercardioid
50 Hz–15 kHz
Designed for percussion and brass instruments.
Try on: guitar amps, snare drum, toms, and live vocals.
p.90
SENNHEISER MD 421

$$
Dynamic
Cardioid
30 Hz–17 kHz
Designed for most instruments, group vocals, and radio broadcast announcers. Introduced in 1960.
Try on: kick drum, snare drum, toms, and any other percussion. Often works great on bass amps, guitar amps, and horns.
SHURE BETA 52A
$
Dynamic
Supercardiod
20 Hz–10 kHz
Designed for miking a kick drum live.
Try on: kick drum, bass amps, and other low-end instruments.
SHURE BETA 57A

$
Dynamic
Supercardioid
50 Hz–16 kHz
Designed for drums, guitar amps, brass, woodwinds, and vocals.
Try on: snare drum (helps eliminate hi-hat bleed), congas, and other percussion.
p.91
SHURE SM57

$
Dynamic
Cardioid
40 Hz–15 kHz
Designed for amps and instruments. Excels in live sound but is common in the studio; it’s rugged and inexpensive.
Try on: snare drum, toms, guitar or keyboard amp, horns, and vocals.
SHURE SM58
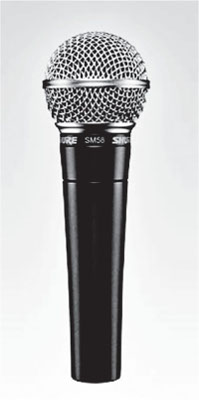
$
Dynamic
Cardioid
50 Hz–15 kHz
Designed for vocals, especially for live performance.
Try on: vocals, backing vocals, horns, strings, and snare drum.
SHURE SM7B
$$
Dynamic
Cardioid
50 Hz–20 kHz
Designed for radio broadcast announcers and vocals.
Try on: kick drum, bass amp, loud vocals, and horns.
p.92
Condenser Mics
AKG C 414
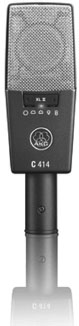
$$$
Large-diaphragm condenser
Omni, wide Cardioid, Cardioid, Hypercardioid, Figure 8
20 Hz–20 kHz
Designed for recording detailed acoustic instruments.
Try on: vocals, group vocals, acoustic guitar, room sounds, and drum overheads.
AKG C 12

$$$$
Large-diaphragm tube condenser
Nine selectable patterns from Omni to Figure 8
30 Hz–20 kHz
Designed for recording brass, strings, and vocals.
Try on: acoustic guitar, flute, strings, vocals, and guitar amp.
p.93
AKG C 451 B
![]()
$$/$$$
Small-diaphragm condenser
Cardioid
20 Hz–20 kHz
Designed for capturing rich transients such as with an acoustic guitar or drum overheads.
Try on: piano, hi-hat, cymbals, acoustic guitar, and percussion.
AUDIO TECHNICA AT4050

$$/$$$
Large-diaphragm condenser
Omni, Cardioid, Figure 8
20 Hz–18 kHz
Designed for vocals, piano, strings, and drum overheads.
Try on: group vocals, lead vocals, room sounds, and acoustic guitar.
p.94
AVENSON STO-2

$$/$$$
Small-diaphragm condenser
Omni
20 Hz–20 kHz
Designed to be used as a matched pair.
Try on: room sounds, drum overheads, and acoustic guitar.
EARTHWORKS TC30
![]()
$$$
Small-diaphragm condenser
Omni
9 Hz–30 kHz
Designed for recording louder sources.
Try on: drums, amps, live club recordings, and room sounds.
p.95
LAUTEN AUDIO LA-320
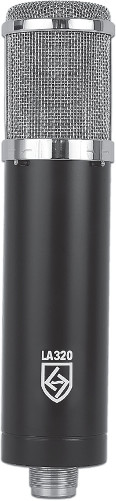
$$/$$$
Large-diaphragm tube condenser
Cardioid
20 Hz–20 kHz
Designed to be a versatile large-diaphragm tube condenser. Inspired by classic German microphones.
Try on: acoustic guitar, violin, mandolin, piano, vocals, and drum overheads.
MOJAVE AUDIO MA-200
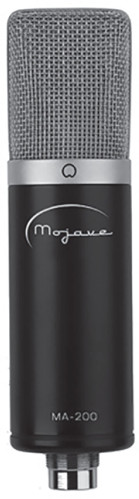
$$$/$$$$
Large-diaphragm vacuum tube condenser
Cardioid
20 Hz–20 kHz
Designed for anything that calls for a high-quality large-diaphragm condenser.
Try on: vocals, voice-overs, acoustic instruments, drum overheads, and piano.
p.96
NEUMANN TLM 103

$$$/$$$$
Large-diaphragm condenser
Cardioid
20 Hz–20 kHz
Designed for quiet acoustic sources.
Try on: acoustic guitar, room sounds, flute, and vocals.
NEUMANN U 87
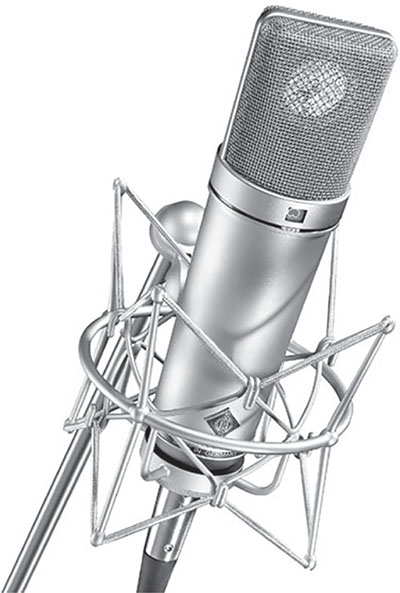
$$$$
Large-diaphragm condenser
Omni, Cardioid, Figure 8
40 Hz–16 kHz
Designed for orchestral recordings, as a spot mic for individual instruments, and vocals for music or speech.
Try on: vocals, acoustic guitar, room sounds, and drum overheads.
p.97
PELUSO MICROPHONE LAB 22 251

$$$$
Large-diaphragm vacuum tube condenser
Nine switchable patterns from omni to bi-directional
20 Hz–24 kHz
Designed after and inspired by the vintage “251.”
Try on: vocals, acoustic guitar, room sounds, and upright bass.
RØDE NT5

$$
Small-diaphragm condenser
20 Hz–20 kHz
Cardioid
Designed for small choirs and ensembles, cymbals, drum overheads, and acoustic instruments.
Try on: acoustic guitar, hi-hat, drum overheads, and live recordings.
SAMSON CO3U
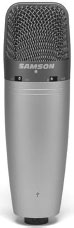
$
Large-diaphragm condenser
Supercardioid, Omni, Figure 8
20 Hz–20 kHz
Designed to plug straight into your computer. This mic has a direct USB output, so no interface is needed.
Try on: vocals and acoustic instruments. Great for podcasts.
p.98
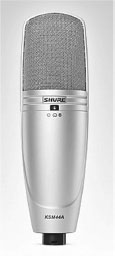
SHURE KSM27
$$
Large-diaphragm condenser
Cardioid
20 Hz–20 kHz
Designed for general purposes and a wide range of applications.
Try on: a nasally vocal, acoustic guitar, flute, and room sounds.
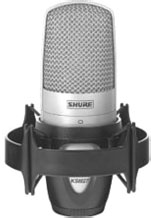
SHURE KSM44
$$$
Large-diaphragm condenser
Cardioid, Omni, Figure 8
20 Hz–20 kHz
Designed for woodwind, acoustic guitar, studio vocals, brass, percussion, strings, acoustic bass, piano, and voice-overs.
Try on: flute, vocals, and acoustic guitar.
STUDIO PROJECTS CS5
$$
Large-diaphragm condenser
Cardioid, Wide Cardioid, Hypercardioid, Omni, Figure 8
20 Hz–20 kHz
Designed for loud sounds and close miking.
Try on: guitar amps, vocals, wind instruments, strings, and percussion.
p.99
WUNDER AUDIO CM7 FET

$$$$
Large-diaphragm condenser
Cardioid, Omni, Figure 8
30 Hz–20 kHz
Designed for larger-than-life kick drum and bass guitar sounds and thick vocals.
Try on: kick drum, bass amps, vocals, and for beefy room sounds.
Ribbon Mics
AEA R84

$$$/$$$$
Ribbon
Figure 8
20 Hz–18 kHz
Designed to handle better than 165dB at higher frequencies.
Try on: brass, strings, guitar amps, piano, vocals, and percussion.
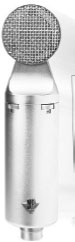
BEYERDYNAMIC M 160
![]()
$$/$$$
Double ribbon
Hypercardioid
40 Hz–18 kHz
Designed for miking strings, pianos, saxophones, hi-hat, and toms.
Try on: strings, snare drum, toms, and dulcimer.
p.100
CASCADE FAT HEAD

$
Ribbon
Figure 8
30 Hz–18 kHz
Designed for a Blumlein setup as well as with live application.
Try on: drum overheads, room sounds, guitar amps, vocal, piano, and strings.
COLES 4038
$$$$
Ribbon
Figure 8
30 Hz–15 kHz
Designed for broadcasting and recording applications. Used by the Beatles and the BBC.
Try on: drum overheads, guitar amps, vocals, and room sounds.
RCA 44
$$$$
Ribbon
Figure 8
50 Hz–15 kHz
Designed for radio and television broadcast announcers around 1932.
Try on: room sounds, acoustic bass, strings, and female vocals.
p.101
ROYER R-122
![]()
$$$$
Phantom-powered ribbon
Figure 8
30 Hz–15 kHz
Designed for a wide variety of acoustic and electric instruments, brass, and drum overheads.
Try on: guitar amps, room sounds, drum overheads, acoustic guitar, horns, and strings.
SE ELECTRONICS VOODOO VR1
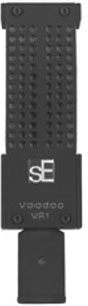
$$$
Ribbon
Cardioid
20 Hz–20 kHz
Designed to be one of the first ribbon mics to capture frequencies above 18 kHz.
Try on: electric guitar, percussion, and voice.