
CHAPTER 3
Installation and Configuration
In the last chapter, you performed a rapid installation and configuration. If everything worked fine, you have the foundation of a site up and running. You may want to begin customizing your site and skip this chapter for now. However, be sure to return to it so you can get a clear understanding of the core Joomla installation structure. This knowledge will benefit you greatly as you begin to do more advanced Joomla modification.
If the installation from the last chapter didn't go perfectly and you hit a few speed bumps, this chapter is for you. In addition to providing extensive installation instructions on each piece of the technology suite (Apache, Microsoft Internet Information Services [IIS], PHP, and MySQL) that Joomla uses, it also shows you how to install Joomla on your own server rather than a commercial host.
Even if you plan on using a commercial host for final deployment, it's often more convenient to perform testing and development on a desktop machine. Generally, the configuration settings that are best for the experimentation phase of a server are not desirable on a deployment server. Your desktop machine can provide the advantages of local testing (such as direct access to files and server settings) without the security threats that exist in a deployment environment.
The multiple server programs employed by a Joomla site have to integrate properly and "play nice" for the CMS to function properly. Figure 3-1 shows a general layer diagram of the two different installation options that will be presented in this chapter.
Because of the variety of technologies involved in a Joomla installation, it can sometimes be extremely frustrating to track down the source of a problem. In this chapter, I provide troubleshooting guides that should help you to locate and remedy problems you might encounter. The guides solve most of the more common problems that I've come across. If the presented solutions don't directly eliminate the trouble, they should put you on the right track to solving it yourself.
Before you begin an installation, however, examining the organization of a Joomla site will help you recognize the directory structure for later configuration.
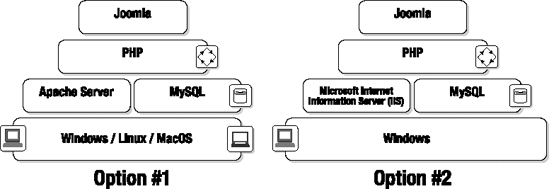
Figure 3-1. Joomla runs atop three other layers of technology.
File and Directory Overview
The Joomla system consists of approximately 3,200 files, so the system is too large to describe file by file. Nonetheless, now that you have an understanding of Joomla from an administrator perspective from the last chapter, it's useful to examine the directory structure so you'll know where to look when you want to make a direct modification.
Figure 3-2 shows the basic directory structure and the primary files located at the root. This figure shows the files of a virgin installation. Once you've installed Joomla on a web host, it's a good idea to eliminate the installation directory, even though it's shown here.
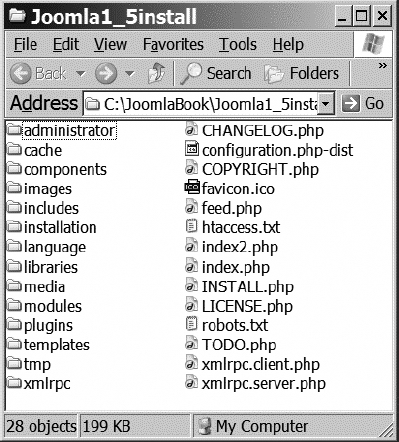
Figure 3-2. The primary folders that hold the Joomla system
The directories of the Joomla system are well named, and you can guess the contents of most of them. Nonetheless, the following list provides a summary explanation of the contents of each folder. Note that any directory in the following list with an asterisk (*) following its name is new as of Joomla version 1.5—the directory either didn't exist in previous versions or was named differently.
root(/): When you first place Joomla on your web site, the root directory contains anindex.phpfile that will launch the Joomla installer. Once installation is complete,index.phpwill detect the settings in theconfiguration.phpfile and execute the main Joomla engine. To make the system run the installer again, you need only delete theconfiguration.phpfile. The fileconfiguration.php-distcan be used to manually configure the Joomla site if the installer fails.administrator: This directory holds folders that closely mirror those of therootdirectory (such ascomponents/,modules/,plugins/, etc.), because the Administrator interface itself is essentially a Joomla web site. The Administrator user interface can be augmented by administrative extensions.cache: You will most likely never need to examine the contents of this directory. To accelerate performance, Joomla can cache popular prerendered pages here, so they don't have to be rerendered by PHP and MySQL for each page request. The cached pages will simply be loaded from the directory and sent to the browser. The caching occurs down to the module level, so even if the page itself isn't cached, modules on the page may have been. Joomla performs all of the housekeeping functions on the cache (including deleting outdated material), so you don't have to worry about its contents.components: Components are stored in this directory. You may notice that the default Joomla system includes a number of components, such as login, newsfeeds, poll, registration, search, and others, with functionality that is often displayed on the front-end using associated modules. A component, like a plug-in or module, is a type of add-on grouped under the general term "Extensions." Each component is stored in its own folder with a prefix ofcom_(such ascom_banners,com_contact, etc.).images: This folder contains all of the bitmaps used by the Administrator interface as well as images that have been uploaded to present within article content. Within the/imagesfolder, the/smiliesfolder contains emoticons that can be used in articles, the/storiesfolder has images for use within articles, and the/bannersfolder contains some sample banner files.includes: The/includesfolder contains PHP and JavaScript files that are included by other files for functions such as e-mail or tooltip display. You may notice that several files have the prefixmambo—these are included for backward compatibility. Joomla 1.5 can be run in legacy mode, making these files necessary. Expect the legacy mode as well as the Mambo files to disappear with the next major upgrade.installation: The/installationfolder contains all of the files needed for configuration during initial installation. This folder and its contents should be deleted following initial configuration.language: This folder holds the site translation files. Joomla stores translations in a simple INI-based file format. All files are saved in the UTF-8 encoding format (see the sidebar titled "UTF-8 Character Encoding" later in the chapter). The filenames indicate the language using a standardized naming convention of a three-letter language code followed by a two-letter country code. The language code complies with the ISO-639-2 standard, while the country code complies with the ISO-3166 standard. For example, the English template from the country Great Britain has a folder name ofeng-GB. All of the files contained in the folder have a filename prefix that matches the folder name.libraries*: The/librariesfolder contains the framework or programming foundation of the entire Joomla system. A Joomla CMS is actually a web application that uses the core libraries contained inside the/librariesfolder for execution. If you look in the library folder named/libraries/joomla, you will see the various implementation areas (such as application, database, file system, etc.) that make up the functional parts of the application. Third-party libraries are also stored in the/librariesfolder. Each library has its own subfolder in this folder to aid in organization.media: Media may be stored here for Joomla to access. Note that there are also a number of JavaScript files stored in this folder for system inclusion. One of the most useful is the MooTools JavaScript framework, located at/media/system/js/mootools.js. MooTools (www.mootools.net) is a powerful open source JavaScript framework that makes browser-based tasks such as user interface (accordions, drag-and-drop, etc.) and client system functions (Ajax interaction, DOM manipulation, etc.) much easier and compatible across most browsers. Since it is included with every copy of Joomla, many extensions take advantage of the features it provides.modules: The modules available for display by a template are contained in this folder. Some of the standard modules include banners, breadcrumbs, latest news, login, newsflash, poll, and random image. Modules are placed like panels into a Joomla template. They often encapsulate or provide the front-end display for a related component. A module, like a component or plug-in, is a type of add-on grouped under the general term extensions. Each module is stored in its own folder with a prefix ofmod_(such asmod_banners,mod_login, etc.).plugins*: Plug-ins are located in the/pluginsdirectory. In past versions, these were called mambots, short for Mambo robot (again, Mambo was the precursor application to Joomla), and were located in the/mambotsfolder. Plug-ins are framework extensions, so they operate at a lower level than components. Unlike components and modules, plug-ins are located in one of nine folders together (in contrast to each extension having an individual folder). Each of the nine plug-in folders (authentication,content,editors,editors-xtd,search,system,tmp,user, andxmlrpc) defines the functionality provided by the plug-in (e.g., the/editorsfolder holds the WYSIWYG editor plug-ins).templates: This folder holds the folders of any templates installed on the Joomla site. Note that the name of each template subfolder must match the template it contains. With the default installation, the default template is called/rhuk_milkyway. You will find a folder of that name within the/templatesdirectory. If the folder does not match the template name, Joomla won't recognize it.tmp*: The/tmpdirectory stores temporary files and cookies that are used by both the Administrator and user interface portions of Joomla.xmlrpc*: This folder signifies perhaps the most powerful new feature of Joomla: eXtensible Markup Language Remote Procedure Call (XML-RPC) interface code. The XML-RPC interface allows remote procedure calls to be encoded in an XML wrapper. This means that a procedure call can be sent into the Joomla server for on-server execution.What does XML-RPC mean to a Joomla administrator? Potentially multiple Joomla servers could be administered from a single server. More directly, XML-RPC can be used to allow client applications to talk to the Joomla server. In particular, blog applications such as w.bloggar (http://wbloggar.com) provide support for XML-RPC posting of content. The w.bloggar software has an advanced Windows interface for blogging. Users can maintain their blog in the program on their desktop computer, and then the application can directly upload blog content into Joomla as articles. Since the w.bloggar application handles the server interface, the blogger never has to go through the Joomla interface to add content. Support for other blog interfaces such as MetaWebBlog and Movable Type API are planned for future plug-ins.
Note Even if you haven't heard of XML-RPC, you may be familiar with Simple Object Access Protocol (SOAP). SOAP was derived from XML-RPC and has evolved to become essentially a bigger, stronger younger brother (with features such as Web Services Description Language [WSDL] generation, client proxy generation, WS-Security, etc.). The Joomla team decided to stick with XML-RPC because it is leaner and faster, and the additional SOAP features didn't seem necessary for Joomla applications—given the extra overhead they demanded. The Joomla team also realized that if a developer needed the extra SOAP functionality, it could be addressed directly through PHP 5's built-in SOAP extension.
Most of the time, you will have no need to access these directories yourself. The majority of the configuration and modification of a Joomla web site can be accomplished through the web-based administrative interface. However, there are some actions, such as modifying a template with a third-party text editor, where you may want to directly access the source files.
Installing with XAMPP
As I mentioned earlier, installing and configuring all of the different server programs so they run together properly can be very difficult. Unless you're an accomplished system administrator, you may want to take a shortcut with XAMPP. Known as the "lazy man's installer," XAMPP combines all of the primary web server applications (Apache, PHP, and MySQL) into a single installation binary.
The XAMPP package was created to ensure that all server versions in the installer are compatible with each other and properly configured to work together. The "X" in XAMPP stands for the variety of operating systems for which this superinstaller is available (such as WAMPP for Windows, LAMPP for Linux, etc.). The other letters of the acronym stand for Apache MySQL PHP Perl. Although Joomla doesn't need Perl for execution, it won't interfere with Joomla functionality.
XAMPP installers are available for Windows, Linux, Sun Solaris, and Mac OS. You can download the appropriate installer from the official XAMPP site: www.apachefriends.org/en/xampp.html.
When you download and install XAMPP, there should be no need to edit any configuration files or struggle with incompatibilities. After installation is complete, you should be able to install Joomla immediately without any further work.
Note If you want an even simpler method of installing Joomla, you can choose Joomla! Stand Alone Server (JSAS; available from http://jsas.joomlasolutions.com). Note that the organization that provides JSAS has moved to a subscription-based service, so download of the JSAS package requires payment of a modest fee to cover the cost of their bandwidth. If you intend to use Joomla beyond the most basic implementation, I suggest you perform the Joomla installation yourself and separately, instead of using a JSAS solution. It will help you learn and understand the system.
XAMPP Components by Operating System
Each operating system (OS) installer contains its own set of applications, some of which are unique to that specific platform. Many of these applications aren't required for basic Joomla execution, but they can help you administer the web server. Others, like the FileZilla FTP server, can add functionality to Joomla for file upload.
The capabilities included in the XAMPP installer vary with the OS:
- Windows: Tested to run on Windows 98, NT, 2000, XP, and Vista. At the time of this writing, the installer includes Apache, MySQL, PHP and PEAR, Perl, mod_php, mod_perl, mod_ssl, OpenSSL, phpMyAdmin, Webalizer, Mercury Mail Transport System for Win32 and NetWare Systems v3.32, JpGraph, GD, Ming, FreeType 2, libxml, FileZilla FTP server, MCrypt, eAccelerator, SQLite, WebDAV, and mod_auth_mysql.
- Linux systems: Tested to run on SUSE, Red Hat/CentOS, Mandrake, and Debian. At the time of this writing, the installer includes Apache, MySQL, PHP and PEAR, Perl, ProFTPD, phpMyAdmin, OpenSSL, GD, FreeType2, libjpeg, libpng, gdbm, zlib, expat, Sablotron, libxml, Ming, Webalizer, PDF Class, ncurses, mod_perl, FreeTDS, gettext, MCrypt, mhash, eAccelerator, SQLite, and IMAP c-client.
- Mac OS X: Tested to run on version 10.4 and higher. At the time of this writing, the installer includes Apache, MySQL, PHP and PEAR, SQLite, Perl, ProFTPD, phpMyAdmin, OpenSSL, GD, FreeType 2, libjpeg, libpng, zlib, Ming, Webalizer, mod_perl, eAccelerator, and phpSQLiteAdmin.
- Solaris: Tested to run on Solaris 8 and Solaris 9. At the time of this writing, the installer includes Apache, MySQL, PHP and PEAR, Perl, ProFTPD, phpMyAdmin, OpenSSL, FreeType2, libjpeg, libpng, zlib, expat, Ming, Webalizer, and PDF Class.
Before you install XAMPP, recognize that it was created for use as a development platform, not for deployment. While many people do use it for deployment, the system is set up for ease of use rather than security. That means that there are many areas where the security is left wide open. These insecure areas include (but are not limited to) the following:
- The MySQL administrator account has no password.
- The MySQL daemon is open to the network.
- The PHP web administrative interface (phpMyAdmin) is open to the network.
- Standard default users of FileZilla and Mercury are well known.
If you are thinking of using the XAMPP installation as a server platform, be sure to close all of these security holes before you even consider deployment. Check the XAMPP web site for the latest list of security settings that should be configured before deployment.
Tip The XAMPP installers include numerous optional server components so that nothing is missing. This also means that XAMPP installations generally have a much larger hard drive footprint than a manual installation of the individual servers. If space is at a premium on your server and you have the expertise to perform individual server configuration, manual installation is probably the path to follow.
The sections that follow describe the installation procedure for each OS.
Installing on Windows
After you've downloaded the installer, installation is as simple as double-clicking the executable file (.exe) or Microsoft installer file (.msi). The first screen (see Figure 3-3) prompts you for the installation language. In most cases you can leave the default language of English and click the OK button.
You will be presented with a splash screen that has no options, so click the Next button. The Install Location screen will ask for a directory in which to place the XAMPP files. The space requirements (around 220MB) will be displayed, as well as the available disk space. Click the Next button to accept the default Program Files directory.
XAMPP will proceed to extract all the necessary files into the installation folder. When complete, it will begin presenting you with a series of message box prompts. Each prompt will ask if a separate application in the XAMPP suite (Apache, PHP, MySQL, etc.) can be run as a service. Figure 3-4 shows an example of the primary message box.
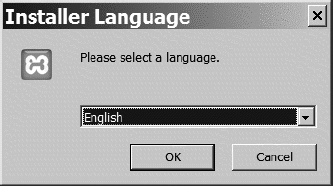
Figure 3-3. Select a language to use for the XAMPP installer.
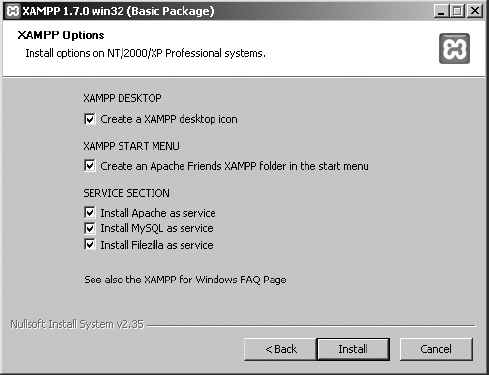
Figure 3-4. Message boxes will ask whether you want the various applications to run as services.
You want these servers to execute as services in the background, so click the Yes button on each message box. When installation is complete, you will be asked whether to run the XAMPP Control Panel. Click the Yes button and the Control Panel window will appear as shown in Figure 3-5. From the Control Panel, you can start and stop services, check the status of each application, and access the individual administrative applications.
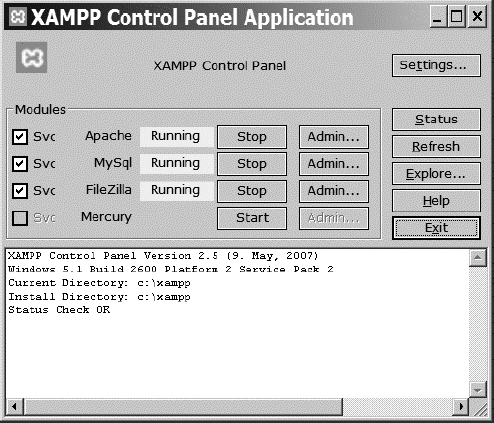
Figure 3-5. The XAMPP Control Panel centralizes the basic administration of the applications.
Click the Admin button to the right of the Apache entry. A browser window appears to show the central XAMPP default page (see Figure 3-6). Along the left side of the window, there are various options to administer the server through this interface. It's a good idea to bookmark this page so you can get back to it easily.
To get Joomla running, it won't be necessary for you to use any of these links. However, the Security link on the left panel is very useful, as it shows you the current security settings on the web server. I suggest you take a brief look at the page so you may understand what aspects of the new server system are open to others.
You should be all ready for a Joomla install! Note that the default directory for web content is in the htdocs subfolder of the XAMPP folder. You can copy the Joomla files into this folder for activation and installation. With a traditional installation, the path to the content directory is C:Program Filesxampphtdocs.
Note If you're having a problem accessing the web server under Windows XP Service Pack 2 or Windows Vista, it could be that the default Windows installation included a firewall that is blocking one or more of the needed IP ports. See the "Troubleshooting" section later in this chapter for more information.
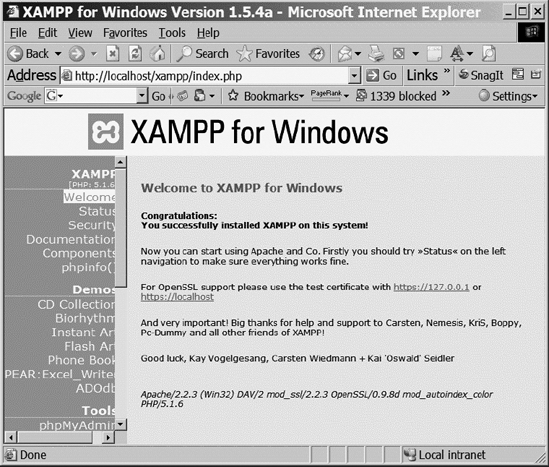
Figure 3-6. The XAMPP for Windows main page
To install XAMPP, you'll need to download the tar.gz archive to your local drive. Once the archive is downloaded, log into the Linux system with the system administrator root command:
su
On some Linux distributions (such as Knoppix and Ubuntu/Kubuntu), su is not available and you will need to use sudo to gain root access, like this:
sudo -s
Now you can extract the XAMPP installation into the /opt directory. Use the following command, modifying the filename (here shown as xampp-linux-1.5.tar.gz) to match the name of the archive you downloaded:
tar xvfz xampp-linux-1.6.8a.tar.gz -C /opt
This will install XAMPP to the /opt/lampp directory. To start the XAMPP system from the shell, type
/opt/lampp/lampp start
To access the main XAMPP page, just access the default directory of the server from a web browser with the following URL:
http://localhost
The default directory where web content will be stored is /opt/lampp/htdocs/.
Caution XAMPP is intended to be installed as a developer platform; it's not meant to be run as a deployment server. If you do use it as a deployment server, be sure to configure the security properly, as XAMPP installs with no passwords and your system is wide open. To properly configure XAMPP for security, the installation includes a security check application. Consult the online manual for more information.
On many Linux implementations, after you reboot the system following the initial installation, the XAMPP system will no longer be running. You will have to configure your OS bootup sequence to execute XAMPP. The general procedure for configuring your system involves some diagnostic work.
First you need to determine the default runlevel. Run egrep with the following parameters:
egrep :initdefault /etc/inittab
You should see a line like this:
id:3:initdefault
The id number will likely be 3 or 5. If you're running a Debian installation, the number will be 2. Move to the runlevel directory by typing the following command (substituting the runlevel number egrep revealed for X):
/etc/rc.d/rcX.d
If that doesn't work, try moving into the /etc/init.d/rcX.d or /etc/rcX.d directories. Set the startup initialization by executing the file link command:
ln -s /opt/lampp/lampp S99lampp
Link in the shutdown process by typing this:
ln -s /opt/lampp/lampp K01lampp
That should do it! Your OS should initialize XAMPP on boot.
Tip The openSUSE 10.0 distribution has a special bootup procedure. Check the XAMPP web site (www.apachefriends.org/en/xampp.html) for instructions.
Installing on Mac OS
XAMPP installation on Mac OS is likely the simplest of all. You need to download the XAMPP package, which is available in both StuffIt (.sit) and tar archives. I recommend using the StuffIt archive, as Mac OS includes StuffIt Expander natively and it has a friendly user interface.
Extract the PKG file to a scratch directory on your local drive. Double-click to execute the file, and the installer will take you through the installation steps and install XAMPP to the /Applications/xampp directory.
To start XAMPP, go to the Terminal shell and activate the system administrator account using the sudo command:
sudo -s
You should be able to start Apache, MySQL, and PHP from the shell with this command:
/Applications/xampp/xamppfiles/mampp start
That should do it!
Installing the Individual Servers of WAMPP/LAMPP/MAMPP
You may decide that XAMPP is more technology than you need installed. Because of the "everything and the kitchen sink" approach of the XAMPP installation, its footprint on the local drive is more than three times larger than that of the individual servers Joomla requires. You can separately install and configure each of these servers.
When installing the various servers, you may run into configuration conflicts. I have included some of the most common installation problems in the "Troubleshooting" section, so look there if you have a problem. Although I've tried to cover most of the common obstacles in this chapter, be sure to check the ReadMe files included with the installers to understand the most recent remedies.
Tip If you're going to do your own individual installation, I suggest that you check the version numbers of the various servers that make up each suite in the XAMPP installers. By downloading the versions of each server that match those contained in a XAMPP package (which are known to work together), you can minimize potential problems.
The sections that follow take you step by step through installing the individual servers.
Installing and Configuring the Apache Server
Installing an Apache web server is only difficult if the vanilla installation doesn't work. Debugging a failing Apache service can be time consuming because the server itself will often return vague or misleading error messages. For example, if you install a MySQL plug-in that is incompatible with the installed version of Apache, the error doesn't state this incompatibility. Instead it declares that the plug-in was not found with an error such as the following:
Cannot load...into server: No such file or directory
Like many such errors, this initially led me on a wild goose chase thinking that the configuration parameter pointing to the plug-in was set incorrectly. Figuring out the real problem is usually a combination of guesswork and searching the user forums for answers to similar problems. That said, let's get Apache up and running.
You can download the Apache web server at www.apache.org. Click the HTTP Server link for download instructions. I advise against downloading the installation of the very latest, bleeding-edge version of the server. It sometimes takes a while for the Apache developers to work out the kinks in the beta releases. Look for a stable package installation to minimize potential problems.
Note Mac OS comes with the Apache server preinstalled, so you don't need to download the installation package—unless you want to use a version newer than the one already available. Instructions for activating Apache on Macintosh (which Apple calls "web sharing") are provided in the "Mac OS Installation" section of this chapter.
You will have the opportunity to download either a binary file or the source code for the server. If you know how to compile the source code, you don't need any help from me. If you are a new Joomla user, simply download the binary installation. The following binaries are available: aix, cygwin, darwin, freebsd, hpux, linux, macosx, netware, os2, os390, reliantunix, rpm, sinix, solaris, and win32.
You'll want to download Apache version 1.13 or later for use with Joomla. At the time of this writing, I recommend that you use a build of version 2.2 or later.
Windows Installation
When you execute the Windows installer, you will be presented with an introductory screen that describes the Apache server. There are very few steps in the installation. Chiefly you will be asked for the configuration of the network domain, the server name, the administrator's e-mail address, and the selected port (as shown in Figure 3-7).
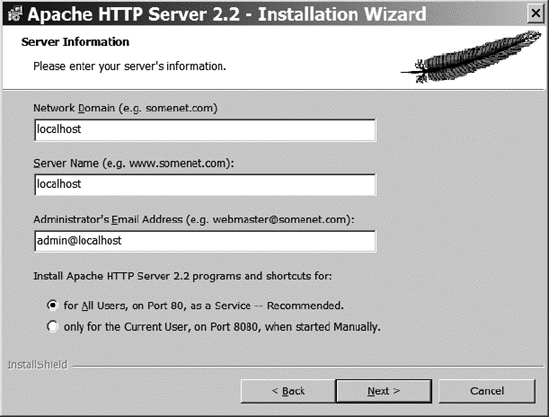
Figure 3-7. The Apache server requires the configuration of basic information before installation.
If you are installing Apache on a private server, laptop, or desktop machine, you probably don't have a DNS server that provides a domain URL (such as www.example.com). Therefore, for the Network Domain field, enter localhost. Enter localhost in the Server Name field as well to keep everything simple. For the administrator's e-mail, enter admin@localhost.
Note If you want your web server accessible on your local area network and don't have a DNS, you can enter the IP address in the first two fields (Network Domain and Server Name). If you run a DNS, you will likely already know how you want these settings configured.
Leave the port set at 80 (the default) if you don't have another web server (such as IIS) already running on the machine. If you do, I suggest setting the port to the "only for the Current User" option, which selects port 8080 to address the web server.
Note If you install for all users, the server will run as a Windows service (this is preferable if you're doing a lot of development), while the "only for the Current User" option will require you to manually run the server every time you reboot. It might be useful to install for all users even if you plan to run the server on a different port than 80. You can reconfigure the port as needed through the configuration file. Alternately, you can select the manual installation option and later add Apache as a service by executing the apache.exe application with the -k install switch. Check the Apache manual for more details.
Click the Next button and you will be asked to select either a typical or a custom installation. Unless you already have a good understanding of the Apache server, stick with the typical installation.
Finally, the installer asks for a directory in which to place Apache. The default directory is fine for a Joomla installation. At the time of this writing, the default directory offered by the installer is C:Program FilesApache Software FoundationApache2.2.
Take note of the directory where Apache will be installed. You'll need to access the folders within this directory for proper setup of PHP, MySQL, and later Joomla. Click the Next button to move to the final installation screen and click the Install button. Installation should occur without any problems. To get Apache working properly, however, you may have to tweak some of the configuration settings after the installation is complete.
On Windows, the Apache service will be run as the system user on the LocalSystem account. The first time you run Apache on Windows XP, your Windows Firewall may show a prompt asking whether to block the application, as shown in Figure 3-8. In this figure, the firewall detected Apache attempting to open a port (port 80) for communication. You must click the Unblock button to allow Apache to execute properly.
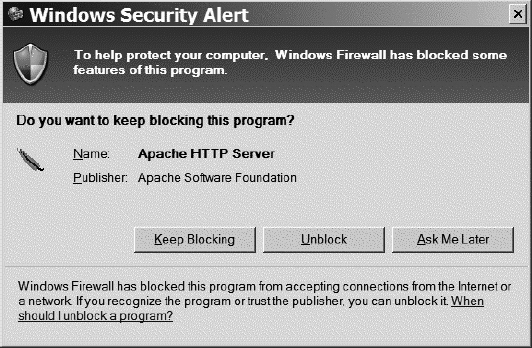
Figure 3-8. Click the Unblock button to allow access to the Apache server through the firewall.
If you open a browser window and type in the address http://localhost, you should see the simple welcome Apache message shown in Figure 3-9. If you didn't install Apache to the standard port, you may have to add the port number to the web address like this: http://localhost:8080. In the preceding case, port 8080 was set for the Apache server.
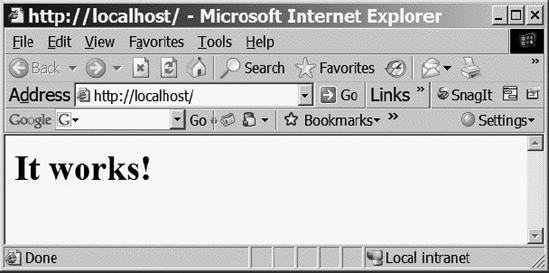
Figure 3-9. If Apache is working, you should see this simple welcome message.
If you received any errors during installation, you can look in the /logs directory of the Apache folder for files that describe the errors. With a default installation, you will find the logs directory here: C:Apache Software FoundationApache2.2logs.
In that directory you will find several log files. The most important files for locating your errors are error.log (which contains any Apache execute errors) and install.log (which contains a list of operations performed during the installation). Both are standard text files and may be opened in a text editor such as Notepad.
Tip If you encountered issues during the Apache server installation (aside from the firewall blocking), it may be a good idea to correct the problems and then uninstall and reinstall Apache. This process can save you headaches later, as a repaired installation can sometimes introduce little flaws in the Apache server such that it doesn't execute quite right.
Linux Installation
Apache installation on Linux will vary greatly depending on your version of Linux. If you're running Red Hat or CentOS, you can use a simple yum command to install all three of the servers you will need for Joomla (note that httpd is the name of the Apache server on Linux):
yum -y install httpd php mysql mysql-server php-mysql
To make Apache autoboot on startup, execute this command:
/sbin/chkconfig httpd on
To make MySQL autoboot on startup, execute this command:
/sbin/chkconfig mysqld on
To start the Apache server manually, you can use the service program in the /sbin directory:
/sbin/service httpd start
To start the MySQL server manually, execute this command:
/sbin/service mysqld start
With Ubuntu, you should be able to use the following command:
sudo apt-get install apache2
If you have problems, check the Ubuntu documentation for Apache at https://help.ubuntu.com/community/ApacheMySQLPHP.
If the Apache server is not available for automated installation in your Linux distribution, the recommended procedure for installing on Linux requires downloading the source code files and using a C++ compiler to compile an executable for your flavor of Linux. Such an involved and variable process is beyond the scope of this book, so you'll need to go to the Apache web site (http://httpd.apache.org) for specific instructions to address your needs.
Mac OS Installation
There is rarely a need to install the Apache server on Mac OS since it comes with a copy of Apache built into the OS! To activate it, simply go to System Preferences under the Apple menu. Select Sharing and you'll see the File & Web tab. In the Web Sharing section of the tab, click the Start button and the Apache server will be activated.
You should note the IP address that appears under Network Identity (something like 172.128.62.114) of your web server. You'll use it in a moment to look at your default page.
To display the default display, bring up a browser window and enter your IP address: http://172.128.62.114/. You can locate the root files of your web server by using the file browser to look at the directory: /Library/Webserver/Documents/.
Configuring the Apache Server
Configuration of Apache after the installation is generally the most difficult step of running the Apache server. Because of the available features and the powerful technology included with the web server, there are numerous settings that can be modified to resolve a bad condition.
The configuration settings are stored in the /conf directory at the root folder of the Apache installation. On the Windows platform, use Windows Explorer to open the /conf folder now. The main configuration file is named httpd.conf. Open it in a text editor and you will likely be slightly overwhelmed. At the time of this writing, the file is over 530 lines in length.
Listing 3-1 shows a small excerpt of the configuration file for a snapshot of how Apache settings are determined. You can see that each directive in the file is followed by a space and then the setting. Some settings are numeric, whereas others consist of text, URLs, and other character-based options.
Listing 3-1. Portion of the httpd.conf File Showing Directives to the Apache Server
## httpd.conf -- Apache HTTP server configuration file

##

#

# Based upon the NCSA server configuration files originally by Rob McCool.

#

### Section 1: Global Environment

#

# ServerType is either inetd, or standalone. Inetd mode is only supported on

# Unix platforms.

#

ServerType standalone

#

# ServerRoot: The top of the directory tree under which the server's

# configuration, error, and log files are kept.

ServerRoot "/usr/local/apache_t3.1b1"

#

# Timeout: The number of seconds before receives and sends time out.

#

Timeout 300


#

# KeepAlive: Whether or not to allow persistent connections (more than

# one request per connection). Set to "Off" to deactivate.

#

KeepAlive On
You will need a search function in whatever text editor you use to load the file. Even the simplest of editors (such as Notepad) have a Find command, so you shouldn't have much difficulty.
It's likely that the only edits you'll need to make at the beginning will be related to problems. If you can't get PHP to run after it's installed, you should check the following Apache settings:
#BEGIN PHP INSTALLER EDITS

PHPIniDir "C:Program FilesApache Software FoundationApache2.2"

LoadModule php5_module "C:Program FilesApache Software Foundation

    Apache2.2php5apache2_2.dll"

#END PHP INSTALLER EDITS
If these lines are missing after you install PHP, you will likely have to add them to guide Apache to the PHP execution engine.
Testing the Apache Server
There are two standard ways to address a web server on a local machine. In most cases, the following address in a web browser displays the default web page:
http://localhost/
If that doesn't work or an error is generated, try the default IP loopback for a local machine:
http://127.0.0.1
If that doesn't work or an error is generated, make sure you installed Apache to the default port. Open the httpd.conf file in a text editor and search for the Listen directive. The default should read Listen 80 to indicate that port 80 is being used. If the Listen directive specifies another port (such as port 8080), you can use the following URL to access the web server at that port:
http://127.0.0.1:8080
Setting Up the .htaccess File
The Hypertext Access file, with a default name of .htaccess, is used by the Apache server to determine directory-level security access. If an .htaccess file exists in a directory addressed by the web server, it can modify configuration directives that reside in the main Apache configuration file.
These directives can do many things, including govern the user permissions to that directory or change the error page returned to the web browser when a requested file is not found. Other directives can enable server-side includes, deny users by IP address, change the default directory page, set up page redirects, prevent hotlinking (i.e., retrieving files such as images within the HTML from another site), prevent hotlinking from specific domains, and offer standardizing web access.
An .htaccess file controls the directory where it exists as well as any child directories below it in the hierarchy. However, .htaccess files in subdirectories can override the parent directives.
Joomla includes a sample .htaccess file that can be used to provide the proper Joomla configurations for the Joomla directory if search engine–friendly (SEF) URLs are needed (see Chapter 12 for a complete explanation). The installation includes the filename set to htaccess.txt, so it needs to be renamed to .htaccess for use.
Tip On the Windows platform, Windows Explorer will not let you rename the file to .htaccess because Windows sees this as an extension with no filename (like .txt). You can, however, use the rename or ren command from the Command Prompt window and the file will be renamed with no error generated.
Listing 3-2 shows the settings included in the htaccess.txt file that ships with Joomla. The Joomla manual recommends not using this file unless there are permission errors after Joomla installation. If an .htaccess file exists in the directory already, you can compare its settings with the ones shown here to help you determine the differences.
Listing 3-2. The Joomla .htaccess File Settings
##

# @version $Id: htaccess.txt 11188 2008-10-19 04:02:39Z eddieajau $
# @package Joomla

# @copyright Copyright (C) 2005 - 2008 Open Source Matters. All rights reserved.

# @license http://www.gnu.org/copyleft/gpl.html GNU/GPL

# Joomla! is Free Software

##


#####################################################

#  READ THIS COMPLETELY IF YOU CHOOSE TO USE THIS FILE

#

# The line just below this section: 'Options +FollowSymLinks' may cause problems

# with some server configurations.  It is required for use of mod_rewrite, but may

# already be set by your server administrator in a way that dissallows changing it

# in your .htaccess file.  If using it causes your server to error out,

# comment it out (add # to

# beginning of line), reload your site in your browser and test your

# sef url's.  If they work,

# it has been set by your server administrator and you do not need it set here.

#

#####################################################


##  Can be commented out if causes errors, see notes above.

Options +FollowSymLinks


#

#  mod_rewrite in use


RewriteEngine On


########## Begin - Rewrite rules to block out some common exploits

## If you experience problems on your site block out the operations listed below

## This attempts to block the most common type of exploit `attempts` to Joomla!

#

# Block out any script trying to set a mosConfig value through the URL

RewriteCond %{QUERY_STRING} mosConfig_[a-zA-Z_]{1,21}(=|\%3D) [OR]

# Block out any script trying to base64_encode crap to send via URL

RewriteCond %{QUERY_STRING} base64_encode.*(.*) [OR]

# Block out any script that includes a <script> tag in URL

RewriteCond %{QUERY_STRING} (<|%3C).*script.*(>|%3E) [NC,OR]

# Block out any script trying to set a PHP GLOBALS variable via URL

RewriteCond %{QUERY_STRING} GLOBALS(=|[|\%[0-9A-Z]{0,2}) [OR]

# Block out any script trying to modify a _REQUEST variable via URL

RewriteCond %{QUERY_STRING} _REQUEST(=|[|\%[0-9A-Z]{0,2})

# Send all blocked request to homepage with 403 Forbidden error!


RewriteRule ^(.*)$ index.php [F,L]

#

########## End - Rewrite rules to block out some common exploits


#  Uncomment following line if your webserver's URL

#  is not directly related to physical file paths.

#  Update Your Joomla! Directory (just / for root)


# RewriteBase /


########## Begin - Joomla! core SEF Section

#

RewriteCond %{REQUEST_FILENAME} !-f

RewriteCond %{REQUEST_FILENAME} !-d

RewriteCond %{REQUEST_URI} !^/index.php

RewriteCond %{REQUEST_URI} (/|.php|.html|.htm|.feed|.pdf|.raw|/[^.]*)$  [NC]

RewriteRule (.*) index.php

RewriteRule .* - [E=HTTP_AUTHORIZATION:%{HTTP:Authorization},L]

#

########## End - Joomla! core SEF Section
Installing and Configuring PHP
Once you have the Apache server running properly, you'll need to install and configure PHP. Whereas the Apache server is a web server, PHP is a programming language that runs on top of the Apache server (or Microsoft IIS) to provide dynamic web content. Joomla is written in the PHP language, so PHP must be installed for Joomla to execute on the server machine. Conveniently, if you're running the Windows OS, you can install PHP on the Apache server or even Microsoft IIS if that is your web server of choice. You'll need to download PHP from www.php.net.
Apache can process PHP files by two methods: through direct module interface (known as Server Application Programming Interface, or SAPI) or through the CGI interface. Since the CGI interface is much slower and more resource intensive than SAPI, only the direct module will be covered here.
Installing PHP on Windows Apache Server
There is a precompiled installer for Windows that you can download and install. For PHP to work properly with Apache, you need to add the PHP directory path to your Windows Path variable. Once you have installed PHP, the full directory path to the folder should be something like this: C:Program FilesPHP.
To add the PHP directory to the Windows Path variable, go to Start ![]() Control Panel
Control Panel ![]() System. The System Properties window will be displayed. Click the Advanced tab and then click the Environment Variables button, as shown in Figure 3-10.
System. The System Properties window will be displayed. Click the Advanced tab and then click the Environment Variables button, as shown in Figure 3-10.
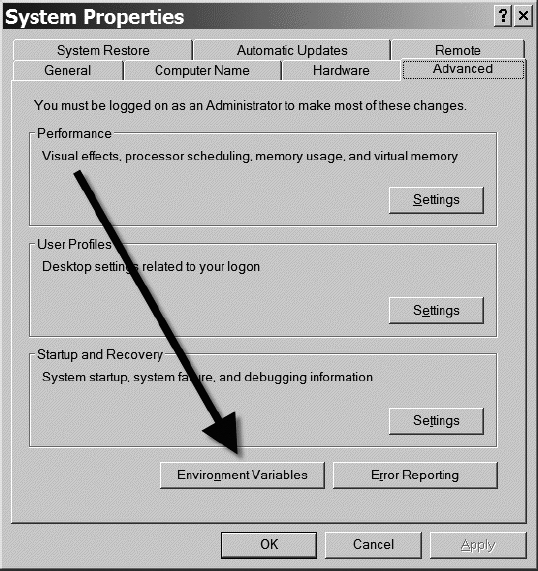
Figure 3-10. Click the Environment Variables button to access the path field.
Scroll down the System Variables list until you see the Path variable shown in Figure 3-11. Click the Edit button to display the Edit Variable box. Most likely the Path variable is already very long. Use the down arrow key to reach the end (or press the End key).
You'll need to add a semicolon character (;) and then enter the full PHP directory path. Once you've entered the path, click the OK button to accept the setting. Click OK on the Environment Variables window, and then click OK on the System Properties window. This new Path variable setting will not be active until you reboot your machine—do that now, so you can test PHP on the Apache server. After the server has restarted, skip to the "Testing PHP" section.
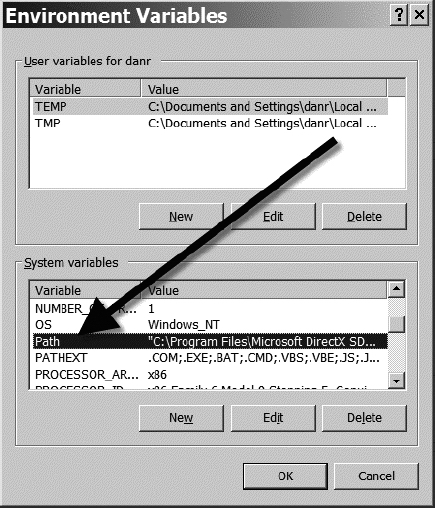
Figure 3-11. Select the Path variable in the System Variables list.
Installing PHP on Linux Apache Server
On Linux, the Apache installation instructions will help you install PHP as well if it is available through your distribution. If not, as with the Apache server itself, it is recommended that you compile the PHP code yourself and then perform the installation. Given the range of platforms, such a technical process is beyond the scope of this book. You can find instruction on the PHP site here: www.php.net/manual/en/install.unix.apache2.php.
Installing PHP on Mac OS Apache Server
There is a precompiled installer for Mac OS that you can download and install. If you would like Mac OS–specific information on installing or compiling the PHP server, Apple has set up a Developer Connection web page with hints, tips, instructions, and sample code: http://developer.apple.com/internet/opensource/php.html.
Recent versions of Mac OS have shipped with a free development system called Xcode. Xcode can host a number of different languages, and PHP is one of them. You can find complete development information about using PHP with Xcode here: http://developer.apple.com/internet/scripting/phpappledevtools.html.
Installing PHP on Microsoft Internet Information Services
Many users of the Windows OS already have IIS installed. It would typically be a waste of resources to install another web server on the same machine. Further, IIS is specifically tuned to provide the best performance on the Windows platform. To use Joomla, you will need to add PHP capabilities to IIS.
Download the PHP installer and execute it. On the options screen where you select the type of web server you'll be using, select your IIS version. By default, PHP will install to either the C:Program FilesPHP or C:PHP directory.
When you are prompted about whether you want the installation program added to the system path, select the Yes option so IIS will be able to find the necessary PHP components for execution. Additionally, if the installation displays a warning stating that the script map is not registered and asking you if you want to register it, click the Yes button.
Once installation is complete, a message box will be displayed that provides the following information:
NT user may need to set appropriate permissions for the various php files and

directories. Usually IUSR_MachineName (or the user your web server runs as) will

need read writer access to the uploadtmp and session directories, and execute

access for php.exe and php4ts.dll.
You'll need to reboot your system to reset the Path variable and activate PHP, but that should do it!
Testing PHP
After you've installed PHP, you can test it by putting together an extremely simple PHP program. Open a text editor (such as Notepad) and enter the following line:
<?php phpinfo(); ?>
Save the file as phpinfo.php in the root directory of your web server. From your web browser, access it with the following URL:
http://localhost/phpinfo.php
Your browser should display a PHP information page like the one shown in Figure 3-12. I suggest that for future reference you print the current information and tuck it away in a file. If you have problems in the future, check the general information against the printed copy of the clean installation. More than once, I've been able to spot a change that led to the root of the problem.
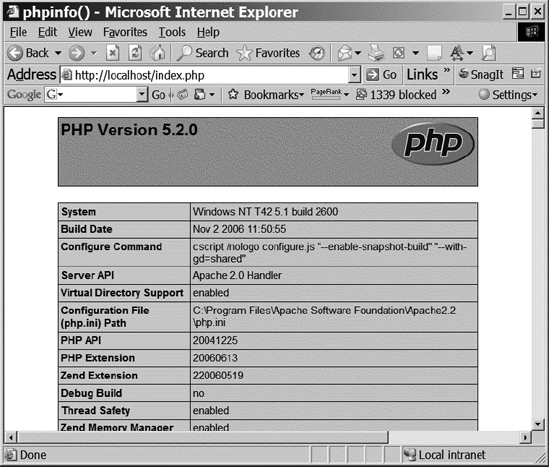
Figure 3-12. The phpinfo() routine summarizes information about the PHP installation.
If your browser doesn't execute the function to display the PHP information, and the PHP installation program indicated that everything installed correctly, check out the "Troubleshooting" section of this chapter for help locating the cause of the problem. Always try rebooting the system first to make sure the PHP module is activated.
Installing and Configuring MySQL
MySQL is an amazing open source relational database that has features comparable to database servers costing thousands of dollars. Joomla uses MySQL as the back-end to store all text content and most configuration settings. Installing MySQL is a simple, short process, whereas configuring the server is a little bit more involved.
You can download MySQL Community Server from www.mysql.com. Click the Downloads link at the top of the page. You will most likely want to install MySQL 5 because it has far more capabilities than previous versions, including stored procedures. If you would like to use the latest update of MySQL version 4, however, Joomla will function perfectly with it.
Tip If you are running the Server Edition of Mac OS, note that MySQL comes preinstalled. To access the MySQL Manager, look under Applications/Server/MySQL Manager.
There are generally two options when downloading MySQL: the Essentials installer and the Complete installer. You only need the Essentials installer, but I have provided instructions for using the Complete installer here so everything will be covered.
When you go to the MySQL site to download the server, I strongly recommend also downloading the separate MySQL Administrator tool. It provides a GUI for MySQL administration and makes life much easier. It is free and included in the MySQL GUI Tools bundle on the MySQL web site. I will be using it in this chapter.
Once you've downloaded the installer, you will likely have to extract it from a ZIP or tar archive. Extract the installer to your local drive for execution.
Installing MySQL
The MySQL installer works similarly on all platforms. These installation instructions show the Windows MySQL installation process, but other platforms follow a similar path. To begin, extract the MySQL installer onto a local drive and execute it (see Figure 3-13). Click the Next button to advance beyond the splash screen.
For Joomla, you won't need most of the specialty tools that are included with the complete installation. Select the typical installation and click the Next button.
On the MySQL.com subscription screen, unless you want to receive e-mail and updates from MySQL.com, you can select the Skip Sign-Up for MySQL.com option and click the Next button. The information provided by MySQL.com is useful, but the wizard requires several screens to configure that are unnecessary to go into here.
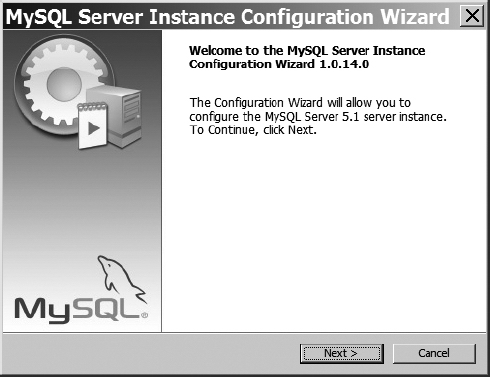
Figure 3-13. Executing the MySQL installer
When you click the Next button, MySQL will begin installation. On most machines, complete installation should take less than ten minutes. Although the installation completes, you're not done yet. The installation wizard will give you the option of configuring MySQL. Leave the "Configure the MySQL Server now" option checked and click the Finish button to execute the configuration wizard.
Configuring MySQL
After the MySQL Server Instance Configuration Wizard home screen is displayed, you'll be asked if you want to do a detailed configuration or a standard configuration (see Figure 3-14). Even though you'll be leaving nearly all of the default options selected, it's a good exercise to go through the detailed configuration so you have an understanding of how MySQL can be configured. Make sure the Detailed Configuration option is selected and click the Next button.
On the server type screen shown in Figure 3-15, you'll see a number of options that ask you to specify how the machine running MySQL will be used. Since this chapter demonstrates how to set up a development machine for Joomla, you can leave the default option, Developer Machine, selected. If the machine being configured was a server or a dedicated MySQL machine, these other options could be selected and MySQL would allocate more of the resources of the target machine.
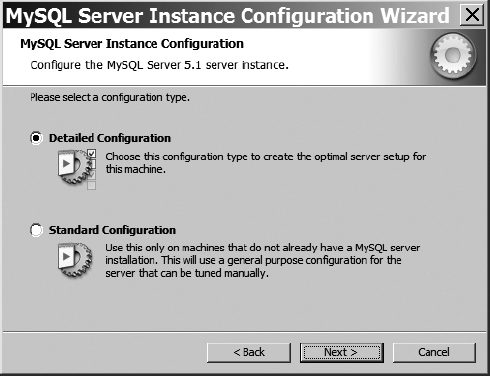
Figure 3-14. Select Detailed Configuration and click the Next button.
The next screen allows you to configure the primary usage of the database server. Since Joomla addresses the server in many ways, you can leave the Multifunctional Database option selected and click the Next button (see Figure 3-16). If you were installing MySQL for a point-of-sale Joomla system or a virtual community site that had more transactional operations, the Transactional Database Only option might be a better choice. However, most Joomla installations provide a variety of read-only and interactive situations that are better served by the default selection.
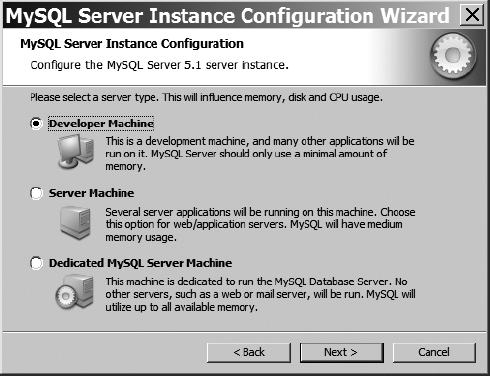
Figure 3-15. For this Joomla test environment, select the Developer Machine option.
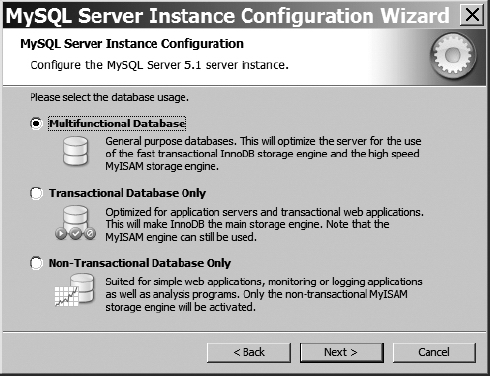
Figure 3-16. Choose Multifunctional Database and click the Next button.
The installation path screen allows you to set the location of the MySQL data file. For most development installations, the default will be fine. If you have another location or drive where you want the data file installed, choose it now. Click the Next button when you've finished.
On the concurrent connections screen (see Figure 3-17), you can configure MySQL for optimization to the expected processing load. Since you're performing this installation for a Joomla development server, you can leave the Decision Support (DSS)/OLAP option selected and click the Next button. However, if you're going to be running this MySQL installation as a full Joomla web server, choose the Online Transaction Processing (OLTP) option so the database will be optimized for many concurrent users.
On the networking options screen shown in Figure 3-18, the default options will be effective for most users, so you can click the Next button. The only setting you may have a need to change is the port number. Port 3306 is the default port for MySQL. However, some firewalls restrict this port, so access is impossible. If so, the system administrator should be able to provide you with a generalized database port number that provides a tunnel through the firewall. You can enter it here.
On the language settings screen, you can select the Standard Character Set (the most common UTF-8 character set) as the one to be used by the system and click the Next button. If you are going to be using an alternate character set for your Joomla system, make sure to select it here, as MySQL character recording must match the one to be used by Joomla.

Figure 3-17. Select Decision Support (DSS)/OLAP and click the Next button.
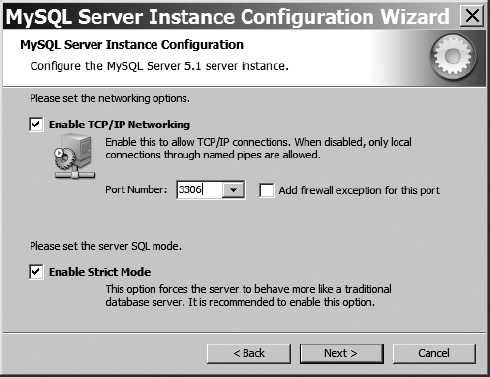
Figure 3-18. The default TCP/IP settings are fine, so click the Next button.
You will want to execute MySQL as a service that runs in the background (see Figure 3-19), so leave this option selected and make sure the setting to launch the service automatically is set.
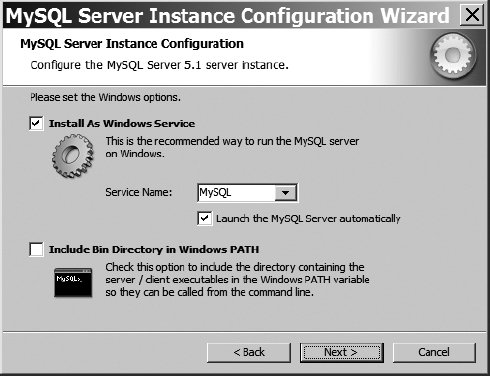
Figure 3-19. Make sure the "Launch the MySQL Server automatically" box is checked and click the Next button.
On the password screen, set the MySQL administrator password. This password can be left blank, but I don't recommend it. You can set it to match the administrative account password on your normal system. If not, make sure you write down your choice and store it somewhere safe. You will need the MySQL password only infrequently, and that means you're more likely to forget it if it isn't recorded somewhere. Just make sure that the somewhere you record it is safe and secure.
Click the Execute button to begin the automated configuration process. If you run into any problems during configuration, be sure to check the "Troubleshooting" section at the end of this chapter, where a few of the installation problems are mentioned. When the configuration has completed properly, you will see a screen detailing the steps that were taken, as shown in Figure 3-20.
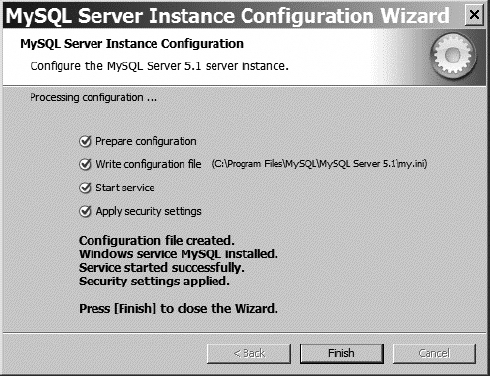
Figure 3-20. Successful completion of MySQL configuration will give you four blue check marks.
At this point, MySQL should be running perfectly. If you haven't downloaded the MySQL Administrator program (part of the MySQL GUI Tools package), do that now. Install the Administrator and you can take a look at your new server.
When you first execute MySQL Administrator, you'll be asked for the general configuration settings, as shown in Figure 3-21. You'll have to enter this information only once and the program will keep everything except the password for the next execution. In this case, I'm logging directly into the local host. If your MySQL installation is remote, your dialog configuration may appear slightly different from the one shown.
When the Administrator interface opens, it will display all the general information about the server, as shown in Figure 3-22. This opening MySQL Administrator screen gives you a general idea of how the system is configured.
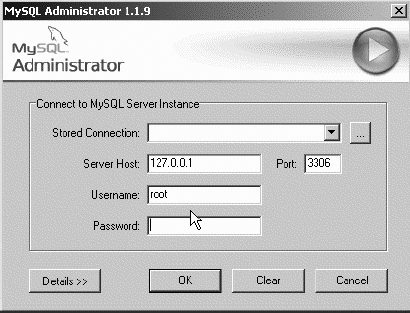
Figure 3-21. Enter the administrator's username and password, and click the OK button.
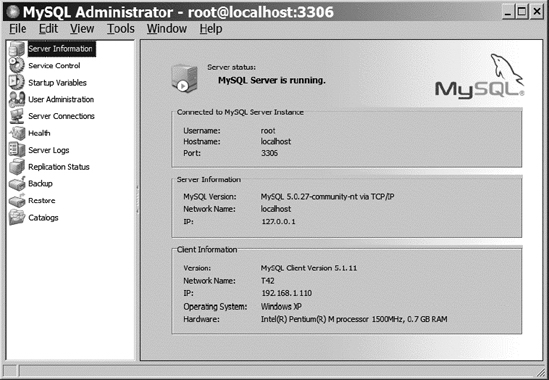
Figure 3-22. The MySQL Administrator main page shows all the current server status information.
Creating the Joomla! Database from MySQL Administrator
Security access permissions on a remote web host are generally the most difficult to anticipate and therefore resolve in a book. The next section provides an in-depth description of how these authorizations might be configured. One of the difficult configurations (which is unavailable on some web hosts) relates to the ability of a program to create a new database.
Once permission is given to a program to create databases, the potential for security mishaps and hacker malfeasance dramatically increases. Your web host may limit you to manually creating the Joomla database. Therefore, we'll use MySQL to manually create the database to avoid any possible problems.
You can create a database with a single command through MySQL Administrator. Log into MySQL Administrator, move to the Catalog area, and right-click in the window pane that displays the existing schemas (see Figure 3-23). From the context menu, select the Create New Schema option.
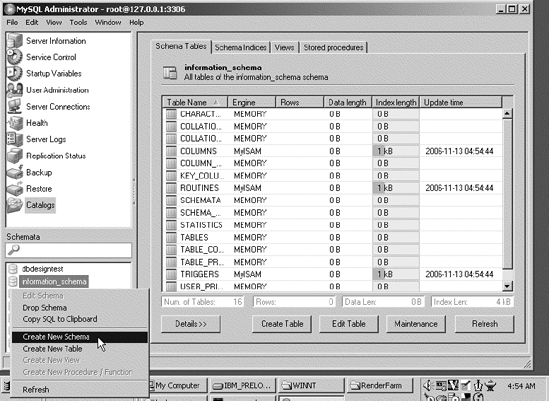
Figure 3-23. Right-click in the schema pane and select Create New Schema.
I had an existing Joomla 1.0 database on this server (Joomla 1.0 and 1.5 can coexist on the same server), so I named my new database joomla15. You can use the database name joomla if you don't have any other installations. Later, after you run the Joomla installer, you can look at the Joomla database with MySQL Administrator and see that it's populated, as shown in Figure 3-24.
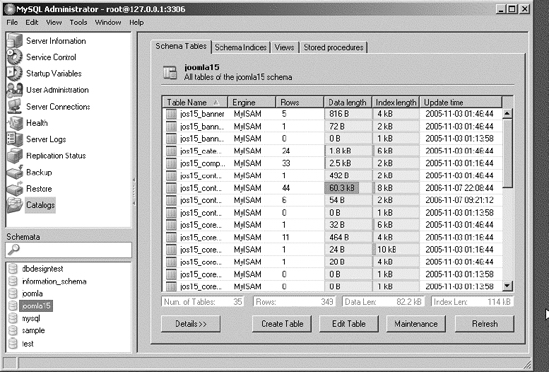
Figure 3-24. From MySQL Administrator, you can examine the Joomla tables.
While you're in MySQL Administrator, it's a good idea to create a Joomla account that has the proper administrative privileges to access the Joomla database. Click the User Administration button and create a new user. You can call the user joomla or joomlaAdmin to keep everything clear. Once you've created this user, select the account and click the Schema Privileges tab. You want to give the user full access to the Joomla database.
In the schema list of the tab, click your Joomla database and then click the double arrows (![]()
![]() ) to move all of the Available Privileges to the Assigned Privileges list, as shown in Figure 3-25. Click the Apply changes button to confirm these settings.
) to move all of the Available Privileges to the Assigned Privileges list, as shown in Figure 3-25. Click the Apply changes button to confirm these settings.
That's it! Now the Joomla Installation Wizard will be able to construct the database tables in the joomla15 database through the joomla user account.
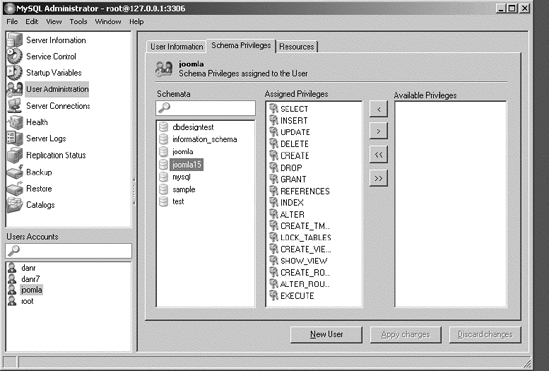
Figure 3-25. Assign all privileges of the Joomla database to the Joomla user.
Creating the Joomla! Database from the MySQL Command Line
If your host provides only a MySQL command-line interface, these instructions will show you how to create the Joomla database with direct command-line statements. If you want to use the command line on a local installation of MySQL, you can access it by selecting Start ![]() MySQL
MySQL ![]() MySQL Server
MySQL Server![]() MySQL Command Line Client. The command console will ask you for the login password for the root user before you can enter the MySQL system.
MySQL Command Line Client. The command console will ask you for the login password for the root user before you can enter the MySQL system.
Once the password is accepted, you should see a prompt displayed that looks like the one in Figure 3-26. You'll notice that there is MySQL prompt of mysql > where you can enter commands.
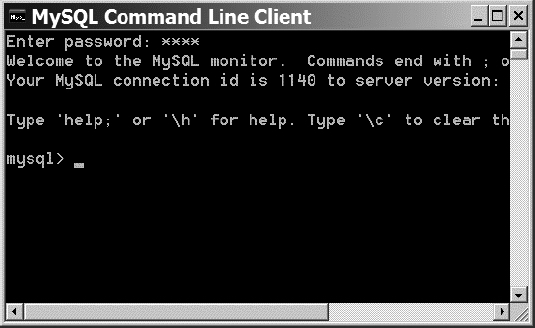
Figure 3-26. The MySQL command-line interface accepts SQL commands.
To create the Joomla database, you need only enter a single command:
mysql> CREATE DATABASE joomla;
The command should return a notification of Query OK and let you know that one row was affected. If you want to see all of the databases accessible to the current logon, enter the following command at the MySQL command prompt:
SHOW DATABASES;
You should see the joomla database listed, as shown in Figure 3-27.
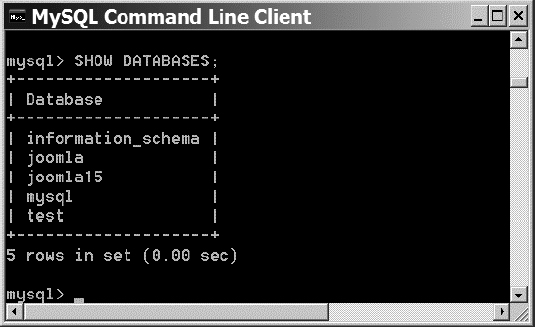
Figure 3-27. The joomla database should now appear in the available list.
Setting Up File and Folder Permissions
If you're running your own web server, then you have administrative access to OS permissions. Properly configuring permissions can be one of the frustrating aspects of setting up the Joomla system. On a UNIX or Linux system, you need to use the chmod command to set up access to file and folder permissions.
You can change the file and folder attributes through most FTP programs. In FileZilla, you can right-click a file or folder and select the File Attributes option. A chmod file attributes screen similar to the one shown in Figure 3-28 will be displayed. From that screen, you can make the changes you need. Note that you can enter the numeric value (such as 777) directly into the text field.
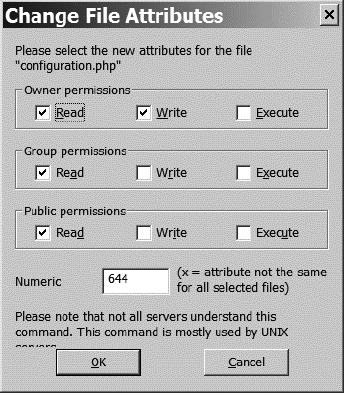
Figure 3-28. Changing permissions through FileZilla
Many web hosts provide the online cPanel utility (see Figure 3-29). This cPanel or Control Panel (depending on the installation) can perform a variety of functions, from executing installation scripts (for applications including Joomla, MySQL, and Gallery2) to file management. For setting permissions, the File Manager in cPanel can move, delete, edit, rename, and copy files or folders. Most important for our purposes here, you can use cPanel to change the permissions on files and folders.

Figure 3-29. Many Linux web hosting services use cPanel to allow for configuration.
Select the file or folder you want and click the Change Permissions link (see Figure 3-30). You'll be presented with a web interface to the chmod utility, which provides the security settings for User, Group, and World.
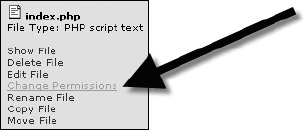
Figure 3-30. Click the Change Permissions link.
Set the permission options and click the Change button to save the new settings (see Figure 3-31). If an error is generated, check the permissions policy of your web provider. There may be explicit limits on the level of permissions a customer may set.
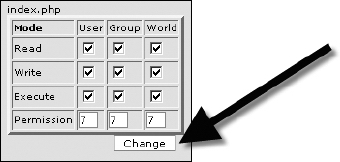
Figure 3-31. Click the Change button to set the new permission settings.
Installing the Joomla! Files
In this chapter, you saw how each of the servers can be installed separately and configured to work together. Now that you have the servers installed and configured, you can reference the previous chapter for a complete description of installing Joomla on your server. With XAMPP, WAMPP, LAMPP, or MAMPP installed properly, you should be able to use those instructions without much difficulty. If you get an error during Joomla installation (such as a write access error or a connection problem with MySQL), refer to the appropriate section of this chapter to troubleshoot the issue.
Troubleshooting
If you've run into a problem with any of the suite of servers, you may find the solution to your problem here. Technical challenges can be so difficult and varied that is impossible to address all possible situations. In this section, I've tried to collect examples of both the challenges I've encountered and the troubles others have posted on the Internet. Each problem is described and a solution is proposed to help you navigate even the most treacherous waters of installation.
Keep in mind that when you're troubleshooting, you're often looking for the solution as much as the symptoms. I have often run across an issue that had an answer that I didn't think was relevant to my problem at first. Later I realized that although the error description was different, it was exactly the same problem as my own. Therefore, even if the snag you've hit doesn't exactly fit a problem description presented here, I suggest you skim the solution. It might bring to light an unexpected resolution.
Challenges with the Apache Server
In this section, you'll examine some of the common problems with installation and configuration of the Apache server. While an error may lie within Apache, the fault may actually rest in the web server's communication with PHP or MySQL. Be sure to read through the PHP and MySQL sections as well to determine if your problem lies outside of the web server itself.
Accessing the Apache Server Remotely
Problem
I can run the Apache server on my local Windows XP machine, but I'm unable to access it from anywhere else on the network. What's the problem?
Solution #1
Windows XP Service Pack 2 and Windows Vista install a firewall that defaults to blocking all IP ports, including the HTTP port (80), which Apache needs to communicate with the outside world. With this port blocked, sometimes Apache won't even start!
To test if this might be the problem, go to Start ![]() Control Panel
Control Panel ![]() Windows Firewall. Turn off the firewall for a moment. Try to restart Apache, and then access it from another machine. Do things seem to be working correctly? If not, then the firewall isn't your problem and you'll have to look elsewhere.
Windows Firewall. Turn off the firewall for a moment. Try to restart Apache, and then access it from another machine. Do things seem to be working correctly? If not, then the firewall isn't your problem and you'll have to look elsewhere.
If things are working fine, turn the firewall back on. You don't want your machine wide open. Under the Windows Firewall control panel, click the Exceptions tab and then click the Add Port button. Start by opening HTTP port 80, as shown in Figure 3-32.
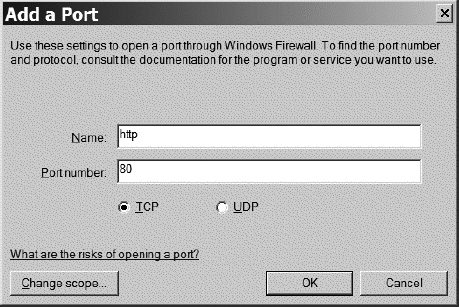
Figure 3-32. Open HTTP port 80 to allow web service.
You may need to open a couple more ports for certain Joomla configurations. You can open https through port 443 (SSL) and MySQL through port 3306. You may also want to open the following ports for the other XAMPP servers:
- ftp, port 21
- smtp, port 25
- pop3, port 110
- imap, port 143
- AJP/1.3, port 8009
- http-alt, port 8080 (Apache Tomcat default port)
Solution #2
Apache, by default, uses the standard web server port of 80. Only one application can use a port at a time. Sometimes another installed application (such as Skype Internet phone software) can block the port for other applications—most notably your Apache server. First try shutting down other Internet applications and restart the Apache server.
If that doesn't work, you might try reconfiguring the port used by Apache. To change the port, alter the following directives in the Apache http.conf configuration file:
ListenPortBindAddress
Note that depending on your version of the Apache server, you may not find all of these directives in the default configuration file. You can nonetheless add them to your configuration file and the server will recognize them.
Start with the Listen directive. Set it to another value (such as 8080), and restart the Apache server. You can test the server by adding the port to the end of the IP address like this:
http://127.0.0.1:8080
.htaccess 404 Problems on the Apache Server
Problem
On an Apache/PHP server, if I change the htaccess.txt file to .htaccess, I get 404 errors on all links.
Solution
On your web server or perhaps on your web host provider, the .htaccess file may be cached. Typically the cache reload time is set to one hour. Try waiting for a period of time and trying again. Generally this problem will solve itself.
Note You may want to limit write access to the Joomla server directory (to foil hackers) through the .htaccess file. If your Internet service provider does not allow modification of the .htaccess file, you should at least try to prevent write access to the Joomla configuration.php file. The configuration.php Writable feature is changeable on many web hosts via the cPanel utility.
No Server-Side Includes
Problem
Server-side includes aren't working and I get the error "INCLUDES filter removed."
Solution
The Options +Includes directive is being overridden by a configuration file. Look in all of the .conf files located in the /conf folder (i.e., C:Program FilesApache Software Foundation Apache2.2confhttpd.conf) and change the directives that read AllowOverride None to AllowOverride Options. This setting may also be located in a .htaccess file in the root Joomla directory.
Strange Apache Server Behavior
Problem
My Apache server lately has been giving unexplained error messages, cutting off files, and corrupting file downloads.
Solution
You may have installed an add-on into the Apache server that corrupted some of the advanced techniques Apache uses to speed file transfer (such as memory mapping, kernel sendfile support, and Winsock AcceptEx use). If you add the following three directives to your httpd.conf file, they will turn off the advanced sending functions:
EnableMMAP Off

EnableSendfile Off

Win32DisableAcceptEx
Restart the web server. If that doesn't correct the problem, try reinstalling the server.
Challenges with PHP
Some of the most difficult problems with PHP installation occur as a result of the subtleties of the php.ini file. The configuration file is fairly long and presents myriad options, some of which conflict with each other. Always be sure to make a backup copy of your php.ini file before you make any changes so you can return to the original settings if you need to.
Tip If you want to understand the initialization backward and forward, check out W. Jason Gilmore's excellent book, Beginning PHP and MySQL 5: From Novice to Professional, Third Edition (Apress, 2008), for a directive-by-directive explanation of everything you'll find in php.ini.
PHP Not Executing
Problem
When I attempt to access the phpinfo.php page I created, nothing appears in the browser window.
Solution
Whenever you're dealing with PHP and you get a blank browser window, first select the View Source option in your web browser. This option will display the HTML that was received from the server. If the PHP code has not operated as planned, a seemingly blank page may be returned that may in fact have generated some of the header HTML before the code faulted. Looking at the HTML is a way to determine if the PHP code executed at all. Then check the web server error log in case the display of PHP errors is turned off. You'll generally find the web server error log (which is where PHP errors are sent by default) at C:Program FilesApache Software FoundationApache2.2logserror.log on a Windows system and /var/log/httpd/error_log on Linux.
If PHP didn't execute, make sure the PHP extensions are in the ext folder found at the root of the Apache installation. On the other hand, if the source shows some output, an error occurred during script execution. You can check the server log files for the error, or you can turn on the display_errors directive in the php.ini file. Then reset the Apache server and reaccess the page that faulted.
No Input File Error
Problem
When I try to run PHP, I get a "No input file specified" error and it won't start.
Solution
Some installers set the docroot directive to a specific directory, and this can cause problems—especially on systems with multiple hosts. Look in the php.ini file and clear the current directory setting.
Changes to php.ini Have No Effect
Problem
When I make changes to the php.ini file, they don't seem to have any effect.
Changes to the php.ini file won't take effect until the web server is restarted. For the Apache server, use the Restart menu option on the Apache server Control menu. On Microsoft IIS, you can use the command line to execute the command iisreset /stop to stop the service and net start w3svc to restart it. Once the web server is rebooted, your modifications should be active.
Solution #2
You may have more than one php.ini file installed on the system. Some installers place the php.ini file in the windows directory. If the php.ini file is there, those settings will be used in preference to an INI in the central directory. Do a search for php.ini on your local drive. Try appending a suffix (such as _InActive) to the names of the files you don't think are active. Restart the web server and see if your desired php.ini file is now used.
IIS Returns a 505 Error and PHP Won't Start
Problem
When I configure IIS to run a PHP script, it doesn't execute, and the server gives a 505 error: "The specified module could not be found."
Solution
Sometimes installations of PHP have problems with long filenames (longer than the old DOS eight characters plus three character extensions) or paths with spaces in them. Try relocating the PHP directory and the scripts to a simple directory like C:php5. Locating the PHP directory in the Program Files folder hits both bugs, and this can sometimes cause script execution problems.
Challenges with MySQL
While PHP configuration is generally not that difficult, sometimes getting PHP to work with MySQL leaves you wringing your hands in frustration. As I recommended in the previous chapter, as much as possible think in terms of KISS (keep it super-simple).
Try to narrow down the problem to the most basic test that you can execute, and work toward the more complex. When I have a problem, I generally return to the MySQL command line to eliminate even the possible problems introduced by the Administrator interface. From there, I work my way backward to the problem that originally appeared in my PHP code.
Can't Connect to MySQL Server Error
Problem
I get a "Can't connect to MySQL server" error. I've checked and MySQL is running and I have the name and the password entered correctly. What's the problem?
Solution
A great number of things could be preventing the connection. Here are a few of the most common solutions:
- A program will generally connect to MySQL through TCP/IP via a port number. Make sure the port number is configured properly. The default port for MySQL is 3306.
- Try using
127.0.0.1instead oflocalhostfor the URL in your accessing program (e.g., PHP). On several systems there is a bug that preventslocalhostfrom resolving to the MySQL server. - At the time of this writing, on Yahoo hosted servers, you need to use
mysqlinstead oflocalhostfor the MySQL address. - On Linux, a program can also connect to MySQL through a UNIX socket file on the file system. Make sure the filename for connection is correct. The default socket is
/tmp/mysql.sock. Also make sure the file exists, as some job executions empty the/tmpdirectory and the socket file may have been deleted. - Make sure your accessing program supports the correct MySQL password authentication system. MySQL 4 has a completely different and incompatible password system from MySQL 5. When the accessing program addresses the MySQL database with the wrong system, it will get a "Can't connect" error rather than an invalid password error. See the "MySQL 5 Server Connection Error" section to resolve the interaction when a MySQL 4 accessing program attempts to access a MySQL 5 server.
- The Windows platform opens a number of virtual ports through which it allows TCP traffic. The default installation opens 5,000 virtual ports. While this may seem like a lot, it isn't in the machinery of Internet interaction. Once a port is opened, it remains reserved for 120 seconds of inactivity before allowing reallocation. If you have intermittent connection problems, you can try reducing the time before each port is freed. You'll need to execute the registry editor (
regedt32.exe) and locate theHKEY_LOCAL_MACHINE SYSTEM CurrentControlSetServicesTcpipParameterskey. Add a value to the key with the following settings: setNametoTcpTimedWaitDelay, setData TypetoREG_DWORD, and setValueto30.
Can't Create MySQL Windows Service
Problem
When I run the installer and get to the MySQL Server Instance Configuration Wizard, I click the Execute button and get the error "Cannot create Windows service for MySQL. Error: 0." How do I correct this?
Solution
You probably have a second, older version of MySQL installed on your machine whether you know it or not (another program may have installed it). You can check by going to the Start ![]() Control Panel
Control Panel ![]() Administration
Administration ![]() Services option and looking at the list of services. You may see a MySQL service executing despite the installer telling you the service couldn't start. From here you can stop the older service and/or set it to manual execution so it won't start automatically the next time the system boots.
Services option and looking at the list of services. You may see a MySQL service executing despite the installer telling you the service couldn't start. From here you can stop the older service and/or set it to manual execution so it won't start automatically the next time the system boots.
To delete the old MySQL service, go to the command line and type
sc delete mysql
This command runs the Service Control utility, and proper execution of the delete command should output the message:
[SC] DeleteService SUCCESS
Try executing the installation again and it should work fine. Note that the Service Control utility comes standard with Windows XP or Vista, but for earlier versions of Windows, such as Windows 2000, you'll have to download it from the Microsoft web site.
Connection Error During MySQL Installation
Problem
During the MySQL installation, I get a connection error (see Figure 3-33). How do I get around this?
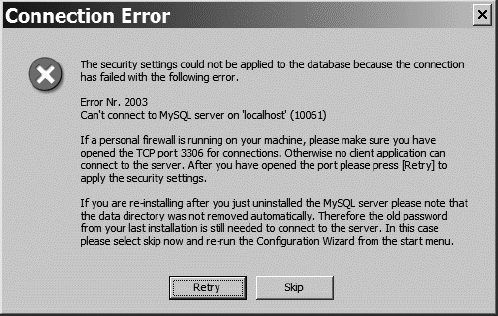
Figure 3-33. Connection problem during MySQL installation
Solution
As the error indicates, it's a problem with your firewall. The easiest way to correct this fault is to go to Control Panel ![]() Windows Firewall. Click the Exceptions tab and click the Add Port button. Fill in the MySQL port information (port 3306) as shown in Figure 3-34. Click OK to add the port exception and retry the MySQL installation. It should work fine now.
Windows Firewall. Click the Exceptions tab and click the Add Port button. Fill in the MySQL port information (port 3306) as shown in Figure 3-34. Click OK to add the port exception and retry the MySQL installation. It should work fine now.
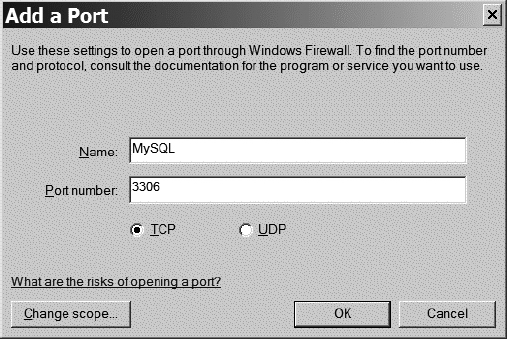
Figure 3-34. Add a port exception to the firewall.
MySQL 5 Server Connection Error
Problem
My web host is running MySQL version 5, and I've run into problems when Joomla attempts to log into MySQL. I get an error message that Joomla cannot connect to my MySQL server.
Solution
MySQL, when moving from version 4 to version 5, modified the method by which passwords were authenticated. While the new password method is more secure, it is also incompatible with many of the applications written prior to the release of version 5. To provide relief from incompatibilities, version 5 includes a method of setting the authentication to the method used by version 4.
Note At the time of this writing, Go Daddy and many other web hosting providers still default to version 4 of MySQL. By the time you read this section, your web host may have upgraded its server. If you're having connection difficulties, please check the MySQL version. If you can execute a query on the MySQL server (e.g., through phpMyAdmin), use select version(); to return the version number on the server.
You can set the password styles for individual accounts using the MySQL command-line utility. Execute the command-line program and log into the system. Enter the following command at the MySQL prompt, replacing the joomla username and mypass password with the user and password desired:
mysql> SET PASSWORD FOR 'joomla' = OLD_PASSWORD('mypass'),
If successful, MySQL should respond with the following statement:
Query OK, 0 rows affected (0.02 sec)
Even though it says that zero rows were affected, the user password is now set to the older method. Try the application that needed to access the MySQL server again, and you can determine if the password handshake was the problem.
If you want to configure your entire MySQL server to use the older password method, execute the MySQL Administrator program. Select the Security tab of the Startup Variables section. As shown in Figure 3-35, there is a setting that makes MySQL use the older style of MySQL 4 passwords.
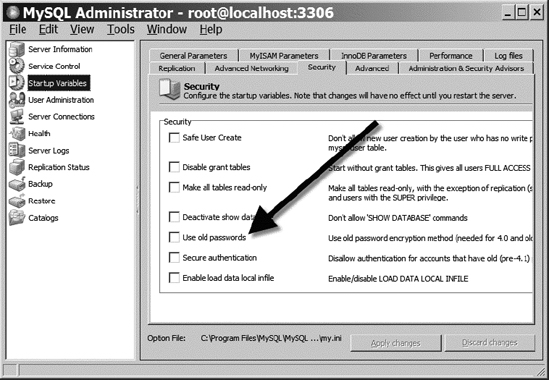
Figure 3-35. Set the "Use old passwords" option to use MySQL 4–style password access.
Conclusion
If you're installing a staging server or deploying Joomla on your own server, you now know a variety of ways to set up and configure the system. You can use the XAMPP installer for one-time installation and configuration of all the servers that Joomla needs. Alternatively, you can manually set up each of the individual servers that are included in an XAMPP (LAMPP/WAMPP/MAMMP) configuration.
Since Joomla requires essentially four different servers to work together in order to function correctly, you may run into a variety of problems during installation. This chapter presented a basic troubleshooting guide with the most common problems and the solutions to these difficulties. With this information, you should be able to effectively deploy Joomla in most circumstances.