According to the Privacy Rights Clearinghouse, more than 255 million records with sensitive information have been breached since January 2005. If you browse through the detailed report at http://www.privacyrights.org/ar/ChronDataBreaches.htm, you'll see that there are many kinds of breaches of stolen data. In some cases, there were stolen laptops; in others, it was in inside job by a disgruntled employee. This report yields an almost endless supply of breaches of stolen data.
As a customer of a business, you want to feel confident that a stolen laptop thousands of miles away will not have you repairing your credit report for years. Businesses need you, the customer, to have this faith.
The payment card industry is one such industry to come together and create a set of standards for its business practices. The Payment Card Industry Security Standards Council—an independent counsel originally formed by American Express, Discover Financial Services, JCB, MasterCard Worldwide, and Visa International in 2006—charters itself with the goal of managing the ongoing evolution of the Payment Card Industry Data Security Standard specification. This specification details technical and operational requirements that help companies prevent credit card fraud, hacking, and various other security vulnerabilities and threats.
PCI is just one type of regulatory compliance. There are many others spanning most major industries. For example, if your company is publicly traded, it will have to comply with the Sarbanes-Oxley (SOX) Act.
As a DBA, you may be asked to help in a compliance effort. Unfortunately, most of these regulatory compliances are vaguely written and are subject to interpretation. For this reason, many times companies will hire a third-party auditor to help them. Microsoft understands the importance of compliance and has some resources dedicated to the effort. Specifically, Microsoft has a senior program manager within the SQL Server group who is in charge of compliance strategy. When we began this book, the person in that position was J.C. Cannon. The following is an excerpt from an interview that we had with him:
Robert Walters: What is your role at Microsoft?
J.C. Cannon: I help customers understand how SQL Server 2008 can help them address their compliance needs and provide input to future releases of SQL Server that will improve its compliance capabilities.
Robert Walters: What is compliance?
J.C. Cannon: There is not a simple answer to this. I tell customers that, related to the database, it is the ability to manage data in a verifiable manner based on policy.
Robert Walters: My company is publicly traded, and management says we have to be SOX compliant. Can I select a box that makes SQL Server SOX compliant?
J.C. Cannon: Not at all. Becoming compliant with most regulations requires that a formal process be developed that includes a risk assessment, action plan, verification procedures, and remediation capabilities. No product can make an organization compliant by itself. Manual processes are also needed to perform the tasks that technology is unable to.
Robert Walters: How will SQL Server continue to address compliance in future releases?
J.C. Cannon: Microsoft has a strong commitment to compliance. SQL Server, along with other product groups, will continue to engage customers to determine the most important compliance features that are needed and add them to future releases.
Robert Walters: What advice do you have for folks new to the DBA profession as it relates to security and compliance?
J.C. Cannon: Start with reading the SQL Server 2008 Compliance Guide on our compliance portal at
http://www.microsoft.com/sql/compliance. When developing a strategy for database compliance, you want to start by creating a set of actionable policies. Determine how you will implement those polices. Ensure you provide a means for validating that the policies are in compliance. The new Policy-Based Management feature of SQL Server 2008 provides a strong mechanism for validating that database settings are set a certain way and remain that way. There is also a means for validating that those settings were in compliance over a period of time. SQL Server Audit provides a granular means for monitoring sensitive operations in a database. The logs generated by the auditing process can be sent to a central auditing server to make it easy to create consolidated reports. In general, SQL Server 2008 provides the best platform for building compliance solutions.
As you can begin to see from this interview excerpt, compliance is a hard problem. We can't solve it in this one chapter. But what we can do is make you familiar with the tools that are built into SQL Server to help you along the way.
Auditing is the process by which you track events occurring within the database. These events could be almost anything, including the creation of new users, the insertion of data into a table, or the querying of data. The capability of auditing has been around in some form for a few versions of SQL Server; however, its implementation was sketchy at best. Up until SQL Server 2008, there has never been any formal user interface for auditing.
In the past, SQL Server DBAs would have to use Profiler, a performance tuning and optimization tool, to create and manage audits. Alternatively, they could roll their own auditing solution using DDL triggers. Or they could forget the pain and drop some money on a third-party auditing solution.
With the worldwide effort around defining and enforcing compliance, SQL Server 2008 comes with native auditing support. The majority of regulatory compliance agencies want some form of auditing, and chances are if your company is going through the process of becoming compliant, either you will be involved with auditing via SQL Server or you'll be aware of it occurring using hardware-based auditing devices.
Auditing support in SQL Server 2008 consists of the following three objects:
Server audit: Defines an abstract container, if you will, representing a specific audit that you want to perform. For example, you might want to create a compliance audit to ensure that you comply with a specific regulation.
Server audit specification: Defines a specific, server-level item to watch and record as part of an audit. Perhaps you want to record failed logins as part of your compliance audit. You would create a server audit specification for that purpose.
Database audit specification: Defines a specific, database-level item to watch and record as part of an audit. For example, you might want to log stored procedure executions as part of your compliance audit.
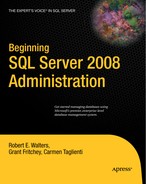
Figure 15-1 shows these three objects and the scope where these objects are defined.

The concept of scope is important to understand when you learn about auditing, because it's only through having a good understanding of instance scope vs. database scope that you will know which audit specification object to choose for a given purpose. If you are talking about something affecting a particular database, then you are referring to a database-scoped object or action. If you are interested in auditing failed logins, you would create a server instance–scoped audit specification, since logins affect all databases.
The idea of an audit as an abstract concept is also important to grasp. A server audit is an abstract object—a container, if you will—containing one or more audit specifications. When you enable or disable a specific audit, you are really enabling or disabling all of that audit's specifications. Likewise, when you specify a location at which to record audit data, that location applies to all specifications within an audit. This container concept will get clearer as you read through the following examples.
When you want to perform an audit, you have the option to write audit data to one of three places. First, you can write audit data to the Windows Application log. Next, you can write data to the Windows Security log. Finally, you can write audit data to the file system. Each one of these destinations has pros and cons, which will be explored later in this chapter.
To create an audit object, navigate down the Object Explorer tree to the Security node.
Select New Audit from the Audits node context menu. This will launch the Create Audit dialog box, as shown in Figure 15-2.

The audit name will be autogenerated for you, but you can easily change the generated name to something simple like Compliance Audit. A number of options are available when you create the audit object. The first is the queue delay. Since auditing is leveraging a Service Broker–based eventing system called extended events, it is possible to configure the maximum amount of time you are willing to wait before auditing events are guaranteed to be written. Here's another way of thinking about the queue delay. If a meteor flew in from the sky and crashed through the roof into my data center right through my server and we had defined the queue delay to be 1000, then that meteor may cause you to lose one second worth of auditing events, because the queue delay is in terms of thousandths of a second, or milliseconds. If the default queue delay of 1000 milliseconds seems unacceptable, just consider the performance impact of making the queue delay smaller.
In some cases, auditing is so important that if SQL Server fails to write an audit event to the log, then the SQL Server service will be stopped. This is what happens when you select the "Shut down server on audit log failure" option.
The "Audit destination" drop-down box allows you to choose File, Application Log, or Security Log. Where you write auditing information is extremely important. Auditing information can contain sensitive information such as Social Security numbers, salaries, and credit card numbers. Thus, you would not want to write this information in a place where other users might unintentionally have access to it. Writing to the Application log is easy, and you do not need to have an elevated privilege within Windows to see the Application log. A more secure solution would be to use the Windows security log. There are additional measures in place that restrict who can see the Security log and who can erase the log. You can integrate your SQL Server auditing events with other auditing events from other servers by using tools such as Windows Audit Collection Services, which is part of the System Center Operations Manager (http://www.microsoft.com/systemcenter/operationsmanager/en/us/default.aspx). These tools use the Windows Security log to obtain auditing data.
If you do not plan on using another tool to consume audit data, then writing the audit data to the file system is the best option. For one thing, it's very fast, but more important, it is possible to protect against repudiation attacks by the sysadmin.
Selecting a file destination also enables a series of other options. Since it's the file system we are writing to, you can specify the maximum file size an audit can be as well as reserve the space up front so you are sure to always have enough room for the audit data.
You can also create the audit object via DDL. An example of this is as follows:
USE MASTER
GO
CREATE SERVER AUDIT [Compliance Audit]
TO FILE
(    FILEPATH = N'c:audit'
)
WITH
(    QUEUE_DELAY = 1000,
     ON_FAILURE = CONTINUE
)
GONow that you have created a server audit object, you can start writing auditing events to it. In this example, let's audit all failed logins. Since logins affect more than one database, you need to create a server audit specification. To create a server audit specification, select New Server Audit Specification from the Server Audit Specifications context menu. This will launch the dialog box shown in Figure 15-3.

By default a name is provided for you, but you can easily change this to something more meaningful. In our example, since we want to audit just failed logins, let's call it Logins. The Audit drop-box contains all the server audit objects that are defined for the server. Notice that you can create as many server audit objects as you want. Since you created Compliance Audit, you can select this server audit.
The actions grid is where you specify what events or groups of events you want to record. To audit failed logins, select FAILED_LOGIN_GROUP.
If you click OK, the server audit specification will be created.
You can also create the server audit specification using DDL as follows:
USE MASTER
GO
CREATE SERVER AUDIT SPECIFICATION [Logins]
FOR SERVER AUDIT [Compliance Audit]
ADD (FAILED_LOGIN_GROUP)
GO
Now that you have both a server audit defined and a server audit specification, you can start an audit with these two objects. Note that auditing objects are not enabled by default since you may not be ready for the onslaught of auditing events after simply defining an audit. To enable the server audit specification, you can either select Enable Server Audit Specification from the context menu of the object or issue the following T-SQL statement:
ALTER SERVER AUDIT SPECIFICATION Logins WITH (STATE=ON)
GO
To enable the server audit, you can select Enable Audit from the context menu of the audit or issue the following T-SQL statement:
ALTER SERVER AUDIT [Compliance Audit] WITH (STATE=ON)
GO
Once you have enabled both the server audit and the server audit specification, you can test the audit by trying to make a connection to SQL Server using false credentials. Once you attempt to make this false connection, the audit event will be written to the audit log. You can view audit logs by selecting View Audit Logs from the context menu of your audit, Compliance Audit. Figure 15-4 shows the Log File Viewer dialog box with the failed login event.

You cannot write auditing events directly to a table in SQL Server 2008. If you really want to see them or push them into a table, you can use the fn_get_audit_file function. An example of using this function is as follows:
SELECT * FROM fn_get_audit_file ('c:audit*',null,null)This yields a result set that includes a plethora of columns. Some of the more meaningful columns include the actual T-SQL statement that was executed and the calling context of the user.
If you want to audit events that occur within a database, you will need to define a database audit specification. To create one, you can select New Database Audit Specification from the Database Audit Specification node of the Security node of a specific database in SSMS. Figure 15-5 shows the Create Database Audit Specification dialog box that opens.

Just like the server audit specification points to a server audit, so too can the database audit specification. In this example, select Compliance Audit to use the existing server audit that you created earlier.
The Actions grid is where you define which audit events or event groups you want to record. In addition to having groups of events, the database audit specifications have a handful of single events. Some of these are SELECT, INSERT, UPDATE, DELETE, and EXECUTE. If you wanted to audit anyone who issues a SELECT statement on the Customers table, you would select SELECT from the Audit Action Type list. You would then specify that the object class is an object. The object name is the object that is the target of the audit. In this case, you want the Customers table. If you want to audit all users, you can enter public for the principal name, or else you can specify a specific user or group to audit.
You can also create a database audit specification using the following T-SQL statement:
USE [Accounting]
GO
CREATE DATABASE AUDIT SPECIFICATION [Customers Table]
    FOR SERVER AUDIT [Compliance Audit]
        ADD(SELECT ON Customers by public)
GO
In the previous chapter, you created the Accounting database. If you want to follow along and do not have this database created, execute the following script:
USE master
GO
CREATE DATABASE Accounting
GO
USE Accounting
GO
CREATE TABLE Customers
(id INT NOT NULL,
firstname VARCHAR(20) NOT NULL,
lastname VARCHAR(40) NOT NULL)
GO
Remember to enable the database audit specification once you are ready to start collecting events. You can do this by selecting Enable Database Audit Specification from the context menu of the specification or by issuing the following T-SQL statement:
ALTER DATABASE AUDIT SPECIFICATION [Customers Table]
    WITH (STATE=ON)
GO
Note
To turn off auditing but retain the audit definitions, simply use STATE=OFF in the preceding code.
Now to test this audit event, try issuing a SELECT * FROM CUSTOMERS statement. If you view the Compliance Audit audit log, you will notice an additional entry for the SELECT statement. Notice that you can see both the calling context and the actual T-SQL statement that triggered the audit.
Encryption is the process of obscuring information to make it unreadable to those who do not possess some special knowledge. The history of encryption dates far back to the days of Julius Caesar where he used a special algorithm called the Caesar shift cipher to protect military messages. The algorithm was quite simple. It was simply a shift of the alphabet three spaces to the left, as shown in Table 15-1.
Table 15.1. Caesar Shift Cipher Alphabet
Cipher | Alphabet |
|---|---|
None |
|
Shift cipher |
|
To encrypt a message, you would just take each letter and match its cipher equivalent. For example, if you were to encrypt the word bomb, it would be erpe.
To decrypt a message, simply reverse the process, and look up the plain alphabet letter that aligns with the cipher letter. For example, the encrypted word odcb grj becomes lazy dog.
Encryption serves a critical role in some compliance requirements. Consider the case where a client computer sends a password over the network and the server authenticates the user based on this password. If an attacker were to packet sniff the network, they would easily obtain the credentials the user used to log into the server. Alternatively, consider the case where one user sends an order over the network. The attacker intercepts the order and changes the shipping address to a house that is in foreclosure close to the attacker's location. There are countless scenarios where sending data and storing data in cleartext is suboptimal. Encryption adds an extra layer of protection.
Before you dive into encryption in SQL Server 2008, it is important to understand a few concepts: plain text, algorithms, encryption keys, and ciphertext. In our order-changing scenario, the order itself is in plain text. It is in fact the sensitive data you are trying to protect. If you were to encrypt the order, you would need two things: an encryption algorithm and, depending on the algorithm, at least one encryption key. If you throw all three of these into a bowl, not only will you make a tasty soup, but you'll have a stream of data called ciphertext. Ciphertext is the sensitive data once it's been encrypted. SQL Server leverages encryption functions that are part of the Cryptographic API. This API is part of the operating system and exposes a set of functions that allows you to encrypt and decrypt data.
To encrypt plain text, you need the plain text itself, an encryption algorithm, and an encryption key. Together this will produce ciphertext (or in layman's terms, a bunch of binary data that doesn't look all that exciting). If you wanted to decrypt the ciphertext and determine the plain text, you could reverse this process and provide the ciphertext, encryption algorithm, and encryption key. Together this would produce the plaintext that you originally encrypted. If you use the same key for encrypting plain text as you do for decrypting the ciphertext, then this key is referred to as a symmetric key.
Symmetric keys and their corresponding algorithms provide the best encryption and decryption performance, but there is an inherent problem with their use. If you use the same key to perform encryption as you do decryption, then it is safe to say that the key material is sensitive information itself. You can't simply copy the symmetric key in the file system or database and call it secure. Anyone who can see the key can encrypt or decrypt the data. Symmetric keys are used extensively within SQL Server because of their performance benefit. However, there are ways of protecting symmetric keys, and you will learn about this later in the chapter.
An asymmetric key consists of two keys. One is called a public key, and the other is a private key. The idea is the encryption algorithms used with asymmetric keys take plain text and encrypt with the public key to yield the ciphertext. This ciphertext, or encrypted data, can be decrypted only by the private key. Conversely, you could encrypt plain text using a private key that will be decrypted only by an encryption algorithm plus the public key. With asymmetric keys, the private key is as sensitive as symmetric keys and should always be protected when stored. SQL Server also protects private keys.
A certificate is an asymmetric key with some extra metadata. This metadata defines attributes such as a certificate authority and an expiration date, to name a few. Certificates stored in SQL Server are not validated for expiration or against a certificate authority such as VeriSign for authenticity. Rather, certificates are used for a variety of reasons including protecting and managing encryption keys and signing modules in SQL Server.
Now that you are exposed to the basic definitions of these concepts, let's walk through an example of encrypting data.
In this example, say you work for a bank called ContosoBank that has a single table called Customers. The auditor requires you to encrypt the social_security_number column. There will be a single login called BankManagerLogin, which will be mapped to the BankManagerUser database user. Data stored in the Social Security number column will be encrypted such that only BankManagerUser will be able to decrypt the contents. The following is a script that will create the ContosoBank database as well as the Customers table and database user:
USE [master]
GO
CREATE LOGIN BankManagerLogin WITH PASSWORD='g4mqw9K@32!@'
GO

CREATE DATABASE ContosoBank
GO

USE [ContosoBank]
GO

CREATE USER BankManagerUser FOR LOGIN BankManagerLogin
GO

CREATE TABLE Customers
(customer_id INT PRIMARY KEY,
first_name varchar(50) NOT NULL,
last_name varchar(50) NOT NULL,
social_security_number varbinary(100) NOT NULL)
GO

GRANT SELECT, INSERT, UPDATE, DELETE ON Customers TO BankManagerUser
GO
If you read this script carefully, you may notice that the data type for the social_security_number column is a varbinary. Since ciphertext is binary, the only data type that will support storing encrypted data is varbinary.
Now you need to create a symmetric key that will be used to encrypt the data. You can do this using the CREATE SYMMETRIC KEY statement as follows:
CREATE SYMMETRIC KEY BankManager_User_Key
AUTHORIZATION BankManagerUser
WITH ALGORITHM=TRIPLE_DES
ENCRYPTION BY PASSWORD='HighFeesRule!'
GO
The AUTHORIZATION parameter describes who the owner of the key is; in this case, it's the database user BankManagerUser.
You can use a number of different encryption algorithms. Some of the available options include DES, Triple DES, RC2, RC4, and RC4 128-bit. Each one of these algorithms has unique characteristics. Some are faster than others, and some are weaker encryption. DES, for example, can be broken in 22 hours. See http://en.wikipedia.org/wiki/Data_Encryption_Standard for more information. Every day hackers and educators attempt to crack these encryption algorithms, so do some research before you place all your bets on using a specific algorithm.
When a symmetric key is created, it needs to be protected because simply leaving it in cleartext within the database or file system defeats the purpose of encrypting our data. SQL Server will not allow you to create a symmetric key without first specifying how to protect it. In this example, you are encrypting it by a password. This also means that any time you want to use this key, you will have to specify this password.
All encryption keys are visible in SSMS under the Security node of a specific database. There are also catalog views that return useful information. Sys.symmetric_keys returns a list of symmetric keys, the encryption algorithm defined for the key, and other useful information.
Now that you have created a symmetric key, you are ready to produce encrypted data. A number of functions within SQL Server allow you to encrypt and decrypt data. These functions simply pass parameters down to a call to Microsoft's Cryptographic API. The function used to encrypt plain text using a symmetric key is called EncryptByKey. To insert data into your table using this function, consider the following script:
EXECUTE AS USER='BankManagerUser'
GO

OPEN SYMMETRIC KEY [BankManager_User_Key] DECRYPTION BY PASSWORD='HighFeesRule!'
GO

INSERT INTO Customers VALUES (1,'Howard','Stern',
EncryptByKey(Key_GUID('BankManager_User_Key'),'042-32-1324'))

INSERT INTO Customers VALUES (2,'Donald','Trump',
EncryptByKey(Key_GUID('BankManager_User_Key'),'035-13-6564'))

INSERT INTO Customers VALUES (3,'Bill','Gates',
EncryptByKey(Key_GUID('BankManager_User_Key'),'533-13-5784'))
GO
CLOSE ALL SYMMETRIC KEYS GO
The EXECUTE AS statement gives sysadmins or users with IMPERSONATE permissions the ability to change the execution context of the current connection. Since you want to simulate being the BankManagerUser, you issue the EXECUTE AS statement. In this example, we're using this statement to support the script. In the real world, the execution context would already be set by the user who is actually doing the encryption.
When you want to perform any encryption or decryption operation, SQL Server needs to have the key available in memory. The OPEN SYMMETRIC KEY statement will open the key and place it in memory. Notice at the end of the script the CLOSE SYMMETRIC KEY statement is given. This statement will release the memory used by the key, and the best practice when using encryption is to open all your keys first, perform your encryption or decryption work, and then issue the close statement. The reason for this is that opening the key requires permission checks and other operations that, if done at every encryption statement within your script, would hinder performance.
The EncryptByKey function takes the GUID of an open key and the plain text that you want to encrypt. Rather than typing the GUID of the key, there is another function called KEY_GUID that will obtain this for you. The EncryptByKey function will return the ciphertext or encrypted binary data.
At this point, if you issue a SELECT * FROM Customers statement, you would get the output shown in Table 15-2.
Table 15.2. Sample Output from Customers Table
|
|
|
|
|---|---|---|---|
|
|
|
|
|
|
|
|
|
|
|
|
To decrypt the data, you can issue the following statements:
OPEN SYMMETRIC KEY [BankManager_User_Key] DECRYPTION BY PASSWORD='HighFeesRule!'
GO

SELECT customer_id,first_name + ' ' + last_name AS 'Name',
CONVERT(VARCHAR,DecryptByKey(social_security_number)) as 'Social Security Number'
FROM Customers
GO

CLOSE ALL SYMMETRIC KEYS
GO
These statements will return your original table with the Social Security number decrypted, as shown here:
customer_id    Name    Social Security Number
1    Howard Stern    042-32-1324
2    Donald Trump    035-13-6564
3    Bill Gates    533-13-5784
Notice that in the DecryptByKey function, you did not have to specify which key was used to encrypt the data. The reason for this is there is a thumbprint of the encryption key stored within the header of the encrypted data. Thus, to decrypt as long as you have the key opened in memory using the OPEN SYMMETRIC KEY statement, SQL Server will be able to figure out which key to use for you.
In the previous section, you encrypted data and protected the symmetric key by using a password. Although this is a perfectly acceptable way of protecting the key, the problem is that whenever you want to access the encrypted data, you will have to specify a password. If you are accessing the data from a script file or stored procedure, then you will have to store the password in cleartext in your script or stored procedure, which defeats the purpose of encryption. For this reason, a better approach would be to create a certificate and give the user, in our case BankManagerUser, access to the certificate. The certificate will then be used instead of a password to protect the symmetric key.
When you create a certificate, you need to protect that as well since certificates contain private keys. Certificates can be protected using a password or by using the database master key. There is only one database master key per user database. The purpose of this key is to protect keys like private keys where no explicit password is provided.
The following is how you create a master key. Before creating it, you should issue a REVERT statement to revert your current connection context to SYSADMIN if have been following along on your own SQL Server.
REVERT
GO
USE [ContosoBank]
GO
CREATE MASTER KEY
ENCRYPTION BY PASSWORD = 'Some!@Complex*@(39'
GO
Do not lose this password, because if you do, you won't be able to back up the key. Now that you have created the database master key within the ContosoBank database, you can create a certificate that will be used to protect the symmetric key.
CREATE CERTIFICATE BankManagersCert
AUTHORIZATION BankManagerUser
WITH SUBJECT='Bank manager''s certificate'
GO
There is no dialog box in SSMS that will allow you to create a certificate, so you will have to use the CREATE CERTIFICATE T-SQL statement. Now you can create your symmetric key, protecting it with a certificate instead of a password. Since you are going to replace the protection, you need to open the key first, add the certificate protection, and then remove the password protection. This will ensure that the symmetric key is never stored in cleartext for any duration of time. The following is an example:
OPEN SYMMETRIC KEY [BankManager_User_Key] DECRYPTION BY PASSWORD='HighFeesRule!'
GO
ALTER SYMMETRIC KEY BankManager_User_Key
ADD ENCRYPTION BY CERTIFICATE BankManagersCert
GO
ALTER SYMMETRIC KEY BankManager_User_Key
DROP ENCRYPTION BY PASSWORD='HighFeesRule!'
GO
CLOSE ALL SYMMETRIC KEYS
GO
Now that you have protected your key with a certificate, BankManagerUser does not need to specify a password to open the key. To confirm this, you can change your context to BankManagerUser by using the EXECUTE AS statement. For example:
EXECUTE AS USER='BankManagerUser'
GO
USE [ContosoBank]
GO
OPEN SYMMETRIC KEY [BankManager_User_Key] DECRYPTION BY CERTIFICATE BankManagersCert
GO
SELECT customer_id,first_name + ' ' + last_name,
CONVERT(VARCHAR,DecryptByKey(social_security_number)) as 'Social Security Number'
FROM Customers
GO
CLOSE ALL SYMMETRIC KEYS
GO
Encrypting data is a very important tool that can be used to add some protection above and beyond column-level permissions. SQL Server provides addition encryption capabilities such as the ability to encrypt the entire database. This is known as transparent data encryption (TDE).
The encryption capabilities within SQL Server are powerful; however, they require application changes that may or may not be feasible in your environment. For this reason, SQL Server 2008 comes with an ability to encrypt the entire database. Technically what happens when you enable encryption at the database level is that when SQL Server physically writes data pages to disk, it encrypts them first. Conversely, when data pages are read from the disk, they are decrypted and placed into memory. To the user, the experience with SQL Server is unchanged. They do not know the data is encrypted.
This type of encryption is termed transparent data encryption and protects against the attack in which someone copies the database files themselves and attempts to attach them to a SQL Server instance that they themselves control. As an added benefit, if you perform a BACKUP DATABASE on a database that has encryption enabled, the backup will be encrypted as well.
To enable encryption on a database, you need to create a database encryption key (DEK). A DEK is a symmetric key that the SQL Server service used to encrypt and decrypt the database files. Since this is a symmetric key, it needs to be protected. You protect the DEK through a certificate that is created in the master database. This certificate contains a private key and needs to be protected as well. The certificate is protected by the database master key of the master database. This process is similar to encrypting specific data as described in the previous section of this chapter. To enable encryption on the ContosoBank database, use the following script:
USE master;
GO
--This database master key is created in master
-- and is used to protect the certificate
CREATE MASTER KEY ENCRYPTION BY PASSWORD = 'EOhnDGS6!7JKv';
GO
--This certificate is used to protect the database encryption key
CREATE CERTIFICATE MyServerCert WITH SUBJECT = 'My DEK Certificate';
GO
--You are now ready to create the Database Encryption Key
USE ContosoBank
GO
CREATE DATABASE ENCRYPTION KEY
WITH ALGORITHM = AES_128
ENCRYPTION BY SERVER CERTIFICATE MyServerCert
GO
ALTER DATABASE ContosoBank SET ENCRYPTION ON;
GO
There is a slight CPU performance hit when enabling TDE on databases. The actual amount depends on server hardware and many other factors. This should not prohibit you from enabling this useful feature. Perform testing and see for yourself that the benefits will most likely outweigh the performance hit.
Chances are if you work for a company that has gone through a compliance certification, you realize that it takes a lot of time and effort. Once you are considered compliant, it is important to stay in compliance. As a DBA, you may be asked to ensure server settings remain unchanged. Some of the properties that you need to ensure might be that databases must be encrypted or might be making sure a highly privileged function such as xp_cmdshell is disabled. SQL Server 2008 has a feature called Policy-Based Management (PBM) that makes enforcing compliance easy. With PBM, you can create, deploy, and validate policies that enforce the configuration that you have defined.
PBM models objects such as databases, tables, and logins within the SQL Server instance and provides a hierarchical structure of these managed targets. Each target has many characteristics. For example, the database target has properties such as autoclose, whether the database is encrypted, and so on. These targets have specific properties that are exposed through facets. When you create a policy, it is based on a facet. A facet describes some characteristics of a specific target that you can create a policy against.
To help illustrate these concepts, I'll show how to create a policy that will validate your security settings. The scenario for this example is as follows: recently a consultant was hired by your company to determine which kinds of things needed to be done to be PCI compliant. The consultant has tasked you with ensuring all servers in your organization match the given configuration:
The common criteria mode should be enabled.
SQL Server should be in Windows integrated mode only.
The
xp_cmdshellextended stored proc should be disabled.Cross-database ownership chaining should be disabled on every database.
You manage 25 production SQL Server instances. Now go and earn your paycheck!
First, let's create the policy on the local server to make sure it's what you want to deploy. To create a new policy, select New Policy from the context menu of the Policy node in the Management tree in Object Explorer. This will launch the Create New Policy dialog box, as shown in Figure 15-6.

After typing Server Security Policy in the name text box, you need to select a check condition. A check condition is a lot like a WHERE clause in a T-SQL statement. It defines what specifically the policy is checking. Since you have not created a check condition for your server security settings, you need to select "New condition." This will launch the Create New Condition dialog box, shown in Figure 15-7.

Since you are interested in ensuring server-wide security settings are enforced, you need to select the Server Security facet. Notice that when you open the Facet list you are presented with a plethora of facets. Each one of these facets exposes a variety of parameters that you can use to create policies with. Once you select Server Security, you are now able to build your logical expression.
The expression grid shown in Figure 15-7 builds the requirements. The common criteria switch should be enabled, XP command shell should be disabled, the login mode should be Windows Integrated, and cross-database ownership chaining should be disabled. Once you click OK to create this new condition, control will return to the Create New Policy dialog box.
Had the Server Security facet applied to specific targets such as tables or stored procedures, those options would be presented in the Against Targets list in Figure 15-6. Since the Server Security facet applies only to the SQL Server instance, there are no specific targets to apply this policy against. The next combo box is Evaluation Mode. The default is "On demand," which means that this policy will be created on the server, and nothing will be done with it unless you explicitly evaluate it. The next option is "On schedule," which schedules the evaluation of the policy using SQL Server Agent. If you had specified a policy that triggered on DDL events such as enforcing table names to be a certain format, you would see two additional execution modes: "On change: log only" and "On change: prevent." The log-only option allows a new table with the wrong name to be created; the prevent option rolls back the transaction, inhibiting the table from being created.
Click OK. You can see the new policy created in the Policies node in Object Explorer.
Having created a policy, you should evaluate it to see whether your server is in compliance. If you select Evaluate from the context menu of the Server Security Policy policy, you will launch the Evaluate Policies dialog box shown in Figure 15-8.

In Figure 15-8, you can see that the policy that you created failed its evaluation. To view the details of the failure, click the View hyperlink in the Details column. Figure 15-9 shows an example of what you'll see. You'll get a list of the criteria, and that list will include a pass/fail result for each one.
Note
Some policy dialog boxes use a blue highlight against light blue hyperlink text. It is very hard to see on print and on the screen, but it's there, trust me.

In Figure 15-9, you can see that the policy's evaluation failed because the common criteria switch was disabled and because the login mode was mixed and not set to integrated mode. You can see that having a policy is an easy and fast way to ensure your servers are in compliance.
In this example, you evaluated a single server. The real power of policy-based management comes with the easy ability to deploy policies and evaluate policies across multiple servers and multiple versions of SQL. You can create policies that check both SQL Server 2000, SQL Server 2005, and SQL Server 2008.
To evaluate multiple servers on demand, you can use the Registered Servers window in SSMS. This functionality has been expanded in SQL Server 2008 to include the concept of a central management server.
In the Registered Servers window of SSMS, there is a node called Central Management Server. A central management server (CMS) is not a special server or a new edition of SQL Server; rather, it's a SQL Server 2008 instance that you and your DBA team decide on to be the central management server.
Having a CMS server solves two problems. First, imagine the scenario where you are on a DBA team of five other people. Everyone is responsible for the 50 SQL Server instances your company owns. To make administration easier, you create a registered server list of all 50 SQL Server instances. You export this list and email it to your DBA team. Your manager sees that you are proactive and really trying to save the company money by decreasing wasted time. Fast-forward a few days to when some new servers come online and some old ones are consolidated. Now it's time to send out the registered servers list again, but this time you forget because you are trying to troubleshoot a faulty backup on one of your servers. Your co-workers don't know the new server names and are stuck until they can get hold of you. Now your manager doesn't think so highly, and in the words of Sir Topham Hat (from the children's series Thomas the Tank Engine), "You are causing confusion and delay!"
To solve this registered server fiasco, SQL Server 2008 has the capability to create a shared registered servers list, and that is the purpose of the central management server. Now as you make changes to the registered servers list, everyone can see and leverage the same list.
The central management server allows you to group your servers. In Figure 15-10, SQL_DBA_1 is a SQL Server 2008 instance that is defined as a CMS. Within it is a folder called Production. Production contains two instances, SQLPROD_1 and SQLPROD_2.

A few options are available in the context menu of the folders within the Central Management Server. One of them, New Query, allows you to execute a query against all the instances within the Production folder. Another capability is the ability to execute policies. Imagine now how easy it is to determine whether all your servers are in compliance. It is almost just a right-click of a mouse button.
Compliance requirements come in many shapes and forms dependant completely on what kind of company you work for and who your company hired for an auditor. SQL Server 2008 exposes functionality that makes it easy for DBAs to become compliant and to maintain compliance. Table 15-3 lists some additional resources that you may want to peruse relative to what we've discussed in this chapter.