One of the most significant challenges you are likely to encounter while building your new Drupal site is deciding on the visual design. Using Drupal, the general term that is associated with creating the look of your site is "theming." The concept applies to the overall visual design of your site, as well as to how an individual element on a page is displayed, such as a title. In this chapter I'll walk you through the process of taking an off-the-shelf Drupal theme and customizing the overall look, as well as the look for individual elements on a page. This is your chance to take the concepts covered in this book and apply them to your site, taking it from ho-hum to sizzle!
To get started, you can do any of the following:
- Use an off-the-shelf theme from
Drupal.org/project/themes. There are hundreds of free themes that you can download and use on your site. It's likely that you'll find a theme that either matches what you're looking for or is close enough that minor modifications will fulfill your specific requirements.
- Use a starter theme from
Drupal.org/project/themes. Starter themes are barebones templates that lack any graphical elements, but provide a basic non-graphical skeleton that you can expand on. Think of a start theme as a new house that has been framed and sheet rocked, all ready for you to pick the paint colors, flooring, cabinets, and fixtures.
- Create your own theme from scratch.
If you can't find a pre-built or starter theme that provides the look or structure that you want, you can build your theme from scratch.
For most beginning to intermediate Drupal developers, the easiest approach is to pick an existing theme and modify it to meet the specific requirements of the site you are building. For situations where you can't find a theme that is close to what you're trying to create, a starter theme may be the best approach. Starter themes provide all of the scaffolding and structure required to create a theme, without having to start from a blank sheet of paper. To start this chapter, I will take you through the steps of using a starter theme. Although slightly more complicated than using an off-the-shelf theme, the concepts you will learn in this chapter will be applicable to modifying an off-the-shelf theme.
A starter theme has all of the elements necessary to create a Drupal theme; it's just missing attributes like colors, fonts, and images. The starter theme that I have picked to demonstrate the theming process is Genesis. There are other Drupal starter themes that you can choose from, and each takes a slightly different approach. Two other popular starter themes are Zen and Fusion. Genesis happens to be my personal favorite, as it is based on a CSS-grid approach and the structure of the theme is easy to understand.
Before taking your first step, there are few things that you'll need to know about theming. Creating or updating a theme does require knowledge of HTML, CSS, and, to some extent, PHP. The complexity of what you are trying to accomplish will drive the depth and breadth of knowledge required to create the desired effects and capabilities in your theme. If you're new to HTML, CSS, or PHP, I suggest picking up Getting StartED with CSS by David Powers, Beginning HTML with CSS and XHTML: Modern Guide and Reference by David Schultz and Craig Cook, PHP for Absolute Beginners by Jason Lengstorf, and Beginning PHP and MySQL: From Novice to Professional, Third Edition by W.J. Gilmore. All are excellent references that provide the background knowledge necessary to succeed at Drupal theming.
In the following sections I'll assume that you have at least a basic understanding of HTML and CSS. If you don't, take a quick trip to the bookstore.
Drupal themes are composed of several files, all of which reside in a directory with the same name as the theme itself. You can find the Genesis directory in the /sites/all/themes directory of your Drupal installation.
Note
Base themes that are shipped with Drupal 7 core reside in the themes directory at the root of your website. Contributed themes or custom themes that you develop from scratch should reside in the /sites/all/themes directory of your website. This ensures that upgrades to core Drupal do not wipe out your custom themes.
There are several files associated with a Drupal theme. Each file must conform to Drupal's naming and content standards. In the case of the Genesis theme, the key files that we'll be modifying are listed in Table 13-1.
Table 13-1. Standard Drupal Files
File | Description |
|---|---|
<themename>.info | Every Drupal theme must have a .info file, and the file name must be the same as the name of the theme. For the Genesis theme, the file is named genesis.info. Within the info file, you will define attributes of your theme including the
The key element that we will focus on in this chapter is the list of regions. |
page.tpl.php | Each Drupal theme must have a page.tpl.php file. The file contains a mixture of HTML and PHP code, and defines the overall layout and structure of a page on your website. This file also brings other key Drupal core components into your theme through a number of include files. If you look inside the file, you'll see that there are several instances of code that looks like the following: <?php print $somevariable; ?> Where the value of $somevariable changes depending on where you are in the page.tpl.php file. For example you will find the <?php print $styles; ?> statement in the file. This line of code pulls all of the CSS files defined in the themes .info file into the page as it is rendered by Drupal. Other variables perform similar functions. In this chapter I will focus on how the regions defined in your .info file are incorporated and displayed on the site and how the CSS attributes are applied to those regions. An example of how regions are displayed is <?php print render($page['footer']); ?> This code takes the elements assigned to the footer region and renders them on the page at the point where this line of code appears. For an in-depth understanding of page.tpl.php file, please visit the theme guide on |
node.tpl.php | This file is composed of a combination of HTML and PHP snippets. The contents of the file define how nodes are laid out when displayed on your site; for example, the placement of the title, the author information, the taxonomy terms, the body, and pictures included with the node. In this chapter I will show you how to define the layout for a node. |
style.css | All of your sites' CSS markup should be stored in one or more CSS files in your theme directory. A typical Drupal theme will have at minimum a style.css file. You may choose to call the file something else, and you can have multiple CSS files if you wish (e.g., you might want to put CSS overrides for Internet Explorer in its own CSS file). |
There may be other optional files in your theme's directory. Examples include theme files (often referred to as .tpl files) for individual components (such as a block). In this chapter I will focus on the core files listed in the table.
If you haven't done so already, follow the instructions in Chapter 6 and install the Genesis theme (www.drupal.org/project/genesis). You'll notice that the installation process creates two versions of it: Genesis base and Genesis subtheme. A majority of Drupal starter themes use subthemes as the mechanism for creating a new theme based on the foundation provided by the base theme. This allows you to create one or several new themes using the same underlying foundation without having to start from scratch each time you want to create a new theme. I will follow the Drupal standard approach in this chapter, using the off-the-shelf subtheme that is created by during the Genesis installation process.
To create a custom subtheme using the Genesis starter theme, you must follow these steps:
Copy the genesis_SUBTHEME directory in the /sites/all/themes/genesis directory to your /sites/all/themes directory.
Rename the copied directory to genesis_mytheme (I'll use "mytheme" as the name of the new theme that I am creating).
In the /sites/all/themes/mytheme directory, rename the genesis_SUBTHEME.info file to genesis_mytheme.info. The .info file must be named the same as the directory in which it resides.
Edit the genesis_mytheme.info file and change the following values:
Change the value of name from Genesis SUBTHEME to Genesis mytheme;
Change the description of the theme to My Genesis Subtheme.
Edit the template.php file. Using search and replace, change every occurrence of genesis_SUBTHEME to genesis_mytheme.
Copy the following files from the /sites/all/themes/genesis/templates directory to your /sites/all/themes/genesis_mytheme directory:
page.tpl.php
node.tpl.php
block.tpl.php
field.tpl.php
region.tpl.php
comment.tpl.php
html.tpl.php
The next step in the process is to enable the Genesis base theme as well as your new Genesis subtheme. Click on the Appearance link in the top menu and scroll down to the "disabled themes" section. You should see three versions of the Genesis theme: base, the off-the-shelf subtheme, and your new derivative of the subtheme named mytheme. Click on the "Enable and set default" link for your new subtheme and return to the home page of your site. Your site should look something close to Figure 13-1.

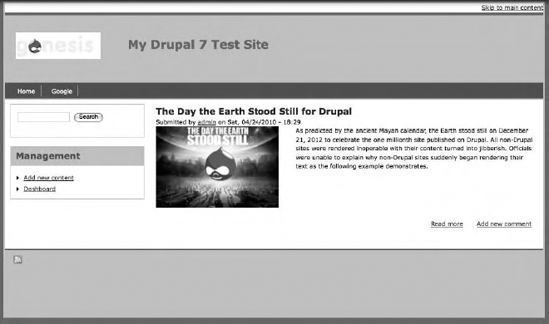
The Genesis theme is pretty stark in its out-of-the-box state, but that's a positive aspect of using a starter theme. You have the opportunity to create a theme that displays your site exactly how you want, without trying to make an off-the-shelf theme behave the way you want it to. Next I will show you how to use the Genesis starter theme to create a site that looks like Figure 13-2.
Before starting the modification process, it's important to understand the basic structure of the starter theme. The first thing that I look at when modifying a theme is the list of regions defined by the starter theme. In the case of Genesis, I open and look at the genesis_mytheme.info file, which can be found in the /sites/all/themes/genesis_mytheme directory. The starter theme defines the following 12 regions:
Leaderboard
Header
Help
Secondary content
Highlighted content
Content
First sidebar
Second sidebar
Tertiary content
Footer
Page bottom
Figure 13-3 shows the positioning of the standard regions.

One of the reasons that I like the Genesis theme is it provides several powerful features that are simple to use, including the ability to pick the layout of your new site. Genesis provides nine basic layout options in three categories, as shown in Figure 13-4.

I'll choose the genesis-1c layout. It is a standard three-column layout using fixed-width sidebars. Depending on the requirements for your site, you could select another layout option.
To set the desired layout, I'll edit the html.tpl.php file in the /sites/all/themes/genesis_mytheme directory. In the html.tpl.php file I'll change the CSS ID assigned to the body tag from 1a to 1c, as shown here:
<body id="genesis-1c" <?php print $attributes;?>>
The next step is to set the width of your theme. By default, Genesis is set to display as a fluid width-based theme, meaning the theme will stretch to the width of the visitor's browser. For demonstration purposes, I'll change the default width from 100% to a fixed width of 960px by updating the page.css file, which is located in the /sites/all/themes/genesis_mytheme/css directory. There are two CSS IDs that you will need to change: one for IE6 and the other for all other browsers. Find the #container CSS ID in the page.css file and change the two definitions to match the following, by changing 100% to 960px:
#container {
 width: 960px;      /* Width for IE6 */
}

body > #container {
  width: 960px;      /* Width for all other browsers */
  min-width: 760px; /* set a minimum width */
/*max-width: 960px;    set a maximum width */
}
After changing the values, save the file and press refresh on the home page of your site. If your monitor supports a resolution of at least 1024×768, maximize your browser window and you will see the affect of setting the site to a fixed width of 960px. There will now be white space on either side of the main section of your website.
Next I'll jazz up the theme by adding color. I'll create a theme that is based on a green color scheme. One of my favorite tools for creating color schemes is found at http://colorschemedesigner.com/. I used the tool provided on that site to generate a green-based color scheme, and will use these colors:
Primary background color: #528544
Secondary color: #287314
Tertiary color: #9CD88C
I'll set the main body background color to the primary background color, and the main section of the site to white by adding the background color definition to the following CSS elements found in the page.css file:
body {
  padding: 0 10px;
  background-color: #528544;
}

#container {
  width: 960px;      /* Width for IE6 */
  background-color: #ffffff;
}
After adding the values, save the file and return to your sites home page, clicking the browsers refresh button to reload the CSS file. The updates should have changed the colors on either side of the main section of your website to green, with the main section of your site having a white background.
The next change is to make the header of the site stand out from the rest of the site. I'll add four attributes to the #header CSS definition in the page.css file. I'll add a background color, borders at the top and bottom, and set the height of the header to 120px. After updating the #header definition, you should have something like the following:
#header {
   background-color: #9CD88C;
   border-top: 6px solid #528544;
   border-bottom: 3px solid #287314;
   height: 120px;
}
After updating and saving the file, reload the homepage of your website to see the effects of the changes you've made.
Next I'll fix the logo and the site title so it renders properly in the header region. I'll first add the following attributes to the #logo CSS id in the page.css file:
#logo {
  position: relative;
  float: left;
  margin-left: 20px;
  margin-right: 50px;
  margin-top: 30px;
}
Next I'll add the position, float, and margin top attributes as shown here to #site-name CSS id in the page.css file:
#site-name {
  font-weight: bold; /* Bold or else the line heights vary. */
  font-size: 2em;
  line-height: 1.5;
  position: relative;
  float: left;
  margin-top: 35px;
}
Next I'll change how the site title is displayed. Instead of displaying the title as a hypertext link (underlined and blue), I'll remove the underline and change the text color. In the page.css file, search for the #site-name a:link and #site-name a:visited CSS IDs and add the text-decoration and color attributes as shown here:
#site-name a:link    {
   text-decoration: none;
   color: #528544;
}

#site-name a:visited {
   text-decoration: none;
   color: #528544;
}
After updating the #logo, #site-name CSS IDs, save the page.css file and press the browser refresh button while on the home page of your website. The revised header layout should now look like Figure 13-5.

The next requirement for our new theme is to create a horizontal menu that appears below the header. The first step in this process is to add a new region to the theme. To add a new region, edit the genesis_mytheme.info file and add the following line to the end of the list of regions contained within that file:
regions[main_menu_links] = Main Menu Links
This code instructs Drupal to include a new region with an internal name of main_menu_links to the list of available regions. The value to the right of the equal sign is the value that will appear in the block configuration page, which we will see in a moment.
The next step is to update the page.tpl.file, where I will add the code that instructs Drupal where to display the main_menu_links region. The code that we need to add includes checking to see whether anything is assigned to the main_menu_links region before attempting to display it on the page. If the region is empty, we don't want Drupal to display it. The second block of code is to instruct Drupal to display the contents of the region. I'll insert the following code right under the "</div><!—header -->" line of code in the page.tpl.php file:
<?php if ($page['main_menu_links']): ?>
      <div id="main-menu-wrapper" class="clearfix">
        <div class="main-menu-inner"><?php print render($page['main_menu_links']); ?></div>
      </div>
    <?php  endif; ?>
The first line of code listed here checks to see if there is anything assigned to the region. If there is something assigned to the region, the next line defines a DIV structure to render the region, in this case a DIV with an ID of main-menu-wrapper. The next line of code declares another DIV structure (main-menu-inner) and uses PHP's Print function to render the contents of the main_menu_links region on the page. The next line closes out the DIV main-menu-wrapper DIV structure, and the last line ends the conditional statement that checks to see whether there is anything assigned to the region. You can use this same approach to create new regions in your theme that are outside of what is provided by the base theme that you began with.
The next step is to update the page.css file with the CSS attributes required to render our new horizontal menu correctly. I'll update the main-menu-wrapper CSS definition in the page.css file by removing the margin attributes that were set in the off-the-shelf version of the page.css file, and adding background-color, border-bottom, and height attributes. The resulting definition should look like the following:
#main-menu-wrapper {
  background-color:#287314;
  border-bottom:2px solid #9CD88C;
  height:25px;
}
The next step is to add a CSS definition for the main-menu-inner class directly below the main-menu-wrapper. The definition that I created is as follows:
.main-menu-inner {
  position: relative;
  float: left;
  height: 25px;
}
The next step is to define how the menu items will appear on the menu. Because Drupal menus are rendered vertically as HTML unordered lists, I'll first force the menu items to render horizontally by setting the CSS display attribute to inline. I'll then remove the standard bullet point that is displayed for lists by setting the list-style attribute for the menu items to None, and then to make each menu item stand out I'll add a border to the right of each item and change the padding to offset the borders a bit to the left, right, and bottom. To make those changes, edit the page.css file and add the following CSS class definition:
.main-menu-inner ul.menu li {
  display: inline;
  list-style: none;
  border-right: 1px solid #9CD88C;
  padding-right: 10px;
  padding-left: 10px;
  padding-bottom: 3px;
For those of you who are new to CSS, this definition applies formatting only to content within HTML LI tags that are contained within the unordered list (ul) with a class definition of menu, within the main-menu-inner DIV tags.
The next step is to clean up the text displayed for each menu item. I'll change the text color to white, and I'll remove the standard underline for HTML links.
.main-menu-inner ul.menu li a {
  color: #ffffff;
  text-decoration: none;
}
Next I'll add a CSS definition so that when visitors hover over the menu item the text color will change to black, indicating they're hovering over the item. The CSS required to enable this capability is as follows:
.main-menu-inner ul.menu li a:hover {
  color: #000;
}
The horizontal menu is now set up and ready to enable.
Drupal caches all of the regions defined in the template, meaning changes to your .info file aren't picked up until Drupal refreshes the sites cache. I need to manually reset the cache so that Drupal will recognize the new region I added for the horizontal menu. To do this, click on the Configuration link in the menu at the top of the page. On the Configuration page, click on the Performance link. On the Performance page, click on the "Clear all caches" button. Drupal will now recognize your new region.
The next step in the process is to reassign the Secondary menu from its current position on the page to the new region we created in the previous steps. Click on the Structure link at the top of the page, and on the Structure page click on the Blocks link. On the Blocks page, scroll down until you find the Secondary menu item, and change the block assignment in the drop-down list from its current block to the Main Menu Links block. After making the change, click on the "Save blocks" button at the bottom of the page.
To test the horizontal menu, add another menu item to the Secondary menu following the steps outlined in Chapter 5. For demonstration purposes I've added a new menu item named Google that links to www.google.com. After adding the new menu item to the theme, your new horizontal menu should look something like Figure 13-6.

Before moving on to theming the footer, blocks, and nodes that are rendered on the site, there are two minor theming issues that need to be addressed. In its current state, the text rendered in the main body of the site touches the left edge of the body container, and the body container itself needs a little snazzing up around the edges.
To fix the text running into the left edge of the site, I'll add a bit of padding to the DIV that contains all of the main text of the site. The DIV ID that the Genesis theme uses for the main body area is the #columns ID. Locate that CSS ID in the page.css file and add the following line of CSS code:
padding-left: 10px;
Save the page.css file and refresh the home page of your site. The text in the left column should now render 10 pixels in from the left edge of the main body.
The next step is to add a border to the #container CSS is. I'll use the tertiary color as the borders. Locate the #container ID in the page.css file, and add the following line of CSS code:
border: 3px solid #9CD88C;
After making the updates, save the page.css file and refresh your browser. Your site should be looking pretty good by now, but we're not done yet. Let's make it even better.
The footer of our site is pretty plain at the moment. The only content assigned to that area is the powered by Drupal statement. Let's pretty it up a bit by adding a top and bottom border and changing the background color.
Find the #footer DIV ID in the page.css file. Remove the existing margin definition and add the background-color, height, padding, and border-top definitions as shown here:
#footer {
  background-color: #9CD88C;
  height: 100px;
  padding: 10px;
  border-top: 2px solid #287314;
}
After making the updates, save the file and refresh your home page. There's one more change that we want to make to the footer, and that is removing the "Powered by Drupal" statement and menu that are shown in the off-the-shelf version of the theme. Our requirements don't include a menu in the footer, nor the "Powered by Drupal" statement. To remove the statement, visit the Blocks page and unassign that item from the footer region by selecting None from the list of options and clicking the "Save blocks" button at the bottom of the Blocks page.
To remove the menu, edit the page.tpl.php file and carefully delete the following lines from the file:
<?php if ($secondary_menu_links): ?>
          <div id="secondary-menu-wrapper" class="clearfix">
            <div class="secondary-menu-inner"><?php print $secondary_menu_links; ?></div>
          </div>
<?php endif; ?>
After deleting these lines, save the file and refresh your browser. You should now have a clean footer.
At this point you could call it quits and use the theme as is, but there are a few other minor changes that can be made to define how nodes and blocks are themed to make our site just a little bit better.
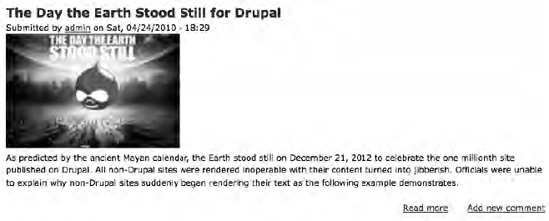
Drupal provides a mechanism for controlling how nodes are displayed on a page. By default, a node is displayed with the title at the top; the author, date, and time below the title; the pictures attached to the node; and then the body of the node. The problem with this approach is that there is a large area taken up by the picture before the visitor sees any text. I'll update the nodes.css file so that the picture will float left of the text, allowing text to begin at the top of the picture, as shown in Figure 13-7. But first I'll take a moment to create a test Article content item and set the publishing option so that the new Article will be displayed on the front page of the site. I'll be sure to attach a picture to the Article using the picture upload feature—any picture will do—and create at least a paragraph of text so you can test the changes that you are about to make.
Next, edit the nodes.css file from the /sites/all/themes/genesis_mytheme/css directory. In the file, search for a CSS class definition named field-type-image. Update the class definition, adding the position, flat, margin-right, and margin-bottom definitions as shown here:
.field-type-image {
  position: relative;
  float: left;
  margin-right: 15px;
  margin-bottom: 10px;
}
There is another cleanup task, and that is to add some padding to the right edge of nodes. By default, the text will render to the right edge of the DIV container for nodes (node-inner). Search for node-inner in the nodes.css file, and update CSS class so that it includes a padding-right attribute as shown here:
.node-inner {
  padding-right: 15px;
}
After making the changes, save the file and refresh your browser while on the home page. Your new node layout should look somewhat like Figure 13-8.

You could make other changes by updating the node.tpl.php and nodes.css files. I would suggest reading the header of the node.tpl.php file. In the header, you will find a description of the optional elements that you can include in the output generated when Drupal renders a node. For the example theme, the only change that I needed to make was floating the pictures to the left of the text.
Another common way to dress up your site is to theme how blocks are displayed. In the out-of-the-box state, a block on our site will be displayed by default as shown in Figure 13-9. As you can see, it's pretty plain.

A common approach that I use on my clients' sites is to add a background color to the block titles and to wrap the blocks with a border. Fortunately with the Genesis theme, all I'll have to do is to update the blocks.css file with a few additional CSS attributes.
The first CSS class that I'll change is the .sidebar .block .block-content class. I'll add an attribute for padding of 10px around the edges of the block-content container, and a 1px border using the tertiary color. Once changed, the definition should look like the following:
.sidebar .block .block-content {
    border: 1px solid #9CD88C;
    padding: 10px;
}
The next step is to update the definition for the block title. I will add a background color to the title and change the font color for the title. In the blocks.css file, search for the line that defines the CSS for .sidebar .block h2 and add the attributes shown here:
.sidebar .block h2 {
  background-color: #9CD88C;
  padding-left: 10px;
  padding-top: 5px;
  padding-bottom: 5px;
  color: #287314;
}
After making the changes, save the blocks.css file and refresh your browser. The changes made to the CSS should result in the themed blocks looking like Figure 13-10—significantly better than the plain look of the default definition for blocks.

Most Drupal themes adhere to a standard approach for incorporating the logo and the name of the site. To change the logo of the site from the default Genesis logo, click on the Appearance link in the top menu. On the Appearance page, click on the Settings link for your Genesis subtheme. On the Settings page, uncheck the use default logo checkbox. As soon as you uncheck the box, Drupal displays a text field where you can enter the path to the image you wish to use for your logo or have the option to upload a file. Either approach results in a new logo being displayed in place of the default Genesis logo. Be mindful of the dimensions of the logo based on the dimensions of your banner area.
You can also change the site's name by clicking on the Configuration link on the top menu and on the Configuration page clicking on the Site information link. On the Site information page you can change the value in the Site name text field.
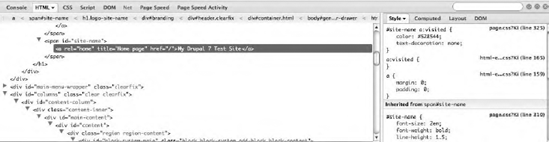
There is a tool that I use on a daily basis that is indispensible when it comes to theming: Firefox's Firebug plug-in (which is now available for Google Chrome). Firebug provides all of the information you need to identify the right CSS elements to create or modify in order to achieve the look of any item on any page. Firebug provides a simple-to-use mechanism for identifying the CSS ID or class that is assigned to a specific element by simply right-clicking on that element and choosing the inspect element item from the menu. For example, I right-clicked on the site title in the header area and selected the inspect element option. As shown in Figure 13-11, Firebug displayed the HTML used by the theme to render the title and the CSS used by the browser to render that element. Firebug even goes so far as to display the name of the CSS file and the line number within that file where the attributes are defined. It doesn't get much easier than that!
You're now ready to begin creating your own custom themes by either modifying an existing theme, creating a derivative theme from a starter theme like Genesis, or creating a new theme from scratch. There are a number of resources on Drupal.org to help guide you through other more advanced theming topics. A good place to start is Drupal.org/theme-guide and the forums (Drupal.org/forum).
You now have your site themed and ready for its public unveiling, but before you unleash the hordes of people chomping at the bit to see your site, let's make sure you're ready to administer it.