
As we write this chapter, Qt is about to enter its second decade as a cross-platform toolkit for software development. Given that Qt is used in applications from Autodesk Maya to the VLC Media Player, in applications both proprietary and open, Nokia's choice to provide it on Nokia smartphones and mobile computers is well justified. With support for graphics, multimedia, multithreading, and platform services such as network and file system access, along with a port of WebKit for application development, Qt offers a robust collection of APIs and elegant programming metaphor on top of C++.
In this chapter, we give you a whirlwind tour of Qt. While an introduction to Qt can fill an entire book (and does; see, for example, Johan Thelin's excellent Foundations of Qt Development, also available from Apress), one of Qt's strengths is that its basic principles are easy to understand and enable you to begin writing real code for real applications quickly. We begin by providing a high-level view of Qt's object model and the benefits it brings to you. Next, we show you Qt's solution to message passing between instances of classes, and we follow up with how it's used in both GUI and non-GUI development, such as access to the network. With these skills in hand, you're ready to learn about how Qt provides an elegant suite of classes to manage application interfaces using the popular model-view-controller (MVC) paradigm. Finally, we close the chapter with a concrete example that combines network access with an MVC user interface to display recent earthquakes from data provided by the United States Geological Service (USGS).
While C++ provides a well-understood object model based on classes and inheritance, it's by no means perfect. Details including resource ownership, the static object system at runtime, competing graphical user interface standards, and so forth can make writing a complex GUI-based application in C++ alone a real headache. Qt begins with C++, and adds a robust object system that includes:
A powerful inter-object communication system called signals and slots.
A hierarchical object ownership system that reduces resource leaks.
An interface to set and obtain object properties.
Dynamic casting that works across object boundaries.
Static resource management (for example, pictures, audio, XML, etc.) and contextual string translation.
A template library for collections. These facilities are available to any class that implements the
QObjectobject, the base class from which many Qt classes descend. Let's look at each of these facilities in a little more detail.
Signals and slots permit objects to communicate through a run-time conduit based on C++ method dispatch (ensuring that it's fast) while permitting the developer to provide the method without needing to subclass or implement an interface (so it's flexible). It's similar in principle to the callback technique used in C and C++, although considerably more flexible.
Any QObject descendant can emit a signal to indicate the occurrence of an event, such as a button being pressed, the movement of a slider, the completion of an HTTP transaction, or other events. Qt permits you to declare what signals a given object can emit, and lets you declare slots in QObject descendants that you can connect to appropriate signals.
Note
Don't confuse "event" in the context of signals and slots with Qt's events, structures sent to specific methods of widgets, as they're not the same. It's easily to get confused at first, because some things Qt uses signals and slots for (such as a button press) are represented in other GUI frameworks as an event.
Signals and slots are type-safe, helping reduce potential programming errors. The coupling between signals and slots is loose, so that an object is free to emit signals as its state changes, even if no slots are connected to those signals. In the same way, slots need not be connected; they're just method declarations with a bit of extra glue in the class definition to indicate that you may be using the method as a slot, but you can still call them from your source code like any other method.
At runtime, you connect a signal to a slot using QObject's connect method, and disconnect using QObject's disconnect method. These connections are one-way, indicating that a signal should trigger a slot; the mechanism may be one-to-many, in which a single signal is connected to a number of slots, each through an invocation of QObject's connect method. We show you a concrete example of how to do this later in the chapter in the section titled "Using Signals and Slots."
C++, like C before it, relies on you, the developer, to keep track of when your application allocates memory and when it should release it for reuse. In small applications this isn't difficult, but as your application grows in complexity, it gets more difficult. Errors where you allocate memory and don't free it cause memory leaks; on constrained devices such as mobile phones, that can mean the difference between running and crashing as your application runs out of memory. Worse, large programs can see more insidious problems, such as using a region of memory after you've released it to the memory manager, which can cause crashes and other aberrant behavior in your application.
To help your application track when it needs to free allocated memory, Qt provides a hierarchy of memory ownership with most of its classes. When you create an object instance, you can designate another QObject as the owner (called the parent) of the object you're about to create. In turn, when the parent is released, any objects owned by the parent are also released. For example, to create a button to be released when the allocating object is deleted, we'd write:
QPushButton* button = new QPushButton(this);
In practice, it's generally best to use parented objects like this, rather than keeping a bunch of pointers and releasing them in the parent object's destructor.
As in other frameworks, it's common to use a null pointer (with the value 0) to indicate an object that has already been freed. To automate the process of setting a pointer to null when the pointer's memory is released, you can use the QPointer template, like this:
QPointer<QPushButton> button = new QPushButton(this);
For memory allocated in a function's scope, Qt provides the QScopedPointer, which automatically deletes the memory associated with the pointer when the scope ends, like this:
{
    QScopedPointer<QXmlStreamReader> xmlReader = new QXmlStreamReader();
    // ...parse the xml here...
} // xmlReader is deleted by the QScopedPointer
QScopedPointers are handy to have around in large functions with multiple exit points, where it's likely you'll forget to free an object. They're especially useful in doing device programming, where it's best to make light use of stack allocation, because the stack size on mobile devices is much smaller than what you're used to on desktop or server platforms.
As we've already said, Qt object instances are just C++ instances with a bit of extra magic glue provided by Qt for things including the signal/slot mechanism and managing the memory used by parented objects. Another feature of Qt's objects that descend from QObject are properties, name-value pairs for attributes of the objects you define. As with other extensions to C++ that Qt provides, you can define properties in any class that inherits from QObject. Properties are especially important for things like integration with Qt Quick (see Chapter 7) and JavaScript in WebKit (see Chapter 8). To declare a property in an object, use the Q_PROPERTY macro inside the class definition, like this:
Q_PROPERTY(bool focus
           READ hasFocus)
Q_PROPERTY(bool enabled
           READ isEnabled
           WRITE setEnabled)
After specifying the property's type and name you can specify additional information in the form of functions that perform a specific action. All properties must have a READ directive that indicates the function the Qt meta-object system must invoke to obtain the value of the property. It's important to remember that you provide that function; all the Q_PROPERTY does is set things up with the meta-object system, rather than actually implementing functions like setters and getters.
In addition to READ, you can also provide several other directives defining the property, including:
WRITEindicates the method to call to set the value.RESETindicates a function that returns the property to its default context-sensitive value.NOTIFYindicates a signal to emit whenever the property changes.DESIGNABLEistrueorfalseand, whentrue, indicates that the property should be shown in the Qt Creator UI. You can also specify a member function that returns a bool for this directive. This value defaults totrue.SCRIPTABLEistrueorfalseand, whentrue, indicates that the property should be available to the scripting system in Qt Quick or JavaScript. You may also specify a member function that returns bool for this directive. This value defaults totrue.STOREDindicates whether the property is best thought of as an independent property rather than one computed from other values known to the object. Most properties areSTORED true, and this is the default.USERindicates whether the property is designated as a user-editable property for the class (trueorfalse). Typically, there is only oneUSERproperty in a class, by Qt convention.CONSTANT, another directive of typebool, indicates that the property value is constant.FINALindicates that subclasses will not override this property. Note that this is really a comment to the developer; the meta-object compiler and run time do not currently enforce this.
In practice, when implementing your class, you generally specify the READ and WRITE values; occasionally you may come across a property that includes a RESET value.
Warning
Don't forget that the Q_PROPERTY macro provides only the glue between your class and its properties! You must provide methods that implement the setter, getter, and reset operations if you specify them in a Q_PROPERTY macro.
You are doubtless already aware of C++'s dynamic_cast, which lets you safely downcast or crosscast a pointer (returning 0 if the cast fails because of a type mismatch). Typically, you can't perform a dynamic cast across a plug-in boundary. Because Qt provides a cross-platform mechanism for managing plug-ins (in fact, Qt's support for different image types uses plug-ins to encapsulate the image format decoders), Qt needs a type-safe way to crosscast and downcast across dynamic library boundaries. To do this, Qt provides qobject_cast, a cast operation that's essentially the same in principle to dynamic_cast. In general when looking at Qt C++ code, you will likely see more use of qobject_cast than dynamic_cast, and it's generally a good idea to prefer it to dynamic_cast as well in your code. Another benefit to using qobject_cast is performance, as it uses the meta-object system rather than the C++ run time type inference.
Note
We don't explicitly discuss creating plug-ins using Qt in this book. If you think you have a design that would benefit from using a plug-in architecture, take a peek at the Qt documentation on plug-ins (http://doc.qt.nokia.com/plugins-howto.html is a good place to start).
Most applications—even many that have a minimal GUI—require resources as well as code. Images, sounds, and text—whether programmatic text, such as JavaScript to be used with the QtWebKit port or the text in the interface for windows, buttons, and so forth—must be packaged together with your application. Rather than taking the approach of providing a resource bundle with your executable, Qt takes the approach of statically compiling any resources into your executable. That way, you don't have multiple files to carry around with most applications, nor do you need to depend on a platform-specific mechanism, such as an application bundle.
You begin the process by specifying the resources your application requires in a resource collection file. The resource collection file is just a text file containing XML that describes the name and path to each required resource, like this:
<!DOCTYPE RCC>
    <RCC version="1.0">
    <qresource>
        <file>images/happy.png</file>
        <file>images/sad.png</file
    </qresource>
</RCC>
These files should already reside in your source tree (keeping them in your change control system isn't a bad idea, unless you're using one that doesn't handle binary files well), and the paths you provide to each <file> item are the paths relative to the resource collection definition file, as well as the paths to the resource when you load the resource in your application. You can name the resource file anything you like, as long as the filename ends with ".qrc."
To include the resource file in your application, just add a RESOURCES line to your project file indicating the resource file's location, like this:
RESOURCES += resources.qrc
To use a resource in your application, simply precede the location of the resource with a single colon and a solidus (":/"), like this:
QImage image(":/images/happy.png");(We go into using Qt resources in more detail in the next chapter, in the section "Using Application Resources.")
Note
Nearly any place you can specify a file path you can specify a resource path, too (just don't forget the leading :/ indicator in the path).
Small text resources, like those for labels, application error messages, and so forth, are best carried separately in a translation file created using Qt Linguist and the localization utilities lupdate and lrelease provided by Qt. You begin by ensuring that every string that needs a translation is marked using the function tr, provided by QObject. For example, when creating a button with the label "OK", we might write:
QPointer<QPushButton> button(tr("OK"), this);The tr function is what will load the appropriate locale-specific string at run time; if a string is unavailable, it will default to the text you invoke it with.
Obviously, the thing you don't want to do is pick through thousands of lines of source code looking for tr invocations, so Qt provides lupdate, a utility to do just that. You must specify only the translation files to create in your project file and run Qt's lupdate command on your project file to create translation files (their names will end in .ts) containing every localizable string in your sources, headers, and Qt Designer files. Thus, the resource and localization parts of my project file might read:
RESOURCES = resources.qrc
TRANSLATIONS = myapp_dk.ts
               myapp_en.ts
               myapp_fi.ts
(The translation files include the source language name using the ISO-639-1 defined two-character code for the language.)
Once you create the initial translation files, your translator can use Qt Linguist to add the translated resources. Once that's done, you run lrelease over your project to compile the resulting release files. The resulting files are highly compressed and optimized for rapid access.
Occasionally, you might want to localize other resources, too—say, adding a localized version of a specific icon within your application. You do this using the XML in the resource collection file, by specifying the lang attribute of a specific qresource tag, like this:
<qresource lang="en">
    <file alias="images/flag.png">images/flag_en.png</file>
</qresource>
<qresource lang="fi">
    <file alias="images/flag.png">images/flag_fi.png</file
</qresource>Like the C++ Standard Template Library (STL), Qt provides a number of type-safe collections through classes. These include sequenced collections through the use of the templates QList, QLinkedList, QVector, QStack, and QQueue, as well as associative containers through the use of QMap and QMultiMap, as well as QHash and QMultiHash. Finally, there is also QPair, which you can use to contain pairs of objects of arbitrary types.
For most applications needing to keep a list of items, QList is the logical choice. It's optimized for fast access, with only moderate penalties for insertion and deletion. If you find you need better performance for an updating list, try QLinkedList, which trades accessibility for performance when inserting or removing items. On the other hand, if QList doesn't meet your needs for access performance, there's also QVector, which stores its items in a contiguous region in memory, providing the fastest access but with considerable cost when inserting or removing items in the middle of the vector. QStack and QQueue provide convenience methods for implementing a stack using QVector and a first-in-first-out (FIFO) store using QList.
Associative maps let you store key-value pairs. Usually, you do this using a hash table; QHash and QMultiHash provide classic hash tables with arbitrary types for keys and values. You can also do the same thing with a binary search across a sorted set using QMap and QMultiMap. The "Multi" in QMultiHash and QMultiMap indicate that these templates can store multiple values for a single key, giving you additional flexibility.
These collections let you access items individually (using a method such as at or value) and iterate across the entire contents of the collection. These collections provide both STL-style iterators and a simpler Qt iterator to permit you to traverse the collection, visiting each item. The example at the end of the chapter shows you how to enumerate through the values in a QMap.
It's worth observing that the QString class, intended to represent strings of characters, isn't actually a collection class, but provides similar methods for inserting and removing characters from a string. The QString class also provides the usual methods you'd expect of a container of characters, including methods to format non-string values such as integers or floats, compare two strings, find and replace contents of a string, and so forth.
As we mentioned previously, signals and slots play a crucial role in Qt, enabling any two objects to communicate with each other without the need for clumsy interface definitions or callback functions. Declaring a signal requires only that the signal's object be a QObject and that the signal be declared with the signal's keyword in the class definition. In a similar vein, Qt's classic signal/slot example is that of a counter, wired to a button and slider. Our simple Qt counter class might look like what you see in Listing 4-1.
Example 4.1. An example declaring signals and slots
#include <QObject>
class Counter : public QObject
{
    Q_OBJECT

public:
    Counter() { mValue = 0; }
    int value() const { return mValue; }

public slots:
    void setValue(int value);
    void increment();

signals:
    void valueChanged(int newValue)

private:
    int mValue;
}
This class derives from QObject, as you can tell from the class declaration and the inclusion of Qt's Q_OBJECT declaration at the top of the class declaration. This pulls in code generated by Qt's metaobject compiler. Any class that uses signals or slots must both be declared as a QObject and include the Q_OBJECT declaration.
Warning
Forgetting the Q_OBJECT declaration at the top of a class definition that inherits from QObject is one of the most common mistakes people make when they first start working with Qt. If you forget, you'll get an error such as Class declarations lacks Q_OBJECT macro (or something more confusing depending on what platform you're targeting) when you compile your class.
The class definition includes two slots and one signal. You can think of the signal declaration as an output of the class. When mValue changes, the class must emit that signal. As such, the signal itself does not have a method body; the prototype indicates the type signature and name of the signal.
Slots, on the other hand, do have method bodies; the slot's method body executes either when a signal connected to it fires, or if another piece of code invokes it. (After all, a slot really is just a method, albeit with special properties imbued by Qt.) For example, Listing 4-2 shows the definitions of setValue and increment.
Example 4.2. Implementing Counter's slots
void Counter::setValue(int _value)
{
    if (mValue != value) {
        mValue = value;
        emit valueChanged(mValue);
    }
}

void Counter::increment()
{
    emit valueChanged(++mValue);
}
As you can see, the slots perform the expected operation (copying the new value or incrementing the existing value) and then emit the signal using Qt's emit statement.
For a signal to notify a slot, you must first connect them. In keeping with the counter example, you might want to increment the counter every time the user presses a button and show the resulting count. Listing 4-3 has pseudo code that demonstrates this.
Example 4.3. Connecting signals to slots
...
QPushButton *button = new QPushButton("Bump", this);
QLCDNumber *countLCD = new QLCDNumber(this);
Counter *counter = new Counter(this);
connect(button,   SIGNAL(clicked()),
        counter,  SLOT(increment()));
connect(counter,  SIGNAL(valueChanged(int)),
        countLCD, SLOT(display(int)));
...
When the push button receives an appropriate event from the Qt main event loop, it emits the released signal. This in turn invokes the counter's increment slot, which emits a valueChanged signal accepted by the countLCD's display slot, which redraws itself to show the new value provided to the slot.
Many newcomers and those unfamiliar with Qt often think that Qt is only a GUI abstraction layer, completely overlooking the support Qt provides for networking, file system access, and other key components in application development. As you see in Figure 4-1, Qt provides a clean abstraction for working with various kinds of I/O devices, including files and sockets, too.
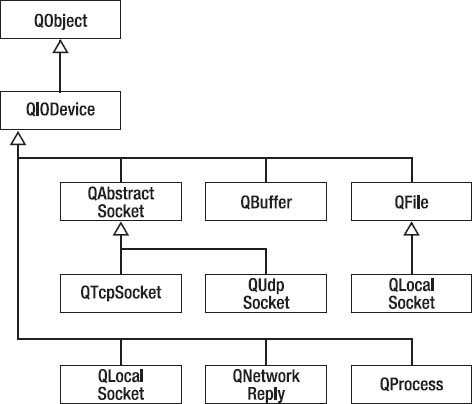
At the root of the I/O hierarchy is QIODevice. QIODevice defines familiar methods for managing a bidirectional stream of data, including:
open, which prepares the device for reading and writing data.close, which terminates the device's interface for reading and writing and may release the system context (such as a file handle) associated with the instance.read, which reads up to the indicated number of bytes and returns them as an array of bytes.readAll, which reads the remainder of the available data and returns the data as an array of bytes.write, which lets you write an array of bytes to the device.peek, which lets you read ahead of the current file pointer.statusmethods, includingisOpen,isReadable, andisWritable, indicating whether the stream is open, provides data, or accepts data, respectively.In many cases, you may not need to use the
readandwritemethods at all. Many utility classes, such as theQXmlStreamReaderclass, acceptQIODeviceinstances so you don't have to shuffle the data from one interface to another. We show you how to use theQXmlStreamReaderin the section "Putting It All Together" at the end of this chapter.
Perhaps even more useful is the QDataStream class, which provides serialization of binary data to a QIODevice. For example, you might write:
QFile file("some.dat");
file.open(QIODevice::WriteOnly);
QDataStream out(&file);
out << QString("Hello World");
out.close();
The QDataStream class has bidirectional stream operators for types including: bool; eight-bit, sixteen-bit, thirty-two bit, and sixty-four bit int; float; double; and char – plus most Qt data types like QString, QColor, etc. You can configure the stream to indicate byte order and floating-point precision, as well as directly read or write the raw data for serializing your own data types.
While Qt makes easy work of most I/O tasks, I/O brings its own issue: latency. While a QIODevice is working, your application waits; wait too long and your application performance will suffer as the UI thread stalls, blocking on pending I/O operations. In some cases, such as application launch, this isn't a problem. But in many cases (especially network I/O), it can be. Fortunately, to help with this and other tasks that can be run in parallel, Qt provides a platform-independent thread implementation, so you can move lengthy tasks to run in separate threads within your application.
The Qt class QThread is at the heart of Qt's thread support, and provides the usual semantics for creating, managing, and terminating a single thread. To create a thread, you simply subclass QThread and override its run method. At run time, you only need to create an instance of your thread class and invoke start. In turn, Qt spawns a platform thread and uses it to execute your run method. Once the run method exits, the QThread cleans up and releases the thread it used.
A thread may have (although it doesn't have to) an event loop that you can start by calling exec in your thread's run method. This makes it possible to connect signals and slots between your thread and other threads, such as the main thread on which the user interface of your application runs.
Warning
Although a thread can have an event loop, your graphical user interface code (widgets and painting) must all run on the main thread. Running user interface code—any code that triggers painting to the screen—on threads other than the main thread is not supported, and will yield unpredictable results.
The mechanics of managing the QThread are convenient, and made especially simple through the use of (you guessed it!) signals that the thread emits at various stages of its life. The methods QThread provides are:
exit, which exits therunmethod and terminates the thread.isFinishedreturns true if the thread has run to completion, otherwise it returns false.isRunningreturns true if the thread is still running in its run method.priorityandsetPrioritylet you obtain and modify the thread's priority.stackSizeandsetStackSizelet you determine and set the thread's stack size. Be careful using this method, because many devices have a relatively small maximum stack size anyway.waitblocks the thread until either its run method exits, or the amount of time that you specify (the time value is in milliseconds).
QThread provides the following slots (also usable as methods, of course):
quit, which terminates a thread's event loop.start, which starts a thread.terminate, which forcibly exits a thread. (In general, you should prefer using quit to terminate.)
Note
To terminate a thread, you can call exit from within the thread, or invoke the quit slot from outside the thread.
The signals that QThread provides are:
finished, emitted when the thread's run method exits.started, emitted when the thread's run method commences.terminated, emitted if the thread is forcibly terminated.
Threads should be as independent as possible. Wherever you need inter-thread communication, you should use signals and slots in conjunction with a thread's event loop if you can. However, there's no getting around the fact that if your threads share resources such as mutable data structures, you simply have to synchronize access between threads. Qt provides the usual inter-thread synchronization primitives:
QSemaphoreprovides synchronization for a specific number of identical resources.QMutexprovides a mutually exclusive lock for a specific resource.QReadWriteLockis similar toQMutex, and is useful in that it distinguishes between read and write access to shared data, permitting multiple readers, while ensuring that only one thread is writing to your data.QWaitConditionpermits one thread to wake other threads when some condition has been met.
As you would expect, Qt provides a host of user interface widgets to present things such as lists of items to the user. These widgets, such as QListWidget, provide an item-oriented interface to your application, where you provide items (perhaps from a collection your application maintains) that the user can manipulate (such as to make a selection). This sounds good in theory, but in practice it has limitations.
The key limitation is one of scalability—as the size of your collection increases, it's more work and more memory to keep essentially two copies (one for your application and one for the widget). Worse, if an item in your collection changes, you need to synchronize the widget's item list with your item list, which includes the need to repaint the widget.
Fortunately, there's a better way. Qt provides an implementation of the model-view-controller (MVC) pattern now commonplace in user interface development. The widgets QListWidget, QTableWidget, and QTreeWidget have corresponding classes, QListView, QTableView, and QTreeView, which each take a model of the data to present and monitor for changes, sharing data with the model to ensure both a small footprint and rapid updates.
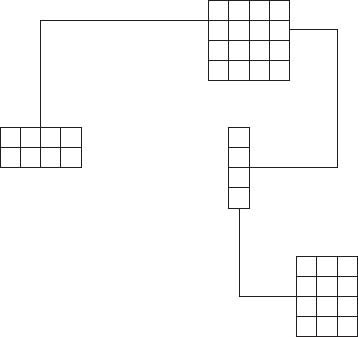
Qt provides a class hierarchy for models that are a little different than what you may have encountered on other platforms. While you can use a model with a single flat collection of objects such as a list, the Qt platform itself provides for a tree of two-dimensional tables such as the one you see in Figure 4-2. In the figure, we see a tree with a root that is a 4×4 table of items; the items at (0, 0) and (1, 3) each have child data, and so forth. While dizzying, this general representation provides the ability for a model to represent items in one dimension (lists), two dimensions (tables), and a hierarchy (such as a directory tree).
Qt uses the QAbstractItemModel to encapsulate the full flexibility of a tree of tables; normally, a QAbstractListModel or QAbstractTableModel suffices, hiding the complexity of the tree unless you really need it.
In most cases, you don't even need to create your own model; instead you can use a QStringListModel for a one-dimensional list of QStrings, or a QStandardItemModel for one- or two-dimensional array, as well as data structured in a hierarchy.
The two-dimensional nature of the QTableModel is strongly reminiscent of a SQL database's tables, and it almost immediately comes to mind when you have data organized in rows with different facets of the data in each column. It shouldn't, however—in a Qt table model, each cell in the table is independent of every other cell. Think of a Qt table like a financial spreadsheet (not a well-formatted list!). Instead, if you have a list of items with different data per item—say, a list of location names with latitudes and longitudes—each location is a single item in a list.
To provide access to different facets of a single item, Qt provides roles. A role is a constant in an enumeration, and models return different data depending on the role you pass when you interrogate the model. Qt defines several roles by default defined by the Qt::ItemDataRole enumeration, including:
Qt::DisplayRole, indicating the primary visible facet of a datum.Qt::DecorationRole, indicating a decoration (such as an icon) for a datum.Qt::EditRole, indicating the primary editable facet of a datum.Qt::SizeHintRole, indicating the desired size of the item for display layout purposes (this is the size the layout will try to accommodate, rather than the actual object's size).Qt::CheckStateRole, indicating whether the item is marked in some way (say, a list item bearing a check mark).
So, for example, the QListView uses the Qt::DisplayRole to indicate to the model what data is requested for display for each item. You can define your own roles, too, if you need to represent different kinds of data and find the Qt roles limiting in the kind of data being represented; just be sure that your first role has a value greater than Qt::UserRole.
When you set or get data from a model, you do so using a QModelIndex that indicates which datum you're interacting with as well as Qt's QVariant class. The QVariant class is a type-safe wrapper for most C++ and all Qt value types, including integers, floating-point numbers, and strings. You access the model's data through the data and setData methods; they use QVariant for encapsulating the actual values.
Note
There's even a way to add your own data types to those QVariant supports; see the documentation for QVariant at http://doc.qt.nokia.com/qvariant.html.
For example, here's how to access the first datum in a QStringListModel:
QStringListModel model;
...
QModelIndex index = model->createIndex(0);
QString datum = model->data(index, Qt::DisplayRole).toString();
Setting the data is similar:
QStringListModel model;
...
QModelIndex index = model->createIndex(0);
QString anEntry("hello world");
QString datum = model->setData(index,
    QVariant(anEntry),
    Qt::DisplayRole);
In addition to being able to set a datum within the model, you can manipulate the model in various ways. The most common things you're likely to want to use are:
columnCountandrowCountindicate the number of rows and columns, respectively.insertColumnandinsertColumnsinsert a column or columns after the indicated column.insertRowandinsertRowsinsert a row or rows after the indicated row.removeColumnandremoveColumnsremove a specified column or columns.removeRowandremoveRowsremove a specified row or rows.dataandsetDatalet you manipulate a specific datum at a specific index in the model.indexto create an index object that indicates a specific datum within the model.
As you manipulate a model with these methods, it emits signals so that the view or other code can be kept abreast of any changes within the model. Typically, when using a model, you don't need to worry about these signals, unless you're implementing your own model.
You needn't implement your own model most of the time. Qt also provides the QStandardItemModel, which provides a concrete implementation of a model you can use within your application for normal purposes. (We show you how to use the QStandardItemModel later in this chapter, in the section "Putting it All Together.")
Qt's view classes provide robust components that rely on a model for their data. QListView, QTableView, and QTreeView provide the fundamental UI classes many applications can use to provide a browsing metaphor for their data. These implement the abstract class QAbstractItemView, which defines the various methods, signals, and slots exposed by all view classes.
In general, you need to know very little about how a Qt view class works; it often suffices to drag one out in the GUI designer (or create one at run time, as you see later in this chapter in the section "Putting it All Together") and set its model, like this:
// In a class declaration inheriting from QMainWindow
QStandardItemModel *mModel;
QListView *mListView;
// Someplace in the GUI code
mListView = new QListView(this);
mStandardItemModel mModel = new QStandardItemModel(this);
mListView->setModel(mModel);
setCentralWidget(mListView);
Qt's design style calls for generally shallow class hierarchies, with a great deal of configurability being embedded in specific implementation classes, rather than dozens of classes providing slightly different behaviors. Thus, the QAbstractItemView has a number of properties affecting how an instance renders data, including:
alternatingRowColors, indicating that the background of rows should alternate between two colors, rather than a single color.autoScroll, indicating that the control should automatically scroll when the touch drags over the view.horizontalScrollModeandverticalScrollMode, indicating whether the view should provide scrolling in the indicated direction.selectionBehaviorindicating whether an item, row, or column can be selected.selectionMode, indicating whether one item or multiple items (perhaps contiguous) can be selected.
Unlike the classic implementation of model-view-controller, where the controller is a separate class with its own (usually application-specific) logic, Qt divides the responsibilities of the controller between the view and the application. The view handles the view-specific events, such as responding to events that would cause scrolling or item selection, and issues signals for user interaction that requires application logic, such as item activation and selection. These signals include:
activated, indicating an item has received focus.clicked, indicating that an item has been selected with the primary selector such as a touch or mouse click.doubleClicked, indicating a double-click action.pressed, indicating the beginning of a click or double-click as the item receives the initial down component of a mouse or touch.
Tip
On touch screen devices, you should always prefer clicked over the other signals. Users expect that an action should take a single touch.
In the next section, you see how wiring a signal from the QListView triggers an action when the user touches an item in the list.
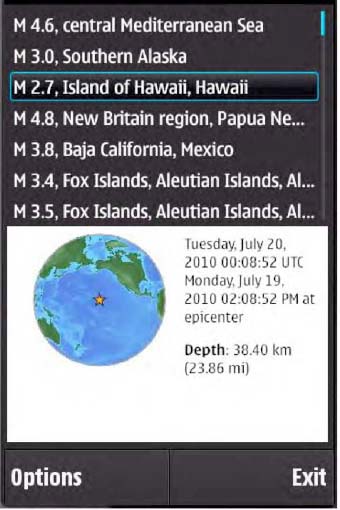
Figure 4-3 shows our first prototype sample application "Shake", which connects to a Web service provided by the United States Geological Service (USGS) to show recent earthquakes around the world. (This application doesn't fully meet the design guidelines we set out in Chapter 2; in the next chapter we'll address that.)
Let's take a closer look at the source code, calling your attention to the construction of the user interface, and its use of model-view-controller, threads, and I/O.
The user interface for our application is admittedly simple, providing a single list of recent seismic events and a region showing the details of the event you select. The class MainForm, which extends QMainWindow supports the user interface. Listing 4-4 shows the MainForm class.
Example 4.4. The class declaration for MainForm
class MainForm : public QMainWindow
{
    Q_OBJECT

public:
    MainForm(QWidget *parent = 0);
    ~MainForm();

public slots:
    void fetch();
private slots:
void handleRequestFinished();
void handleError(const QString& message);
void handleItemClicked(const QModelIndex&);
private:
WorkerThread* mBgThread;
QuakeListModel* mEventModel;
QSortFilterProxyModel* mSortedModel;
QListView* mListView;
QWebView* mItemView;
QWidget* mMainView;
};The UI itself uses a QListView to show the list of events, and a QWebView to show the results. (We talk more about the QWebView class in the next chapter.) The earthquake data is kept in the QuakeListModel, a simple subclass of QStandardItemModel that has a single helper method to permit easy storage of seismic data through a container class. In turn, the list view obtains the data through a QSortFilterProxyModel, which provides the data sorted so that the resulting list has the most recent item first. All of this is initialized in MainForm's constructor (shown in Listing 4-5).
Example 4.5. The MainForm constructor
MainForm::MainForm(QWidget *parent)
    : QMainWindow(parent)
    , mBgThread(0)
    , mEventModel(new QuakeListModel())
    , mSortedModel(new QSortFilterProxyModel(this))
    , mListView(new QListView(this))
    , mItemView(new QWebView(this))
    , mMainView(new QWidget(this))
{
    mItemView->setHtml(tr("<body><p align="center">"
        "Loading data... please wait</p></body>"));

    mSortedModel->setSourceModel(mEventModel);
    mSortedModel->setDynamicSortFilter(false);
    mSortedModel->setSortRole(QuakeListModel::When);
    mListView->setModel(mSortedModel);

    mListView->setSizePolicy(QSizePolicy::Expanding,
        QSizePolicy::Expanding);
    mItemView->setSizePolicy(QSizePolicy::Expanding,
        QSizePolicy::Expanding);

    mListView->setHorizontalScrollBarPolicy(Qt::ScrollBarAlwaysOff);

    QBoxLayout::Direction direction;
    if (height()>=width()) {
        direction = QBoxLayout::LeftToRight;
    } else {
        direction = QBoxLayout::TopToBottom;
    }
    QBoxLayout *layout = new QBoxLayout(direction, mMainView);

    layout->addWidget(mListView, 1);
layout->addWidget(mItemView, 1);
mMainView->setLayout(layout);
setCentralWidget(mMainView);
connect(mListView, SIGNAL(clicked(QModelIndex)),
this, SLOT(handleItemClicked(QModelIndex)));
fetch();
}As you see immediately, we chose to manually create the UI, rather than use Qt Creator within the Nokia Qt SDK. The reason is only to show you that you can; you could easily use the user interface you created from Chapter 4 with Qt Creator. Regardless, the code creates the two visible elements and combines them in a single widget, set to be the main widget of the QMainWindow using QMainWindow's setCentralWidget method.
Perhaps the most interesting code in the constructor is the lines that link the QuakeModel instance with the QSortFilterProxyModel instance. As the name suggests, the QSortFilterProxyModel is a model in the object-oriented sense (it inherits from QAbstractItemModel), but doesn't contain any data. Instead, it provides a view with an ordered or filtered model (hence the "proxy" in its name) created using an indicated role. Here, the code:
Tells the proxy model to use the data in the
mEventModelmodel.Says the model should be sorted on demand, not automatically when items are added or removed.
Tells the proxy model to present the data in the
mEventModelsorted by a custom role,QuakeListModel::When.
In turn, the QListView accesses the data through the proxy model; behind the scenes the proxy model does some magic with its model indexes so that the model data appears to be sorted by time.
Once the user interface component and model is initialized, the constructor invokes fetch to obtain the latest seismic data.
It's worth mentioning that in the user interface, our error handling is admittedly primitive, but demonstrates that something needs to be done in the event of an error. In our case, we simply emit an error message, which the UI will present in a dialog indicating the nature of the error (Listing 4-6).
Listing 4-7 shows the fetch method, responsible for starting the thread to fetch the data.
Example 4.7. Starting the Qt thread for network access and data parsing
void MainForm::fetch()
{
    if (!mBgThread)
        mBgThread = new WorkerThread(this, *mEventModel);
    connect(mBgThread, SIGNAL(finished()),
            this, SLOT(handleRequestFinished()));
    connect(mBgThread, SIGNAL(error(const QString&)),
            this, SLOT(handleError(const QString&)));
    mBgThread->fetch(
      "http://earthquake.usgs.gov/earthquakes/catalogs/1day-M2.5.xml"
    );
}
This code is quite simple. In addition to creating an instance of our worker thread, the code connects its signals to slots in the main view so that the main view can respond to success or failure in the attempt to obtain data from the network.
The thread itself is responsible for making the HTTP request and parsing the XML results. Construction of the thread (see Listing 4-8) initializes a hash with the XML tags we seek, and does the necessary connecting between signals and slots.
Example 4.8. Worker thread initialization
WorkerThread::WorkerThread(QObject* owner,
                           QuakeListModel& eventModel)
    : QThread(owner)
    , mCancelled(false)
    , mNetManager(0)
    , mReply(0)
    , mEventModel(eventModel)
{
    // Initialize the hashtable of tags we seek
    mXmlTags.append("id");
    mXmlTags.append("title");
    mXmlTags.append("updated");
    mXmlTags.append("summary");
    mXmlTags.append("point");
    mXmlTags.append("elev");
    mXmlTags.append("link");

    mNetManager = new QNetworkAccessManager(this);
    connect(mNetManager, SIGNAL(finished(QNetworkReply*)),
            this, SLOT(handleNetFinished(QNetworkReply*)));
}
Performing the HTTP request, done in the fetch method with the URL you pass it, is very easy. Listing 4-9 shows how it's done.
Example 4.9. Making an HTTP request
void WorkerThread::fetch(const QString& url)
{
    QNetworkReply *reply = mNetManager->get(QNetworkRequest(QUrl(url)));
    if (!reply) {
        emit error(tr("Could not contact the server"));
    }
}
It's worth noting that the QNetworkAccessManager's get method does not block; control returns to the main thread, and the manager performs the network request asynchronously. In fact, the real reason to encapsulate this part of the application in its own thread is the XML parsing, which can take a bit of time in a large document. When the network operation completes, the manager will emit the finished signal, which we handle in handleNetFinished (Listing 4-10).
Example 4.10. Handling the completion of the network transaction
void WorkerThread::handleNetFinished(QNetworkReply* reply)
{
    // Start parser by starting.
    if (reply->error() == QNetworkReply::NoError) {
        if (!this->isRunning()) {
            mReply = reply;
            start();
        }
    } else {
        emit error(tr("A network error occurred"));
        qDebug() << QString("net error %1").arg(reply->error());
    }
}The USGS data provides its data in well-formed XML. A specific seismic event might look like this:
<entry>
    <id>urn:earthquake-usgs-gov:ci:10756957</id>
    <title>M 3.8, Baja California, Mexico</title>
    <updated>2010-07-19T23:06:11Z</updated>
    <link rel="alternate" type="text/html" href="url"/>
    <link rel="related" type="application/cap+xml" href="url" />
    <summary type="html">
        <![CDATA
            html description of event
      ]]></summary>
    <georss:point>32.1465 −115.1627</georss:point>
    <georss:elev>-6300</georss:elev>
    <category label="Age" term="Past hour"/>
</entry>
This is contained within a root-level <feed> block. (For brevity, we've elided the actual URLs and HTML content describing the event.) The only catch in working with the data is that the <id> attribute uniquely identifies an event, but multiple <entry> items may have the same <id>. This can occur when the USGS provides updated information about a seismic event, such as after collecting more data and refining the estimate. Consequently, we must not only parse the XML <entry> items in the document, but also de-duplicate the data by ID, taking the most recent item when multiple items exist. Fortunately, there's an easy way to do this—accumulate the <entry> items in a hash indexed by the <id> field's value. Listing 4-11 shows the parsing and de-duplication that begins when the thread actually runs.
Example 4.11. Parsing and de-duplicating the XML results
void WorkerThread::run()
{
    QuakeEvent anEvent;
    QXmlStreamReader xml;
    QXmlStreamReader::TokenType type;
    QString fieldName;
    QString value;
    QString tag;
    QMap<QString, QuakeEvent> events;
    bool successful = false;
    bool gotValue = false;
    bool gotEntry = false;

    xml.setDevice(mReply);
    while(!xml.atEnd())
    {
        // If we've been cancelled, stop processing.
        if (mCancelled) break;

        type = xml.readNext();
        QString tag = xml.name().toString().toLower();
        switch( type )
        {
            case QXmlStreamReader::StartElement:
                {
                    gotValue = false;
                    if (tag == "entry") {
                        gotEntry = true;
                    } else if (mXmlTags.contains(tag)) {
                        fieldName = tag;
                    } else {
                        fieldName = QString();
                    }
                }
                break;
            case QXmlStreamReader::Characters:
                // Save aside any text
                if ( gotEntry && !fieldName.isEmpty() && !gotValue)
                {
                    value = xml.text().toString();
                    gotValue = true;
                }
                break;
            case QXmlStreamReader::EndElement:
                // Save aside this value
                if (gotValue && tag != "entry") {
anEvent.set(fieldName, value);
} else if (tag == "entry"){
events.insert(anEvent.id(), anEvent);
anEvent.clear();
gotEntry = false;
gotValue = false;
}
break;
default:
break;
}
}
successful = xml.hasError() ? false : true;
if (!mCancelled && successful) {
mEventModel.removeRows(0, mEventModel.rowCount());
mEventModel.insertRows(0, events.count(), QModelIndex());
int row = 0;
// Convert the hash into a list
foreach(anEvent, events) {
mEventModel.setData(row++, anEvent);
}
emit finished();
} else if (!mCancelled) {
emit error(tr("Could not interpret the server's response"));
}
}The QXMLStreamReader takes a QIODevice, so it's easily connected to either a file or a network result like this one. An event-generating stream-based parser, it's far more efficient to use than a DOM parser, although it requires a little more code. (This is a good trade-off, because neither the whole XML document nor the whole DOM must be stored in memory when using a streaming parser like this one.) In brief, we use the reader to walk through the stream a tag at a time, storing the characters bound by the tag. When the tag closes, the code looks to see if the closed tag was an entry tag. The parser accumulates data for the various sub-tags, creating a QuakeEvent in the hash for each <entry> tag indexed by its <id> tag. Once the parser completes scanning all tags, the code converts the hash to a list, enumerating the hash's entries and inserting them into the model. (Because our list view uses a proxy model that performs the sorting, it doesn't matter what order the hash's entries are inserted in the model.) After updating the model, the thread emits a finished signal so the UI knows that the download and parsing work is complete.
Tip
A more robust sample application might store the previous results in a file so that data would be immediately visible when starting the application, and then replace the older data with that fetched from the network. See if you can make the modifications yourself. (Hint: Look at where the data is parsed.)
The QuakeEvent class is a data container and data helper class; it handles some of the messier bits of parsing the XML, such as converting the USGS time stamps into QDateTime instances that can be used elsewhere in the application. Listing 4-12 shows the class definition for QuakeEvent.
Example 4.12. The QuakeEvent class, representing a single seismic event
class QuakeEvent {
public:
    QuakeEvent();

    QString id() const;
    QString summary() const;
    QDateTime when() const;
    QString where() const;
    qreal magnitude() const;
    QPair<qreal, qreal> position() const;
    qreal elevation() const;
    QString html() const;

    // Used by the XML parser
    void set(const QString& name, const QString& value);
    QString get(const QString& name) const;

    bool isEmpty() const;
    void clear();

    // For use when sorting by time
    bool operator<(const QuakeEvent& b) const;

private:
    QMap<QString, QString> mData;
    static bool mRegisterMetaType;
};
The class itself stores the various fields of data in a hash table, and the accessor methods do a bit of necessary screen scraping to obtain semantically valid values for each field. For example, Listing 4-13 shows the code necessary to extract a numerical magnitude and QString containing the human-readable location for a single event.
Example 4.13. Screen scraping the magnitude and location from the USGS data
qreal QuakeEvent::magnitude() const
{
    QString title = mData.value("title");
    // Format of title is "M 2.6, Baja California, Mexico"
    QString mag = title.mid(2, 3);
    return mag.toFloat();
}

QString QuakeEvent::where() const
{
    QString title = mData.value("title");
    // Format of title is "M 2.6, Baja California, Mexico"
    QString where = title.mid(title.indexOf(", ")+2);
    return where;
}
Similar—albeit more complex—work is done to render the dates to a format usable by Qt for sorting quake events.
Note
In a perfect world, there'd be no need for screen-scraping. Instead, the XML schema would provide specific tags for each bit of data your application requires. Hopefully, you get to define both sides of the transaction, or at least provide some input in the process of determining what data the client must parse. Screen-scraping is brittle and subject to potential failure; we use it here to show you how to obtain meaningful data from a Web service as a compromise between looking for a data service ideal to our task and free for everyone to use.
The great thing about working with the MVC paradigm is that nothing special is required to display updated content—stick some data in the model, and poof! The view updates itself. Consequently, there's little need for the handleRequestFinished slot, shown in Listing 4-14.
Example 4.14. Sorting the network results and helping the user
void MainForm::handleRequestFinished() {
    mSortedModel->sort(0, Qt::DescendingOrder);
    mItemView->setHtml(tr("<body><p align="center">"
        "Select an item for more details.</p></body>"));
}
This method simply performs the deferred sorting of the data by recency, and provides a bit of help text in the QWebView. A more complex application might need to do more here, such as manage a distraction graphic.
In the section "Implementing the Application User Interface," in the MainForm's constructor, we connected a slot to the mListView's clicked method. Listing 4-15 shows this slot.
Example 4.15. Displaying more data associated with an item
void MainForm::handleItemClicked(const QModelIndex& which)
{
    QVariant html = mSortedModel->data(which,
                                       QuakeListModel::Description);
    qDebug() << html.value<QString>();
    mItemView->setHtml(html.value<QString>());
}
This method just sets the HTML for the QWebView to the verbose description of the seismic event, letting the user see a small map indicating the event's position and more information about the event.
In this chapter, we've touched on a number of aspects of Qt programming, including:
Qt's introduction of signals and slots to facilitate decoupled communication between different objects.
Qt's object model, including object properties that can be queried, hierarchical memory management, and resource management.
Qt's collection classes, including lists and associative arrays (hashes).
Using Qt's
QIODevicewith other classes for reading and writing data.Qt's facility for providing platform threads to multithreaded applications.
Qt's support for MVC programming using a data model and view to ease the construction of data-centric applications.
With this information in hand and perhaps an occasional peek at the Qt documentation, you're on your way to building many kinds of applications that obtain or process data and present the results to users. In the next chapter, we'll build on this information to polish the application you've already seen by showing you how to include menu actions and multiple views within your application.