
C H A P T E R 7
Database Integration I
In this chapter, we'll primarily be dealing with NoSQL databases. The most popular among NoSQL databases are MongoDB, CouchDB, Google Big Table, and Cassandra, but there are others. NoSQL databases, as the name implies, are not classic SQL databases and do not implement the ACID properties. ACID stands for Atomicity, Consistency, Isolation, and Durability, which are traditional features of RDBMS (Relational Database Management System) transactions.
NoSQL databases do not have a transaction management layer, commits, or the ability to roll transactions back. They are also schema free, which means that they do not conform to the traditional schema-table-column pattern. Instead of tables, they have collections, which are different from tables because they can hold a variety of rows or documents, as NoSQL databases call them. The difference between rows and documents is that rows have a fixed structure, defined by the relational schema, and documents do not. Also, NoSQL databases do not store rows in the traditional sense; they store documents. Documents are described as objects in the JSON (JavaScript Object Notation) notation.
Here is an example of a JSON document:
var= { "key1":"value1",

           "key2": { "key3":"value3" },

           "key4":["a1","a2","a3"...],

          …

         }
This format is one of many developed to shorten the lengthy and verbose XML descriptions. NoSQL databases mostly use JavaScript as an internal database language, in conjunction with JSON object notation used for the document manipulation. NoSQL databases are created with two goals in mind:
- Raw performance and scalability
- Low administrative overhead
Typically, searching within a single collection is blindingly fast, but there are no joins. In other words, joins are delegated to the application. The speed is achieved by using Google's patented map-reduce algorithm, which enables NoSQL databases to be highly scalable and usable on loosely coupled cluster systems. Google's algorithm enables those databases to efficiently divide work among several machines that don't share anything except a network connection.
These databases are very new. They came into use in 2009, and there are no standards governing the dialect they use to access database information. Typically, they have the following commands, implemented as calls to their API (Application Programming Interface): insert, find, findOne, update, and delete. The exact syntax and the options available for each of these calls vary between databases. Also, application generators, like Cake or Symfony, are not well tested with the vast majority of these databases, which makes application development a bit harder.
Let's go to back to the ACID requirements for a moment. They are as follows:
- Every transaction succeeds or fails as a whole. If a transaction fails, the state of the database must be as if the transaction had never taken place (Atomicity).
- Every transaction must only see the data that was committed before the transaction started (Consistency).
- Users don't see each other's changes before the changes are committed (Isolation).
- Once committed, the changes are permanent. In particular, the changes must not be lost, even if the database system crashes (Durability).
ACID requirements are followed by all major relational databases and are modeled after the banking business. A database transaction in the Relational Database Management System (RDBMS) world is modeled after a financial transaction in the real world. All of the above applies for paying bills with a check. If there are sufficient funds, the transaction will update both banking accounts – that of the payer and the payee; without sufficient funds, neither account will be updated. Each transaction will only see the state of the bank account at the moment it starts. Transactions by other users have no influence over each other, and once the payment is made, there should be a permanent record. Not following the ACID rules makes NoSQL databases ill-suited for financial transactions or any other business process with similar requirements. Also, the schema-free nature of the NoSQL databases makes them hard to use with object relational mappers like Hibernate, which slows down application development. NoSQL databases are best suited for huge data warehouse type databases, where they shine because of their speed and scalability. Of course, as I said before, these databases are very new, so one should expect an adventure in terms of debugging.
Introduction to MongoDB
MongoDB is the most popular among the NoSQL databases, due to its ease of installation, raw speed, and the number of features supported. Installation of PHP interface for MongoDB is extremely easy, especially on Unix or Linux. One just executes pecl install mongo. The result looks like the following:
pecl install mongo

downloading mongo-1.1.3.tgz ...

Starting to download mongo-1.1.3.tgz (68,561 bytes)

................done: 68,561 bytes

18 source files, building

running: phpize

Configuring for:

PHP Api Version:         20041225

Zend Module Api No:      20060613

Zend Extension Api No:   220060519

building in /var/tmp/pear-build-root/mongo-1.1.3
….............................

(a lot of compilation messages)

Build process completed successfully

Installing '/usr/lib/php5/20060613+lfs/mongo.so'

install ok: channel://pecl.php.net/mongo-1.1.3

configuration option "php_ini" is not set to php.ini location

You should add "extension=mongo.so" to php.ini
The installation is complete. For MS Windows, it is even easier, as an already linked copy can be downloaded from www.mongodb.org. All that is needed is to put it into the right place and update the php.ini file.
Once that is done, we have a bunch of classes at our disposal. MongoDB doesn't follow the SQL standards, so its data types are a bit different. Every MongoDB data type is defined as a PHP class. The reference information for the MongoDB classes can be found on the PHP website at http://us3.php.net/manual/en/book.mongo.php. In addition to the data types, there are also classes that describe connections, collections, cursors, and exceptions. Collections are roughly analogous to tables in the RDBMS world. A NoSQL collection is a named collection of documents that doesn't necessarily have the same structure. A collection can be indexed or partitioned (“sharded”), if so desired. Collections are contained in the physical objects named “databases,” which are implemented as collections of database files. If the database or the collection does not exist at the time of insert, they're automatically created. This is what a completely empty MongoDB installation looks like in the MongoDB command line shell mongo:
mongo

MongoDB shell version: 1.6.5

connecting to: test

> show dbs

admin

local

>
The show dbs command will show us available databases.
This book is about the PHP language, not about MongoDB, so I will not get into the details of using the command line interface to MongoDB. There are many MongoDB tutorials available on the Internet. The best and the most complete is probably the one on the MongoDB website itself.
Now, let's see the first PHP script, which will create a database named “scott” and a collection named “emp.” The collection will then be populated by 14 rows. The collection describes employees of a small company. See Listing 7-1.
Listing 7-1. PHP Script That Will Create a Database Named “scott” and a Collection Named “emp”
<?php

$host = 'localhost:27017';

$dbname = 'scott';

$colname = "emp";


$EMP = array(

    array("empno" => 7369, "ename" => "SMITH", "job" => "CLERK",

          "mgr" => 7902,"hiredate" => "17-DEC-80", "sal" => 800,

          "deptno" => 20),
    array("empno" => 7499, "ename" => "ALLEN", "job" => "SALESMAN",

          "mgr" => 7698, "hiredate" => "20-FEB-81", "sal" => 1600,

          "comm" => 300,"deptno"=>30),

    array("empno"=>7521,"ename"=>"WARD","job"=>"SALESMAN","mgr"=>7698,

          "hiredate"=>"22-FEB-81","sal"=>1250,"comm"=>500, "deptno" => 30),

    array("empno" => 7566, "ename" => "JONES", "job" => "MANAGER",

          "mgr" => 7839, "hiredate" => "02-APR-81", "sal" => 2975,

          "deptno" => 20),

    array("empno" => 7654, "ename" => "MARTIN", "job" => "SALESMAN",

          "mgr" => 7698, "hiredate" => "28-SEP-81", "sal" => 1250,

          "comm" => 1400,"deptno"=>30),

    array("empno"=>7698,"ename"=>"BLAKE","job"=>"MANAGER","mgr"=>7839,

          "hiredate"=>"01-MAY-81","sal"=>2850,"deptno"=>30),

    array("empno"=>7782,"ename"=>"CLARK","job"=>"MANAGER","mgr"=>7839,

          "hiredate"=>"09-JUN-81","sal"=>2450,"deptno"=>10),

    array("empno"=>7788,"ename"=>"SCOTT","job"=>"ANALYST","mgr"=>7566,

          "hiredate"=>"19-APR-87","sal"=>3000,"deptno"=>20),

    array("empno"=>7839,"ename"=>"KING","job"=>"PRESIDENT",

          "hiredate" => "17-NOV-81", "sal" => 5000, "deptno" => 10),

    array("empno" => 7844, "ename" => "TURNER", "job" => "SALESMAN",

          "mgr" => 7698, "hiredate" => "08-SEP-81", "sal" => 1500,

           "comm" => 0,"deptno"=>30),

    array("empno"=>7876,"ename"=>"ADAMS","job"=>"CLERK","mgr"=>7788,

          "hiredate"=>"23-MAY-87","sal"=>1100,"deptno"=>20),

    array("empno"=>7900,"ename"=>"JAMES","job"=>"CLERK","mgr"=>7698,

           "hiredate"=>"03-DEC-81","sal"=>950,"deptno"=>30),

    array("empno"=>7902,"ename"=>"FORD","job"=>"ANALYST","mgr"=>7566,

          "hiredate"=>"03-DEC-81","sal"=>3000,"deptno"=>20),

    array("empno"=>7934,"ename"=>"MILLER","job"=>"CLERK","mgr"=>7782,

          "hiredate"=>"23-JAN-82","sal"=>1300,"deptno"=>10));

try {

    $conn=new Mongo($host);

    $db=$conn->selectDB($dbname);

    $coll=$conn->selectCollection($dbname,$colname);

    foreach ($EMP as $emp) {

        $coll->insert($emp, array('safe'=>true));

    }

}

catch(MongoException $e) {

    print "Exception:
";

    die($e->getMessage()."
");

}

?>
The structure of the code is extremely simple. The code defines the host name and port to connect to (localhost:27017), the database name (“scott”) and the collection name (“emp”).
![]() Note There is no username or password, although it is possible to define them. Initially, the installation is wide open to anyone who wants to access it. It is, however, possible to secure it and require the user and password authentication.
Note There is no username or password, although it is possible to define them. Initially, the installation is wide open to anyone who wants to access it. It is, however, possible to secure it and require the user and password authentication.
The array $EMP defines all the employees for the small company. The array has nested arrays as elements, because MongoDB documents are represented by PHP associative arrays. Please note that the array attributes are not homogeneous; some elements have comm attribute, some do not. Also, employee “KING” doesn't have the mgr attribute. There is no need for NULLS, empty attributes, or other placeholders. MongoDB collections can store heterogeneous elements. Both the database and the collection will be created when the first insert is done. The best place to see exactly what happens is the MongoDB log file. Its location depends on the installation. On Linux, it usually resides in the “log” sub-directory of the main MongoDB directory. Here is what shows up in the MongoDB logfile when the script above is run:
Thu Jan  6 16:15:35 [initandlisten] connection accepted from 127.0.0.1:29427 #3

Thu Jan  6 16:15:35 allocating new datafile /data/db/scott.ns, filling with zeroes...

Thu Jan  6 16:15:35 done allocating datafile /data/db/scott.ns, size: 16MB,  took 0 secs

Thu Jan  6 16:15:35 allocating new datafile /data/db/scott.0, filling with zeroes...

Thu Jan  6 16:15:35 done allocating datafile /data/db/scott.0, size: 64MB,  took 0 secs

Thu Jan  6 16:15:35 allocating new datafile /data/db/scott.1, filling with zeroes...

Thu Jan  6 16:15:35 done allocating datafile /data/db/scott.1, size: 128MB,  took 0 secs

Thu Jan  6 16:15:35 [conn3] building new index on { _id: 1 } for scott.emp

Thu Jan  6 16:15:35 [conn3] done for 0 records 0.001secs

Thu Jan  6 16:15:35 [conn3] end connection 127.0.0.1:29427
As you can see from the output, our MongoDB installation now has a new database. No special privileges were needed to do that. The MongoDB shell now shows a different picture:
> show dbs

admin

local

scott

> use scott

switched to db scott

> show collections

emp

system.indexes

>
The “scott” database is now present in the output and the show collections command displays the collection called emp. Let's see few more things that can be done from the shell:
> db.emp.ensureIndex({empno:1},{unique:true});

>  db.emp.ensureIndex({ename:1});

> db.emp.count();

14
Those three commands will create a unique index on the empno attribute, which will prevent two rows from having the same value of the empno attribute, create a non-unique index on the ename attribute, and count the documents in our emp collection. We have 14 documents in the emp collection, not 14 rows. Remember in the case of NoSQL databases, we are talking about documents, not rows.
> db.emp.find({ename:"KING"});

{ "_id" : ObjectId("4d2630f7da50c38237000008"), "empno" : 7839, "ename" : "KING", "job" :

 "PRESIDENT", "hiredate" : "17-NOV-81", "sal" : 5000, "deptno" : 10 }

>
Here we have actually looked for the document with ename attribute equal to “KING”, and MongoDB has returned us the document with the desired attribute. Note the _id attribute in the result, which wasn't present in the original $EMP array. That is object id, assigned to each document in the database by MongoDB, and is guaranteed to be unique across the entire installation, not just within the single database. It can be used to search the specific document:
> db.emp.find({"_id":ObjectId("4d2630f7da50c3823700000d")});

{ "_id" : ObjectId("4d2630f7da50c3823700000d"), "empno" : 7934, "ename" : "MILLER",

"job" : "CLERK", "mgr" : 7782, "hiredate" : "23-JAN-82", "sal" : 1300, "deptno" : 10 }
Finally, let's see all the documents in our collection:
> db.emp.find();

{ "_id" : ObjectId("4d2630f7da50c38237000000"), "empno" : 7369, "ename" : "SMITH",

 "job" : "CLERK", "mgr" : 7902, "hiredate" : "17-DEC-80", "sal" : 800, "deptno" : 20 }

{ "_id" : ObjectId("4d2630f7da50c38237000001"), "empno" : 7499, "ename" : "ALLEN",

 "job" : "SALESMAN", "mgr" : 7698, "hiredate" : "20-FEB-81", "sal" : 1600, "comm" : 300,

 "deptno" : 30 }

{ "_id" : ObjectId("4d2630f7da50c38237000002"), "empno" : 7521, "ename" : "WARD",

 "job" : "SALESMAN", "mgr" : 7698, "hiredate" : "22-FEB-81", "sal" : 1250, "comm" : 500,

 "deptno" : 30 }

{ "_id" : ObjectId("4d2630f7da50c38237000003"), "empno" : 7566, "ename" : "JONES",

 "job" : "MANAGER", "mgr" : 7839, "hiredate" : "02-APR-81", "sal" : 2975, "deptno" : 20 }

{ "_id" : ObjectId("4d2630f7da50c38237000004"), "empno" : 7654, "ename" : "MARTIN",

 "job" : "SALESMAN", "mgr" : 7698, "hiredate" : "28-SEP-81", "sal" : 1250, "comm" : 1400,v

 "deptno" : 30 }
{ "_id" : ObjectId("4d2630f7da50c38237000005"), "empno" : 7698, "ename" : "BLAKE",

 "job" : "MANAGER", "mgr" : 7839, "hiredate" : "01-MAY-81", "sal" : 2850, "deptno" : 30 }

{ "_id" : ObjectId("4d2630f7da50c38237000006"), "empno" : 7782, "ename" : "CLARK",

 "job" : "MANAGER", "mgr" : 7839, "hiredate" : "09-JUN-81", "sal" : 2450, "deptno" : 10 }

{ "_id" : ObjectId("4d2630f7da50c38237000007"), "empno" : 7788, "ename" : "SCOTT",

 "job" : "ANALYST", "mgr" : 7566, "hiredate" : "19-APR-87", "sal" : 3000, "deptno" : 20 }

{ "_id" : ObjectId("4d2630f7da50c38237000008"), "empno" : 7839, "ename" : "KING",

 "job" : "PRESIDENT", "hiredate" : "17-NOV-81", "sal" : 5000, "deptno" : 10 }

{ "_id" : ObjectId("4d2630f7da50c38237000009"), "empno" : 7844, "ename" : "TURNER",

 "job" : "SALESMAN", "mgr" : 7698, "hiredate" : "08-SEP-81", "sal" : 1500, "comm" : 0,

 "deptno" : 30 }

{ "_id" : ObjectId("4d2630f7da50c3823700000a"), "empno" : 7876, "ename" : "ADAMS",

 "job" : "CLERK", "mgr" : 7788, "hiredate" : "23-MAY-87", "sal" : 1100, "deptno" : 20 }

{ "_id" : ObjectId("4d2630f7da50c3823700000b"), "empno" : 7900, "ename" : "JAMES",

 "job" : "CLERK", "mgr" : 7698, "hiredate" : "03-DEC-81", "sal" : 950, "deptno" : 30 }

{ "_id" : ObjectId("4d2630f7da50c3823700000c"), "empno" : 7902, "ename" : "FORD",

 "job" : "ANALYST", "mgr" : 7566, "hiredate" : "03-DEC-81", "sal" : 3000, "deptno" : 20 }

{ "_id" : ObjectId("4d2630f7da50c3823700000d"), "empno" : 7934, "ename" : "MILLER",

 "job" : "CLERK", "mgr" : 7782, "hiredate" : "23-JAN-82", "sal" : 1300, "deptno" : 10 }
Our collection now has a unique index. If we attempted to re-execute the script from the Listing 7-1, the result would look like this:
Exception:

E11000 duplicate key error index: scott.emp.$empno_1  dup key: { : 7369 }
If there wasn't a safe argument to the insert call, the exception would have not been thrown. That is a fairly practical thing when loading data into an already existing collection with the unique index. Also, using safe means that every insert will wait until all the previous inserts are physically written to the database. In other words, our little script would result in at least one I/O per document, which may be an unacceptable performance penalty for large data loads. MongoDB is most often used for data warehouses where data loads are frequently huge – up to tens of millions of documents. Using safe writes might not be such a great idea in that case. The usual practice is to insert just the last document using safe, which will greatly improve the performance. The safe argument can also be used to specify the number of slaves that must have the information before the insert is considered complete, but the complexities of replication and cluster installation are beyond the scope of this book.
Querying MongoDB
Now, let's do some querying. Listing 7-2 is the first and most basic example. As stated before, MongoDB is not a SQL database, so the syntax will look unfamiliar to those who have never worked with a NoSQL database before.
Listing 7-2. A Basic Example of Querying MongoDB
<?php

$host = 'localhost:27017';

$dbname = 'scott';

$colname = "emp";

try {

    $conn=new Mongo($host);

    $db=$conn->selectDB($dbname);

    $coll=$conn->selectCollection($dbname,$colname);

    $cursor = $coll->find(array("deptno"=>20));

    $cursor->sort(array("sal"=>1));

    foreach($cursor as $c) {

        foreach($c as $key => $val) {

            if ($key != "_id") { print "$val	"; }

        }

        print "
";

    }

}
catch(MongoException $e) {

    print "Exception:
";

    die($e->getMessage()."
");

}

?>
This script introduces the cursor object, as returned by the find method. Cursor is just an iterative object (implementing the interface “Iterator”), representing results of a query and which can be used in the foreach loop, in an array-like fashion. The elements of this quasi-array are documents returned by the query. Each document is an associative array, used by PHP to represent MongoDB documents. When this script is executed, the output will look like this:
7369    SMITH           CLERK           7902    17-DEC-80       800     20

7876    ADAMS           CLERK           7788    23-MAY-87       1100    20

7566    JONES           MANAGER         7839    02-APR-81       2975    20

7788    SCOTT           ANALYST         7566    19-APR-87       3000    20

7902    FORD            ANALYST         7566    03-DEC-81       3000    20
Only the employees from the deptno=20 are returned, as this was the condition of our query. The documents are then sorted by salary (the sal attribute). The query is not actually executed until the foreach loop. To retrieve all the documents, one would simply use the find() method without arguments.
This was a very simple query, asking for all documents having the deptno attribute equal to 20. MongoDB can do much more than that. MongoDB query can skip specified number of documents and limit the number of documents returned by the query. For those who have worked with open source databases, that is completely analogous to MySQL or PostgreSQL limit and offset query options. An example of such query syntax would look like this:
$cursor = $coll->find()->skip(3)->limit(5);
If that was put into the script in Listing 7-2, instead of the line that specifies the deptno=20 criteria, the result would look like this:
7521    WARD    SALESMAN        7698    22-FEB-81       1250    500     30

7654    MARTIN  SALESMAN        7698    28-SEP-81       1250    1400    30

7934    MILLER  CLERK           7782    23-JAN-82       1300    10

7844    TURNER  SALESMAN        7698    08-SEP-81       1500    0       30

7499    ALLEN   SALESMAN        7698    20-FEB-81       1600    300     30
The first three documents were skipped, and only five documents were returned. So far, we have seen only a simple equality condition. The next query would return all the documents with the sal attribute greater than 2900:
$cursor = $coll->find(array("sal"=> array('$gt'=>2900)));
Note the $gt in the nested array. MongoDB has the operators $lt, $gt, $lte, $gte, and $ne, which stand for “less than,” “greater than,” “less than or equal,” “greater than or equal,” and “not equal,” respectively. The syntax for those operators is simple: an associative array with an argument is put in place of the plain value, just like in the line above. The documents in the cursor can also be counted, using the count() function, like this:
printf("%d documents were extracted.
",$cursor->count());
Please note that the skip and limit options will not change the count. In other words, in the line that says $cursor = $coll->find()->skip(3)->limit(5), the cursor count would still be 14. MongoDB also knows how to do an in query. The following query will return all documents with the “deptno” equal to 10 or 20:
$cursor = $coll->find(array("deptno"=> array('$in'=>array(10,20))));
Of course, the same syntax also applies to the $nin (“not in”) operator. It is also possible to do exists queries. The following line will only return documents which have the comm (as in “commission”) attribute:
$cursor = $coll->find(array("comm"=> array('$exists'=>true)));
Exactly the opposite line below will only return documents which do not have the comm attribute:
$cursor = $coll->find(array("comm"=> array('$exists'=>false)));
MongoDB can also use regular expressions for queries. Listing 7-3 will only return the documents of the employees hired in December.
Listing 7-3. MongoDB Can Use Regular Expressions for Queries
<?php

$host = 'localhost:27017';

$dbname = 'scott';

$colname = "emp";

try {

    $conn=new Mongo($host);

    $db=$conn->selectDB($dbname);

    $coll=$conn->selectCollection($dbname,$colname);

    $cursor = $coll->find(array("hiredate"=>

                                new MongoRegex("/d{2}-dec-d{2}/i")));

    $cursor->sort(array("deptno"=>1,"sal"=>1));

    $cursor->sort(array("sal"=>1));

    foreach($cursor as $c) {

        foreach($c as $key => $val) {

            if ($key != "_id") { print "$val	"; }

        }

        print "
";

    }

    printf("%d documents were extracted.
",$cursor->count());


}

catch(MongoException $e) {

    print "Exception:
";

    die($e->getMessage()."
");

}

?>
The regular expression /d{2}-dec-d{2}/i has the same syntax as the PHP preg variety of regular expressions. This particular regular expression is translated like this: two digits for the day of the month (d{2}), followed by the string -dec-, followed by another two digits, signifying year. The /i at the end of the regular expression means that the expression is not case sensitive. In particular, both dec and DEC will be matched. The execution of that script will produce the following result:
7369    SMITH   CLERK           7902    17-DEC-80       800     20

7900    JAMES   CLERK           7698    03-DEC-81       950     30

7902    FORD    ANALYST         7566    03-DEC-81       3000    20

3 documents were extracted.
Of course, it is possible to do the exact opposite, to match everything that doesn't conform to the regular expression. The following code snippet will do just that:
$cursor = $coll->find(array("hiredate"=>

                             array('$not' =>

                                    new MongoRegex("/d{2}-dec-d{2}/i"))));
Please observe that we are using MongoRegex type to let MongoDB know that this is a regular expression. The classes for types were mentioned in the beginning of this chapter. This is one of them. The MongoDate class will be demonstrated when we turn our attention to updating MongoDB. Finally, MongoDB also has $where operator, which uses JavaScript syntax:
    $cursor = $coll->find(array('$where'=>

                                'this.deptno >= 10 & this.deptno<=20'));
The keyword this in this expression is roughly analogous to the variable $this in PHP; it points to the current instance of the class, currently in focus. JavaScript and PHP are both object oriented, with similar syntax.
So far, we have concentrated on how to locate the desired documents. We can also define which attributes, also known as fields, will be returned in the result set. In Listing 7-4, we can get rid of that pesky checking for the object id, which would otherwise make our output look ugly. In the Listing 7-4 script, there is no longer a need for checking whether the returned field is the object id.
Listing 7-4. Define Which Attributes Will Be Returned in the Result Set
<?php

$host = 'localhost:27017';

$dbname = 'scott';

$colname = "emp";

try {

    $conn=new Mongo($host);

    $db=$conn->selectDB($dbname);

    $coll=$conn->selectCollection($dbname,$colname);

    $cursor = $coll->find(array('$where'=>

                                'this.deptno >= 10 & this.deptno<=20'));

    $cursor->sort(array("deptno"=>1,"sal"=>1));

    $cursor->fields(array("ename"=>true,

                          "job"=>true,

                          "deptno"=>true,

                          "hiredate"=>true,

                          "sal"=>true,

                          "_id"=>false));

    foreach($cursor as $c) {

        foreach($c as $key => $val) {

            print "$val	";

        }

        print "
";

    }
    printf("%d documents were extracted.
",$cursor->count());


}

catch(MongoException $e) {

    print "Exception:
";

    die($e->getMessage()."
");

}

?>
In the current version of MongoDB, it is not possible to mix field inclusion and exclusion, except for the object id. Object id would still show, unless it was explicitly excluded. However, the ugly if ($key != "_id") part is no longer needed. Here is the output of that script:
MILLER          CLERK           23-JAN-82       1300    10

CLARK           MANAGER         09-JUN-81       2450    10

KING            PRESIDENT       17-NOV-81       5000    10

SMITH           CLERK           17-DEC-80       800     20

ADAMS           CLERK           23-MAY-87       1100    20

JONES           MANAGER         02-APR-81       2975    20

SCOTT           ANALYST         19-APR-87       3000    20

FORD            ANALYST         03-DEC-81       3000    20

8 documents were extracted.
Updating MongoDB
This part of the chapter will show you how to update MongoDB. The syntax is trivial and straightforward, so I will also mention some design issues in the realm of the data warehouses. Our little collection has served us well, but it has some shortcomings, too. First, the hiredate attribute is stored as a string, which would make sorting documents by date almost impossible. Second, MongoDB cannot do joins, so we must include the department information into our little collection. The department number is much less clear and understandable than the department name and location. MongoDB is not a relational database, so we have to “denormalize” it. In the relational world, the design would look like Figure 7-1.
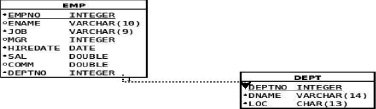
Figure 7-1. MongoDB Collection Information Design
As a matter of fact, those two tables should be easily recognizable to anyone who has ever attended an Oracle course. Because there are no joins possible in MongoDB, the best thing to do is simply to put the information from both of the tables in Figure 7-1 into a single collection. That is what is known as denormalization, and it is a very common practice in the realm of the data warehouses that are built on all kinds of databases, not just MongoDB. The good news is that with MongoDB, no complex alter table is needed to achieve that; all that we need is to update the documents themselves. Listing 7-5 shows the script that does all of these updates.
Listing 7-5. The Script to Update the Documents
<?php

$host = 'localhost:27017';

$dbname = 'scott';

$colname = "emp";

try {

    $conn=new Mongo($host);

    $db=$conn->selectDB($dbname);

    $coll=$conn->selectCollection($dbname,$colname);

    $cursor = $coll->find();

    foreach($cursor as $c) {

        switch($c["deptno"]) {

            case 10:

                $c["dname"]="ACCOUNTING";

                $c["loc"]="NEW YORK";

                break;

            case 20:

                $c["dname"]="RESEARCH";

                $c["loc"]="DALLAS";

                break;

            case 30:

                $c["dname"]="SALES";

                $c["loc"]="CHICAGO";

                break;

            case 40:

                $c["dname"]="OPERATIONS";

                $c["loc"]="BOSTON";

                break;

        }

        $c["hiredate"]=new MongoDate(strtotime($c["hiredate"]));

        $coll->update(array("_id"=>$c["_id"]),$c);

    }


}

catch(MongoException $e) {

    print "Exception:
";

    die($e->getMessage()."
");

}

?>
The first thing to notice is that the update method belongs to the collection class, not to the cursor class. The cursor class was only used to loop through the collection and to prepare the values for the update. The update itself takes the following arguments: the criteria to locate the documents to be updated, the actual document that will be written in their place, and the options array. The update method also supports safe option, just like the insert method. If the script in Listing 7-2 was re-executed, it would show us unintelligible, large numbers in place of our once pretty hiredate attribute. MongoDB stores the dates as milliseconds since the epoch. The epoch is, of course, 01-JAN-1970 00:00:00. If we use the mongo shell instead of the script in Listing 7-2, the result looks like this:
> db.emp.find({"deptno":10});

{ "_id" : ObjectId("4d2630f7da50c38237000006"), "empno" : 7782, "ename" : "CLARK",

 "job" : "MANAGER", "mgr" : 7839, "hiredate" : "Tue Jun 09 1981 00:00:00 GMT-0400 (EDT)",

 "sal" : 2450, "deptno" : 10, "dname" : "ACCOUNTING", "loc" : "NEW YORK" }

{ "_id" : ObjectId("4d2630f7da50c38237000008"), "empno" : 7839, "ename" : "KING",

 "job" : "PRESIDENT", "hiredate" : "Tue Nov 17 1981 00:00:00 GMT-0500 (EST)", "sal" : 5000,

 "deptno" : 10, "dname" : "ACCOUNTING", "loc" : "NEW YORK" }

{ "_id" : ObjectId("4d2630f7da50c3823700000d"), "empno" : 7934, "ename" : "MILLER",

 "job" : "CLERK", "mgr" : 7782, "hiredate" : "Sat Jan 23 1982 00:00:00 GMT-0500 (EST)",

 "sal" : 1300, "deptno" : 10, "dname" : "ACCOUNTING", "loc" : "NEW YORK" }

>
The mongo shell reveals that the hiredate attribute has all the characteristics of a proper date. We only need to format it properly and our little script will be perfect. The description of the MongoDate class at www.php.net shows that MongoDate has two public properties: sec for seconds since the epoch, and usec for the milliseconds since the epoch. We can now use the built-in function strftime to properly format the result, like this:
foreach($c as $key => $val) {

        if ($val instanceof MongoDate) {

            printf("%s	",strftime("%m/%d/%Y",$val->sec));

        } else { print "$val	"; }

}
With this modification, the script in Listing 7-4 will now produce the readable and expected output:
MILLER          CLERK           01/23/1982      1300    10

CLARK           MANAGER         06/09/1981      2450    10

KING            PRESIDENT       11/17/1981      5000    10

SMITH           CLERK           12/17/1980      800     20

ADAMS           CLERK           05/23/1987      1100    20

JONES           MANAGER         04/02/1981      2975    20

SCOTT           ANALYST         04/19/1987      3000    20

FORD            ANALYST         12/03/1981      3000    20

8 documents were extracted.
With the hiredate attribute stored like the proper date/time type, it is now possible to sort documents by date and obtain the proper temporal ordering. Also, our emp collection now contains the information about the department, which is much more useful than just a number. We have just taken the first step toward building the proper data warehouse.
Aggregation in MongoDB
The proper data warehouses are, of course, used for various types of trending and aggregation. We looked at the various techniques for querying MongoDB, but nothing so far resembles group by, sum, and other group functions present in the relational database world. We keep comparing MongoDB to relational databases because MongoDB is a newcomer in this realm; it's a database with the specific purpose of easier creation of data warehouses. Relational databases were used to operate data warehouses long before MongoDB, so a comparison of the available tools is completely justified. One of the questions that a traditional data warehouses would have to answer would be to calculate the sum of salaries per department.
MongoDB isn't a relational database, so the traditional select deptno,sum(sal) from emp group by deptno answer is not applicable. MongoDB uses Google map-reduce framework to achieve the same thing. This framework first divides the task among the “workers” (this it the “map” phase) and then processes the output of the “workers” to produce the requested information; this is the “reduce” phase. MongoDB passes the JavaScript functions to the worker processes, an approach that is even more powerful than the fixed syntax group functions like SUM or COUNT. Of course, the downside is that the full use of the map/reduce framework requires knowledge of JavaScript. JavaScript as such is beyond the scope of this book, so only the most basic examples emulating the SUM, COUNT, and AVG functions in the relational databases will be discussed. Also, there is one more important limitation of MongoDB: as of now, all existing JavaScript engines are single threaded, which means that, in order to use parallelism, one needs to configure sharding, which is the MongoDB version of partitioning the database in multiple data sets, across multiple nodes, in a shared-nothing cluster. This limitation is likely to be removed in the future releases.
The next script will retrieve the sum of salaries, embodied in the sal attribute or our emp collection, along with the number of employees per department and the average salary for the department. The script uses the group method, which belongs to the collection class. Listing 7-6 shows the script.
Listing 7-6. Script to Retrieve the Sum of the Salaries, the Number of Employees per Department, and the Average Salary for the Department
<?php

$host = 'localhost:27017';

$dbname = 'scott';

$colname = "emp";

try {

    $conn = new Mongo($host);

    $db = $conn->selectDB($dbname);

    $coll = $conn->selectCollection($dbname, $colname);

    $keys = array("deptno" => 1);

    $initial = array('sum' => 0, 'cnt' => 0);

    $reduce = new MongoCode('function(obj,prev) {  prev.sum += obj.sal;

                                                   prev.cnt++; }'),

    $finalize= new MongoCode('function(obj) {  obj.avg = obj.sum/obj.cnt; }'),


    $group_by = $coll->group($keys,

                                               $initial,

                                               $reduce,

                                               array('finalize'=>$finalize));

    foreach ($group_by['retval'] as $grp) {

        foreach ($grp as $key => $val) {

            printf("%s => %s	", $key, $val);

        }

        print "
";

    }

}

catch(MongoException $e) {

    print "Exception:
";

    die($e->getMessage() . "
");

}

?>
The map-reduce algorithm is recursive. The reduce function takes two arguments: the current object being processed and the previous value of the object with the properties specified in the initial variable. MongoDB will iterate through the data set and recursively compute the sum and the count. When finished, it will execute the finalize function on the result. The argument of the finalize function is the object in the result, containing the deptno, count, and sum. The finalize function will add the avg member. The output of this script will look like this:
deptno => 20    sum => 10875   cnt => 5        avg => 2175

deptno => 30    sum => 9400     cnt => 6        avg => 1566.6666666667

deptno => 10    sum => 8750     cnt => 3        avg => 2916.6666666667
The result will be stored in the variable $group_by, which is itself an associative array that contains not only the result of the operation, but also the information about the number of groups, the number of the documents traversed in the process of computing the aggregate, and the final status of the operation. The structure of the result can be revealed by print_r, the function most frequently used for debugging. The print_r function dumps the variable structure to the standard output. In the case of the script in Listing 7-6, the result looks like this:
Array

(

    [retval] => Array

        (

            [0] => Array

                (

                    [deptno] => 20

                    [sum] => 10875

                    [cnt] => 5

                    [avg] => 2175

                )


            [1] => Array

                (

                    [deptno] => 30

                    [sum] => 9400

                    [cnt] => 6

                    [avg] => 1566.6666666667

                )


            [2] => Array

                (

                    [deptno] => 10

                    [sum] => 8750

                    [cnt] => 3

                    [avg] => 2916.6666666667

                )


        )


    [count] => 14

    [keys] => 3

    [ok] => 1

)
The retval item will contain our desired return values. The count item will contain the number of documents visited in the process, and the keys item will contain the number of distinct group keys discovered in the data set. The OK is the returning status of the command; if something was wrong, this will contain 0.
Also, please note that we have used the MongoCode class in the script, similar to the MongoRegex in the part about querying using regular expression or MongoDate in the example about updating. JavaScript is a potent object oriented language in its own right which can be used to compute much more complex aggregates than sum, count or average. There is also a general map-reduce framework available here:
https://github.com/infynyxx/MongoDB-MapReduce-PHP
However, further discussion of the map-reduce and JavaScript aggregates would require knowledge of JavaScript and is, therefore, beyond the scope of this book.
MongoDB Conclusion
MongoDB is a relative newcomer in the database arena, and is the most popular among the NoSQL databases. It is a great tool for building data warehouses, especially because of its ability to fully utilize so called “shared-nothing cluster architecture.” It is an open-source database, which makes it ideal for building high performance data warehouses. It is also well documented, well supported, and easy to install, integrate into PHP, and test. Also, because it is so new, updated versions are released practically every day, so one has to approach the project for which MongoDB is considered with a sense of adventure.
Today, the RDBMS software still rules for many reasons. One of the reasons is the availability of the standard data manipulation language SQL, while there is no standardization of the NoSQL databases. Our next database will be CouchDB, an Apache project similar in nature to MongoDB.
Introduction to CouchDB
CouchDB is an open-source project led by the Apache Foundation. It is also a schema-free NoSQL database with multiple version consistency control (MVCC). MVCC is the mechanism that allows having several revisions of the same document in the database. Installing CouchDB is easy; there are packages for every major OS. There is a binary installer on Windows 7, and there are packages for the various Linux distributions and Unix systems. The installation is, generally speaking, very easy and straightforward. However, CouchDB is primarily a Linux database.
While both MongoDB and CouchDB are schema free, CouchDB is much more consistently schema free than MongoDB. CouchDB doesn't have any entities like collections. The entire database is one amorphous collection of documents. To make organization of the database easier, CouchDB uses user-defined views, written as JavaScript functions, which utilize Google map-reduce framework to organize documents.
As is the case with MongoDB, documents are JSON objects. MongoDB driver takes care of converting PHP associative arrays to and from JSON objects; CouchDB doesn't do that. CouchDB communicates with the outside world by using HTTP protocol and returns and accepts JSON objects. In order to facilitate easier communication with CouchDB, it is certainly helpful to install the PHP JSON extension, using PECL installation tool. That extension provides the functions json_encode and json_decode, which are used to convert the PHP associative arrays to and from JSON objects. Because of such architecture, PHP libraries for CouchDB do not require linking, such as the PHP extension for MongoDB. The most popular PHP library for CouchDB is PHP-on-Couch, which can be downloaded from
https://github.com/dready92/PHP-on-Couch
This library doesn't require a special installation. It can be downloaded anywhere and included into the scripts using include and require commands. The reason for such simplicity is precisely the fact that CouchDB communicates with the outside world by using the standard HTTP protocol. On Linux, there are command line tools for communicating with HTTP servers. The most popular among those is curl, which is very useful when working with CouchDB. The first command, to print just the welcome screen and check whether CouchDB is active usually looks like this:
curl http://localhost:5984

{"couchdb":"Welcome","version":"1.0.1"}
The curl utility contacted the HTTP server on the host localhost, IP address 127.0.0.1, port 5984, which replied with a JSON object, true to the form. Let's parse that JSON object with a small script, like this:
<?

$a='{"couchdb":"Welcome","version":"1.0.1"}';

print_r(json_decode($a,true));

?>
The result will look like this:
Array

(

    [couchdb] => Welcome

    [version] => 1.0.1

)
In other words, the json_decode function has converted the JSON object returned by CouchDB into a PHP associative array.
Using Futon
CouchDB can accept HTTP commands, and it certainly is possible to create a database using the curl -X PUT http://localhost:5984/dbname command; it is much more comfortable to use the CouchDB administrative interface, called Futon. The interface can be accessed using your favorite web browser and pointing it to http://localhost:5984/_utils. If the server is not on the local host, you should substitute the server name and port instead. It is configurable. In Opera, the result looks like Figure 7-2.
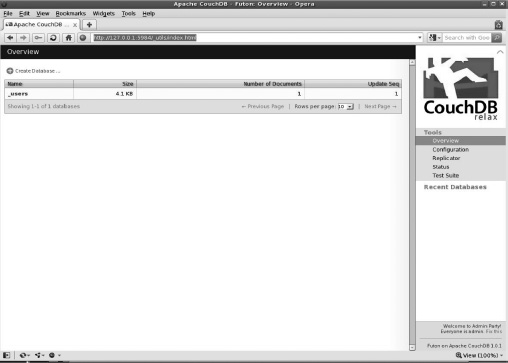
Figure 7-2. Futon can help you with both creating databases and creating collections.
Creating databases is simplicity itself. In the upper-left-hand corner, there is a Create Database button. Click it, enter scott in the dialog box as the database name, and send it to the database. Voila! The database called “scott” is created! See Figure 7-3.

Figure 7-3. The database called “scott”
Futon can also help us with creating views. Views are user defined JavaScript functions that implement Google's map-reduce protocol. When views are evaluated for the first time, they are calculated on every document in the database and the results are stored in a B-tree index. That happens only the first time, when the view is created. After that, only added or changed documents are run through the view function. So, in order to create views, let's first create some documents. It is time for our first PHP script accessing CouchDB. It will create the same “emp” structure as was the case with MongoDB. See Listing 7-7.
Listing 7-7. PHP Script Accessing CouchDB
<?php

require_once("PHP-on-Couch/couch.php");

require_once("PHP-on-Couch/couchClient.php");

require_once("PHP-on-Couch/couchDocument.php");

$host =  'http://localhost:5984';

$dbname = 'scott';


$EMP = array(

    array("empno" => 7369, "ename" => "SMITH", "job" => "CLERK",

          "mgr" => 7902,"hiredate" => "17-DEC-80", "sal" => 800,

          "deptno" => 20,"_id" => "7369"),

    array("empno" => 7499, "ename" => "ALLEN", "job" => "SALESMAN",

          "mgr" => 7698, "hiredate" => "20-FEB-81", "sal" => 1600,

          "comm" => 300,"deptno"=>30,"_id" => "7499"),

    array("empno"=>7521,"ename"=>"WARD","job"=>"SALESMAN","mgr"=>7698,

          "hiredate"=>"22-FEB-81","sal"=>1250,"comm"=>500, "deptno" => 30,

          "_id" => "7521"),

    array("empno" => 7566, "ename" => "JONES", "job" => "MANAGER",

          "mgr" => 7839, "hiredate" => "02-APR-81", "sal" => 2975,

          "deptno" => 20, "_id" => "7566"),

    array("empno" => 7654, "ename" => "MARTIN", "job" => "SALESMAN",

          "mgr" => 7698, "hiredate" => "28-SEP-81", "sal" => 1250,

          "comm" => 1400,"deptno"=>30, "_id"=>"7654"),

    array("empno"=>7698,"ename"=>"BLAKE","job"=>"MANAGER","mgr"=>7839,

          "hiredate"=>"01-MAY-81","sal"=>2850,"deptno"=>30,"_id" => "7698"),

    array("empno"=>7782,"ename"=>"CLARK","job"=>"MANAGER","mgr"=>7839,

          "hiredate"=>"09-JUN-81","sal"=>2450,"deptno"=>10,"_id" => "7782"),

    array("empno"=>7788,"ename"=>"SCOTT","job"=>"ANALYST","mgr"=>7566,

          "hiredate"=>"19-APR-87","sal"=>3000,"deptno"=>20,"_id" => "7788"),

    array("empno"=>7839,"ename"=>"KING","job"=>"PRESIDENT",

          "hiredate" => "17-NOV-81", "sal" => 5000, "deptno" => 10,

          "_id" => "7839"),
    array("empno" => 7844, "ename" => "TURNER", "job" => "SALESMAN",

          "mgr" => 7698, "hiredate" => "08-SEP-81", "sal" => 1500,

           "comm" => 0,"deptno"=>30,"_id" => "7844"),

    array("empno"=>7876,"ename"=>"ADAMS","job"=>"CLERK","mgr"=>7788,

          "hiredate"=>"23-MAY-87","sal"=>1100,"deptno"=>20,"_id" => "7876"),

    array("empno"=>7900,"ename"=>"JAMES","job"=>"CLERK","mgr"=>7698,

           "hiredate"=>"03-DEC-81","sal"=>950,"deptno"=>30,"_id" => "7900"),

    array("empno"=>7902,"ename"=>"FORD","job"=>"ANALYST","mgr"=>7566,

          "hiredate"=>"03-DEC-81","sal"=>3000,"deptno"=>20,"_id" => "7902"),

    array("empno"=>7934,"ename"=>"MILLER","job"=>"CLERK","mgr"=>7782,

          "hiredate"=>"23-JAN-82","sal"=>1300,"deptno"=>10,"_id" => "7934"));

try {

    $db=new couchClient($host,$dbname);

    foreach($EMP as $e) {

        $doc=new couchDocument($db);

        $doc->set($e);

        $doc->record();

    }

}

catch(Exception $e) {

    printf("Exception code:%d
",$e->getCode());

    printf("%s
",$e->getMessage());

    exit(-1);

}

?>
The classes couchClient, providing the connection, and couchDocument are provided by the initial files included from the PHP-on-Couch directory in the include path. The name of the directory is arbitrary, as there is no installation procedure. The directory here was named PHP-on-Couch and put into the directory specified in the include_path parameter. The include_path parameter is a parameter for the PHP interpreter, usually specified in the php.ini configuration file. With the exception of the include files and the actual procedure to load the data, this looks almost identical to Listing 7-1, which was about MongoDB. The main difference is in the fact that the empno attribute is duplicated in the _id attribute, which is a string. CouchDB allows us to assign our own string for the ID. The ID must, of course, be unique and must be a string, not number. That is why the original empno column wasn't simply renamed to _id. If we take a look at our friendly Futon interface, we will see the newly ingested documents. See Figure 7-4.
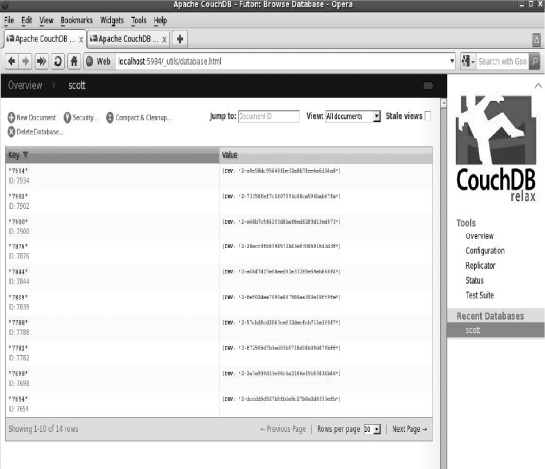
Figure 7-4. The newly ingested documents in the Futon interface
CouchDB communicates through the HTTP protocol, which means that every record is visible in the browser. We can see it by simply clicking on any of the shown documents. See Figure 7-5.
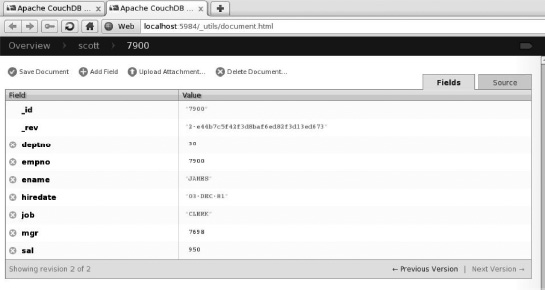
Figure 7-5. Every record is visible in the browser.
The revision field, marked as _rev is also worth noticing. Only the last revision is shown, but it is possible to retrieve any revision. As mentioned earlier, CouchDB has a version control and is fully ACID-compliant. I also mentioned that CouchDB doesn't have ad hoc query capability. That means that, in order to retrieve a document, one has to query it by the _id column. Listing 7-8 shows a little script that retrieves and updates a single document.
Listing 7-8. Script to Retrieve and Update a Single Document
<?php

require_once("PHP-on-Couch/couch.php");

require_once("PHP-on-Couch/couchClient.php");

require_once("PHP-on-Couch/couchDocument.php");

$host =  'http://localhost:5984';

$dbname = 'scott';

try {

    $db=new couchClient($host,$dbname);

    $doc = couchDocument::getInstance($db,'7844'),

    $doc->sal=1500;

    $doc->record();

}

catch(Exception $e) {

    printf("Exception code:%d
",$e->getCode());

    printf("%s
",$e->getMessage());

    exit(-1);

}

?>
This script will retrieve document with id='7844', update its sal property to 1500 and store it back. The class isn't perfect for querying a document; it uses a static class function getInstance, called in the class context. That means that the function is not being called as an object member; there is no object context in which the function is getInstance is called. The document class also uses __get and __set functions to set the properties of the document.
If you check the document back in the Futon, you will see that its revision has increased. Unfortunately, there is no ad hoc querying by other keys. To query CouchDB, one has to create a view of documents. Views are created using map-reduce JavaScript functions. The first time the view is created, the function is computed for every document in the database and the result is stored in a B-tree index. For every added or modified document, the index is changed. The views are created using Futon. In the upper right-hand corner, the Futon view of the database has View: selection field, which is set to “All documents.” If we scroll the selection to the Temporary View selection, the form for creating the temporary views will appear. Going in the details of the view creation and implementation is beyond the scope of this book. The details are well described in the excellent book Beginning CouchDB by Joe Lennon.
For the purposes of this book, I entered the following JavaScript function into the form to create a view named deptno30, stored in the document named sal. Views are also documents, stored in the special database named _design. Our view looks like this:
function(doc) {

    if (doc.deptno==30) {

        emit(doc._id, { empno:doc.empno,

                        ename: doc.ename,

                        job: doc.job,

                        mgr:doc.mgr,

                        sal:doc.sal});

    }

}
This view will only extract the information about the employees of the SALES department, the department number 30. It should be noted that the function returns (“emits”) two items: the key and a JSON document. If the key is NULL, CouchDB will assign one automatically.
This function will be executed on every document in the database, and if the deptno attribute is equal to 30, it will emit empno, ename, job, mgr, and sal attributes to the view, in a form of a JSON object. The view will be stored in document with id="sal" and name="deptno30". Now that we have a database structure that we can query, the script itself is trivial and looks like Listing 7-9.
Listing 7-9.
<?php

require_once("PHP-on-Couch/couch.php");

require_once("PHP-on-Couch/couchClient.php");

require_once("PHP-on-Couch/couchDocument.php");

$host =  'http://localhost:5984';

$dbname = 'scott';

try {

    $db=new couchClient($host,$dbname);

    $deptno30=$db->asArray()->getView('sal','deptno30'),
    foreach ($deptno30['rows'] as $r) {

        foreach ($r['value'] as $key => $value) {

            printf("%s = %s	",$key,$value);

        }

        print "
";

    }

}

catch(Exception $e) {

    printf("Exception code:%d
",$e->getCode());

    printf("%s
",$e->getMessage());

    exit(-1);

}

?>
This script calls the getView method of the couchClient class to query the database. The result of the query is returned as an array. There are numerous other options that can be included for limiting the number of results, to restrict the returned keys, to sort them, and the like. The documentation of the classes is rather scant, so one's best bet is to look in the class source code itself. When this script is executed, the result looks like this:
empno = 7499    ename = ALLEN     job = SALESMAN  mgr = 7698      sal = 1600

empno = 7521    ename = WARD     job = SALESMAN  mgr = 7698      sal = 1250

empno = 7654    ename = MARTIN   job = SALESMAN  mgr = 7698      sal = 1250

empno = 7698    ename = BLAKE     job = MANAGER   mgr = 7839      sal = 2850

empno = 7844    ename = TURNER  job = SALESMAN  mgr = 7698      sal = 1500

empno = 7900    ename = JAMES     job = CLERK         mgr = 7698      sal = 950
CouchDB Conclusion
CouchDB is very powerful, but the lack of ad hoc query capability does somewhat limit its use. It is very popular and well documented. The PHP interfaces are easy to use, but also unnecessary. One can harness the power of CouchDB by directly using the HTTP protocol and command line utilities like curl. Utilizing PEAR HTTP_Request or HTTP_Request2 packages and JSON extension is quite sufficient for communicating with CouchDB.
Our next database belongs to the category of SQL databases. It is not a full-fledged RDBMS, but implements a very significant subset of the SQL 92 standard.
Introduction to SQLite
SQLite is a SQL-based database that fits in a single file and is meant for the embedded systems. It is used by Firefox browser, Thunderbird e-mail client, and many other applications that run on everything from cell phones to mainframe systems. SQLite is a relational database, which means that it implements SQL language. SQLite is an open-source software (http://sqlite.org).
Relational databases, in contrast with NoSQL databases, have rather a strict schema structure. Schema is a collection of related objects, mostly tables and views. The basic unit of a relational database schema is called a table. The tables are modeled after the real-world tables: fixed structure with columns, usually called attributes and rows. Each row can only contain the columns defined for the table and no additional attributes – again as opposed to the NoSQL databases, which are schema free, which means that they do not impose the fixed row structure on the documents. If a column is not present in a row, the value of the column for that row is set to NULL, the artificial value with some strange properties. NULL is a black hole of the relational theory. Nothing is ever equal to NULL; one can only test for a column being NULL with the IS [NOT] NULL relational operator. Also, the NULL value modifies logic in the RDBMS systems. Logical comparison with NULL value always yields NULL, which is the third value of the statement logical examination, in addition to the “true” and “false” values. Yes, that's right: relational databases do not use binary logic. They use ternary logic, with the three possible outcomes of an expression evaluation. NULL is not actually a value; it's an absence of the value.
NULL is also one of the SQLite data types. SQLite 3 supports the following self explaining data types:
- NULL
- Integer
- Real
- Text
- Blob
Other relational databases also support a rich variety of separate date/time types like DATE, TIME, INTERVAL, or TIMESTAMP, but SQLite is an embedded database and its types are limited to what is described above. “Small footprint” was one of its design goals, and having a complex date/time library would significantly increase it, so it was omitted from the final version. The next chapter will describe a full-fledged relational database called MySQL, which has an extensive support of date/time data types, but the remainder of this chapter will introduce SQLite and its integration with PHP.
There are two other important types of entities to mention for relational databases: views and constraints. Views are pre-packaged queries, stored into the database to be used for querying. They are allowed to stand anywhere where tables are allowed in queries. Views are, essentially, named queries.
Constraints, as the name implies, are rules and regulations that we require from our data. SQLite allows declaring constraints, but it doesn't enforce them, except the primary key constraints, which are, of course, the most important constraints.
The primary key constraint on table uniquely identifies each row in the table. Every row must have a value, and all values must be different from one another. It is something like a bank account number: every customer of the bank must have one, and different customers have different account numbers. In particular, that implies that the value of the primary key cannot be NULL. Primary key constraints are very important in the relational theory and purists say that every table should have one. What is the point of having a table in which there is no way of uniquely identifying rows? How can we tell when the rows are different?
There are also unique constraints, with the requirement that the values are unique where they exist. That means that the value of unique key can be null, as opposed to the primary key. There are also NOT NULL constraints that require a column to have a value, if the row is allowed to be inserted into the table.
Check constraints are column constraints that impose user calculated value limitation on the column. An example would be a constraint that requires that the column value is always positive, no negative numbers allowed. The final and the most complex constraints are foreign key constraints. To explain them, let me bring back the picture from the “Updating MongoDB” section of this chapter (see Figure 7-6).
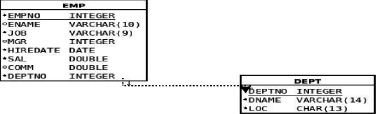
Figure 7-6. MongoDB Collection Information Design
We have two tables: one describes employees and the other one describes the departments. The requirement that the department numbers in the employees table are contained in the department table is called a “foreign key.” Every value of the deptno column in the EMP table is required to be present in the primary or unique key column of another table – the DEPT table, in this example. It is important for the reader to understand that these types of entities are not specific for the SQLite database; they are described in the SQL standard. The latest revision of the SQL standard was released in 2008. SQL is a living and breathing language that rules supreme in the database realm, and is implemented by most of the database systems currently on the market. That includes commercial databases such as Oracle, Microsoft SQL Server, IBM DB2, and Sybase, as well as the open source databases like MySQL, PostgreSQL, SQL Lite, or Firebird. The NoSQL databases, introduced earlier in this chapter, are very new and still looking for their place on the market.
This book is about PHP and not about databases and SQL standardization. However, in order to explain how to use relational databases from PHP, I will attempt to explain the basics. This book doesn't assume reader familiarity with a relational database system, but having it would certainly help with understanding the material in this and the next chapter.
Now that we know what objects can reasonably be expected in the relational databases, we need to say something about how those objects are manipulated, how is the data retrieved, and how updated. Relational databases were modeled after the elementary set theory. The principle objects of all SQL statements are subsets. Queries, embodied in the SELECT statements, allow the user to select a subset of one or more tables. It is important to think about the data returned by the SELECT statements as the subset and not individual rows or records, as they're sometimes called. In addition to SELECT statements, there are also INSERT, DELETE, and UPDATE statements, which also operate on subsets.
The discussion of the relational entities wouldn't be complete without mentioning indexes. Indexes are not logical objects like tables or views; indexes are purely physical structures created by the administrator to speed queries. Indexes are normally automatically created to implement primary and unique key constraints, not so with SQLite. In SQLite, unique indexes must be created manually, if the constraint is to be enforced.
SQL is not a procedural language. SQL statements specify the subset that they shall operate on, not how to extract that subset. Every relational database software contains a part called a query optimizer that determines the access path to the objects requested by the SQL command at run time. In particular, a query optimizer decides which indexes will be used to resolve the query and retrieve the requested subset and which method will be used to join tables, if needed.
In addition to the query optimizer, all relational databases, and SQLite is no exception, have a data dictionary. Data dictionary is what is known as metadata – data about data. It describes all other objects in the database and plays a crucial role for the functioning of the database software. SQLite is an embedded database, created with a small footprint in mind, so the role of the data dictionary is entrusted to the single table, called sqlite_master. This table has the following columns:
- name (name of the object)
- type (type of the object)
- tbl_name (table name, important for indexes)
- rootpage (the beginning of the object in the database file)
- sql (the creating statement for the object)
Most of the other relational databases have a significantly bigger data dictionary that consists of hundreds of tables. The data dictionary is best demonstrated through the command line interface, the program named sqlite3. It is usually invoked with the desired database name as the command line argument: sqlite3 scott.sqlite.
If the database scott.sqlite doesn't exist, it will be created. The result will look like this:
sqlite3 scott.sqlite

SQLite version 3.3.6

Enter ".help" for instructions

sqlite>
This utility has a very good help and quite a few useful features. It can be utilized to execute SQL commands and verify the results without much scripting. However, this book, as I keep reminding myself, is about PHP. SQLite is an embedded database, which means that it is supposed to be used from programs, not from the CLI utilities like sqlite3. So, let's start describing the PHP interface to SQLite. Any programming interface to any relational database has at least the following components:
- Connection routines: For SQLite, these are really simple, as opposed to other relational databases that usually have their network protocols and different authentication methods.
- Execute SQL routines: These can be relatively complex, depending on the options. Together with the routines to execute SQL, every programming interface usually provides a method to “bind” variables. We will see some examples later, when the process of binding variables is explained in detail. Also included in this category are “prepare” routines, which will translate a SQL statement from a readable text form into an object called “statement handle.”
- Routines to describe the result set: Relational databases will return the result set, which has different columns, having different names and data types. There is always a “describe” call, which will describe the result set being returned to the invoking program.
- Routine(s) to fetch the result set into the invoking program: Different databases have different options to speed data retrieval so this is not completely trivial, either.
If the interface has classes, there is usually a connection class, statement class, and a result set class. For historical reasons, the result set class is also sometimes called a cursor class. That does not describe the language used by the developers when writing programs that access relational databases.
These components are, of course, present in the PHP interface to SQLite. So, without further ado, let's see our first SQLite example (see Listing 7-10). The script will create the database structure, consisting of the previously shown emp and dept tables, along with one foreign key and an index.
Listing 7-10. SQLite Example
<?php

$DDL = <<<EOT

CREATE TABLE dept

(

  deptno integer NOT NULL,

  dname text,

  loc text,

  CONSTRAINT dept_pkey PRIMARY KEY (deptno)

);

CREATE TABLE emp

(

  empno integer NOT NULL,

  ename text ,

  job text ,

  mgr integer,

  hiredate text,

  sal real,

  comm real,

  deptno integer,

  CONSTRAINT emp_pkey PRIMARY KEY (empno),

  CONSTRAINT fk_deptno FOREIGN KEY (deptno)

      REFERENCES dept (deptno) ON DELETE CASCADE

);

CREATE UNIQUE INDEX pk_emp on emp(empno);

CREATE INDEX emp_deptno on emp(deptno);

CREATE UNIQUE INDEX pk_dept on dept(deptno);

EOT;

try {

    $db = new SQLite3("scott.sqlite");

    @$db->exec($DDL);

    if ($db->lastErrorCode() != 0) {

        throw new Exception($db->lastErrorMsg()."
");

    }

    print "Database structure created successfully.
";

}

catch(Exception $e) {

    print "Exception:
";

    die($e->getMessage());

}

?>
This script consists, for the most part, of the SQL commands in the $DDL variable. The really active part is in the try block, which executes this variable by passing it to the query method, used to execute SQL statements. This method returns an instance of the resultset or cursor class, which can be used to find out the information about the number of columns returned by the query, their names and types, as well as to retrieve data.
Our $DDL command creates tables and indexes and doesn't return any columns. So, how should we know whether the command has succeeded or not? Unfortunately, SQLite3 class doesn't throw exceptions: the exceptions have to be thrown by the programmer. SQLite does, however, provide the methods to determine the last error code and message, which can then be used to create and throw an exception. The code for success is 0, anything else signifies an error.
When this script is executed, it will create a database scott.sqlite if it doesn't exist, and will create our desired database structure. You should also note that several SQL statements were bundled together: two create table statements and three create index statements were executed as a unit. Also, the unique indexes will prevent duplicate data from being entered into the tables, despite the fact that SQLite doesn't enforce constraints. They will not prevent a NULL value from being inserted into the primary key columns.
Now, our tables are created and we have to load some data into them. The data to be loaded resides in two comma separated values (CSV) files, so what is needed is a relatively general script to load a CSV file into the database. The script will take two command line arguments, the table name and the file name. Such a script is an excellent tool for demonstrating many of the concepts that can be seen in all relational database management system (RDBMS) varieties. The two files look like this:
Emp.csv


7369,SMITH,CLERK,7902,17-DEC-80,800,,20

7499,ALLEN,SALESMAN,7698,20-FEB-81,1600,300,30

7521,WARD,SALESMAN,7698,22-FEB-81,1250,500,30

7566,JONES,MANAGER,7839,02-APR-81,2975,,20

7654,MARTIN,SALESMAN,7698,28-SEP-81,1250,1400,30

7698,BLAKE,MANAGER,7839,01-MAY-81,2850,,30

7782,CLARK,MANAGER,7839,09-JUN-81,2450,,10

7788,SCOTT,ANALYST,7566,19-APR-87,3000,,20

7839,KING,PRESIDENT,,17-NOV-81,5000,,10

7844,TURNER,SALESMAN,7698,08-SEP-81,1500,0,30

7876,ADAMS,CLERK,7788,23-MAY-87,1100,,20

7900,JAMES,CLERK,7698,03-DEC-81,950,,30

7902,FORD,ANALYST,7566,03-DEC-81,3000,,20

7934,MILLER,CLERK,7782,23-JAN-82,1300,,10


Dept.csv


10,ACCOUNTING,"NEW YORK"

20,RESEARCH,DALLAS

30,SALES,CHICAGO

40,OPERATIONS,BOSTON
The script to load the data into the emp and dept tables, respectively, looks like Listing 7-11.
Listing 7-11. The Script to Load the Data Into the emp and dept Tables
<?php

if ($argc != 3) {

    die("USAGE:script7.11 <table_name> <file name>
");

}

$tname = $argv[1];

$fname = $argv[2];

$rownum = 0;


function create_insert_stmt($table, $ncols) {

    $stmt = "insert into $table values(";

    foreach(range(1,$ncols) as $i) {

        $stmt.= ":$i,";

    }

    $stmt = preg_replace("/,$/", ')', $stmt);

    return ($stmt);

}

try {

    $db = new SQLite3("scott.sqlite");

    $res = $db->query("select * from $tname");

    if ($db->lastErrorCode() != 0) {

        throw new Exception($db->lastErrorMsg());

    }

    $ncols = $res->numColumns();

    $res->finalize();

    $ins = create_insert_stmt($tname, $ncols);

    print "Insert stmt:$ins
";

    $res = $db->prepare($ins);

    $fp=new SplFileObject($fname,"r");

    while ($row = $fp->fgetcsv()) {

        if (strlen(implode('',$row))==0) continue;

        foreach(range(1,$ncols) as $i) {

            $res->bindValue(":$i", $row[$i - 1]);

        }

        $res->execute();

        if ($db->lastErrorCode() != 0) {

            print_r($row);

            throw new Exception($db->lastErrorMsg());

        }

        $rownum++;

    }

    print "$rownum rows inserted into $tname.
";

}

catch(Exception $e) {

    print "Exception:
";

    die($e->getMessage() . "
");

}

?>
When executed, the result looks like this:
./script7.11.php emp emp.csv

Insert stmt:insert into emp values(:1,:2,:3,:4,:5,:6,:7,:8)

14 rows inserted into emp.

./script7.11.php dept dept.csv

Insert stmt:insert into dept values(:1,:2,:3)

4 rows inserted into dept.
Now, let's discuss the script. This script is actually meant to be useful as it is easily ported to all kinds of databases. As was the case with the script in Listing 7-10, the most important part is the part within the try block. The first thing to notice is the query on the beginning of the try block:
$res = $db->query("select * from $tname");
The query method executes the query passed to it as a string and returns an instance of the statement class. The statement class is used to find out the information about the names and types of the columns returned by the query as well as to retrieve the data itself. Note, however, that no rows have been retrieved from the table; the result of the query has only been examined to determine the number of columns being returned. That was done by invoking the “numColumns” method of the statement class:
$ncols = $res->numColumns();
When the number of columns in the table is known, the insert statements can be constructed and the result set of the query was closed using the “finalize” call. It is good practice to close the cursors when they are no longer needed, and thus prevent memory leaks and fatal mix-ups. Now, let's get back to constructing the insert statement. There are two possible strategies for creating the insert statement:
- A separate insert statement can be constructed for each row that needs to be inserted. This forces the database to parse each thus constructed SQL statement as a separate statement and execute it. Parsing each statement means passing it through the query optimizer. This can be an expensive operation, especially in the more complex databases that consider the object statistics as a part of the query optimization. It is frequently, but not always, much easier to program, especially when the program is operating on the known set of tables and columns.
- We can construct a statement with the placeholders for every value to be inserted, parse it once and execute it multiple times, binding new values to the placeholders every time the statement is executed. Doing this requires using the “bind” calls from the programming interface and is thus usually more complex than the simple creating of the SQL statements using the built-in string manipulation functions, but almost always results in the significantly faster code.
This script conveniently prints the created insert statement on the standard output, so that we can see the result of our handiwork. For the emp table, the result looks like this:
insert into emp values(:1,:2,:3,:4,:5,:6,:7,:8)
The entities “:1”, “:2”, “:3”... “:8” are called placeholders. Any string of alphanumeric characters, preceded by the colon character (“:”), is a legal placeholder. When the database is asked to prepare a statement that contains placeholders, it parses it into an internal form, but cannot execute the statement until the actual values for the placeholders are supplied. That part is done by using bindValue or bindParam calls, which bind the placeholder to a value or a variable. In this script, bindValue call was used because the main loop will return a new variable $row every time, so it doesn't make sense to bind it as a parameter. It could have been declared in the beginning, making it global, but using global variables is a frowned upon programming practice. Global variables make programs unreadable and can lead to name collisions and bugs. The prepare method returns an instance of the statement class, which also has an execute method. Once all placeholders have known values, by virtue of the bind calls, the statement can be executed over and over again, with no re-parsing necessary, just by supplying the new set of values for every execution. The bind call looks like this:
$res->bindValue(":$i", $row[$i – 1]);
The main reason for choosing the :$i form of the placeholder names was to be able to bind the values within a loop. And that brings us to the end of the script itself. There is only one more thing to note about this script: the strange “if” condition in the main loop, examining whether the $row is empty by using implode and strlen. The SplFileObject objects will, in some versions of PHP 5.3, return an empty line at the end of the file, and without this condition it would get inserted into the table because SQLite doesn't enforce constraints. Other databases would reject a line with an empty primary key but would also roll the entire transaction back, thus removing all the previously inserted rows, not exactly the desired outcome. Having that “if” statement is a small price to pay for having all the error checking built into the class itself and not having to write something like:
$fp = fopen($fname, "r");

if (!$fp) {

    die("Cannot open $fname for reading!
");

}
That was done by the kind authors of SPL. There is only one more thing to do, before concluding this chapter. So far, we have been creating SQLite tables and loading data, but we haven't actually retrieved anything from the database. The query that will be executed is a standard join:
select e.ename,e.job,d.dname,d.loc

from emp e join dept d on(d.deptno=e.deptno);
This type of query is called a join because it joins the data from the two (or more) tables to present them as rows. This particular syntax is called ANSI join syntax and is very portable across databases. This exact same query could be executed on any relational database, without changing even a single character.
Executing the scripts shown in Listings 7-10 and 7-11 will provide the database structures and the data within, so this query can be tested by using the aforementioned sqlite3 command line tool, before writing the script. Printing just the data would be too trivial and not much fun, so the script will also print the column headings and determine the column format accordingly. So, here it is, in Listing 7-12.
Listing 7-12.
<?php

$QRY = "select e.ename,e.job,d.dname,d.loc

              from emp e join dept d on(d.deptno=e.deptno)";

$colnames = array();

$formats = array();

$ncols = 0;

try {

    $db = new SQLite3("scott.sqlite");

    $res = $db->query($QRY);
    if ($db->lastErrorCode() != 0) {

        throw new Exception($db->lastErrorMsg());

    }

    // Get the number of columns

    $ncols = $res->numColumns();

    // For every column, define format, based on the type

    foreach (range(0, $ncols - 1) as $i) {

        $colnames[$i] = $res->columnName($i);

        switch ($res->columnType($i)) {

            case SQLITE3_TEXT:

                $formats[$i] = "% 12s";

            break;

            case SQLITE3_INTEGER:

                $formats[$i] = "% 12d";

            break;

            case SQLITE3_NULL:

                $formats[$i] = "% 12s";

            break;

            default:

                $formats[$i] = "%12s";

        }

    }

    //  Print column titles, converted to uppercase.

    foreach ($colnames as $c) {

        printf("%12s", strtoupper($c));

    }

    //  Print the boundary

    printf("
% '-48s
", "-");

    //  Print row data

    while ($row = $res->fetchArray(SQLITE3_NUM)) {

        foreach (range(0, $ncols - 1) as $i) {

            printf($formats[$i], $row[$i]);

        }

        print "
";

    }

}

catch(Exception $e) {

    print "Exception:
";

    die($e->getMessage() . "
");

}

?>
The output of the script looks like this:
/script7.12.php

 ENAME    JOB                DNAME               LOC

------------------------------------------------ ---------------------

SMITH      CLERK            RESEARCH         DALLAS

ALLEN      SALESMAN     SALES                CHICAGO

WARD      SALESMAN     SALES                CHICAGO

JONES      MANAGER      RESEARCH         DALLAS

MARTIN   SALESMAN      SALES                CHICAGO
BLAKE     MANAGER       SALES                CHICAGO

CLARK     MANAGER       ACCOUNTING    NEW YORK

SCOTT     ANALYST         RESEARCH        DALLAS

KING       PRESIDENT      ACCOUNTING    NEW YORK

TURNER  SALESMAN       SALES               CHICAGO

ADAMS    CLERK             RESEARCH        DALLAS

JAMES     CLERK             SALES                CHICAGO

FORD      ANALYST         RESEARCH        DALLAS

MILLER    CLERK             ACCOUNTING    NEW YORK
This script contains the usual suspects, with some new calls. New methods are columnName, columnType, and fetchArray. The columnName() method is trivial; it takes the column number as the argument, the numbering starts from zero, and returns the name of the column. The columnType is similar to the columnName, and returns the predefined constants, which are aptly named: SQLITE3_INTEGER, SQLITE3_FLOAT, SQLITE3_TEXT, SQLITE3_BLOB, and SQLITE3_NULL. The type names are self-explanatory. Other databases also return information like the column size and scale, if floating point, but SQLite is an embedded database and doesn't do that.
The final method is fetchArray, which will return the data from the database, in a row by row fashion, presenting rows as normal arrays, associative arrays or both, depending on the mode argument, which can take one of the three values: SQLITE3_NUM, SQLITE3_ASSOC or SQLITE3_BOTH.
SQLite Conclusion
The PHP interface to SQLite is consistent with the normal calls that we can see in the interfaces for many other databases, like MySQL or PostgreSQL, both of which will be described in the next chapter. SQLite gained immense popularity with the advent of wireless computing. It is not a full-fledged RDBMS system, with multi-versioning, row-level locking, network access protocol, the ability to participate in the two-phased distributed commits, or even to enforce the basic constraints. However, it has a very familiar SQL interface and the programming language extensions, which make it very easy to learn, for anybody who has previously worked with a relational database system. It is a perfect database for holding things like Firefox bookmarks, e-mail contact lists, phone numbers, or even playing lists of songs on a mobile phone. PHP and Apache are also available on many platforms, including mobile ones, like iPhone, which makes the PHP/SQLite combination ideal for the mobile applications development. The SQLite and PHP combination has some interesting possibilities, which are beyond the scope of this book. It is possible to extend SQLite and register PHP functions to work within SQL or even serve as aggregate functions. Both products are developing rapidly and I am sure that the combination will only get better.
Summary
This chapter was devoted to PHP integration with the databases that are not the classic relational databases such as MySQL or Oracle. All of these databases are very new. For instance, SQLite3, described in this chapter, is only available in PHP 5.3 or later. MongoDB and CouchDB are also extremely new technologies. For now, the realm of the database software continues to be ruled by the relational databases which were, after all, modeled with the financial transactions in mind.
In the next chapter, we will examine one full-fledged relational database, MySQL and two abstraction layers, PDO and ADOdb. At the end of the chapter, something will also be said about the Sphinx tool which is a very popular full text search software.