
C H A P T E R 10
Libraries
PHP is a versatile language with a broad range of applications. There are many existing open source libraries that are mature and feature rich. This is a good thing, because as programmers, we prefer to not reinvent the wheel whenever possible. Libraries can save us time and effort. This chapter is very hands-on, and we will show how to:
- Parse RSS feeds using SimplePie
- Use TCPDF to generate PDFs
- Scrape data from websites using cURL and phpQuery
- Integrate Google Maps using php-google-map-api
- Generate email and SMS text messages with PHPMailer
- Wrap the Google Chart API with gChartPHP
SERVER SETUP
SimplePie
SimplePie is a library that enables very easy RSS and Atom-feed consumption. SimplePie also offers advanced functionality, is very well documented and free. Download SimplePie from http://simplepie.org/ and place it at /htdocs/simplepie/. In your browser, the page http://localhost/simplepie/compatibility_test/sp_compatibility_test.php will help you troubleshoot your server settings. You can enable the cURL extension if you receive this message:
"cURL: The cURL extension is not available. SimplePie will use fsockopen() instead."
However, as the output says that it is not strictly needed, the choice is up to you.
Let us look at the RSS feed from wired.com. We will revisit this feed without using the SimplePie library in Chapter 14 on XML. The feed URL is http://feeds.wired.com/wired/index?format=xml. SimplePie throws several E_DEPRECATED errors, which are new in PHP 5.3. We will disable the output of this message with the line error_reporting(E_ALL ^ E_NOTICE ^ E_DEPRECATED);. See Listing 10-1.
Listing 10-1. SimplePie Basic Usage
<HTML>

<HEAD>

<meta http-equiv="Content-Type" content="text/html; charset=UTF-8" />

</HEAD>

<BODY>

<?php

error_reporting ( E_ALL ^ E_NOTICE ^ E_DEPRECATED );

require_once ('simplepie/simplepie.inc'),


$feed_url = "http://feeds.wired.com/wired/index?format=xml";

$simplepie = new Simplepie ( $feed_url );


foreach ( $simplepie->get_items () as $item ) {

        echo '<p><strong><a href="' . $item->get_link () . '">';

        echo $item->get_title () . '</a></strong><br/>';

        echo '<em>' . $item->get_date () . '</em><br/>';

        echo $item->get_content () . '</p>';

}

?>

</BODY>

</HTML>
If you receive the warning “./cache is not writeable. Make sure you've set the correct relative or absolute path, and that the location is server-writable" then we need to fix this. Either supply a writeable custom path as a second argument to the constructor, or create a writeable folder called 'cache' in the same directory as our script. Figure 10-1 shows the output of Listing 10-1.

Figure 10-1. Sample browser output of Listing 10-1
Our own code in Chapter 14 is not much longer than this example. The real advantage of using the SimplePie library is that it is much more configurable and mature. It handles different types of feeds and would save us a lot of work the more complex we got in our parsing. SimplePie has a lot of auxiliary methods for tasks such as retrieving a favicon or social media fields. It also has built-in sanitization support and subscription management. SimplePie has plugins for external frameworks, CMSes, and APIs. In Listing 10-2, we have added the favicon image of the feed link and formatted the date.
Listing 10-2. SimplePie Adding Favicon and Custom Formatted Date
<HTML>

<HEAD>

<meta http-equiv="Content-Type" content="text/html; charset=UTF-8" />

</HEAD>

<BODY>

<?php

error_reporting ( E_ALL ^ E_NOTICE ^ E_DEPRECATED );

require_once ('simplepie/simplepie.inc'),
$feed_url = "http://feeds.wired.com/wired/index?format=xml";
$simplepie = new Simplepie ( $feed_url );
$favicon = $simplepie->get_favicon ();
foreach ( $simplepie->get_items () as $item ) {
echo '<p><img src="' . $favicon . '" alt="favicon"/> ';
echo '<strong><a href="' . $item->get_link () . '">';
echo $item->get_title () . '</a></strong><br/>';
echo '<em>' . $item->get_date ( 'd/m/Y' ) . '</em><br/>';
echo $item->get_content () . '</p>';
}
?>
</BODY>
</HTML>
Our last example will deal with a namespaced element in the RSS feed. If you are not sure what fields are populated in a certain feed, view the source in a web browser and inspect the XML. In our sample feed from Wired, the author is a namespaced element "dc:creator".
<rss xmlns:dc="http://purl.org/dc/elements/1.1/" xmlns:feedburner="http://rssnamespace.org/feedburner/ext/1.0" version="2.0">
We can see that dc corresponds to http://purl.org/dc/elements/1.1/ and can use the get_item_tags method to examine the structure of an item. See Listings 10-3 and 10-4.
Listing 10-3. Examining the Structure of an Element with a Namespace
<?php

error_reporting ( E_ALL ^ E_NOTICE ^ E_DEPRECATED );

require_once ('simplepie/simplepie.inc'),


$feed_url = "http://feeds.wired.com/wired/index?format=xml";

$simplepie = new Simplepie ( $feed_url );

$item = array_pop($simplepie->get_items());

$creator = $item->get_item_tags("http://purl.org/dc/elements/1.1/", "creator");

var_dump($creator);
Outputs
array

 0 =>

    array

     'data' => string 'Sample Author' (length=13)

     'attribs' =>

       array

         empty

     'xml_base' => string '' (length=0)

     'xml_base_explicit' => boolean false

     'xml_lang' => string '' (length=0)
Now that we know the structure of the creator element, we can add it into our script.
Listing 10-4. Adding the Namespaced Element Creator
<HTML>
<HEAD>
<meta http-equiv="Content-Type" content="text/html; charset=UTF-8" />
</HEAD>
<BODY>
<?php
error_reporting ( E_ALL ^ E_NOTICE ^ E_DEPRECATED );
require_once ('simplepie/simplepie.inc'),
$feed_url = "http://feeds.wired.com/wired/index?format=xml";
$simplepie = new Simplepie ( $feed_url );
$favicon = $simplepie->get_favicon ();
foreach ( $simplepie->get_items () as $item ) {
$creator = $item->get_item_tags ( "http://purl.org/dc/elements/1.1/", "creator" );
echo '<p><img src="' . $favicon . '" alt="favicon"/> ';
echo '<strong><a href="' . $item->get_link () . '">';
echo $item->get_title () . '</a></strong><br/>';
echo '<em>' . $item->get_date ( 'd/m/Y' ) . '</em><br/>';
echo '<em>' . $creator [0] ['data'] . '</em><br/>';
echo $item->get_content () . '</p>';
}
?>
</BODY>
</HTML>
The output from Figure 10-4 is shown in Figure 10-2.
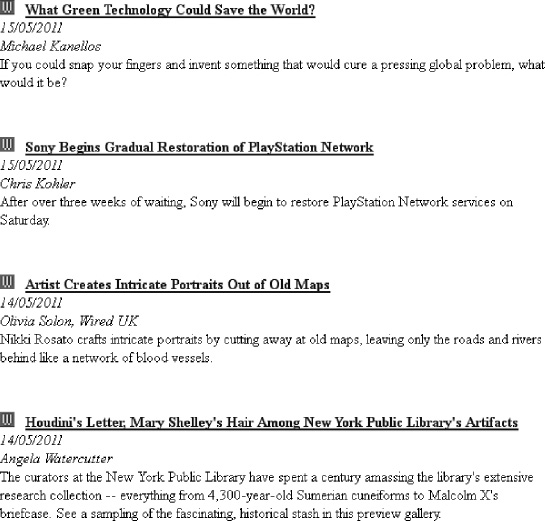
Figure 10-2. Browser output of Listing 10-4, displaying favicon and story creator
For more methods and documentation on the SimplePie API, refer to the excellent documentation found at http://simplepie.org/wiki/reference/start.
TCPDF
TCPDF (tecnick.com PDF) is a library for generating PDF documents with PHP. It requires no external libraries, is very popular, and actively developed. TCPDF can be found at www.tcpdf.org. TCPDF is fully featured and supports graphics through PHP GD and imagemagick, barcodes, gradients, HTML, CSS, fonts, layout management, headers, and footers. Default definitions and settings are in the configuration file, found at /htdocs/tcpdf/config/tcpdf_config.php.
When generating PDFs with TCPDF, command line execution will be faster than in a browser. Browser speeds may also differ substantially from one another. For example, the built-in PDF renderer found in the Chrome browser is blazingly fast. PDF generation through TCPDF can take a lot of memory and execution time. We may need to adjust a couple of php.ini settings.
max_execution_time = 90 //adjust up or down as necessary

memory_limit = 256M     //increase/decrease as necessary
Listing 10-5 generates a line of text in a PDF with minimal coding.
Listing 10-5. Minimal TCPDF Example
<?php


error_reporting(E_ALL);

require_once('/tcpdf/config/lang/eng.php'),

require_once('/tcpdf/tcpdf.php'),


//Construct a new TCPDF object

$pdf = new TCPDF();


//add a page

$pdf->AddPage();


//assign text

$txt = "Pro PHP Programming - Chapter 10: TCPDF Minimal Example";


//print the text block

$pdf->Write( 20, $txt );


//save the PDF

$pdf->Output( 'minimal.pdf', 'I' );


?>
In Listing 10-5, we include the language configuration file and library entry file. Then we construct a new TCPDF object and add a page to it with the AddPage method call. We write a single line of text with line height 20, and then generate our PDF. The 'I' option is to view the document in our browser using a plug-in if one is available.
The constructor has many optional parameters that set orientation, unit, format, unicode usage, encoding, and disk cache. The corresponding default values are portrait, mm, A4, true, UTF-8, and false. For diskcache, false is faster, but consumes more RAM. True is slower because of disk writes but uses less RAM.
The Write method requires only the line height and text, but then has about ten optional parameters. The Output method takes as a first argument the name of the file or raw data string. When representing a data string, the first character should be an @ sign. When representing a filename, illegal characters are removed and whitespace converted into underscores. Save options include inline browser viewing (default) using a plugin if available, forced download, saving to the server, returning a document as a raw string or as an email attachment.
![]() Note The numbers of optional arguments on method calls like
Note The numbers of optional arguments on method calls like Write are hard to remember and can be easily mixed up. When designing an API consider making method signatures programmer friendly. This can be done by limiting the number of method arguments or passing in an associative array or object. Too many parameters is also a “code smell.” Robert Martin puts it best in Clean Code (Prentice-Hall, 2009):
“The ideal number of arguments for a function is zero (niladic). Next comes one (monadic), followed closely by two (dyadic). Three arguments (triadic) should be avoided where possible. More than three (polyadic) requires very special justification -- and then shouldn't be used anyway.”
Fewer parameters makes memorization easier or unnecessary. However, using an IDE – such as Zend Studio or Netbeans – will provide inline links to the sources and autocompletion tips.
Graphically, TCPDF contains methods for using GD images, PNG with alpha, or EPS; or composing shapes such as circles, lines, and polygons. As with most methods, there are a plethora of configurable optional arguments. It is not essential to remember the arguments, just look them up in the tcpdf.php file as needed.
In Listing 10-6, we will show how to output an image and HTML formatted text within a document.
Listing 10-6. Second TCPDF Example with an Image and HTML
<?php


error_reporting ( E_ALL );

require_once ('/tcpdf/config/lang/eng.php'),

require_once ('/tcpdf/tcpdf.php'),


//Contruct a new TCPDF object

$pdf = new TCPDF ();


//set document meta information

$pdf->SetCreator ( PDF_CREATOR );

$pdf->SetAuthor ( 'Brian Danchilla' );

$pdf->SetTitle ( 'Pro PHP Programming - Chapter 10' );

$pdf->SetSubject ( 'TCPDF Example 2' );

$pdf->SetKeywords ( 'TCPDF, PDF, PHP' );


//set font

$pdf->SetFont ( 'times', '', 20 );
//add a page
$pdf->AddPage ();
$txt = <<<HDOC
Pro PHP Programming:
Chapter 10: TCPDF Example 2
An Image:
HDOC;
$pdf->Write ( 0, $txt );
//image scale factor
$pdf->setImageScale ( PDF_IMAGE_SCALE_RATIO );
//JPEG quality
$pdf->setJPEGQuality ( 90 );
//a sample image
$pdf->Image ( "bw.jpg" );
$txt = "Above: an image<h2>Embedded HTML</h2>
This text should have some <em>italic</em> and some <strong>bold</strong>
and the caption should be an <h2>.";
$pdf->WriteHTML ( $txt );
//save the PDF
$pdf->Output ( 'image_and_html.pdf', 'I' );
?>
The results of running this example are shown in Figure 10-3.
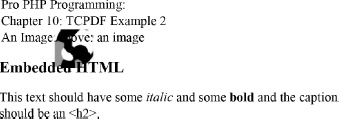
Figure 10-3. Running Listing 10-6 results in overlapping text and image
In Listing 10-6, we set document metadata and our font. Like our first example in Listing 10-5, we add a text block with Write. Then we set some image properties and output our image with the Image method. Finally, we embed HTML tags and output the markup with the WriteHTML method.
By default, the logo will be output where our cursor was last. This causes some of our output to overlap. To fix this issue, we will add some line breaks with the Ln method in Listing 10-7. Ln optionally takes a height value as an argument. The default height will be equal to the height of the previously written element.
Listing 10-7. Fixing the Overlap Issue by Inserting Line Breaks
<?php
error_reporting ( E_ALL );
require_once ('/tcpdf/config/lang/eng.php'),
require_once ('/tcpdf/tcpdf.php'),
//Contruct a new TCPDF object
$pdf = new TCPDF ();
//set document meta information
$pdf->SetCreator ( PDF_CREATOR );
$pdf->SetAuthor ( 'Brian Danchilla' );
$pdf->SetTitle ( 'Pro PHP Programming - Chapter 10' );
$pdf->SetSubject ( 'TCPDF Example 2' );
$pdf->SetKeywords ( 'TCPDF, PDF, PHP' );
//set font
$pdf->SetFont ( 'times', '', 20 );
//add a page
$pdf->AddPage ();
$txt = <<<HDOC
Pro PHP Programming:
Chapter 10: TCPDF Example 2
An Image:
HDOC;
$pdf->Write ( 0, $txt );
$pdf->Ln ();
//image scale factor
$pdf->setImageScale ( PDF_IMAGE_SCALE_RATIO );
//JPEG quality
$pdf->setJPEGQuality ( 90 );
//a sample image
$pdf->Image ( "bw.jpg" );
$pdf->Ln ( 30 );
$txt = "Above: an image
<h2>Embedded HTML</h2>
This text should have some <em>italic</em> and some <strong>bold</strong>
and the caption should be an <h2>.";
$pdf->WriteHTML ( $txt );
//save the PDF
$pdf->Output ( 'image_and_html.pdf', 'I' );
?>
The results of running this example can be seen in Figure 10-4.

Figure 10-4. Running Listing 10-7 fixes the overlap issues
Our third and final example of TCPDF usage, see Listing 10-8, will output a barcode and gradient. The available barcode types can be found in the barcodes.php file. Methods for outputting barcodes are write1DBarcode, write2DBarCode, and setBarcode. Gradient methods include Gradient, LinearGradient, CoonsPatchMesh, and RadialGradient.
Listing 10-8. TCPDF Generating a Barcode and Gradient
<?php


error_reporting ( E_ALL );

require_once ('/tcpdf/config/lang/eng.php'),

require_once ('/tcpdf/tcpdf.php'),


//Contruct a new TCPDF object

$pdf = new TCPDF ();


//set document meta information

$pdf->SetCreator ( PDF_CREATOR );

$pdf->SetAuthor ( 'Brian Danchilla' );

$pdf->SetTitle ( 'Pro PHP Programming - Chapter 10' );

$pdf->SetSubject ( 'TCPDF Example 3 - Barcode & Gradient' );

$pdf->SetKeywords ( 'TCPDF, PDF, PHP' );


//set font

$pdf->SetFont ( 'times', '', 20 );


//set margins

$pdf->SetMargins( PDF_MARGIN_LEFT, PDF_MARGIN_TOP, PDF_MARGIN_RIGHT );


//add a page

$pdf->AddPage();

$txt = <<<HDOC

Chapter 10: TCPDF Example 3 - Barcode & Gradients

HDOC;

$pdf->Write( 20, $txt );
$pdf->Ln();


$pdf->write1DBarcode('101101101', 'C39+'),


$pdf->Ln();


$txt = "Above: a generated barcode. Below, a generated gradient image";


$pdf->WriteHTML($txt);


$pdf->Ln();


$blue = array( 0, 0, 200 );

$yellow = array( 255, 255, 0 );

$coords = array( 0, 0, 1, 1 );


//paint a linear gradient

$pdf->LinearGradient( PDF_MARGIN_LEFT, 90, 20, 20, $blue, $yellow, $coords );

$pdf->Text( PDF_MARGIN_LEFT, 111, 'Gradient cell' ); //label


//save the PDF

$pdf->Output( 'barcode_and_gradient.pdf', 'I' );

?>
The code in Listing 10-8 has added functionality to set the page margins, write a barcode and paint a linear gradient. Running this example results in Figure 10-5.
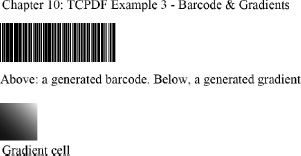
Figure 10-5. Barcode and Gradient generated with TCPDF
Finally, you should know that you can alter the behavior of page breaks with the method SetAutoPageBreak. By default, page breaks are automatic as if $pdf->SetAutoPageBreak( TRUE, PDF_MARGIN_FOOTER); was called. To turn off automatic page breaking, you would call $pdf->SetAutoPageBreak( FALSE );. Without automatic page breaks, any extra data that can not fit on a page is cut off. This requires the programmer to add more AddPage calls and check the size of page content. With automatic page breaks, data that does not fit is output onto a new page.
Scraping Website Data
There are times when we want to retrieve information from a website, but it is not easily accessible through web service API calls or feeds. The data we are interested in is present as raw HTML. We would like to obtain the data in an automated way for further data processing. This process is known as page scraping.
Scraping data is not as precise as receiving XML data from a feed or API. However, we can use contextual clues such as CSS element, id, and class values and regularly output data in tables to make sense of the retrieved data. Sites with more strictly followed formatting provide data which is easier to accurately scrape.
Scraping website data is a two step process. First, we need to grab the remote content, and then we have to do something with it. Grabbing the remote content can be done simply with the file_get_contents function, or with more configuration options using the cURL library. Some things we could do with the data would be to display it directly, filter/parse it for specific content, or store it in a file or database.
In this section we are concerned with the second option, parsing for specific content. For general content we could accomplish this with regex. For our HTML examples, it makes more sense to load the data into a DOMDocument object. We will show how to use DOMDocument together with DOMXPath. We will also show the equivalent functionality using the phpQuery library.
phpQuery wraps the DOMDocument and aims to be a “port” of jQuery notation on the server side. Thus, if you already know jQuery, then this library will be easy to pick up. More information on XML, DOM, and jQuery can be found in Chapters 14 and 15.
![]() Note If you receive the message
Note If you receive the message Fatal error: Call to undefined function curl_init(), then you need to install or enable the cURL extension. You may need to download the cURL library if it is not on your system.
In php.ini add or enable the extension line:
;windows:

extension=php_curl.dll


;linux:

extension=php_curl.so
and restart your webserver
In Listing 10-9, we will fetch and output data from www.nhl.com using cURL.
Listing 10-9. Basic cURL Usage
<?php

error_reporting ( E_ALL ^ E_NOTICE );


$url = "http://www.nhl.com";

print fetchRawData ( $url );


function fetchRawData($url) {

        $ch = curl_init ();

        curl_setopt ( $ch, CURLOPT_URL, $url );

        curl_setopt ( $ch, CURLOPT_RETURNTRANSFER, true ); //return the output as a variable

        curl_setopt ( $ch, CURLOPT_FAILONERROR, true ); //fail if error encountered

        curl_setopt ( $ch, CURLOPT_FOLLOWLOCATION, true ); //allow redirects

        curl_setopt ( $ch, CURLOPT_TIMEOUT, 10 ); //time out length


        $data = curl_exec ( $ch );

        if (! $data) {

                echo "<br />cURL error:<br/>
";

                echo "#" . curl_errno ( $ch ) . "<br/>
";

                echo curl_error ( $ch ) . "<br/>
";

                echo "Detailed information:";

                var_dump ( curl_getinfo ( $ch ) );

                die ();

        }


        curl_close ( $ch );

        return $data;

}


?>
In Listing 10-9, we get a cURL resource handle with curl_init(). Then we configure our cURL settings with curl_setopt calls. curl_exec executes the request and returns the result. Finally, we check if the result is non null. If it is then we use curl_errno, curl_error and curl_getinfo to troubleshoot the error. curl_getinfo contains information about the last request. A typical error would look like:
cURL error:

#6

Could not resolve host: www.znhlz.com; Host not found
cURL is very configurable. Some other options are:
curl_setopt( $ch, CURLOPT_POST, true );                           //POST request

curl_setopt( $ch, CURLOPT_POSTFIELDS, "key1=value1&key2=value2" );//POST key/value pairs

curl_setop($ch, CURLOPT_USERPWD, "username:password" );           //for authenticated sites

//some sites block requests that do not have the user agent sent

curl_setopt( $ch, CURLOPT_USERAGENT, $userAgent );
If we do not require extensive configuration and have file_get_contents usage enabled in php.ini, then the script in Listing 10-9 could be reduced to Listing 10-10.
Listing 10-10. Simplified Fetching of Content Using file_get_contents
<?php

error_reporting(E_ALL ^ E_NOTICE);


$url = "http://www.nhl.com";

print fetchRawData( $url );


//our fetching function

function fetchRawData( $url ) {

  $data = file_get_contents($url);

   if( $data === false ) {

     die("Error");

   }

  return $data;

}


?>
In the next script which builds upon Listing 10-9, we will parse specific data and display the results. In this case we will be finding all of the links and their titles on the webpage. See listing 10-11.
Listing 10-11. Using cURL, DOMDocument, and DOMXPath to Find the Links on a Webpage
<?php


error_reporting ( E_ALL ^ E_NOTICE );


$url = "http://www.nhl.com";

$rawHTML = fetchRawData ( $url );

$parsedData = parseSpecificData ( $rawHTML );

displayData ( $parsedData );


//our fetching function

function fetchRawData($url) {

        $ch = curl_init ();

        curl_setopt ( $ch, CURLOPT_URL, $url );

        curl_setopt ( $ch, CURLOPT_RETURNTRANSFER, true ); //return the output as a variable

        curl_setopt ( $ch, CURLOPT_FAILONERROR, true ); //fail if error encountered

        curl_setopt ( $ch, CURLOPT_FOLLOWLOCATION, true ); //allow redirects

        curl_setopt ( $ch, CURLOPT_TIMEOUT, 10 ); //time out length


        $data = curl_exec ( $ch );

        if (! $data) {

                echo "<br />cURL error:<br/>
";

                echo "#" . curl_errno ( $ch ) . "<br/>
";

                echo curl_error ( $ch ) . "<br/>
";

                echo "Detailed information:";

                var_dump ( curl_getinfo ( $ch ) );

                die ();

        }
        curl_close ( $ch );

        return $data;

}


//our parsing function

function parseSpecificData($data) {

        $parsedData = array ();

        //load into DOM

        $dom = new DOMDocument ();

        @$dom->loadHTML($data); //normally do not use error suppression!


        $xpath = new DOMXPath ( $dom );

        $links = $xpath->query ( "/html/body//a" );

        if ($links) {

                foreach ( $links as $element ) {

                        $nodes = $element->childNodes;

                        $link = $element->attributes->getNamedItem ( 'href' )->value;

                        foreach ( $nodes as $node ) {

                                if ($node instanceof DOMText) {

                                        $parsedData [] = array ("title" => $node->nodeValue,

                                                                "href" => $link );

                                }

                        }

                }

        }

        return $parsedData;

}


//our display function

function displayData(Array $data) {

        foreach ( $data as $link ) { //escape output

                $cleaned_title = htmlentities ( $link ['title'], ENT_QUOTES, "UTF-8" );

                $cleaned_href = htmlentities ( $link ['href'], ENT_QUOTES, "UTF-8" );

                echo "<p><strong>" . $cleaned_title . "</strong><br/>
";

                echo $cleaned_href . "</p>
";

        }

}


?>
In Listing 10-11, we load our raw data into a DOMDocument object. We then call loadHTML and use PHP's error suppression operator, @.
![]() Note Normally we do not use error suppression, as it hinders debugging. However, in this case it hides a lot of DOMDocument warnings that we are not concerned with.
Note Normally we do not use error suppression, as it hinders debugging. However, in this case it hides a lot of DOMDocument warnings that we are not concerned with.
We then use DOMXPath to find the document links and corresponding text, and store them into an array. As the data is from an external source, we should not trust it. We escape all of our values before printing the output to our screen. This is a best practice to prevent Cross-Site Scripting which is covered in the Chapter 11: Security.
The following is sample output from running Listing 10-11:
TEAMS


http://www.nhl.com/ice/teams.htm#?nav-tms-main


Chicago Blackhawks


http://blackhawks.nhl.com


Columbus Blue Jackets


http://bluejackets.nhl.com


Detroit Red Wings


http://redwings.nhl.com
We will now show how the phpQuery library allows us to use selectors and notation similar to jQuery (see Listing 10-12). This simplifies the parsing step of our scraping script. You will first need to download the phpQuery library from http://code.google.com/p/phpquery/.
Listing 10-12. Using cURL and phpQuery to Find the Links on a Webpage
<?php

error_reporting ( E_ALL ^ E_NOTICE );

require_once ("phpquery/phpQuery/phpQuery.php");


$url = "http://www.nhl.com";

$rawHTML = fetchRawData ( $url );

$parsedData = parseSpecificData ( $rawHTML );

displayData ( $parsedData );


//our fetching function

function fetchRawData($url) {

        $ch = curl_init ();

        curl_setopt ( $ch, CURLOPT_URL, $url );

        curl_setopt ( $ch, CURLOPT_RETURNTRANSFER, true ); //return the output as a variable

        curl_setopt ( $ch, CURLOPT_FAILONERROR, true ); //fail if error encountered

        curl_setopt ( $ch, CURLOPT_FOLLOWLOCATION, true ); //allow redirects

        curl_setopt ( $ch, CURLOPT_TIMEOUT, 10 ); //time out length
        $data = curl_exec ( $ch );

        if (! $data) {

                echo "<br />cURL error:<br/>
";

                echo "#" . curl_errno ( $ch ) . "<br/>
";

                echo curl_error ( $ch ) . "<br/>
";

                echo "Detailed information:";

                var_dump ( curl_getinfo ( $ch ) );

                die ();

        }


        curl_close ( $ch );

        return $data;

}


//our parsing function

function parseSpecificData($data) {

        $parsedData = array ();

        phpQuery::newDocumentHTML ( $data );

        foreach ( pq ( "a" ) as $link ) {

                $title = pq ( $link )->text ();

                if ($title) {

                        $parsedData [] = array ("title" => $title,

                                                "href" => pq ( $link )->attr ( 'href' ) );

                }

        }

        return $parsedData;

}


//our display function

function displayData(Array $data) {

        foreach ( $data as $link ) { //escape output

                $cleaned_title = htmlentities ( $link ['title'], ENT_QUOTES, "UTF-8" );

                $cleaned_href = htmlentities ( $link ['href'], ENT_QUOTES, "UTF-8" );

                echo "<p><strong>" . $cleaned_title . "</strong><br/>
";

                echo $cleaned_href . "</p>
";

        }

}


?>
Notice that from Listing 10-11 to Listing 10-12 only our parsing function has changed. To use phpQuery instead of a DOMDocument directly, we call the newDocumentHTML method:
phpQuery::newDocumentHTML($data);
A full breakdown of the phpQuery library will not be covered here. Instead, we will compare the XPath, phpQuery, and jQuery notations for the selectors used in the example (Table 10-1).

Google Map Integration
To use Google Maps, we will make use of the php-google-map-api library available at http://code.google.com/p/php-google-map-api/. A direct download package of the current release, 3.0, is not available at this time. You will need to use a subversion client to checkout the sources, with the following command:
svn checkout http://php-google-map-api.googlecode.com/svn/trunk/
Two svn clients are tortoiseSVN available at http://tortoisesvn.net/downloads.html and slik svn available at http://www.sliksvn.com/en/download.
The php-google-map-api library is actively developed and feature rich. We will define a boilerplate template that our example scripts will be output into (Listing 10-13).
Listing 10-13. Our Boilerplate Template, gmap_template.php
<html>

    <head>

        <?php

          echo $gmap->getHeaderJS();

          echo $gmap->getMapJS();

        ?>

    </head>

    <body>

        <?php

          echo $gmap->printOnLoad();

          echo $gmap->printMap();

          echo $gmap->printSidebar();

        ?>

    </body>

</html>
In our first example, we will display a Google Map with a single marker. See Listing 10-14.
Listing 10-14. Google Maps Satellite Imagery, Single Marker Example
<?php

error_reporting(E_ALL ^ E_NOTICE);

require_once("php-google-map-api/GoogleMap.php");

require_once("php-google-map-api/JSMin.php");


$gmap = new GoogleMapAPI();

$gmap->addMarkerByAddress(

                          "Eiffel Tower, Paris, France",

                          "Eiffel Tower Title",

                          "Eiffel Tower Description" );

require_once('gmap_template.php'),

?>
As you can see, displaying a Google Map with the library is very easy. In Listing 10-14, we create a new GoogleMapAPI object and mark an address. The method addMarkerByAddress takes a title and description as additional arguments. The result is shown in Figure 10-6.
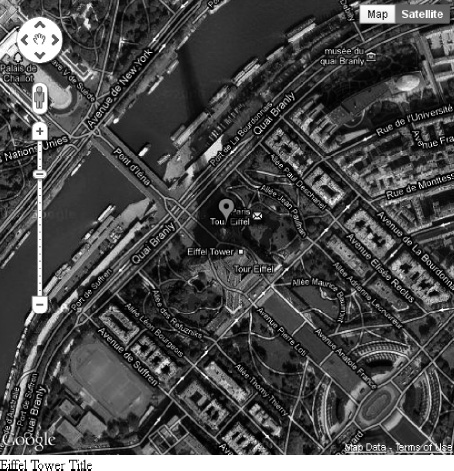
Figure 10-6. A Google Map marking the Eiffel Tower
In Listing 10-15, we will show a map instead of satellite imagery. We will also set the default zoom level and show traffic routes as an overlay. The result is shown in Figure 10-7.
Listing 10-15. Google Maps Traffic Routes Overlay Example
<?php

error_reporting(E_ALL ^ E_NOTICE);

require_once("php-google-map-api/GoogleMap.php");

require_once("php-google-map-api/JSMin.php");


$gmap = new GoogleMapAPI();

$gmap->addMarkerByAddress( "New York, NY", "New York Traffic", "Traffic description here" );

$gmap->setMapType( 'map' );

$gmap->setZoomLevel( 15 );

$gmap->enableTrafficOverlay();

require_once('gmap_template.php'),

?>
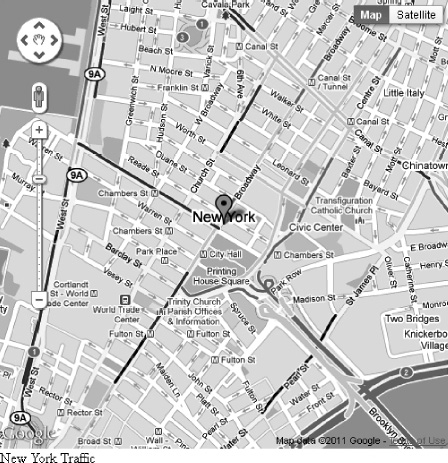
Figure 10-7. Google Map showing New York traffic routes
For our last example, we will place several markers on the same map. We will also set the map type to terrain. See Listing 10-16, the results of which are shown in Figure 10-8.
Listing 10-16. Google Maps Terrain, Multiple Markers Example
<?php

error_reporting(E_ALL ^ E_NOTICE);

require_once("php-google-map-api/GoogleMap.php");

require_once("php-google-map-api/JSMin.php");


$gmap = new GoogleMapAPI();

$gmap->addMarkerByAddress( "Saskatoon, SK", "", "Home" );

$gmap->addMarkerByAddress( "Vancouver, BC", "", "West Coast" );

$gmap->addMarkerByAddress( "Montreal, QC", "", "Hockey" );

$gmap->addMarkerByAddress( "Playa del Carmen, Mexico", "", "Tropical vacation" );

$gmap->setMapType( 'terrain' );


require_once('gmap_template.php'),

?>
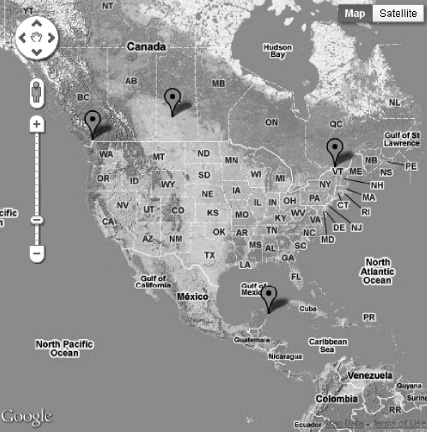
Figure 10-8. Google Map displaying terrain and multiple markers
E-mail and SMS
PHP has a built in function, mail, to send e-mail. However, for more complex server or e-mail settings, an external library enables mail creation in an easier object-oriented manner. The library PHPMailer lets us easily send e-mail and SMS messages. PHPMailer is available for download at http://sourceforge.
net/projects/phpmailer/files/phpmailer%20for%20php5_6/.
Listing 10-17 shows basic usage of the PHPMailer library.
Listing 10-17. Basic Mail Usage
<?php

error_reporting(E_ALL);

require("phpmailer/class.phpmailer.php");


$mail = new PHPMailer(); //default is to use the PHP mail function


$mail->From = "[email protected]";

$mail->AddAddress( "[email protected]" );


$mail->Subject = "PHPMailer Message";

$mail->Body = "Hello World!
 I hope breakfast is not spam.";


if( $mail->Send() ) {

  echo 'Message has been sent.';

} else {

  echo 'Message was not sent because of error:<br/>';

  echo $mail->ErrorInfo;

}

?>
![]() Note If you receive the error message
Note If you receive the error message “Could not instantiate mail function,” then it is likely because the From e-mail address is not valid on the server that you are sending from.
Next we will demonstrate sending an HTML formatted message and an attachment (Listing 10-18).
Listing 10-18. Sending an HTML-Formatted Message with an Attachment
<?php

error_reporting(E_ALL);

require("phpmailer/class.phpmailer.php");


$mail = new PHPMailer(); //default is to use the PHP mail function


$mail->From = "[email protected]";

$mail->AddAddress( "[email protected]" );
$mail->Subject = "PHPMailer Message";


$mail->IsHTML(); //tell PHPMailer that we are sending HTML
$mail->Body = "<strong>Hello World!</strong><br/> I hope breakfast is not spam.";


//fallback message in case their mail client does not accept HTML

$mail->AltBody = "Hello World!
 I hope breakfast is not spam.";

//adding an attachment

$mail->AddAttachment( "document.txt" );


if( $mail->Send() ) {

  echo 'Message has been sent.';

} else {

  echo 'Message was not sent because of error:<br/>';

  echo $mail->ErrorInfo;

}

?>
In Listing 10-19, we will use a SMTP server with authentication. We will also loop through an array of e-mail addresses and names to send bulk e-mail.
Listing 10-19. PHPMailer Sending Bulk Mail with SMTP
<?php


error_reporting(E_ALL);

require("phpmailer/class.phpmailer.php");


$mail = new PHPMailer();


$mail->IsSMTP();  //using SMTP

$mail->Host = "smtp.example.com"; // SMTP server


//authenticate on the SMTP server

$mail->SMTPAuth = true;

$mail->Username = "brian";

$mail->Password = "briansPassword";


$mail->From = "[email protected]";

$mail->Subject = "PHPMailer Message";


$names = array(

    array( "email" => "[email protected]", "name" => "foo1" ),

    array( "email" => "[email protected]", "name" => "foo2" ),

    array( "email" => "[email protected]", "name" => "foo3" ),

    array( "email" => "[email protected]", "name" => "foo4" )

);
foreach ( $names as $n ) {
$mail->AddAddress( $n['email'] );
$mail->Body = "Hi {$n['name']}!
Do you like my SMTP server?";
if( $mail->Send() ) {
echo 'Message has been sent.';
} else {
echo 'Message was not sent because of error:<br/>';
echo $mail->ErrorInfo;
}
$mail->ClearAddresses();
}
?>
In our last example of using the PHPMailer library, Listing 10-20, we will send a Short Message Service (SMS) message. SMS messages are more commonly referred to as text messages or texts. To send an SMS, we need to know the recipient's phone number and provider. From the provider, we need to know the SMS domain.
Listing 10-20. Using PHPMailer to Send an SMS
<?php


error_reporting(E_ALL);

require("phpmailer/class.phpmailer.php");

define( 'MAX_SMS_MESSAGE_SIZE', 140 );


$mail = new PHPMailer();


$mail->IsSMTP();

$mail->Host = "smtp.example.com";

$mail->SMTPAuth = true;

$mail->Username = "brian";

$mail->Password = "briansPassword";


$mail->From = "[email protected]";

$mail->Subject = "PHPMailer Message";


$phone_number = "z+a  555 kfla555-@#1122";

$clean_phone_number = filter_var( $phone_number, FILTER_SANITIZE_NUMBER_INT );

//+555555-1122

$cleaner_phone_number = str_replace( array( '+' ,  '-' ), '', $clean_phone_number );

//5555551122


$sms_domain = "@sms.fakeProvider.com";


//[email protected]

$mail->AddAddress( $cleaner_phone_number . $sms_domain );

$mail->Body = "Hi recipient!
 here is a text";

if ( strlen( $mail->Body ) < MAX_SMS_MESSAGE_SIZE ) {

    if ( $mail->Send() ) {

        echo 'Message has been sent.';
    } else {

        echo 'Message was not sent because of error:<br/>';

        echo $mail->ErrorInfo;

    }

} else {

    echo "Your message is too long.";

}

?>
In Listing 10-20, we first ensure that our phone number contains only digits. We use filter_var to strip out all characters except for digits, the plus and minus sign. Then we use str_replace to remove any plus or minus signs. We also define a maximum string length and ensure that our body is smaller than this restriction. We concatenate the cleaned phone number with our SMS domain and use it as the address to send our SMS message to.
![]() Note Most SMS providers require that the number be ten digits long with no punctuation. This means that the number excludes the country code. You may want to add validation that the cleaned number is ten digits in length.
Note Most SMS providers require that the number be ten digits long with no punctuation. This means that the number excludes the country code. You may want to add validation that the cleaned number is ten digits in length.
gChartPHP: a Google Chart API Wrapper
The Google Chart API is a very easy to use, extremely powerful library to generate dynamic graphs and charts. The gChartPHP wrapper abstracts the exact syntax needed by the API in an object oriented fashion. This makes it even easier to use and less error prone. With the Chart API, Google generates the images so it takes some load off of your server. You can download the API wrapper at http://code.google.com/p/gchartphp/. For more information on the Google Chart API, visit http://code.google.com/apis/chart/.
The Google Chart API can generate the following types of charts: line, bar, pie, map, scatter, venn, radar, QR Codes, google-o-meter, compound charts, candlesticks and GraphViz. We will show how to generate a map and a candlestick chart.
A map chart is like those found in Google Analytics. Countries that we want to mark are colored between a gradient range of two color values. The data that we assign to a country determines the level of shading that the country receives. This is useful to show countries or areas that have more weight in the statistic we are charting. See Listing 10-21.
Listing 10-21. Displaying a Colored Map of Select European Countries
<?php


error_reporting(E_ALL);

require_once ('GChartPhp/gChart.php'),


$map = new gMapChart();


$map->setZoomArea( 'europe' );  //geographic area

//italy, sweden, great britain, spain, finland

$map->setStateCodes( array( 'IT', 'SE', 'GB', 'ES', 'FI') );
$map->addDataSet( array( 50, 100, 24, 80, 65 ) ); //level of shading in gradient

$map->setColors(

        'E7E7E7', //default

        array('0077FF', '000077') //gradient color range

);

echo "<img src="" . $map->getUrl() . "" /><br/>Europe";

?>
In Listing 10-21, we construct a gMapChart object and zoom in to Europe. We then add some country codes. A listing of these abbreviations can be found online at http://en.wikipedia.org/wiki/ISO_3166-1_alpha-2. We set corresponding data to each country code. If we wanted all of the countries to be the same color, then set all the values to be equal. Next we set the colors. Our gradient range runs from light blue-green to dark blue. Finally, we output the URL directly into an image tag. Figure 10-9 shows a map generated with the Google Chart API.
![]() Note We are restricted in the query length when performing a
Note We are restricted in the query length when performing a GET request. The Google Chart API and wrapper do have ways of sending a POST request. One such way is using renderImage(true).

Figure 10-9. A map generated with the Google Chart API
Our second and last example will show how to make a candlestick chart. Candlestick charts require at least four data series and are commonly used to portray stock market data. See Figure 10-10.
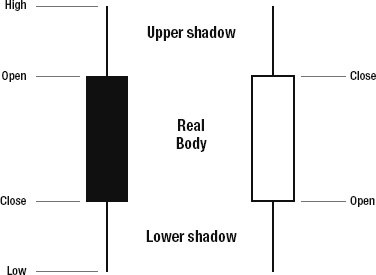
Figure 10-10. A candlestick marker
In a candlestick marker, the area between the stock open and close is known as the “body” or “real body.” The high and low “wicks” are also known as the “shadows” and show the highest and lowest stock price during the day. Listing 10-22 produces a candlestick-style chart.
Listing 10-22. Code to Produce a Candlestic-Style Chart
<?php


error_reporting(E_ALL);

require_once ('GChartPhp/gChart.php'),


$candlestick = new gLineChart( 400, 400 );


//the regular line graph of close prices

//32 pts

$candlestick->addDataSet(

        array( 90, 70, 60, 65, 75, 85, 70, 75,

            80, 70, 75, 85, 100, 105, 100, 95,

            80, 70, 65, 35, 30, 45, 40, 50,

            40, 40, 50, 60, 70, 75, 80, 75

));


//the candlestick markers. the close price is the same as our line graph

$candlestick->addHiddenDataSet(

        array( 100, 95, 80, 75, 85, 95, 90, 95,

            90, 85, 85, 105, 110, 120, 110, 110,

            105, 90, 75, 85, 45, 55, 50, 70,

            55, 50, 55, 65, 80, 85, 90, 85

)); //high
$candlestick->addHiddenDataSet(

        array( 80, 90, 70, 60, 65, 75, 85, 70,

            75, 80, 70, 75, 85, 100, 105, 100,

            95, 80, 70, 65, 35, 30, 45, 40,

            50, 45, 40, 50, 60, 70, 75, 80

)); //open

$candlestick->addHiddenDataSet(

        array( 90, 70, 60, 65, 75, 85, 70, 75,

            80, 70, 75, 85, 100, 105, 100, 95,

            80, 70, 65, 35, 30, 45, 40, 50,

            40, 40, 50, 60, 70, 75, 80, 75

)); //close

$candlestick->addHiddenDataSet(

        array( 65, 65, 50, 50, 55, 65, 65, 65,

            70, 50, 65, 75, 80, 90, 90, 85,

            60, 60, 55, 30, 25, 20, 30, 30,

            30, 25, 30, 40, 50, 55, 55, 55

));   //low


$candlestick->addValueMarkers(

        'F', //line marker type is candlestick

        '000000', //black color

        1, //start with "high" data series

        '1:', //do not show first marker

        5           //marker width

);

$candlestick->setVisibleAxes( array( 'x', 'y' ) );  //both x and y axis

$candlestick->addAxisRange( 0, 0, 32 );           //x-axis

$candlestick->addAxisRange( 1, 0, 110 );          //y-axis


echo "<img src="" . $candlestick->getUrl() . "" /><br/>Stock market report";

?>
In Listing 10-22, we construct a gLineChart object. Then we define the line dataset and four hidden data sets that will be used for our candlesticks. Next we add the candlestick markers. Finally, we set some axis information and display our generated image. The output of Listing 10-22 is shown in Figure 10-11.
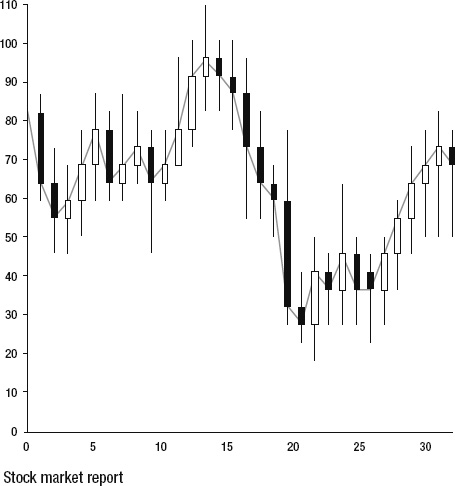
Figure 10-11. A stock market candlestick graph output by running Listing 10-22
Summary
In this chapter we showcased a lot of PHP libraries and their usage. By doing so, we demonstrated how using existing solutions can be very beneficial. We used wrappers for integration with Google Maps and the Google Chart API. We parsed RSS feeds and scraped website data. We generated PDFs, e-mails, and SMS messages.
Using existing libraries enables us to develop quickly and at a high level, abstracting away low level details. The flip side is that we do not have control over the third-party code. We have to trust that it is not malicious or buggy.
As programmers it can be tempting to write your own library because the existing options lack some functionality or are not written to your standards. However, doing this is usually a tremendous waste of time and effort. Often, a better idea is to participate with patches, bug fixes, and feature requests on an existing open source library.