
C H A P T E R 15
JSON and Ajax
Web pages have evolved over recent years, mimicking the functionality found on desktop applications. Despite the added complexity, the user experience has greatly improved; developed sites feel more responsive and engaging. Through quicker feedback, popup tips, auto-completion, and fewer necessary full-page reloads, browsing is a richer, more intuitive, and enjoyable experience.
What makes this all possible is the technique of issuing asynchronous requests from the browser to the server and receiving back responses. The requests are asynchronous because they are done in separate threads that do not block the main script execution. Information is passed back and forth in the form of JSON (JavaScript Object Notation), XML (eXtensible Markup Language), or plain text. This asynchronous communication between browser and server does not require a full page reload and is known as Ajax.
![]() Note The term Ajax was coined in 2005 by Jesse James Garrett and originally stood for Asynchronous JavaScript and XML. Since then, asynchronous communication has been made possible with other scripting languages and data formats, such as VBScript and JSON. For this reason, depending on who you ask, Ajax can also just mean the technique of asynchronous web communication.
Note The term Ajax was coined in 2005 by Jesse James Garrett and originally stood for Asynchronous JavaScript and XML. Since then, asynchronous communication has been made possible with other scripting languages and data formats, such as VBScript and JSON. For this reason, depending on who you ask, Ajax can also just mean the technique of asynchronous web communication.
Ajax is not one technology but comprises several interrelated tools. These components are:
- Presentation layer: HTML (HyperText Markup Language) or XHTML (eXtensible HTML) and CSS (Cascading Style Sheets) and DOM (Document Object Model)
- Data Exchange: XML, JSON, HTML, or plain text
- Asynchronous communication: JavaScript
XMLHttpRequestobject
XML and DOM are covered in Chapter 14. It is assumed that the reader has familiarity with HTML, CSS, and JavaScript.
In this chapter, we will first look at the JSON format and use it with PHP. We will discuss the JavaScript XMLHttpRequest object and how to use it. We will show how to send an Ajax request to a URL and respond with data. We will demonstrate how the higher-level JavaScript API, jQuery, can make Ajax requests much easier.
Toward the end of the chapter, we will build a demo example that encompasses all of the components we have learned. The demo will be of a table-based drawing grid that we can modify, edit, save, and load. We will use jQuery to change the cell background colors and Ajax requests along with PHP to save the image data to a file and load it when we revisit the page.
JSON
Like XML, which is covered in detail in Chapter 14, JSON is just another way to represent data. JSON has seven data types: strings, objects, arrays, numbers, true, false, and null. Strings must be enclosed in double quotes and can contain escape characters such as
, and ". JSON objects are enclosed in braces and contain key/value pairs separated by commas. In JSON, keys are always strings, while the value can be any of the seven data types, including objects and arrays.
An example JSON object would look like:
{"name":"Brian", "age":29}
Here the key "name" corresponds to the string value "Brian" and the key "age" corresponds to the number value 29.
JSON arrays are enclosed in brackets and contain values separated by commas. An example JSON array would look like:
["Brian", 29]
JSON objects and arrays can also be nested. Here is a JSON object representing an image:
{    "dimensions": {

          "width":800, "height":600

      },

      "format":"jpg",

      "alpha_channel": false,

      "filename":"clouds.jpg"

}
The key "dimensions" has another object as its value. This nested object has key/value pairs representing the object's width and height.
Multiple JSON objects nested within a JSON array are shown here:
[

      {  "dimensions": {

             "width":800, "height":600

         },

         "format":"jpg",

         "alpha_channel": false,

         "filename":"clouds.jpg"

      },


     {  "dimensions": {

             "width":40, "height":40

          },
"format":" png",
"alpha_channel":true,
"filename":"icon.jpg"
}
]
A JSON object containing arrays that represent the separate red, green, and blue (RGB) channels of some color data is shown here:
{ "red":   [128,128,255,255,255,128,128,0,0],

  "green": [0, 0, 0, 0, 0, 0, 0,0,0],

  "blue":  [128,128,255,255,255,128,128,0,0]

}
Here is the same color data, expressed as a nested array of RGB array triplets:
[

  [128, 0, 128], [128,0,128], [255, 0, 255],

  [255, 0,255], [255, 0, 255], [128,0,128],

  [128, 0, 128], [0, 0, 0], [0,0,0]

]
PHP and JSON
Luckily for us, PHP arrays are very similar to JSON objects, and PHP has built-in functions to encode and decode JSON. These functions are json_encode and json_decode, respectively.
![]() Note The one PHP data type that cannot be encoded into JSON is a resource, like a database or file handle. Unlike with PHP, you cannot specify the difference between integer and floating point numbers in JSON. Both are represented as the same numeric type.
Note The one PHP data type that cannot be encoded into JSON is a resource, like a database or file handle. Unlike with PHP, you cannot specify the difference between integer and floating point numbers in JSON. Both are represented as the same numeric type.
Both json_encode and json_decode only work with UTF-8 encoded data. The second, optional parameter of json_decode, $assoc, takes a boolean value and is FALSE by default. When $assoc is set to TRUE, JSON objects are decoded into associative arrays. When troubleshooting json_decode, it is important to know that “NULL is returned if the json cannot be decoded or if the encoded data is deeper than the recursion limit.” This is according to the manual found at www.php.net/manual/en/function.json-decode.php
A third PHP function, json_last_error, returns an integer value which represents an error code. The error code returned is one of:
JSON_ERROR_NONE No error has occurred
JSON_ERROR_DEPTH The maximum stack depth has been exceeded
JSON_ERROR_CTRL_CHAR Control character error, possibly incorrectly encoded
JSON_ERROR_STATE_MISMATCH Invalid or malformed JSON
JSON_ERROR_SYNTAX Syntax error
JSON_ERROR_UTF8 Malformed UTF-8 characters, possibly incorrectly
encoded
Listing 15-1 is an example of encoding representatives of the PHP datatypes to a JSON representation and then back again into PHP datatypes.
Listing 15-1. Encoding PHP Datatypes to JSON and Decoding Back to PHP Datatypes
<?php

//we will leave out the PHP resource type

$php_data_types = array(4.1, 3, NULL, true, false, "hello", new StdClass(), array());


$json = json_encode($php_data_types);

$decoded = json_decode($json);

?>

<p>JSON Representation:<br/>

<pre>

<?php var_dump($json); ?>

</pre>

</p>

<p>PHP Representation:<br/>

<pre>

<?php var_dump($decoded); ?>

</pre>

</p>
Running Listing 15-1 results in the following output:
JSON Representation

string(37) "[4.1,3,null,true,false,"hello",{},[]]"


PHP Representation:

array(8) {

  [0]=>

  float(4.1)

  [1]=>

  int(3)

  [2]=>

  NULL

  [3]=>

  bool(true)

  [4]=>

  bool(false)

  [5]=>

  string(5) "hello"

  [6]=>

  object(stdClass)#2 (0) {

  }

  [7]=>

  array(0) {

  }

}
Listing 15-2 encodes a PHP nested array of books into JSON and then decodes the JSON back to PHP. As you will see, JSON represents the encoding as an array of objects.
Listing 15-2. A PHP Nested Array Being First Encoded to JSON and Then Decoded Back to PHP
<?php


$books = array(

      array("author" => "Lewis Carroll",

          "title" => "Alice's Adventures in Wonderland",

          "year" => 1865),

      array("author" => "Yann Martel",

          "title" => "Life of Pi",

          "year" => 2001),

      array("author" =>"Junot Diaz",

          "title" => "The Brief Wondrous Life of Oscar Wao",

          "year" => 2007),

      array("author" => "Joseph Heller",

          "title" => "Catch-22",

          "year" => 1961),

      array("author" => "Timothy Findley",

          "title" => "Pilgrim",

          "year" => 1999),

      array("author" => "Fyodor Dostoyevsky",

          "title" => "Brothers Karamazov",

          "year" => 1880),

      );


$json_books = json_encode($books);

$decoded_json_books = json_decode($json_books);

?>

<pre>

<?php var_dump($json_books); ?>


<?php var_dump($decoded_json_books); ?>

</pre>
Listing 15-2 first outputs the JSON representation of a PHP nested array, which is in the form of an array of objects. The actual output is a continuous string. Line breaks have been added to improve readability:
string(415) "[

{"author":"Lewis Carroll","title":"Alice's Adventures in Wonderland","year":1865},

{"author":"Yann Martel","title":"Life of Pi","year":2001},

{"author":"Junot Diaz","title":"The Brief Wondrous Life of Oscar Wao","year":2007},

{"author":"Joseph Heller ","title":"Catch-22","year":1961},

{"author":"Timothy Findley","title":"Pilgrim","year":1999},

{"author":"Fyodor Dostoyevsky","title":"Brothers Karamazov","year":1880}

]"
Listing 15-2 then outputs the PHP encoding, which is again represented as an array of objects.
array(6) {

  [0]=>

  object(stdClass)#1 (3) {

    ["author"]=>

    string(13) "Lewis Carroll"

    ["title"]=>

    string(32) "Alice's Adventures in Wonderland"

    ["year"]=>

    int(1865)

  }

  [1]=>

  object(stdClass)#2 (3) {

    ["author"]=>

    string(11) "Yann Martel"

    ["title"]=>

    string(10) "Life of Pi"

    ["year"]=>

    int(2001)

  }

  [2]=>

  object(stdClass)#3 (3) {

    ["author"]=>

    string(10) "Junot Diaz"

    ["title"]=>

    string(36) "The Brief Wondrous Life of Oscar Wao"

    ["year"]=>

    int(2007)

  }

  [3]=>

  object(stdClass)#4 (3) {

    ["author"]=>

    string(14) "Joseph Heller "

    ["title"]=>

    string(8) "Catch-22"

    ["year"]=>

    int(1961)

  }

  [4]=>

  object(stdClass)#5 (3) {

    ["author"]=>

    string(15) "Timothy Findley"

    ["title"]=>

    string(7) "Pilgrim"

    ["year"]=>

    int(1999)

  }
[5]=>
object(stdClass)#6 (3) {
["author"]=>
string(18) "Fyodor Dostoyevsky"
["title"]=>
string(18) "Brothers Karamazov"
["year"]=>
int(1880)
}
}
It is worth noting that JSON ignores numeric keys of the individual book arrays. However, as soon as we set one key to be associative, all of the keys, including numeric ones, are stored in the JSON object. Modifying the start of Listing 15-2 from
$books = array(

      array("author" => "Lewis Carroll",

          "title" => "Alice's Adventures in Wonderland",

          "year" => 1865),
to
$books = array(

      "sample_book" =>

      array("author" => "Lewis Carroll",

          "title" => "Alice's Adventures in Wonderland",

          "year" => 1865),
so that it contains an associative key, will produce an object of objects in both the encoded JSON and decoded PHP representations:
string(449) "{

"sample_book":

  {"author":"Lewis Carroll","title":"Alice's Adventures in Wonderland","year":1865},

"0":{"author":"Yann Martel","title":"Life of Pi","year":2001},

"1":{"author":"Junot Diaz","title":"The Brief Wondrous Life of Oscar Wao","year":2007},

"2":{"author":"Joseph Heller ","title":"Catch-22","year":1961},

"3":{"author":"Timothy Findley","title":"Pilgrim","year":1999},

"4":{"author":"Fyodor Dostoyevsky","title":"Brothers Karamazov","year":1880}

}"


object(stdClass)#1 (6) {

  ["sample_book"]=>

  object(stdClass)#2 (3) {

    ["author"]=>

    string(13) "Lewis Carroll"

    ["title"]=>

    string(32) "Alice's Adventures in Wonderland"

    ["year"]=>

    int(1865)

  }
["0"]=>
object(stdClass)#3 (3) {
["author"]=>
string(11) "Yann Martel"
["title"]=>
string(10) "Life of Pi"
["year"]=>
int(2001)
}
["1"]=>
object(stdClass)#4 (3) {
["author"]=>
string(10) "Junot Diaz"
["title"]=>
string(36) "The Brief Wondrous Life of Oscar Wao"
["year"]=>
int(2007)
}
["2"]=>
object(stdClass)#5 (3) {
["author"]=>
string(14) "Joseph Heller "
["title"]=>
string(8) "Catch-22"
["year"]=>
int(1961)
}
["3"]=>
object(stdClass)#6 (3) {
["author"]=>
string(15) "Timothy Findley"
["title"]=>
string(7) "Pilgrim"
["year"]=>
int(1999)
}
["4"]=>
object(stdClass)#7 (3) {
["author"]=>
string(18) "Fyodor Dostoyevsky"
["title"]=>
string(18) "Brothers Karamazov"
["year"]=>
int(1880)
}
}
Ajax
Ajax allows partial reloading and manipulation of rendered content without the need for a full page reload. Ajax calls can be synchronous, but are usually asynchronous background calls. This is so data can be sent and retrieved without interfering with the main program flow. As mentioned, Ajax is not one single technology, but several pieces that work together.
A few negative points of Ajax are:
- Browser back button and bookmarks do not keep track of Ajax state.
- Dynamically generated content is hard for search engines to index.
- Graceful degradation is needed for non-JavaScript users and requires extra work.
- Accessibility issues with screen readers.
However, the responsive and dynamic nature of Ajax generally outweighs the negative aspects. Applications like Gmail, Google Docs, and Facebook showcase what Ajax can do.
The Traditional Web Model
In a simplified view of the classic web model (see Figure 15-1), a client browser sends HTTP requests to a web server and receives responses back. Any time the browser wishes to update the display, even if it is a single <div> element or <img /> element that has changed, or validate input, a full request needs to be made to the server. With every request, the browser is waiting for feedback from the server.

Figure 15-1. Traditional web model
When the web first became widely used 20 years ago, waiting 30 seconds or more for a form submission was acceptable. Internet connections were much slower and the web was still a wondrous new technology, and much quicker than sending a letter or submitting a paper form in person. As humans have become accustomed to faster connections and prompt feedback, tolerance of slow response times has steadily decreased. The need arose for a way to communicate with the server without interrupting the flow of user experience.
Ajax Web Model
In the Ajax web model (shown in Figures 15-2 and 15-3), there is an intermediary – the Ajax engine, which is placed between the client and server. With this model, the client now sends its events to the Ajax engine. Depending on the type of event, the Ajax engine will either manipulate the presentation layer (HTML and CSS) of the client or send an asynchronous event to the server. In the latter case, the server responds to the Ajax engine, which in turn updates the client. Not requiring direct client to server requests allows communication without the need for full page refreshes that interrupt the user's train of thought.
With the Ajax web model, events such as updating the display and form validation can take place without contacting the server. When we need to save and load data, then the server is contacted.

Figure 15-2. Ajax web model – a simple event, with only client and Ajax engine interaction
You can see in Figure 15-2 that some browser client events, such as display changes, do not require requesting or receiving data from the server.

Figure 15-3. Ajax web model – more complex event requiring client, Ajax engine, and server interaction
Other events do require HTTP requests and responses to the server, as shown in Figure 15-3.
Asynchronous Versus Synchronous Events
Suppose that we have three HTTP request events: A, B, and C. Under the synchronous model, we need to wait until we have a server response for event A before we can send request B. We then have to wait until we receive a response for event B until we can send out request C. The events are sequential and so event A blocks event B and event C until it is complete. Similarly, the next event, B, blocks event C until it is complete. See Figure 15-4.
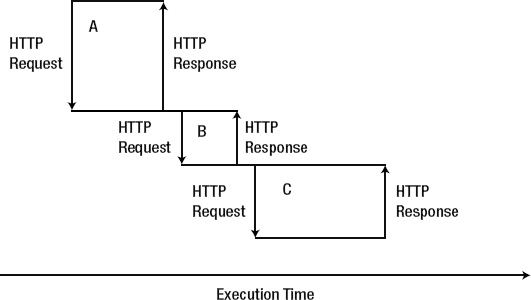
Figure 15-4. Sequential, synchronous HTTP events
With asynchronous events, requests never wait. They are executed individually, in parallel. Even if HTTP event A is still awaiting a server response, new events B and C can start their HTTP requests immediately. As you can see by comparing Figures 15-4 and Figure 15-5, asynchronous events speed up overall event processing times.

Figure 15-5. Parallel, asynchronous HTTP events
XMLHttpRequest Object
The XMLHttpRequest object, often abbreviated XHR, was created by Microsoft in 2000. It is an API, often implemented in JavaScript, that enables sending a request from the client to the server and receiving a response without needing to reload the page. The name of the object is not to be taken literally. Its constituent parts are merely indicative – for example:
- XML: Can actually be XML, JSON, HTML, or plain text documents.
- Http: May be HTTP or HTTPS.
- Request: Requests or responses.
Some browsers do not support the XMLHttpRequest object, but instead support the XDomainRequest object or window.createRequest() method. We will not worry about supporting outdated or non standard browsers in this chapter.
To create a new XMLHttpRequest object takes one line as shown in Listing 15-3.
Listing 15-3. Creating an XMLHttpRequest Object in JavaScript
        <script type="text/javascript">

            var xhr = new XMLHttpRequest();

        </script>
To set the parameters of a request we use the open() function. This function takes the following parameters:
- Request method: One of
{"GET", "POST", "HEAD", "PUT", "DELETE", "OPTIONS"}. - URL: The request URL. Could be to a PHP, JavaScript, HTML, plain text or other file type.
- Asynchronous (optional): Default is true to indicate a non blocking call.
- Username (optional): Username if using authentication on request server.
- Password (optional): Password if using authentication on request server.
Asynchronous calls have a listener callback function, onreadystatechange, which allows the main script to continue. Synchronous calls have no listener, and so need to block the main script until a response is received. If we are sending an asynchronous call, then the onreadystatechange callback will set the readyState property of the request object.
To set the object properties, but not send the request yet, we would use code that looks like:
<script type="text/javascript">

      var xhr = new XMLHttpRequest();

      xhr.open("GET", "animals.xml");

</script>
By default, the headers sent out with the request are "application/xml;charset=_charset" where _charset is the actual encoding used such as UTF-8. If we need to override these values, we would use the function setRequestHeader(String header_name, String header_value). If a proxy is used, the request object will automatically set and send Proxy-Authorization headers.
Before we send our request, we need to define our callback function. We will use an anonymous (unnamed) function and check for a readyState of 4 which indicates a completed request:
xhr.onreadystatechange=function(){

           if (xhr.readyState == 4){ //ready state 4 is completion

                if (xhr.status==200){ //success
Possible Ready States are:
0 Uninitialized - open() has not been called yet.
1 Loading - send() has not been called yet.
2 Loaded - send() has been called, headers and status are available.
3 Interactive - Downloading, responseText holds the partial data.
4 Completed - Finished with all operations.
States 0-3 are inconsistent across browsers. We are mainly interested in state 4.
Now that we have our request object initialized and our callback defined, we can send out our request:
xhr.send("our content");
Altogether sending an Ajax request with an XMLHttpRequest looks like Listing 15-4.
Listing 15-4. A Basic XMLHttpRequest
<script type="text/javascript">

      var xhr = new XMLHttpRequest();

      xhr.open("GET", "animals.xml");

      xhr.onreadystatechange=function(){

           if (xhr.readyState == 4){ //ready state 4 is completion

                if (xhr.status==200){

                    alert("success");

                }

                else{

                    alert("error");

                }

            }

        }

      xhr.send("our content");

</script>
Using XMLHttpRequest
In our first example (Listing 15-5) of using an XMLHttpRequest Object, we will replace the contents of a <p> tag.
Listing 15-5. Modifying a Page Element with XMLHttpRequest, listing_15_5.html
<html>

    <head></head>

    <body>

        <p>Original content</p>

        <script type="text/javascript">

            var xhr = new XMLHttpRequest();


            //assign the request attributes

            xhr.open("GET", window.location.pathname, true);


            //define the callback function

            xhr.onreadystatechange=function(){

                if (xhr.readyState == 4){ //ready state 4 is completion

                    var message = "";

                    if (xhr.status==200){ //success

                        message = "Ajax loaded content";

                    }

                    else{ //error

                        message = "An error has occured making the request";

                    }

                    document.getElementsByTagName("p")[0].innerHTML = message;

                }

            }


            //send the actual request

            xhr.send(null);

        </script>

    </body>

</html>
The URL we are using in the open() method in Listing 15-5 is the current page, accessible in the JavaScript variable window.location.pathname. We are sending no data in our Ajax call, xhr.send(null).
The JavaScript is placed after the HTML element we are manipulating. This is because we need all of the DOM tree loaded so that the JavaScript will be able to find and manipulate elements in it. Higher level frameworks like jQuery have functions to test that a document is ready and by doing so, enable placing the JavaScript anywhere in the page.
Depending on your computer's response time, you may be able to see the element change from its initial value of "Original content" to "Ajax loaded content"
Listing 15-6 will grab the plain text contents of an external XML file and place it into our document, after the page loads. By plain text, we mean that only the XML element values are retrieved. Element names and attributes are discarded.
Listing 15-6. Grabbing the Contents of an XML File with an XMLHttpRequest and Displaying It as Plain Text
<html>
<head>
<title>XHR Example</title>
<style type="text/css">
#generated_content{
border: 1px solid black;
width: 300px;
background-color: #dddddd;
}
</style>
</head>
<body>
<p><strong>Ajax grabbed plain text:</strong></p>
<div id="generated_content"> </div>
<script type="text/javascript">
var xhr = new XMLHttpRequest();
//assign the request attributes
xhr.open("GET", "animals.xml", true);
//define the callback function
xhr.onreadystatechange=function(){
if (xhr.readyState == 4){ //ready state 4 is completion
var message = "";
if (xhr.status==200){ //success
//retrieve result as plain text
message = "<pre>" + xhr.responseText + "</pre>";
}
else{ //error
message = "An error has occured making the request";
}
document.getElementById("generated_content").innerHTML = message;
}
}
//send the actual request
xhr.send(null);
</script>
</body>
</html>
Listing 15-7. The Included XML file, animals.xml
<?xml version="1.0" encoding="UTF-8" ?>

<animals>

  <dogs>

    <dog>

      <name>snoopy</name>

      <color>brown</color>

      <breed>beagle cross</breed>

    </dog>

    <dog>

      <name>jade</name>

      <color>black</color>

      <breed>lab cross</breed>

    </dog>

  </dogs>

  <cats>

    <cat>

      <name>teddy</name>

      <color>brown</color>

      <breed>tabby</breed>

    </cat>

  </cats>

</animals>
The output of Listing 15-6 is shown in Figure 15-6
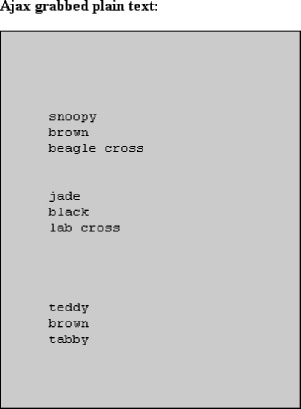
Figure 15-6. The output from running Listing 15-6, which uses Ajax to read the plain text of an XML file
The key line to note in Listing 15-6 is that we are assigning the plain text output of our response on success:
         if (xhr.status==200){ //success

              //retrieve result as plain text

              message = "<pre>" + xhr.responseText + "</pre>";

         }
and placing it as the innerHTML of our <div> with id equal to generated_content:
document.getElementById("generated_content").innerHTML = message;
To get just the animal names (Listing 15-8), we retrieve the output as XML and parse all the name element values.
Listing 15-8. Grabbing XML with XMLHttpRequest and Parsing Specific Values
<html>
<head>
<title>XHR Example - XML</title>
<style type="text/css">
#generated_content{
border: 1px solid black;
width: 300px;
background-color: #dddddd;
padding: 20px;
}
</style>
</head>
<body>
<p><strong>Ajax grabbed specific XML below:</strong></p>
<div id="generated_content"> </div>
<script type="text/javascript">
var xhr = new XMLHttpRequest();
//assign the request attributes
xhr.open("GET", "animals.xml", true);
//define the callback function
xhr.onreadystatechange=function(){
if (xhr.readyState == 4){ //ready state 4 is completion
var message = "";
if (xhr.status==200){ //success
var xml_data = xhr.responseXML
//retrieve result as an XML object
var names = xml_data.getElementsByTagName("name");
for(i=0; i<names.length; ++i){
message += names[i].firstChild.nodeValue + "<br/>
";
//ex) "Snoopy
"
}
}
else{ //error
message = "An error has occured making the request";
}
document.getElementById("generated_content").innerHTML = message;
}
}
            //send the actual request

            xhr.send(null);

        </script>

    </body>

</html>
We use JavaScript in Listing 15-8 to take the XML data that was returned by our Ajax call using xhr.responseXML and parse it for the <name> element values. The output is shown in Figure 15-7.

Figure 15-7. The output from running Listing 15-8, which uses Ajax to parse XML data
If we request a file that is written with HTML, then using responseText preserves the HTML structure, as demonstrated in Listing 15-9. The output is shown in Figure 15-8
Listing 15-9. Grabbing HTML with XMLHttpRequest
<html>
<head>
<title>XHR Example - Plain Text Containing HTML</title>
<style type="text/css">
#generated_content{
border: 1px solid black;
width: 300px;
background-color: #dddddd;
}
</style>
</head>
<body>
<p><strong>Ajax grabbed plain text containing html:</strong></p>
<div id="generated_content"> </div>
<script type="text/javascript">
var xhr = new XMLHttpRequest();
//assign the request attributes
xhr.open("GET", "sample_table.html", true);
//define the callback function
xhr.onreadystatechange=function(){
if (xhr.readyState == 4){ //ready state 4 is completion
var message = "";
if (xhr.status==200){ //success
message = xhr.responseText //retrieve result as plain text
}
else{ //error
message = "An error has occured making the request";
}
document.getElementById("generated_content").innerHTML = message;
}
} //send the actual request
xhr.send(null);
</script>
</body>
</html>
where sample_table.html contains
<table border="1">

    <tr><th>foo</th><th>bar</th></tr>

    <tr><th>a</th><th>1</th></tr>

    <tr><th>b</th><th>2</th></tr>

    <tr><th>c</th><th>3</th></tr>

</table>

Figure 15-8. The output from running Listing 15-9, which uses Ajax to include HTML
High Level JavaScript APIs
High level JavaScript APIs such as jQuery, Prototype, and YUI have gained much popularity in part because they abstract away details and make using complex objects such as XMLHttpRequest easier. This means that a user of the library does not need to know the inner workings of the XMLHttpRequest object directly. However, an understanding of the XMLHttpRequest object is beneficial to understand what is going on “under the hood.” Other advantages of these libraries are that they make cross browser support and DOM manipulation much easier.
There are several libraries available to choose from. Danchilla is an advocate of jQuery, which is by far the most popular JavaScript library in use today. It is used by Google, Amazon, Twitter, within Microsoft Visual Studio, by IBM, the Drupal CMS (Content Management System), and by many other sites and frameworks: see http://docs.jquery.com/Sites_Using_jQuery. If it is not to your liking other choices include Dojo, YUI, Prototype, MooTools, and script.aculo.us. Covering the fine details of any of these APIs is beyond the scope of this book. However, Danchilla will explain any functions that we use.
jQuery Examples
Listing 15-10 is the jQuery equivalent of Listing 15-5, which replaces the contents of a <p> element after the page is loaded.
Listing 15-10. Modifying a <p> Element After a Page Loads with jQuery
<html>

    <head>

        <title>First jQuery Example</title>

        <script type="text/javascript"

                src="https://ajax.googleapis.com/ajax/libs/jquery/1.6.1/jquery.min.js" >

        </script>

        <script type="text/javascript">

            $(document).ready(function() {

                $.ajax(

                {

                    type: "get",

                    url: window.location.pathname,

                    dataType: "text",

                    success: function(data) {

                        $("p").html("Ajax loaded content");

                    },

                    failure: function(){

                        $("p").html("An error has occurred making the request");

                    }

                });

            });

        </script>

    </head>

    <body>

        <p>Original content</p>

    </body>

</html>
In Listing 15-10, the line
        <script type="text/javascript"

                src="https://ajax.googleapis.com/ajax/libs/jquery/1.6.1/jquery.min.js" >

        </script>
loads the jQuery library from the Google CDN (Content Delivery Network). Alternatively, you could serve up a locally downloaded copy of the library. In production environments, CDNs are usually faster and more reliable. Most browsers have a limit to the number of simultaneous files that can be downloaded from a domain. Using an external CDN removes one file from your web page's loading queue. The result is higher throughput and a quicker page load. Note the filename is jquery.min.js. This is the packed, obfuscated version of the library. The file size is smaller and you would want to use this version in production. In development, where you might be debugging your output, it is better to include the human readable version, jquery.js.
The $(document).ready function call is standard for jQuery scripts. The $(document) represents the full DOM document and is shortened later in the script as $(). The call to .ready executes the script once the DOM document has been fully loaded. This allows us to place the script before the element that we are manipulating within the HTML document.
The Ajax parameters are initiated and set in one function call, $.ajax(). This function takes the request type – GET or POST, the URL, and the response data type as parameters. It also defines success and failure callbacks.
Finally, the document.getElementsByTagName("p")[0].innerHTML line of our original script is replaced by $("p").html("some data"). The first part of the line finds the relevant <p> element by using CSS selectors. The second part sets the element data.
![]() Note Technically,
Note Technically, $("p") matches all <p> tags in the document. If we wanted to explicitly match just the first occurrence, like in Listing 15-5, we could chain the built-in function $("p").first(). Alternatively, we could use CSS selectors such as $("p:first") or $("p:eq(0)").
This jQuery version of our script is shorter than the original version using the XMLHttpRequest object. As our scripts become more complex, the value of a higher level API like jQuery become even more apparent.
Listing 15-11 is the jQuery equivalent of Listing 15-6, which loads plain text from an XML file.
Listing 15-11. Using jQuery to Load Plain Text from an XML File
<html>

    <head>

        <title>Loading Plain Text with jQuery</title>

        <style type="text/css">

            #generated_content{

                border: 1px solid black;

                width: 300px;

                background-color: #dddddd;

            }

        </style>

        <script type="text/javascript"

                src="https://ajax.googleapis.com/ajax/libs/jquery/1.6.1/jquery.min.js" >

        </script>

        <script type="text/javascript">

            $(document).ready(function() {

                $.ajax(

                {

                    type: "get",

                    url: "animals.xml",

                    dataType: "text",

                    success: function(data) {

                        $("#generated_content").html("<pre>" + data + "</pre>");

                    },

                    failure: function(){

                        $("#generated_content").html(

                        "An error has occured making the request");

                    }

                }

            );

            });

        </script>
</head>
<body>
<p><strong>Ajax grabbed plain text:</strong></p>
<div id="generated_content"> </div>
</body>
</html>
If we were not concerned with possible error values, we could have rewritten the script in Listing 15-11 as the more concise code shown in Listing 15-12..
Listing 15-12. More Concise Version of Loading a File Using the jQuery .load() Function
<html>
<head>
<title>Loading Plain Text with jQuery</title>
<style type="text/css">
#generated_content{
border: 1px solid black;
width: 300px;
background-color: #dddddd;
}
</style>
<script type="text/javascript"
src="https://ajax.googleapis.com/ajax/libs/jquery/1.6.1/jquery.min.js" >
</script>
<script type="text/javascript">
$(document).ready(function() {
$("#generated_content").load("animals.xml");
$("#generated_content").wrap("<pre>");
});
</script>
</head>
<body>
<p><strong>Ajax grabbed plain text:</strong></p>
<div id="generated_content"> </div>
</body>
</html>
The jQuery load function in Listing 15-12 performs a GET request and uses an “intelligent guess” to return plain text. It then inserts the text into the selected element. The jQuery wrap function places markup around an element's content. This allows us to enclose our loaded data within a <pre>..</pre> tag above.
In addition to the $.ajax function, jQuery has $.get and $.post functions for GET and POST requests. With these functions, jQuery tries to guess the desired output. If the guess is wrong, we can explicitly specify the return type. For more in-depth coverage please refer to the jQuery documentation at http://api.jquery.com/jQuery.get/. See Listing 15-13.
Listing 15-13. Using jQuery $.get and Requesting the XML DataType.
<html>
<head>
<title>Loading XML with jQuery</title>
<style type="text/css">
#generated_content{
border: 1px solid black;
width: 300px;
background-color: #dddddd;
}
</style>
<script type="text/javascript"
src="https://ajax.googleapis.com/ajax/libs/jquery/1.6.1/jquery.min.js" >
</script>
<script type="text/javascript">
$(document).ready(function() {
$.get("animals.xml" , function(data){
var message = "";
var names = data.getElementsByTagName("name");
for(i=0; i < names.length; ++i){
message += names[i].firstChild.nodeValue + "<br/>
";
}
$("#generated_ content").html(message);
}, "xml");
});
</script>
</head>
<body>
<p><strong>Ajax parsed XML:</strong></p>
<div id="generated_content"> </div>
</body>
</html>
In Listing 15-13, the $.get function takes three parameters. The first is the request file, the second is a function callback, where we manipulate the response data, and the third is the expected data type. Without specifying "xml", jQuery would have chosen plain text.
So far we have shown how to use the XMLHttpRequest object, and how higher level API wrappers like jQuery hide some of the details, making life a little easier. Let us now try a JSON example (see Listing 15-14))
Listing 15-14. Outputting JSON Data from a PHP Array, json_example.php
<?php


$animals = array(

    "africa" => array("gorilla", "giraffe", "elephant"),

    "asia" => array("panda"),

    "north america" => array("grizzly bear", "lynx", "orca"),

    );


print json_encode($animals);

?>
Listing 15-15 uses jQuery to get JSON values from a PHP file (Listing 15-14) with an Ajax request.
Listing 15-15. Using $.getJSON and $.each
<html>
<head>
<title>Loading JSON with jQuery</title>
<script type="text/javascript"
src="https://ajax.googleapis.com/ajax/libs/jquery/1.6.1/jquery.min.js" >
</script>
<script type="text/javascript">
$(document).ready(function() {
$.getJSON("json_example.php" , function(data){
$.each(data, function(continent, animals){
var message = "<strong>" + continent + "</strong><br/>";
for(j=0;j<animals.length;++j){
message += animals[j] + ", ";
}
//remove last comma and space
message = message.trim();
message = message.substring(0, message.length - 1);
$("#generated_content").append("<p>" + message + "</p>");
});
});
});
</script>
</head>
<body>
<p><strong>Ajax parsed JSON:</strong></p>
<div id="generated_content"> </div>
</body>
</html>
The output of Listing 15-15 is:
Ajax parsed JSON:


africa:

gorilla, giraffe, elephant


asia:

panda


north america:

grizzly bear, lynx, orca
In Listing 15-15, we have used the $.getJSON shorthand function. We could have also used $.get with “json” as a third argument. We also used the jQuery function $.each to loop through the JSON objects returned. To assign the key/value data variable names of continent and animals, we define our callback function as:
$.each(data, function(continent, animals){)
Sending Data to a PHP Script via Ajax
In this example (Listing 15-16), we will have two buttons on the browser page, labeled “Predator” and “Prey”. When either button is pressed, an Ajax request is sent to a PHP script with the query parameter ?type=predator or ?type=prey. When the PHP script receives the request it use the query value to select and return an appropriate animal entry encoded as JSON.
Listing 15-16. PHP File That Selects a Predator or Prey Animal and Outputs It in JSON Format, predator_prey.php
<?php

error_reporting(E_ALL);

$predators = array(

    "bear", "shark", "lion", "tiger",

    "eagle", "human", "cat", "wolf"

    );

$prey = array(

    "salmon", "seal", "gazelle", "rabbit",

    "cow", "moose", "elk", "turkey"

    );


if (isset($_GET['type'])) {

    switch ($_GET['type']) {

        case "predator":

            print json_encode($predators[array_rand($predators)]);

            break;

        case "prey":

            print json_encode($prey[array_rand($prey)]);

            break;
default:
print json_encode("n/a");
break;
}
}
?>
In Listing 15-17, we handle the .click event of either of our two buttons by sending an Ajax .load request. The predator_prey.php file receives this request, along with a type parameter, and sends back a string response, which we load into our document. We have used array_rand to generate a random index of our chosen array and then use json_encode to output it in JSON format.
Listing 15-17. HTML File That Loads the Response from an Ajax Request
<html>
<head>
<title>Predator/Prey Example</title>
</head>
<script type="text/javascript"
src="https://ajax.googleapis.com/ajax/libs/jquery/1.6.1/jquery.min.js" >
</script>
<script type="text/javascript">
$(document).ready(function() {
$("#predator").click(function(){
$("#response").load("predator_prey.php?type=predator");
});
$("#prey").click(function(){
$("#response").load("predator_prey.php?type=prey");
});
});
</script>
<body>
<button id="predator">Predator</button>
<button id="prey">Prey</button>
<p><strong>Ajax response from PHP:</strong></p>
<div id="response"> </div>
</body>
</html>
The output of Listing 15-17 is shown in Figure 15-9.
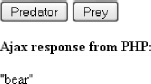
Figure 15-9. Sample output of Listing 15-17
A Simple Graphic Program
In Listing 15-18, we will build a simple drawing application out of a palette of colors, a grid of HTML table cells, and jQuery. Once this is working, we will add the ability to save and load our image using PHP and Ajax.
Listing 15-18. Graphic Application to Manipulate the Background Color of Table Cells
<html>
<head>
<title>Drawing Grid Example</title>
<style type="text/css">
#grid, #palette{
padding: 0px;
margin: 0px;
border-collapse: collapse;
}
#palette td, #grid td{
width: 20px;
height: 20px;
}
#grid td{
border: 1px solid #cccccc;
}
</style>
<script type="text/javascript"
src="https://ajax.googleapis.com/ajax/libs/jquery/1.6.1/jquery.min.js" >
</script>
<script type="text/javascript">
$(document).ready(function() {
//10 by 10 grid
for(i=0; i<10; ++i){
$("#grid").append(
"<tr>" +
"<td> </td>" +
"<td> </td>" +
"<td> </td>" +
"<td> </td>" +
"<td> </td>" +
"<td> </td>" +
"<td> </td>" +
"<td> </td>" +
"<td> </td>" +
"<td> </td>" +
"</tr>"
);
} var active_color = "rgb(0, 0, 0)";
                $("#palette td").each(

                function( index ){

                    //bind the onClick event

                    $( this ).bind (

                    "click",

                    function(){
active_color = $(this).css("background-color");
$("#debug_palette_color").html("active palette color is: " +
"<span style='width: 20px; height: 20px; background-color:"
+ active_color
+ ";'>" + active_color + "</span>");
}
);
});
$("#grid td").each(
function( index ){
//bind the onClick event
$( this ).bind (
"click",
function(){
$(this).css("background-color", active_color);
}
);
});
});
</script>
</head>
<body>
<p><strong>Palette</strong></p>
<table id="palette">
<tr>
<td style="background-color: rgb(0, 0, 0);"> </td>
<td style="background-color: rgb(119, 119, 119);"> </td>
<td style="background-color: rgb(255, 255, 255);"> </td>
<td style="background-color: rgb(255, 0, 0);"> </td>
<td style="background-color: rgb(0, 255, 0);"> </td>
<td style="background-color: rgb(0, 0, 255);"> </td>
<td style="background-color: rgb(255, 255, 0);"> </td>
</tr>
</table>
<p><strong>Draw!</strong></p>
<table id="grid" cellspacing="0">
</table>
<p><em>Debug console: </em></p>
<div id="debug_palette_color"></div>
</body>
</html>
In the CSS of Listing 15-18, we set margin-collapse: collapse for our table grid, so that the inner borders are the same thickness as the edge borders. We create a palette of colors to select from. Even though we specify the dimensions, the (non-breaking space) character helps to ensure that the browser draws the cell borders. Without DOM manipulation, our grid is empty. In our jQuery .ready function, we use a loop and the jQuery append function to add ten table rows each with ten cells to the grid.
Next, we define the click action of our palette cells with:
$("#palette td").each(
function( index ){
//bind the onClick event
$( this ).bind (
"click",
function(){
In the function details, we change the active_color and show what it is in our debug area:
                    function(){

                        active_color = $(this).css("background-color");

                        $("#debug_palette_color").html("active palette color is: " +

                            "<span style='width: 20px; height: 20px; background-color:"

                            + active_color

                            + ";'>" + active_color + "</span>");

                    }
We bind our grid cells to a click event, so that after any click the background-color is changed to our active_color:
              $("#grid td").each(

                function( index ){

                    //bind the onClick event

                    $( this ).bind (

                    "click",

                    function(){

                        $(this).css("background-color", active_color);

                    }

                );
The output is shown in Figure 15-10. Our program works. However, we can not save our image. So when we browse away from the page and come back, we will always have a blank canvas. We will address this issue next.
![]() Note jQuery background colors are in the newer
Note jQuery background colors are in the newer rgb(255, 0, 0) form instead of hex values like #ff0000. The new color format is part of the CSS 3 specification, which also includes an alpha version, rgba. Alpha values allow easy opacity settings and will have full cross-browser support soon.

Figure 15-10. Our drawing grid from Listing 15-18
Maintaining State
In order to save Ajax changes, we can use PHP and write data into a database, $_SESSION, or files. When we reload the page at some later date, we can populate the image grid from our saved data. For our example, we will use a physical file. You can extend the example to save the data per unique session or username, but we will just store one set of results.
We do not want to save the result after each pixel change, because that could be very slow and resource intensive. Instead, we will add a save button so that the user can explicitly request a save. You could also keep track of the number of changes between every save. Then we could do a behind-the-scenes autosave after every 100 changes or so. This could help to protect user data without the user needing to be interrupted to backup their work.
We could also add a “Clear” button to reset the grid to a transparent, unmodified state, and truncate the saved data file. See Listing 15-19.
Listing 15-19. The HTML That Displays the Drawing Grid and Makes Ajax Calls to Our PHP Scripts
<html>
<head>
<title>Drawing Grid Example</title>
<style type="text/css">
#grid, #palette{
padding: 0px;
margin: 0px;
border-collapse: collapse;
}
#palette td, #grid td{
width: 20px;
height: 20px;
}
#grid td{
border: 1px solid #cccccc;
}
</style>
<script type="text/javascript"
src="https://ajax.googleapis.com/ajax/libs/jquery/1.6.1/jquery.min.js" >
</script>
<script type="text/javascript">
$(document).ready(function() {
//10 by 10 grid
for(i=0; i<10; ++i){
$("#grid").append(
"<tr>" +
"<td> </td>" +
"<td> </td>" +
"<td> </td>" +
"<td> </td>" +
"<td> </td>" +
"<td> </td>" +
"<td> </td>" +
"<td> </td>" +
"<td> </td>" +
"<td> </td>" +
"</tr>"
);
}
$.getJSON("load_drawing.php", function(data){
$("#grid td").each(function(index){
$(this).css("background-color", data[index]);
});
}); var active_color = "rgb(0, 0, 0)";
$("#palette td").each(
function( index ){
//bind the onClick event
$( this ).bind (
"click",
function(){
active_color = $(this).css("background-color");
$("#debug_palette_color").html("active palette color is: " +
"<span style='width: 20px; height: 20px; background-color:"
+ active_color
+ ";'>" + active_color + "</span>");
}
);
});
$("#grid td").each(
function( index ){
//bind the onClick event
$( this ).bind (
"click",
function(){
$(this).css("background-color", active_color);
}
);
});
$("#clear").click(function(){
$("#grid td").css("background-color", "transparent");
});
$("#save").click(function(){
var colorsAsJson = new Object();
var i=0;
$("#grid td").each(function() {
colorsAsJson[i] = $(this).css("background-color");
++i;
});
$.ajax(
{
type: "post",
url: "save_drawing.php",
dataType: "text",
data: colorsAsJson,
success: function(data) {
$("#debug_message").html("saved image");
}, failure: function(){
$("#debug_message").html(
"An error has occured trying to save the image");
}
});
});
});
</script>
</head>
<body>
<p><strong>Palette</strong></p>
<table id="palette">
<tr>
<td style="background-color: rgb(0, 0, 0);"> </td>
<td style="background-color: rgb(119, 119, 119);"> </td>
<td style="background-color: rgb(255, 255, 255);"> </td>
<td style="background-color: rgb(255, 0, 0);"> </td>
<td style="background-color: rgb(0, 255, 0);"> </td>
<td style="background-color: rgb(0, 0, 255);"> </td>
<td style="background-color: rgb(255, 255, 0);"> </td>
</tr>
</table>
<button id="save">Save</button>
<p><strong>Draw!</strong></p>
<table id="grid" cellspacing="0">
</table>
<p><em>Debug console: </em></p>
<div id="debug_message"></div>
<div id="debug_palette_color"></div>
</body>
</html>..
Listing 15-20. The PHP Script That Saves the Passed-In $_POST Variable Data in JSON Format, save_drawing.php
<?php

   error_reporting(E_ALL);

   file_put_contents("image.x", json_encode($_POST));

?>
Listing 15-21. The PHP Script to Load the Saved File Data, load_drawing.php
<?php

$filename = "image.x";

if (file_exists($filename)) {

  print file_get_contents($filename);

}

?>
Our new jQuery now has a function to save the data when the “Save” button is clicked. To do this, a new JavaScript Object is created. Then each cell's CSS background color property is added to the Object. Once this is done, we send an Ajax POST request to our save_drawing.php file. We need to make it a POST request because the data we are sending is too long to be in a GET query string. Inside the PHP script we encode the $_POST values to JSON and save it in a file. See Listing 15-22.
Listing 15-22. The Save Function of Our Full Program (Listing 15-19)
                $("#save").click(function(){

                    var colorsAsJson = new Object();

                    var i=0;

                    $("#grid td").each(function() {

                        colorsAsJson[i] = $(this).css("background-color");

                        ++i;

                    });


                    $.ajax(

                    {

                        type: "post",

                        url: "save_drawing.php",

                        dataType: "text",

                        data: colorsAsJson,

                        success: function(data) {

                            $("#debug_message").html("saved image");

                        },

                        failure: function(){

                            $("#debug_message").html(

                              "An error has occured trying to save the image");

                        }

                    });

                });
Now that we have saved our image data, we can load the data when we revisit the page. To do this, we send a $.getJSON request to load_colors.php. This returns the contents of the JSON formatted file we have saved. Inside our jQuery we loop through each cell of the grid and assign the corresponding background color. See Listing 15-23. The output is shown in Figure 15-11.
Listing 15-23. The Load Function of Our Full Program (Listing 15-19)
               $.getJSON("load_drawing.php", function(data){

                    $("#grid td").each(function(index){

                        $(this).css("background-color", data[index]);

                    });

                });

Figure 15-11. Our Ajax drawing program with initially loaded data, a Save button, and Firebug output
When working with Ajax, it is helpful to use developer tools for debugging. The Firefox extension Firebug is one of the best utilities around. In Firebug, Ajax data can be found in the section Net > XHR. The Chrome developer tools are also very useful.
Summary
In this chapter, we have explained how asynchronous web requests enable richer, more responsive, and more enjoyable web sites. This is made possible by injecting an intermediary – the Ajax engine – between the client and server end points. This results in less server requests to update the browser display, and non-blocking calls when we do transfer data between the server and client.
The most popular scripting language to send Ajax requests with is JavaScript. Using a high level API such as jQuery can make working with Ajax easier and more enjoyable than dealing directly with XMLHttpRequest objects.
Data formats that can be communicated with Ajax include XML, which was covered in Chapter 14, JSON, which we covered in this chapter, HTML, and plain text.
The usage of Ajax in modern web development is a double-edged sword. On the one hand, Ajax enables responsiveness and behind-the-scenes data transfer not possible with the classic web model. On the other hand, users expect a rich browsing experience. So a great deal of work needs to be done on a web application just to meet those expectations. To create a good user experience (UX) with Ajax, a developer needs to be adept with several technologies, the most important of which are JavaScript, DOM selectors, JSON and XML.
Finally, Ajax is an emerging area, with other techniques such as reverse Ajax being explored. Reverse Ajax involves long-lived HTTP connections and the server pushing data to the client. The future promises to make Ajax even more central to web development.