
Chapter 4
Placing Calls with iPhone
iPhones are versatile devices. They can surf the Web, check the latest stock prices, request a weather report, play thousands of games, and map out directions. But at its core, the iPhone remains a cell phone and that means that making phone calls is its primary function. In this chapter, you'll learn the essential things you need to know in order to maximize your iPhone use for placing and receiving calls. You'll discover ways you can get up to speed and make the most of your iPhone as a cell phone.
Checking the Cell Network Indicator
The bars at the top-left corner of your iPhone screen indicate how strong a signal you're receiving from the local cellular network. Five bars indicate the strongest signal. No bars or the words “No Service” indicate a complete lack of signal strength: no bars means no calls.
Reception problems can stem from many causes: distance to the nearest cell tower, hills and trees blocking reception, or even wiring or ducts inside your building. When you're not receiving a good signal, you'll need to move. Go to a place where the signal is stronger. This can mean anything from moving around a room, getting closer to a window, stepping outside your building, or driving toward a tower. Can they hear you now?
NOTE: The iPhone 4 had a well-publicized design issue in which holding a bare phone a certain way causes a dramatic drop in signal quality. As a result, Apple recommended the use of an iPhone case or the Apple Bumper to reduce the issue's effect on your calls. These issues don't seem to affect the iPhone 4S, but a case will help protect your unit against physical impacts and may help your signal quality as well.
Finding good reception can be an art, but most mobile phone carriers try to help by making coverage maps on their websites that show where you should be able to receive service. Just google up your carrier and the phrase coverage map. In the United States, each carrier (AT&T, Sprint, and Verizon) offers interactive tools to help you determine whether coverage extends to particular locations. A network provider that offers excellent coverage in one region might provide only spotty reception in another.
TIP: When attempting to place calls, make sure you haven't enabled Airplane Mode, which turns off all of the radios on your iPhone – the cell phone radio, Wi-Fi, and Bluetooth. If you can't make a call, check for an orange airplane at the top-left of your screen. If you see it, go to Settings and make sure that Airplane Mode is set to Off.
iPhone Basics
As with all Apple products, there's never just one way to do anything. In this section, you'll find many ways to perform the most basic iPhone tasks including answering calls, sending calls to voicemail, and even hanging up. You may be surprised to discover just how many options Apple has built into your iPhone to get the job done.
Launching the Phone app
By default, the green phone icon appears in the lower-left corner of your iPhone's Home screen. It looks like a white old-style handset slightly tilted to the left. Labelled Phone, this is the app that you use to place and receive phone calls, check your voicemail, review recent calls, and more. You may see a red bubble with a number on the Phone app icon. This number indicates the total number of missed calls and unheard voice mails. If you missed three calls and have one unlistened-to message, the bubble will show the number 4.
Once tapped, the green icon launches the Phone application and opens to the main screen. Once launched, take a look at the bottom of the screen. There's a shortcut bar at the bottom that offers the following key features:
- Favorites allows you to create a list of the most frequently called contacts for instant dialing.
- Recents lists all of your recent incoming, outgoing, and missed calls. To call back, tap any phone number in the list. You may see a red bubble with a number over the Recents icon. That number indicates any missed calls. Missed calls appear in your Recents list displayed in red.
- Contacts provide access to your complete address book. You can sync it to your PC or Mac, and also to Apple's iCloud and other online services. To call a contact, tap the Contacts icon, choose a contact from the address book and tap any phone number listed for that contact. You can store numbers for home, for work, for mobile (cell) phones, and more.
- Keypad is used to manually call phone numbers, and also to press keys during a phone call. If you ever call up the local pharmacy to refill a prescription, for example, you'll want to use the keypad to respond to the auto-fill robots that many drugstores now offer to their clients.
- Voicemail is the gateway to Visual Voicemail, and where you can listen to voice messages left when you missed phone calls. Like Recents, you may see a number in a red bubble. This indicates the number of unheard voicemail messages that await you.
To leave the Phone app, press the Home button. This suspends the application but does not cause it to quit. You'll still be able to receive phone calls.
Placing Calls
The simplest way to place calls is by dialing in numbers directly. Tap Keypad to enter the iPhone dialing screen shown in Figure 4–1. From here, you can place a call by tapping in a number to dial. Tap the green Call button to place the call with the number you have entered.
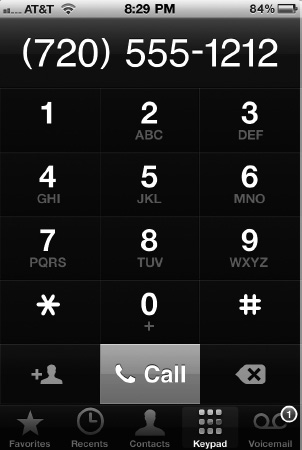
Figure 4–1. The iPhone keypad, from which you can dial numbers and make phone calls.
Here is an overview of the many ways the Phone app can be used to place calls:
Dial directly: To place a call manually, tap the Keypad icon at the bottom of the Phone app. Use the keypad to enter the phone number, then tap Call to place the call. If you make a mistake while typing, tap the backspace key. It's just to the right of the Call button, and looks like a sideways-pointing pentagon with an “X” in it.
Add contacts: The Add Contact button sits just to the left of the Call button. It looks like a face with a + sign next to it. This button provides a fast way to create a new contact using the number you just entered. Enter a phone number, press the Add Contact button, and a details screen opens (Figure 4–2). On the details screen, enter the details for the new contact, such as name, address, and company. If you need to add the number to an existing contact rather than create a new contact, choose Add to Existing Contact instead.
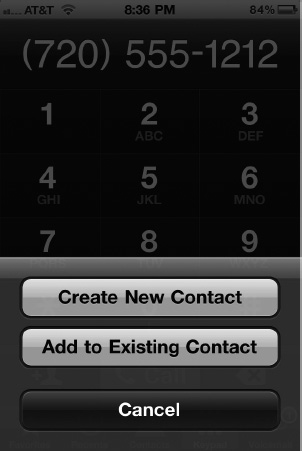
Figure 4–2. When you tap the Add Contact button, you're given the choice of creating a new contact with the phone number you just entered, or adding that phone number to an existing contact. “Add to Existing Contact” is a great feature to use when someone you know gets a new phone number.
Select a contact: To call someone in your address book, tap Contacts. The scrolling Contacts screen opens. Search down the list of names until you find the person you want to call. To speed this along, you can drag through the alphabet at the right side of the screen. Tap a name to display its address book entry, and then tap a phone number to place your call.
Call favorites: The Favorites screen lets you add your most frequently called contacts to a quick-call list. To call, just tap any name in the list. Since the Favorites screen stores a preferred number for your contacts, you don't have to select a specific phone number (for example, home or work) each time the way you do with the Contacts screen.
Reply to recent calls: Tap the Recents icon to open a list of your most recent incoming, outgoing, and missed calls. Missed calls appear in red, while incoming and outgoing calls are listed in black. Tap any number to instantly place a call back to that number.
NOTE: Buttons at the top of the Recents screen let you view All calls, only the Missed calls, and to Clear the list entirely.
Call via email, calendar, note, and web links: The iPhone knows what a phone number looks like, and it will automatically add links to your emails, calendar events, notes, and web links using a technology called “data detectors". Telephone links show up as blue underlined text in emails, calendar events, and on web pages. In notes, they show up in brown underlined text. To call an embedded phone number, just tap it.
Place international calls: Mobile phone carrier policies range widely in terms of placing international calls and using the iPhone while roaming. Be sure to call your carrier before leaving on a foreign trip or placing international calls. Avoid the horror stories of thousand-dollar phone bills or the disappointment in finding that your phone doesn't work at all overseas by checking your facts before you use your iPhone in unconventional ways and locations. As a rule, you can usually add international calling to an iPhone plan, and will need to shop the current deals to find the best rates for your package. These details vary by country and carrier.
Using your iPhone for international calls adds a few more features and rules that you should be aware of. Here are a few tips to keep in mind regarding international calling:
- Use the plus (+) symbol to prefix international calls, for example +44 800 555 1212. To add + to a phone number, press and hold the 0 button on the iPhone keypad for about 2 seconds (note the + symbol under 0 in Figure 4–1). A tone sounds as you hold the button. Just ignore it. After a second or two, the 0 turns to a +, and you're ready to continue entering the number.
- When traveling outside the United States, add +1 to your numbers to call back to America, for example, +1 (212) 555 1212. If you do foreign travel regularly, use this style for all your contacts. Calls placed with +1 work both inside and outside the United States. Calls without +1 work only inside the United States. Your iPhone is smart enough to know when you're dialing from the United States, and you won't be charged extra for using +1.
- Check with your carrier for international calling rates. These vary wildly and can range from reasonable to outrageous. You may want to consider using alternative ways of connecting overseas, such as by using FaceTime or Skype or other Voice-over-IP (VoIP) solutions to save money.
- If you're a fan of SMS text or MMS multimedia (picture and video) messaging, you may want to text friends abroad. Once again, rates are dependent on the carrier. You may want to use use IM clients instead of texting to save money.
- When you're using your using your iPhone in a foreign country, be aware of data roaming costs. These can easily add up without you really knowing what's happening, as the iPhone often sends and receives data behind the scenes. If you don't want to get accidentally charged for data roaming, it can be disabled by selecting Settings
 General Network and sliding Data Roaming to Off.
 - If, on the other hand, you do wish to use data services while abroad, consider using Wi-Fi only. Many hotels, restaurants, and bars offer free Wi-Fi to visitors, or you can pay a nominal fee for access. If you must use a 3G or EDGE network in a foreign country, check with your carrier for a discounted rate plan or use an unlocked iPhone with a locally-purchased subscriber card. You can purchase unlocked world GSM-only iPhone 4S units from Apple's online store. The next section discusses unlocked contract-units from Sprint and Verizon.
- Find out if cell phone carriers abroad provide short-term pay-as-you-go plans or iPhone rentals. This can reduce your cost significantly as the iPhone you're using is tied to the local carrier in the country you're visiting.
GSM versus CDMA
In the United States, you can purchase the iPhone 4S from AT&T, from Sprint, from Verizon, or Apple. The iPhone 4S use two kinds of technology: GSM (Global System for Mobile Communications, the most common international standard) and CDMA (Code Division Multiple Access). These are different technologies using distinct cellular network standards. (The unlocked international “world phone" 4S ships with GSM technology only onboard.)
Each US carrier-based iPhone is carrier locked. This means that you cannot use the phones with third party carriers, even when they use the same network technology. You cannot take a US AT&T iPhone to Germany and expect to use it with T-Mobile's GSM service, even though they are both built on GSM technology. Apple and its official carriers cannot unlock these carrier-locked units. From the time they are purchased, they are set to only work with the approved carrier.
That's where unlocked phones come in. Apple now sells unlocked GSM World-service iPhones (but not CDMA), which allow you to use those units overseas or with different carriers in-country. Because they sell them unlocked and without contract subsidies, they cost far more than the ones you purchase from AT&T, Sprint, and Verizon. Normally, a large part of the purchase price is paid off over the lifetime of the contract and is not reflected in the initial upfront costs for the phone.
Sprint's policy allows customers in good standing to use the GSM technology on their iPhone 4S outside the United States. Sprint writes that they will allow those customers to unlock unit for international travel. Verizon added a sixty-day waiting period, specifying that customers must be in good standing for two months before they would issue an unlock. AT&T had not issued statements by the time this book went to press on the matter.
You can use unlocked phones, including the unlocked Apple world phone 4S or unlocked units from Sprint or Verizon with other GSM carriers like T-Mobile, both domestically and overseas, O2, Orange, and so forth. However, you may not be able to access full data speeds on these units. That's because each carrier licenses different frequencies for their data connections. The iPhone's internal antennas may or may not be able to tune into these. In the United States, you can use an unlocked GSM iPhone with T-Mobile data service, but only for the slower EDGE service, not with the faster 3G.
Placing Calls with Siri
The Siri voice assistant can help you place phone calls to contacts. To invoke Siri, raise the iPhone to your face or press and hold the Home button for a few seconds. You can also squeeze the stereo headset button for two seconds.
Siri uses your address book contact information to simplify the way you place phone calls. For example, you might say one of the following phrases to initiate calls with one of your personal contacts. If a person is not listed in your address book, you can explicitly speak out the number.
- Call Jason
- Call TJ (Yes, Siri works with nicknames too)
- Call Jennifer Wright mobile
- Call Susan on her work phone
- Call 408 555 1212
- Call home
Be aware that Siri does not confirm phone calls before placing them. It initiates the call directly and immediately switches to the phone application. You can cancel the call in that application as needed, but you may use an airtime minute in the process.
When calling a person with multiple numbers, Siri may ask you to specify whether you wish to to call the home number or work number, etc. Telling Siri in advance which number you wish to use, e.g. “Call John Appleseed at home”.
If Siri cannot find a home number for this example, it will offer an alternative number, such as the mobile number or work number if one is available.
Relationships form an important part of the Siri/Address Book story. Siri allows you to personalize your relationships with others and use those relationships as shortcuts when making requests.
Here are some relationship examples you could use with Siri.
- My mom is Susan Park
- Michael Manning is my brother
- Call my brother at work
- Text my assistant
These phrases help establish those connections between your contact information and other entries in your address book. You can then use them when placing calls to instantly know exactly whom you're talking about. You may know 20 Mary's, but you probably only have one Mom.
Placing Calls with Voice Control
Older iPhones include a very helpful and mostly hands-free method of interaction called Voice Control. Not only is Voice Control fun to use, but it can also be very useful for making phone calls with or without the iPhone stereo headset. To enable voice control, press and hold the Home button for two seconds or squeeze the stereo headset button for two seconds. The Voice Control screen appears, and you can begin speaking to your iPhone to dial a number.
To place a call to someone who is in your Contacts list, simply say:
Call Bob Smith at Work / Home / iPhone / Mobile: For the best possible recognition, always tell the iPhone which destination to call.
Call Bob Smith: You can get away without specifying a destination when there's more than one number for Bob, and the iPhone will prompt you for the proper phone, but the recognition rate does go down quite a bit with this approach.
Dial Bob Smith at Home: This works identically to “Call Bob Smith at Home”.
Dial 1-720-555-1212: If dialing internationally, you can preface the first number with the word “plus”. This dials the number you read to the phone. Although you can use this approach, the error rate is high enough to make it inconvenient while driving. You'd be better off waiting for a red light and typing in the numbers directly.
Answering Calls
When your iPhone receive calls, it rings, playing back whatever ringtone you have selected and, if you've set it up that way, vibrates. The screen updates and tells you (to the best of its ability) who is calling by showing you a contact name and picture. If you're using the iPhone when a call comes in, the screen offers you the option of answering or declining the call (see Figure 4–3, left).
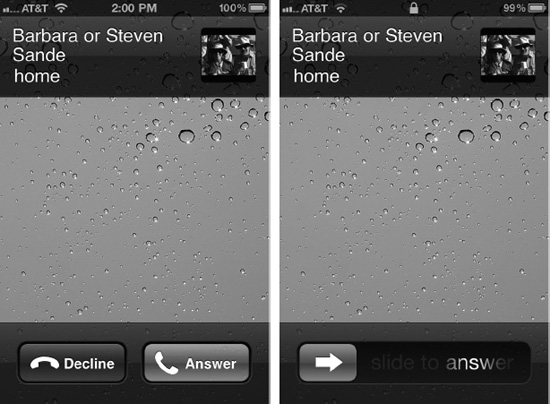
Figure 4–3. When you receive a call, your iPhone identifies the caller with a name (if possible), contact photo, and the phone (work, home, iPhone, etc.) from which the call was placed. Tap Answer (or slide the green arrow button to the righ), to accept the call and talk, or Decline to send the call directly to voicemail. When two or more contacts share the same number (as seen here), your iPhone lists each possible caller.
When your iPhone is in sleep mode, you'll see a different screen when there's an incoming call (Figure 4–3, right). To answer the phone when it wakes from sleep and is ringing, slide the green arrow button to the right.
Here are the ways you can answer and manage your calls:
Answering calls: Tap the green Answer button to accept the call. The iPhone connects you to the caller, and you proceed with your call. You can also answer calls by squeezing the iPhone headset control once. If you are using a Bluetooth headset, you can usually click an onboard button to answer the call. Both the phone and the earpiece will ring. During the call, you may tap the Audio Sources button to re-route audio from the earpiece to the phone, to the speaker, or back. Tap Hide Sources to leave the audio selection as-is.
Sending calls to voicemail: To decline a call, sending that call to voicemail, tap Decline. Your Voicemail account must be set up in advance for this to work, otherwise your caller may hear a message about a voice mailbox that has not yet been set up. Alternatively, press and hold the headset control for about two seconds, or press the Sleep/Wake button. AT&T's automated answering service prompts your caller to leave a message, which you can check later at your convenience.
Silencing the ringer: Sometimes you forget to power off your phone before meetings. When this happens to you, silence the ringer by pressing one of the volume buttons. The iPhone stops ringing immediately. You can still answer the call for the normal period of time until it gets sent to voicemail. And don't forget to switch the Ring/Silent switch off before that next call comes through!
The iPhone's Ring/Silent switch is located just above the volume controls on the top-left side of the phone. Toggle your iPhone between ring mode (all black) and silent mode (red dot) by flipping the switch. You can set whether the iPhone vibrates upon receiving a call in Settings ![]() Sounds, where you'll find two vibrate settings: one for silent mode and another to make the phone vibrate when it's in ring mode.
Sounds, where you'll find two vibrate settings: one for silent mode and another to make the phone vibrate when it's in ring mode.
Managing Calls
During conversations, your iPhone provides several ways to handle calls from muting your caller to handling call waiting (see Figure 4–4).
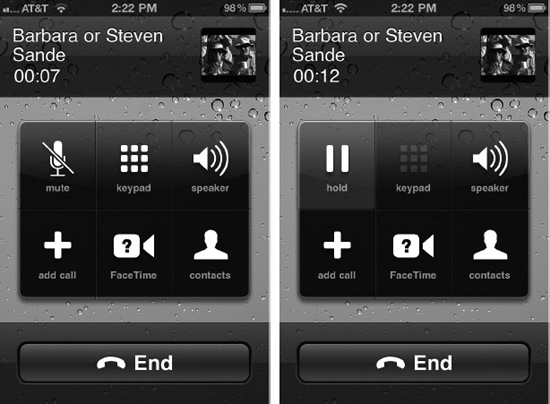
Figure 4–4. The iPhone options available while you're on a call allow you to mute the microphone, place a call on speaker, establish a conference call, and more.
When you need control your conversation, here are the options available to you:
Mute the microphone: Tap Mute to temporarily disable your microphone. You can still hear your caller, but your caller will not be able to hear you until you tap Mute a second time. When enabled, the Mute button turns blue. This is a particularly great feature when you're using your phone with a multiparty conference, and a spouse or child walks into the room. You can keep listening to the ongoing call but no one will hear what's going on from your end.
Use the keypad: Tap the Keypad icon to bring up the iPhone keypad during a call. The keypad lets you navigate through automated voice systems (e.g., “Press 1 for English”) or enter a PIN number. Tap Hide Keypad to return to the options shown in Figure 4–4. Use this for any keypad-driven menu system, such as contacting your insurance company, your pharmacy, or your bank.
Use the speakerphone: Tap the Speaker icon once to switch sound output from the earpiece to the built-in iPhone speaker. Like Mute, the Speaker icon turns blue when enabled. Tap a second time to return sound to the earpiece. Like the iPhone 4, the iPhone 5 has a terrific speaker, which is far improved from the iPhone 3GS and earlier models. Unfortunately, pickup is never as good as the speaker. If people complain that you're sounding too soft, you may want to switch off speaker and hold the handset to your face.
NOTE: Your iPhone uses its proximity sensor to determine when the phone is held up to your ear. This blanks the screen but has no effect on the speaker. If you've enabled the speakerphone and hold the iPhone up to your ear, it remains on speakerphone but with a black screen. Unfortunately, both the iPhone 4 and iPhone 5 have some issues with proximity detection. If you find that your cheek keeps muting your call, or creating a secondary call, bring your device into the Genius Bar to be checked by a technician. This is called “cheek dialing", even though it's rare to actually place a second outgoing call by accident.
Placing a call on hold: To place a call on hold, tap and hold the mute button for two seconds. It will turn blue and display the hold icon seen in Figure 4–4, right. To take a caller off of hold, tap the hold button again. Use the hold feature rather than muting as a courtesy to provide privacy to the person who is calling you. It's rude listen to personal conversations while the other party thinks they're on hold.
Conference calling: To add another party to your call, tap the Add Call button. This places your current call on hold and allows you to place a new call. Use the keypad or the contacts list to place the call. After establishing the new call, tap Merge Calls to add the new call to the on-hold call. If needed, repeat these hold, call, and merge actions to bring additional parties into the conference call. On AT&T, the iPhone offers spectacular conference calling; this is one of the most powerfully useful features the phone offers. And it does so as a part of the built-in calling package for most carriers. On Verizon, you may be limited to adding a single third party into your call. Please check with your carrier for details about this feature.
Begin a FaceTime video chat (iPhone 4 or later, and iPod 4th generation or later, and iPad 2 and later only):FaceTime is Apple's unique videophone application that works only with very recent devices. It was first introduced as a feature on the iPhone 4. Chapter 4 introduces FaceTime in more detail. You can start a FaceTime chat with another iPhone 4 caller by tapping the FaceTime button. FaceTime uses the Internet to connect, and does not charge against your account minutes on your cell plan. You may, however, use cellular data so it's best to always connect to WiFi when you plan to FaceTime.
Accessing Contacts: Tap the Contacts icon to look up another contact during a call. Tapping a contact's phone number is equivalent to tapping Add Call and then selecting that contact.
TIP: You can run normal iPhone applications during your calls. Click the Home button, and select an application to open. To return to the call screen, tap the green bar that appears at the top each screen during an active call.
Responding to Call Waiting: When receiving a new call during a conversation, the iPhone asks whether to switch to that new call. You can choose to answer or decline that call in several ways.
- To end your current call and answer the new one, tap the red End Call and Answer buttons.
- Tap Ignore to continue with your current call. Alternatively, squeeze and hold the headset control for about 2 seconds and then release. Your iPhone beeps twice to confirm.
- Tap Hold Call and Answer to place your conversation on hold and answer the incoming call. Once answered, you can merge calls into the call on hold.
- Squeeze the headset control once to place the current call on hold and answer the incoming call. Squeeze again to toggle back and forth between the first call and the new one.
TIP: When using headphones or Bluetooth earpieces, your iPhone rings through both the handset and the attached headset—very convenient when you've put the iPhone down with the headphones still plugged in.
Ending a call: Tap End Call to hang up. You can also end calls by squeezing the iPhone headset control once.
TIP: Living in an age of quick-dial and disposable phone numbers, you might not always remember your iPhone's number. Fortunately, Apple makes it easy to look up. Scroll all the way to the top of the Contacts list or select Settings ![]() Phone. Your number appears at the top of each of these: “My Number: 1 (555) 555-1212”. You can also check your iPhone's telephone number by docking it to your computer. Select your iPhone from the Sources list (the blue column on the left side of the iTunes screen), and check the number on the Summary page. It appears toward the top of the page, just under the serial number.
Phone. Your number appears at the top of each of these: “My Number: 1 (555) 555-1212”. You can also check your iPhone's telephone number by docking it to your computer. Select your iPhone from the Sources list (the blue column on the left side of the iTunes screen), and check the number on the Summary page. It appears toward the top of the page, just under the serial number.
Managing Favorites
The Favorites screen offers one-touch access to your most often-used phone numbers. It can be a little counterintuitive to manage your favorites, because this one-tap behavior means you can't select a contact and then edit it. When you tap a name, the iPhone immediately calls it. Instead, here are the ways you should use to keep your Favorites list in line:
Adding a favorite: In the Favorites screen, tap the plus (+) button in the top-right corner. Select a contact and then a phone number from that contact. The iPhone adds the number to Favorites and returns you to the Favorites screen.
Removing a favorite: Tap Edit to place Favorites into edit mode (see Figure 4–5). Red circles with minus signs appear next to each contact. To delete a contact, tap the red circle and then confirm by tapping Remove. To cancel without removing the selected favorite, tap anyplace else on the screen. Tap Done to leave edit mode.
Reordering favorites: Tap Edit at the top-left corner of the Favorites screen. In addition to the red circles to the left of each name, notice the gray bars to the right of each name. Drag these handles to move names into new positions. Tap Done when finished.
TIP: Although you can edit contact information on your iPhone—as when you add a new phone number on the go—the easiest place to manage contacts is on your computer. Your iPhone updates its contact information every time you synchronize. In iTunes, make sure you've chosen to sync your contacts by checking the appropriate option in the iPhone Info tab. You can also sync contact information over the air using Apple's iCloud service.
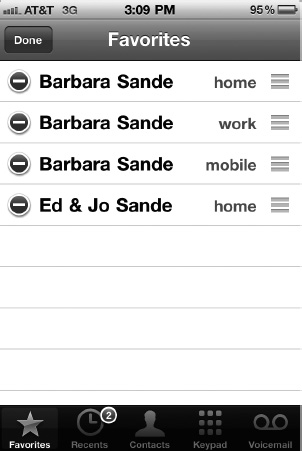
Figure 4–5. In Edit mode, tap the red buttons to delete contacts and use the gray drag handles on the right to reorder contacts. Your favorites list can quickly grow long. Using these management features helps you keep your quick-access contacts list lean and ordered.
Using Visual Voicemail
When someone calls and you can't or don't answer, they're transferred to your carrier's voicemail system and prompted to leave a message. Your iPhone's Visual Voicemail allows you to see a list of messages that have been left for you, where you can select which ones you want to hear. A small red bubble with a number in it may appear on the Voicemail icon at the bottom of the Phone app. This number indicates the number of voicemail messages that you have not yet heard.
If you purchase an unlocked iPhone from Apple and use it with a phone plan that is not an official iPhone account, tapping on the voicemail button takes you directly to the voicemail service for your carrier. You will not have access to visual voicemail except for official iPhone plans.
Setting Up Your Voicemail Passcode
The first time you enter the Voicemail screen, your iPhone prompts you to enter a new voicemail passcode (PIN). Select a number you will remember and make a note of it some place secure and private, i.e., not in your wallet or on a stick-it note attached to your computer.
To change your passcode at a later date, go to Settings ![]() Phone, and tap Change Voicemail Password. The iPhone prompts you for the current passcode. Enter it, and tap Done. Then enter the new passcode, and tap Done. To confirm the new passcode, enter it one more time, and tapDone.
Phone, and tap Change Voicemail Password. The iPhone prompts you for the current passcode. Enter it, and tap Done. Then enter the new passcode, and tap Done. To confirm the new passcode, enter it one more time, and tapDone.
TIP: Advanced iPhone users should note that the Settings ![]() Phone screen also allows you to specify a SIM PIN. This number locks your SIM card, so it can't be used in other phones. When enabled, you must enter the SIM passcode every time you power on your iPhone.
Phone screen also allows you to specify a SIM PIN. This number locks your SIM card, so it can't be used in other phones. When enabled, you must enter the SIM passcode every time you power on your iPhone.
Choosing Your Greeting
To set the message that plays when your mobile carrier transfers a call to voicemail, tap Greeting at the top-left of the Voicemail screen. Select Default to use the standard message or tap Custom to record a greeting as follows: tap Record; speak your message; tap Stop. You can review your recording by tapping Play and save it by tapping Save.
Managing Voicemail Messages
As mentioned earlier in this chapter, the small number in a red circle that appears on the green Phone icon on your Home screen indicates the combined number of accumulated missed calls and voicemails. When you tap the icon and enter the Phone application, these numbers break down individually, as shown in Figure 4–1. Tap the Voicemail icon to open the Voicemail screen and see your message list (Figure 4–6).
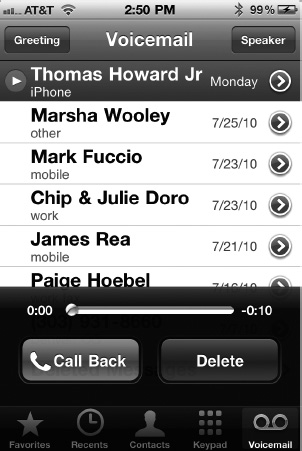
Figure 4–6. The iPhone's Visual Voicemail lists your messages. To play back a message, select it and tap the play button to the left of the name or number.
From the Voicemail screen, you can perform the following functions:
Toggling the speaker: By default, voicemail audio plays back through the iPhone's earpiece. Tap the Speaker button to play back voicemail through the iPhone's built-in speaker system instead. It turns a brighter, lighter blue when enabled. Tap again to redirect audio back to the internal earpiece.
Playing messages: To listen to voicemail, select a message, and tap the Play button that appears to the left of the contact name or phone number, as shown in Figure 4–6. The button switches to a two-lined Pause indicator, which you can tap again to pause playback. You also can rewind and fast-forward by adjusting the playhead on the scrubber bar that appears just above the Call Back and Delete buttons.
Removing voicemail: Tap Delete to remove the currently selected message. The iPhone moves that item into its Deleted Messages list. To undelete, select Deleted Messages, tap the item you want to restore, and tap Undelete. Permanently remove deleted voicemail by tapping Clear All in the Deleted Messages list. When the iPhone prompts you, confirm by tapping Clear All again.
Reviewing contact information: The Disclose button at the right of each message links to the informational page for that contact. If you haven't assigned a phone number to a contact, use this page to add the selected number to an existing contact or to create a new contact for the number. Tap the Voicemail button in the upper left corner to return to the Voicemail screen.
Returning a call: Select any message from the list, and tap Call Back to return the call.
Accessing Voicemail Files
If you have a need to save important voicemail that you've received, you may want to look into a third-party Mac application from Mark/Space called The Missing Sync for iPhone (www.markspace.com/products/iphone), or PhoneView from ecamm (www.ecamm.com/mac/phoneview). With these applications, you can move voicemail messages to your Mac for future reference. There are similar application for Windows including WideAngle'sTouchCopy (www.wideanglesoftware.com/touchcopy/index.php).
Another way you can save those messages on just about any computer is to play the voicemails on the iPhone through the speaker, and use a sound recording application to record the voicemail to the PC or Mac. On most Windows machines, you can use the Sound Recorder accessory, found in the list of All Programs under Accessories, to record the voicemail. On the Mac, the GarageBand application (part of iLife) is useful for recording and editing voicemail messages.
Sending Voicemail Indirectly
AT&T customers can uncover their AT&T message center phone number by opening the Phone application. Tap Keypad, enter *#61# (i.e., star, pound, 6, 1, pound), and tap Call. The iPhone responds with “Please wait”. After a few seconds, the screen updates with overlaid text. One message will read, “Setting interrogation Succeeded. Voice Call Forwarding When Unanswered Forwards to” followed by a number. This number is the AT&T voice-messaging center. When you call this number, AT&T welcomes you and asks you to enter a ten-digit phone number. By entering the phone number for your iPhone, it's as if you'd dialed the iPhone directly. You hear the greeting you've set and can leave a message for your iPhone.
Managing Ringtones and Other iPhone Alerts
The Sounds pane (Settings ![]() Sounds) allows you to choose how your iPhone responds to incoming calls and other events. Here, you can both set the volume of the ringtone and choose which ringtone to play when calls arrive.
Sounds) allows you to choose how your iPhone responds to incoming calls and other events. Here, you can both set the volume of the ringtone and choose which ringtone to play when calls arrive.
To switch to a new sound, tap Ringtone, and choose any of the sounds listed. The iPhone plays it back for you to hear. When you're satisfied with your selection, tap Sounds to set the ringtone and return to the previous screen.
Note In addition to setting ringtones, the Sounds pane allows you to choose whether to play sounds for new voicemail, new text messages, new mail, sent mail, calendar alerts, locking your iPhone, and keyboard clicks.
The iPhone allows you to assign custom ringtones to individual contacts. This allows you to instantly know which contact is calling: a happy song for your spouse or an alarm for your boss (or vice versa, depending on how much you like your job). Choose Phone ![]() Contacts, and select a contact. Scroll down the contact information page, and tap Assign Ringtone. Select a ringtone, and tap Save to select that sound, or select Cancel to use the default ringtone for this contact.
Contacts, and select a contact. Scroll down the contact information page, and tap Assign Ringtone. Select a ringtone, and tap Save to select that sound, or select Cancel to use the default ringtone for this contact.
Adding Custom Ringtones
The iPhone uses m4a audio files (AAC format) as ringtones but renames them as m4r, which allows iTunes to know that they are to be used as ringtones. While almost any sound file can be converted to this format in iTunes, third-party applications such as Ambrosia Software's iToner2 (www.ambrosiasw.com/utilities/itoner/) make this simple. Make sure you limit your ringtones to 30 seconds in length. Any unprotected m4a AAC file (i.e. doesn't use digital rights management) that's shorter than 30 seconds long can be renamed with an m4r extension, imported into iTunes, and used on your iPhone.
You can also turn a short segment of some songs that you've purchased from the iTunes store into a ringtone. Here's how:
- Launch iTunes on your Mac or PC.
- To find songs that you've purchased in iTunes, click the Purchased icon under the Store listing. You will also see a Purchased icon for each device that you've used to buy iTunes content.
- Click a purchased song in the list, and then select Store Create Ringtone. If it's possible to convert a portion of the song into a ringtone, a small ringtone editor appears at the bottom of the iTunes screen (Figure 4–7). You can drag the highlighted area to any point of the song, make the ringtone longer (up to 30 seconds) or shorter, and choose to loop the ringtone over and over. There's an adjustable time gap between rings as well.

Figure 4–7. The ringtone editor in iTunes provides a way to turn some purchased songs into iPhone ringtones.
- When you've edited the ringtone to your satisfaction, click the Buy button to purchase the ringtone for $0.99. It is saved to your Library under a section titled Ringtones.
- Connect your iPhone to your computer. Under the Ringtones tab for your iPhone, make sure that Sync Ringtones is selected and that you have chosen either “All ringtones” or “Selected ringtones” to sync.
- Click Apply, and the ringtones are transferred to your iPhone.
NOTE: Not all songs in iTunes can be purchased as ringtones. Apple previously put a small icon next to songs in iTunes that could be made into ringtones, but has stopped doing that recently. The only way to determine if a song can be turned into a ringtone is to try it. You can also create your own ringtones in Garage band from your own audio and export them in a format that you can bring into iTunes for use on your phone.
Advanced Phone Preferences
The Phone Settings pane (Settings ![]() Phone) allows you to enable and disable several key features including call forwarding, call waiting, and caller ID (that is, showing your caller ID information to other cell phones). Each of these preferences leads to a toggle switch, which selects whether the feature is enabled or not. In addition, the Call Forwarding setting lets you specify which number to forward calls to when the feature is in use. Choosing to hide your Caller ID means that others will not be able to see either your name or phone number when you call them or answer their calls.
Phone) allows you to enable and disable several key features including call forwarding, call waiting, and caller ID (that is, showing your caller ID information to other cell phones). Each of these preferences leads to a toggle switch, which selects whether the feature is enabled or not. In addition, the Call Forwarding setting lets you specify which number to forward calls to when the feature is in use. Choosing to hide your Caller ID means that others will not be able to see either your name or phone number when you call them or answer their calls.
TIP: The Settings ![]() Phone pane allows you enable iPhone use with a teletype machine. To use a TTY system with your iPhone, you must purchase a separate iPhone TTY adapter cable at the online Apple Store.
Phone pane allows you enable iPhone use with a teletype machine. To use a TTY system with your iPhone, you must purchase a separate iPhone TTY adapter cable at the online Apple Store.
iPhone Codes
Every GSM phone (in the US, this means an AT&T or unlocked iPhone, and not a Verizon- or Sprint-provisioned one) has a “secret” vocabulary, codes that you can type into the number pad that provide backdoor access to phone information. To use these codes, open the Phone application, and tap Keypad. Next, enter the codes exactly as stated, including any stars and pound signs. Tap Call after entering the code. The iPhone implements a large subset of the standard GSM service codes as well as a number of carrier-specific ones. Here is a sampling of the codes you can use on your iPhone in the US on the AT&T network. To learn more, Google for GSM codes. If you are a Verizon customer, you will want to download the free My Verizon Mobile application, which allows you to access your account, check your usage, and pay your bills on the go. Sprint should have an iPhone app out shortly, now that it has joined the iPhone club with its new 4S.
Basic iPhone Information
Use these shortcuts to view information about your iPhone's core functionality:
*#06#: Displays your iPhone IMEI, the unique identifier for your cell phone hardware. (No need to tap Call.) Together with your SIM information, it identifies you to the provider network.
Service Shortcuts
These shortcuts provide quick access to information about your US account:
*225#: Current bill balance. (Postpaid service only; the acronym is BAL for balance. For prepaid units, use *777# instead.)
*646#: Check remaining minutes. (Postpaid service only; the acronym is MIN for minutes.)
*3282#: Check your data usage. (Postpaid service only; the acronym is DATA.)
*729: Make a payment. (The acronym is PAY.)
611: Connect to customer service.
Summary
They don't call it an iPhone for nothing. This chapter introduced the “phone” part of the iPhone. In it, you have read about placing calls, receiving calls, and managing your iPhone contacts. You've learned about some of the ways to access and control calling features, and you've seen a few added features like adding ringtones and using GSM codes. Before you go away, here are a few key points that you may want to remember about making calls with the iPhone:
- AT&T, Sprint, and Verizon are the current US iPhone providers, although you can now purchase an unlocked world iPhone 4S and use it with any compatible GSM carrier. If you do not spend the extra money on an unlocked unit, your iPhone will be locked to its carrier. Both Sprint and Verizon offer courtesy unlocking to customers in good standing. In the U.S. and other countries, be sure to check with local carriers to determine if service at your most frequently-visited locations is good before purchasing an iPhone.
- It takes only a few seconds to get acquainted with many of the advanced iPhone calling features like multiway conference calling. If you're unsure how to proceed, just look at the menus on the iPhone screen. They are clear, explicit, and indicate what you need to do next. These features are truly amazing, simplifying single and multi-party calling in ways that just work, and work well.
- It's easy to purchase an inexpensive application to add ringtones to your iPhone or even, if you feel comfortable doing so, rolling your own using Garage Band. Just remember to keep those ringtones under 30 seconds in length.
- If you have a lot of music in your iTunes library that has been purchased from iTunes, you may be able to create, edit, and transfer your own ringtone to your iPhone for a small fee.
- The GSM iPhone code shortcuts are both safe and convenient to use. Check your balance or your minutes directly from your iPhone without fear or download an application from the App Store for your current carrier.