
![]()
Business Connectivity Services
Business Connectivity Services (BCS), introduced in SharePoint 2010 is a much-evolved version of the Business Data Catalog (BDC) created for MOSS 2007. With BCS, you can read as well as write to external systems. There are various ways to accomplish this, but to begin with you can simply define BCS with one simple equation as
usiness Connectivity Services = Business Data Catalog (MOSS 2007) + much more!
What Will You Learn in This Chapter?
By the end of the chapter, you’ll learn about
- BCS terminology
- Introduction to Business Connectivity Services
- Setting up BCS on your SharePoint 2013 installation
- Creating external content types (ECTs) using SharePoint Designer 2013
- Authoring ECTs using Visual Studio and a .NET assembly connector
- BDC runtime
- BDC and Office integration
- App-scoped ECT and data exchange using OData
- Relevant Windows PowerShell commands
To get the most out of this chapter, you’ll need the following software:
- SharePoint Server 2013 Enterprise Edition
- SharePoint Designer 2013 x64
- SQL Server 2012 x64
- Adventure Works Database (SQL Server 2012), downloadable at http://msftdbprodsamples.codeplex.com/
- Office Word 2013 Professional Plus
It’s a lot easier to learn about a new system if you’re familiar with the terminology. So let’s start with the common terms you’ll encounter, in both their full and short form, in this chapter:
- Business Connectivity Services (BCS): BCS is a set of services that facilitates the connection between SharePoint solutions and external systems. BCS architecture includes BDC services, BDC service data, Secure Store Services, the BDC runtime, and more.
- Business Data Connectivity (BDC) Service: This used to be the Business Data Catalog in MOSS 2007. The BDC in SharePoint 2013 is a service that acts as a bridge between business data and a SharePoint site. However, it still depends on the Metadata Store, and it helps you to design the external system model. The Metadata Store is used to bring external data into SharePoint or Office.
- External System: This includes your various databases, web services, and so forth.
- External Content Type (ECT): Introduced in SharePoint 2010, the ECT is a much-evolved version of its predecessor, which was called an entity in MOSS 2007.
- External List: Also introduced in SharePoint 2010, an external list is nothing but a SharePoint list (an “app” in SharePoint 2013 terminology) that is used to display data from an external system in SharePoint.
- BDC Model: This is basically an XML metadata file that contains definitions and details about connection settings, the authentication mode, and available ECTs. A BDC model file is uploaded to the BDC Metadata Store.
- BDC Model definition file: The physical XML file that contains the metadata information mentioned in the BDC Model description.
- Type Descriptor: A type descriptor, as the name suggests, describes a data type. Here, however, it is a data type that’s specific to BCS and completely independent of Windows Communication Foundation (WCF), SQL Server, or .NET connector data types. It is reusable across all data sources.
If you’ve worked with the Business Data Catalog in MOSS 2007, you know that it facilitates presenting LOB1 data within MOSS 2007. People often ask, “Why use the BDC when the functionality can be achieved by writing custom code?” But the BDC does a lot more than bring LOB data into MOSS. If you are new to the BDC, see http://msdn.microsoft.com/en-us/library/ms563661(v=office.12).aspx to learn the basics.
However, the BDC in MOSS 2007 had a few limitations.
- It was read-only: BDC entities, web parts, lists, and so forth provided read-only functionality.
- Understanding the data wasn’t easy: Implementers of the BDC needed to have a thorough understanding of the underlying XML data structure and its elements.
- Insufficient tools: Though there were a few tools available to build a BDC XML structure (model), it was not always easy.
- Lack of client integration: There was no way to integrate data with rich client applications such as Word or Outlook.
Not only has Business Connectivity Services addressed these limitations, it also comes with additional features. Let’s look at some of the major capabilities and enhancements in BCS.
- It’s read/write capable: You can perform CRUD (Create, Read, Update and Delete) operations on the external systems either using Office applications or SharePoint external lists.
- Familiar UI: In the earlier version, you had to rely on third-party tools to work with the BDC. Now you can work in an environment you are very familiar with, such as Office (Outlook, Word, and SharePoint Workspaces) and SharePoint (lists, Web Parts, profile pages, and so forth).
- Good tools: There has been a significant improvement in tools, as well as some new ones that enable both no-code and code-based solutions.
- No-code connectivity to external systems: You can perform operations on external systems without writing any code for simple requirements using SharePoint Designer 2013. SharePoint Designer 2013 can perform many more operations than its predecessor.
- Advanced and custom development: You can use Visual Studio 2012 to meet more complex and specific custom requirements.
- Connectivity options: There are more options to connect with data. You can use WCF services or .NET assembly connectors in addition to web services and databases. Additionally, SharePoint 2013 introduces support for OData connections.
- Rich-client integration: You can use external lists2 within Outlook, Word, or a SharePoint 2010 Workspace. The SharePoint Workspace feature has been discontinued in Office 2013. However, SharePoint Workspace 2010 continues to work with SharePoint 2013.
- Offline Access: You can work with data in offline or cache mode and synchronize with external system(s) when online.
- External data governance: Using Business Data Connectivity, you can access data securely and audit and perform management tasks from one central location.
- Search: SharePoint enterprise search offers look up (discover) and index functionalities to the data in your external system.
Well, that looks pretty impressive doesn’t it? But do you get all this functionality by installing any flavor of SharePoint 2013? And what do you have to configure to get it all to work?
![]() Note When we say “BDC,” we are referring to Business Data Connectivity in SharePoint 2013, unless otherwise specified as MOSS 2007.
Note When we say “BDC,” we are referring to Business Data Connectivity in SharePoint 2013, unless otherwise specified as MOSS 2007.
Setting Up Business Data Connectivity Services
BDC is part of the Service Applications model in SharePoint. BDC arrives preactivated with installation of SharePoint, and it creates a specific database with the name Bdc_Service_DB_<guid> on the same database server selected for SharePoint installation. In the sections that follow, we will explore steps involved in creating and configuring a new BDC service application. You will learn the following:
- How to set up and manage a new BDC service application using SharePoint 2013 Central Administration
- Different BCS features available across SharePoint editions
- Overview of the Business Connectivity Services Layer
Set Up a New BDC Service Application
To create a new BDC service application, you need to have Farm Administration privileges. Open Central Administration ![]() Application Management
Application Management ![]() Service Applications, and choose Business Data Connectivity Service from the New button on the Service Applications menu, as shown in Figure 4-1.
Service Applications, and choose Business Data Connectivity Service from the New button on the Service Applications menu, as shown in Figure 4-1.

Figure 4-1. Creating a new BDC Service Application
In the Create New Business Data Connectivity Service Application window, enter a new Service Application Name, Database Server, and Database Name, and choose the Database authentication mode. Set the Failover Database Server3 name, and choose an existing application pool or create a new one for the BDC service application to run in, as shown in Figure 4-2.

Figure 4-2. Configuring a new BDC Service Application
Once the new BDC Service Application is created, you can manage it through Central Administration ![]() Application Management
Application Management ![]() Service Applications
Service Applications ![]() Manage Service Applications
Manage Service Applications ![]() Business Data Connectivity Service. You’d follow the same steps to configure the default BDC Service Application. You can manage BDC services using various settings, as Figure 4-3 shows.
Business Data Connectivity Service. You’d follow the same steps to configure the default BDC Service Application. You can manage BDC services using various settings, as Figure 4-3 shows.

Figure 4-3. Manage the BDC Service
Notice that these menu items are contextual, based on the BDC View chosen. There are three views available: BDC Models, External Systems, and External Content Types, each showing or hiding various options. Let’s look at the options each view presents.
BDC Models View
The following sections describe the settings available in the BDC model section when BDC Models view is selected.
You can import a BDC model definition file or a resource definition file that contains information about connection strings, authentication, and external content types related to the external system, as shown in Figure 4-4. You can also choose to Export a selected BDC Model or delete one or more existing models.

Figure 4-4. Importing a BDC Model file
You can add users and set permissions to Edit, Execute, Selectable In Clients, or Set Permissions for a particular object in a BDC Metadata Store. An object can be an External Content Type or an External System. You can remove user permissions for a selected object if it’s not required.
Set Metadata Store Permissions
The BDC Metadata Store includes models, external systems, ECTs, methods, and so on. You can assign administrator(s) and set permissions to Edit, Execute, Selectable In Clients, or Set Permissions for the BDC Metadata Store itself. You can remove user permissions for the BDC Metadata Store if they’re not required. If object permissions included in the store need to be overridden, select the option “Propagate permissions” to all BDC Models, External Systems, and External Content Types in the BDC Metadata Store. Doing so will overwrite existing permissions.
![]() Note Edit Permission allows users or a group to edit an ECT. Handle this set of permissions very carefully because it has elevated privileges.
Note Edit Permission allows users or a group to edit an ECT. Handle this set of permissions very carefully because it has elevated privileges.
Execute Permission allows users or a group to execute CRUD operations. In the case of the Metadata Store, these permissions are related to metadata store child objects only.
Selectable In Clients allows users or a group to create external lists by choosing an ECT in the ECT item picker.
Set Permissions allows users or a group to set permissions on ECTs or child objects of the Metadata Store.
The following settings are available in the Manage section when the External Systems view is selected.
Settings
When an external system contains configurable properties to manage, you can alter them from the Settings menu.
Delete
Choose one or more content type or system from the list of available external content types or external systems to delete.
The following settings are available in the Profile Pages section when the External Content Types view is selected:
Profile pages display data for an item that belongs to an ECT. For instance, it can display all fields of an Employee from the Employees table populated using the ECT. However, profile pages are not automatically created in this version and are available only with SharePoint Server Standard and Enterprise editions. To create a profile page, first you need to enable profile page creation and specify the host site URL.
This setting is also available only with SharePoint Server Standard and Enterprise editions. Once you create a host site and enable profile page creation, you can create a new profile page for a particular ECT, and each ECT will then have a unique profile page or will upgrade existing profile pages from MOSS 2007. Default action links will be created for these profile pages. For new profile pages, the default action is View Profile. For upgrades, a new action—View Profile (SharePoint 2007)—is created. If you re-create a profile page, it overwrites a previous version of the same file.
BDC in MOSS 2007 was part of the enterprise licensing model. However, SharePoint 2010 and 2013 brought good news for organizations and individuals who had budget restrictions and wouldn’t purchase the Enterprise edition but still wanted to use BCS. SharePoint Foundation (SPF) 2010 and 20134 come with some of the BCS features that you can use to connect with external systems.
Figure 4-5 shows the different BCS features available across SharePoint editions. As you can see, SPF has the basic features. To obtain complete BCS functionality, you need the Enterprise edition.
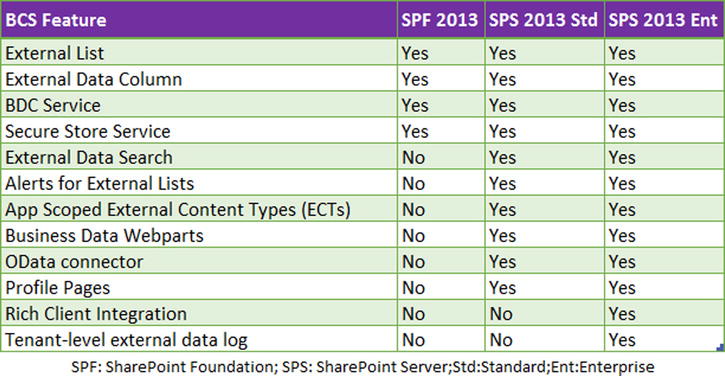
Figure 4-5. BCS feature comparison
This comparison can also be depicted in a feature set view, as shown in Figure 4-6. BCS has an offline capability when connecting with an Office (Office Professional Plus 2013 only) client. However, you can sync data with an external system on a timely basis. For instance, the default sync time for a SharePoint Workspace with a SharePoint site is 10 minutes. You can, of course, choose to manually sync them at any time.
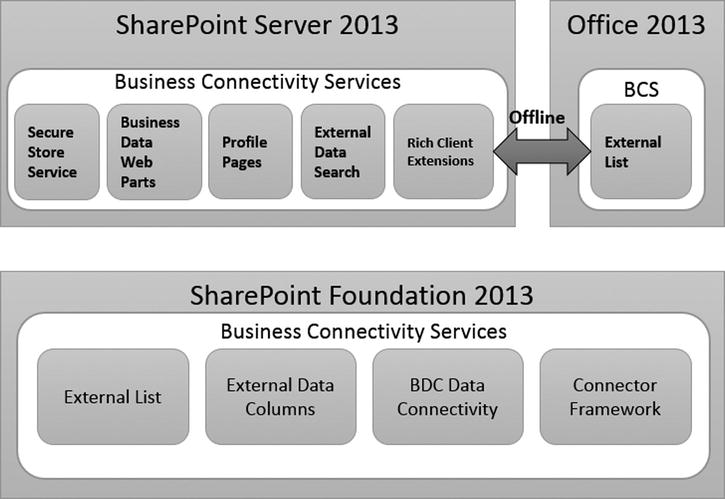
Figure 4-6. BCS feature sets
Let’s see at a high level how all these components are connected. As you can see in Figure 4-7, there are three major participants—Business Connectivity Services, External Systems, and Rich Client Office applications. Note, however, that BCS is the connector for the other two layers.

Figure 4-7. BCS high-level overview
Business Connectivity Services Layer
The BCS layer consists of two major blocks, the BDC Metadata Store and the BCS Client Cache. To understand what the BDC Metadata Store is, you need some background information. The BDC model contains metadata related to external content types, database connections, and so on. It actually enables the API of an external system described in the metadata model with a much simplified BDC object model. A metadata model contains real information about methods, entities, and so forth, such as employee data, customer information, and sales orders.
BDC models are stored in SQL Server database tables and are loaded into memory before the BDC runtime5 can use them. To perform operations such as load, modify, and so on, you make use of stored procedures. All these pieces form the BDC Metadata Store.
The BCS Client Cache essentially copies the external system data from the server and caches it for Office client solutions in the SQL Server Compact Edition database on the basis of per-user instances on the client computer. This facilitates the automatic copying and linking of client data with external systems either manually or by automatic synchronization, thus avoiding heavy transactions between the client and server data and improving the throughput of the application. This caching mechanism also enables offline disconnected mode.
This layer basically consists of the real meat—your data. The external system comprises the LOB system, database, and web service, WCF service, or .NET component. Data from this system is extracted using one of the mechanisms we will discuss later in this chapter, but ultimately is channeled into the SharePoint site or Office client application using an ECT. As mentioned earlier, the BCS service and BCS Client Cache bridge the gap between the SharePoint site and the Office client.
The thick Office client application layer contains the client applications, such as Office, SharePoint Workspace, and Word. As discussed earlier, data from the external system is propagated to the client applications using the BCS client cache for automatic or manual sync and data refresh. This automatic cache refresh and synchronization is performed on the client machine by the BDC Client Runtime. The request for external data access is passed from the Office application to the BDC Client Runtime, which in turn queries the BDC model, stored in the BDC client-side cache (Microsoft SQL Server Compact 4.0 database). The BDC client-side cache provides BDC runtime connection information related to the external source. The user credentials provided are stored in the Windows Credential Manager for later use. Based on information returned by the BDC client-side cache, the BDC Runtime passes the request to the appropriate external data source connector. This process is illustrated in Figure 4-8.
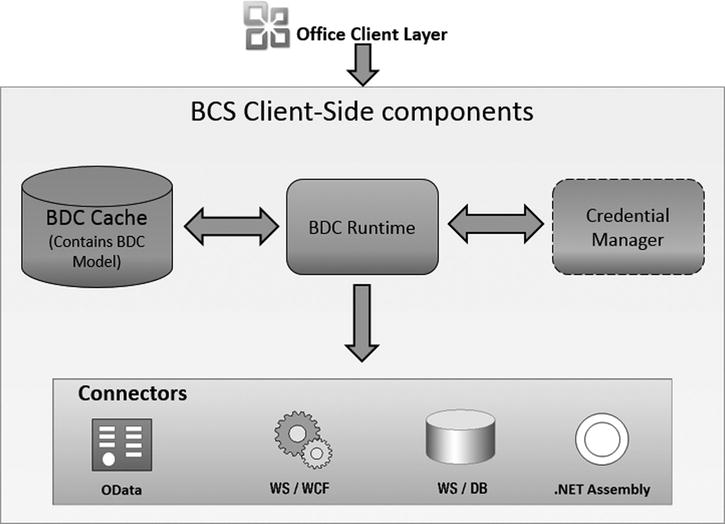
Figure 4-8. BCS client-side components
So far, we have discussed a little about terminology, fundamentals, and the core components of BCS. It’s also important to see what tools should be used to work with BCS.
![]() Note The client stack also consists of an additional component called Dispatcher, which will be aware of offline and online modes. Dispatcher is responsible for switching the connection to the external system for synchronization.
Note The client stack also consists of an additional component called Dispatcher, which will be aware of offline and online modes. Dispatcher is responsible for switching the connection to the external system for synchronization.
Based on the type of use and implementation, users can be categorized into two groups:
- Power users or RAD6 developers who work with out-of-the-box functionalities on both thin and thick clients. These are essentially simple solutions.
- Advanced developers who work with custom functionalities and design and develop complex applications with both thick and thin clients.
BCS tools are laid out so that each of these groups can take advantage of specific tools to accomplish their missions. For instance, as you can see in Figure 4-9, advanced solutions on the server side can be designed and developed using a custom .NET assembly connector to allow the use of external system data. At the same time, for a basic client solution, you can use Outlook, SharePoint Workspace, or Word.

Figure 4-9. Tools decision tree
Now that I’ve introduced the concepts, let’s roll with some examples. But wait; there is one last important concept you need to thoroughly understand in order to proceed.
External Content Types
You learned about ECTs at a very high level earlier. Now, let’s take a deep dive. Anything and everything that is accomplished using BDC services is with the help of external content types. You can consider ECTs to be the backbone for the entire BCS system. They are the content types that bring the external data sources—along with their schema, access capabilities, and behavior—into thin and thick clients, as shown in Figure 4-10. External content types contain business objects and can be created using either SharePoint Designer or Visual Studio 2012.

Figure 4-10. External content types bring external data sources to clients
Once you have ECTs, you can use them in many ways:
- Use ECTs as data sources to drive an external list. External lists use metadata defined with the ECT and perform like any other SharePoint list.
- Add data from the ECT modeled in BDC to an External Data Column, and use the column in any standard SharePoint list.
- External lists created using ECTs enable Read/Write operations on external system data, as long as the external system allows this.
- Display external system data using ECTs using BDC Web Parts—External Data List, External Data Item, External Data Item Builder, External Data Related List, and External Data Connectivity Filter. However, BDC Web Parts are read-only and can’t be used to write data back into external systems.
- ECTs supplement profile pages that display ECT item data.
- View or edit external system data using view and edit operations through the ECB menu7 on the external lists.
- Use parameterized query and filter capabilities on external lists using ECTs to prefilter the results.
Now you are ready to do a simple exercise. We will do the example first the no-code way, and then achieve the same result by writing code.
![]() Note In this chapter, all the examples will use Employee table data from the AdventureWorks database. This way, you’ll see how different mechanisms can be used with one data source.
Note In this chapter, all the examples will use Employee table data from the AdventureWorks database. This way, you’ll see how different mechanisms can be used with one data source.
Creating Your First ECT Using SharePoint Designer
SharePoint Designer is the no-code mechanism by which you can design a simple ECT to bring external system data into SharePoint for read and write actions. This mechanism is primarily used by power users or RAD developers. By completing this exercise, you’ll see how simple it is to build an ECT and how powerful SharePoint Designer is.
PROBLEM CASE
Create an ECT using SharePoint Designer—the no-code way. Retrieve Employee information from the AdventureWorks database Employees table. Facilitate insert, view, update, and delete operations on this data using external lists in SharePoint.
Solution
- Open SharePoint Designer and, from the Backstage window, click on Sites and then on Open Site.
- In the Site Name text box in the Open Site window, enter the SharePoint site URL—for example, http://yoursiteurl—then click Open.
- From the Site Objects window, click on External Content Types as shown in Figure 4-11.

Figure 4-11. Creating External Content Types in SharePoint Designer
- In the New section of the External Content Types menu, click on External Content Type.
- In the “New external content type” section, click on External Content Type Information and set the Name and Display Name fields. For this exercise, set the Name as EmployeesList_From_HR.
- Click the link “Click here to discover external data sources and define operations,” as shown in Figure 4-12.

Figure 4-12. Discover external data sources
- Clicking that link launches the Operation Designer window shown in Figure 4-13.

Figure 4-13. Manage connections for ECT
- Click on Add Connection and from External Data Source Type Selection
 Data Source Type, select SQL Server, and click OK.
 - Set Database Server, Database Name, and Optional Connection Name in the SQL Server Connection window. For this example, choose “Connect with User’s Identity” and click OK. (Also, make sure the logged-in user has sufficient rights on the database selected.)
 Note In this example, we will use the AdventureWorks database. However, note that we will be using the relational database this time, not cube data.
 - The selected data connection will be displayed in the Data Source Explorer section. Expand the Data source and Tables and, after right-clicking on the Employee table, select Create All Operations from the context menu. This launches a wizard you can use to create the required CRUD operations for the ECT, as shown in Figure 4-14. This also allows you to select columns you’d like to display and define any input or filter parameters.

Figure 4-14. Create CRUD operations using the ECT wizard
- In the “All operations” window, click on Finish without altering any other settings. The window will close, and the External Content Type Operations section in the Operation Designer window will be populated with operations you created.
- Return to the External Content Types EmployeesList_From_HR window, and notice that the Identifiers value now says BusinessEntityID(Int32).
- Leave the Office Item Type and Offline Sync for external list values as the defaults, and click on Save from the Backstage window. All the changes to the ECT are saved to the BDC Metadata Store at this time.
After successful completion of these steps, the ECT EmployeesList_From_HR window should look similar to the one in Figure 4-15.

Figure 4-15. The ECT EmployeesList_From_HR window
The ECT is now ready and can be used in your SharePoint site. To access the external data source via the ECT, you need an external list, which is available out of the box in SPF/SPS 2013.
![]() Note You can choose to create the external list either from SharePoint Designer or from the SharePoint site.
Note You can choose to create the external list either from SharePoint Designer or from the SharePoint site.
Create an External List
Click on the Create Lists & Form menu in the Lists & Forms section of the ribbon. On the Create List and Form for <ECT> ![]() Create New External List option, enter List Name and List Description. Leave the other settings at the defaults, and click OK. This action creates a new external list on your SharePoint site. Notice that the External Lists section in the ECT designer window will now display the external list name and URL. You can return to your SharePoint site and view your new external list.
Create New External List option, enter List Name and List Description. Leave the other settings at the defaults, and click OK. This action creates a new external list on your SharePoint site. Notice that the External Lists section in the ECT designer window will now display the external list name and URL. You can return to your SharePoint site and view your new external list.
To create an external list from your SharePoint site, follow these steps:
- Open your SharePoint site.
- From Site Settings Site Content, click the “add an app” button.
- From the available apps, select External List and click on Create. The Team Collaboration Lists site feature must be enabled for the External List app to be available.
- Enter the Name, Description, and Navigation values.
- In the “Data source configuration” section, for the External Content Type, click the Select External Content Type icon (which is the second icon to the right of the input).
- In the External Content Type Picker window, choose the ECT you created and click OK as shown in Figure 4-16. Click on the Create button in the Create External List window.

Figure 4-16. Choosing the External Content Type
On successful creation of the list, when a user attempts to open and view list data, he or she will receive the error “Access denied by Business Data Connectivity.” There are two factors to understand here. First, the logged-in user needs to have permission to execute the ECT that created the list. Second, the logged-in user should have permissions on the SQL Server back end to read data from the AdventureWorks database Employee table. Let’s see how to configure both of these settings.
Configure External Content Type Permissions
When an ECT is created, it is added to the BDC Metadata Store and can be accessed under BDC Metadata Store views, from which you need to manually configure the permissions related to the ECT. To do this, open Central Administration and from Application Management ![]() Service Applications
Service Applications ![]() Manage service applications, click on Business Data Connectivity Services. From the available list of ECTs, choose the ECT you created earlier. Then, from its ECB menu, click on Set Permissions (Figure 4-17).
Manage service applications, click on Business Data Connectivity Services. From the available list of ECTs, choose the ECT you created earlier. Then, from its ECB menu, click on Set Permissions (Figure 4-17).

Figure 4-17. Setting permissions on an External Content Type
In the Set Object Permissions window (Figure 4-18), in the “To add an account” box, enter a user account or group and click the Add button. In the Permissions section, choose the set of permissions you’d like to assign to the selected user. Choose or leave the value for propagating permissions, and click OK.

Figure 4-18. Setting object permissions to the external content type
Return to your SharePoint site, and access the external list you created earlier. You should now see that list populated with Employee table details (Figure 4-19). To edit an item from the ECB menu on the BusinessEntityID, click on Edit Item. In the Edit Item window, change any value and click on Save, which results in a data update. Similarly, you can perform other operations, such as View Item, Delete Item, as well as create a New Item. Now, why do you have an ECB menu on the BusinessEntityID column? It’s because BusinessEntityID was chosen as the identifier in this example.

Figure 4-19. Employee details loaded in an external list
Note that in the example, the logged-in user is an Administrator who has the necessary rights on the SQL back end and so was able to view data. However, this will not be the case with every logged-in user. So do you end up giving access to every user of your database? That’s not a recommended practice.
You will have to set up an unattended service account that has access to the database and will impersonate the logged-in user. Secure Store Service (SSS) comes to your rescue in such cases. As discussed in previous chapters, SSS replaces single sign-on and allows you to configure an unattended service account to avoid authentication issues.
Configure ECT Data Connections with Secure Store Service
In this section, you’ll learn how to configure ECT data connections with the Secure Store Service application. The steps are similar to those you performed in Chapter 2. You can either skim through this section or skip it if you want to.
- Open Central Administration Application Management Service Applications Manage service applications, and click on Secure Store Service. In the Secure Store Service management window, click the New button in the Manage Target Applications section.
- In the Target Application Settings window, set the Target Application ID (to BCS-SSS), Display Name, and Contact E-mail values. Specify the Target Application Type as “Individual” and the Target Application Page URL as “Use default page,” and click Next.
- In the “Specify credential fields” window, leave the defaults and click Next.
- In the Members settings, add administrators to the Target Application Administrators list who should have full control on the target applications and click OK.
- On returning to the Secure Store Services management window, select the Target Application ID created in the previous steps and click the Set button on the Credentials section of the ribbon.
- In the “Set Credentials for Secure Store Target Application (Individual)” window, enter a value for the Credential Owner as well as values for Windows User Name and Windows Password, and confirm the Windows Password value. Notice that in this case you are setting a domain account, not a SQL Server account. It is important that the user credentials you enter have permissions on SQL Server database tables. Click OK to close the window.
- Launch SharePoint Designer, and open your SharePoint site. On the Site Objects menu, choose External Content Types and select the ECT you created (EmployeesList_From_HR).
- Click on either the Edit Connection Properties button on the ribbon in the Connection Properties section or the External System link in the External Content Type Information section.
- In the Connection Properties windows, on the Default tab, choose Impersonate Windows Identity for the Authentication Mode. Enter the previously created Secure Store Application ID in the appropriate box as shown in Figure 4-20, and click OK.
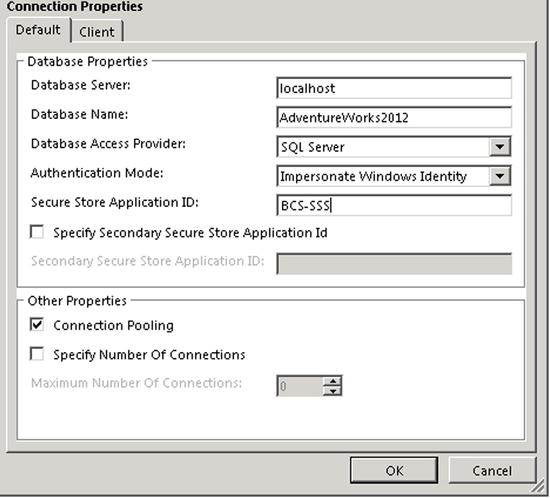
Figure 4-20. Set Secure Store Service Application ID for ECT database connection properties
- When a user with insufficient permissions tries to access the external list, he will be presented with a link to authenticate, as shown in Figure 4-21.

Figure 4-21. Authenticate with credentials
- After clicking the link, the user will be presented with a window for entering his credentials (Figure 4-22), and on successful validation, he will have access to the back-end system data.

Figure 4-22. Manage credentials for SSS target application
Now that you have configured ECT with the SSS Application ID, users can access external data via an external list in SharePoint without encountering any issues.
![]() Note You can’t configure an ECT data source with SSS in SharePoint Foundation 2013. You have to use the User’s Identity or Impersonated Windows Identity only.
Note You can’t configure an ECT data source with SSS in SharePoint Foundation 2013. You have to use the User’s Identity or Impersonated Windows Identity only.
Did you realize that you haven’t seen or modified any XML file as you used to do in MOSS 2007? Do you now agree how simple and easy it is to create an ECT in SharePoint 2013? But wait! What if the data source is not a database but is actually a service that is delivering data, and this is the most common scenario your enterprise bus will have? If you use the tools decision tree (refer back to Figure 4-9), you’ll see that for advanced solutions, you need to write a custom .NET assembly connector.
Authoring an ECT Using Visual Studio with a .NET Connector
Before you begin actually creating the .NET assembly connector for the ECT using Visual Studio, let’s identify the essential steps. Here’s what you’ll need to do:
- Create stored procedures that enable the get item, get collection, and set item operations.
- Author an external content type.
- Develop a custom .NET Connector, and associate the above-mentioned operations to the ECT.
PROBLEM CASE
Author an ECT using Visual Studio, and generate actions—View and Edit for individual items. Develop a .NET assembly connector to Employee information in the Employees table in the AdventureWorks database. Enable the ECT to use the .NET assembly connector, and, finally, create an external list using this ECT.
Solution
By the end of this exercise, you will have
- a .NET Type assembly connector and
- an ECT
When you use the Visual Studio BDC template, you automatically obtain the BDC Model and External System along with an ECT. But first, using Listings 4-1 through 4-3, create three stored procedures.
Listing 4-1. Stored Procedure for Retrieving All Employee Information
USE [AdventureWorks2012]
GO


CREATE PROCEDURE [dbo].[uspGetEmployees]
AS
BEGIN
    SET NOCOUNT ON;
    SELECT BusinessEntityID, NationalIDNumber, LoginID, JobTitle, BirthDate, MaritalStatus,
    Gender, HireDate, SalariedFlag, VacationHours, SickLeaveHours, CurrentFlag, ModifiedDate
    FROM
    HumanResources.Employee
    WHERE OrganizationNode.GetAncestor(1) IS NOT NULL
END

GO
Listing 4-2. Stored Procedure for Retrieving Specific Employee Information Using Employee ID
USE [AdventureWorks2012]
GO

CREATE PROCEDURE [dbo].[uspGetEmployeesById]
@BusinessEntityID [int]
AS
BEGIN
    SET NOCOUNT ON;
    SELECT BusinessEntityID, NationalIDNumber, LoginID, JobTitle, BirthDate, MaritalStatus,
    Gender, HireDate, SalariedFlag, VacationHours, SickLeaveHours, CurrentFlag, ModifiedDate
    FROM
    HumanResources.Employee
    WHERE
    BusinessEntityID = @BusinessEntityID

END

GO
Listing 4-3. Stored Procedure for Updating Specific Employee Information Based on Employee ID
USE [AdventureWorks2012]
GO

CREATE PROCEDURE [dbo].[uspSetEmployeesValueById]
@BusinessEntityID [int],
@NationalIDNumber nvarchar(15),
@LoginID nvarchar(256),
@JobTitle nvarchar(50),
@BirthDate DateTime,
@MaritalStatus nchar(1),
@Gender nchar(1),
@HireDate DateTime,
@SalariedFlag bit,
@VacationHours smallint,
@SickLeaveHours smallint,
@CurrentFlag bit,
@ModifiedDate DateTime
AS
BEGIN

    UPDATE HumanResources.Employee
    Set NationalIDNumber = @NationalIDNumber,
        LoginID = @LoginID,
        JobTitle = @JobTitle,
        BirthDate = @BirthDate,
        MaritalStatus = @MaritalStatus,
        Gender = @Gender,
        HireDate = @HireDate,
        SalariedFlag = @SalariedFlag,
        VacationHours = @VacationHours,
        SickLeaveHours = @SickLeaveHours,
        CurrentFlag = @CurrentFlag,
        ModifiedDate = @ModifiedDate
    WHERE
        BusinessEntityID = @BusinessEntityID
END

GO
Now that you have the necessary stored procedures, let’s go ahead and create the project in Visual Studio 2012:
- Open Visual Studio, and create a SharePoint 2013 - Empty Project.
- Enter the SharePoint site URL to use for debugging, and choose for the solution to be deployed as a farm solution.8 Click Finish to continue.
- Right-click the project, and select Add, New Item, Business Data Connectivity Model (Farm Solution only).
- After the project is successfully created, it will display windows that should look similar to those in Figure 4-23.

Figure 4-23. BDC model in Visual Studio 2012
Note If you don’t see the BDC Explorer window, you can launch it from View Other Windows BDC Explorer. - Let’s familiarize ourselves a little with important windows in the project, as indicated in Figure 4-23.
- a. BDC Explorer: This allows you to define a model, its entities, and their identifiers and methods. Methods can be configured with in and out parameters.
- b. BDC Method Details: This allows you to configure both in and out parameters and also to add new method templates, such as Blank, Creator, Deleter, Finder, Specific Finder, and Updater.
- c. BDC Model designer: This is a designer space where you can drag and drop entities and create associations.
By default, an entity (Entity1) is added to the model as shown in Figure 4-23. You will use it and configure it in this example. Entity1 consists of Identifier1 as its identifier and two methods, namely ReadList (Finder method) and ReadItem (Specific Finder method). While ReadList returns an entire entity collection, ReadItem returns only the specific collection item that matches the input filter parameter.
Note Visual Studio lets you add different stereotypes and methods for an entity of an external content type to perform the various operations noted next. All these methods are called by the BDC shared service. As soon as you create these methods, Visual Studio adds corresponding empty and not implemented methods in the entity service class file.Blank Method: Create a custom method to perform a specific operation in addition to the following methods.
Creator Method: Implement a method to create and return a new entity. This method is named Create.
Deleter Method: Implement a method to delete an existing entity instance. This method is named Delete.
Finder Method: Implement a method to query and return a list or collection of entities. This method is named ReadList.
Specific Finder Method: Implement a method to query and return a specific entity. This method is named ReadItem.
Updater Method: Implement a method to edit an existing entity instance. This method is named Update.
In the Employees table, BusinessEntityID is the primary key and hence you need to configure the Entity1 Type Descriptor such that it can be mapped to BusinessEntityID. As you might have noticed, Identifier1 in this example is a Type Descriptor of type System.String. You need to set its type to System.Int32 in order to make it work in conjunction with the BusinessEntityID data type.
- Select Identifier1 under Entity1 in the designer window. In the properties window, change the Type Name to System.Int32.
- Expand the BdcModel1 under the BDC Explorer. Go to the ReadItem and ReadList method input and output parameters and change Identifier1 Type Name to System.Int32 as shown in Figure 4-24.

Figure 4-24. Adding Identifier1’s Type Name in BDC Explorer
- Delete the return parameter Message from both ReadItem and ReadList.
Because the idea is to retrieve and display columns from the Employees table, you need to create corresponding Type Descriptors related to the columns in the Employees table. Expand returnParameter under the ReadItem method. Right-click on Entity1, and click Add Type Descriptor. In the properties window, set the Type Descriptor Name to the column name you’d like to map and set the Type Name to the corresponding data type of the column. For example, set Name to NationalIDNumber and Type to System.String because the column NationalIDNumber is an nvarchar(15) data type. Make sure you rename the existing return parameter Identifier1 to BusinessEntityID. Perform these steps for all the columns that you’d like to retrieve. Repeat the steps for returnParameter under the ReadList method.
Note Columns chosen in this example are BusinessEntityID {int}, NationalIDNumber {nvarchar(15)}, LoginID {nvarchar(256)}, JobTitle {nvarchar(50)}, BirthDate {datetime}, MaritalStatus {nchar(1)}, Gender {nchar(1)}, HireDate {datetime}, SalariedFlag {Flag(bit)}, VacationHours {smallint}, SickLeaveHours {smallint}, CurrentFlag {Flag(bit)} and ModifiedDate {datetime}. - Switch to Solution Explorer, open the Entity1.cs file, and remove the lines of code for the Message property declaration.
- Modify the public properties under Entity1 as shown in Listing 4-4.
Listing 4-4. Properties in the Entity1 Class
public Int32 BusinessEntityID { get; set; }
public string NationalIDNumber { get; set; }
public string LoginID { get; set; }
public string JobTitle { get; set; }
public DateTime BirthDate { get; set; }
public char MaritalStatus { get; set; }
public char Gender { get; set; }
public DateTime HireDate { get; set; }
public bool SalariedFlag { get; set; }
public Int16 VacationHours { get; set; }
public Int16 SickLeaveHours { get; set; }
public bool CurrentFlag { get; set; }
public DateTime ModifiedDate { get; set; } - In the Entity1Service.cs file, declare the namespace System.Data.SqlClient:
using System.Data.SqlClient; - Copy the code in Listing 4-5 for the ReadList method into the Entity1Service.cs file.
Listing 4-5. The ReadList Method
List<Entity1> entityList = new List<Entity1>();
using (SqlConnection conn = new SqlConnection(
"Data Source=localhost; Integrated Security=SSPI; Initial Catalog=AdventureWorks2012"))
{
    conn.Open();
    using (SqlCommand cmd = new SqlCommand("uspGetEmployees", conn))
    {
        cmd.CommandType = System.Data.CommandType.StoredProcedure;
        SqlDataReader reader = cmd.ExecuteReader();
        while (reader.Read())
        {
            entityList.Add(new Entity1
            {
                BusinessEntityID = Int32.Parse(reader[0].ToString()),
                NationalIDNumber = reader.GetString(1),
                LoginID = reader.GetString(2),
                JobTitle = reader.GetString(3),
                BirthDate = DateTime.Parse(reader[4].ToString()),
                MaritalStatus = char.Parse(reader[5].ToString()),
                Gender = char.Parse(reader[6].ToString()),
                HireDate = DateTime.Parse(reader[7].ToString()),
                SalariedFlag = bool.Parse(reader[8].ToString()),
                VacationHours = Int16.Parse(reader[9].ToString()),
                SickLeaveHours = Int16.Parse(reader[10].ToString()),
                CurrentFlag = bool.Parse(reader[11].ToString()),
                ModifiedDate = DateTime.Parse(reader[12].ToString())
            });
        }
        reader.Close();
    }
}
return entityList; - Copy the code in Listing 4-6 for the ReadItem method into the Entity1Service.cs file.
Listing 4-6. The ReadItem Method
Entity1 entity = new Entity1();
using (SqlConnection conn = new SqlConnection(
"Data Source=<DB Server Name>; Integrated Security=SSPI; Initial Catalog=AdventureWorks2012"))
{
    conn.Open();
    using (SqlCommand cmd = new SqlCommand("uspGetEmployeesById", conn))
    {
        cmd.CommandType = System.Data.CommandType.StoredProcedure;
        cmd.Parameters.Add("@BusinessEntityID", System.Data.SqlDbType.Int).Value = id;
        SqlDataReader reader = cmd.ExecuteReader();
        while (reader.Read())
        {
            entity.BusinessEntityID = Int32.Parse(reader[0].ToString());
            entity.NationalIDNumber = reader.GetString(1);
            entity.LoginID = reader.GetString(2);
            entity.JobTitle = reader.GetString(3);
            entity.BirthDate = DateTime.Parse(reader[4].ToString());
            entity.MaritalStatus = char.Parse(reader[5].ToString());
            entity.Gender = char.Parse(reader[6].ToString());
            entity.HireDate = DateTime.Parse(reader[7].ToString());
            entity.SalariedFlag = bool.Parse(reader[8].ToString());
            entity.VacationHours = Int16.Parse(reader[9].ToString());
            entity.SickLeaveHours = Int16.Parse(reader[10].ToString());
            entity.CurrentFlag = bool.Parse(reader[11].ToString());
            entity.ModifiedDate = DateTime.Parse(reader[12].ToString());
        }
    }
}
return entity;
Note As a recommended practice, add connection strings to the web.config file in the connectionStrings section instead of including them in the code. Also, make sure to encrypt the connectionStrings element if you have information such as the username and password in the connection string. - Return to BDC Explorer, expand Entity1 under the returnParameter of the ReadItem method, and select BusinessEntityID. From the properties window, ensure that the Identifier value is Identifier1. Check this for the ReadList method’s returnParameter as well.
These steps provide you with the infrastructure for retrieving data as a list or a single item. The next step is to implement update functionality when a single item is selected.
- In the BDC Explorer window, select Entity1. In the BDC Method Details window, click on “Add a Method” and choose Create Updater Method as shown in Figure 4-25.

Figure 4-25. Adding the Create Updater method
This step automatically creates an empty Update method in the Entity1Service.cs file. Note that Entity1 would be an In parameter for this method. Add another parameter to serve as the selected row item.
- Click on Add Parameter, and choose Create Parameter in the Name column.
- Choose the direction as “In” (in the Direction column).
- Edit the parameter TypeDescriptor in the Type Descriptor column by clicking on the Edit link on the drop-down menu.
- In the Type Descriptor Properties window, do the following:
- a. Set the Name property to BusinessEntityID and the Type Name as System.Int32. Select the Identifier as Identifier1.
- b. Set the Pre-Updater Field value to True. The Pre-Updater Field is a Boolean value that applies only to Type Descriptors and indicates if the TypeDescriptor object stores the latest business application data.
After you complete this step, your BDC Model window should look similar to the one in Figure 4-26.

Figure 4-26. The BDC model
- Switch to Solution Explorer, and open the Entity1Service.cs file. Replace the code with the Update method code in Listing 4-7.
Listing 4-7. The Update Method
int ret = 0;
using (SqlConnection conn = new SqlConnection(
"Data Source=localhost; Integrated Security=SSPI; Initial Catalog=AdventureWorks2012"))
{
    conn.Open();
    using (SqlCommand cmd = new SqlCommand("uspSetEmployeesValueById", conn))
    {
        cmd.CommandType = System.Data.CommandType.StoredProcedure;
        cmd.Parameters.Add("@BusinessEntityID", System.Data.SqlDbType.Int).Value = parameter;
        cmd.Parameters.Add("@NationalIDNumber", System.Data.SqlDbType.NVarChar).Value =
entity1.NationalIDNumber;
        cmd.Parameters.Add("@LoginID", System.Data.SqlDbType.NVarChar).Value = entity1.LoginID;
        cmd.Parameters.Add("@JobTitle", System.Data.SqlDbType.NVarChar).Value = entity1.JobTitle;
        cmd.Parameters.Add("@BirthDate", System.Data.SqlDbType.DateTime).Value = entity1.BirthDate;
        cmd.Parameters.Add("@MaritalStatus", System.Data.SqlDbType.NChar).Value = entity1.MaritalStatus;
        cmd.Parameters.Add("@Gender", System.Data.SqlDbType.NChar).Value = entity1.Gender;
        cmd.Parameters.Add("@HireDate", System.Data.SqlDbType.DateTime).Value = entity1.HireDate;
        cmd.Parameters.Add("@SalariedFlag", System.Data.SqlDbType.Bit).Value = entity1.SalariedFlag;
        cmd.Parameters.Add("@VacationHours", System.Data.SqlDbType.SmallInt).Value =
entity1.VacationHours;
        cmd.Parameters.Add("@SickLeaveHours", System.Data.SqlDbType.SmallInt).Value =
entity1.SickLeaveHours;
        cmd.Parameters.Add("@CurrentFlag", System.Data.SqlDbType.Bit).Value = entity1.CurrentFlag;
        cmd.Parameters.Add("@ModifiedDate", System.Data.SqlDbType.DateTime).Value =
entity1.ModifiedDate;
        ret = cmd.ExecuteNonQuery();
    }
}
Your Solution Explorer should look like what’s shown in Figure 4-27.

Figure 4-27. The .NET Connector Assembly in Solution Explorer
- Finally, ensure that all classes and projects have the same namespace defined. If the namespace or assembly name is incorrect, you’ll run into errors.
Deploy the Solution
Now it’s time to build, package, and deploy the solution to your SharePoint site. Right-click on the project and then click on Deploy. This essentially builds the project and deploys the package (.wsp) to your SharePoint site.
As mentioned earlier, the Business Data Connectivity Model template delivers two major pieces:
- The BDC Model, which contains one or more entities
- An external content type that actually contains metadata information related to the external system
- Open your Central Administration web application, and go to Application Management Service Applications Manage service applications Business Data Connectivity Service.
- Observe the different views by choosing them from the drop-down menu in the View section of the ribbon, as shown in Figure 4-28.

Figure 4-28. ECT deployed to BDC Service Application
- From the list of available ECTs, select the previously created and deployed ECT from the Visual Studio project.
- From the ECB menu on the entity, select Set Permissions. Enter a user account, and click the Add button. You can add more than one user account and set object permissions.
- Select the added user, set any permission (Edit, Execute, Selectable In Clients, Set Permissions) or all permissions, and click OK.
- Open your SharePoint site. From Site Actions More Options, select External List and click Create. In the Create New window, provide a Name and Description and choose whether or not to display the external list on the Quick launch.
- In the “Data source configuration” section, pick the ECT you created earlier by clicking on the Select External Content Type icon as shown in Figure 4-29. Then click on Create.

Figure 4-29. Choose the external content type through an external list
An external list will be created as shown in Figure 4-30. As you’ll see, it is similar to the list you created using SharePoint Designer earlier in this chapter. In this case, however, the list is populated with data from the external data source using .NET assembly connector code.
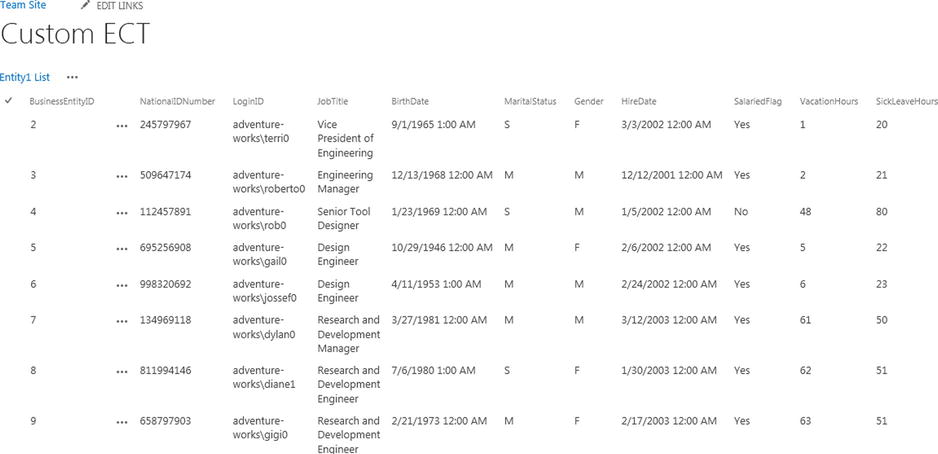
Figure 4-30. An external list with data populated using an ECT
![]() Note Columns might be ordered alphabetically. You can set the column order by editing the default view under the list settings or from the List Tools
Note Columns might be ordered alphabetically. You can set the column order by editing the default view under the list settings or from the List Tools ![]() List
List ![]() Modify View option.
Modify View option.
Not only is the external list populated, you can also select an item to view and edit (Figure 4-31). When the View option is selected, the ReadItem method will be triggered and the selected identifier id (item id) is passed to the function as a parameter. When the Edit option is selected, the Update method is called and the identifier id (item id) and the entity (row data) are passed as parameters.

Figure 4-31. You can view or edit an item using the ECB menu on the external list
![]() Note When you change any entity value, type descriptor, assembly name, or namespaces and redeploy the solution on an existing ECT, it is recommended you delete the external list and re-create it. When you get an error, however, the first place to look is under %Program Files%Common FilesMicrosoft SharedWeb Server Extensions15LOGSfolder.
Note When you change any entity value, type descriptor, assembly name, or namespaces and redeploy the solution on an existing ECT, it is recommended you delete the external list and re-create it. When you get an error, however, the first place to look is under %Program Files%Common FilesMicrosoft SharedWeb Server Extensions15LOGSfolder.
You must have noticed that an external list looks similar to a normal SharePoint list, but it’s not exactly the same. Table 4-1 provides a comparison.
Table 4-1. External Lists vs. Normal SharePoint Lists
| External List | Normal/Custom SharePoint List |
|---|---|
| Requires an external content type to create an external list, and holds data related to the external source. | Can use existing content type, and holds data related to data within the list. |
| Can read and write to external data. | Can read and write to data within the list. |
| Can create an external list using SharePoint Designer or a SharePoint site. | Can create a custom list using SharePoint Designer or a SharePoint site. |
| Default views and forms are created to display and edit external data when the external list is created. | Default views and forms are created to display and edit list data when the custom list is created. |
| Can create custom actions and initiate workflows. | Can create custom actions and initiate workflows. |
| Can be used with SharePoint Workspace or Outlook to display external data. | Can be used with SharePoint Workspace or Outlook to display external data. |
| Customize forms using InfoPath. | Customize forms using InfoPath. |
| Does not allow management of non-external content types. | Allows management of content types. |
| Versioning is not supported. | Supports versioning on items. |
| Can’t add additional columns unless the ECT is changed. | Can create columns or use existing site columns. |
In this exercise, the solution you created earlier using .NET code and deployed to SharePoint is deployed globally and will add the BDC model to the BDC Service Application. This means any Web application in the farm can access this ECT, from which you can create an external list. You will see this ECT under SharePoint Designer as a .NET type. We will see how to create an external list from it.
Creating an ECT Using SharePoint Designer and a .NET Type
As mentioned earlier, you can also access and use the ECT you created from the .NET assembly. Launch SharePoint Designer, and use the Open Site option to open your SharePoint site. From the Site Objects window, click External Content Types. In the External Content Types window, you’ll see the list of available ECTs, including the one you created earlier, as shown in Figure 4-32.

Figure 4-32. External Content Types in SharePoint Designer
Click on Entity1 to load the Entity1 external content type. From the Lists & Forms section on the ribbon, click the Create Lists & Form button as shown in Figure 4-33. Also, note the operations available with the ECT in the External Content Type Operations section.

Figure 4-33. Creating an external list from an exisiting ECT using SharePoint Designer
In the “Create Lists and Form for” window (Figure 4-34), select Create New External List and enter a value for List Name. Leave the other default input values, and click OK. If there is more than one model definition available in the .NET assembly, you can choose one from the System Instance drop-down list.

Figure 4-34. Creating a new external list
Return to your SharePoint site, and find the list with the name (External List Created from SPD ECT) you provided in the previous step. Launch the external list, and you’ll see this new list with view and edit functionality; it is similar to the lists created using other techniques.
Again, even with Visual Studio and writing a custom .NET assembly connector, you haven’t seen or edited any XML file so far, either while creating the model or when defining your entity. I’d say this is one of the biggest advantages when compared with the BDC in MOSS 2007.
Another important improvement of this version over the prior one is in the runtime object model. There have been phenomenal changes and more capabilities added in the new version. Let’s take a look at them.
Do you recall the question9 I asked in the “Introduction” section of this chapter? I’d say the BDC runtime is one of the answers for it. With BDC runtime, you now have the ability to represent the external system using either the server-side object model or the client-side object model. The server-side and client-side object models are both symmetrical; this means that what you can do with the server object model can also be done using the client object model and, in fact, the assembly is the same for both.
Using the BDC runtime, you not only can read from the external system, but also write back to it. There’s also a batch-read process by which you can send multiple inputs as a batch and get the corresponding results in a single request and response. This should improve performance and latency phenomenally.
There are many other improvements, including streaming support, an extensibility mechanism with .NET assembly connectors, custom connectors, secure store providers, and so on. But what is most compelling here is that whenever you develop a custom object using the BDC runtime against an ECT or external system deployed to your farm, it’s a one-time deal. As long as the ECT isn’t updated, your custom object need not be changed.
What this also means is that if your data source changes but your ECTs are untouched, your application will not be affected. Great, isn’t it? Let’s perform a simple example to help you understand in more detail.
PROBLEM CASE
Using the BDC runtime, access the ReadList method from the previously deployed ECT Entity1 and retrieve the Employee LoginID and Job Title.
Solution
First, take a look at the ECT we previously developed and deployed using Visual Studio—Entity1. After it is deployed, you can locate Entity1 in CA ![]() Application Management
Application Management ![]() Service Applications
Service Applications ![]() Manage service applications
Manage service applications ![]() Business Data Connectivity Service. (Refer back to Figure 4-33.)
Business Data Connectivity Service. (Refer back to Figure 4-33.)
Before you begin, you will need a few values from the ECT, as well as the code from which it has been deployed. Follow these steps:
- Note the Name of the ECT and the corresponding namespace because you’ll be using them in the BDC runtime (Figure 4-35).

Figure 4-35. Entity1 in the BDC Service Application
- Next, because the goal is to access the Read List method, you need to obtain the exact method name from the code. If you followed previous example, you know it is named ReadList.
- Finally, you need the column names for the Login ID and job title, which are LoginID and JobTitle.
Launch Visual Studio. From File ![]() New
New ![]() Project, select the Visual C# Console Application template and ensure that you selected .NET Framework 4.5. Provide the Name, Location, and Solution Name, and click OK. Add references to the following assemblies:
Project, select the Visual C# Console Application template and ensure that you selected .NET Framework 4.5. Provide the Name, Location, and Solution Name, and click OK. Add references to the following assemblies:
- C:Program FilesCommon FilesMicrosoft SharedWeb Server Extensions15ISAPIMicrosoft.BusinessData.dll
- C:Program FilesCommon FilesMicrosoft SharedWeb Server Extensions15ISAPIMicrosoft.SharePoint.dll
- C:WindowsMicrosoft.NETassemblyGAC_MSILMicrosoft.SharePoint.BusinessData.Administration.Clientv4.0_15.0.0.0__71e9bce111e9429cMicrosoft.SharePoint.BusinessData.Administration.Client.dll
- System.Web
Replace the code in Program.cs with that of Listing 4-8. Ensure that you change the SharePoint site URL correctly to your own. Also, if the method names, ECT name, or namespace are different, make sure to change them accordingly in the code.
Listing 4-8. Code for the BDC Runtime
using System;
using Microsoft.SharePoint;
using Microsoft.SharePoint.BusinessData.SharedService;
using Microsoft.SharePoint.BusinessData.MetadataModel;
using Microsoft.BusinessData.MetadataModel;
using Microsoft.BusinessData.Runtime;
namespace BCSRunTime // Set namespace according to your project
{
    class Program // Set class name as per your project
    {
        static void Main(string[] args)
        {
            ExecuteBcsEctMethods(@" http://localhost:81/ "); // set your site URL
        }
        static void ExecuteBcsEctMethods(string siteUrl)
        {
            using (SPSite site = new SPSite(siteUrl))
            {
                using (new SPServiceContextScope(SPServiceContext.GetContext(site)))
                {
                    BdcServiceApplicationProxy proxy = (BdcServiceApplicationProxy)SPServiceContext.Current.GetDefaultProxy(
typeof(BdcServiceApplicationProxy));
                    DatabaseBackedMetadataCatalog model = proxy.GetDatabaseBackedMetadataCatalog();

                    // Namespace, Entity name
                    IEntity entity = model.GetEntity("EmployeeEntityModel.BdcModel1", "Entity1");

                    ILobSystemInstance lobSystemInstance =
entity.GetLobSystem().GetLobSystemInstances()[0].Value;

                    // Finder method name
                    IMethodInstance method = entity.GetMethodInstance("ReadList", MethodInstanceType.Finder);
                    IView view = entity.GetFinderView(method.Name);

                    IFilterCollection filterCollection = entity.GetDefaultFinderFilters();
                    IEntityInstanceEnumerator entityInstanceEnumerator =
                    entity.FindFiltered(filterCollection, method.Name, lobSystemInstance, OperationMode.Online);
                    Console.WriteLine("Employee Login ID | Job Title");
                    while (entityInstanceEnumerator.MoveNext())
                    {
                        // Column names
                        Console.WriteLine(entityInstanceEnumerator.Current["LoginID"].ToString() +
                                                       " - " + entityInstanceEnumerator.Current["JobTitle"].ToString());

                    }
                    Console.ReadLine();
                }
            }
        }
    }
}
Save the file, and then build and run the code. You should see output similar to what’s shown in Figure 4-36.

Figure 4-36. Accessing external system data through the ECT using the BDC runtime
What you achieved just now is this: you are able to execute a finder method in the ECT and retrieve the data from the external system. Similarly, you can execute any method that you define in the ECT, whether it’s for updating the data in a default view or reading a specific item.
Note that the logic in the code is unaware of the external system. All it cares about is the ECT name, its finder method, and the namespace. As long as these don’t change, your logic runs forever.
The BCS comes with many more features. You can use it with SharePoint and also integrate it with other Office applications, and you can work offline using SharePoint Workspace. In the next section, we will discuss some of these capabilities.
Integration with Office Applications
You can integrate BCS with Office applications such as Outlook and Word. If you recall the Office client layer (refer back to Figure 4-7), that’s what we’ll be using now. We will demonstrate a simple example using Office Word; if you’d like to understand how BCS can be integrated with Outlook, refer to the following TechNet link: technet.microsoft.com/en-us/library/jj683117.aspx.
Launch your SharePoint site, and create a document library from Site Actions ![]() More Options
More Options ![]() Create. Once the document library is created, open the library settings and click on Create Column. Enter the column name, and select External Data as the type of information (Figure 4-37).
Create. Once the document library is created, open the library settings and click on Create Column. Enter the column name, and select External Data as the type of information (Figure 4-37).

Figure 4-37. Creating an external data column
Under Additional Column Settings, select the external content type you created earlier in this chapter. Select all fields or only those you want to use (Figure 4-38) and click OK.

Figure 4-38. Choosing fields for the external data column
Return to the document library, and upload a document by choosing the Add document link and clicking OK. Note that the document can’t be empty. Also, before you save the document to the library, select data by clicking the External Item icon. Then enter text in the Title text box and click the Save button as shown in Figure 4-39.

Figure 4-39. Selecting an external item
The selected data item is added as an entry to the document library with the columns you chose in the previous step. From the document’s ECB menu, click Check Out, and then click OK in the pop-up window. Click on the document to launch the document in Office Word 2013.
Go to Word ![]() Insert
Insert ![]() Text
Text ![]() Quick Parts, and then choose Document Property and select Employee Details as shown in Figure 4-40.
Quick Parts, and then choose Document Property and select Employee Details as shown in Figure 4-40.

Figure 4-40. Choosing document properties under Quick Parts
After you choose the values you’re interested in, the final document should look something like the one in Figure 4-41.
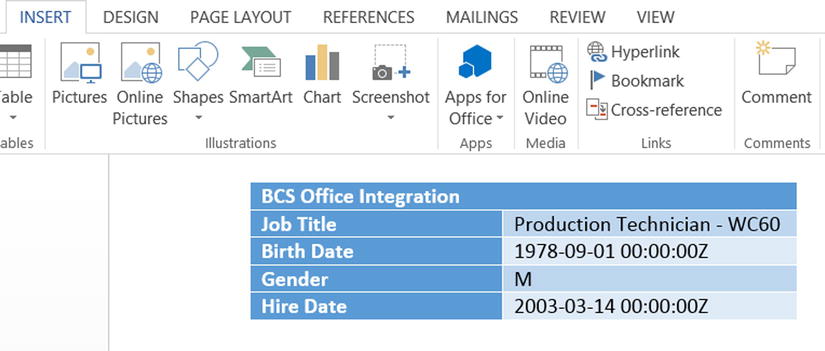
Figure 4-41. Document properties displaying data
You can now save the document, check it in, provide any version comments from the Backstage window of the ribbon, and then close the document.
The ECTs we developed so far could be deployed only at the farm level and required the involvement of a farm administrator. The main issue with this approach is that farm administrator rights are needed even for simple applications. SharePoint 2013 removes this limitation by introducing App-Scoped External Content Types. An app-scoped ECT can be packaged with a SharePoint 2013 app and can run in isolation within the app boundaries. This eliminates the need to involve the farm administrator for an installation of ECT. To understand more about SharePoint 2013 apps, refer to the following MSDN link: msdn.microsoft.com/en-IN/library/fp179930.aspx.
An app-scoped ECT restricts the scope of the ECT to the app level. Further, the BDC model representing ECTs is also packaged along with the app. This enables an app-scoped ECT to run in isolation, insulated from other applications.
![]() Note Only one BDC model can be included per app, and only OData connections (covered in the next section) are allowed.
Note Only one BDC model can be included per app, and only OData connections (covered in the next section) are allowed.
Working with OData Sources
SharePoint 2013 introduces support for OData sources. BCS in SharePoint 2013 now allows connections to OData sources. Open Data (OData) is a web protocol that provides simplified approach for data exchange between applications and external data sources. OData is built on top of popular protocols like HTTP, Atom, and JSON.
To better understand app-scoped ECT and BCS support for OData sources, consider the following problem.
PROBLEM CASE
Create an app-scoped ECT that connects to the Northwind OData source (Northwind OData service’s URL is http://services.odata.org/Northwind/Northwind.svc), retrieves Employee details, and makes them available in a SharePoint 2013 app.
![]() Note In this scenario, we are using a free-for-use Northwind OData data set provided by Microsoft, which is based on a classic Northwind database. You can view other live OData services at http://www.odata.org/ecosystem#liveservices.
Note In this scenario, we are using a free-for-use Northwind OData data set provided by Microsoft, which is based on a classic Northwind database. You can view other live OData services at http://www.odata.org/ecosystem#liveservices.
Solution
- Launch Visual Studio, and create a new app for the SharePoint 2013 project.
- Name your project AppScopedECT, and click the OK button.
- In the new app for SharePoint, provide a name for your app (AppScopedECT) and the SharePoint site to use for debugging. Select SharePoint-hosted as the hosting model for the app, and click the Finish button.
- In Solution Explorer, right-click on the project, select Add, and then select the “Content Types for an External Data Source” option, as shown in Figure 4-42.

Figure 4-42. Adding content types for an external data source
- In the wizard, specify the Northwind OData source URL and name the data source NorthwindDS, as shown in Figure 4-43.
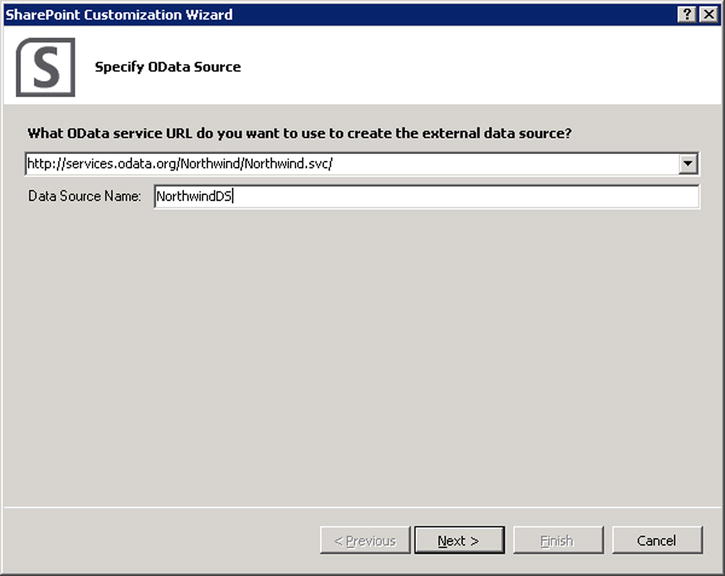
Figure 4-43. Specifying the OData source
- On the next screen, select the Employees data entity, ensure that the “Create list instances for the selected data entities (except Service Operations)” option is selected, as shown in Figure 4-44, and click Finish. Selecting this option directs Visual Studio to create the list based on ECT so that you don’t have to do this manually later.
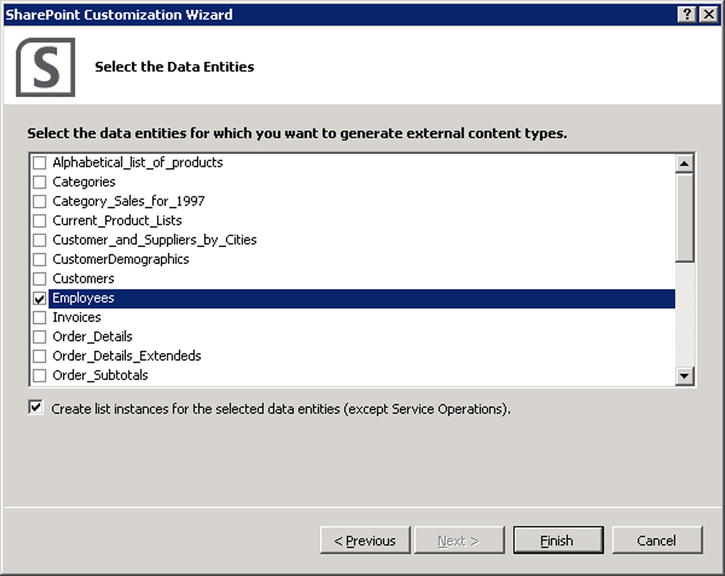
Figure 4-44. Selecting data entities
- This creates the Employees ECT. At this stage, your project structure should look like the one shown in Figure 4-45.

Figure 4-45. AppScopedECT project structure
- At this stage, examine the Feature Explorer to verify that features items contain the External Content Type and Employees list instance, as shown in Figure 4-46.

Figure 4-46. External Content Type and Employees list instance included in feature items
- Examine the Elements.xml under the Employees list instance. Notice the MetadataCatalogFileName property (shown in Figure 4-47), which is used to define the BDC model file that contains the external content type definition. An app cannot include more than one BDC Model file.

Figure 4-47. MetadataCatalogFileName property, which specifies the BDC model file
- Deploy the solution from Visual Studio, and navigate to Site Contents. The app should be listed there on deployment completion, as shown in Figure 4-48.

Figure 4-48. Deploying an app to the SharePoint site
- Click on the app to verify that the app is working fine and a Hello message is displayed as shown in Figure 4-49.

Figure 4-49. Hello message from the AppScopedECT app
- Finally, navigate to the Employees list by navigating to the http://<appUrl>/AppScopedECT/lists/Employees URL. This should open up the Employees external list as shown in Figure 4-50.

Figure 4-50. Employees external list based on the Northwind OData source
Now that you’ve seen how useful the BCS can be, it’s time to learn the Windows PowerShell cmdlets you can use to configure it. These commands are shown in Tables 4-2 through 4-8.
Table 4-2. Clear and Copy Operations
| Command | Description |
|---|---|
| Clear-SPSiteSubscriptionBusinessDataCatalogConfig | Command to delete all the data from the BDC Metadata Store for a specific partition or site. Example: Clear-SPSiteSubscriptionBusinessDataCatalogConfig –ServiceContext http://yourservername |
| Copy-SPBusinessDataCatalogAclToChildren | Command to copy a set of permissions to child objects from the BDC Metadata Store object. You need to create the metadata object first using the Get-SPBusinessDataCatalogMetadataObject command. Example: $yourmetadataobject = Get-SPBusinessDataCatalogMetadataObject –BdcObjectType “LobSystem” –ServiceContext http://yoursharepointsite –Name “contentdatabase” Copy-SPBusinessDataCatalogAclToChildren –MetadataObject $<yourmetadataobject> |
Table 4-3. Disable and Enable Operations
| Command | Description |
|---|---|
| Disable-SPBusinessDataCatalogEntity | Command to disable an ECT in the BDC Metadata Store. You need to create the metadata object first using the Get-SPBusinessDataCatalogMetadataObject command. Example: Disable-SPBusinessDataCatalogEntity –Identity $<yourmetadataobject> |
| Enable-SPBusinessDataCatalogEntity | Command to enable an ECT in the BDC Metadata Store. You need to retrieve entity details from metadata object first using the Get-SPBusinessDataCatalogMetadataObject command. Example: Enable-SPBusinessDataCatalogEntity –Identity $<yourentity> |
Table 4-4. Export and Import Operations
| Command | Description |
|---|---|
| Export-SPBusinessDataCatalogModel | Command to export a BDC Model. You need to retrieve model details from the metadata object first using the Get-SPBusinessDataCatalogMetadataObject command. Example: Export-SPBusinessDataCatalogModel –Identity $<yourmodel> –Path “<pathfile.dcm>” |
| Export-SPSiteSubscriptionBusinessDataCatalogConfig | Command to export data from the BDC Metadata Store associated with a partition or site. Example: Export-SPSiteSubscriptionBusinessDataCatalogConfig –ServiceContext http://yoursite –Path “pathfile.xml” |
| Import-SPBusinessDataCatalogDotNetAssembly | Command to import a .NET assembly. Example: Import-SPBusinessDataCatalogDotNetAssembly –LobSystem $<your db> -Path “filename” |
| Import-SPBusinessDataCatalogModel | Command to import a BDC model. You need to retrieve Metadata Store details from the metadata object first using the Get-SPBusinessDataCatalogMetadataObject command. Example: Import-SPBusinessDataCatalogModel –Path “pathfile.bdcm” –Identity $MetadataStore |
| Import-SPSiteSubscriptionBusinessDataCatalogConfig | Command to import data from an exported file containing all data for the BDC Metadata Store for a given partition or site. Example: Import-SPSiteSubscriptionBusinessDataCatalogConfig –Path “<filepath>” –ServiceContext http://yoursharepointsite |
Table 4-5. Get and Set Operations
| Command | Description |
|---|---|
| Get-SPBusinessDataCatalogMetadataObject | Command to retrieve the BDC Metadata Store metadata object. Example: Get-SPBusinessDataCatalogMetadataObject –BdcObjectType “Model” –Name “yourmodel” –ServiceContext http://yoursharepointsite |
| Get-SPBusinessDataCatalogThrottleConfig | Command to retrieve a BDC service application throttling configuration. Example: Get-SPBusinessDataBCatalogThrottleConfig –Scope Database –ThrottleTypeItems –ServiceAppicationProxy $proxy |
| Set-SPBusinessDataCatalogMetadataObject | Command to set a BDC Metadata Store metadata object property or attribute value. You need to retrieve identity object details from the metadata object first using the Get-SPBusinessDataCatalogMetadataObject command. Example: Set-SPBusinessDataCatalogMetadataObject –Identity $<identityobject> -PropertyName <propertyname> -PropertyValue <value> |
| Set-SPBusinessDataCatalogServiceApplication | Command to set BDC service application global properties. Example: Set-SPBusinessDataCatalogServiceApplication –Identity $<serviceapplication> -FailoverDatabaseServer <servername> |
| Set-SPBusinessDataCatalogThrottleConfig | Command to set the BDC application throttling configuration. Example: Set- SPBusinessDataCatalogThrottleConfig –Maximum <value> -Default <value> |
Table 4-6. Grant and Revoke Operations
| Command | Description |
|---|---|
| Grant-SPBusinessDataCatalogMetadataObject | Command to grant permissions to a principal for a specified BDC metadata object. You need to retrieve model details from the metadata object first using the Get-SPBusinessDataCatalogMetadataObject command and claim details from the New-SPClaimObject command. Example: $yourclaim = New-SPClaimObject –User “domainusername” –Type windowssamaccountname $yourmodel = Get-SPBusinessDataCatalogMetadataObject –BdcObjectType “Model” –ServiceContext http://yoursharepointsite –Name “yourmodel” Grant-SPBusinessDataCatalogMetadataObject –Identity $<yourmodel> –Principal $<yourclaim> –Right <right> |
| Revoke-SPBusinessDataCatalogMetadataObject | Command to revoke rights for a user in the BDC Metadata Store metadata object. You need to retrieve model details from the metadata object first using the Get-SPBusinessDataCatalogMetadataObject command and claim details from the New-SPClaimObject command. Example: Revoke-SPBusinessDataCatalogMetadataObject –Identity $<metadataobject> -Principal $<claims> -Right <right> |
| Command | Description |
|---|---|
| New-SPBusinessDataCatalogServiceApplication | Command to create a new BDC service application in the farm. Example: New-SPBusinessDataCatalogServiceApplication –ApplicationPool “<AppPool>” –DatabaseName “<dbname>” –DatabaseServer “<DBServer Name>” –Name “<BDCServiceAppName>” |
| New-SPBusinessDataCatalogServiceApplicationProxy | Command to create a new BDC service application proxy in the farm. Example: New-SPBusinessDataCatalogServiceApplicationProxy –Name “proxyname” –ServiceApplication $<serviceapplication> |
Table 4-8. Remove Operations
| Command | Description |
|---|---|
| Remove-SPBusinessDataCatalogModel | Command to delete the BDC model. You need to retrieve model details from the metadata object first using the Get-SPBusinessDataCatalogMetadataObject command. Example: Remove-SPBusinessDataCatalogModel –Identity $yourmodel |
| Remove-SPSiteSubscriptionBusinessDataCatalogConfig | Command to remove the BDC Metadata Store for a partition or site. Example: Remove-SPSiteSubscriptionBusinessDataCatalogConfig –ServiceContext http://yoursharepointsite |
Summary
Figure 4-51 highlights what you’ve learned in this chapter, which includes
- BCS terminology
- BCS setup and administration
- Differences between BCS features across SharePoint editions
- BCS architecture
- Authoring ECTs using SharePoint Designer
- Creating ECTs with Visual Studio
- Using a .NET assembly connector
- BDC runtime
- BDC integration with Office client applications
- Creating app-scoped ECTs based on an OData source
- Using PowerShell commands for administration

Figure 4-51. Business Connectivity Services road map
What’s Next?
In the next chapter, you will learn about Excel Services, in particular about the improvements in the new version. After an introduction, we will walk you through setting up Excel Services, show you what’s new, and show you how to author and publish Excel to SharePoint 2013. You will also learn how to consume Excel Services through SOAP, the REST-based API, and the JavaScript Object Model. Lastly, we will introduce you to PowerPivot and its capabilities.
1 Line-of-business
2 You will learn more about external lists later in this chapter.
3 A failover server is used in the case of SQL Server database mirroring.
4 SharePoint Foundation (SPF) is the new version of WSS 3.0
5 You will learn more about the BDC runtime later in this chapter.
6 RAD – Rapid Application Development
7 ECB stands for Edit Control Button, which is available for items on a SharePoint list or a document library. The ECB menu is often called a context menu, which you can use to perform various operations, such as Edit, View, and Delete.
8 A farm solution is a full-trust solution that provides access to the entire SharePoint API, unrestricted data access, and all solution functionalities. Farm solutions, however, can be deployed only by farm administrators and are unmonitored.