
![]()
Choosing and Optimizing Indexes
An index is a database object used primarily to improve the performance of SQL queries. The function of a database index is similar to an index in the back of a book. A book index associates a topic with a page number. When you’re locating information in a book, it’s usually much faster to inspect the index first, find the topic of interest, and identify associated page numbers. With this information, you can navigate directly to specific page numbers in the book. In this situation, the number of pages you need to inspect is minimal.
If there were no index, you would have to inspect every page of the book to find information. This results in a great deal of page turning, especially with large books. This is similar to an Oracle query that does not use an index and therefore has to scan every used block within a table. For large tables, this results in a great deal of I/O.
The book index’s usefulness is directly correlated with the rarity of occurrence of a topic within the book. For example, take this book; it would do no good to create an index on the topic of “performance” because every page in this book deals with performance. However, creating an index on the topic of “bitmap indexes” would be effective because there are only a few pages within the book that are applicable to this feature.
Keep in mind that the index isn’t free. It consumes space in the back of the book, and if the material in the book is ever updated (like a second edition), every modification (insert, update, delete) potentially requires a corresponding change to the index. It’s important to keep in mind that indexes consume space and require resources when updates occur.
Also, the person who creates the index for the book must consider which topics will be frequently looked up. Topics that are selective and frequently accessed should be included in the book index. If an index in the back of the book is never looked up by a reader, then it unnecessarily wastes space.
Much like the process of creating an index in the back of the book, there are many factors that must be considered when creating an Oracle index. Oracle provides a wide assortment of indexing features and options. These objects are manually created by the DBA or a developer. Therefore, you need to be aware of the various features and how to utilize them. If you choose the wrong type of index or use a feature incorrectly, there may be detrimental performance implications. Listed next are aspects to consider before you create an index:
- Type of index
- Table column(s) to include
- Whether to use a single column or a combination of columns
- Special features such as parallelism, turning off logging, compression, invisible indexes, and so on
- Uniqueness
- Naming conventions
- Tablespace placement
- Initial sizing requirements and growth
- Impact on performance of SELECT statements (improvement)
- Impact on performance of INSERT, UPDATE, and DELETE statements
- Global or local index, if the underlying table is partitioned
When you create an index, you should give some thought to every aspect mentioned in the previous list. One of the first decisions you need to make is the type of index and the columns to include. Oracle provides a robust variety of index types. For most scenarios, you can use the default B-tree (balanced tree) index. Other commonly used types are concatenated, bitmap, and function-based indexes. Table 2-1 describes the types of indexes available with Oracle.
Table 2-1. Oracle Index Type Descriptions
Index Type |
Usage |
|---|---|
B-tree |
Default, balanced tree index, good for high-cardinality (high degree of distinct values) columns |
This index is efficient when most of the column values are included in the primary key. You access the index as if it were a table. The data are stored in a B-tree-like structure. |
|
A form of B-tree index; used to enforce uniqueness in column values; often used with primary key and unique key constraints but can be created independently of constraints. |
|
A form of B-tree index; useful for balancing I/O in an index that has many sequential inserts. |
|
Good for concatenated indexes in which the leading column is often repeated; compresses leaf block entries; applies to B-tree and IOT indexes. |
|
Descending |
A form of B-tree index; used with indexes in which corresponding column values are sorted in a descending order (the default order is ascending). You can’t specify descending for a reverse-key index, and Oracle ignores descending if the index type is bitmap. |
Bitmap |
Excellent in data warehouse environments with low cardinality (i.e., low degree of distinct values) columns and SQL statements using many AND or OR operators in the WHERE clause. Bitmap indexes aren’t appropriate for OLTP databases in which rows are frequently updated. You can’t create a unique bitmap index. |
Bitmap join |
Useful in data warehouse environments for queries that use star schema structures that join fact and dimension tables. |
Good for columns that have SQL functions applied to them; can be used with either a B-tree or bitmap index. |
|
Good for columns that have SQL functions applied to them; viable alternative to using a function-based index. |
|
Virtual |
Allows you to create an index with no physical segment or extents via the NOSEGMENT clause of CREATE INDEX; useful in tuning SQL without consuming resources required to build the physical index. Any index type can be created as virtual. |
Invisible |
The index is not visible to the query optimizer. However, the structure of the index is maintained as table data are modified. Useful for testing an index before making it visible to the application. Any index type can be created as invisible. |
Global index across all partitions in a partitioned or regular table; can be a B-tree index type and can’t be a bitmap index type. |
|
Local index based on individual partitions in a partitioned table; can be either a B-tree or bitmap index type. |
|
B-tree cluster |
Used with clustered tables. |
Hash cluster |
Used with hash clusters. |
Specific for an application or cartridge. |
![]() Note Several of the index types listed in Table 2-1 are actually just variations on the B-tree index. A reverse-key index, for example, is merely a B-tree index optimized for reducing contention when the index value is sequentially generated and inserted with similar values.
Note Several of the index types listed in Table 2-1 are actually just variations on the B-tree index. A reverse-key index, for example, is merely a B-tree index optimized for reducing contention when the index value is sequentially generated and inserted with similar values.
This chapter focuses on the most commonly used indexes and features. Hash cluster indexes, partitioned indexes, and domain indexes are not covered in this book. If you need more information regarding index types or features not covered in this chapter or book, see Oracle’s SQL Reference Guide at http://otn.oracle.com.
The first recipe in this chapter deals with the mechanics of B-tree indexes. It’s critical that you understand how this database object works. Even if you’ve been around Oracle for a while, we feel it’s useful to work through the various scenarios outlined in this first recipe to ensure that you know how the optimizer uses this type of index. This will lay the foundation for solving many different types of performance problems (especially SQL tuning).
2-1. Understanding B-tree Indexes
Problem
You want to create an index. You understand that the default type of index in Oracle is the B-tree, but you don’t quite understand how an index is physically implemented. You want to fully comprehend the B-tree index internals so as to make intelligent performance decisions when building database applications.
Solution
An example with a good diagram will help illustrate the mechanics of a B-tree index. Even if you’ve been working with B-tree indexes for quite some time, a good example may illuminate technical aspects of using an index. To get started, suppose you have a table created as follows:
create table cust(
 cust_id number
,last_name varchar2(30)
,first_name varchar2(30));
You determine that several SQL queries will frequently use LAST_NAME in the WHERE clause. This prompts you to create an index:
SQL> create index cust_idx1 on cust(last_name);
![]() Note There isn’t an explicit CREATE INDEX privilege (although there is a CREATE ANY INDEX privilege). If you can create a table (which requires CREATE TABLE) then you can create indexes on it. You also need space quotas for consuming space in the tablespace the table/index is placed within. Keep in mind that with the deferred segment feature (available only with Enterprise Edition of database), that it’s possible to create a table and index in a tablespace, but not realize the space quotas are required until a record is inserted into the table (and attempts to consume space).
Note There isn’t an explicit CREATE INDEX privilege (although there is a CREATE ANY INDEX privilege). If you can create a table (which requires CREATE TABLE) then you can create indexes on it. You also need space quotas for consuming space in the tablespace the table/index is placed within. Keep in mind that with the deferred segment feature (available only with Enterprise Edition of database), that it’s possible to create a table and index in a tablespace, but not realize the space quotas are required until a record is inserted into the table (and attempts to consume space).
Next several thousand rows are now inserted into the table (not all of the rows are shown here):
insert into cust values(7, 'ACER','SCOTT'),
insert into cust values(5, 'STARK','JIM'),
insert into cust values(3, 'GREY','BOB'),
insert into cust values(11,'KHAN','BRAD'),
.....
insert into cust values(274, 'ACER','SID'),
After the rows are inserted, we ensure that the table statistics are up to date so as to provide the query optimizer sufficient information to make good choices on how to retrieve the data:
SQL> exec dbms_stats.gather_table_stats(ownname=>user,tabname=>'CUST',cascade=>true);
![]() Note Oracle strongly recommends that you do not use the ANALYZE statement (with the COMPUTE and ESTIMATE clauses) to collect statistics. Oracle does support using the ANALYZE statement for non-statistics gathering uses such as validating objects and listing chained/migrated rows.
Note Oracle strongly recommends that you do not use the ANALYZE statement (with the COMPUTE and ESTIMATE clauses) to collect statistics. Oracle does support using the ANALYZE statement for non-statistics gathering uses such as validating objects and listing chained/migrated rows.
As rows are inserted into the table, Oracle will allocate extents that consist of physical database blocks. Oracle will also allocate blocks for the index. For each record inserted into the table, Oracle will also create an entry in the index that consists of the ROWID and column value (the value in LAST_NAME in this example). The ROWID for each index entry points to the datafile and block that the table column value is stored in. Figure 2-1 shows a graphical representation of how data is stored in the table and the corresponding B-tree index. For this example, datafiles 10 and 15 contain table data stored in associated blocks and datafile 22 stores the index blocks.
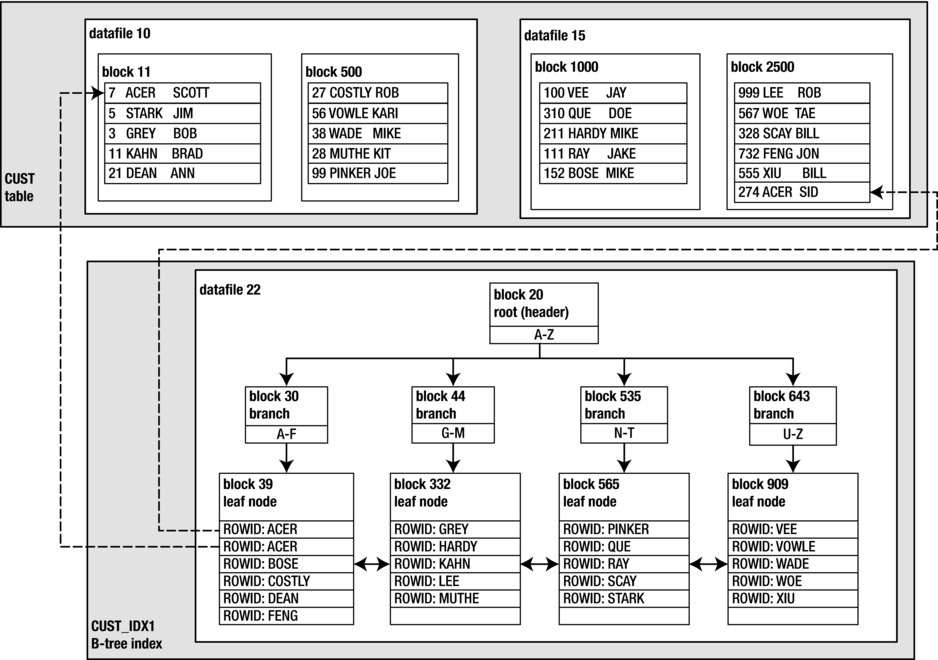
Figure 2-1. Physical layout of a table and B-tree index
There are two dotted lines in Figure 2-1. These lines depict how the ROWID (in the index structure) points to the physical location in the table for the column values of ACER. These particular values will be used in the scenarios in this solution. When selecting data from a table and its corresponding index, there are three basic scenarios:
- All table data required by the SQL query is contained in the index structure. Therefore only the index blocks need to be accessed. The blocks from the table are never read.
- All of the information required by the query is not contained in the index blocks. Therefore the query optimizer chooses to access both the index blocks and the table blocks to retrieve the data needed to satisfy the results of the query.
- The query optimizer chooses not to access the index. Therefore only the table blocks are accessed.
The prior situations are covered in the next three subsections.
Scenario 1: All Data Lies in the Index Blocks
There are two scenarios that will be shown in this section:
- Index range scan: This occurs when the optimizer determines it is efficient to use the index structure to retrieve multiple rows required by the query. Index range scans are used extensively in a wide variety of situations.
- Index fast full scan: This occurs when the optimizer determines that most of the rows in the table will need to be retrieved. However, all of the information required is stored in the index. Since the index structure is usually smaller than the table structure, the optimizer determines that a full scan of the index is more efficient (than a full scan of the table). This scenario is common for queries that count values.
First the index range scan is demonstrated. For this example, suppose this query is issued that selects from the table:
SQL> select last_name from cust where last_name='ACER';
Before reading on, look at Figure 2-1 and try to answer this question: “What is the minimal number of blocks Oracle will need to read to return the data for this query?” In other words, what is the most efficient way to access the physical blocks in order to satisfy the results of this query? The optimizer could choose to read through every block in the table structure. However, that would result in a great deal of I/O, and thus it is not the most optimal way to retrieve the data.
For this example, the most efficient way to retrieve the data is to use the index structure. To return the rows that contain the value of ACER in the LAST_NAME column, Oracle will need to read at least three blocks: block 20, block 30, and block 39. We can verify that this is occurring by using Oracle’s Autotrace utility:
SQL> set autotrace on;
SQL> select last_name from cust where last_name='ACER';
Here is a partial snippet of the output:
------------------------------------------------------------------------------
| Id  | Operation        | Name      | Rows  | Bytes | Cost (%CPU)| Time     |
------------------------------------------------------------------------------
|   0 | SELECT STATEMENT |           |    15 |   165 |     3   (0)| 00:00:01 |
|*  1 |  INDEX RANGE SCAN| CUST_IDX1 |    15 |   165 |     3   (0)| 00:00:01 |
------------------------------------------------------------------------------
The prior output shows that Oracle needed to use only the CUST_IDX1 index to retrieve the data to satisfy the result set of the query. The table data blocks were not accessed; only the index blocks were required. This is a particularly efficient indexing strategy for the given query. Listed next are the statistics displayed by Autotrace for this example:
Statistics
----------------------------------------------------------
          1  recursive calls
          0  db block gets
          3  consistent gets
          0  physical reads
The consistent gets value indicates that three blocks were read from memory (db block gets plus consistent gets equals the total blocks read from memory). Since the index blocks were already in memory, no physical reads were required to return the result set of this query.
Next an example that results in an index fast full scan is demonstrated. Consider this query:
SQL> select count(last_name) from cust;
Using SET AUTOTRACE ON, an execution plan is generated. Here is the corresponding output:
-----------------------------------------------------------------------------------
| Id  | Operation             | Name      | Rows  | Bytes | Cost (%CPU)| Time     |
-----------------------------------------------------------------------------------
|   0 | SELECT STATEMENT      |           |     1 |    17 |   170   (0)| 00:00:01 |
|   1 |  SORT AGGREGATE       |           |     1 |    17 |            |          |
|   2 |   INDEX FAST FULL SCAN| CUST_IDX1 |   126K|  2093K|   170   (0)| 00:00:01 |
-----------------------------------------------------------------------------------
The prior output shows that only the index structure was used to determine the count within the table. In this situation, the optimizer determined that a full scan of the index was more efficient than a full scan of the table.
Scenario 2: All Information Is Not Contained in the Index
Now consider this situation: suppose we need more information from the CUST table. Let’s begin with the previous section’s query and additionally return the FIRST_NAME column in the query results. Now we need to access the table itself, for that one data element. Here’s the new query:
SQL> select last_name, first_name from cust where last_name = 'ACER';
Using SET AUTOTRACE ON and executing the prior query results in the following execution plan:
-----------------------------------------------------------------------------------------------
| Id  | Operation                           | Name    | Rows  | Bytes | Cost (%CPU)| Time     |
-----------------------------------------------------------------------------------------------
|   0 | SELECT STATEMENT                    |         |     2 |    68 |     1   (0)| 00:00:01 |
|   1 |  TABLE ACCESS BY INDEX ROWID BATCHED|CUST     |     2 |    68 |     1   (0)| 00:00:01 |
|*  2 |   INDEX RANGE SCAN                  |CUST_IDX1|     2 |       |     1   (0)| 00:00:01 |
-----------------------------------------------------------------------------------------------
The prior output indicates that the CUST_IDX1 index was accessed via an INDEX RANGE SCAN. The INDEX RANGE SCAN identifies the index blocks required to satisfy the results of this query. Additionally the table is read by TABLE ACCESS BY INDEX ROWID BATCHED. The access to the table by the index’s ROWID means that Oracle uses the ROWID (stored in the index) to locate the corresponding rows contained within the table blocks. In Figure 2-1, this is indicated by the dotted lines that map the ROWID to the appropriate table blocks that contain the value of ACER in the LAST_NAME column.
Again, looking at Figure 2-1, how many table and index blocks need to be read in this scenario? The index requires that blocks 20, 30, and 39 must be read. Since FIRST_NAME is not included in the index, Oracle must read the table blocks to retrieve these values. Oracle must read block 39 twice because there are two corresponding rows in the table. Oracle knows the ROWID of the table blocks and directly reads blocks 11 and 2500 to retrieve that data.
That makes a total of 6 blocks. With that number in mind, take a look at the statistics generated by Autotrace:
Statistics
----------------------------------------------------------
          1  recursive calls
          0  db block gets
          5  consistent gets
Notice that the prior statistics indicate that only 5 blocks were read (consistent gets), yet we predicted 6 blocks. This is because some block reads are not accounted for in the Autotrace generated statistics. Oracle will pin some blocks and re-read them. In our scenario, block 39 is read once, pinned, and then re-read for a second time (because there are two ROWIDs associated with the value of ACER). The count of re-reads of blocks is collected in the buffer is pinned count statistic (which is not displayed in the Autotrace statistics).
Regardless, the point here is that when the index is accessed there is a back-and-forth read process between index blocks and data blocks. The number of blocks read when an index is used to provide ROWIDs for table will be at least double the number of rows returned (because the index block with the ROWID is read and then the corresponding table block is read). And in many scenarios, the consistent gets statistic doesn’t accurately reflect the actual number of buffer reads.
Scenario 3: Only the Table Blocks Are Accessed
In some situations, even if there is an index, Oracle will determine that it’s more efficient to use only the table blocks. When Oracle inspects every row within a table, this is known a full table scan. For example, take this query:
SQL> select * from cust;
Here are the corresponding execution plan and statistics:
--------------------------------------------------------------------------
| Id  | Operation         | Name | Rows  | Bytes | Cost (%CPU)| Time     |
--------------------------------------------------------------------------
|   0 | SELECT STATEMENT  |      |   150K|  4101K|   206   (1)| 00:00:01 |
|   1 |  TABLE ACCESS FULL| CUST |   150K|  4101K|   206   (1)| 00:00:01 |
--------------------------------------------------------------------------

Statistics
----------------------------------------------------------
          0  recursive calls
          0  db block gets
       2586  consistent gets
          0  physical reads
The prior output shows that several thousand blocks were inspected. Oracle searched every row in the table to bring back the results required to satisfy the query. In this situation, all blocks of the table must be read, and there is no way for Oracle to use the index to speed up the retrieval of the data.
![]() Note For the examples in this section, your results may vary slightly, depending on how many rows you initially insert into the table. We inserted a little over 100,000 rows to seed the table.
Note For the examples in this section, your results may vary slightly, depending on how many rows you initially insert into the table. We inserted a little over 100,000 rows to seed the table.
ARBORISTIC VIEWS
Oracle provides two types of views containing details about the structure of B-tree indexes:
- INDEX_STATS
- DBA/ALL/USER_INDEXES
The INDEX_STATS view contains information regarding the HEIGHT (number of blocks from root to leaf blocks), LF_ROWS (number of index entries), and so on. The INDEX_STATS view is only populated after you analyze the structure of the index; for example,
SQL> analyze index cust_idx1 validate structure;
The DBA/ALL/USER_INDEXES views contain statistics, such as BLEVEL (number of blocks from root to branch blocks; this equals HEIGHT – 1); LEAF_BLOCKS (number of leaf blocks); and so on. The DBA/ALL/USER_INDEXES views are populated automatically when the index is created and refreshed via the DBMS_STATS package.
How It Works
The B-tree index is the default index type in Oracle. For most OLTP-type applications, this index type is sufficient. This index type is known as B-tree because the ROWID and associated column values are stored within blocks in a balanced tree-like structure (see Figure 2-1). The B stands for balanced.
B-tree indexes are efficient because, when properly used, they result in a query retrieving data far faster than it would without the index. If the index structure itself contains the required column values to satisfy the result of the query, then the table data blocks need not be accessed. Understanding these mechanics will guide your indexing decision-making process. For example, this will help you decide which columns to index and whether a concatenated index might be more efficient for certain queries and less optimal for others. These topics are covered in detail in subsequent recipes in this chapter.
ESTIMATING THE SPACE AN INDEX WILL REQUIRE
Before you create an index, you can estimate how much space it will take via the DBMS_SPACE.CREATE_INDEX_COST procedure—for example:
SQL> set serveroutput on
SQL> exec dbms_stats.gather_table_stats(user,'CUST'),
SQL> variable used_bytes number
SQL> variable alloc_bytes number
SQL> exec dbms_space.create_index_cost( 'create index cust_idx2 on cust(first_name)', -
:used_bytes, :alloc_bytes );
SQL> print :used_bytes
Here is some sample output for this example:
USED_BYTES
----------
363690
SQL> print :alloc_bytes
Here is some sample output for this example:
ALLOC_BYTES
-----------
2097152
The used_bytes variable gives you an estimate of how much room is required for the index data. The alloc_bytes variable provides an estimate of how much space will be allocated within the tablespace.
2-2. Deciding Which Columns to Index
Problem
A database you manage contains hundreds of tables. Each table typically contains a dozen or more columns. You wonder which columns should be indexed.
Solution
Listed next are general guidelines for deciding which columns to index.
- Define a primary key constraint for each table that results in an index automatically being created on the columns specified in the primary key (see Recipe 2-3).
- Create unique key constraints on non-null column values that are required to be unique (different from the primary key columns). This results in an index automatically being created on the columns specified in unique key constraints (see Recipe 2-4).
- Explicitly create indexes on foreign key columns (see Recipe 2-5).
- Create indexes on columns used often as predicates in the WHERE clause of frequently executed SQL queries (if they are selective).
After you have decided to create indexes, we recommend that you adhere to index creation standards that facilitate the ease of maintenance. Specifically, follow these guidelines when creating an index:
- Use the default B-tree index unless you have a solid reason to use a different index type.
- Create ASSM managed tablespaces (see Recipe 1-2 for details). Let the index inherit its storage properties from the tablespace. This allows you to specify the storage properties when you create the tablespace and not have to manage storage properties for individual indexes.
- If you have a variety of storage requirements for indexes, then consider creating separate tablespaces for each type of index—for example, INDEX_LARGE, INDEX_MEDIUM, and INDEX_SMALL tablespaces, each defined with storage characteristics appropriate for the size of the index.
Listed next is a sample script that encapsulates the foregoing recommendations from the prior two bulleted lists:
CREATE TABLE cust(
 cust_id    NUMBER
,last_name  VARCHAR2(30)
,first_name VARCHAR2(30))
TABLESPACE hr_data;
--
ALTER TABLE cust ADD CONSTRAINT cust_pk PRIMARY KEY (cust_id)
USING INDEX TABLESPACE hr_data;
--
ALTER TABLE cust ADD CONSTRAINT cust_uk1 UNIQUE (last_name, first_name)
USING INDEX TABLESPACE hr_data;
--
CREATE TABLE address(
 address_id NUMBER,
 cust_id    NUMBER
,street     VARCHAR2(30)
,city       VARCHAR2(30)
,state      VARCHAR2(30))
TABLESPACE hr_data;
--
ALTER TABLE address ADD CONSTRAINT addr_fk1
FOREIGN KEY (cust_id) REFERENCES cust(cust_id);
--
CREATE INDEX addr_fk1 ON address(cust_id)
TABLESPACE hr_data;
In the prior script, two tables are created. The parent table is CUST and its primary key is CUST_ID. The child table is ADDRESS and its primary key is ADDRESS_ID. The CUST_ID column exists in ADDRESS as a foreign key mapping back to the CUST_ID column in the CUST table.
CREATING MULTIPLE INDEXES ON THE SAME SET OF COLUMNS
Prior to Oracle Database 12c, you could not have multiple indexes defined on the exact same combination of columns in one table. This has changed in 12c. You can now have multiple indexes on the same set of columns. However, you can only do this if there is something physically different about the indexes; for example, one index is created as a B-tree index, and the second, as a bitmap index.
Also, there can be only one visible index for the same combination of columns. Any other indexes created on that same set of columns must be declared invisible; for example,
SQL> create index cust_idx2 on cust(first_name, last_name);
SQL> create bitmap index cust_bmx1 on cust(first_name, last_name) invisible;
Prior to Oracle Database 12c, if you attempted the previous operation, the second creation statement would throw an error such as ORA-01408: such column list already indexed.
Why would you want two indexes defined on the same set of columns? You might want to do this if you originally implemented B-tree indexes and now wanted to change them to bitmap—the idea being, you create the new indexes as invisible, then drop the original indexes and make the new indexes visible. In a large database environment this would enable you to make the change quickly.
How It Works
You should add an index only when you’re certain it will improve performance. Misusing indexes can have serious negative performance effects. Indexes created of the wrong type or on the wrong columns do nothing but consume space and processing resources. As a DBA, you must have a strategy to ensure that indexes enhance performance and don’t negatively impact applications.
Table 2-2 encapsulates many of the index management concepts covered in this chapter. These recommendations aren’t written in stone: Adapt and modify them as needed for your environment.
Table 2-2. Index Creation and Maintenance Guidelines
Guideline |
Reasoning |
|---|---|
Add indexes judiciously. Test first to determine quantifiable performance gains. |
Indexes consume disk space and processing resources. Don’t add indexes unnecessarily. |
Use the correct type of index. |
Correct index usage maximizes performance. See Table 2-1 for more details. |
Use consistent naming standards. |
This makes maintenance and troubleshooting easier. |
Monitor your indexes, and drop indexes that aren’t used. See Recipe 2-15 for details on monitoring indexes. |
Doing this frees up physical space and improves the performance of Data Manipulation Language (DML) statements. |
Don’t rebuild indexes unless you have a solid reason to do so. See Recipe 2-17 for details on rebuilding an index. |
Rebuilding an index is generally unnecessary unless the index is corrupt or you want to change a physical characteristic (such as the tables pace) without dropping the index. |
Before dropping an index, consider marking it as unusable or invisible. |
This allows you to better determine if there are any performance issues before you drop the index. These options let you rebuild or re-enable the index without requiring the Data Definition Language (DDL) index creation statement. |
Consider creating concatenated indexes that result in only the index structure being required to return the result set. |
Avoids having to scan any table blocks; when queries are able to use the index only, this results in very efficient execution plans. |
Consider creating indexes on columns used in the ORDER BY, GROUP BY, UNION, or DISTINCT clauses. |
This may result in more efficient queries that frequently use these SQL constructs. |
Refer to these guidelines as you create and manage indexes in your databases. These recommendations are intended to help you correctly use index technology.
INDEXES WITH NO SEGMENTS
You can instruct Oracle to create an index that will never be used and won’t have any extents allocated to it via the NOSEGMENT clause:
SQL> create index cust_idx1 on cust(first_name) nosegment;
Even though this index will never be used, you can instruct Oracle to determine if the index might be used by the optimizer via the _USE_NOSEGMENT_INDEXES initialization parameter—for example:
SQL> alter session set "_use_nosegment_indexes"=true;
SQL> set autotrace trace explain;
SQL> select first_name from cust where first_name = 'JIM';
Here’s a sample execution plan showing the optimizer would use the index (assuming that you dropped and re-created it normally without the NOSEGMENT clause):
-----------------------------------------------------------------------------
Id | Operation | Name | Rows | Bytes | Cost (%CPU)| Time |
-----------------------------------------------------------------------------
0 | SELECT STATEMENT | | 1 | 17 | 1 (0)| 00:00:01 |
* 1 | INDEX RANGE SCAN| CUST_IDX1 | 1 | 17 | 1 (0)| 00:00:01 |
-----------------------------------------------------------------------------
That begs the question, why would you ever create an index with NOSEGMENT? If you have a very large index that you want to create without allocating space, to determine if the index would be used by the optimizer, creating an index with NOSEGMENT allows you to test that scenario. If you determine that the index would be useful, you can drop the index and re-create it without the NOSEGMENT clause.
2-3. Creating a Primary Key Constraint and Index
Problem
You want to enforce that the primary key columns are unique within a table. Furthermore many of the columns in the primary key are frequently used within the WHERE clause of several queries. You want to ensure that indexes are created on primary key columns.
Solution
When you define a primary key constraint for a table, Oracle will automatically create an associated index for you. There are several methods available for creating a primary key constraint. Our preferred approach is to use the ALTER TABLE...ADD CONSTRAINT statement. Defining a constraint in this way will create the index and the constraint at the same time. This example creates a primary key constraint named CUST_PK and also instructs Oracle to create the corresponding index (also named CUST_PK) in the USERS tablespace:
alter table cust add constraint cust_pk primary key (cust_id)
using index tablespace users;
The following queries and output provide details about the constraint and index that Oracle created. The first query displays the constraint information:
select constraint_name, constraint_type
from user_constraints
where table_name = 'CUST';

CONSTRAINT_NAME                C
------------------------------ -
CUST_PK                        P
This query displays the index information:
select index_name, tablespace_name, index_type, uniqueness
from user_indexes
where table_name = 'CUST';

INDEX_NAME      TABLESPACE_NAME INDEX_TYPE      UNIQUENESS
--------------- --------------- --------------- ---------------
CUST_PK         USERS           NORMAL          UNIQUE
How It Works
The solution for this recipe shows the method that we prefer to create primary key constraints and the corresponding index. In most situations, this approach is acceptable. However, you should be aware that there are several other methods for creating the primary key constraint and index. These methods are listed here:
- Create an index first, and then use ALTER TABLE...ADD CONSTRAINT.
- Specify the constraint inline (with the column) in the CREATE TABLE statement.
- Specify the constraint out of line (from the column) within the CREATE TABLE statement.
These techniques are described in the next several subsections.
Create Index and Constraint Separately
You have the option of first creating an index and then altering the table to apply the primary key constraint. Here’s an example:
SQL> create index cust_pk on cust(cust_id);
SQL> alter table cust add constraint cust_pk primary key(cust_id);
The advantage to this approach is that you can drop or disable the primary key constraint independently of the index. If you work with large data volumes, you may require this sort of flexibility. This approach allows you to disable/re-enable a constraint without having to later rebuild the index.
Create Constraint Inline
You can directly create an index inline (with the column) in the CREATE TABLE statement. This approach is simple but doesn’t allow for multiple column primary keys and doesn’t name the constraint:
SQL> create table cust(cust_id number primary key);
If you don’t explicitly name the constraint (as in the prior statement), Oracle automatically generates a name like SYS_C123456. If you want to explicitly provide a name, you can do so as follows:
create table cust(cust_id number constraint cust_pk primary key
using index tablespace users);
The advantage of this approach is that it’s very simple. If you’re experimenting in a development or test environment, this approach is quick and effective.
Create Constraint Out of Line
You can also define the primary key constraint out of line (from the column) within the CREATE TABLE statement:
create table cust(
 cust_id number
,constraint cust_pk primary key (cust_id) using index tablespace users);
The out-of-line approach has one advantage over the inline approach in that you can specify multiple columns for the primary key.
All of the prior techniques for creating a primary key constraint and corresponding index are valid. It’s often a matter of DBA or developer preference as to which technique is used.
2-4. Ensuring Unique Column Values
Problem
You want to define a column or set of columns can be used to identify a row and must be unique. These columns are not part of the primary key.
![]() Note One difference between a primary key and a unique key is that you can have only one primary key definition per table, whereas you can have multiple unique keys. Also, unique key constraints allow for null values, whereas primary key constraints do not.
Note One difference between a primary key and a unique key is that you can have only one primary key definition per table, whereas you can have multiple unique keys. Also, unique key constraints allow for null values, whereas primary key constraints do not.
Solution
This solution focuses on using the ALTER TABLE...ADD CONSTRAINT statement. When you create a unique key constraint, Oracle will automatically create an index for you. This is our recommended approach for creating unique key constraints and indexes. This example creates a unique constraint named CUST_UX1 on the combination of the LAST_NAME and FIRST_NAME columns of the CUST table:
alter table cust add constraint cust_ux1 unique (last_name, first_name)
using index tablespace users;
The prior statement creates the unique constraint, and additionally Oracle automatically creates an associated index. The following query displays the constraint that was created successfully:
select constraint_name, constraint_type
from user_constraints
where table_name = 'CUST';
Here is a snippet of the output:
CONSTRAINT_NAME                C
------------------------------ -
CUST_UX1                       U
This query shows the index that was automatically created along with the constraint:
select index_name, tablespace_name, index_type, uniqueness
from user_indexes
where table_name = 'CUST';
Here is some sample output:
INDEX_NAME           TABLESPACE INDEX_TYPE UNIQUENESS
-------------------- ---------- ---------- ---------
CUST_UX1             USERS      NORMAL     UNIQUE
How It Works
Defining a unique constraint ensures that when you insert or update column values, then any combination of non-null values are unique. Besides the approach we displayed in the “Solution” section, there are several additional techniques for creating unique constraints:
- Create a regular index, and then use ALTER TABLE to add a constraint.
- Use the CREATE TABLE statement.
- Create a unique index and don’t add the constraint.
These techniques are described in the next few subsections.
Create Index First, Then Add Constraint
You have the option of first creating an index and then adding the constraint as a separate statement—for example:
SQL> create unique index cust_uidx1 on cust(last_name, first_name) tablespace users;
SQL> alter table cust add constraint cust_uidx1 unique (last_name, first_name);
The advantage of creating the index separate from the constraint is that you can drop or disable the constraint without dropping the underlying index. When working with large indexes, you may want to consider this approach. If you need to disable the constraint for any reason and then re-enable it later, you can do so without dropping the index (which may take a long time for large indexes).
Use CREATE TABLE
Listed next is an example of using the CREATE TABLE statement to include a unique constraint.
create table cust(
 cust_id number
,last_name varchar2(30)
,first_name varchar2(30)
,constraint cust_ux1 unique(last_name, first_name)
 using index tablespace users);
The advantage of this approach is that it’s simple and encapsulates the constraint and index creation within one statement.
You can also create just a unique index without adding the unique constraint—for example:
SQL> create unique index cust_uidx1 on cust(last_name, first_name) tablespace users;
When you create only a unique index explicitly (as in the prior statement), Oracle creates a unique index but doesn’t add an entry for a constraint in DBA/ALL/USER_CONSTRAINTS. Why does this matter? Consider this scenario:
SQL> insert into cust values (1, 'STARK', 'JIM'),
SQL> insert into cust values (1, 'STARK', 'JIM'),
Here’s the corresponding error message that is thrown:
ORA-00001: unique constraint (MV_MAINT.CUST_UIDX1) violated
If you’re asked to troubleshoot this issue, the first place you look is in DBA_CONSTRAINTS for a constraint named CUST_UIDX1. However, there is no information:
select constraint_name
from dba_constraints
where constraint_name='CUST_UIDX1';
no rows selected
The “no rows selected” message can be confusing: the error message thrown when you insert into the table indicates that a unique constraint has been violated, yet there is no information in the constraint-related data-dictionary views. In this situation, you have to look at DBA_INDEXES to view the details of the unique index that has been created—for example:
select index_name, uniqueness
from dba_indexes where index_name='CUST_UIDX1';

INDEX_NAME                     UNIQUENESS
------------------------------ ----------
CUST_UIDX1                     UNIQUE
When should you explicitly create a unique index versus creating a constraint and having Oracle automatically create the index? If a unique column (or set of columns) will ever have a corresponding foreign key relationship to another table, then you must explicitly create the unique constraint (and not just a unique index). Also, if you prefer to view constraint related information in DBA/ALL/USER_CONSTRAINTS, then create a constraint.
If the columns that the unique key are defined on will never be used as parent columns to foreign key constraints, then it's fine to just create a unique index (without the constraint). If you take this approach, just be aware that you may not find any information in the constraint-related data dictionary views.
![]() Tip If you need to enforce uniqueness on a column value with a function applied to it, such as UPPER(NAME), you can’t do that with a constraint (although you could create a virtual column based on UPPER(NAME) and put a constraint on that). However, you can directly create a unique function based index on UPPER(NAME).
Tip If you need to enforce uniqueness on a column value with a function applied to it, such as UPPER(NAME), you can’t do that with a constraint (although you could create a virtual column based on UPPER(NAME) and put a constraint on that). However, you can directly create a unique function based index on UPPER(NAME).
2-5. Indexing Foreign Key Columns
Problem
A large number of the queries in your application use foreign key columns as predicates in the WHERE clause. Therefore, for performance reasons, you want to ensure that you have foreign key columns indexed.
Solution
Unlike primary key constraints, Oracle does not automatically create indexes on foreign key columns. For example, say you have a requirement that every record in the ADDRESS table be assigned a corresponding CUST_ID column that exists in the CUST table. To enforce this relationship, you create a foreign key constraint on the ADDRESS table as follows:
alter table address add constraint addr_fk1
foreign key (cust_id) references cust(cust_id);
![]() Note A foreign key column must reference a column in the parent table that has a primary key or unique key constraint defined on it. Otherwise you’ll receive the error “ORA-02270: no matching unique or primary key for this column-list.”
Note A foreign key column must reference a column in the parent table that has a primary key or unique key constraint defined on it. Otherwise you’ll receive the error “ORA-02270: no matching unique or primary key for this column-list.”
You realize the foreign key column is used extensively when joining the CUST and ADDRESS tables and that an index on the foreign key column will dramatically increase performance. You have to manually create an index in this situation. For example, a regular B-tree index is created on the foreign key column of CUST_ID in the ADDRESS table:
SQL> create index addr_fk1 on address(cust_id);
You don’t have to name the index the same as the foreign key name (as we did in the prior lines of code). It’s a personal preference as to whether you do that. We feel it’s easier to maintain environments when the constraint and corresponding index have the same name.
How It Works
Foreign keys exist to ensure that when inserting into a child table, a corresponding parent table record exists. This is the mechanism to guarantee that data conforms to parent/child business relationship rules. There are three good reasons to index foreign keys:
- Parent/child tables are typically joined on foreign key columns; therefore the query optimizer may choose to use the index on the foreign key column to identify the child records that are required to satisfy the results of the query. If no index exists, Oracle has to perform a full table scan on the child table.
- Mitigate the possibility of TM enqueue contention on the child table when rows are updated or deleted in the parent table.
- Prevent situations where Oracle will unnecessarily lock entire tables when an index on a foreign key does not exist. Thus leading to situations where the DBA or developers can't figure out why they're having strange locking issues.
If you’re creating an application from scratch, it’s fairly easy to create the code and ensure that each foreign key constraint has a corresponding index. However, if you’ve inherited a database, it’s prudent to check if the foreign key columns are indexed.
You can use data dictionary views to verify if all columns of a foreign key constraint have a corresponding index. The task isn’t as simple as it might first seem. For example, here is a query that gets you started in the right direction:
SELECT DISTINCT
  a.owner                                 owner
 ,a.constraint_name                       cons_name
 ,a.table_name                            tab_name
 ,b.column_name                           cons_column
 ,NVL(c.column_name,'***Check index****') ind_column
FROM dba_constraints  a
    ,dba_cons_columns b
    ,dba_ind_columns  c
WHERE constraint_type = 'R'
AND a.owner           = UPPER('&user_name')
AND a.owner           = b.owner
AND a.constraint_name = b.constraint_name
AND b.column_name     = c.column_name(+)
AND b.table_name      = c.table_name(+)
AND b.position        = c.column_position(+)
ORDER BY tab_name, ind_column;
This query, while simple and easy to understand, doesn’t correctly report on unindexed foreign keys for all situations. For example, in the case of multicolumn foreign keys, it doesn’t matter if the constraint is defined in an order different from that of the index columns, as long as the columns defined in the constraint are in the leading edge of the index. In other words, if the constraint is defined as COL1 and then COL2, then it’s okay to have a B-tree index defined on leading-edge COL2 and then COL1.
Also if you have a multi-column index that contains more columns than just the foreign key columns, as long as the foreign key columns are in the leading edge of the index, then you’re protected from locking issues.
Additionally, if you have a many-to-many intersection table, which usually has one primary key (and index) defined on all columns, the primary key index will protect the foreign key column that happens to be in the leading edge of the index, but the primary key index does not protect (from locking issues) the other foreign key columns.
Another issue is that a B-tree index protects you from locking issues, but a bitmap index does not. In this situation, the query should also check the index type.
In these scenarios (outlined in the prior paragraphs), you’ll need a more sophisticated query to detect indexing issues related to foreign key columns. The following example is a more complex query that uses the LISTAGG analytical function to compare columns (returned as a string in one row) in a foreign key constraint with corresponding indexed columns:
SELECT
 CASE WHEN ind.index_name IS NOT NULL THEN
   CASE WHEN ind.index_type IN ('BITMAP') THEN
     '** Bitmp idx **'
   ELSE
     'indexed'
   END
 ELSE
   '** Check idx **'
 END checker
,ind.index_type
,cons.owner, cons.table_name, ind.index_name, cons.constraint_name, cons.cols
FROM (SELECT
        c.owner, c.table_name, c.constraint_name
       ,LISTAGG(cc.column_name, ',' ) WITHIN GROUP (ORDER BY cc.column_name) cols
      FROM dba_constraints  c
          ,dba_cons_columns cc
      WHERE c.owner           = cc.owner
      AND   c.owner = UPPER('&&schema')
      AND   c.constraint_name = cc.constraint_name
      AND   c.constraint_type = 'R'
      GROUP BY c.owner, c.table_name, c.constraint_name) cons
LEFT OUTER JOIN
(SELECT
  table_owner, table_name, index_name, index_type, cbr
 ,LISTAGG(column_name, ',' ) WITHIN GROUP (ORDER BY column_name) cols
 FROM (SELECT
        ic.table_owner, ic.table_name, ic.index_name
       ,ic.column_name, ic.column_position, i.index_type
       ,CONNECT_BY_ROOT(ic.column_name) cbr
       FROM dba_ind_columns ic
           ,dba_indexes     i
       WHERE ic.table_owner = UPPER('&schema')
       AND   ic.table_owner = i.table_owner
       AND   ic.table_name  = i.table_name
       AND   ic.index_name  = i.index_name
       CONNECT BY PRIOR ic.column_position-1 = ic.column_position
       AND PRIOR ic.index_name = ic.index_name)
  GROUP BY table_owner, table_name, index_name, index_type, cbr) ind
ON  cons.cols       = ind.cols
AND cons.table_name = ind.table_name
AND cons.owner      = ind.table_owner
ORDER BY checker, cons.owner, cons.table_name;
This query will prompt you for a schema name and then will display foreign key constraints that don’t have corresponding indexes. This query also checks for the index type; as previously stated, bitmap indexes may exist on foreign key columns but don’t prevent locking issues.
TABLE LOCKS AND FOREIGN KEYS
Here is a simple example that demonstrates the locking issue when foreign key columns are not indexed. First, create two tables (DEPT and EMP), and associate them with a foreign key constraint:
create table emp(emp_id number primary key, dept_id number);
create table dept(dept_id number primary key);
alter table emp add constraint emp_fk1 foreign key (dept_id) references dept(dept_id);
Next, insert some data:
insert into dept values(10);
insert into dept values(20);
insert into dept values(30);
insert into emp values(1,10);
insert into emp values(2,20);
insert into emp values(3,10);
commit;
Open two terminal sessions. From one, delete one record from the child table (don’t commit):
delete from emp where dept_id = 10;
Then, attempt to delete from the parent table some data not affected by the child table delete:
delete from dept where dept_id = 30;
The delete from the parent table hangs until the child table transaction is committed. Without a regular B-tree index on the foreign key column in the child table, any time you attempt to insert or delete in the child table, a table-wide lock is placed on the parent table; this prevents deletes or updates in the parent table until the child table transaction completes.
Now, run the prior experiment, except this time, additionally create an index on the foreign key column of the child table:
create index emp_fk1 on emp(dept_id);
You should be able to run the prior two delete statements independently. When you have a B-tree index on the foreign key columns, if deleting from the child table, Oracle will not excessively lock all rows in the parent table.
2-6. Deciding When to Use a Concatenated Index
Problem
You have a combination of columns (from the same table) that are often used in the WHERE clause of several SQL queries. For example, you use LAST_NAME in combination with FIRST_NAME to identify a customer:
select last_name, first_name
from cust
where last_name = 'SMITH'
and first_name = 'STEVE';
You wonder if it would be more efficient to create a single concatenated index on the combination of LAST_NAME and FIRST_NAME columns or if performance would be better if two indexes were created separately on LAST_NAME and FIRST_NAME.
Solution
When frequently accessing two or more columns in conjunction in the WHERE clause, a concatenated index is often more selective than two single indexes. For this example, here’s the table creation script:
create table cust(
 cust_id number primary key
,last_name varchar2(30)
,first_name varchar2(30));
Here’s an example of a concatenated index created on LAST_NAME and FIRST_NAME:
SQL> create index cust_idx1 on cust(last_name, first_name);
To determine whether the concatenated index is used, several rows are inserted (only a subset of the rows is shown here):
SQL> insert into cust values(1,'SMITH','JOHN'),
SQL> insert into cust values(2,'JONES','DAVE'),
..........
SQL> insert into cust values(3,'FORD','SUE'),
Next, statistics are generated for the table and index:
SQL> exec dbms_stats.gather_table_stats(ownname=>user,-
           tabname=>'CUST',cascade=>true);
Now Autotrace is turned on so that the execution plan is displayed when a query is run:
SQL> set autotrace on;
Here’s the query to execute:
select last_name, first_name
from cust
where last_name = 'SMITH'
and first_name = 'JOHN';
Listed next is an explain plan that shows the optimizer is using the index:
------------------------------------------------------------------------------
| Id  | Operation        | Name      | Rows  | Bytes | Cost (%CPU)| Time     |
------------------------------------------------------------------------------
|   0 | SELECT STATEMENT |           |    13 |   143 |     1   (0)| 00:00:01 |
|*  1 |  INDEX RANGE SCAN| CUST_IDX1 |    13 |   143 |     1   (0)| 00:00:01 |
------------------------------------------------------------------------------
The prior output indicates that an INDEX RANGE SCAN was used to access the CUST_IDX1 index. Notice that all of the information required to satisfy the results of this query was contained within the index. The table data was not required. Oracle accessed only the index.
One other item to consider: suppose you have this query that additionally selects the CUST_ID column:
select cust_id, last_name, first_name
from cust
where last_name = 'SMITH'
and first_name = 'JOHN';
If you frequently access CUST_ID in combination with LAST_NAME and FIRST_NAME, consider adding CUST_ID to the concatenated index. This will provide all of the information that the query needs in the index. Oracle will be able to retrieve the required data from the index blocks and thus not have to access the table blocks.
How It Works
Oracle allows you to create an index that contains more than one column. Multicolumn indexes are known as concatenated indexes. These indexes are especially effective when you often use multiple columns in the WHERE clause when accessing a table. Here are some factors to consider when using concatenated indexes:
- If columns are often used together in the WHERE clause, consider creating a concatenated index.
- If a column is also used (in other queries) by itself in the WHERE clause, place that column at the leading edge of the index (first column defined).
- Keep in mind that Oracle can still use a lagging edge index (not the first column defined) if the lagging column appears by itself in the WHERE clause (but not as efficiently as it would if it was an index on a column in the leading edge of the index).
In older versions of Oracle (circa v8), the optimizer would use a concatenated index only if the leading edge column(s) appeared in the WHERE clause. In modern versions, the optimizer considers using a concatenated index even if the leading edge column(s) aren’t present in the WHERE clause. This ability to use an index without reference to leading edge columns is known as the skip-scan feature. For example, say you have this query that uses the FIRST_NAME column (which is a lagging column in the concatenated index created in the “Solution” section of this recipe):
SQL> select last_name from cust where first_name='DAVE';
Here is the corresponding explain plan showing that the skip-scan feature is in play:
------------------------------------------------------------------------------
| Id  | Operation        | Name      | Rows  | Bytes | Cost (%CPU)| Time     |
------------------------------------------------------------------------------
|   0 | SELECT STATEMENT |           |    38 |   418 |     1   (0)| 00:00:01 |
|*  1 |  INDEX SKIP SCAN | CUST_IDX1 |    38 |   418 |     1   (0)| 00:00:01 |
------------------------------------------------------------------------------
A concatenated index used for skip-scanning in some scenarios can be more efficient than a full table scan. However, if you’re consistently using only a lagging edge column of a concatenated index, then consider creating a single-column index on the lagging column.
![]() Note Keep in mind that adding an extra column to a concatenated index may help the performance of one SQL statement but may decrease the performance of other SQL statements that use the index (due to an increased number of leaf blocks in the index when the extra column is added).
Note Keep in mind that adding an extra column to a concatenated index may help the performance of one SQL statement but may decrease the performance of other SQL statements that use the index (due to an increased number of leaf blocks in the index when the extra column is added).
2-7. Reducing Index Size Through Compression
Problem
You want to create an index that efficiently handles cases in which many rows have the same values in one or more indexed columns. For example, suppose you have a table defined as follows:
create table cust(
 cust_id number
,last_name varchar2(30)
,first_name varchar2(30)
,middle_name varchar2(30));
Furthermore, you inspect the data inserted into the prior table with this query:
SQL> select last_name, first_name, middle_name from cust;
You notice that there is a great deal of duplication in the LAST_NAME and FIRST_NAME columns:
LEE                  JOHN                  Q
LEE                  JOHN                  B
LEE                  JOHN                  A
LEE                  JOE                   D
SMITH                BOB                   A
SMITH                BOB                   C
SMITH                BOB                   D
SMITH                JOHN                  J
SMITH                JOHN                  A
SMITH                MIKE                  K
SMITH                MIKE                  R
SMITH                MIKE                  S
You want to create an index that compresses the values so as to compact entries into the blocks. When the index is accessed, the compression will result in fewer block reads and thus improve performance. Specifically you want to create a key-compressed index on the LAST_NAME and FIRST_NAME columns of this table.
Solution
Use the COMPRESS N clause to create a compressed index:
SQL> create index cust_cidx1 on cust(last_name, first_name) compress 2;
The prior line of code instructs Oracle to create a compressed index on two columns (LAST_NAME and FIRST_NAME). For this example, if we determined that there was a high degree of duplication only in the first column, we could instruct the COMPRESS N clause to compress only the first column (LAST_NAME) by specifying an integer of 1:
SQL> create index cust_cidx1 on cust(last_name, first_name) compress 1;
How It Works
Index compression is useful for indexes that contain multiple columns where the leading index column value is often repeated. Compressed indexes have the following advantages:
- Reduced storage
- More rows stored in leaf blocks, which can result in less I/O when accessing a compressed index
The degree of compression will vary by the amount of duplication in the index columns specified for compression. You can verify the degree of compression and the number of leaf blocks used by running the following two queries before and after creating an index with compression enabled:
SQL> select sum(bytes) from user_extents where segment_name='&ind_name';
SQL> select index_name, leaf_blocks from user_indexes where index_name='&ind_name';
You can verify the index compression is in use and the corresponding prefix length as follows:
select  index_name, compression, prefix_length
from user_indexes
where index_name = 'CUST_CIDX1';
Here’s some sample output indicating that compression is enabled for the index with a prefix length of 2:
INDEX_NAME                     COMPRESS PREFIX_LENGTH
------------------------------ -------- -------------
CUST_CIDX1                     ENABLED              2
You can modify the prefix length by rebuilding the index. The following code changes the prefix length to 1:
SQL> alter index cust_cidx1 rebuild compress 1;
You can enable or disable compression for an existing index by rebuilding it. This example rebuilds the index with no compression:
SQL> alter index cust_cidx1 rebuild nocompress;
![]() Note You cannot create a key-compressed index on a bitmap index.
Note You cannot create a key-compressed index on a bitmap index.
2-8. Implementing a Function-Based Index
Problem
A query is running slow. You examine the WHERE clause and notice that a SQL UPPER function has been applied to a column. The UPPER function blocks the use of the existing index on that column. You want to create a function-based index to support the query. Here’s an example of such a query:
SELECT first_name
FROM cust
WHERE UPPER(first_name) = 'DAVE';
You inspect USER_INDEXES and discover that an index exists on the FIRST_NAME column:
select  index_name, column_name
from user_ind_columns
where table_name = 'CUST';

INDEX_NAME           COLUMN_NAME
-------------------- --------------------
CUST_IDX1            FIRST_NAME
You generate an explain plan via SET AUTOTRACE TRACE EXPLAIN and notice that with the UPPER function applied to the column, the index is not used:
--------------------------------------------------------------------------
| Id  | Operation         | Name | Rows  | Bytes | Cost (%CPU)| Time     |
--------------------------------------------------------------------------
|   0 | SELECT STATEMENT  |      |     1 |    17 |     2   (0)| 00:00:01 |
|*  1 |  TABLE ACCESS FULL| CUST |     1 |    17 |     2   (0)| 00:00:01 |
--------------------------------------------------------------------------
You need to create an index that Oracle will use in this situation.
Solution
There are two ways to resolve this issue:
- Create a function-based index.
- If using Oracle Database 11g or higher, create an indexed virtual column (see Recipe 2-9 for details).
This solution focuses on using a function-based index. You create a function-based index by referencing the SQL function and column in the index creation statement. For this example, a function-based index is created on UPPER(name):
SQL> create index cust_fidx1 on cust(UPPER(first_name));
To verify if the index is used, the Autotrace facility is turned on:
SQL> set autotrace trace explain;
Now the query is executed:
SELECT first_name
FROM cust
WHERE UPPER(first_name) = 'DAVE';
Here is the resulting execution plan showing that the function-based index is used:
------------------------------------------------------------------------------------------
| Id  | Operation                   | Name       | Rows  | Bytes | Cost (%CPU)| Time     |
------------------------------------------------------------------------------------------
|   0 | SELECT STATEMENT            |            |     1 |    34 |     1   (0)| 00:00:01 |
|   1 |  TABLE ACCESS BY INDEX ROWID| CUST       |     1 |    34 |     1   (0)| 00:00:01 |
|*  2 |   INDEX RANGE SCAN          | CUST_FIDX1 |     1 |       |     1   (0)| 00:00:01 |
------------------------------------------------------------------------------------------
![]() Note You can’t modify a column that has a function-based index applied to it. You’ll have to drop the index, modify the column, and then re-create the index.
Note You can’t modify a column that has a function-based index applied to it. You’ll have to drop the index, modify the column, and then re-create the index.
How It Works
Function-based indexes are created with functions or expressions in their definitions. Function-based indexes allow index look-ups on columns referenced by SQL functions in the WHERE clause of a query. The index can be as simple as the example in the “Solution” section of this recipe, or it can be based on complex logic stored in a PL/SQL function.
![]() Note Any user-created SQL functions must be declared deterministic before they can be used in a function-based index. Deterministic means that for a given set of inputs, the function always returns the same results. You must use the keyword DETERMINISTIC when creating a user-defined function that you want to use in a function-based index.
Note Any user-created SQL functions must be declared deterministic before they can be used in a function-based index. Deterministic means that for a given set of inputs, the function always returns the same results. You must use the keyword DETERMINISTIC when creating a user-defined function that you want to use in a function-based index.
If you want to see the definition of a function-based index, select from the DBA/ALL/USER_IND_EXPRESSIONS view to display the SQL associated with the index. If you’re using SQL*Plus, be sure to issue a SET LONG command first—for example:
SQL> SET LONG 5000
SQL> select index_name, column_expression from user_ind_expressions;
The SET LONG command in this example tells SQL*Plus to display up to 5000 characters from the COLUMN_EXPRESSION column, which is of type LONG.
2-9. Indexing a Virtual Column
Problem
You’re currently using a function-based index but need better performance. You want to replace the function-based index with a virtual column and place an index on the virtual column.
![]() Note The virtual column feature requires Oracle Database 11g or higher.
Note The virtual column feature requires Oracle Database 11g or higher.
Solution
Using a virtual column in combination with an index provides you with an alternative method for achieving performance gains when using SQL functions on columns in the WHERE clause. For example, suppose you have this query:
SELECT first_name
FROM cust
WHERE UPPER(first_name) = 'DAVE';
Normally, the optimizer will ignore any indexes on the column FIRST_NAME because of the SQL function applied to the column. There are two ways to improve performance in this situation:
- Create a function-based index (see Recipe 2-8 for details).
- Use a virtual column in combination with an index.
This solution focuses on the latter bullet. First a virtual column is added to the table that encapsulates the SQL function:
SQL> alter table cust add(up_name generated always as (UPPER(first_name)) virtual);
Next an index is created on the virtual column:
SQL> create index cust_vidx1 on cust(up_name);
This creates a very efficient mechanism to retrieve data when referencing a column with a SQL function.
How It Works
You might be asking this question: “Which performs better, a function-based index or an indexed virtual column?” In our testing, we were able to create several scenarios where the virtual column performed better than the function-based index. Results may vary depending on your data.
The purpose of this recipe is not to convince you to immediately start replacing all function-based indexes in your system with virtual columns; rather, we want you to be aware of an alternative method for solving a common performance issue.
A virtual column is not free. If you have an existing table, you have to create and maintain the DDL required to create the virtual column, whereas a function-based index can be added, modified, and dropped independently from the table.
Several caveats are associated with virtual columns:
- You can define a virtual column only on a regular heap-organized table. You can’t define a virtual column on an index-organized table, an external table, a temporary table, object tables, or cluster tables.
- Virtual columns can’t reference other virtual columns.
- Virtual columns can reference columns only from the table in which the virtual column is defined.
- The output of a virtual column must be a scalar value (a single value, not a set of values).
To view the definition of a virtual column, use the DBMS_METADATA package to view the DDL associated with the table. If you’re selecting from SQL*Plus, you need to set the LONG variable to a value large enough to show all data returned:
SQL> set long 5000;
SQL> select dbms_metadata.get_ddl('TABLE','CUST') from dual;
Here’s a partial snippet of the output showing the virtual column details:
"UP_NAME" VARCHAR2(30) GENERATED ALWAYS AS (UPPER("FIRST_NAME")) VIRTUAL
You can also view the definition of the virtual column by querying the DBA/ALL/USER_IND_EXPRESSIONS view. If you’re using SQL*Plus, be sure to issue a SET LONG command first—for example:
SQL> SET LONG 5000
SQL> select index_name, column_expression from user_ind_expressions;
The SET LONG command in this example tells SQL*Plus to display up to 5000 characters from the COLUMN_EXPRESSION column, which is of type LONG.
2-10. Limiting Index Contention when Several Processes Insert in Parallel
Problem
You use a sequence to populate the primary key of a table and realize that this can cause contention on the leading edge of the index because the index values are nearly similar. This leads to multiple inserts into the same block, which causes contention. You want to spread out the inserts into the index so that the inserts more evenly distribute values across the index structure. You want to use a reverse-key index to accomplish this.
Solution
Use the REVERSE clause to create a reverse-key index:
SQL> create index cust_idx1 on cust(cust_id) reverse;
You can verify that an index is reverse-key by running the following query:
SQL> select index_name, index_type from user_indexes;
Here’s some sample output showing that the INV_IDX1 index is reverse-key:
INDEX_NAME                     INDEX_TYPE
------------------------------ ---------------------------
CUST_IDX1                      NORMAL/REV
USERS_IDX1                     NORMAL
![]() Note You can’t specify REVERSE for a bitmap index or an index-organized table.
Note You can’t specify REVERSE for a bitmap index or an index-organized table.
How It Works
Reverse-key indexes are similar to B-tree indexes except that the bytes of the index key are reversed when an index entry is created. For example, if the index values are 102, 103, and 104, the reverse-key index values are 201, 301, and 401:
Index value              Reverse key value
-------------            --------------------
102                      201
103                      301
104                      401
Reverse-key indexes can perform better in scenarios where you need a way to spread index data that would otherwise have similar values clustered together. Thus, when using a reverse-key index, you avoid having I/O concentrated in one physical disk location within the index during large inserts of sequential values. The downside to this type of index is that it can’t be used for index range scans, which may not be an issue for sequence numbers that don't correspond to any natural order that wouldn’t normally be used in any type of range scan.
You can rebuild an existing index to be reverse-key by using the REBUILD REVERSE clause—for example:
SQL> alter index cust_idx1 rebuild reverse;
Similarly, if you want to make an index that is reverse-key into a normally ordered index, then use the REBUILD NOREVERSE clause:
SQL> alter index cust_idx1 rebuild noreverse;
2-11. Toggling the Visibility of an Index to the Optimizer
Problem
You want to add an index to a production environment and want a mechanism for toggling whether the optimizer will consider using the index for SELECT statements. The idea being you can observe the performance of SELECT while the index is available to the optimizer and compare that to performance with the index not being available.
Solution
Create the index as invisible and then selectively make the index visible to the optimizer for specific sessions. This will allow you to observe in a somewhat controlled setting as to whether the index will be beneficial. Here's an example of creating an invisible index:
SQL> create index emp_idx1 on emp(first_name) invisible;
Next, set the OPTIMIZER_USE_INVISIBLE_INDEXES initialization parameter to TRUE (the default is FALSE). For the currently connected session, the following instructs the optimizer to consider invisible indexes:
SQL> alter session set optimizer_use_invisible_indexes=true;
![]() Note If you want all sessions to consider using invisible indexes, then alter the OPTIMIZER_USE_INVISIBLE_INDEXES parameter via the ALTER SYSTEM statement. So in a sense, when you do this the invisible indexes are no longer invisible.
Note If you want all sessions to consider using invisible indexes, then alter the OPTIMIZER_USE_INVISIBLE_INDEXES parameter via the ALTER SYSTEM statement. So in a sense, when you do this the invisible indexes are no longer invisible.
You can verify that the index is being used by setting AUTOTRACE TRACE EXPLAIN and running the SELECT statement:
SQL> set autotrace trace explain;
Here’s some sample output indicating that the optimizer chose to use the invisible index:
-----------------------------------------------------------------------------
| Id  | Operation        | Name     | Rows  | Bytes | Cost (%CPU)| Time     |
-----------------------------------------------------------------------------
|   0 | SELECT STATEMENT |          |     1 |    17 |     1   (0)| 00:00:01 |
|*  1 |  INDEX RANGE SCAN| EMP_IDX1 |     1 |    17 |     1   (0)| 00:00:01 |
-----------------------------------------------------------------------------
How It Works
In Oracle Database 11g and higher, you have the option of making an index invisible to the optimizer. The index is invisible in the sense that the optimizer won't directly use the index when the optimizer is creating an execution plan. As shown in the Solution section, you make the index visible to the optimizer by setting the OPTIMIZER_USE_INVISIBLE_INDEXES parameter.
Although the index may be invisible to the optimizer, it can still impact performance in the following ways:
- Invisible indexes consume space and resources the underlying table has records inserted, updated, or deleted. This could impact performance (slow down DML statements).
- The optimizer may consider an invisible index for cardinality calculations (which could alter the choice of subsequent execution plans).
- Oracle can still use an invisible index to prevent certain locking situations when an index is placed on a foreign key column.
- If you create a unique invisible index, the uniqueness of the columns will be enforced regardless of the visibility setting.
Therefore, even if you create an index as invisible, it could have far reaching performance implications. It would be erroneous to assume that an invisible index has no impact on the applications using the tables on which invisible indexes exist. Invisible indexes are only invisible in the sense that the optimizer won't directly use them for SELECT statements unless instructed to do so.
If you want to make an invisible index visible, you can do so as follows:
SQL> alter index emp_idx1 visible;
You can verify the visibility of an index via this query:
SQL> select index_name, status, visibility from user_indexes;
Here’s some sample output:
INDEX_NAME                     STATUS   VISIBILITY
------------------------------ -------- ----------
EMP_IDX1                       VALID    VISIBLE
2-12. Creating a Bitmap Index in Support of a Star Schema
Problem
You have a data warehouse that contains a star schema. The star schema consists of a large fact table and several dimension (lookup) tables. The primary key columns of the dimension tables map to foreign key columns in the fact table. You would like to create bitmap indexes on all of the foreign key columns in the fact table.
Solution
You use the BITMAP keyword to create a bitmap index. The next line of code creates a bitmap index on the CUST_ID column of the F_SALES table:
SQL> create bitmap index f_sales_cust_fk1 on f_sales(cust_id);
The type of index is verified with the following query:
SQL> select index_name, index_type from user_indexes where index_name='F_SALES_CUST_FK1';

INDEX_NAME                     INDEX_TYPE
------------------------------ ---------------------------
F_SALES_CUST_FK1               BITMAP
![]() Note Bitmap indexes and bitmap join indexes are available only with the Oracle Enterprise Edition of the database. Also, you can't create a unique bitmap index.
Note Bitmap indexes and bitmap join indexes are available only with the Oracle Enterprise Edition of the database. Also, you can't create a unique bitmap index.
How It Works
You shouldn’t use bitmap indexes on OLTP databases with high INSERT/UPDATE/DELETE activities, due to locking issues. Locking issues arise because the structure of the bitmap index results in potentially many rows being locked during DML operations, which results in locking problems for high-transaction OLTP systems.
A bitmap index stores the ROWID of a row and a corresponding bitmap. You can think of the bitmap as a combination of ones and zeros. A one indicates the presence of a value, and a zero indicates that the value doesn’t exist. Bitmap indexes are ideal for low-cardinality columns (few distinct values) and where the application is not frequently updating the table.
Bitmap indexes are commonly used in data warehouse environments where you have star schema design. A typical star schema structure consists of a large fact table and many small dimension (lookup) tables. In these scenarios, it’s common to create bitmap indexes on fact table–foreign key columns. The fact tables are typically loaded on a daily basis and (usually) aren’t subsequently updated or deleted.
Bitmap indexes are especially effective at retrieving rows when multiple AND and OR conditions appear in the WHERE clause. This is because Oracle can filter the rows by simply applying Boolean algebra operations on the bitmap values to quickly identify which rows match the specified criteria.
An example will drive home this point. In a data warehouse at the center of a star schema design sits a fact table that stores information such as sales amounts. The fact table is linked via foreign keys to several dimension tables. The dimensions store look-up values such as dates, regions, customers, and so on. The following bit of code simulates creating several dimension tables and a fact table:
create table d1(d1 number);
create table d2(d2 number);
create table d3(d3 number);
create table d4(d4 number);
create table d5(d5 number);
create table f_fact(d1 number, d2 number, d3 number, d4 number, d5 number, counter number);
Next many values are inserted into the dimension tables and the fact table:
insert into d1 select level from dual connect by level <= 2;
insert into d2 select level from dual connect by level <= 3;
insert into d3 select level from dual connect by level <= 5;
insert into d4 select level from dual connect by level <= 100;
insert into d5 select level from dual connect by level <= 1000;
--
insert into f_fact (d1,d2,d3,d4,d5,counter)
select d1,d2,d3,d4,d5,dbms_random.value*100
from d1,d2,d3,d4,d5;
Next bitmap indexes are created on the dimension columns that exist in the fact table:
create bitmap index f_fact_b1 on f_fact(d1);
create bitmap index f_fact_b2 on f_fact(d2);
create bitmap index f_fact_b3 on f_fact(d3);
create bitmap index f_fact_b4 on f_fact(d4);
create bitmap index f_fact_b5 on f_fact(d5);
Now statistics are generated:
exec dbms_stats.gather_schema_stats(ownname=>user);
Now consider what types of queries are typically issued against a fact table. They usually consist of counts or sums, and/or many varying ways of filtering the data via the dimension values. Notice what the execution plan looks like when autotracing is enabled and the fact table is queried:
set autotrace trace explain;
select count(*) from f_fact where d1 = 2 and (d2 = 3 or d3 = 4) and d4 IN (10,11,12);
Here are the execution plan details:
-------------------------------------------------------------------------------------------
| Id  | Operation                     | Name      | Rows  | Bytes | Cost (%CPU)| Time     |
-------------------------------------------------------------------------------------------
|   0 | SELECT STATEMENT              |           |     1 |    12 |    70   (0)| 00:00:01 |
|   1 |  SORT AGGREGATE               |           |     1 |    12 |            |          |
|   2 |   BITMAP CONVERSION COUNT     |           | 21000 |   246K|    70   (0)| 00:00:01 |
|   3 |    BITMAP AND                 |           |       |       |            |          |
|   4 |     BITMAP OR                 |           |       |       |            |          |
|*  5 |      BITMAP INDEX SINGLE VALUE| F_FACT_B4 |       |       |            |          |
|*  6 |      BITMAP INDEX SINGLE VALUE| F_FACT_B4 |       |       |            |          |
|*  7 |      BITMAP INDEX SINGLE VALUE| F_FACT_B4 |       |       |            |          |
|*  8 |     BITMAP INDEX SINGLE VALUE | F_FACT_B1 |       |       |            |          |
|   9 |     BITMAP OR                 |           |       |       |            |          |
|* 10 |      BITMAP INDEX SINGLE VALUE| F_FACT_B2 |       |       |            |          |
|* 11 |      BITMAP INDEX SINGLE VALUE| F_FACT_B3 |       |       |            |          |
-------------------------------------------------------------------------------------------
The optimizer is able to make efficient use of the bitmap indexes to satisfy the results of the query. Consider what happens if you dropped the bitmap indexes and replaced them with B-tree indexes:
drop index f_fact_b1;
drop index f_fact_b2;
drop index f_fact_b3;
drop index f_fact_b4;
drop index f_fact_b5;
--
create index f_fact_b1 on f_fact(d1);
create index f_fact_b2 on f_fact(d2);
create index f_fact_b3 on f_fact(d3);
create index f_fact_b4 on f_fact(d4);
create index f_fact_b5 on f_fact(d5);
--
exec dbms_stats.gather_schema_stats(ownname=>user);
Now run the same select statement and view the execution plan:
set autotrace trace explain;
select count(*) from f_fact where d1 = 2 and (d2 = 3 or d3 = 4) and d4 IN (10,11,12);
Here’s a snippet of the output (part of the output was removed so it would fit within the width of the page):
---------------------------------------------------------------------------------------
| Id  | Operation                             | Name      | Rows  | Bytes | Cost (%CPU)|
----------------------------------------------------------------------------------------
|   0 | SELECT STATEMENT                      |           |     1 |    12 |   961   (1)|
|   1 |  SORT AGGREGATE                       |           |     1 |    12 |            |
|   2 |   INLIST ITERATOR                     |           |       |       |            |
|*  3 |    TABLE ACCESS BY INDEX ROWID BATCHED| F_FACT    | 21000 |   246K|   961   (1)|
|*  4 |     INDEX RANGE SCAN                  | F_FACT_B4 | 93314 |       |   185   (1)|
----------------------------------------------------------------------------------------
Notice that the cost is much higher for the query when it is using regular B-tree indexes. For queries against a Star schema design, which typically include many different and unpredictable combinations of AND/OR of the dimensions in the WHERE clause, bitmap indexes usually are a better choice.
![]() Tip One common belief is that bitmap indexes should only be used for low cardinality columns. This isn’t necessarily true; a bitmap index can efficiently be used for columns that have high cardinality. When deciding whether to use a bitmap versus a B-tree index, consider how the data is updated and how the tables will be queried.
Tip One common belief is that bitmap indexes should only be used for low cardinality columns. This isn’t necessarily true; a bitmap index can efficiently be used for columns that have high cardinality. When deciding whether to use a bitmap versus a B-tree index, consider how the data is updated and how the tables will be queried.
2-13. Creating a Bitmap Join Index
Problem
You’re working in a data warehouse environment. You have a fairly large dimension table that is often joined to an extremely large fact table. You wonder if there’s a way to create a bitmap index in such a way that it can eliminate the need for the optimizer to access the dimension table blocks to satisfy the results of a query.
Solution
Here’s the basic syntax for creating a bitmap join index:
create bitmap index <index_name>
on <fact_table> (<dimension_table.dimension_column>)
from <fact_table>, <dimension_table>
where <fact_table>.<foreign_key_column> = <dimension_table>.<primary_key_column>;
Bitmap join indexes are appropriate in situations where you’re joining two tables using the foreign key column(s) in one table that relate to primary key column(s) in another table. For example, suppose you typically retrieve the CUST_NAME from the D_CUSTOMERS table while joining to a large F_SHIPMENTS fact table. This example creates a bitmap join index between the F_SHIPMENTS and D_CUSTOMERS tables:
create bitmap index f_shipments_bm_idx1
on f_shipments(d_customers.cust_name)
from f_shipments, d_customers
where f_shipments.d_cust_id = d_customers.d_cust_id;
Now, consider a query such as this:
select d.cust_name
from f_shipments f, d_customers d
where f.d_cust_id = d.d_cust_id
and d.cust_name = 'Oracle';
The optimizer can choose to use the bitmap join index and thus avoid the expense of having to join the tables.
How It Works
Bitmap join indexes store the results of a join between two tables in an index. Bitmap indexes are beneficial because they avoid joining tables to retrieve results. The syntax for a bitmap join index differs from a regular bitmap index in that it contains FROM and WHERE clauses.
Bitmap join indexes are usually suitable only for data warehouse environments where you have tables that get loaded and then are not updated. When updating tables that have bitmap join indexes declared, this potentially results in several rows being locked. Therefore this type of an index is not suitable for an OLTP database.
2-14. Creating an Index-Organized Table
Problem
You want to create a table that is the intersection of a many-to-many relationship between two tables. The intersection table will consist of two columns. Each column is a foreign key that maps back to a corresponding primary key in a parent table. The combination of columns is the primary key of the intersection table.
Solution
Index-organized tables (IOTs) are efficient objects when the table data is typically accessed through querying on the primary key. Use the ORGANIZATION INDEX clause to create an IOT:
create table cust_assoc
(cust_id number
,user_group_id number
,create_dtt timestamp(5)
,update_dtt timestamp(5)
,constraint cust_assoc_pk primary key(cust_id, user_group_id)
)
organization index
including create_dtt
pctthreshold 30
tablespace nsestar_index
overflow
tablespace dim_index;
Notice that DBA/ALL/USER_TABLES includes an entry for the table name used when creating an IOT. The following two queries show how Oracle records the information regarding the IOT in the data dictionary:
select table_name, iot_name
from user_tables
where iot_name = 'CUST_ASSOC';
Here is some sample output:
TABLE_NAME                     IOT_NAME
------------------------------ ------------------------------
SYS_IOT_OVER_184185            CUST_ASSOC
Listed next is another slightly different query with its output:
select table_name, iot_name
from user_tables
where table_name = 'CUST_ASSOC';
Here is some sample output:
TABLE_NAME                     IOT_NAME
------------------------------ ------------------------------
CUST_ASSOC
Additionally, DBA/ALL/USER_INDEXES contains a record with the name of the primary key constraint specified. The INDEX_TYPE column contains a value of IOT - TOP for IOTs:
select index_name, index_type
from user_indexes
where table_name = 'CUST_ASSOC';
Here is some sample output:
INDEX_NAME                     INDEX_TYPE
------------------------------ ---------------------------
CUST_ASSOC_PK                  IOT - TOP
How It Works
An IOT stores the entire contents of the table’s row in a B-tree index structure. IOTs provide fast access for queries that have exact matches and/or range searches on the primary key.
All columns specified up to and including the column specified in the INCLUDING clause are stored in the same block as the CUST_ASSOC_PK primary key column. In other words, the INCLUDING clause specifies the last column to keep in the table segment. Columns listed after the column specified in the INCLUDING clause are stored in the overflow data segment. In the previous example, the UPDATE_DTT column is stored in the overflow segment.
PCTTHRESHOLD specifies the percentage of space reserved in the index block for the IOT row. This value can be from 1 to 50, and defaults to 50 if no value is specified. There must be enough space in the index block to store the primary key. The OVERFLOW clause details which tablespace should be used to store overflow data segments.
2-15. Monitoring Index Usage
Problem
You maintain a large database that contains thousands of indexes. As part of your proactive maintenance, you want to determine if any indexes are not used in SELECT statements. You realize that unused indexes have a detrimental impact on performance, because every time a row is inserted, updated, and deleted, the corresponding index has to be maintained. This consumes CPU resources and disk space.
Solution
Use the ALTER INDEX...MONITORING USAGE statement to enable basic index monitoring. The following example enables index monitoring on an index named EMP_IDX1:
SQL> alter index emp_idx1 monitoring usage;
The first time the index is used in a SELECT statement, Oracle records this; you can view whether an index has been accessed via the DBA_OBJECT_USAGE view. To report which indexes are being monitored and have ever been used, run this query:
SQL> select index_name, table_name, monitoring, used from dba_object_usage;
![]() Tip Prior to Oracle Database 12c, Oracle recorded monitored index usage in the V$OBJECT_USAGE view.
Tip Prior to Oracle Database 12c, Oracle recorded monitored index usage in the V$OBJECT_USAGE view.
If the index has ever been used in a SELECT statement, then the USED column will contain the YES value. Here is some sample output from the prior query:
INDEX_NAME           TABLE_NAME           MON USE
-------------------- -------------------- --- ---
EMP_IDX1             EMP                  YES NO
Most likely, you won’t monitor only one index. Rather, you’ll want to monitor all indexes for a user. In this situation, use SQL to generate SQL to create a script you can run to turn on monitoring for all indexes. Here’s such a script:
set pagesize 0 head off linesize 132
spool enable_mon.sql
select
  'alter index ' || index_name || ' monitoring usage;'
from user_indexes;
spool off;
To disable monitoring on an index, use the NOMONITORING USAGE clause—for example:
SQL> alter index emp_idx1 nomonitoring usage;
How It Works
Enabling the monitoring of indexes will allow you to determine which indexes are being used by Oracle for retrieving the result set of a query. If an index is never used then you should consider dropping the index. However, keep in mind that there are other scenarios in which Oracle will use an index, but its usage is not recorded in DBA_OBJECT_USAGE. Before dropping an index (that isn't used by a SELECT statement), consider these other uses:
- The optimizer may use an index for cardinality calculations (and therefore potentially impact the optimizer's choice of execution plan).
- When an index is placed on a column that has a foreign key constraint defined on it, Oracle can use an index to prevent certain locking situations.
- For unique indexes, Oracle will still use the index for enforcing uniqueness, regardless whether the index is used in a SELECT statement.
- Be certain that the index isn’t crucial to end of month/quarter/year query that didn’t run during the monitoring period.
If you've considered the prior reasons and an index that has been monitored for a reasonable amount of time is displayed as not used, then you can consider dropping the index. There's no hard and fast rule for how long is the right amount of time to monitor an index. Minimally you would want to monitor an index for a couple of weeks so as to give application code sufficient time such that an adequate sample of queries has been executed against the database.
![]() Tip You can view index monitoring information for the currently connected session via the USER_OBJECT_USAGE view.
Tip You can view index monitoring information for the currently connected session via the USER_OBJECT_USAGE view.
2-16. Maximizing Index Creation Speed
Problem
You’re creating an index based on a table that contains millions of rows. You want to create the index as fast as possible.
Solution
This solution describes two techniques for increasing the speed of index creation:
- Turning off redo generation
- Increasing the degree of parallelism
You can use the prior two features independently of each other, or they can be used in conjunction.
Turning Off Redo Generation
You can optionally create an index with the NOLOGGING clause. Doing so has these implications:
- The redo isn’t generated that would be required to recover the index in the event of a media failure.
- Subsequent direct-path operations also won’t generate the redo required to recover the index information in the event of a media failure.
Here’s an example of creating an index with the NOLOGGING clause:
create index inv_idx1 on inv(inv_id, inv_id2)
nologging
tablespace inv_mgmt_index;
You can run this query to determine whether an index has been created with NOLOGGING:
SQL> select index_name, logging from user_indexes;
Increasing the Degree of Parallelism
In large database environments where you’re attempting to create an index on a table that is populated with many rows, you may be able to reduce the time it takes to create the index by using the PARALLEL clause. For example, this sets the degree of parallelism to 2 when creating the index:
create index inv_idx1 on inv(inv_id)
parallel 2
tablespace inv_mgmt_data;
![]() Note If you don’t specify a degree of parallelism, Oracle selects a degree based on the number of CPUs on the box times the value of PARALLEL_THREADS_PER_CPU.
Note If you don’t specify a degree of parallelism, Oracle selects a degree based on the number of CPUs on the box times the value of PARALLEL_THREADS_PER_CPU.
You can verify the degree of parallelism on an index via this query:
SQL> select index_name, degree from user_indexes;
How It Works
The main advantage of NOLOGGING is that when you create the index, a minimal amount of redo information is generated, which can have significant performance implications when creating a large index. The disadvantage is that if you experience a media failure soon after the index is created (or have records inserted via a direct-path operation), and subsequently have a failure that causes you to restore from a backup (taken prior to the index creation), then you may see this error when the index is accessed:
ORA-01578: ORACLE data block corrupted (file # 4, block # 11407)
ORA-01110: data file 4: '/ora01/dbfile/O12C/inv_mgmt_index01.dbf'
ORA-26040: Data block was loaded using the NOLOGGING option
This error indicates that the index is logically corrupt. In this scenario, you must re-create or rebuild the index before it’s usable. In most scenarios, it’s acceptable to use the NOLOGGING clause when creating an index, because the index can be re-created or rebuilt without affecting the table on which the index is based.
In addition to NOLOGGING, you can use the PARALLEL clause to increase the speed of an index creation. For large indexes, this can significantly decrease the time required to create an index.
Keep in mind that you can use NOLOGGING in combination with PARALLEL. This next example rebuilds an index in parallel while generating a minimal amount of redo:
SQL> alter index inv_idx1 rebuild parallel nologging;
2-17. Reclaiming Unused Index Space
Problem
You have an index consuming space in a segment, but without actually using that space. For example, you’re running the following query to display the Segment Advisor’s advice (see Recipe 1-9 for further details on running the Segment Advisor):
SELECT
 'Task Name        : ' || f.task_name  || CHR(10) ||
 'Start Run Time   : ' || TO_CHAR(execution_start, 'dd-mon-yy hh24:mi') || chr (10) ||
 'Segment Name     : ' || o.attr2      || CHR(10) ||
 'Segment Type     : ' || o.type       || CHR(10) ||
 'Partition Name   : ' || o.attr3      || CHR(10) ||
 'Message          : ' || f.message    || CHR(10) ||
 'More Info        : ' || f.more_info  || CHR(10) ||
 '------------------------------------------------------' Advice
FROM dba_advisor_findings   f
    ,dba_advisor_objects    o
    ,dba_advisor_executions e
WHERE o.task_id   = f.task_id
AND   o.object_id = f.object_id
AND   f.task_id   = e.task_id
AND   e. execution_start > sysdate - 1
AND   e.advisor_name = 'Segment Advisor'
ORDER BY f.task_name;
The following output is displayed:
ADVICE
--------------------------------------------------------------------------------
Task Name        : F_REGS Advice
Start Run Time   : 19-feb-11 09:32
Segment Name     : F_REGS_IDX1
Segment Type     : INDEX
Partition Name   :
Message          : Perform shrink, estimated savings is 84392870 bytes.
More Info        : Allocated Space:166723584: Used Space:82330714: Reclaimable...
pace :84392870:
------------------------------------------------------
You want to shrink the index to free up the unused space.
Solution
There are a couple of effective methods for freeing up unused space associated with an index:
- Rebuilding the index
- Shrinking the index
Before you perform either of these operations, first check USER_SEGMENTS to verify that the amount of space used corresponds with the Segment Advisor’s advice. In this example, the segment name is F_REGS_IDX1:
SQL> select bytes from user_segments where segment_name = 'F_REGS_IDX1';

BYTES
----------
 166723584
This example uses the ALTER INDEX...REBUILD statement to re-organize and compact the space used by an index:
SQL> alter index f_regs_idx1 rebuild;
Alternatively, use the ALTER INDEX...SHRINK SPACE statement to free up unused space in an index—for example:
SQL> alter index f_regs_idx1 shrink space;

Index altered.
Now query USER_SEGMENTS again to verify that the space has been de-allocated. Here is the output for this example:
  BYTES
----------
    524288
The space consumed by the index has considerably decreased.
How It Works
Usually rebuilding an index is the fastest and most effective way to reclaim unused space consumed by an index. Therefore this is the approach we recommend for reclaiming unused index space. Freeing up space is desirable because it ensures that you use only the amount of space required by an object. It also has the performance benefit that Oracle has fewer blocks to manage and sort through when performing read operations.
Besides freeing up space, you may want to consider rebuilding an index for these additional reasons:
- The index has become corrupt.
- You want to modify storage characteristics (such as changing the tablespace).
- An index that was previously marked as unusable now needs to be rebuilt to make it usable again.
Keep in mind that Oracle attempts to acquire a lock on the table and rebuild the index online. If there are any active transactions that haven’t committed, then Oracle won’t be able to obtain a lock, and the following error will be thrown:
ORA-00054: resource busy and acquire with NOWAIT specified or timeout expired
In this scenario, you can either wait until the there is little activity in the database or try setting the DDL_LOCK_TIMEOUT parameter:
SQL> alter session set ddl_lock_timeout=15;
The DDL_LOCK_TIMEOUT initialization parameter is available in Oracle Database 11g or higher. It instructs Oracle to repeatedly attempt to obtain a lock for the specified amount of time.
If no tablespace is specified, Oracle rebuilds the index in the tablespace in which the index currently exists. Specify a tablespace if you want the index rebuilt in a different tablespace:
SQL> alter index inv_idx1 rebuild tablespace inv_index;
![]() Tip If you’re working with a large index, you may want to consider using features such as NOLOGGING and/or PARALLEL (see Recipe 2-16 for details).
Tip If you’re working with a large index, you may want to consider using features such as NOLOGGING and/or PARALLEL (see Recipe 2-16 for details).
If you use the ALTER INDEX...SHRINK SPACE operation to free up unused index space, keep in mind that this feature requires that the target object must be created within a tablespace with automatic segment space management enabled. If you attempt to shrink a table or index that has been created in a tablespace using manual segment space management, you’ll receive this error:
ORA-10635: Invalid segment or tablespace type
The ALTER INDEX...SHRINK SPACE statement has a few nuances to be aware of. For example, you can instruct Oracle to attempt only to merge the contents of index blocks (and not free up space) via the COMPACT clause:
SQL> alter index f_regs_idx1 shrink space compact;
The prior operation is equivalent to the ALTER INDEX...COALESCE statement. Here’s an example of using COALESCE:
SQL> alter index f_regs_idx1 coalesce;
If you want to maximize the space compacted, either rebuild the index or use the SHRINK SPACE clause as shown in the “Solution” section of this recipe. It’s somewhat counterintuitive that the COMPACT space doesn’t actually initiate a greater degree of realized free space. The COMPACT clause instructs Oracle to only merge index blocks where possible and not to maximize the amount of space being freed up.