
Session
4
Give It Form:
3D Forms

In this session, makers will design and build three-dimensional (3D) sculptures out of paper or clay. In the process, they will learn about transforming two-dimensional (2D) shapes into 3D forms. As an extension, you can introduce 3D modeling using Pixologic’s Sculptris digital sculpting software.
Session Goals
In this session, makers will
- Collaboratively design and create 3D sculptures using images as visual prompts.
- Engage in digital sculpting using Sculptris and design a model for 3D printing.
- Learn about transforming two-dimensional shapes into three-dimensional forms.
✓ Getting Ready
In this session you can introduce 3D design in two different ways: by paper modeling and by digital sculpting.
Make your own 3D projects as examples to help spark interest.


Design for a 3D paper toy (Museo de los Niños, BogotÁ, Colombia)
Materials
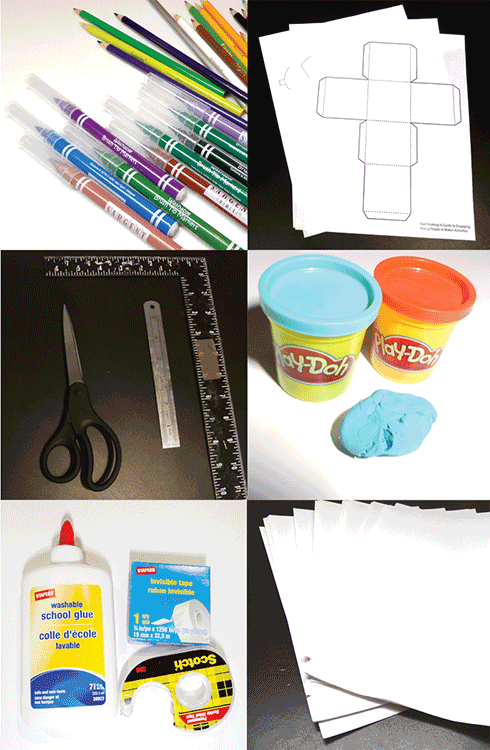
- Printouts of templates to make 3D forms:
- Cube: bit.ly/start-making-cube
- Pyramid: bit.ly/start-making-pyramid
- Cylinder: bit.ly/start-making-cylinder
- Paper (plain, cardstock, grid, or graph)
- Modeling clay, such as Play-Doh
- Glue, clear tape or double-sided tape
- Rulers
- Crayons, pencils, and markers
- Sculptris 3D modeling software; download from pixologic.com/sculptris/
Space and Tools Setup
- Lay out the basic materials for the session. You can also include other drawing tools and grid paper.
- Install Sculptris software on each computer. If you plan to introduce digital sculpting, you’ll need Sculptris software installed on each computer. If possible, arrange one computer for every two to three makers.
 Opening
We recommend beginning the session with two introductory activities to help makers start thinking about 2D shapes and 3D forms.

Character sketches (Flagship Clubhouse, Museum of Science, Boston, MA)
- Draw your own creature.
- Distribute scratch paper and ask makers to take five minutes to draw their own monster, animal, or cartoon character.
- Prompt makers to give the creature a name and to list three adjectives to describe it.
- Have makers introduce themselves and their creature to the group.
- Use 2D nets to make 3D forms.
In this starter activity, makers take a flat pattern (called a 2D net) and make a pyramid, a cube, or a cylinder.

Taping together a pyramid
- Ask the makers to get into groups of three. Give each group a template for a pyramid, a cube, and a cylinder (see Materials list).
- Allow time for makers to cut out and fold each 2D shape into a 3D form.
- Tape each of the 3D forms so that they hold together.
- Ask the makers to think about the three forms. For example, “What does the pyramid remind you of?” “Where have you seen pyramids?” “Can you spot an object that is a pyramid in this room?”

Cylinder, pyramid, and cube models made from their 2D net templates
- Then give the groups another short period of time (five minutes) to combine the three forms into a collaborative form, based on fun prompts such as “build the friendliest robot” or “form a spaceship.”
- Finally, give makers another short period of time to try to flatten the form back into a 2D net.
 Demoing
Share an example that shows how a 2D drawing can lead to a 3D sculpture.

Sharing examples (Flagship Clubhouse)

3D model based on 2D sketch
For example, you can show
- A drawing of a fantasy creature or other character
- A clay model of the character
- A digital 3D model of the character
- A 3D printed version of the character (optional)

Making a creature from clay (Flagship Clubhouse)
 Building a First Project
For the first project, you can make either a paper sculpture or a clay sculpture.

Printed images of animals
Paper Sculptures

Marking shapes on the image
Begin by having each maker choose what type of animal or character they would like to make. You can provide pictures of animals or creatures (such as a cat face or a fish). Give the makers the choice of using one of those characters or one of their own drawings.

Designing a 2D net to make a 3D form
Encourage them to identify and break down their image into basic shapes. For example, a cube or an octagon can be used for a head, a cylinder can be used for an arm, and pyramids can be used for ears or noses.
Ask the makers to design a 2D net based on their image.
The makers can later cut out, fold, and tape the 2D net to make a 3D form.

Making a 3D form of a cat face


3D form of a cat face made from an octagon and two pyramids
Clay Sculptures
If you are planning to engage the makers in digital sculpting, start by using modeling clay.
- In pairs, have the makers decide on a character that they would like to design out of clay. For example, they can make a hybrid animal, such as an “owl-bear,” a “zebra-duck,” or a “shark-elephant.”
- Pass out the modeling clay to the makers and encourage them to start sculpting their character.

A character sculpted from clay (Flagship Clubhouse)

Sculpting an animal from clay (Flagship Clubhouse)
- Encourage them to experiment with sculpting tools using clay.
- Ask the makers to identify basic forms in their clay model, such as cones, cylinders, pyramids, spheres, and cubes.

Beginning to sculpt (Flagship Clubhouse)
 Taking It Further
Now that the makers have experience designing 3D forms using physical materials, they are ready to explore the design of 3D models on computers.
Digital Sculpting
An inviting way to get started with 3D modeling is through digital sculpting—that is, forming a 3D shape by modeling it like clay.
Introduce Sculptris Software
Have all the makers gather near a computer screen and introduce Sculptris software. First, show an example project. Then, start a new, blank Sculptris file. Show how you can shape the virtual clay using different tools. Point out the key features (primary brush tools like “pull” and “pinch”). Pick up a clay form and show how surfaces change when you pinch and pull the clay.


Introducing Sculptris software (Flagship Clubhouse)
- Make Makers can look at their paper or clay models for inspiration. Ask them to think about the key shapes that make up the parts of their characters. They then can start making figures using the Sculptris tools to draw or shape features.
- View After makers have had some time to experiment, show them how to zoom in and toggle the wireframe on and off; point out all the triangles that fit together to make the features they just pulled and pinched. It’s geometry at work!

Digital sculpting with Sculptris (Flagship Clubhouse)
- Enhance Show makers how to manipulate the forms using other Sculptris tools, including selecting, moving, rotating, and scaling.
- 3D Print If you have access to a 3D printer, you can walk makers through the steps to convert their 3D models into printed form. If you do not have access to 3D printers, 3D printing services, such as Shapeways (shapeways.com), allow you to upload 3D files and get them printed.

3D prints from Sculptris designs (Flagship Clubhouse)
- Sculptris imports and exports
.OBJfiles. You’ll need to convert to other formats, such as.STLfiles, to output to a 3D printer. To convert your Sculptris file, use a plug-in or conversion software, such as Meshmixer (meshmixer.com), to make it compatible with the make and model of the 3D printer. Make sure everything is connected and the model has no holes in it. You can make multiple prints of your design in different sizes and using different printing materials.
Generating Ideas
Now that the makers have a basic understanding of how to create 3D forms, they can brainstorm other projects they can create.
To brainstorm ideas, ask makers the following questions:
- What are some things that you would like to change or add to the 3D sculpture you made?
- What is your next step? Sketch three ideas that you want to make using this process.
- Can you make your character friendly? Scary? How does the shape of the features communicate personality traits like this?
 Open Make

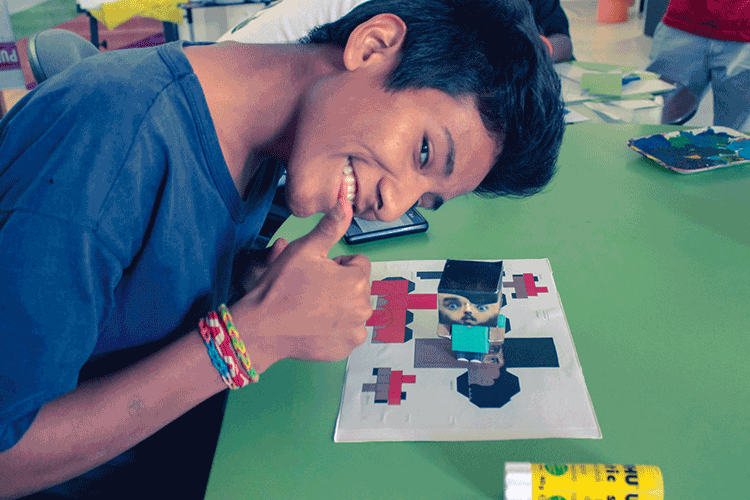
Sketching an avatar for Minecraft (Thunderbirds Branch Boys & Girls Club, Guadalupe, AZ)
Here are some ideas to explore for 3D design during Open Make time:
- Design a character or avatar for a game.
- Create a self-portrait.
- Design your own origami or paper toys.

Designing a self-portrait to build into a 3D sculpture (Puerta 18 Clubhouse, Buenos Aires, Argentina)

Cutting out designs for 3D sculptures (Puerta 18 Clubhouse)
Story from the Clubhouse Network: Sculpting Jack-o’-lanterns

A 3D model of a jack-o'-lantern designed in Sculptris (GOLD CROWN CLUBHOUSE, DENVER, CO)
Inspired by the approach of Halloween, the Gold Crown Clubhouse in Denver, CO, decided to use 3D-modeling tools to design jack-o’-lanterns. Clubhouse facilitator Victor Escobedo created a simple pumpkin template in Sculptris. The young people in the Clubhouse used the Sculptris digital sculpting tools to remix the file and make their own jack-o’-lantern designs. They then were able to 3D-print their projects. They were so thrilled by the results that they were motivated to make more 3D designs based on other holidays and personal interests.
 Sharing and Reflecting
Encourage makers to take time to reflect on the process of creating 3D projects from 2D paper.
 Documenting and Displaying
Make a slideshow of the 2D shapes and 3D models, including photos or screenshots of the creations.
Create a stage for exhibiting the projects. You can also encourage makers to light up their 3D creations.

Screenshot of a 3D model in progress made using Sculptris
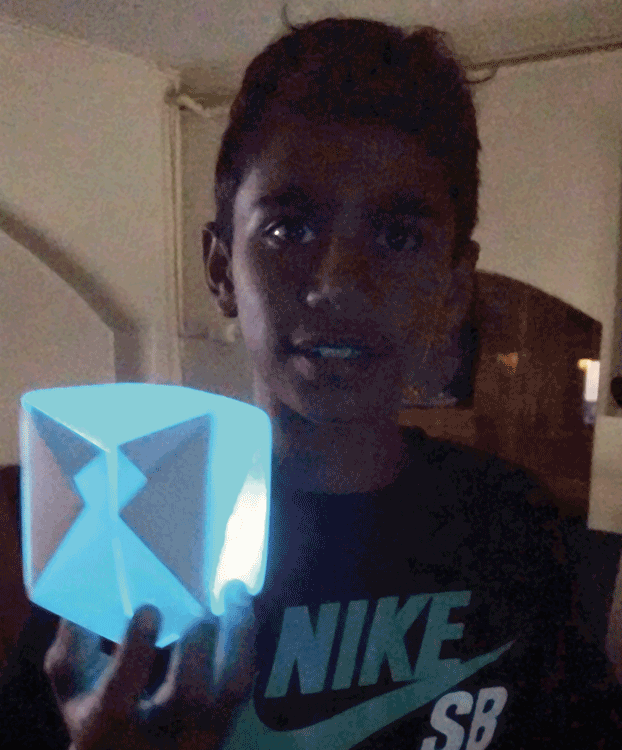
Lighting a 3D cube (Youth Connections Clubhouse, Lismore, Australia)
Additional Resources
- Scultpris features: pixologic.com/sculptris/features/
- Shapeways 3D printing services: shapeways.com
- Designing paper toys: bit.ly/papertoydesign
