Session
6
Sew the Circuits:
E-Textiles

Makers will create a bracelet or bookmark with programmed light effects. In the process, they will learn how to sew circuits with sewable LED lights, conductive thread, and the LilyTiny microcontroller, which can turn the LED lights on and off in surprising and interesting ways.
Session Goals
In this session, makers will
- Make an electronic circuit with interesting light effects using sewable LED lights and a preprogrammed board called a LilyTiny.
- Design a light-up project such as a bracelet or a bookmark.
- Explore what they can create by combining sewing and electronics, as an introduction to a new area known as soft circuits or e-textiles.

✓ Getting Ready
You and your makers are about to explore e-textiles, which can inspire makers to learn both sewing and electronic skills. The projects make use of new materials, such as conductive thread and the LilyTiny board, which is designed for sewing patterns of lights onto fabrics.
To prepare for the session, gather the materials. Then, try making a bracelet and a bookmark yourself to share as examples.

Display of craft and electronic materials put together by facilitators before the session
Materials

- Felt
- Needles
- Conductive thread
- Regular thread
- LilyPad sewable LEDs
- LilyTiny
- LilyPad sewable battery holder
- Coin batteries, 3V (such as the CR2032)
- Alligator clips (optional)
To find out how to order LilyPad parts, see lilypadarduino.org or order directly from sparkfun.com/products/10899.
Space and Tools Setup
You can organize and display all the materials, putting together the familiar craft supplies alongside the new electronic materials.
Be ready to show makers how to thread a needle and sew a backstitch. You can set up sewing demos or sewing stations to help makers who don’t have previous experience sewing by hand.
 Opening
As makers arrive, you can invite them to walk around and touch the different objects that they are going to explore in the session. Ask them to make mental notes of what is surprising or interesting to them.
If your group does not have much previous experience with sewing, start with a short sewing activity or “sewing circle.” Show how to do a basic stitch using regular thread before you introduce the conductive thread. Conductive thread is expensive and can be a bit difficult to work with for first-timers.

Start Making! facilitator demonstrating how to sew (CEDES Clubhouse in Alajuelita, San José, Costa Rica)

Sewing a backstitch
For sewing electrical connections with conductive thread, the backstitch works the best. This stitch takes time, but it makes a solid connection. You can find many tutorials for how to do a backstitch online or in any introductory sewing book. Check the “Additional Resources” section later in this chapter for a recommended backstitch video tutorial.
 Demoing

Facilitators explaining how to sew circuits (Compadre Boys & Girls Club Clubhouse, Chandler, AZ)
Show an example of a LilyTiny project that you designed. Share your design process with the makers and highlight the parts they will be using for their bracelets or bookmarks.
LilyTiny boards are already programmed. Introduce the different patterns of the LED lights attached to the LilyTiny boards. Makers will remix these light patterns in their own projects.
Soft circuits project example
 Building a First Project

Sewing electronic bookmarks and bracelets (SWICN Clubhouse, Dublin, Ireland)
You can use the following steps for making the soft circuits to help guide the makers. This activity is inspired by a project described in more detail in the book Sew Electric by Leah Buechley, Kanjun Qiu, and Sonja de Boer (2013). You can find more information at sewelectric.org.
- Cut the fabric.
Cut rectangles of felt, roughly 3×8 inches (or about 8×20 centimeters). If you want to make a bracelet, trim the length down to your wrist size with about an inch of overlap. Use snaps to create a bracelet. Otherwise, you can leave your rectangle flat if you want to make a bookmark.

- Sketch a project design.
Make a sketch of your design for the bracelet/bookmark. You can decide how many LEDs you want to use for your design and mark the positions of the LEDs in your drawing.

Sketch of a light-up bracelet with LEDs placed on top to plan which parts will light up
- Choose the light pattern.
As mentioned earlier, LilyTiny has four pins with different patterns programmed into each one. Pin 0 makes an LED fade in and out, pin 1 makes the LED light up in a heartbeat pattern, and pins 2 and 3 make the light steadily blink and twinkle, respectively.
Choose the LED pattern that you want to add to your bracelet/bookmark. You can have all the LEDs light up in the same style by connecting them all to one pin, or you can attach each light to a different pin for multiple light patterns.

Circuit layout showing connections between battery holder and LilyTiny
- Mark the position of the battery holder and LilyTiny in your design drawing.
In your drawing, mark the positions of the battery holder and the LilyTiny microcontroller. Sketch the connections between the battery negative (–) terminal and the LilyTiny negative (–) terminal. You can use different color pens to distinguish the connections to the positive and negative terminals.

Sketch of a light-up project, with the battery holder and LilyTiny placed on top of the drawing
- Draw the circuit connections on top of the project design drawing.
Now, draw the connections between the positive (+) sides of your LEDs and the LilyTiny pins. The following diagram shows connections from pins 1 and 2 to the LEDs.
Connect the negative (–) sides of both the LEDs to the negative (–) pin of the LilyTiny board or the negative (–) side of the battery, as shown in the figure.


- Sew the circuit.
Once you have marked the electrical connections on the bracelet/bookmark design, cut out your smaller elements. Then place the components on the fabric and start sewing.
To make it a little easier, you can glue the battery holder, LilyTiny board, and LEDs to the fabric before sewing with the conductive thread. Just make sure that there is no glue on the metal coating.
Stitch your circuit with the conductive thread. Attach the battery to the LilyTiny first, and then make the connections to the LEDs.

Sewing the circuit
- Test the circuit.
Add a 3V battery. Then turn on the switch on the LilyTiny board.

Circuit sewn on felt
- Embellish your project.
Refer to your initial drawing and complete your bookmark or bracelet design with craft materials. You might also want to try some appliqué embroidery. Felt fabric diffuses the light very well. You might also use pom-pom balls and googly eyes to decorate.

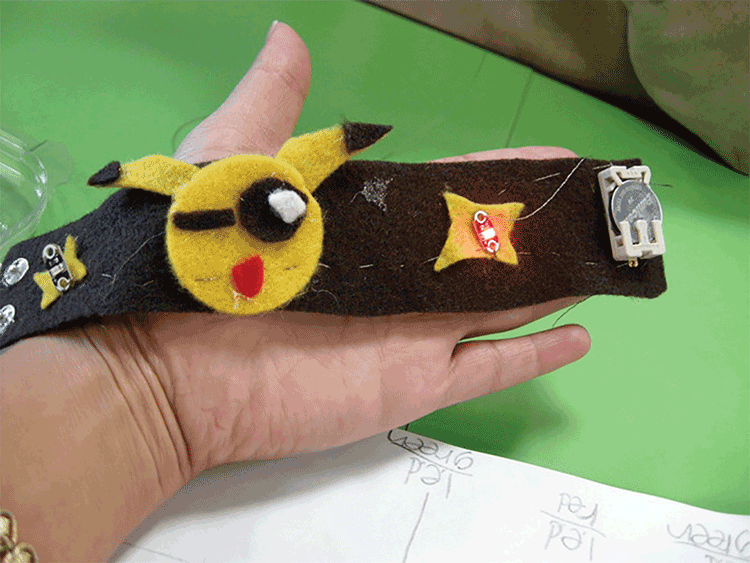
A blinking light-up bracelet
Story from the Clubhouse Network: High-Tech + Low Tech
Sewing might not be the first technical skill you associate with a STEM or engineering activity, but there are many reasons why it should be! Part of the fun of Maker culture is that it embraces design and crafting as much as science and engineering skills. This is especially true of projects that incorporate low-tech materials such as thread, cloth, and sequins combined with high-tech wearable components such as conductive thread, programmable microcontrollers, and LEDs.

Rodrigo Castellon sewing electrical circuits (Gila River Boys & Girls Club, Sacaton, AZ)
In the Start Making! program, we embrace both of these aspects, especially when they present an opportunity to engage youth and adults who may be reluctant to participate in a technology-based program. When facilitated well, sewn-circuit activities disrupt stereotypes based on gender, age, and expertise. The activity can motivate anyone interested in crafting, art, or fashion to become excited about materials science and coding.
Clubhouse Coordinator Rodrigo Castellon at the Gila River Boys & Girls Club in Sacaton, AZ, expressed his newfound interest in sewing by designing his own tie as a soft circuit project. The youth in his Start Making! program were inspired by his enthusiasm and ingenuity, and many also made light-up wearables as a result!
 Taking It Further
You can encourage the makers to try using all the pins on the LilyTiny in the next iteration of their soft circuit projects.
Generating Ideas

A facilitator and a young maker discussing ideas while sewing together (Flagship Clubhouse, Museum of Science, Boston, MA)
Encourage the makers to share their ideas for projects using LilyTiny boards.
To brainstorm ideas, ask makers the following questions:
- What would you change in your design if you were to make something like this again?
- Brainstorm ideas for designing more light behaviors or patterns.
- What would you do if you got a chance to change the pattern of lights?
 Open Make
Explore these ideas in the Open Make time.
- Express something personal. Make an e-textile project that shares something special about you. It could present your hobbies, things that you like, or the place where you come from.

E-textile projects made using LilyTiny boards, each project representing something special about the creator (Clubhouse Network Teen Summit, Boston, MA)

- Remix this circuit. Brainstorm ways to create a collaborative project combining two or more LilyTiny boards.

Project prototype with two LilyTiny boards powered by a single 3V battery
- Make a 3D soft circuit. Make your own stuffed toy and add lights to your creation using conductive thread.

Stuffed toys with lights (JORDAN BOYS & GIRLS CLUB CLUBHOUSE, CHELSEA, MA [LEFT]; CLUBHOUSE ANNUAL CONFERENCE, DENVER, CO [RIGHT])

 Sharing and Reflecting
Share everyone’s projects with the group. Encourage the makers to write their session reflections in their journals.
 Documenting and Displaying
Encourage your makers to share the design process behind their soft circuit projects. Ask them to create a display board for their project with their bracelet/bookmark drawings and circuit sketches. If possible, include some photos of your makers wearing their bracelets or with their light-up bookmarks inside a book. Encourage them to make notes on their display board to capture their moments of joy and frustration while working on this project and the ideas they have for taking it further.
All the annotated display boards can be posted on a wall or table.
Makers can also use media tools like photo slideshows or videos.

Soft circuit bookmarks and bracelets (SORENSON UNITY CENTER CLUBHOUSE, SALT LAKE CITY, UT)
Makers at the Sorenson Unity Center Clubhouse in Salt Lake City, UT, documented their process of creating soft circuit projects, including photos. They also shared reflections about their experiences:
“It was hard because I was running out of thread. It was fun because I learned and had new experiences. I would like to light up a car.”
“I liked sewing my project. It was fun. I would like to make a star that lights up.”
“I liked the project. I would like to make a haunted house.”
“I did not like it because I don’t like sewing. I would like to do a car with a solar panel.”
“It’s beautiful art. I would like to make a video game controller.”
“The part that I thought was hard was the conducting wire—making sure that it wasn’t touching the other and things like that—but it was fun because later the work would be all cool and creative.”
Shared by Janette Nelson, Clubhouse Coordinator, Sorensen Unity Center
Additional Resources
- Sew Electric: sewelectric.org
- LilyTiny: lilypadarduino.org/?p=523
- Mary Corbet’s Needle ’n Thread channel about the backstitch: http://bit.ly/backstitch-demo-tutorial