![]()
Material Considerations
This book focuses on 3D printers that feed filament into an extruder, which melts the filament and lays it down a layer at a time. Filament is a thick thread made of a variety of materials such as plastics, nylon, and elastomers, typically in one-kilogram (plastic) or one-pound (nylon) spools. Figure 7-1 shows a one-pound nylon spool and a one-kilogram spool of polylactic acid (PLA) plastic.
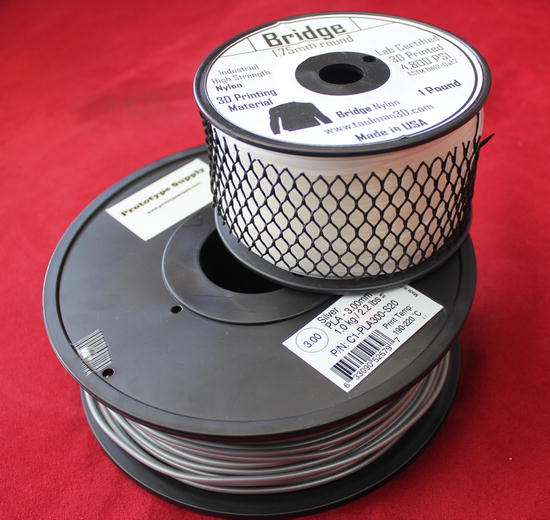
Figure 7-1. Typical spools of nylon (top) and PLA (bottom) filament
This chapter covers the materials that a consumer filament-using printer can use, with a focus on non-proprietary filament. (Some printers use proprietary cartridges for their filament to manage some of the issues discussed in this chapter. These cartridges are typically far more expensive, however, than generic spooled filament.) This chapter covers the types of materials available now, which applications are particularly suited for which materials, and things to think about when printing in one material versus the other.
An open source community effort is underway to develop a sticker for filament spools that would encode some of the printer settings. A system called the Uniform Filament Identification system (UFID) is under discussion in the user community to create a standard for these stickers.If this effort is successful (and if manufacturers accurately provide the information), a user may not need to be concerned about adjusting printer settings based on the material used because this information may be picked up by printers automatically. Until filament manufacturers implement such standards, though, users need to deduce and input various settings describing the filament diameter and the appropriate extruder and build platform temperatures.
Some filaments require a slower print speed than normal or special cooling settings to ensure that one layer cools before the next one is laid down. The settings suggestions in this chapter are typical; you may need to make adjustments based on experience with a particular filament/printer combination.
![]() Caution Build a small test object to try out settings for a new brand of filament before embarking on a many-hour big print.
Caution Build a small test object to try out settings for a new brand of filament before embarking on a many-hour big print.
Filament Quality Control
3D printers initially used filament that had been intended for welding plastic tanks. The filament diameter did not need to be very precise for that application, and so in the early days of filament-based 3D printers, the quality control on filament diameter was often inadequate. As the 3D printer filament market has grown, quality control is improving, but there are still occasional inconsistencies.
Common filament diameters are 3 mm and 1.75 mm. However, these are nominal diameters, and the actual diameter may vary. Many experts own a pair of calipers to measure the actual diameter for each manufacturer and check the filament diameter first if the printer seems to be laying down too much plastic or not extruding at all. If the diameter is bigger than the extruder is designed for, the printer may jam or stop extruding. To check the diameter of filament, use a pair of calipers, as shown in Figure 7-2. In fact, it is a good idea generally to have a pair of calipers available to check print results and compare prints to actual desired values.
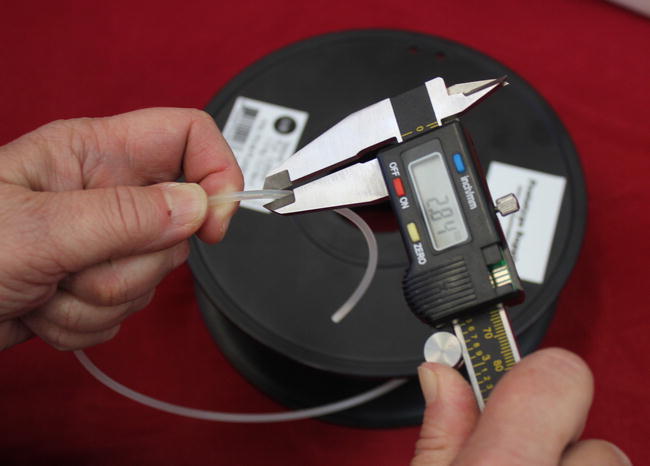
Figure 7-2. Checking filament diameter with a pair of calipers
If the diameter is too small, the print quality may be degraded. Commonly “3mm” filament may actually measure around 2.87 mm or so. It is a bigger problem for filament to be too big than too small, so manufacturers aim for a nominal diameter in the 2.85 to 2.9 mm range, with 3 mm being an absolute maximum.
![]() Tip After you check the actual diameter of your filament, adjust the “filament diameter” or equivalent setting in your slicing program accordingly. You may want to save one slicing-software setting per manufacturer. Sometimes different color filament from the same manufacturer or different batches from the same manufacturer can vary.
Tip After you check the actual diameter of your filament, adjust the “filament diameter” or equivalent setting in your slicing program accordingly. You may want to save one slicing-software setting per manufacturer. Sometimes different color filament from the same manufacturer or different batches from the same manufacturer can vary.
Poor quality filament may have air bubbles, which will result in erratic print quality. Worse, contaminant particles can block the extruder nozzle. If a printer suddenly starts having problems extruding, an erratic filament diameter or filament contaminants should be early suspects. Be sure to use 3D printer filament, and not something that looks like it but was not intended for the purpose.
Can you start with raw plastic and make (or recycle) your own filament? Unfortunately, this is not as easy as it seems, largely because of the need for precision already noted. There is also always a risk that a raw plastic may have unexpected additives.
There have been some entrepreneurial efforts to create desktop machines that make filament from raw material, but they are still at a pretty early stage. Track developments on crowdfunding sites like Kickstarter (www.kickstarter.com) if you want to pick up an experimental machine when they stabilize enough for your taste.
Selecting and Using a Filament
Selecting material for a project requires trading off many different factors based on the use of the object, available materials, and cost. Some 3D printers are only able to print in one material and then the issue becomes whether it is possible to use that material for the intended purpose.
If your printer gives you some options, however, there are some significant differences in material properties among the common materials used by consumer-grade printers. Most 3D printing materials are classed as thermoplastics (polymers that soften as they melt and then harden again when cooled) or thermoplastic elastomers (TPEs), which are a combination of a plastic and a rubber.
Common 3D printing thermoplastics include polylactic acid (PLA), acrylonitrile butadiene styrene (ABS), and nylon. Depending on the characteristics of the extruder, printers may also be able to handle polyethylene terephthalate (PET) and polycarbonate.
There are also more exotic materials and mixtures for interesting esthetic effects. More types of filament are coming up all the time. This chapter does not presume to be an exhaustive list, but rather an attempt to sample some typical and up-and-coming options.
Looking at the manufacturer’s specifications for any given filament is a good idea. Numbers given in this chapter are typical numbers. Some extruder nozzles, however, may have an upper temperature limit below that needed for some of the materials mentioned here.
![]() Caution Open source slicing software does not check to see whether a user is exceeding the upper limits of any given printer model. Printer firmware may or may not catch attempts to exceed limits. Be sure to check the manufacturer’s specifications before setting up for any particular extruder and bed temperature.
Caution Open source slicing software does not check to see whether a user is exceeding the upper limits of any given printer model. Printer firmware may or may not catch attempts to exceed limits. Be sure to check the manufacturer’s specifications before setting up for any particular extruder and bed temperature.
The following sections lay out some of the key considerations when choosing a material to make your object and when printing in that material. First you will need to think about whether the material is strong enough at all, and how to orient the print to take advantage of the fact that a 3D-printed part will be stronger along a layer than across layer boundaries. Next, we will talk about issues that arise when printing in different materials—whether a heated bed is required, whether drafts are a problem, and whether you might need to print more slowly with some materials.
Directional Strength
How strong is something made on a 3D printer? The answer depends on the filament material, but also on the details of the print. Prints are weakest in the z direction (because the layers can pull apart), so the orientation of a print on the print bed also has implications for strength of the printed object. Design of an object should take into account the following:
- The inherent strength of the material
- Whether the object’s operating environment will get hot
- Whether the object’s operating environment will contain any chemicals that affect the material
- The direction in which the object will need to be strongest
- Support structure needed in various build orientations
- Thickness of the outer shell of the model
- Infill pattern and density
- Any connections with other (non-3D-printed) parts
- Brittleness— the ease with which a part (particularly a small part, or support) will break off
- Tolerances and clearances
It is tempting to create a 3 mm hole in a part and print a peg that is exactly 3mm in diameter to fit in that hole if you are looking at an idealized computer model of your peg and your hole. This will not work in the real world, though (as opposed to computer-screen world) because small clearances are needed for one part to actually go through another. For a consumer-level printer, a clearance of half a millimeter or so is probably about the smallest practical space required between parts.
As discussed in Chapter 5, many settings in slicing software specify the external and internal structure of a part. Chapter 8 discusses some typical case studies to make it more concrete how these factors interact.
The Right Print Bed
Prints need to stick solidly to the build platform so that they do not shift or fall off while the piece is printing. On the other hand, the platform or the print may be damaged if the print is stuck down too firmly.
For many materials (like ABS and polycarbonate), the platform has to be kept warm so that the print sticks to it. Some 3D printers have heated platforms; ones that do not probably cannot print in these materials. Materials that need a heated bed will warp while printing if the bed is not adequately heated. As the lower layers cool, they will shrink and pull up from the bed at the corners. The hot layers on top will be a bit bigger, and as they cool the part will warp more and more as the upper layers also contract.
Beyond heating, the surface of the platform needs to be a material that is compatible with the print material. At the moment figuring out what sticks to what is fairly empirical. Blue painter’s tape (3M seems to work best) and high-temperature Kapton tape (transparent gold-colored tape) are common printer bed materials. Glass, often with glue or some other adhesive coating, is becoming a more popular printing surface. Follow your manufacturer’s directions, but generally the following rules of thumb hold:
- PLA will stick well to blue painter’s tape. Typically, we think of this tape as something that pulls off a wall easily, but interestingly the 3M tape in particular seems to be just the right surface for PLA to stick to sturdily. Blue tape is available in wide rolls that can cover a smaller print bed in one shot, which avoids tape edge lines in the first layer of the print.
- PLA does not need a heated bed if the print bed is covered with blue tape. However, if the bed is covered with something else (for example, Kapton tape), the bed needs to be heated to a low temperature to make the model stick.
- If you have a heated bed covered with Kapton tape and you decide to try blue tape on top to print PLA with the bed cold, be sure the bed is cold and put on the blue tape at right angles to the Kapton so that it does not tear off the Kapton when you remove it. Blue tape also tends not to stick to Kapton tape as well as it does to bare glass, and the PLA parts warp enough to pull up the tape.
- Nylon does not like to stick to many materials. Garolite (sometimes called phenolic or Bakelite) is a good material for print beds used for nylon. Some printer manufacturers sell a Garolite platform that can be switched out instead of (or on top of) a heated platform.
- Other materials (like ABS) do well on a heated bed covered in high-temperature tape (like Kapton tape). Some printers come with glue sticks or other materials to enhance printed part adhesion. Experiment a bit to see what works for your printer and the parts you are printing.
Ventilation and Drafts
There are few standards for materials for 3D printing just yet, so it’s generally a good idea to ventilate the area around your 3D printer. Some materials (like ABS) smell fairly strongly, so think about who and what else is nearby when using the printer.
However, direct airflow on a printer when it is printing can be either a positive or negative thing (PLA often does better when cooled with a small fan, but ABS needs to be kept warm). It is usually best to ventilate by pulling air away from a printer rather than blowing air onto it. Generally airflow onto a print should be carefully directed and controlled with a fan, and you should avoid printing in the presence of erratic or unpredictable drafts.
Figure 7-3 shows a PLA fan on a printer cooling a print. The PLA fan is the small round object held on with two cable ties.

Figure 7-3. A PLA fan cooling an object
Storing and Handling Filament
Most filament is hygroscopic (absorbs water from the air), which can affect its properties and the quality of a print. Keep spools of filament dry and avoid extreme temperatures. If you buy a spool of filament and are not going to use it for a while, keep it in the original sealed package until you are ready to use it under environmentally stable conditions. It’s probably unwise to store it in a damp garage that gets very hot in summer, for example.
![]() Tip Before you begin a print, be sure filament loops do not cross over or under each other on the roll. Try to loosen the filament a little so it is not overly tight, particularly if you are starting a print near the end of a roll. If the filament knots in place even briefly, it can pull on the extruder and affect print quality (or stop the print). A plastic lazy susan (from a kitchen supply store) works well if it is the right diameter to carry the filament roll. See Figure 7-4 for the wrong way!
Tip Before you begin a print, be sure filament loops do not cross over or under each other on the roll. Try to loosen the filament a little so it is not overly tight, particularly if you are starting a print near the end of a roll. If the filament knots in place even briefly, it can pull on the extruder and affect print quality (or stop the print). A plastic lazy susan (from a kitchen supply store) works well if it is the right diameter to carry the filament roll. See Figure 7-4 for the wrong way!
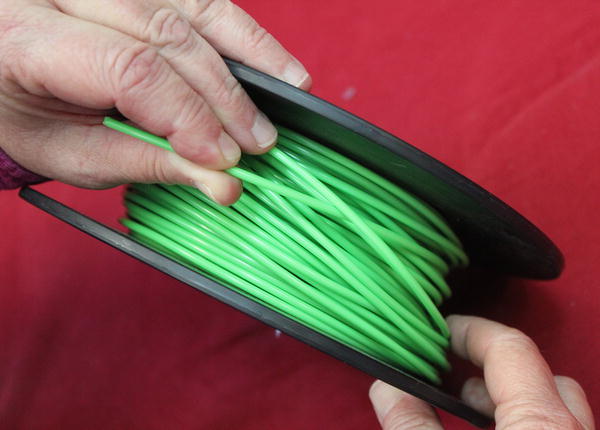
Figure 7-4. The wrong way to lay out filament at the start of the print (crossing a loop under another)
Temperature and Speed Settings
When you print in a particular material, there are three major settings to worry about: temperature of the extruder (otherwise known as “print temperature”), temperature of the heated bed (or absence of a heated bed), and the speed of printing. Table 7-1 lists some typical values for materials that are discussed later in this chapter. Chapter 5 covers printer settings in more detail along with the effects of the geometry of the object being printed, but this table will give you a sense of the relative difficulty of printing with some of these materials. These are only examples, though, and different formulations and printers may perform best with significantly different settings.
Table 7-1. Filament Characteristics

Will My Filament Spool Run Out During My Print?
Filament is fairly expensive, so you want to use every bit on the spool if you can. However, you also do not want to run out during a print. Slic3r and Cura (described in Chapter 5) both give an estimate of the length of filament that will be used in the print. When you get near the end of a roll, pull some out, measure it, and note roughly what fraction of the remaining filament remains after subtracting that part. That will let you estimate whether your print will work or not.
For example, if you pull out a meter and it’s about a quarter of what is left on the spool, you have four meters of filament left. If your print says it will take 3,900 mm (3.9 meters), you might not want to risk it.
Filament Materials
The following sections describe a few of the common materials in a bit more depth. PLA, ABS, and nylon are currently the most frequently encountered filaments, but we will talk about a few of the more exotic ones, too.
Polylactic Acid (PLA)
PLA is one of the more common materials for 3D printing. It is typically made from corn or similar renewable materials and is biodegradable. It can be extruded at a relatively low temperature (around 210 C) which means it is less challenging to make an extruder print PLA versus other materials. Printing PLA does not require a heated bed. The downside is that it becomes soft at hot-car-dashboard temperatures, so a little thought needs to go into when it is and is not a good idea to print something in PLA.
That said, PLA is a very versatile material that is generally fairly forgiving to print. Many printers have a small fan to cool PLA as it prints to improve print quality. It can be difficult to get support off cleanly with PLA prints (see the discussion in Chapter 5) because the material is still fairly ductile when cold and so does not snap off cleanly. Slicing algorithms in this regard are steadily improving, though.
PLA comes in many colors and opacities, and even in a version that changes color from white to bright purple when exposed to UV light (like sunlight).
PLA also works well in the ancient lost wax technique for making metal and glass objects, which is discussed at length in Chapter 9.
![]() Caution Because PLA becomes soft at a relatively low temperature, it is unwise to use PLA for any application where the printed part might get warm. For example, it’s not a great idea to print critical parts of a RepRap printer (described at length throughout Chapters 1 and 2) in PLA and then put the printer in an un-air-conditioned room during a heat wave. (Yes, it has happened; the result was referred to afterwards as the “Dali printer” for its innovative geometry.)
Caution Because PLA becomes soft at a relatively low temperature, it is unwise to use PLA for any application where the printed part might get warm. For example, it’s not a great idea to print critical parts of a RepRap printer (described at length throughout Chapters 1 and 2) in PLA and then put the printer in an un-air-conditioned room during a heat wave. (Yes, it has happened; the result was referred to afterwards as the “Dali printer” for its innovative geometry.)
There are some exotic proprietary material blends that will print with settings like those for PLA. These are thermoplastics infused with other materials to give interesting printed material properties. Laywoo-3d is a thermoplastic infused with finely ground wood. Varying the temperature a little during printing will give the print a wood-grained appearance. Thin-walled prints in Laywoo-3d can be a little fragile.
Similarly, Laybrick is a thermoplastic infused with milled chalk to look like stone when printed.
Acrylonitrile Butadiene Styrene (ABS)
ABS is another common consumer printer filament material. You may know it best as the plastic used to make many toys (including Lego pieces). It is a hard and durable plastic and stays strong at higher temperatures than PLA does. However, it does tend to warp when cooling and is challenging to print without a heated bed.
ABS is also a good choice for parts that need a lot of support because support typically will snap off more cleanly in ABS than in other common materials.
Nylon
Nylon is a versatile material because thin nylon structures are flexible but thicker ones are fairly stiff and strong. Nylon is often a good choice for functional parts, but you need to be careful to think through the directions of the layers and where the part is weakest. Nylon 618 and nylon 645 are two available formulations (the numbers refer to the molecular structure of the particular formulation).
With nylon, it is particularly important to be certain that you are getting 3D printer filament. Other products out there (like weed-whacker filament) may appear similar but may contain nozzle-clogging impurities or materials that give off toxic volatiles when heated. Nylon filament is particularly prone to absorbing moisture from the air. Keep nylon filament dry. When you start to print nylon, small puffs of steam come from the extruder that can be startling if you do not expect it.
Nylon typically comes in white filament, but pieces printed in nylon can be dyed with dye appropriate for nylon fabrics. Designer Michael Schmidt and architect Francis Bitonti created an articulated 3D printed dress in nylon for entertainer Dita von Teese in one of the more extreme examples of 3D printing in the fashion industry. Although this was not printed on a consumer printer (it consumed a large amount of printing capacity at the Shapeways service bureau when it was created), it shows what is possible. You can see the dress, dyed black, lacquered and with thousands of added Swarovski crystals, at Michael Schmidt’s website (www.michaelschmidtstudios.com.) The dress was made with a powder-based printer, but you can imagine the possibilities for 3D-printed nylon fashions.
Nylon requires a high-temperature nozzle and special unheated platform surface (for example, Garolite) and so may be beyond the capability of your printer.
![]() Caution Be sure the filament you buy is intended for use in 3D printers. Do not go on appearances alone. The chemistry and material composition of the filament is important both for print quality and your safety during printing (review the safety and ventilation section in Chapter 2).
Caution Be sure the filament you buy is intended for use in 3D printers. Do not go on appearances alone. The chemistry and material composition of the filament is important both for print quality and your safety during printing (review the safety and ventilation section in Chapter 2).
T-glase (PET)
PET is a clear plastic that is commonly used in water bottles. It is sold in 3D printer form under the brand name t-glase. It is a plastic that is approved by the U.S. Food and Drug Administration for direct contact with food. As of this writing, Taulman (the makers of t-glase) has said on its website that the company was awaiting direction on the rules for declaring a part printed with t-glase to be food-safe.
Additionally, PET is a very transparent material. A 3D-printed part will not be perfectly clear in all directions because of the layer lines, but will be translucent, particularly in thin-walled objects. It has a relatively low melting point and thus should not be used for parts that will be in hot environments.
Polycarbonate
Polycarbonate is a very strong material but is still somewhat experimental for consumer 3D printing use. It can be challenging to print because it is difficult to get to stick to the build platform. But if you are at the more industrial end of the printing spectrum, polycarbonate is a developmental material to watch for the future. Be sure to read the filament manufacturer’s documentation and consider your printer’s limitations carefully.
Thermoplastic Elastomers (TPEs)
Elastomers are combinations of a thermoplastic and a rubber. Prints made with a TPE (such as NinjaFlex) are strong and flexible. However, the print has to be created very slowly to avoid overstretching the filament during printing. This is more challenging with 1.75 mm filament than 3 mm because the thinner filament tends to flex and be difficult to manage. Bowden extruders can exacerbate this problem because the filament may flex too much between the drive gear and the nozzle.
Once these challenges are overcome, however, the unique qualities of TPEs will probably enable a lot of new applications of 3D printing. Thin TPE prints can be crumpled in your hand like a thin rubber mat, and thicker-walled prints are like shoe soles—tough yet flexible.
Research Filaments
Researchers are using consumer-level 3D printers to fabricate many different exotic materials. A group at the University of Warwick in England and their collaborators created a material they dubbed “carbomorph” out of a mix of polycaprolactone and a carbon black filler to make a mildly electrically conductive filament. They used the filament to print simple piezoresistive sensors that could detect flexing of a surface.
These conductive filaments can be embedded in other printed objects (by using a printer with two or more heads, as described later in this chapter) or attached to other surfaces. The details of the work can be found in the open access journal PLOS ONE (www.plosone.org.)
![]() Tip The PLOS ONE open-access journal (PLOS stands for Public Library of Science) is generally a good source for freely available peer-reviewed reporting on uses of 3D printing. The full citation of the conductive filament work is: Leigh SJ, Bradley RJ, Purssell CP, Billson DR, Hutchins DA, “A Simple, Low-Cost Conductive Composite Material for 3D Printing of Electronic Sensors,” PLOS ONE (November 21,2012); 7(11): e49365. doi:10.1371/journal.pone.0049365. ( www.plosone.org/article/info%3Adoi%2F10.1371%2Fjournal.pone.0049365 )
Tip The PLOS ONE open-access journal (PLOS stands for Public Library of Science) is generally a good source for freely available peer-reviewed reporting on uses of 3D printing. The full citation of the conductive filament work is: Leigh SJ, Bradley RJ, Purssell CP, Billson DR, Hutchins DA, “A Simple, Low-Cost Conductive Composite Material for 3D Printing of Electronic Sensors,” PLOS ONE (November 21,2012); 7(11): e49365. doi:10.1371/journal.pone.0049365. ( www.plosone.org/article/info%3Adoi%2F10.1371%2Fjournal.pone.0049365 )
Multiple Extruders
The choice of materials gets more complicated with printers that have more than one extruder and that can thus print in more than one color or more than one material at a time. If you are using, say, two colors of PLA, probably there will not be any problems other than creating the two-color model in the first place. See the dual extruders case study in Chapter 8 for examples of the process for developing two-color or two-material models.
Printing Dissolvable Support
Filament-based printers need to support objects that have overhangs. One way to make the process of removing filament less difficult both on you and on the object you have printed is to use dissolvable support.
As the name implies, dissolvable support involves printing support in a different material than the primary object, preferably one that has different chemical properties than the primary object’s material. HIPS (high-impact polystyrene) is one common support material; it dissolves in the solvent d-Limonene. HIPS will print adequately with the same settings as ABS, so one good way to print something that needs a lot of hard-to-get-at support is to print the part on a dual-extruder machine with one extruder printing the main part in ABS and the other printing support in HIPS. Then the support can be dissolved away.
If HIPS is not available, just printing support in a different color of the same material used in the primary part can make small bits of support easier to identify and remove, although as already noted this can also make any mistakes more visible.
![]() Tip In general, it is easier to remove support from an all-ABS print than an all-PLA print.
Tip In general, it is easier to remove support from an all-ABS print than an all-PLA print.
Dual-Extruder Printing with Two Different Materials
Printing in two different materials at the same time can be tricky because you may be printing materials in close proximity that individually would be printed with different platform and extruder temperatures, which may mean that one or the other will not be optimal. Here are some considerations to bear in mind if you embark on a two-material print:
- Which material will (primarily) be present in the first few layers? The bed temperature or platform surface material should generally be set to favor the material that primarily will directly interface with the platform. A raft of one material or the other can solve this problem.
- Are the materials extruded at very different temperatures? If so, you might have to experiment with printer speed to give layers more time to cool before another layer is placed on top.
- Some experts feel that it works better to have each extruder set for a slightly (5 to 10 degrees C) lower temperature than would otherwise be nominal with a single extruder printing that material. The two heads put a lot of heat into the piece, and adjusting temperature downward seems to result in better prints. Others feel that this is a bad idea because inter-layer adhesion can be compromised by giving you a lower bonding temperature in a print that already has more layer cooling time than normal. There are exotic ways to manage this, but at the expense of very time-consuming prints.
- Consider whether the part will be stressed in any particular direction and be cautious about where you place material-to-material interfaces that might be weak spots.
- Think about where the “bottom” of the object should go to minimize support.
- You will need to pick one of the materials to be support (if you are not having one material used exclusively for support). Think about which material will be the easiest to snap off if you use it for support.
- Are the materials likely to stick well to each other? If not, the design of the object may need to take account of that—by having one material run through the other, for example, as shown in Figure 7-5. This piece was made from ABS and nylon. The nylon is embedded in each block of ABS, and only ABS touches the platform, minimizing the opportunities for the two materials to pull away from each other.
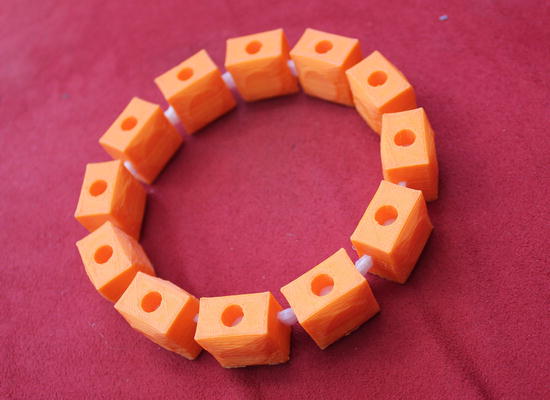
Figure 7-5. A two-material print (ABS squares and nylon connectors). Dual-material bracelet design by Diego Porqueras
- Controlling ooze (the nozzle “drooling” a bit when it is hot and filament is left in it) can be a problem in dual-extruder printers.
![]() Tip A little experimentation with a small test project is probably the best way to test out settings for printing in two dissimilar materials. Dual-extruder prints can take a while to print because the printer has to switch extruders each layer, so it is best to find problems before embarking on a major print.
Tip A little experimentation with a small test project is probably the best way to test out settings for printing in two dissimilar materials. Dual-extruder prints can take a while to print because the printer has to switch extruders each layer, so it is best to find problems before embarking on a major print.
Summary
In this chapter you learned about the different types of filament, their material properties, and how best to use them in your designs. In Chapter 8 we move on to case studies of several objects so that you can see in context how to think about the best choice of material for a given job.