
Azure is Microsoft’s cloud hosting solution. This chapter shows how to deploy the web site to Azure and have it run over the Web. Azure is available for a free trial period and so can be used by anyone for a limited period of time. Alternatively, if you have registered your copy of Visual Studio and have a Microsoft account, you should be eligible for the Developer Program Benefit and receive a free 12-month trial with $25 a month credit. There are a few ways to deploy to the cloud from Visual Studio; for example, Visual Studio will offer to host your solution in the cloud as soon as you log into it with a Microsoft account; however, in this example I’m going to provide a more detailed example using the Azure Portal to set up servers prior to deploying to them.
Note
To complete this chapter, you must either have completed Chapter 10 or download Chapter 10’s source code from www.apress.com as a starting point.
Preparing to Deploy to Azure
Changing from Using a Database Initializer to using a Code First Migrations Seed Method
The starting point for this chapter is the BabyStore solution from Chapter 10. We need to make some changes to the code in order to deploy to Azure. At the moment, the project uses a database initializer to set up the users and roles in the user database. Database initializers do not work on Azure due to the fact that they seek to potentially drop the database and this is not allowed. Instead Azure uses Code First Migrations to update the database.
In order to allow the code for creating an admin user and creating admin and user roles to be able to run on Azure, we’re going to port it to run inside the Seed method of the Configuration class located in the MigrationsConfiguration.cs file. This method runs whenever the database is updated via Code First Migrations and is allowed to run on Azure, making it an ideal place to seed the user and role data.
Open the MigrationsConfiguration.cs file and modify the Seed method to create a new userStore, userManager, roleStore, and roleManager, as follows:
namespace BabyStore.Migrations{using Microsoft.AspNet.Identity;using Microsoft.AspNet.Identity.EntityFramework;using Models;using System;using System.Data.Entity;using System.Data.Entity.Migrations;using System.Linq;internal sealed class Configuration :DbMigrationsConfiguration<BabyStore.Models.ApplicationDbContext>{public Configuration(){AutomaticMigrationsEnabled = false;ContextKey = "BabyStore.Models.ApplicationDbContext";}protected override void Seed(BabyStore.Models.ApplicationDbContext context){var userStore = new UserStore<ApplicationUser>(context);var userManager = new UserManager<ApplicationUser>(userStore);var roleStore = new RoleStore<IdentityRole>(context);var roleManager = new RoleManager<IdentityRole>(roleStore);}}}
The creation of these store and the manager variables is similar to the code found in the App_StartIdentityConfig.cs file for the classes ApplicationUserManager and ApplicationRoleManager; however, the code inside the Seed method does not use IOwinContext.
Next, cut the code from the InitializeIdentityForEF method of the ApplicationDBInitializer class in the App_StartIdentityConfig.cs file (making the method body empty) and paste it into the Seed method of the MigrationsConfiguration.cs file to update it, as follows:
protected override void Seed(BabyStore.Models.ApplicationDbContext context){var userStore = new UserStore<ApplicationUser>(context);var userManager = new UserManager<ApplicationUser>(userStore);var roleStore = new RoleStore<IdentityRole>(context);var roleManager = new RoleManager<IdentityRole>(roleStore);const string name = "[email protected]";const string password = "[email protected]";const string roleName = "Admin";//Create Role Admin if it does not existvar role = roleManager.FindByName(roleName);if (role == null){role = new IdentityRole(roleName);var roleresult = roleManager.Create(role);}var user = userManager.FindByName(name);if (user == null){user = new ApplicationUser{UserName = name,Email = name,FirstName = "Admin",LastName = "Admin",DateOfBirth = new DateTime(2015, 1, 1),Address = new Address{AddressLine1 = "1 Some Street",Town = "Town",County = "County",Postcode = "PostCode"}};var result = userManager.Create(user, password);result = userManager.SetLockoutEnabled(user.Id, false);}// Add user admin to Role Admin if not already addedvar rolesForUser = userManager.GetRoles(user.Id);if (!rolesForUser.Contains(role.Name)){var result = userManager.AddToRole(user.Id, role.Name);}//Create users roleconst string userRoleName = "Users";role = roleManager.FindByName(userRoleName);if (role == null){role = new IdentityRole(userRoleName);var roleresult = roleManager.Create(role);}}
Next, we need to test that this code works. The simplest way to do this is to create a new database for holding user and role data. Update the DefaultConnection connectionString entry in the main Web.config file as follows (ensure you keep the entry all on one line):
<add name="DefaultConnection" connectionString="Data Source=(LocalDb)MSSQLLocalDB;AttachDbFilename=|DataDirectory|aspnet-BabyStore-Identity3.mdf;Initial Catalog=aspnet-BabyStore-Identity3;Integrated Security=True" providerName="System.Data.SqlClient" />Now start the web site without debugging and attempt to log in (the login attempt will fail). This should create the new v3 of the Identity database. Figure 13-1 shows how the new database should appear in Solution Explorer.

Figure 13-1. The new aspnet-BabyStore-Identity3 database shown in Solution Explorer
Right-click the database in Solution Explorer and select Open from the menu. This will open the database in Server Explorer. If you view the data in the AspNetUsers and AspNetRoles tables, you will see that they are empty. Run the update-database -configuration configuration command in Package Manager Console and the Seed method will run. Open the tables again and they will now contain data, plus you will now be able to log in as the user [email protected] .
If you want to continue testing locally with the test users created in previous chapters, revert the connectionString entry back to its previous state so it reads as follows. This will ensure that any users or roles you created manually are still available for use:
<add name="DefaultConnection" connectionString="Data Source=(LocalDb)MSSQLLocalDB;AttachDbFilename=|DataDirectory|aspnet-BabyStore-Identity2.mdf;Initial Catalog=aspnet-BabyStore-Identity2;Integrated Security=True" providerName="System.Data.SqlClient" />Setting Up Azure
To set up Azure, either register for a free trial or take advantage of the Microsoft Developer Program Benefit, which grants 12 months’ access to Azure with $25 credit each month. Once registered, log into the Azure Portal web site and add a new Web APP + SQL from the Marketplace. (Choose the New + option then click on See All followed by Web + Mobile.) You should see the screen shown in Figure 13-2.

Figure 13-2. Using the Azure marketplace to add a Web App + SQL
Choose to add Web App + SQL and you will be prompted to fill in some details for your app. Fill in your app name to give the site a URL to run on. For example, I used MVCBabyStore.azurewebsites.net for this example web site URL. You won't be able to choose this name, since it is used for this demo, so enter your own app name.
Next, add a New Resource Group Name (BabyStore is used here) and optionally add a new App Service plan to run the server nearer to your geographical location. I’m adding a new plan to run in North Europe, as it is closer to our location. Figure 13-3 shows the setup options for this example.

Figure 13-3. Setting options for the app name, a resource group, and a new app service plan
If you have entered a new app service plan, click on the OK button to confirm it, and then click on the SQL Database section to configure the database. First, name the database aspnet-BabyStore-Identity, and then configure the Target server options. Enter an appropriate server name and add an admin user with a suitable password. Choose a location for you database, ideally the same location as your web server. Ensure that Allow Azure services to Access Server is checked and accept the default collation for the database server. Figure 13-4 shows these options.

Figure 13-4. Configuring the database server
Next click the Select and Create buttons to create the new Web App + SQL application. Azure will run through a deployment process, which will take a few minutes to complete. When this is completed, you should be able to click on the All Resources link in the dashboard. Your newly created resources should be visible, similar to those shown in Figure 13-5.

Figure 13-5. Viewing the new resources
To recap, this has now created a web server where the web site will run plus a database server to hold the user and role data. We also need to add a database to hold the store data. To add a new database, click SQL Databases from the side menu and click the Add + button. A section of the screen will open to allow you to create a new database. Add a new database named BabyStore, keeping the subscription set to whatever your current subscription is. Keep the Resource group set to BabyStore. Select the source as a blank database and ensure the server is set to your database server name. Keep the collation and pricing tier set to their default values. Figure 13-6 shows the options to choose. Click the Create button; Azure will run a deployment process to create the database.

Figure 13-6. Adding a database for store data
If you click the SQL databases item from the side menu, you should see the new database listed along with the aspnet-BabyStore-Identity database, as shown in Figure 13-7.

Figure 13-7. Confirmation that the new BabyStore database has been created
Deploying to Azure from Visual Studio
Open the current BabyStore solution in Visual Studio and ensure that you have signed into Visual Studio using the Microsoft Account you used for your Azure subscription. Next, click on the Tools menu and choose the Connect to Microsoft Azure Subscription option. You should be promoted to enter an e-mail address, so enter the e-mail address you used for your Azure account. Verify you are connected by opening Server Explorer and the Azure node. You should be able to see the new BabyStore App Service and the BabyStore and aspnet-BabyStore-Identity databases, as shown in Figure 13-8.

Figure 13-8. Viewing the Azure connection via Server Explorer
To publish the solution to Azure, click on Build from the main Visual Studio menu and the click the Publish BabyStore option. Select Microsoft Azure App Service from the Publish Web window. The Microsoft Azure Web Apps window will appear. Select the MVCBabyStore item, as shown in Figure 13-9, and then click OK.

Figure 13-9. Selecting the MVCBabyStore app to deploy to
The Publish Web window will appear; choose the Web Deploy method and keep all the other default options. Then click the Validate Connection button. You should get a green checkmark, as shown in Figure 13-10, indicating that the connection was successful.

Figure 13-10. Validating the connection in the Publish Web window
Now click the Next button. The Settings section of the Publish Web window will appear, as shown in Figure 13-11. Change the Configuration to Debug so that we can use remote debugging later in the chapter.

Figure 13-11. Configuring the Publish Web Settings options
Configuring Database Publishing
In the Publish Web Settings options, the Databases options contain entries for determining which database each database context in the BabyStore solution should target. In this deployment, ApplicationDBContext needs to target the aspnet-BabyStore-Identity database and StoreContext should target the BabyStore database. If you inspect the connection string for the both connections, you will see that they both contain the text Initial Catalog=aspnet-BabyStore-Identity, meaning that both contexts are targeting the aspnet-BabyStore-Identity database.
To make StoreContext target the BabyStore database, you could just modify the connection string manually; however, we’re going to do this using Visual Studio in order to demonstrate a common issue when deploying the Azure. Click the … button next to the StoreContext connection string in the Publish Web window. The Destination Connection String window will appear, as shown in Figure 13-12.

Figure 13-12. The Destination Connection String window
Now attempt to change the target database name by clicking on the drop-down list containing aspnet-BabyStore-Identity. Visual Studio will attempt to display a list of databases from the remote Azure database server, but it will fail with the error message shown in Figure 13-13.

Figure 13-13. Firewall error message when attempting to connect to the mvcbabystoredb server
This error is caused because your PC does not have access to the remote database server. To enable this access, open the Azure Portal in a web browser and view All Resources, then click on the database server entry (our server is named mvcbabystoredb). Next click on Show Firewall Settings, which will open the Firewall section on the right of the screen. Finally, click on the Add Client IP link at the top right of the screen to grant your local IP address access to the database server. Figure 13-14 shows the Azure Portal with the options activated.

Figure 13-14. Adding a firewall rule to the database server for your client IP address
A new firewall rule should appear similar to the one shown in Figure 13-15. Once it has appeared, click the Save button to add the new rule.

Figure 13-15. The new firewall rule added for the client IP address
Now go back to Visual Studio and open the Destination Connection String window for the StoreContext again, and then click on the aspnet-BabyStore-Identity database entry to change it to a different database. You should now see three databases shown in Figure 13-16. Select the BabyStore database and click the Test Connection button. The test should be successful. Assuming it is, click the OK button.

Figure 13-16. The updated firewall rule now allows selection of a database in Visual Studio
In the Publish Web window, ensure that you check the Execute Code First Migrations option for both database contexts, as shown in Figure 13-17.

Figure 13-17. Ensure the Use Code First Migrations checkbox is checked in the Publish Web window
Next, click the Publish button to publish the web site and databases to Azure. The output window of Visual Studio will show the progress of the publish; it will probably take a few minutes to complete. When the deployment completes, the web site should open automatically in your default web browser. Figure 13-18 shows the resulting site successfully published and running under the http://mvcbabystore.azurewebsites.net/ URL.

Figure 13-18. The site successfully published to Azure
Caution
Azure is sensitive to the order the databases are added to the web app when you first create it via the Azure portal. Be aware of this if you deploy a site with two connection strings and one of them is named defaultConnection. If we had created the BabyStore database first when creating the web app via the portal, then Azure would have created an entry in the app named defaultConnection with the value set to the BabyStore database rather than the Identity database. This would mean that the app would then have tried to connect to the BabyStore database whenever it tried to use defaultConnection so the web site would error when trying to look up a user.
If you do encounter this scenario, it is easily fixed by opening the Web App ➤ Settings ➤ Application Settings section in the Azure portal. Under the Connection Strings section, change the value of the defaultConnection to point at the same database as the defaultConnection entry in your local solution.
Redeploying Code Changes to Azure
The site is now up and running in Azure, but the currency is set to dollars, yet locally in my development environment, this was always set to British Pounds due to our server locale. If you want to change the currency and locale, configure your application via the Web.Config file by adding a globalization entry to the system.web section, as highlighted in bold:
<system.web><authentication mode="None" /><compilation debug="true" targetFramework="4.6.1" /><httpRuntime targetFramework="4.6.1" maxRequestLength="20480" /><globalization uiCulture="en-GB" culture="en-GB"/><customErrors mode="Off"/></system.web>
Next make a very small change to the ViewsSharedLayout.cshtml file to change the copyright section as follows:
<div class="container body-content">@RenderBody()<hr /><footer><p>© @DateTime.Now.Year - MVC Baby Store</p></footer></div>
We now have a very simple code change and a config change to redeploy to Azure. To deploy them, click on Publish BabyStore from the Build menu and click the Publish button in the Publish Web window. You should see that this deployment is much quicker because only the files that have changed are deployed. The web site should open with the changes in a matter of seconds rather than minutes.
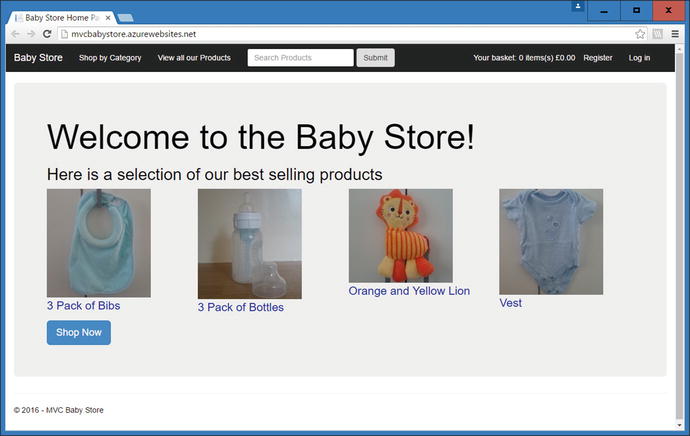
Figure 13-19. The redeployed web site with updated currency and copyright
Remote Debugging an Azure Web Application
To allow your application to be remotely debugged in Azure, you must set the configuration option to Debug when deploying the solution. If you recall, this was already set during the deployment of the BabyStore solution so remote debugging could be demonstrated.
To start remote debugging, ensure you are logged into Azure via Visual Studio (if not, it will prompt you to log in). Then expand the Azure node in Server Explorer until you see your web app. Then right-click the web app (in this example, it’s named MVCBabyStore) and choose Attach Debugger from the menu, as shown in Figure 13-20.

Figure 13-20. Attaching a debugger to an Azure web app from Visual Studio
The web site should now start up and if you now add a breakpoint in Visual Studio, you will be able to debug the remote code within Visual Studio as if it were running locally. This is a very useful when the remote code starts behaving differently than your local server due to environment issues (for example, this is how I figured out what was wrong with using a Database Initializer on Azure). Figures 13-21 and 13-22 show the web site http://mvcbabystore.azurewebsites.net/ being debugged on a local PC.

Figure 13-21. The Azure web site in a waiting state (note the bottom information bar and the circular arrow in the top-left corner of the window)

Figure 13-22. A breakpoint being hit in the remote code being debugged locally, preventing the Azure web site from continuing
Viewing and Editing an Azure Database with Visual Studio
To view and edit a remote database in Visual Studio, first ensure that you have added a firewall rule to the database server, as demonstrated earlier in this chapter.
Next, locate the database you want to view or edit in Server Explorer and right-click it. Choose Open in SQL Server Object Explorer, as shown in Figure 13-23.

Figure 13-23. Opening a remote Azure database in SQL Server Object Explorer
You can now work with the remote database as if it were running locally, adding or deleting tables or data, for example. These changes will take effect in the Azure database. Figure 13-24 shows a new product named Remote Product that we have added to the Products table of the remote BabyStore database.

Figure 13-24. Adding a new product to the remote Azure BabyStore database via Visual Studio
The remote database will now be updated with the new product data. This can now be viewed through the Azure web site, as shown in Figure 13-25.

Figure 13-25. The new Remote Product can now be viewed via the Azure web site, appearing second in the products list when sorted by price
Connection Resiliency When Using Azure
Azure is a cloud-based platform, and by its very nature (such as throttling of a shared platform for performance reasons or network issues), it is more prone to connection issues than a set of servers running on the same LAN. These issues are known as transient connection errors. To help combat this issue, Entity Framework 6 onwards includes a feature known as connection resiliency. It allows Entity Framework to automatically retry any commands that fail due to connection issues.
When working with Azure, you can implement an execution strategy known as SqlAzureExecutionStrategy, which inherits from DbExecutionStrategy, and when working with SqlAzure, will retry any exceptions that are likely to be transient.
To configure Entity Framework to use this execution strategy, you need to add a class that derives from the DbConfiguration class, and within the class, set the execution strategy. For example, in the BabyStore project, you could do this by adding a new class named StoreDbConfiguration.cs to the DAL folder:
using System;using System.Data.Entity;using System.Data.Entity.SqlServer;namespace BabyStore.DAL{public class StoreDbConfiguration : DbConfiguration{public StoreDbConfiguration(){SetExecutionStrategy("System.Data.SqlClient",() => new SqlAzureExecutionStrategy(5, TimeSpan.FromSeconds(30)));}}}
This code will set the execution strategy to retry a maximum of five times with a 30-second delay between each retry. Entity Framework will automatically run any code it finds in a class that derives from DbConfiguration. Note that the parameters passed into SqlAzureExecutionStrategy are optional.
When working with a commercial project in Azure, you should also consider wrapping your database access code inside try catch statements to deal with anything other than transient errors. You would set the catch part of the statement to catch RetryLimitExceededException; the actual exception will be wrapped inside this type.
Summary
This chapter covered deploying an application to Microsoft's cloud-based hosting platform Azure. I started the chapter by showing you how to prepare for deploying to Azure and by changing the reliance on a database initializer for creating an admin user and instead seeding this data via Code First Migrations.
I then covered how to set up Azure to host a web site and a couple of databases, followed by how to configure and deploy your application via Visual Studio, including making code redeployments. The chapter then moved on to cover how to perform remote code debugging and remote database alterations using Visual Studio, wrapping up with a brief description on dealing with connection issues when using Azure. Azure is a large topic in itself and this chapter has just scratched the surface, but hopefully it will give you confidence to play around with Azure and become more familiar with it.