
In this chapter we will jump right into the project and add some basic model classes for products and categories. We will use these to create a database using Entity Framework Code First. I’ll show you how to set up a database context class, specify a connection string, create a database from your code, and add new views and controllers to manage and display the product and category data.
Note
If you want to follow along with the code in this chapter, you must either have completed Chapter 1 or downloaded Chapter 1’s source code from www.apress.com as a starting point.
Adding the Model Classes
Entity Framework Code First allows the creation of a database from classes. To start this chapter we will create two new model classes to represent products and categories. We are going to add a zero or one-to-many relationship between categories and products, where a category may have many products and a product can belong to none or one category.
Right-click the Models folder and choose Add ➤ Class from the menu. Create a new class called Product and add the following code to the class:
namespace BabyStore.Models{public class Product{public int ID { get; set; }public string Name { get; set; }public string Description { get; set; }public decimal Price { get; set; }public int? CategoryID { get; set; }public virtual Category Category { get; set; }}}
Remove all the unnecessary using statements from the top of the file.
Tip
To remove unnecessary using statements, hover over the using statements, click on the light bulb that appears, and choose the Remove Unnecessary Usings option.
This file contains the following properties:
ID—Used to represent the primary key for products in the database.
Name—The name of the product.
Description—A textual description of the product.
Price—Represents the price of the product.
CategoryID—Represents the ID of the category that the product is assigned to. It will be set up as a foreign key in the database. We have allowed this to be empty by setting the type to int? to model the fact that a product does not need to belong to a category. This is crucial to avoid the scenario where, upon deletion of a category, all products in that category are also deleted. By default, Entity Framework enables cascade deletes for on-nullable foreign keys, meaning that if the CategoryID was not nullable, then all the products associated with a category would be deleted when the category was deleted.
Category—A navigation property. Navigation properties contain other entities that relate to this entity so in this case this property will contain the category entity that the product belongs to. If a navigation property can hold multiple entities, it must be defined as a list type. Typically the type used is ICollection. Navigation properties are normally defined as virtual so that they can be used in certain functionality such as with Lazy Loading.
Tip
You can auto-generate properties in a class in Visual Studio by typing prop and then pressing Tab.
Next, complete the model classes by adding a new class named Category to the models folder and then adding the following code to this new class:
using System.Collections.Generic;namespace BabyStore.Models{public class Category{public int ID { get; set; }public string Name { get; set; }public virtual ICollection<Product> Products { get; set; }}}
Remove all the unnecessary using statements from the top of the file. The Category class contains the following properties:
ID —The primary key
Name —The name of the category
Products—A navigational property that will contain all the product entities belonging to a category
Adding a Database Context
The database context is the main class that coordinates Entity Framework functionality for a data model.
Create a new folder in the project named DAL by right-clicking the project (BabyStore) in Solution Explorer. Click Add then New Folder. Now add a new class named StoreContext.cs to the new DAL folder. Update the code in the StoreContext class as follows:
using BabyStore.Models;using System.Data.Entity;namespace BabyStore.DAL{public class StoreContext:DbContext{public DbSet<Product> Products { get; set; }public DbSet<Category> Categories { get; set; }}}
The context class derives from the class System.Data.Entity.DbContext and there is typically one database context class per database, although in more complex projects it is possible to have more. Each DbSet property in the class is known as an Entity Set and each typically corresponds to a table in the database; for example the Products property corresponds to the Products table in our database. The code DbSet<Product> tells Entity Framework to use the Product class to represent a row in the Products table.
Specifying a Connection String
Now we have a database context and some model classes, so we need to tell Entity Framework how to connect to the database. Add a new entry to the connectionStrings section of the main Web.Config file as follows:
<connectionStrings><add name="DefaultConnection" connectionString="Data Source=(LocalDb)MSSQLLocalDB;AttachDbFilename=|DataDirectory|aspnet-BabyStore-20160203031215.mdf;Initial Catalog=aspnet-BabyStore-20160203031215;Integrated Security=True"providerName="System.Data.SqlClient" /><add name="StoreContext" connectionString="Data Source=(LocalDB)MSSQLLocalDB;AttachDbFilename=|DataDirectory|BabyStore.mdf;Initial Catalog=BabyStore;Integrated Security=True" providerName="System.Data.SqlClient" /></connectionStrings>
This new entry tells Entity Framework to connect to a database called BabyStore.mdf in the App_Data folder of our project. I’ve chosen to store the database here so that it can be copied with the project. AttachDbFilename=|DataDirectory|BabyStore.mdf; specifies to create the database in the App_Data folder.
An alternative would be to specify the connectionString entry as Data Source=(LocalDB)MSSQLLocalDB;Initial Catalog=BabyStore.mdf;Integrated Security=True, which would then create the database under the user’s folder (normally C:UsersUser on Windows).
The other existing connectionString entry is used for the database that was created automatically at the beginning of the project when we chose the authentication option Individual User Accounts. We will cover the use of this later in the book.
It’s also worth noting that you don’t need to define a connection string in web.config. If you don’t do so, then Entity Framework will use a default one based on the context class.
Note
Make sure you update the Web.config file in the root of the project and not the one in the Views folder.
Adding Controllers and Views
Now we need to add some controllers and views in order to display and manage our product and category data.
Adding a Category Controller and Views
Build the solution by clicking Build ➤ Build Solution from the Visual Studio menu.
Right-click the Controllers folder and choose Add ➤ Controller.
In the Add Scaffold window, choose the MVC 5 Controller with views option, using Entity Framework (see Figure 2-1).

Figure 2-1. Scaffolding a controller with views using Entity Framework
Click Add and then, in the Add Controller window, choose the following options:
Model class: Category
Data Context class: StoreContext
Ensure that Generate Views, Reference Script Libraries, and Use a Layout Page are all checked
Leave the controller name set to CategoriesController (see Figure 2-2 for full details)

Figure 2-2. Options for adding a new category controller
Click Add and a new CategoriesController class will be created in the Controllers folder. Corresponding views will also be created in the ViewsCategories folder.
Examining the CategoriesController Class and Methods
The newly scaffolded CategoriesController.cs file contains several methods for performing CRUD (Create, Read, Update, and Delete) operations on categories.
The code private StoreContext db = new StoreContext(); instantiates a new context object for use by the controller. This is then used throughout the lifetime of the controller and disposed of by the Dispose method at the end of the controller code.
The new CategoriesController contains the following methods.
The Index method is used to return a list of all the categories to the ViewsCategoriesIndex.cshtml view:
// GET: Categoriespublic ActionResult Index(){return View(db.Categories.ToList());}
The Details method finds a single category from the database based on the id parameter. As you saw in Chapter 1, the id parameter is passed in via the URL using the routing system.
// GET: Categories/Details/5public ActionResult Details(int? id){if (id == null){return new HttpStatusCodeResult(HttpStatusCode.BadRequest);}Category category = db.Categories.Find(id);if (category == null){return HttpNotFound();}return View(category);}
The GET version of the Create method simply returns the Create view. This may seem a little strange at first but what it means is that this returns a view showing a blank HTML form for creating a new category.
// GET: Categories/Createpublic ActionResult Create(){return View();}
There is another version of the Create method that’s used for HTTP POST requests. This method is called when the user submits the form rendered by the Create view. It takes a category as a parameter and adds it to the database. If it’s successful it returns the web site to the Index view; otherwise, it reloads the Create view.
// POST: Categories/Create// To protect from overposting attacks, please enable the specific properties you wantto bind to, for// more details see http://go.microsoft.com/fwlink/?LinkId=317598.[HttpPost][ValidateAntiForgeryToken]public ActionResult Create([Bind(Include = "ID,Name")] Category category){if (ModelState.IsValid){db.Categories.Add(category);db.SaveChanges();return RedirectToAction("Index");}return View(category);}
Because this method is an HTTP POST, it contains some extra code:
The [HttpPost] attribute tells the controller that when it receives a POST request for the Create action, it should use this method rather than the other create method.
[ValidateAntiForgeryToken] ensures that the token passed by the HTML form, thus validating the request . The purpose of this is to ensure that the request actually came from the form it is expected to come from in order to prevent cross-site request forgeries. In simple terms, a cross-site request forgery is a request from a form on another web site to your web site with malicious intentions.
The parameters ([Bind(Include = "ID,Name")] Category category) tell the method to include only the ID and the Name properties when adding a new category. The Bind attribute is used to protect against overposting attacks by creating a list of safe properties to update; however, as we will discuss later, it does not work as expected and so it is safer to use a different method for editing or creating where some values may be blank. As an example of overposting, consider a scenario where the price is submitted as part of the request when a user submits an order for a product. An overposting attack would attempt to alter this price data by changing the submitted request data in an attempt to buy the product cheaper.
The GET version of the Edit method contains code identical to the Details method. The method finds a category by ID and then returns this to the view. The view is then responsible for displaying the category in a format that allows it to be edited.
// GET: Categories/Edit/5public ActionResult Edit(int? id){if (id == null){return new HttpStatusCodeResult(HttpStatusCode.BadRequest);}Category category = db.Categories.Find(id);if (category == null){return HttpNotFound();}return View(category);}
The POST version of the Edit method is very similar to the POST version of the Create method. It contains an extra line of code to check that the entity has been modified before attempting to save it to the database and, if it’s successful, the Index view is returned or else the Edit view is redisplayed:
// POST: Categories/Edit/5// To protect from overposting attacks, please enable the specific properties you want to bind to, for// more details see http://go.microsoft.com/fwlink/?LinkId=317598.[HttpPost][ValidateAntiForgeryToken]public ActionResult Edit([Bind(Include = "ID,Name")] Category category){if (ModelState.IsValid){db.Entry(category).State = EntityState.Modified;db.SaveChanges();return RedirectToAction("Index");}return View(category);}
There are also two versions of the Delete method. ASP.NET MVC scaffolding takes the approach of displaying the entity details to the users and asking them to confirm the deletion before using a form to actually submit the deletion request. The GET version of the Delete method is shown here. You will notice this is very similar to the Details method in that it finds a category by ID and returns it to the view:
// GET: Categories/Delete/5public ActionResult Delete(int? id){if (id == null){return new HttpStatusCodeResult(HttpStatusCode.BadRequest);}Category category = db.Categories.Find(id);if (category == null){return HttpNotFound();}return View(category);}
The POST version of the Delete method performs an anti-forgery check. It then finds the category by ID, removes it, and saves the database changes.
// POST: Categories/Delete/5[HttpPost, ActionName("Delete")][ValidateAntiForgeryToken]public ActionResult DeleteConfirmed(int id){Category category = db.Categories.Find(id);db.Categories.Remove(category);db.SaveChanges();return RedirectToAction("Index");}
This auto-generated Delete method does not work correctly due to the fact that the product entity contains a foreign key referencing the category entity. See Chapter 4 for how to correct this issue.
Note
There are several reasons why ASP.NET takes this approach to disallow a GET request to update the database and several comments and debates about the different reasons about the security of doing so; however, one of the key reasons for not doing it is that a search engine spider will crawl public hyperlinks in your web site and potentially be able to delete all the records if there is an unauthenticated link to delete records. Later we will add security to editing categories so that this becomes a moot point.
Examining the Category Views
The views associated with Categories are found in the folder ViewsCategories. There is one view per CRUD action (Details, Create, Edit, and Delete) and an Index view currently used to show a list of all categories.
The Categories Index View
The auto-generated CategoriesViewsIndex.cshtml view file is as follows:
@model IEnumerable<BabyStore.Models.Category>@{ViewBag.Title = "Index";}<h2>Index</h2><p>@Html.ActionLink("Create New", "Create")</p><table class="table"><tr><th>@Html.DisplayNameFor(model => model.Name)</th><th></th></tr>@foreach (var item in Model) {<tr><td>@Html.DisplayFor(modelItem => item.Name)</td><td>@Html.ActionLink("Edit", "Edit", new { id=item.ID }) |@Html.ActionLink("Details", "Details", new { id=item.ID }) |@Html.ActionLink("Delete", "Delete", new { id=item.ID })</td></tr>}</table>
Here is a breakdown of the code in this view:
@model IEnumerable<BabyStore.Models.Category> is the model that the view is based on. The Index method of the CategoriesController class passes a list of categories to the Index view. In this case, the view needs to display a list of categories to the user so the model is specified as a collection of categories that implements the IEnumerable interface (the List type implements this).
The title of the page is set by this code:
@{ViewBag.Title = "Index";}@Html.ActionLink("Create New", "Create") creates a hyperlink to the Create view with the link text set to "Create New". This is an example of an HTML helper and these are used through ASP.NET MVC to render various data-driven HTML elements.
@Html.DisplayNameFor(model => model.Name) displays the Name of the specified field in the model. In this case, it displays the name of the Category field, which is currently "Name".
The code then loops through each of the categories contained in the model and displays the value contained in the Name field, followed by three links to edit, show the details of, or delete each category (see Figure 2-3). The third parameter in each ActionLink provides the id of the category to show in the view opened by the link:

Figure 2-3. The HTML page generated by the Categories Index view (including the sample data)
@foreach (var item in Model) {<tr><td>@Html.DisplayFor(modelItem => item.Name)</td><td>@Html.ActionLink("Edit", "Edit", new { id=item.ID }) |@Html.ActionLink("Details", "Details", new { id=item.ID }) |@Html.ActionLink("Delete", "Delete", new { id=item.ID })</td></tr>}
Category Details View
The code generated by the scaffolding process for the ViewsCategoriesDetails.cshtml view file is as follows:
@model BabyStore.Models.Category@{ViewBag.Title = "Details";}<h2>Details</h2><div><h4>Category</h4><hr /><dl class="dl-horizontal"><dt>@Html.DisplayNameFor(model => model.Name)</dt><dd>@Html.DisplayFor(model => model.Name)</dd></dl></div><p>@Html.ActionLink("Edit", "Edit", new { id = Model.ID }) |@Html.ActionLink("Back to List", "Index")</p>
The code is simpler than the Index view, as it displays only a single entity. The model is now a single category rather than a collection as specified by the first line of the file.
@model BabyStore.Models.Category.The same HTML display helpers are used as in the Index view, but this time there is no need for a loop, as there is only a single entity, as shown in Figure 2-4.

Figure 2-4. The HTML page generated by the Category Details view
The Category Create View
The Create view displays a blank HTML form to allow the creation of a category. This view implements a lot of new features not included in the Index and Details views in order to generate an HTML form. The form is submitted as a POST request and processed by the POST version of the Create method. The auto-generated code for this view is as follows:
@model BabyStore.Models.Category@{ViewBag.Title = "Create";}<h2>Create</h2>@using (Html.BeginForm()){@Html.AntiForgeryToken()<div class="form-horizontal"><h4>Category</h4><hr />@Html.ValidationSummary(true, "", new { @class = "text-danger" })<div class="form-group">@Html.LabelFor(model => model.Name, htmlAttributes: new { @class = "control-labelcol-md-2" })<div class="col-md-10">@Html.EditorFor(model => model.Name, new { htmlAttributes = new { @class =form-control" } })@Html.ValidationMessageFor(model => model.Name, "", new { @class = "text-danger" })</div></div><div class="form-group"><div class="col-md-offset-2 col-md-10"><input type="submit" value="Create" class="btn btn-default" /></div></div></div>}<div>@Html.ActionLink("Back to List", "Index")</div>@section Scripts {@Scripts.Render("∼/bundles/jqueryval")}
Figure 2-5 shows the fully generated HTML page. Here are the key points from the code shown above:

Figure 2-5. The HTML page generated by the Categories Create view. This page contains an HTML form in order to submit the details of the new category
The first new feature used is the code @Using(Html.BeginForm()), which tells the view to wrap everything inside this using statement in an HTML form.
@Html.AntiForgeryToken() then generates an anti-forgery token, which is checked for a match by the POST version of the Create method (using the [ValidateAntiForgeryToken] attribute).
@Html.ValidationSummary(true, "", new { @class = "text-danger" }) is a helper that will display an error summary if for any reason the form is not valid. The first parameter tells the summary to exclude any property errors and the third parameter, new { @class = "text-danger" }, is used to style the error message with the text-danger Bootstrap CSS class (this is bold red text; more on Bootstrap and CSS is included later in the book).
@Html.LabelFor(model => model.Name, htmlAttributes: new { @class = "control-label col-md-2" }) creates a new HTML label element associated with the following HTML input control for the Name property of the category.
@Html.EditorFor(model => model.Name, new { htmlAttributes = new { @class = "form-control" } }) is an HTML helper method that attempts to display the correct HTML input element for the data type of the specified property. For this example, the property is Name, so the EditorFor method tries to display the correct type of HTML element to allow the user to edit a string. In this case, it produces a text box HTML element inside the HTML form so the user can enter the name of a category.
The final new piece of HTML helper in this view is @Html.ValidationMessageFor(model => model.Name, "", new { @class = "text-danger" }). This adds a specific validation message for the property if the user enters an incorrect value based on the validation rules set in the application. At the moment, there are no rules set, but I will show you in Chapter 4 how to set these.
There is an additional section in this view not seen in the Index and Details view files. It is used to include the JavaScript files required for validation (more on this in Chapter 4):
@section Scripts {@Scripts.Render("∼/bundles/jqueryval")}
The Category Edit View
The Edit view displays an HTML form to allow the editing of the category passed to it by the GET version of the Edit method in the CategoriesController class. This view is very similar to the Create view. The auto-generated code for this view is as follows:
@model BabyStore.Models.Category@{ViewBag.Title = "Edit";}<h2>Edit</h2>@using (Html.BeginForm()){@Html.AntiForgeryToken()<div class="form-horizontal"><h4>Category</h4><hr />@Html.ValidationSummary(true, "", new { @class = "text-danger" })@Html.HiddenFor(model => model.ID)<div class="form-group">@Html.LabelFor(model => model.Name, htmlAttributes: new { @class = "control-labelcol-md-2" })<div class="col-md-10">@Html.EditorFor(model => model.Name, new { htmlAttributes = new { @class ="form-control" } })@Html.ValidationMessageFor(model => model.Name, "", new { @class = "text-danger" })</div></div><div class="form-group"><div class="col-md-offset-2 col-md-10"><input type="submit" value="Save" class="btn btn-default" /></div></div></div>}<div>@Html.ActionLink("Back to List", "Index")</div>@section Scripts {@Scripts.Render("∼/bundles/jqueryval")}
Figure 2-6 shows the fully generated HTML edit page. The only new HTML helper is @Html.HiddenFor(model => model.ID). This creates a hidden HTML input element containing the ID of the category. This is used in the Bind element of the POST version of the Edit method in the CategoriesController class: public ActionResult Edit([Bind(Include = " ID ,Name")] Category category).

Figure 2-6. The HTML page generated by the Category Edit page. The Name input box is prepopulated with the category's current name
The Category Delete View
The Delete view is similar to the Details view but also contains an HTML form to submit to the POST version of the Delete method in the CategoriesController class. It does not introduce any new features in addition to those already covered in the examination of the other views. The auto-generated code is as follows and the HTML it generates is shown in Figure 2-7:

Figure 2-7. The HTML page generated by the Category Delete view
@model BabyStore.Models.Category@{ViewBag.Title = "Delete";}<h2>Delete</h2><h3>Are you sure you want to delete this?</h3><div><h4>Category</h4><hr /><dl class="dl-horizontal"><dt>@Html.DisplayNameFor(model => model.Name)</dt><dd>@Html.DisplayFor(model => model.Name)</dd></dl>@using (Html.BeginForm()) {@Html.AntiForgeryToken()<div class="form-actions no-color"><input type="submit" value="Delete" class="btn btn-default" /> |@Html.ActionLink("Back to List", "Index")</div>}</div>
Adding a Product Controller and Views
Right-click the Controllers folder and choose Add ➤ Controller.
In the Add Scaffold window, choose the MVC 5 Controller with views option, using Entity Framework (see Figure 2-1).
Click Add. Then in the Add Controller window, choose the following options:
Model class: Product
Data Context class: StoreContext
Ensure that Generate Views, Reference Script Libraries, and Use a Layout Page are checked
Leave the Controller name set to ProductsController (see Figure 2-8 for full details)

Figure 2-8. Options for adding a new product controller
Click Add and a new ProductsController class will be created in the Controllers folder. Corresponding views will also be created in the ViewsProducts folder.
Examining the Product Controller and Views
The ProductsController class and the associated views are very similar to the CategoriesController class and I am not going to cover them in great detail; however, there is one significant new piece of functionality to cover. The application needs to provide a way to associate a product with a category and it does this by rendering an HTML select element so that the users can pick a category from a list when creating or editing a product.
In the controller, the new code responsible for this is found in both versions of the Edit methods, as well as in the POST version of the Create method:
ViewBag.CategoryID = new SelectList(db.Categories, "ID", "Name", product.CategoryID);In the GET version of the Create method, the following similar code is used:
ViewBag.CategoryID = new SelectList(db.Categories, "ID", "Name");This code assigns an item to a ViewBag property named CategoryID. The item is a SelectList object consisting of all the categories in the database, with each entry in the list using the Name property as the text and the ID field as the value. The optional fourth parameter determines the preselected item in the select list. As an example, if the fourth argument product.CategoryID is set to 2, then the Toys category will be preselected in the drop-down list when it appears in the view. Figure 2-9 shows how this appears in a view.

Figure 2-9. A select list with the Toys element preselected by using the product.CategoryID parameter
The views display an HTML select element by using the following HTML Helper: @Html.DropDownList("CategoryID", null, htmlAttributes: new { @class = "form-control" }).
This code generates an HTML element based on the ViewBag.CategoryID property and assigns the CSS class form control to it. If the string specified in the first argument matches a ViewBag property name, it is automatically used rather than having to specify a reference to the ViewBag in the DropDownList helper method.
Using the New Product and Category Views
We can’t expect users to navigate to our new views by entering the URL manually in the web browser, so we need to update the main site navigation bar as follows:
Open the ViewsShared\_Layout.cshtml file.
Below the line of code <li>@Html.ActionLink("Contact", "Contact", "Home")</li>, add the following code to add links to the Categories and Products index pages:
<li>@Html.ActionLink("Shop by Category", "Index", "Categories")</li><li>@Html.ActionLink("View all our Products", "Index", "Products")</li>Click on the Debug menu and choose Start Without Debugging. The web site will launch. Click on the Shop by Category link, When you click the link, two things happen:
The Categories Index view appears. It does not contain any data since we have no data in the database (see Figure 2-10).

Figure 2-10. The Categories Index page containing no data
The BabyStore database is created by Entity Framework based on our new model classes using Code First. To view the database, open SQL Server Object Explorer in Visual Studio. If SQL Server Object Explorer is not visible, click on View ➤ SQL Server Object Explorer from the main menu.
Examining the Newly Created BabyStore Database
To view the new columns in the database, expand the following chain within Server Object Explorer: SQLServer>(localdb)MSSQLLocalDB>Databases>BabyStore>Tables>dbo.Categories>Columns. Also expand dbo.Products>Columns, as per Figure 2-11.

Figure 2-11. The initial BabyStore database in SQL Server Object Explorer, expanded to show the columns of the Categories and Products tables and the data types of each column
The columns listed in the database match the properties in our model classes. The table names have been pluralized by default. The Categories table contains the columns ID and Name. The Products table contains the columns ID, Name, Description, Price, and a foreign key CategoryID. The data types of the columns match the types specified in each model class.
To see more details of each table, view the design of each table by right-clicking on the table and choosing View Designer from the menu. Using the designer, you can see more details about each column including foreign keys. In Figure 2-12 you can see the design of the Products table and in the T-SQL section with the Foreign Key Constraint for CategoryID highlighted on line 8. This shows that the foreign key references the ID column in the Categories table.

Figure 2-12. Design of the Products table with the Foreign Key constraint highlighted
Adding Some Data Using the Views
Add some new data to test the new views by clicking on the Create New link in the Categories Index page. Add three new categories named Clothes, Toys, and Feeding using the Create page. When you have finished this, the Categories Index page should look like Figure 2-13.

Figure 2-13. Categories Index page with three test categories
The new categories have been added to the database because when a user clicks the Create button on the Category Create page, the POST version of the Create method in the CategoriesController class is called to save the new category to the database.
Next add some product data by first clicking on the View All Our Products link and then clicking the Create New Link. Add the products shown in Table 2-1.
Table 2-1. Test Products to Add to the Web Site
Name | Description | Price | Category |
|---|---|---|---|
Red sleep suit | For sleeping or general wear | 5 | Clothes |
Blue vest | An underlayer for wearing below other clothing | 3 | Clothes |
Red fluffy dog | Makes a squeaking noise | 2 | Toys |
Three-pack of no leak bottles | For a cleaner feeding time | 25 | Feeding |
Each time the Create button is clicked on the Products Create page, the POST version of the Create method in the ProductsController class is called to save the data to the database.
Once completed, the Products Index page should appear in the web site, as shown in Figure 2-14. The data is also now saved to the database, as shown in Figure 2-15. The data can be viewed by right-clicking on the dbo.Products table in SQL Server Object Explorer and choosing View Data from the menu.
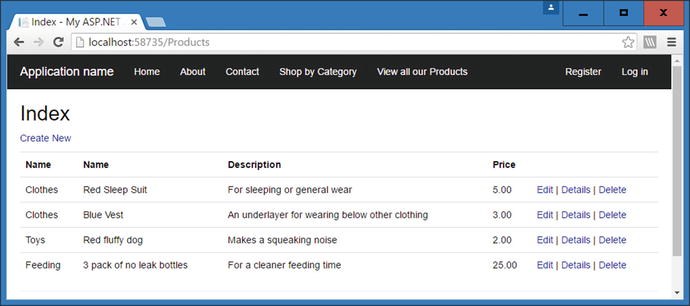
Figure 2-14. The Products Index page with product data

Figure 2-15. Viewing the data in the Products table in the database
Note
Some of the default headings and labels used in the auto-generated views are not very user-friendly so I have updated them in the screenshots that follow. If you want to update them yourself, refer to the source code for Chapter 2, which can be downloaded from Apress.com. I haven’t included the code updates in the book, as they are very repetitive and trivial.
Changing the Way the Category and Product Name Properties are Displayed Using DataAnnotations
The Products Index page contains two columns named Name as per Figure 2-16. This is because the view uses the code @Html.DisplayNameFor(model => model.Category.Name) to display the Name property of the category and then also following this, displays the Name property of the product. This also causes confusion in the Product Details page where the same issue is present.

Figure 2-16. Two Name headings in the Products Index page
To fix this issue, we can use a feature of ASP.NET called DataAnnotations to add a display name attribute to the Name properties of the Category and Product model classes.
Modify the ModelsCategory.cs file with the changes highlighted in bold:
using System.Collections.Generic;using System.ComponentModel.DataAnnotations;namespace BabyStore.Models{public class Category{public int ID { get; set; }[Display(Name = "Category Name")]public string Name { get; set; }public virtual ICollection<Product> Products { get; set; }}}
The entry [Display(Name = "Category Name")] tells the MVC framework to display Category Name rather than Name when displaying a label for the name of the property.
Make similar changes to the ModelsProduct.cs file as follows:
using System.ComponentModel.DataAnnotations;namespace BabyStore.Models{public class Product{public int ID { get; set; }[Display(Name = "Product Name")]public string Name { get; set; }public string Description { get; set; }public decimal Price { get; set; }public int? CategoryID { get; set; }public virtual Category Category { get; set; }}}
Build the solution and run it by choosing Debug ➤ Start Without Debugging from the menu. Click the View All Our Products link to open the Products Index page and you will see that the double Name headings now appear as Category Name and Product Name, as shown in Figure 2-17.

Figure 2-17. Products Index page displaying data annotation display names
Applying DataAnnotations to the class allows us to keep the code that controls the display name of a property in a single place and makes the code easier to maintain. We could have altered the name in the views but this would have involved modifying two files rather than one and been more difficult to maintain, plus every future view we create that used the property would need to be updated.
Splitting DataAnnotations into Another File Using MetaDataType
Some developers prefer the model classes as clean as possible, therefore preferring not to add DataAnnotations to them. This is achieved by using a MetaDataType class as follows.
Add a new class to the Models folder called ProductMetaData.cs and update the contents of the file to the following code:
using System.ComponentModel.DataAnnotations;namespace BabyStore.Models{[MetadataType(typeof(ProductMetaData))]public partial class Product{}public class ProductMetaData{[Display(Name = "Product Name")]public string Name;}}
This declares the Product class as now being a partial class, meaning it is split across multiple files. The DataAnnotation [MetadataType(typeof(ProductMetaData))] is used to tell .NET to apply metadata to the Product class from the ProductMetaData class.
Modify the Product class back to its original state but declare it as a partial class so that it can be used in conjunction with the other class declaration in the ProductMetaData.cs file.
namespace BabyStore.Models{public partial class Product{public int ID { get; set; }public string Name { get; set; }public string Description { get; set; }public decimal Price { get; set; }public int? CategoryID { get; set; }public virtual Category Category { get; set; }}}
The results of this code are exactly the same as in Figure 2-17; however, using this code, the Product class was not altered except to declare it as partial. This can be a useful strategy when working with classes that have been automatically created that you do not want to alter, for example, when using Entity Framework Database First. I don’t cover Entity Framework Database First in this book, but I do cover an alternative scenario to allow you to create classes from an existing database using Code First.
A Simple Query: Sorting Categories Alphabetically
Categories in the Categories Index page are currently sorted by the ID property so we’ll change this to sort them alphabetically by the Name property.
This is a simple change to make. Open the ControllersCategoriesController.cs file and update the Index method as follows:
// GET: Categories public ActionResult Index(){return View(db.Categories.OrderBy(c => c.Name).ToList());}
Click Debug ➤ Start Without Debugging to run the web site and click on the Shop by Category link. The categories are now sorted in alphabetical order by the category name, as shown in Figure 2-18.

Figure 2-18. Categories sorted by name in alphabetical order
This code uses LINQ method syntax to specify which column to order by. A lambda expression is used to specify the Name column. This code then returns an ordered list of categories to the view for display. LINQ stands for Language-Integrated Query and it is a query language built into the .NET framework. Using LINQ method syntax means that queries are built using a dot notation to quickly chain methods together. An alternative to method syntax is query syntax and I give an example of this in Chapter 3 when writing a more complex query. Method syntax is more SQL-like in its appearance and can be easier to understand for more complex queries; however, for shorter queries it can appear more long-winded.
Lambda expressions are anonymous functions that can be used to create delegates. In simple terms, they enable you to create an expression where the value on the left side of the lambda operator (=>) is the input parameter and the value on the right is the expression to be evaluated and returned. Considering the lambda expression we have entered above, it takes a category as an input and returns the Name property. Therefore, in plain English, it says to order by the category’s Name property.
I don’t cover LINQ or lambda expressions in detail in this book. I suggest if you want to learn more about them that you read the excellent Pro C# books by Andrew Troelsen.
Filtering Products by Category: Searching Related Entities Using Navigational Properties and Include
You’ve seen how to create a very basic web site showing two lists of different entities. Now we are going to add some useful functionality and get these lists to interact. We’ll do this using a chosen value from the list of categories to filter the list of products. To do this, we’ll need to make the following changes to the code:
Update the Index method in the ProductsController so that it receives a parameter representing a chosen category and returns a list of products that belong to that category.
Transform the list shown in the Category Index Page to a list of hyperlinks that target the ProductsController Index method rather than a list of text items.
First change the ProductsController Index method as follows:
public ActionResult Index(string category){var products = db.Products.Include(p => p.Category);if (!String.IsNullOrEmpty(category)){products = products.Where(p => p.Category.Name == category);}return View(products.ToList());}
This code adds a new string parameter named category to the method. An if statement has been added to check if the new category string is empty. If the category string is not empty, the products are filtered by using the navigational property Category in the Product class using this code: products = products.Where(p => p.Category.Name == category);.
The use of the Include method in the following code line is an example what is known as eager loading:
var products = db.Products.Include(p => p.Category);It tells Entity Framework to perform a single query and retrieve all the products and also all the related categories. Eager loading typically results in an SQL join query that retrieves all the required data at once. You could omit the Include method and Entity Framework would use lazy loading, which would involve multiple queries rather than a single join query.
There are performance implications to choosing which method of loading to use. Eager loading results in one round trip to the database, but on occasion may result in complex join statements that are slow to process. However, lazy loading results in several round trips to the database. Here eager loading is used since the join statement will be relatively simple and we want to load the related categories in order to search over them.
The products variable is filtered using the Where operator to match products when the Name property of the product’s Category property matches the category parameter passed into the method. This may seem a little like overkill and you may be wondering why I didn’t just use the CategoryID property and pass in a number rather than a string. The answer to this lies in the fact that using a category name is much more meaningful in a URL when using routing. We will cover this later in the book.
This is an excellent example of why navigational properties are so useful and powerful. By using a navigational property in my Product class, I am able to search two related entities using minimal code. If I wanted to match products by category name, but did not use navigational properties, I would have to enter the realm of loading category entities via the ProductsController which by convention is only meant to manage products.
To demonstrate the new method in action, start the web site without debugging and navigate to the Product Index page. Now append ?category=clothes onto the end of the URL. The list of products should now be filtered to items matching those in Figure 2-19.

Figure 2-19. Products filtered to the clothes category by using the URL address bar
Any parameters in the query string part of the URL after ? are automatically matched to parameters in the method being targeted. So in this case, the ?category=clothes part of the URL is used in the ProductsController Index method as a parameter named category with a value of clothes.
Caution
A common error often made by programmers new to using Entity Framework is using ToList() in the wrong place. During a method, LINQ is often used for building queries and that is precisely what is does; it simply builds up a query, it does not execute the query! The query is only executed when ToList() is called. Novice programmers often use ToList() at the beginning of their method. The consequences of this are that more records (usually all) will be retrieved from the database than are required, often with an adverse effect on performance. All these records are then held in memory and processed as an in-memory list, which is usually undesirable and can slow the web site down dramatically. Alternatively, do not even call ToList() and the query will only be executed when the view loads. This topic is known as deferred execution due to the fact that the execution of the query is deferred until after ToList() is called.
To finish the functionality for filtering products by category, we need to change the list of categories in the Categories Index page into a list of hyperlinks that target the ProductsController Index method.
In order to change the categories to hyperlinks, modify the ViewsCategoriesIndex.cshtml file by updating the line of code @Html.DisplayFor(modelItem => item.Name) to:
@Html.ActionLink(item.Name, "Index", "Products", new { category = item.Name }, null)This code uses the HTML ActionLink helper to generate a hyperlink with the link text being the category’s name targeting the Index method of the ProductsController. The fourth parameter is routeValue and if category is set as an expected route value, its value will be set to the category name; otherwise, the string category=categoryname will be appended to the URL’s query string in the same manner as we entered manually to demonstrate the product filtering was working.
The result of this change is that the Category Index Page now contains hyperlinks that pass the name of the category to the Index method of the ProductsController, as shown in Figure 2-20.

Figure 2-20. The Categories Index page with hyperlink to filter products. The URL format generated by the clothes link is highlighted in red
Clicking on each of the links will now open the Products Index page with the list of products displayed limited to the category the user clicked on in the web browser.
Summary
In this chapter, I’ve covered how to create model classes and create a database from them. I’ve also covered how to enter a connection string to specify where the database is created and how to create a database context class. This class and our model classes were then used to create controllers and views and we also created and populated the database.
Once the database was created, I showed you how to examine it and then how to modify the views to correct any issues with scaffolding. Following on from this, the final part of the chapter covered how to filter products by category, thus making use of navigational properties and how to target a different action or method from a view.