
This chapter will cover how to delete categories correctly, how to seed the database with data, how to update the database using Code First Migrations based on code changes, and how to perform data validation with custom error messages.
Note
If you want to follow along with the code in this chapter, you must either have completed Chapter 3 or download Chapter 3’s source code from www.apress.com as a starting point.
Deleting an Entity Used as a Foreign Key
So far we have updated our web site to add some useful search and filter features, and we've been able to add some categories and products to the site. Next we'll consider what happens if we try to delete entities.
First of all, add a new category named Test Category to the web site and then add a new product named Test Product with any description and price and assign it to Test Category. Now try to delete Test Category by using the Categories/Index page and confirming the deletion. The web site will throw an error, as shown in Figure 4-1.

Figure 4-1. A referential integrity error occurs when trying to delete a category
This error occurs because the database column CategoryID is used as a foreign key in the Products table and currently there is no modification of this table when a category is deleted. This means that a product will be left with a foreign key field that contains an ID that no longer refers to a record in the Category table; this causes the error.
To fix this issue, the code created by the scaffolding process needs to be updated so that it sets the foreign key of all the affected products to null. Update the HttpPost version of the Delete method in the file ControllersCategoriesController.cs with the following changes highlighted in bold:
// POST: Categories/Delete/5[HttpPost, ActionName("Delete")][ValidateAntiForgeryToken]public ActionResult DeleteConfirmed(int id){Category category = db.Categories.Find(id);foreach (var p in category.Products){p.CategoryID = null;}db.Categories.Remove(category);db.SaveChanges();return RedirectToAction("Index");}
This code adds a simple foreach loop using the products navigational property of the category entity to set the CategoryID of each product to null. When you now try to delete Test Category, it will be deleted without an error and the CategoryID column of Test Product will be set to null in the database.
Enabling Code First Migrations and Seeding the Database with Data
At present we have been entering data manually into the web site to create products and categories. This is fine for testing a new piece of functionality in a development environment, but what if you want to reliably and easily recreate the same data in other environments? This is where the feature of Entity Framework, known as seeding, comes into play. Seeding is used to programmatically create entries in the database and control the circumstances under which they are entered.
I am going to show you how to seed the database using a feature known as Code First Migrations. Migrations are a way of updating the database schema based on code changes made to model classes. We will use migrations throughout the book from now on to update the database schema.
The first thing we’re going to update is the database connection string in the web.config file so that a new database is used for testing that the seed data works correctly. Update the StoreContext connectionString property as follows to create a new database named BabyStore2.mdf:
<add name="StoreContext" connectionString="Data Source=(LocalDB)MSSQLLocalDB;AttachDbFilename=|DataDirectory|BabyStore2.mdf;Initial Catalog=BabyStore2;Integrated Security=True" providerName="System.Data.SqlClient" />Although the connectionString is shown over multiple lines in the book, be sure to keep it on a single line in Visual Studio.
Enabling Code First Migrations
Open the Package Manager Console by choosing View ➤ Other Windows in the main menu. This is where all the commands to use migrations are entered. The first thing to do when using migrations is to enable them for the database context you want to update the database schema for. If there is only one context, then the context is optional.
In this chapter, we are interested in the product and category data, so in Package Manager Console, enter the command:
Enable-Migrations -ContextTypeName BabyStore.DAL.StoreContextIf you have done this correctly, Visual Studio should respond as shown in Figure 4-2.

Figure 4-2. Enabling Code First Migrations
Enabling migrations also adds a new folder to the project named Migrations, which contains a new Configuration.cs file that is used to configure migrations. Figure 4-3 shows the new folder and file as they appear in Solution Explorer.

Figure 4-3. The Migrations folder and Configuration.cs file created when migrations are enabled
Next add an initial migration called InitialDatabase by entering the following command in Package Manager Console:
add-migration InitialDatabaseThis command creates a new file in the Migrations folder with a name in the format <TIMESTAMP>_InitialDatabase.cs, where <TIMESTAMP> represents the time the file was created. The Up method creates the database tables and the Down method deletes them. Following is the code generated in this new class file. You can see that the Up method contains code to recreate the Categories and Products tables along with the data types and keys.
namespace BabyStore.Migrations{using System;using System.Data.Entity.Migrations;public partial class InitialDatabase : DbMigration{public override void Up(){CreateTable("dbo.Categories",c => new{ID = c.Int(nullable: false, identity: true),Name = c.String(),}).PrimaryKey(t => t.ID);CreateTable("dbo.Products",c => new{ID = c.Int(nullable: false, identity: true),Name = c.String(),Description = c.String(),Price = c.Decimal(nullable: false, precision: 18, scale: 2),CategoryID = c.Int(),}).PrimaryKey(t => t.ID).ForeignKey("dbo.Categories", t => t.CategoryID).Index(t => t.CategoryID);}public override void Down(){DropForeignKey("dbo.Products", "CategoryID", "dbo.Categories");DropIndex("dbo.Products", new[] { "CategoryID" });DropTable("dbo.Products");DropTable("dbo.Categories");}}}
The code in this file will be used shortly to create a new database. Before that, we need to update the Seed() method of the MigrationsConfiguration.cs file to add some test data to the database.
Seeding the Database with Test Data
When using Code First Migrations, the Seed method adds test data into a database. Generally, the data is only added when the database is created or when some new data is added to the method. Data is not dropped when the data model changes. When migrating to production, you will need to decide if any data is initially required, rather than using test data, and update the seed method appropriately.
To add some new data for Categories and Products to the database, update the Seed method of the MigrationsConfigurations.cs file as follows:
namespace BabyStore.Migrations{using Models;using System.Collections.Generic;using System.Data.Entity.Migrations;using System.Linq;internal sealed class Configuration :DbMigrationsConfiguration<BabyStore.DAL.StoreContext>{public Configuration(){AutomaticMigrationsEnabled = false;}protected override void Seed(BabyStore.DAL.StoreContext context){var categories = new List<Category>{new Category { Name = "Clothes" },new Category { Name = "Play and Toys" },new Category { Name = "Feeding" },new Category { Name = "Medicine" },new Category { Name= "Travel" },new Category { Name= "Sleeping" }};categories.ForEach(c => context.Categories.AddOrUpdate(p => p.Name, c));context.SaveChanges();var products = new List<Product>{new Product { Name = "Sleep Suit", Description="For sleeping or general wear",Price=4.99M, CategoryID=categories.Single( c => c.Name == "Clothes").ID },new Product { Name = "Vest", Description="For sleeping or general wear",Price=2.99M, CategoryID=categories.Single( c => c.Name =="Clothes").ID },new Product { Name = "Orange and Yellow Lion", Description="Makes a squeakingnoise", Price=1.99M, CategoryID=categories.Single( c => c.Name =="Play and Toys").ID },new Product { Name = "Blue Rabbit", Description="Baby comforter", Price=2.99M,CategoryID=categories.Single( c => c.Name == "Play and Toys").ID },new Product { Name = "3 Pack of Bottles", Description="For a leak freedrink everytime", Price=24.99M, CategoryID=categories.Single( c =>c.Name == "Feeding").ID },new Product { Name = "3 Pack of Bibs", Description="Keep your baby drywhen feeding", Price=8.99M, CategoryID=categories.Single( c => c.Name== "Feeding").ID },new Product { Name = "Powdered Baby Milk", Description="Nutritional andTasty", Price=9.99M, CategoryID=categories.Single( c => c.Name =="Feeding").ID },new Product { Name = "Pack of 70 Disposable Nappies", Description="Dry andsecure nappies with snug fit", Price=19.99M, CategoryID=categories.Single( c => c.Name == "Feeding").ID },new Product { Name = "Colic Medicine", Description="For helping with babycolic pains", Price=4.99M, CategoryID=categories.Single( c => c.Name== "Medicine").ID },new Product { Name = "Reflux Medicine", Description="Helps to prevent milkregurgitation and sickness", Price=4.99M, CategoryID=categories.Single(c => c.Name == "Medicine").ID },new Product { Name = "Black Pram and Pushchair System", Description="Convertfrom pram to pushchair, with raincover", Price=299.99M, CategoryID=categories.Single( c => c.Name == "Travel").ID },new Product { Name = "Car Seat", Description="For safe car travel",Price=49.99M, CategoryID= categories.Single( c => c.Name =="Travel").ID },new Product { Name = "Moses Basket", Description="Plastic moses basket",Price=75.99M, CategoryID=categories.Single( c => c.Name =="Sleeping").ID },new Product { Name = "Crib", Description="Wooden crib", Price=35.99M,CategoryID= categories.Single( c => c.Name == "Sleeping").ID },new Product { Name = "Cot Bed", Description="Converts from cot into bed forolder children", Price=149.99M, CategoryID=categories.Single( c =>c.Name == "Sleeping").ID },new Product { Name = "Circus Crib Bale", Description="Contains sheet, duvetand bumper", Price=29.99M, CategoryID=categories.Single( c => c.Name =="Sleeping").ID },new Product { Name = "Loved Crib Bale", Description="Contains sheet,duvet and bumper", Price=35.99M, CategoryID=categories.Single( c =>c.Name == "Sleeping").ID }};products.ForEach(c => context.Products.AddOrUpdate(p => p.Name, c));context.SaveChanges();}}}
This code creates a list of category and product objects and saves them to the database. To explain how this works, we will break down the code used for the categories. First a variable named categories is created and a list of category objects is created and assigned to it using the following code:
var categories = new List<Category>{new Category { Name="Clothes" },new Category { Name="Play and Toys" },new Category { Name="Feeding" },new Category { Name="Medicine" },new Category { Name="Travel" },new Category { Name="Sleeping" }};
The next line of code, categories.ForEach(c => context.Categories.AddOrUpdate(p => p.Name, c));, will add or update a category if there is not one with the same name already in the database. For this example, we made the assumption that the category name will be unique.
The final piece of code—context.SaveChanges();—is called to save the changes to the database. WE call this twice in the file but this is not required; you only need to call it once. However, calling it after saving each entity type allows you to locate the source of the problem if there is an issue writing to the database.
If you do encounter a scenario where you want to add more than one entity with very similar data (for example, two categories with the same name), you can add to the context individually as follows:
context.Categories.Add(new Category { Name = "Clothes" });context.SaveChanges();context.Categories.Add(new Category { Name = "Clothes" });context.SaveChanges();
Again there is no need to save the changes multiple times, but doing so will help you to track down the source of any error. The code used to add products follows the same pattern as that to add categories, apart from the fact that the category entity is used to generate the CategoryID field using the following code to find a category's ID value based on its name: CategoryID=categories.Single( c => c.Name == "Clothes").ID.
Creating the Database Using the Initial Database Migration
Now we are ready to create the new database with test data from the Seed method. In Package Manager Console, run the command: update-database. If this works correctly, you should be informed that the migrations have been applied and that the Seed method has run, as shown in Figure 4-4.

Figure 4-4. Output of running a successful database update using the update-database command
A new database named BabyStore2.mdf should now have been created in the App_Data folder of the project. When the update-database command ran, the Up method of the MigrationsConfiguration.cs file was called to create the tables in the database. To view the database, open SQL Server Object Explorer and navigate to the BabyStore2.mdf database. You may have to click the Refresh button for the database to appear if you already have SQL Server Object Explorer open. View the data in the Products table by right-clicking on the table and choosing View Data from the menu. Figure 4-5 shows the data from the Products table. This data was generated when the Seed method ran.

Figure 4-5. The Products table data created by running the Seed method
Tip
If you can’t see anything in the App_Data folder, click on the Show All Files Button in Solution Explorer.
Start the web site without debugging and you will now see the new categories (see Figure 4-6) and products (see Figure 4-7), as populated by the Seed method.
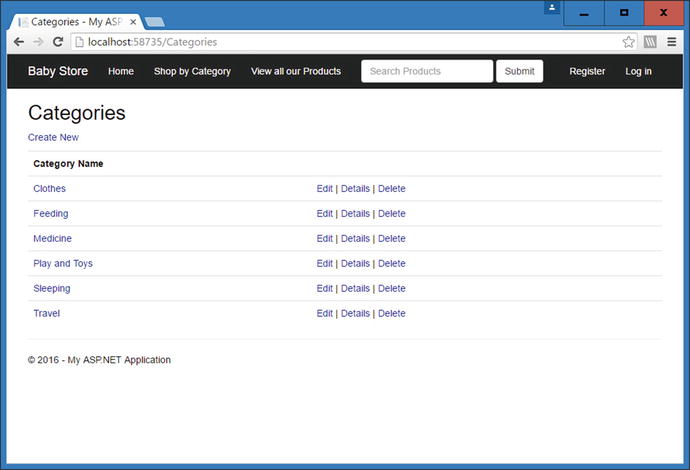
Figure 4-6. The Categories index page showing data populated from the Seed method

Figure 4-7. The Products index page showing data populated from the Seed method
Adding Data Validation and Formatting Constraints to Model Classes
At the moment, the data in the site is not validated on entry or displayed in the relevant formats such as currency. As an example try creating a new category called 23. You are able to do so. A user can also enter a completely blank category name, which causes the application to throw an error when rendering the category index.cshtml page.
Delete the new 23 category you just created. If you did create a category with a blank name, then delete it from the database using SQL Server Object Explorer.
In Chapter 2, I showed you how to use a MetaDataType class to add DataAnnotations to an existing class rather than directly adding them to the class itself. Throughout the rest of the book, we are going to revert to modifying the class itself for the sake of simplicity.
Adding Validation and Formatting to the Category Class
We’re going to add some validation and formatting to the categories as follows:
The name field cannot be blank
The name field only accepts letters
The name must be between three and fifty characters in length
In order to achieve this, you must modify the ModelsCategory.cs file, as highlighted in bold:
using System.Collections.Generic;using System.ComponentModel.DataAnnotations;namespace BabyStore.Models{public class Category{public int ID { get; set; }[Required][StringLength(50, MinimumLength = 3)][RegularExpression(@"^[A-Z]+[a-zA-Z''-'s]*$")][Display(Name = "Category Name")]public string Name { get; set; }public virtual ICollection<Product> Products { get; set; }}}
The [Required] attribute marks the property as being required, i.e., it cannot be null or empty, while the [StringLength(50, MinimumLength = 3)] attribute specifies that the string entered into the field must be between 3 and 50 characters in length. The final attribute—[RegularExpression(@"^[A-Z]+[a-zA-Z''-'s]*$")]—uses a regular expression to specify that the field must only contain letters and spaces and start with an uppercase letter. In simple terms, this expression says the first character must be an uppercase letter followed by a repetition of letter and spaces. I don't cover regular expressions in this book since several tutorials are available online. If you want to translate a regular expression into something more meaningful or view a library of commonly used expressions, try using the site https://regex101.com/ .
Next, start the web site without debugging and click on Shop by Category. Figure 4-8 shows the resulting page. Instead of displaying the Categories index page, the web site shows an error message informing you that the model backing StoreContext has changed.

Figure 4-8. The message displayed when the model is out of sync with the database
This issue is caused because the Category class now has changes in it that need to be applied to the database. Two of the three attributes we added need to be applied to the database to change the rules for the Name column. This will ensure that the column cannot be null and also apply a maxLength attribute. The regular expression and the minimum length are not applicable to the database.
In order to fix this issue, open Package Manager Console and add a new migration by running the add-migration CategoryNameValidation command. A new migration file will be created containing the following code to update the Name column of the Categories table:
namespace BabyStore.Migrations{using System;using System.Data.Entity.Migrations;public partial class CategoryNameValidation : DbMigration{public override void Up(){AlterColumn("dbo.Categories", "Name", c => c.String(nullable: false, maxLength:50));}public override void Down(){AlterColumn("dbo.Categories", "Name", c => c.String());}}}
To apply these changes to the database, run the update-database command in Package Manager Console. The Name column of the Categories table in the database will now be updated, as shown in Figure 4-9. Note that the Allow Nulls box is unchecked and the Data Type is now nvarchar(50).

Figure 4-9. The Categories table and T-SQL script with updated Name column
Now run the web site again and navigate to the Category Create page by clicking on Shop by Category on the home page. Then click Create New on the Categories index page. Try to create a blank category; the web site will inform you that this is not allowed, as shown in Figure 4-10.

Figure 4-10. Error message now displayed when attempting to create an empty category
Now try to create a category named Clothes 2. Figure 4-11 shows the message the web site displays in response to this.

Figure 4-11. The message generated when attempting to put a numeric character in a category name
As you can see, the message displayed in Figure 4-11 is not exactly user friendly. Fortunately, ASP.NET MVC allows us to override the error message text by entering an extra parameter into the attribute. To add some more user friendly error messages for each field, update the ModelsCategory.cs file as follows:
using System.Collections.Generic;using System.ComponentModel.DataAnnotations;namespace BabyStore.Models{public class Category{public int ID { get; set; }[Required(ErrorMessage = "The category name cannot be blank")][StringLength(50, MinimumLength = 3, ErrorMessage = "Please enter a category namebetween 3 and 50 characters in length")][RegularExpression(@"^[A-Z]+[a-zA-Z''-'s]*$", ErrorMessage = "Please enter a categoryname beginning with a capital letter and made up of letters and spaces only")][Display(Name = "Category Name")]public string Name { get; set; }public virtual ICollection<Product> Products { get; set; }}}
Note
This error message should be entered on a single line in Visual Studio. They are split here simply for book formatting. Alternatively, if you want to split them over two lines, you must use closing and opening quote with a plus sign: " + ".
Now start the web site without debugging and try creating the Clothes 2 category again. This time, the more meaningful error message is displayed, as shown in Figure 4-12.

Figure 4-12. A custom validation error message
Adding Formatting and Validation to the Product Class
The product class contains properties that require more complex attributes such as formatting as currency and displaying a field over multiple lines. Update the ModelsProduct.cs file with the following code highlighted in bold:
using System.ComponentModel.DataAnnotations;namespace BabyStore.Models{public partial class Product{public int ID { get; set; }[Required(ErrorMessage = "The product name cannot be blank")][StringLength(50, MinimumLength = 3, ErrorMessage = "Please enter a product namebetween 3 and 50 characters in length")][RegularExpression(@"^[a-zA-Z0-9'-'s]*$", ErrorMessage = "Please enter a product namemade up of letters and numbers only")]public string Name { get; set; }[Required(ErrorMessage = "The product description cannot be blank")][StringLength(200, MinimumLength = 10, ErrorMessage = "Please enter a productdescription between 10 and 200 characters in length")][RegularExpression(@"^[,;a-zA-Z0-9'-'s]*$", ErrorMessage = "Please enter a productdescription made up of letters and numbers only")][DataType(DataType.MultilineText)]public string Description { get; set; }[Required(ErrorMessage = "The price cannot be blank")][Range(0.10, 10000, ErrorMessage = "Please enter a price between 0.10 and 10000.00")][DataType(DataType.Currency)][DisplayFormat(DataFormatString = "{0:c}")]public decimal Price { get; set; }public int? CategoryID { get; set; }public virtual Category Category { get; set; }}}
There are some new entries here that we have not seen before. The code [DataType(DataType.MultilineText)] tells the UI to display the input element for the description field as a text area when used in the edit and create views.
[DataType(DataType.Currency)] is used to give a hint to the UI as to what the format should be and it emits HTML5 date attributes to be used by HTML 5 browsers to format input elements. At the moment, web browser implementation of these attributes is unfortunately patchy.
[DisplayFormat(DataFormatString = "{0:c}")] specifies that the price property should be displayed in currency format, i.e., £1,234.56 (with the currency set by the server locale). Generally either of these attributes should work and display the price formatted as currency. We have included them both here for completeness.
Now build the solution and then, in Package Manager Consoler, run the command add-migration ProductValidation followed by update-database to add the range and nullable settings to the database.
Start the web site without debugging and click on View All Our Products. Figure 4-13 shows the list of products with the price field now formatted as currency due to the data annotations we made.

Figure 4-13. The Products index page with the Price Field now formatted as currency
Note
It is possible to use the currency format when editing by using the code [DisplayFormat(DataFormatString = "{0:c}", ApplyFormatInEditMode = true)], but I don't recommend that you do this, because the price when editing will display in the format £9,999.99. When you then try to submit the edit form, the price will fail validation because £ is not a number.
Click on the Details link and you will see that the price is also now formatted as currency. To see the full effect of the changes to the product class, we need to try creating and editing a product. Figure 4-14 shows an attempt to enter some data that does not comply with the rules when creating a new product.

Figure 4-14. Custom error messages when attempting to create a product with invalid data
This is a big improvement on our default view and the validation applied to it; however, there are still some issues. The price input still displays a default error message when a number is not entered, which can be fixed in a couple of ways.
One way to fix this is to overwrite the data-val-number HTML attribute by modifying the EditorFor code for the price field. You do this by passing in a new HTML attribute, as follows:
@Html.EditorFor(model => model.Price, new { htmlAttributes = new { @class = "form-control", data_val_number = "The price must be a number." } })This change must implemented in each view that allows you to edit price, making it more difficult to maintain.
An alternative and more maintainable way to remedy this is to use a regular expression in the product class in the same manner as before, by updating the price property as follows:
[Required(ErrorMessage = "The price cannot be blank")][Range(0.10, 10000, ErrorMessage = "Please enter a price between 0.10 and 10000.00")][DataType(DataType.Currency)][DisplayFormat(DataFormatString = "{0:c}")][RegularExpression("[0-9]+(\.[0-9][0-9]?)?", ErrorMessage = "The price must be a number up to two decimal places")]public decimal Price { get; set; }
This regular expression allows a number optionally followed by a decimal point, plus another one or two numbers. It allows numbers of the following format—1, 1.1, and 1.10—but not 1. without anything following the decimal point. Figure 4-15 shows the validation in action.
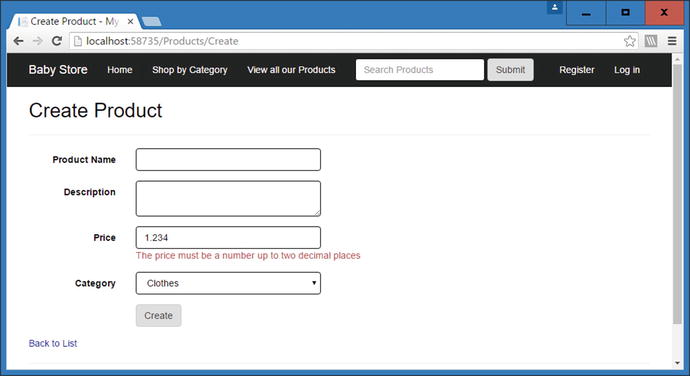
Figure 4-15. Validation to two decimal places applied to the price field of a product
How Validation Works
When we first created the project, it was set up with two NuGet packages installed, which are used for the client-side validation: Microsoft.jQuery.Unobtrusive.Validation and jQuery.Validation. ASP.NET MVC uses jQuery to perform client-side validation whenever the user navigates away from the input field.
The user does not need to submit the form in order to receive validation error messages. Validation is also performed on the server side once the form is submitted since using client-side validation alone is unsafe. Other JavaScript code could be used to bypass the validation.
To see the effect of the server-side validation, remove the following code from the ViewsProductsCreate.cshtml file:
@section Scripts {@Scripts.Render("∼/bundles/jqueryval")}
This removes the JavaScript files used to perform validation from the view so that only the server side code is used to perform validation. Now run the web site and attempt to create a new product with a blank name, blank description, and a price of 1.234. Click the Create button. The page will respond with the same validation messages as before, but this time they have been thrown by the server, as shown in Figure 4-16.

Figure 4-16. Server-side validation after the form is submitted
Add the code back in that you removed from the ViewsProductsCreate.cshtml file earlier:
@section Scripts {@Scripts.Render("∼/bundles/jqueryval")}
The view files for editing and creating contain lines of code used to display validation messages for each input element and a summary for the whole form. The summary is used for any general error messages for the model that are not specific to an input. The code for the ViewsProductsCreate.cshtml file is shown here, with the lines of code responsible for the validation messages highlighted.
@model BabyStore.Models.Product@{ViewBag.Title = "Create Product";}<h2>@ViewBag.Title</h2>@using (Html.BeginForm()){@Html.AntiForgeryToken()<div class="form-horizontal"><hr />@Html.ValidationSummary(true, "", new { @class = "text-danger" })<div class="form-group">@Html.LabelFor(model => model.Name, htmlAttributes: new { @class = "control-labelcol-md-2" })<div class="col-md-10">@Html.EditorFor(model => model.Name, new { htmlAttributes = new { @class ="form-control" } })@Html.ValidationMessageFor(model => model.Name, "", new { @class = "text-danger" })</div></div><div class="form-group">@Html.LabelFor(model => model.Description, htmlAttributes: new { @class ="control- label col-md-2" })<div class="col-md-10">@Html.EditorFor(model => model.Description, new { htmlAttributes = new {@class = "form-control" } })@Html.ValidationMessageFor(model => model.Description, "", new { @class ="text-danger" })</div></div><div class="form-group">@Html.LabelFor(model => model.Price, htmlAttributes: new { @class = "control-labelcol-md-2" })<div class="col-md-10">@Html.EditorFor(model => model.Price, new { htmlAttributes = new { @class ="form-control" } })@Html.ValidationMessageFor(model => model.Price, "", new { @class = "text-danger" })</div></div><div class="form-group">@Html.LabelFor(model => model.CategoryID, "Category", htmlAttributes: new { @class= "control-label col-md-2" })<div class="col-md-10">@Html.DropDownList("CategoryID", null, htmlAttributes: new { @class = "form-control" })@Html.ValidationMessageFor(model => model.CategoryID, "", new { @class ="text-danger" })</div></div><div class="form-group"><div class="col-md-offset-2 col-md-10"><input type="submit" value="Create" class="btn btn-default" /></div></div></div>}<div>@Html.ActionLink("Back to List", "Index")</div>@section Scripts {@Scripts.Render("∼/bundles/jqueryval")}
The code @Html.ValidationSummary(true, "", new { @class = "text-danger" }) is responsible for displaying the overall validation summary for the model, while the other lines of code, such as @Html.ValidationMessageFor(model => model.Name, "", new { @class = "text-danger"}), are used to show any validation messages for each individual property (in this case, for the name property). The Bootstrap CSS class text-danger is used to display the messages in red.
Summary
In this chapter, I’ve shown you how to modify the delete method for an entity with an ID field used as a foreign key in another entity, followed by how to enable Code First Migrations with a view to updating the database schema from your code changes. I then showed you how to seed the database with test data and how to create a new database using migrations. Finally, the chapter covered adding formatting and validation rules to a class, updating the database using migrations, and a high-level discussion of how the validation process works.