
This chapter will enhance the site functionality by adding a feature to search for products and add a more advanced select control using a view model to pass complex data to the view instead of using ViewBag.
Note
If you want to follow along with the code in this chapter, you must either have completed Chapter 2 or download Chapter 2’s sour code from www.apress.com as a starting point.
Adding Product Search
To perform a search for products, I'm going to add some functionality to search through product names, descriptions, and categories so that the user has a better chance of finding relevant results.
The category search is included so that if, for example, a user searches for "clothes" rather than a specific item of clothing, then all clothes will be returned. If we did not search the category field then it's likely that the user wouldn't find anything because it's unlikely that many clothing products actually contain the word “clothes” in the name or the description fields.
I'll use the LINQ to Entities Contains method to search for matches in the product properties.
Updating the Controller for Product Searching
To add product search, modify the Index method of the ControllersProductsController.cs file as shown here:
public ActionResult Index(string category, string search){var products = db.Products.Include(p => p.Category);if (!String.IsNullOrEmpty(category)){products = products.Where(p => p.Category.Name == category);}if (!String.IsNullOrEmpty(search)){products = products.Where(p => p.Name.Contains(search) ||p.Description.Contains(search) ||p.Category.Name.Contains(search));}return View(products.ToList());}
First, a search parameter is added to the method and then if search is not null or empty, the products query is modified to filter on the value of search using this code:
if (!String.IsNullOrEmpty(search)){products = products.Where(p => p.Name.Contains(search) ||p.Description.Contains(search) ||p.Category.Name.Contains(search));}
Translated into plain English, this code says “find the products where either the product name field contains search, the product description contains search, or the product's category name contains search”. The code again makes use of a lambda expression but this expression is more complex and uses the logical OR operator ||. Note that there is still only one operator required on the left of the => lambda operator despite there being multiple alternatives in the code statement to the right of =>. When the query is run against the database, the Contains method is translated to SQL LIKE and is case-insensitive.
Testing Product Search
Test the new search functionality by starting the application without debugging and clicking on View All Our Products to open the Products Index page. Manually append ?search=red to the end of the URL so that it now reads as /Products?search=red. You should now get matching products as shown in Figure 3-1.

Figure 3-1. Searching products manually for “red” via the URL
To test that searching within category names works properly, modify the URL to /Products?search=clothes. The query will now match products that either contain the word clothes in the title or description or that belong to the clothes category, as shown in Figure 3-2.
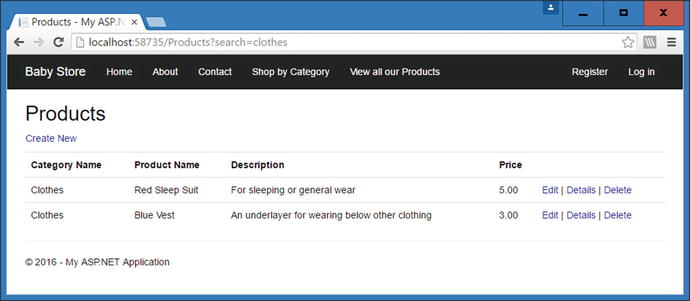
Figure 3-2. Searching for products in the clothes category by altering the URL
Adding a Search Box to the Main Site Navigation Bar
We can't expect users to manually type searches into the URL, so we need to add a search box to the site. I'll place this in the main navigation bar of the site so that it is always visible to users to enable them to find products from any page.
As covered in Chapter 1, the main navigation bar is part of the site layout page and therefore it is contained in the ViewsShared\_Layout.cshtml file.
First of all, delete the About and Contact links from the site. We will not be using them in this example and they take up space. To do this, delete the following code from the ViewsShared\_Layout.cshtml file:
<li>@Html.ActionLink("About", "About", "Home")</li><li>@Html.ActionLink("Contact", "Contact", "Home")</li>
To add a search box, edit the div with the class navbar-collapse collapse in the ViewsShared\_Layout.cshmtl file, as highlighted in the following code listing:
<!DOCTYPE html><html><head><meta charset="utf-8" /><meta name="viewport" content="width=device-width, initial-scale=1.0"><title>@ViewBag.Title - My ASP.NET Application</title>@Styles.Render("∼/Content/css")@Scripts.Render("∼/bundles/modernizr")</head><body><div class="navbar navbar-inverse navbar-fixed-top"><div class="container"><div class="navbar-header"><button type="button" class="navbar-toggle" data-toggle="collapse" data-target=".navbar-collapse"><span class="icon-bar"></span><span class="icon-bar"></span><span class="icon-bar"></span></button>@Html.ActionLink("Baby Store", "Index", "Home", new { area = "" }, new {@class = "navbar-brand" })</div><div class="navbar-collapse collapse"><ul class="nav navbar-nav"><li>@Html.ActionLink("Contact", "Contact", "Home")</li><li>@Html.ActionLink("Shop by Category", "Index", "Categories")</li><li>@Html.ActionLink("View all our Products", "Index", "Products")</li></ul>@using (Html.BeginForm("Index", "Products", FormMethod.Get, new { @class ="navbar-form navbar-left" })){<div class="form-group">@Html.TextBox("Search", null, new { @class = "form-control", @placeholder= "Search Products" })</div><button type="submit" class="btn btn-default">Submit</button>}@Html.Partial("_LoginPartial")</div></div></div><div class="container body-content">@RenderBody()<hr /><footer><p>© @DateTime.Now.Year - My ASP.NET Application</p></footer></div>@Scripts.Render("∼/bundles/jquery")@Scripts.Render("∼/bundles/bootstrap")@RenderSection("scripts", required: false)</body></html>
Here an HTML form has been created to target the Index method of the ProductsController and everything is styled using Bootstrap. The form is similar to those we have already seen in the various Create and Edit views, but this form uses an overloaded version of the BeginForm HTML helper to specify to use GET rather than POST when submitting the form: @using (Html.BeginForm("Index", "Products", FormMethod.Get , new { @class = "navbar-form navbar-left" })).
The form uses GET rather than POST so that the search term can be seen in the URL. Therefore, users can copy it and share it with others by using other means such as e-mail or social media. By convention, GET requests are used when making database queries that do not alter the data in the database.
One additional thing covered in this code but not seen before is the use of an HTML5 placeholder attribute, which is used to display the text "Search Products" in the search box to indicate what it is used for when the page is first loaded. This is done by passing an additional item into the htmlAttributes parameter object in the line of code: @Html.TextBox("Search", null, new { @class = "form-control" , @placeholder = "Search Products" }). The name of the textbox is specified as Search and this is mapped to the Search parameter by the MVC Framework. Figure 3-3 shows the resulting navigation bar, complete with the search box including placeholder text.
Figure 3-3. Navigation bar complete with search box
Perform some searches using the search box. The results should be identical to manually entering the search term into the URL.
How to Style Using Bootstrap
Bootstrap is an HTML, CSS, JavaScript framework originally built at Twitter. It's used by default in ASP.NET projects where scaffolding is used and has been used throughout our project so far for styling the web site's appearance. There's a whole raft of information about Bootstrap available online, so I'm not going to cover it in any great detail, but whenever I introduce something new, I will explain how and why I've styled it as I have.
So how did I know how to style the search box? Well, the answer lies in the web site http://www.bootswatch.com made by Thomas Park. This web site features several free themes for Bootstrap and it offers HTML previews for many elements. If you click on the Preview button on one of the themes and then scroll down the page and hover over an element, a <> symbol appears at the top-right corner of the element, as shown in Figure 3-4. If you click this symbol, an HTML preview appears, as shown in Figure 3-5.

Figure 3-4. The preview <> symbol in the top-right corner of an element on bootswatch.com

Figure 3-5. HTML preview from bootswatch.com. The highlighted section shows how to style a search box and form inside the navbar class
Filtering the Search Results by Category Using ViewBag
Next, we will add a feature so that the user can filter search results down to a particular category. In this example, we will use ViewBag to display a select control with categories in the search results page. We'll relate the select control to any search term entered by the user so that it only shows categories relevant to the products returned by a search and does not allow a user to select an empty category.
Updating the ProductsController Index Method to Filter by Category
Modify the Index method of the ControllersProductsController.cs file as follows in order to store the current search in the ViewBag and generate a list of distinct categories to be stored in the ViewBag as a SelectList.
public ActionResult Index(string category, string search){var products = db.Products.Include(p => p.Category);if (!String.IsNullOrEmpty(category)){products = products.Where(p => p.Category.Name == category);}if (!String.IsNullOrEmpty(search)){products = products.Where(p => p.Name.Contains(search) ||p.Description.Contains(search) ||p.Category.Name.Contains(search));ViewBag.Search = search;}var categories = products.OrderBy(p => p.Category.Name).Select(p =>p.Category.Name).Distinct();ViewBag.Category = new SelectList(categories);return View(products.ToList());}
The search is stored in the ViewBag to allow it to be reused when a user clicks on the category filter. If it weren’t stored, the search term would be discarded and the products would not be filtered correctly.
The code var categories = products.OrderBy(p => p.Category.Name).Select(p => p.Category.Name).Distinct(); then generates a distinct list of categories ordered alphabetically. The list of categories is not exhaustive; it only contains categories from the products that have been filtered by the search.
Finally, a new SelectList is created from the categories variable and stored in the ViewBag ready for use in the view.
Adding the Filter to the Products Index Page
To make the HTML page generated by the ProductsIndex.cshtml file filter by category, we need a new HTML form to submit the category to filter by. Add a new form with an HTML select control by adding the following code to the ViewsProductsIndex.cshtml file after the CreateNew link.
<p>@Html.ActionLink("Create New", "Create")@using (Html.BeginForm("Index", "Products", FormMethod.Get)){<label>Filter by category:</label> @Html.DropDownList("Category", "All")<input type="submit" value="Filter" /><input type="hidden" name="Search" id="Search" value="@ViewBag.Search" />}</p>
This code adds a form that targets the Index method of ProductsController using GET so that the query string contains the values it submits. A select control is generated for the ViewBag.Category property using the code @Html.DropDownList("Category", "All"), where the "All" argument specifies the default value for the select control. A Submit button is added to allow the user to submit the form and perform filtering. A hidden HTML element is also included to hold the value of the current search term. It’s resubmitted so that the search term originally entered by the user is preserved when the products are filtered by category.
Start the web site without debugging. Figure 3-6 shows you how the Products Index page now looks with the category filter in place and a search in place for the word "red". Notice that All is the default value of the filter.

Figure 3-6. The Products Index page with category filter in place
Everything looks as though the code is working as expected; however, there is an issue with it. Figure 3-7 shows the search for “red” with the results filtered to the Clothes category.

Figure 3-7. A search for “red” filtered to the Clothes category
The issue is that the toys category has disappeared from the list of categories to filter by. It’s simple to correct this issue, but it highlights the need to build your queries in the correct order. In order to rectify this issue, modify the Index method of the ControllersProductsController.cs file as follows, so that products are filtered by category after the categories variable has been populated:
public ActionResult Index(string category, string search){var products = db.Products.Include(p => p.Category);if (!String.IsNullOrEmpty(search)){products = products.Where(p => p.Name.Contains(search) ||p.Description.Contains(search) ||p.Category.Name.Contains(search));ViewBag.Search = search;}var categories = products.OrderBy(p => p.Category.Name).Select(p =>p.Category.Name).Distinct();if (!String.IsNullOrEmpty(category)){products = products.Where(p => p.Category.Name == category);}ViewBag.Category = new SelectList(categories);return View(products.ToList());}
Start the web site without debugging. If you now perform a search and filter by category, the category filter will still contain the other matching categories in the filter, as shown in Figure 3-8.

Figure 3-8. A search for “red” filtered to the Clothes category but now also allows the user to select the Toys category
Using a View Model for More Complex Filtering
Using the ViewBag to pass data to views works, but once you need to send more and more data, it becomes messy. This is particularly true when coding because due to the dynamic nature of ViewBag, Visual Studio offers no IntelliSense to tell you what properties are available in ViewBag. This can easily lead to coding errors with incorrect names being used.
Rather than using ViewBag, it is better practice to use a view model for the purpose of passing information from a controller to a view. The view is then based on this model rather than being based on a domain model (so far, all of our views have been based on domain models). Some developers take this concept further and base all their views solely on view models. In this book, we'll use a mixture of the view models and domain models.
In this example, I'll show you how to add a count to the category filter control to show how many matching products are in each category. To do this, we require a view model to hold all the information we want to pass to the view.
Creating a View Model
Create a new folder named ViewModels under the BabyStore project and add a new class to it named ProductIndexViewModel. Next, add the following code to the new file:
using BabyStore.Models;using System.Collections.Generic;using System.Linq;using System.Web.Mvc;namespace BabyStore.ViewModels{public class ProductIndexViewModel{public IQueryable<Product> Products { get; set; }public string Search { get; set; }public IEnumerable<CategoryWithCount> CatsWithCount { get; set; }public string Category { get; set; }public IEnumerable<SelectListItem> CatFilterItems{get{var allCats = CatsWithCount.Select(cc => new SelectListItem{Value = cc.CategoryName,Text = cc.CatNameWithCount});return allCats;}}}public class CategoryWithCount{public int ProductCount { get; set; }public string CategoryName { get; set; }public string CatNameWithCount{get{return CategoryName + " (" + ProductCount.ToString() + ")";}}}}
This class file looks more complex than the code we have used so far so I will break it down step-by-step to explain what each property is used for.
First, the file contains two classes, called ProductIndexViewModel and CategoryWithCount. CategoryWithCount is a simple class used to hold a category name and the number of products within that category.
The ProductCount property holds the number of matching products in a category and CategoryName simply holds the name of the category. The CatNameWithCount property then returns both of these properties combined into a string. An example of this property is Clothes(2).
ProductIndexViewModel needs to hold a combination of information that was previously passed to the view using ViewBag and also the model IEnumerable<BabyStore.Models.Product> (since this is the model currently specified at the top of the /Views/Products/Index.cshtml file).
The first property in the class is public IQueryable<Product> Products { get; set; }. This will be used instead of the model currently used in the view.
The second property, called public string Search { get; set; }, will replace ViewBag.Search currently set in the ProductsController class.
The third property, called public IEnumerable<CategoryWithCount> CatsWithCount { get; set; }, will hold all of the CategoryWithCount items to be used inside the select control in the view.
The fourth property, Category, will be used as the name of the select control in the view.
Finally, the property public IEnumerable<SelectListItem> CatFilterItems is used to return a list of the type SelectListItem, which will generate a value of the categoryName to be used as the value when the HTML form is submitted and the text displayed in the format of CatNameWithCount.
Updating the ProductsController Index Method to Use the View Model
Update the Index method of the ControllersProductsController.cs file so that it matches the following code. The changes—which use the view model rather than the ViewBag and return categories along with a count of items—are highlighted in bold. First of all, ensure that you add a using statement to the top of the file so that the class can access the ProductIndexViewModel class you just created.
using BabyStore.ViewModels;public ActionResult Index(string category, string search){//instantiate a new view modelProductIndexViewModel viewModel = new ProductIndexViewModel();//select the productsvar products = db.Products.Include(p => p.Category);//perform the search and save the search string to the viewModelif (!String.IsNullOrEmpty(search)){products = products.Where(p => p.Name.Contains(search) ||p.Description.Contains(search) ||p.Category.Name.Contains(search));viewModel.Search = search;}//group search results into categories and count how many items in each categoryviewModel.CatsWithCount = from matchingProducts in productswherematchingProducts.CategoryID != nullgroup matchingProducts bymatchingProducts.Category.Name intocatGroupselect new CategoryWithCount(){CategoryName = catGroup.Key,ProductCount = catGroup.Count()};if (!String.IsNullOrEmpty(category)){products = products.Where(p => p.Category.Name == category);}viewModel.Products = products;return View(viewModel);}
The first code change ensures that a new view model is created for use within the method:
ProductIndexViewModel viewModel = new ProductIndexViewModel();The code viewModel.Search = search; assigns the search variable to the viewModel instead of to ViewBag.
The third code change is a LINQ statement that populates the CatsWithCount property of viewModel with a list of CategoryWithCount objects. In this example, I used a different form of LINQ than what I used previously due to the complexity of the query. I used a form of LINQ known as query syntax to make the query easier to read.
The statement works by grouping products by category name, where the category ID is not null, using this code:
from matchingProducts in productswherematchingProducts.CategoryID != nullgroup matchingProducts by matchingProducts.Category.Name intocatGroup
For each group, the category name and the number of products are then assigned to a CategoryWithCount object:
select new CategoryWithCount(){CategoryName = catGroup.Key,ProductCount = catGroup.Count()};
The final code change assigns the products variable to the Products property of the viewModel instead of passing it to the view and then instead passes the viewModel to the view as follows:
viewModel.Products = products;return View(viewModel);
Note that any products not belonging to a category will not be shown in the category filter; however, they can still be searched for.
Modifying the View to Display the New Filter Using the View Model
Next update the ViewsProductsIndex.cshtml file so that it uses the new view model to update the way it generates the filter control, retrieves the search string, displays the table headings, and displays the list of products. Make the following changes:
@model BabyStore.ViewModels.ProductIndexViewModel@{ViewBag.Title = "Products";}<h2>@ViewBag.Title</h2><p>@Html.ActionLink("Create New", "Create")@using (Html.BeginForm("Index", "Products", FormMethod.Get)){<label>Filter by category:</label>@Html.DropDownListFor(vm => vm.Category, Model.CatFilterItems, "All");<input type="submit" value="Filter" /><input type="hidden" name="Search" id="Search" value="@Model.Search"/>}</p><table class="table"><tr><th>@Html.DisplayNameFor(model => model.Category)</th><th>@Html.DisplayNameFor(model => model.Products.First().Name)</th><th>@Html.DisplayNameFor(model => model.Products.First().Description)</th><th>@Html.DisplayNameFor(model => model.Products.First().Price)</th><th></th></tr>@foreach (var item in Model.Products) {<tr><td>@Html.DisplayFor(modelItem => item.Category.Name)</td><td>@Html.DisplayFor(modelItem => item.Name)</td><td>@Html.DisplayFor(modelItem => item.Description)</td><td>@Html.DisplayFor(modelItem => item.Price)</td><td>@Html.ActionLink("Edit", "Edit", new { id=item.ID }) |@Html.ActionLink("Details", "Details", new { id=item.ID }) |@Html.ActionLink("Delete", "Delete", new { id=item.ID })</td></tr>}</table>
The code changes made to this file are simple but significant. The first change, @model BabyStore.ViewModels.ProductIndexViewModel, simply tells the view to use ProductIndexViewModel as the model on which to base the view. Note that this is now a single class and not an enumeration.
The second change, @Html.DropDownListFor(vm => vm.Category, Model.CatFilterItems, "All");, generates a filter control based on the CatFilterItems property of the view model as per the second parameter. The first parameter, vm => vm.Category, specifies the HTML name of the control and hence what it will appear as in the query string section of the URL when the form is submitted. Since the name of the control is category, our previous code that looks for the category parameter in the URL will continue to work correctly.
The third change ensures that the hidden search control now references the view model instead of the ViewBag:
<input type="hidden" name="Search" id="Search" value="@Model.Search"/>We then need to generate the table headings. This is not as straightforward as it appears because the DisplayNameFor HTML helper method does not work with collections and we want to display headings based on the Products property of the view model. The category heading is straightforward since this is a property of the view model, but to display, for example, the name of the description property of the product class, we cannot now use code such as @Html.DisplayNameFor(model => model.Products.Description). Instead, we need to force the helper to use an actual product entity from the products collection by using the First() method as follows:
@Html.DisplayNameFor(model => model.Products.First().Description)This code will now generate the table heading based on the description property of the product class. This code will continue to work even when there are no products in the database.
Tip
When using the DisplayNameFor HTML helper method with a collection rather than a single object, use the first() method to enable access to the properties you want to display the name for.
The final change to the code, @foreach (var item in Model.Products) {, ensures that we now use the Products property of the view model to display products.
Start the web site without debugging and click on View All Our Products. The Filter by Category control now appears with a count in it, which reflects the number of matching products in each category. Figure 3-9 shows the filter displaying the number of items matching a search for “red”.

Figure 3-9. The category filter control, now including a count of matching items in each category
Summary
In this chapter, I showed you how to add search functionality, including how to add a search box using Bootstrap, and how to find out more about how to style using Bootstrap. I also showed you how to add a filter to the search results using ViewBag and how to add a more complex filter using a view model and use it within a view.