
Chapter 3. Typing, Editing & Searching
As a pocket computer, the iPhone faces a fundamental limitation: It has no real keyboard or mouse. Which might be considered a drawback on a gadget that’s capable of running millions of programs.
Fortunately, where there’s a problem, there’s software that can fix it. The modern iPhone’s virtual keyboard is smart in all kinds of ways—automatically predicting words and correcting typos, for example. And besides: If you don’t like the iPhone’s onscreen keyboard, you can just choose one designed by a different company.
This chapter covers every aspect of working with text on the iPhone: entering it, dictating it, fixing it, and searching for it.
The Keyboard
It’s true, boys and girls: The iPhone has no physical keys. A virtual keyboard, therefore, is the only possible built-in system for typing text. Like it or not, you’ll be doing a lot of tapping on glass.
The keyboard appears whenever you tap in a place where typing is possible: in an outgoing email or text message, in the Notes app, in the address bar of the web browser, and so on.
As your finger taps the glass, a “speech balloon” appears above your finger, showing an enlarged version of the key you actually hit (since your finger is now blocking your view of the keyboard).
Tip
If you worry about spies nearby figuring out what you’re typing by watching those bubbles pop up over your fingertips, you can turn them off. Open Settings → General → Keyboard, and turn off Character Preview.
In darker gray, surrounding the letters, you’ll find these special keys:
Shift
 ). When you tap this key, the arrow turns black to indicate that it’s in effect. The next letter you type appears as a capital. Then the key returns to normal—the next letter will be lowercase.
Tip
It used to be that the color of the Shift key was your only clue that you were about to type a capital letter; the actual letters on the onscreen keyboard’s keys always appeared AS CAPITALS. But these days, the key letters appear in lowercase until you press Shift. (If you prefer that old system, though, open Settings → General → Accessibility → Keyboard. Turn off Show Lowercase Keys.
Caps Lock (
 ). The iPhone has a hidden Caps Lock “key.” To engage it, double-tap the key; it changes to . You’re now in Caps Lock mode, and you’ll type in ALL CAPITALS until you tap the key again (or 123 or
  or
or  ). If you can’t seem to make Caps Lock work, try double-tapping the key faster. Or see if maybe Caps Lock got turned off in Settings → General → Keyboard.
Backspace (
 ). This key actually has three speeds:
Tap it once to delete the letter just before the blinking insertion point.
Hold it down to “walk” backward, deleting as you go.
If you hold down the key long enough, it starts deleting words rather than letters, one whole chunk at a time.
Tap this button when you want to type numbers or punctuation. The keyboard changes to offer a palette of numbers and symbols. Tap the same key—which now says ABC—to return to the letters keyboard.
Once you’re on the numbers/symbols pad, a new dark-gray button appears, labeled #+=. Tapping it summons a third keyboard layout, containing the less frequently used symbols, like brackets, the # and % symbols, bullets, and math symbols.
return. Tapping this key moves to the next line, just as on a real keyboard. (There’s no Tab key or Enter key in iPhone Land.)
Making the Keyboard Work
Some people have no problem tapping those tiny virtual keys; others struggle for days. Either way, here are some tips:
Use the whole pad of your finger or thumb. Don’t try to tap with only a skinny part of your finger to match the skinny keys. You’ll be surprised at how fast and accurate this method is. (Tap, don’t mash.)
This may sound like New Age hooey, but trust the keyboard. Don’t pause to check the result after each letter. Just plow on.
Note
Although you don’t see it, the sizes of the keys on the iPhone keyboard change all the time. The software enlarges the “landing area” of certain keys, based on probability.
For example, suppose you type tim. The iPhone knows that no word in the language begins with timw or timr—and so, invisibly, it enlarges the “landing area” of the E key, which greatly diminishes your chances of making a typo on that last letter.
Without a mouse, how are you supposed to correct an error you made a few sentences ago? Easy—use the loupe.
Hold your fingertip down anywhere in the text until the magnified circle appears. Without lifting your finger, drag anywhere in the text; the insertion point moves along with it. Release when the cursor line is where you want to delete or add text, just as though you’d clicked there with a mouse.
Tip
If you have an iPhone 6s or later, you may prefer to use the invisible trackpad to correct an error instead; see “The Secret Trackpad”.

Don’t bother using the Shift key to capitalize a new sentence. The iPhone does that capitalizing automatically. (To turn this feature on or off, use Settings → General → Keyboard → Auto-Capitalization.)
Don’t type a period at the end of each sentence, either. Because the period is such a frequently used symbol, there’s an awesome shortcut that doesn’t require switching to the punctuation keyboard: At the end of a sentence, tap the space bar twice. You get a period, a space, and a capitalized letter at the beginning of the next word. (This, too, can be turned off—in Settings → General → Keyboard → “.” Shortcut—although it’s hard to imagine why you’d want to.)
You can save time by leaving out the apostrophes in contractions. Type im, dont, or cant. The iPhone proposes I’m, don’t, or can’t, so you can just tap the space bar to fix the word and continue.
Many beginners hold the phone with one hand and tap keys with the index finger of the other. As you become more proficient, though, you may prefer two-thumb typing—or, faster yet, type with your left thumb (so that your left hand can grip the phone) and right index finger (which is more agile).
Autocorrect: Your Typing Assistant from Hell
The iPhone, like all smartphones, offers a feature called autocorrect. Whenever the software thinks you’ve made a spelling error, it automatically substitutes the “correct” word or spelling. For example, if you type imsame, the iPhone realizes that you meant insane and replaces it automatically.
Most of the time, that’s helpful; autocorrect even finishes long words for you sometimes. But be vigilant; many times, autocorrect substitutes the wrong word! And sometimes you don’t notice it, and you wind up texting gibberish to your correspondent. The internet is filled with hilarious examples of autocorrect gone wrong. (Visit damnyouautocorrect.com to read some choice ones.)

So here’s the important thing: The iPhone always shows you the replacement it intends to make before making it—as the highlighted QuickType suggestion (above). To accept its suggestion, tap the space bar or any punctuation. To prevent the replacement, tap the first QuickType word (the one in quotes).
Tip
If you turn on Speak Auto-text (in Settings → General → Accessibility → Speech → Typing Feedback), the iPhone even speaks the suggested word out loud. That way, you can keep your focus on the keyboard.
And by the way: If you accidentally accept a QuickType suggestion, tap the Backspace key. A word bubble appears, which you can tap to reinstate what you’d originally typed (shown above at right).
Tip
If you think autocorrect is doing you more harm than good, you can turn it off in Settings → General → Keyboard. Turn off Auto-Correction.
QuickType
What Apple calls its QuickType keyboard can save you a lot of time, tapping, and errors.
The idea is simple: As you type a sentence, the software predicts which word you might type next—the three most likely words, actually—and displays them as three buttons above the keyboard.

If you begin the sentence by typing, “I really,” then the three suggestions might be want, don’t, and like.
But what if you intended to say, “I really hope…”? In that case, type the first letter of “hope.” Instantly, the three suggestions change to “h”, hope, and hate. (The first button always shows, in quotes, whatever non-word you’ve typed so far, just in case that’s what you intend. To place it into your text, you can tap that button or tap the space bar or some punctuation.)
In other words, QuickType is autocomplete on steroids. Frankly, it’s a rush when it correctly proposes finishing a long word for you.
With QuickType, you can produce a sentence like “I’ll gladly pay you Tuesday for a hamburger today” with 26 taps. (If you had to type out the whole thing, you’d have tapped 50 times.) QuickType also adds spaces for you.
QuickType is smart in several ways:
QuickType’s suggestions are different in Messages (where language tends to be casual) than in Mail (where people write more formally).
Similarly, QuickType modifies its suggestions based on whom you’re writing to. It learns.
Sometimes, QuickType offers you several words on a single button, to save you even more time (for example, up to or in the).
When you’re in the Messages app, QuickType suggests an emoji (a tiny cartoon symbol) when you’ve typed a corresponding word. “Help with Emoji and Info-Bits” has the details.
QuickType automatically adds a space after each word you select, so you don’t have to mess with the space bar.
When someone texts you a question that ends with a choice (“Coffee, tea, or me?”), the QuickType buttons cleverly offer those choices on the buttons. Before you’ve even typed a single letter, the choices say Coffee, Tea, and You.
QuickType’s suggestions may offer movie names, song names, or place names you’ve recently viewed in other apps.
If you forget to capitalize a word, double-tap to select it. Now tap Shift once (To Initial Cap The Word) or twice (FOR ALL CAPS). Lo and behold, the QuickType suggestions are now capitalized renditions of the word, ready to replace it!
You can hide the QuickType bar if it’s getting on your nerves, but it’s not as easy as it used to be. Hold down the button next to the 123 key (it usually looks like
or ); from the shortcut menu, tap Keyboard Settings (below, left). You wind up in Settings → General → Keyboard, where you’ll find the Predictive on/off switch (right).

QuickType does mean that you have to split your focus. You have to pay attention to both the keys you’re tapping and the ever-changing word choices above the keyboard. With practice, though, you’ll find that QuickType offers impressive speed and accuracy. You won’t miss the little autocorrect bubbles of old.
The Spelling Dictionary
If you start typing a word the iPhone doesn’t recognize, the first of the three suggestion buttons displays your word in quotation marks. If you really do intend to type that nonstandard word, tap its button. You’ve just allowed the “mistake” to stand—and you’ve added it to the iPhone’s dictionary. The phone assumes you’ve just typed some name, bit of slang, or terminology that wasn’t in its dictionary originally.
From now on, it will accept that bizarre new word as legitimate—and, in fact, will even suggest it the next time you start typing it.
Tip
If you’ve really made a mess of your custom dictionary, and the iPhone keeps suggesting ridiculous alternate words, you can start fresh. From the Home screen, tap Settings → General → Reset, and then tap Reset Keyboard Dictionary. Now the iPhone’s dictionary is the way it was when it came from the factory, without any of the “words” it learned from you.
The Spelling Checker
Here’s the world’s friendliest typo-fixer. Apple calls it a spelling checker, but maybe that’s stretching it.
Anytime the iPhone doesn’t recognize something you’ve typed, it draws a dotted red underline beneath it. Tap the word to see a pop-up balloon with one, two, or three alternate spellings. Often, one of them is what you wanted, and you can tap it to fix the mistake. (Equally often, none of them is, and it’s time to break out the loupe and the keyboard.)
Tip
You can also invoke the spelling checker’s suggestions even if you haven’t made a typo. Double-tap the word; on the editing bar that appears, tap Replace.

Punctuation with One Touch
On the iPhone, the punctuation and alphabet keys appear on two different keyboard layouts. That’s a hassle, because each time you want, say, a comma, it’s an awkward, three-step dance: (1) Tap the 123 key to get the punctuation layout. (2) Tap the comma. (3) Tap the ABC key or the space bar to return to the alphabet layout.
Imagine how excruciating it is to type, for example, “a P.O. box in the U.S.A.” That’s 34 finger taps and 10 mode changes!
Fortunately, there’s a secret way to get a punctuation mark with only a single finger gesture. The iPhone doesn’t register most key presses until you lift your finger. But the Shift and punctuation keys register their taps on the press down instead.

So here’s what you can do, all in one motion:
Touch the 123 key, but don’t lift your finger. The punctuation layout appears.
Slide your finger onto the period or comma key, and release. The ABC layout returns automatically. You’ve typed a period or a comma with one touch instead of three.
Tip
If you’re a two-thumbed typist, you can also hit the 123 key with your left thumb and then tap the punctuation key with your right. It even works on the #+= sub-punctuation layout, although you’ll probably visit that screen less often.
In fact, you can type any of the punctuation symbols the same way. This technique makes a huge difference in the usability of the keyboard.
Tip
This same trick saves you a finger-press when capitalizing words. You can put your finger down on the ![]() key and slide directly onto the letter you want to type in its uppercase version. Or, if you’re a two-handed typist, you can work the Shift key just like the one on your computer: Hold it down with your left thumb, type a letter with your right, and then release both.
key and slide directly onto the letter you want to type in its uppercase version. Or, if you’re a two-handed typist, you can work the Shift key just like the one on your computer: Hold it down with your left thumb, type a letter with your right, and then release both.
Accented Characters
To produce an accented character (like é, ë, è, ê, and so on), keep your finger lightly pressed on that key for one second. A palette of diacritical marks appears; slide onto the one you want.
Not all keys sprout this pop-up palette. Here’s a list of the ones that do:
| Key | Alternates |
|---|---|
| A | à á â ä Æ ã å ā |
| C | ç ć č |
| E | è é ê ë ę ė ē |
| I | ī į í ì ï î i |
| L | ł |
| N | ń ñ |
| O | ō ø œ õ ó ò ö ô |
| S | ß ś š |
| U | ū ú ù ü û |
| Y | ÿ |
| Z | ź ž ż |
| ? | ¿ |
| ‘ | ‘ ‘ ‘ |
| “ | “ “ “ “ “ |
| - | — |
| $ | € £ ¥ |
| & | § |
| 0 (zero) | ° |
| . | … |
| % | ‰ |
Text Replacement (Abbreviation Expanders)
Here’s a feature that hardly anyone ever talks about—probably because nobody knows it exists. But it can be a huge time- and sanity-saver.
You can program the phone to expand abbreviations that you type. Set up addr to type your entire mailing address, or eml to type out your email address. Create two-letter abbreviations for big legal or technical words you have to type a lot. Set up goaway to type out a polite rejection paragraph for use in email. And so on.
This feature has been in Microsoft Office forever (called AutoCorrect). And it’s always been available in add-on apps. But since it’s now built right into the operating system, it works anywhere you can type.
You can start building your list of abbreviations in Settings → General → Keyboard → Text Replacement. Tap the ![]() button. On the resulting screen, type the expanded text into the Phrase box. (It can be very long, but it has to be one continuous blob of text; it can’t contain returns.) In the Shortcut box, type the abbreviation you want to trigger the phrase.
button. On the resulting screen, type the expanded text into the Phrase box. (It can be very long, but it has to be one continuous blob of text; it can’t contain returns.) In the Shortcut box, type the abbreviation you want to trigger the phrase.
Tip
The Shortcut box starts out saying, “Optional.” You might wonder: Why would you leave the shortcut blank? Then your new shortcut will be untriggerable and pointless.
Not quite. It’s optional to enable a sneaky trick: to make the phone stop misreplacing some word (for example, insisting that you mean PTA when you type pta, the name of a new chemical you’ve designed).
In that case, type your phrase into the Phrase box, but leave Shortcut blank.

That’s it! Now, whenever you type one of the abbreviations you’ve set up, the iPhone proposes replacing it with your substituted text.
The One-Handed Keyboard
iOS may go down in history as the first software version that acknowledged morning coffee.
For the first time, you can carry a cup in one hand while typing on your iPhone with the other. That’s because there’s an optional keyboard layout (except on the iPhone 5s or SE): an extra-skinny one that huddles against one side, within reach of a single thumb.
To make it so, hold down the button next to the 123 key (it usually looks like ![]() or
or ![]() ); from the shortcut menu, choose one of the outer two keyboard icons, as shown here. (They represent the left- and right-huddling keyboards, respectively.)
); from the shortcut menu, choose one of the outer two keyboard icons, as shown here. (They represent the left- and right-huddling keyboards, respectively.)

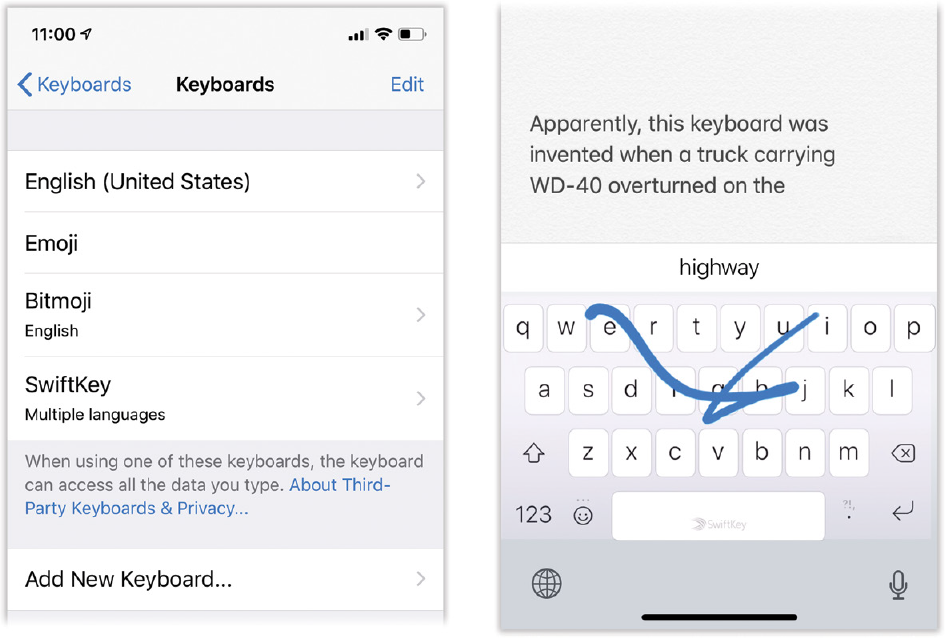
SwiftKey, Gboard, and Other Keyboards
You’re not stuck with Apple’s onscreen keyboard. You can, if you like, install virtual keyboards from other companies. (Hey—just like on Android phones!)
Many people swear that these rival keyboard systems are superior to the standard iOS keyboard in speed and accuracy. In particular, people like the SwiftKey and Gboard keyboards; in these systems, you don’t have to tap each key to spell out a word. Instead, you rapidly and sloppily drag your finger across the glass, hitting the letters you want and lifting your finger at the end of each word. The software figures out what you were going for.
Sounds bizarre, but it’s fast and very satisfying. And pretty—your finger leaves a sort of fire trail as it slides across the glass.
These keyboards generally incorporate their own versions of QuickType—that is, they offer three predictions about the word you’re going to type next.
Most don’t vary their predictions depending on the person you’re writing to or which app you’re using, as iOS’s predictions do. But they do offer other impressive features; for example, SwiftKey can sync what it’s learned to your other gadgets (iOS doesn’t do that; it learns, but its education is locked on your iPhone). The Minuum keyboard is weird-looking but very compact, leaving a lot more room for your writing.
Then there’s Fleksy, TouchPal, Kuaiboard 2, and a raft of others.
Tip
In iOS 12, for the first time, the ![]() button appears when you’re using a third-party keyboard. You can use voice dictation!
button appears when you’re using a third-party keyboard. You can use voice dictation!
Otherwise, these alternate keyboard systems are fascinating and, often, faster than Apple’s. Many are free, so they’re well worth exploring.
To install an alternate keyboard, get it from the App Store (Chapter 10).
Then go to Settings → General → Keyboard → Keyboards (above, left). When you tap Add New Keyboard, you’ll see your newly downloaded keyboard’s name. Turn it on by tapping it and then turning on Full Access.
Now, when you arrive at any writing area in any app, you’ll discover a new icon has appeared on the keyboard: a tiny globe (![]() ) next to the space bar. Tap it. The keyboard changes to the new one you installed. (Each tap on the
) next to the space bar. Tap it. The keyboard changes to the new one you installed. (Each tap on the ![]() button summons the next keyboard you’ve installed—or you can hold your finger down on it for a pop-up list.)
button summons the next keyboard you’ve installed—or you can hold your finger down on it for a pop-up list.)
Note
For many years, turning the iPhone 90 degrees (to landscape orientation) gave you a wider, expanded keyboard with some extra keys on each side, like Copy, Paste, punctuation, and cursor keys. It’s not your imagination: For some reason known only to Apple, the keyboard no longer changes when you rotate the phone. Those useful extra keys are gone, replaced by empty gray space.
International Typing
Because the iPhone is sold around the world, it has to be equipped for non-English languages—and even non-Roman alphabets. Fortunately, it’s ready.
To prepare the iPhone for language switching, go to Settings → General → Language & Region. Tap iPhone Language to set the iPhone’s primary language (for menus, button labels, and so on).
To make other keyboards available, go to Settings → General → Keyboard → Keyboards, tap Add New Keyboard, and then turn on the keyboard layouts you’ll want available: Russian, Italian, whatever.
If you choose Japanese or Chinese, you’re offered the chance to specify which kind of character input you want. For Japanese, you can choose a QWERTY layout (Romaji) or a Kana keypad. For Simplified or Traditional Chinese, your choices include the Pinyin input method (which uses a QWERTY layout) or handwriting recognition, where you draw your symbols onto the screen with your fingertip; a palette of potential interpretations appears above what you’ve written. (That’s handy, since there are thousands of characters in Chinese, and you’d need a 65-inch iPhone to fit the keyboard on it.) Or hey—it’s a free tic-tac-toe game!

As described in the previous section, a new key now appears on the keyboard: ![]() next to the space bar. (It replaces the
next to the space bar. (It replaces the ![]() emoji key, if you had it.) Each time you tap it, you rotate to the next keyboard you requested earlier. The new language’s name appears briefly on the space bar to identify it.
emoji key, if you had it.) Each time you tap it, you rotate to the next keyboard you requested earlier. The new language’s name appears briefly on the space bar to identify it.
Thanks to that ![]() button, you can freely mix languages and alphabets within the same document without having to duck back to some control panel to make the change. And thanks to the iPhone’s virtual keyboard, the actual letters on the “keys” change in real time.
button, you can freely mix languages and alphabets within the same document without having to duck back to some control panel to make the change. And thanks to the iPhone’s virtual keyboard, the actual letters on the “keys” change in real time.
The ![]() button works in three ways:
button works in three ways:
Tap it once to restore the most recent keyboard. Great if you’re flipping back and forth between two languages as you type.
Tap it rapidly to cycle among all the keyboards you’ve selected. (The name of the language appears briefly on the space bar to help you out.)
If you, some United Nations translator, like to write in a lot of different languages, you don’t have to tap that
key over and over again to cycle through the keyboard layouts. Instead, hold your finger down on the key. You get a convenient pop-up menu of the languages you’ve turned on, so you can jump directly to the one you want.
The Emoji Keyboard
Even if you speak only one language, don’t miss the emoji keyboard. It gives you a palette of smileys and fun symbols, also known as emoticons, to use in your correspondence.
When you tap the ![]() button (and then choose Emoji, if necessary), you’re offered thousands of little symbols. They’re spread across eight categories (plus a Frequently Used category), each represented by a small icon below the keyboard.
button (and then choose Emoji, if necessary), you’re offered thousands of little symbols. They’re spread across eight categories (plus a Frequently Used category), each represented by a small icon below the keyboard.
Emoji are even smarter in the Messages app; see “Help with Emoji and Info-Bits”.
Tip
To return to a category’s first page, you don’t have to swipe; just tap the category’s icon.
The bottom line is clear: Smileys are only the beginning.
Note
These symbols show up identically on Apple machinery (phones, tablets, Macs) but may look slightly different on other kinds of phones.

Connecting a Real Keyboard
This iPhone feature barely merits an asterisk in Apple’s marketing materials. But if you’re any kind of wandering journalist, blogger, or writer, you might flip your lid over this: You can type on a real, full-sized, physical keyboard, and watch the text magically appear on your iPhone’s screen—wirelessly.
That’s because you can use a Bluetooth keyboard (the Apple Wireless Keyboard, for example) to type into your iPhone.
To set this up, from the Home screen, tap Settings → Bluetooth. Turn Bluetooth on, if it’s not already.
Now turn on the wireless keyboard. After a moment, its name shows up on the iPhone screen in the Devices list; tap it. You’ll know the pairing was successful, because when you tap in a spot where the onscreen keyboard would usually appear—well, it doesn’t.
Typing is a lot easier and faster with a real keyboard. As a bonus, the Apple keyboard’s brightness, volume, and playback controls actually work to control the iPhone’s brightness, volume, and playback.
Tip
The Apple keyboard’s ![]() key even works: It makes the iPhone’s onscreen keyboard appear or disappear. And to switch languages, press
key even works: It makes the iPhone’s onscreen keyboard appear or disappear. And to switch languages, press ![]() -space bar on the wireless keyboard. You’ll see the list of languages. Tap the space bar again to choose a different language.
-space bar on the wireless keyboard. You’ll see the list of languages. Tap the space bar again to choose a different language.
When you’re finished using the keyboard, turn it off. The iPhone goes back to normal.
The Secret Trackpad
You may remember hearing about the 3D Touch screen on most iPhone models (or reading about it, starting in “Flick”). But you can also use pressure on the screen to create a trackpad for editing text! Whenever text is on the screen and the keyboard is open, press firmly anywhere on the keyboard. All the keys go blank, as shown below.
You can ease up on the pressure, but don’t lift your finger from the glass. You can now move the insertion-point cursor through the text just by dragging your finger across the keys. If it hits the edge of the window, it scrolls automatically.
Still keep your finger down. At this point, hard presses also let you select (highlight) text:
Hard-press twice to select an entire sentence.
Hard-press three times to select an entire paragraph.
Or use this trick: Move the insertion point to a word; if you now press hard, you highlight that word.

At this point, you can expand the selection by doing any of these things:
Drag up or down. (Again, you don’t have to keep pressing hard, but you do have to keep your finger on the glass.)
Hard-press twice to extend the selection to the entire sentence, or three times to extend the selection to the entire paragraph.
Once you’ve selected text in this way, the usual command bar (Cut, Copy, Paste, and so on) appears, for your text-manipulation pleasure.
Little by little, the iPhone is revealing its secret ambition to be a laptop.
Tip
If your phone doesn’t offer 3D Touch—if, say, it’s an iPhone XR—you’re not entirely deprived of the invisible-trackpad thing. If you long-press the space bar, the keys go blank. Without lifting your finger, slide it to precisely position the text cursor.
If you’re especially clever, you can even select text this way. Long-press the space bar with your index finger; without lifting it, slide to the beginning of the desired selection. Still without lifting your index finger, tap and release with a second finger anywhere on the keyboard to enter text-selection mode. Now you can drag your index finger (which has never left the glass) to select text.
Dictation
The iPhone’s speech-recognition feature, sometimes called Siri (even though Siri is also the voice command feature), lets you enter text anywhere, into any program, just by speaking. (Behind the scenes, it’s using the same Nuance recognition technology that powers the Dragon line of dictation programs.)
It’s extremely fast and, usually, remarkably accurate. Suddenly you don’t have to fuss with the tiny keyboard. The experience of “typing” is no longer claustrophobic. You can blather away into an email, fire off a text message, or draft a memo without ever looking at the screen.
Now, before you get all excited, here are the necessary footnotes:
Voice typing works best if there’s not a lot of background noise.
Voice typing isn’t always practical, since everybody around you can hear what you’re saying.
Voice typing isn’t always accurate. Often you’ll have to correct an error or two.
All right—expectations set? Then here’s how to type by speaking.
First, fire up someplace where you can all up the keyboard: Messages, Notes, Mail, Safari, whatever. Tap, if necessary, so that the onscreen keyboard appears. Tap the ![]() next to, or below, the space bar.
next to, or below, the space bar.
When you hear the xylophone note, say what you have to say (below, left). If there’s background noise, hold the phone up to your head; if it’s relatively quiet, a couple of feet away is fine. You don’t have to speak slowly, loudly, or weirdly; speak normally.
As you speak, the words fly onto the screen. You have to speak your own punctuation, like this: “Dear Dad (colon): Send money (dash)—as much as you can (comma), please (period).” The table at the end of this section describes all the punctuation you can dictate.
After you finish speaking, tap anywhere in the big gray sound waves area. Another xylophone note plays—higher, this time—and you may see some of the words change right before your eyes, as though Siri is changing her mind. In fact, she is; she’s using the context of all the words you said to revise what she originally thought you said, as you said it. See?
Note
On models before the iPhone 6s, you can’t use dictation without a good internet signal.

After you stop transcribing, the keyboard returns. Now you can tap in the text to edit any mistakes (previous page, right), exactly as you would fix an error in something you typed. (Make the effort; you’re simultaneously teaching your iPhone to do better the next time.)
Or, if the whole thing is a mess, you can shake your iPhone, the universal gesture for Undo (as long as Shake to Undo is turned on in Settings → General → Accessibility).
Note
Often, the iPhone knows perfectly well when it might have gotten a word wrong—it draws a dashed underline beneath words or phrases it’s insecure about. You can tap that word or phrase to see the iPhone’s alternative interpretation, which is often correct.
Usually you’ll find the accuracy pretty darned good, considering that you didn’t have to train the software to recognize your voice, and considering that your computer is a cellphone, for crying out loud. You’ll also find that the accuracy is better when you dictate complete sentences, and that long words fare better than short ones.
Punctuation
Here’s a handy table that shows what punctuation you can say and how to say it.
Note
If you’ve ever used Dragon NaturallySpeaking (for Windows) or Dragon Dictation (for the Mac), you already know these commands; they’re the standard Nuance dictation-software shortcuts, because that’s what the iPhone uses behind the scenes.
| Say this: | To get this: | For example, saying this: | Types this: |
|---|---|---|---|
| “period” or “full stop” | . [space and capital letter follow] | “Best (period) date (period) ever (period)” | Best. Date. Ever. |
| “dot” or “point” | . [no space follows] | “Email frank (dot) smith (at sign) gmail (dot) com” | Email [email protected] |
| “comma,” “semicolon,” “colon” | , ; : | “Mom (comma) hear me (colon) I’m dizzy (semicolon) tired” | Mom, hear me: I’m dizzy; tired |
| “question mark,” “exclamation point” | ? ! [space and capital letter afterward] | “Ellen (question mark) Hi (exclamation point)” | Ellen? Hi! |
| “inverted question mark,” “inverted exclamation point” | ¿ ¡ | “(inverted question mark) Que paso (question mark)” | ¿Que paso? |
| “ellipsis” or “dot dot dot” | … | “Just one (ellipsis) more (ellipsis) step (ellipsis)” | Just one… more…step… |
| “space bar” | [a space, especially when a hyphen would normally appear] | “He rode the merry (space bar) go (space bar) round” | He rode the merry go round |
| “open paren,” then “close paren” (or “open bracket/close bracket,” or “open brace/close brace”) | ( ) or [ ] or { } | “Then she (open paren) the doctor (close paren) gasped” | Then she (the doctor) gasped |
| “new line” | [a press of the Return key] | “milk (new line) bread (new line) quinoa” | Milk Bread Quinoa |
| “new paragraph” | [two presses of the Return key] | “autumn leaves (new paragraph) softly falling” | autumn leaves softly falling |
| “quote,” then “unquote” | “ ” | Her perfume screamed (quote) available (unquote) | Her perfume screamed “available” |
| “numeral” | [writes the following number as a digit instead of spelling it out] | “Next week she turns (numeral) eight” | Next week she turns 8 |
| “asterisk,” “plus sign,” “minus sign,” “equals sign” | *, +, −, = | “eight (asterisk) two (plus sign) one (minus sign) three (equals sign) fourteen” | 8*2+1−3=14 |
| “ampersand,” “dash” | &, — | “Logan (ampersand) Dexter (dash) the best (exclamation point)” | Logan & Dexter—the best! |
| “hyphen” | - [without spaces] | “Don’t give me that holier (hyphen) than (hyphen) thou attitude” | Don’t give me that holier-than-thou attitude |
| “backquote” | ’ | “Back in (backquote) (numeral) fifty-two” | back in ’52 |
| “smiley,” “frowny,” “winky” (or “smiley face,” “frowny face,” “winky face”) | :-) :-( ;-) | “I think you know where I’m going with this (winky face)” | I think you know where I’m going with this ;-) |
You can also say “percent sign” (%), “at sign” (@), “dollar sign” ($), “cent sign” (¢), “euro sign” (€), “yen sign” (¥), “pounds sterling sign” (£), “section sign” (§), “copyright sign” (©), “registered sign” (®), “trademark sign” (™), “greater-than sign” or “less-than sign” (> or <), “degree sign” (°), “caret” (^), “tilde” (~), “vertical bar” (l), and “pound sign” (#).
The software automatically capitalizes the first new word after a period, question mark, or exclamation point. But you can also force it to capitalize words you’re dictating by saying “cap” right before the word, like this: “Dear (cap) Mom (comma), I’ve run away to join (cap) The (cap) Circus (comma), a nonprofit cooperative for runaway jugglers.”
Here’s another table—this one shows the other commands for capitalization, plus spacing and spelling commands.
Tip
Speak each of the on/off commands as a separate utterance, with a small pause before and after.
| Say this: | To get this: | For example, saying this: | Types this: |
|---|---|---|---|
| “cap” or “capital” | Capitalize the next word | “Give me the (cap) works” | Give me the Works |
| “caps on,” then “caps off” | Capitalize the first letter of every word | “Next week, (caps on) the new england chicken cooperative (caps off) will hire me” | Next week, The New England Chicken Cooperative will hire me |
| “all caps on,” then “all caps off” | Capitalize everything | “So (all caps on) please please (all caps off) don’t tell anyone” | So PLEASE PLEASE don’t tell anyone |
| “all caps” | Type just the next word in all caps | “We (all caps) really don’t belong here” | We REALLY don’t belong here |
| “no caps” | Type the next word in lowercase | “See you in (no caps) Texas” | See you in texas |
| “no caps on,” then “no caps off” | Prevents any capital letters | “I’ll ask (no caps on) Santa Claus (no caps off)” | I’ll ask santa claus |
| “no space” | Runs the two words together | “Try our new mega (no space) berry flavor” | Try our new megaberry flavor |
| “no space on,” then “no space off” | Eliminates all spaces | “(No space on) I can’t believe you ate all that (no space off) (comma) she said excitedly” | Ican’tbelieveyou ateallthat, she said excitedly |
| [alphabet letters] | Types the letters out (usually not very accurately) | “The stock symbol is A P P L” | The stock symbol is APPL |
You don’t always have to dictate these formatting commands, by the way. The iPhone automatically inserts hyphens into phone numbers (you say, “2125561000,” and get “212-556-1000”); formats two-line street addresses without your having to say, “New line” before the city; handles prices automatically (“6 dollars and 32 cents” becomes “$6.32”).
It formats dates and web addresses well, too; you can even use the nerdy shortcut “dub-dub-dub” for the “www” part of a web address.
The phone recognizes email addresses, too, as long as you remember to say “at sign” at the right spot. You’d say, “harold (underscore) beanfield (at sign) gmail (dot) com” to get [email protected].
Tip
You can combine these formatting commands. Many iPhone owners have wondered: “How do I voice-type the word “comma,” since saying “comma” types out only the symbol?”
The solution: Say, “No space on, no caps on, C, O, M, M, A, no space off, no caps off.” That gives you the word “comma.”
Then again, it might just be easier to type that one with your finger.
Cut, Copy, Paste
Copy and Paste do just what you’d expect. They let you grab some text off a web page and paste it into an email message, copy directions from email into Notes, paste a phone number from your address book into a text message, and so on.
So how do you select text and use Cut, Copy, and Paste on a machine with no mouse or menus? As on the Mac or PC, it takes three steps.

Step 1: Select the Text
Start by highlighting the text you want to cut or copy.
To select some. Double-tap the first word (or last word) that you want in the selection. That word is now highlighted, with blue dots at diagonal corners. Drag these handles to expand the selection. The magnifying loupe helps you release the dot at just the right spot.
Tip
On a web page, you can’t double-tap to select a word, because double-tapping means “zoom in.” Instead, hold your finger down on a word to produce the blue handles; the loupe helps you. (If you highlight the wrong word, keep your finger down and slide to the correct one; the highlighting goes with you.)
However, if you’re zoomed out to see the whole page, holding down your finger highlights the entire block of text (a paragraph or even a whole article) instead of one word. Now you can expand the selection to include a photo, if you like; that way, you can copy and paste the whole enchilada into an outgoing email message.
To select all. Suppose you intend to cut or copy everything in the text box or message. Tap anywhere in the text to place the insertion point. Then tap the insertion point itself to summon the selection buttons—one of which is Select All.
Tip
Selecting text is even easier when you use the secret trackpad; see “The Secret Trackpad”.
Step 2: Cut or Copy
At this point, you’ve highlighted the material you want, and the Cut and Copy buttons are staring you in the face. They’re word buttons above your text.
Tap Cut (to remove the selected text) or Copy (to leave it but place a duplicate on your invisible Clipboard). If you want to get rid of the text without copying it to the Clipboard—because you want to preserve something else you copied there, for example—just tap the ![]() key.
key.
Tip
And what if you want to copy text without the formatting (bold, italics, underlining) that it might have? After selecting the text, tap Share and then tap Copy in the Share sheet.
(Possible Step 4: Undo)
Everyone makes mistakes, right? Fortunately, there’s a secret Undo command, which can come in handy when you cut, copy, or paste something by mistake.
The trick is to shake the iPhone. It offers you an Undo button, which you can tap to confirm the backtracking. One finger touch instead of three. (This feature has to be turned on in Settings → General → Accessibility.)
In fact, you can even undo the Undo. Just shake the phone again; now the screen offers you a Redo button. Fun! (Except when you shake the phone by accident and get the Nothing to Undo message. But still.)

The “Look Up” Dictionary
in “The Spelling Dictionary”, you can read about the spelling dictionary that’s built into iOS—but that’s just a dumb list of words. Your iPhone also has a real dictionary, one that shows you definitions.
In many apps, you can look up any word that appears on the screen. Double-tap it to get the editing bar shown on the next page at left; then tap Look Up. (You may have to tap ![]() to bring that button into view.)
to bring that button into view.)
Tip
You can also double-tap the blinking insertion point that’s just before a word. On the editing bar, tap ![]() to see the Look Up button.
to see the Look Up button.
(If you discover that there are “No definitions found,” then tap Manage at the bottom of this screen for a list of dictionaries you can download: English, French, Simplified Chinese, and so on. Tap ![]() to download the ones you think you’ll use.)
to download the ones you think you’ll use.)

But there’s more to Look Up than definitions. Depending on what you’re looking up, you may also see listings for Wikipedia entries, movie titles, sports scores, App Store apps, Twitter tweets, songs from Apple Music, web videos, and the web at large. It’s all meant to put the power of iOS search—including the entire internet—behind any word you see.
Tip
If you’d prefer just to look up definitions, open Settings → Siri & Search, and turn off Suggestions in Look Up. Now tapping Look Up means only “check the dictionary.” (Then again, it still offers a Search Web button in case you change your mind).
Speak!
The iPhone can read to you, too. Visit Settings → General → Accessibility → Speech and turn on Speak Selection and/or Speak Screen. Choose a language (or accent), a voice, and a speaking rate. (The more realistic voices, like Ava and her brother Alex, require you to download audio files from Apple. Just tap the ![]() to begin the download.)
to begin the download.)
It’s fun to turn on Highlight Content, too. (Each word will light up in color as the phone speaks it. Great for kids learning to read!)
From now on, among the other buttons that pop up when you select text, a Speak button appears. Or, if you swipe down the screen with two fingers (and you’ve turned on Speak Screen), your iPhone reads the entire screen.
You can use these features whenever you want to double-check the pronunciation of a word, whenever you want to have a web article or email read to you while you’re getting dressed for the day, or whenever you lose your voice and just want to communicate with the rest of the world.
Searching Your iPhone
The iPhone’s global search feature, formerly called Spotlight, can find information on your phone within any app—but it’s also something like a typed version of Siri, in that it can call up information about movies, restaurants, news, and so on.
How to Use Search
Apple has rejiggered the search bar; you can no longer access it from within any app. You must start at the Home screen. From there, you have two options:
Swipe downward on the middle of the screen. Don’t swipe from the top of the screen, which brings up the pull-down Lock screen (“Notifications”). Instead, drag down on the middle of a Home screen.
Swipe to the right from the first Home screen. Lurking to its left is the Today screen (“The Today Screen (Widgets)”)—with, once again, a search box at the top.
When you tap into the search box, the keyboard opens automatically. Type or dictate to identify what you want to find and open. For example, if you were trying to find a file called Pokémon Fantasy League, typing just pok or leag would probably suffice. (Search doesn’t find text in the middles of words; it searches from the beginnings of words.)
There are two stages of results: what you see before you tap the Search button on the keyboard, and what you see after.
Before you tap Search (while you’re typing), you get, just below the typing box, a list of autocomplete suggestions. It’s composed of data bits actually on your phone: app names, people’s names, calendar appointment names, and so on. For example, if you’ve typed app, the suggestions may include apple, appearance schedule, and so on.
Tip
If you tap an app’s name in this list, you get to see what folder contains that app. (We’re talking about the text list just under the search box—not the rows of app names that display their icons.)
Below that, iOS makes additional guesses at what you’re seeking, grouped by category: Applications, Voice Memos, Mail, Contacts, Notes, News, Safari, Dictionary, and so on (facing page, left). In fact, these suggestions may even come from within non-Apple apps. All of this is part of what Apple calls Siri Suggestions. You can turn them off, either globally or one app at a time; see “Controlling What Shows Up”.
At the very bottom, you get buttons for Search Web, Search App Store, and Search Maps, for the sake of completeness.
Tip
If you drag your finger to scroll the list, the keyboard helpfully vanishes so you can see more results.

After you tap Search, you get a list of results that contain exactly what you typed as your search term (above, right). If you’ve typed app so far, the suggestions may include App Store, Train App, and so on. (If the search can’t find many matches, it may show you some autocompleted suggestions, of the apple, appearance schedule sort.)
Either way, you wind up with a list of tappable search results, each showing a few lines of a preview, and all organized by category or app. This list may reveal matching terms from these categories:
Apple’s apps. Music, Podcasts, TV, Audiobooks (song, performer, and album names, plus the names of podcasts, videos, and audiobooks); Notes, Messages, Reminders, Voice Memos (actual text of your notes, texts, and to-do items; names and descriptions of voice memos); calendar events (including meeting invitees and locations); Mail (To, From, and Subject fields of all accounts; body text in some accounts).
Other companies’ apps. Search can also find recent destinations you’ve used in Google Maps, Uber, or Lyft; photo album names in Flickr; and so on. (Not all apps are searchable—only those updated since iOS 11 came along.)
Applications. For frequent downloaders, this may be the juiciest function. If you have dozens of apps installed, this is a much more efficient way to find one than trying to page through all the Home screens, eyeballing the icons as you go. The search results even identify which folder an app is in.
Siri Suggestions. The Search feature can find movies, music, apps, and other stuff from the web. It works beautifully. The hard part is just remembering that it’s available.
You can get results from Wikipedia (when you search for, say, “rhubarb” or “Thomas Edison”); news; restaurants, shops, and businesses; the App Store; the iTunes Store; and the Book Store.
The results list identifies which category each hit comes from. Tapping a result does what you’d expect: for a web article, opens it; for a business, opens its Maps page so you can call it or get directions; for something from an Apple store, opens the appropriate store.
Really, don’t miss this. When you hear about a cool app, don’t open the App Store to look for it. When you want to know a sports score, don’t start with Safari. When you need the phone number of a restaurant, don’t call 411. Instead, use Search for all those things.
Web Results. You can tap Search Web at the bottom of the results list to hand off to Safari for a search. Handy to have it built right into the Search screen.
Tip
Many apps have their own search boxes (usually hidden until you scroll to the top of their lists). Those individual search functions are great when you’re already in the program where you want to search.
If you see the name and icon of whatever you were hoping to dig up, tap to open it. The corresponding app opens automatically.
Controlling What Shows Up
Fortunately, Apple has seen fit to let you limit which apps’ data shows up in search results. If you don’t ever think you’ll search your email from this screen (and maybe, for privacy reasons, you’d rather not see email snippets show up in the results), you can turn it off.
In Settings → Siri & Search, you’ll find a master list of apps that Search can “see into.” Tap one and turn off its switch to exclude it from search results. (You can still find that app’s icon by typing its name—you just won’t see any information from inside that app.)