Chapter 3. How to use text classification algorithms to identify and classify text into multiple categories
The internet is often referred to as the great enabler - that allows us to accomplish a lot in our daily lives with the help of online tools and platforms. On the other hand, it can also be a source of information overload and endless search. Whether it is communicating with colleagues and customers, partners or vendors, emails and other messaging tools are an inherent part of our daily work lives. Brands interact with customers and get valuable feedback on their products through social media channels like Facebook and Twitter. Software developers and product managers communicate using ticketing applications like Trello (https://www.trello.com/) to track development tasks while open source communities use Github (https://www.github.com/) issues and Bugzilla (https://www.bugzilla.org/) to track software bugs that need to be fixed or new functionality that needs to be added.
While these tools are useful in getting work done, they can also become overwhelming and quickly turn into a deluge of information. A lot of emails contain promotional content, spam and marketing newsletters that are often a distraction. Similarly, software developers can easily get buried under a mountain of bug reports and feature requests that takes away their productivity. In order to make the best use of these tools, we must also use techniques to categorize, filter and prioritize the more important information from the less relevant pieces and text classification is one such technique that can help us achieve this.
The most common example of this is spam detection that is provided by email providers. In this application of text classification, every incoming email is analyzed to determine whether it contains meaningful and useful content or irrelevant information that is not useful. This allows the email application to show only the relevant and important emails and take away the deluge of less useful information. Another application is the classification of incoming customer service requests or software bug reports. If we are able to classify and assign them to the right person(s) or department then they will be resolved faster. There are several applications of text classification and in this chapter we will develop a blueprint that can be applied across several of them.
Chapter 3. What you’ll learn and what we will build
In this chapter we will build a blueprint for text classification using a supervised learning technique. We will use a dataset containing bug reports of a software application and use the blueprint to predict the priority of these bugs and the specific module that a particular bug belongs to. After studying this chapter, you will understand how to apply supervised learning techniques, splitting the data into train and test parts, validating model performance using accuracy measures and applying cross-validation techniques. You will also learn about different types of text classification such as binary and multi-class classifications.
Introducing the Java Development Tools Bug Dataset
Software technology products are often complex and consist of several interacting components. For example, let’s say that you are part of a team developing an Android application that plays podcasts. Apart from the player itself, there can be separate components like the ‘library manager', ’search & discover’ etc. If a user reports that he or she is unable to play any podcasts then it’s important to recognize that this is a critical bug that needs immediate attention. Another user might report an issue with their favorite podcast not showing up. This may not be as critical but it’s important to determine whether this needs to be looked at by the ‘library manager’ team or if it’s actually a problem with ’search & discover’. To ensure fast response times, it’s important to classify issues accurately and assign to the right team. Bugs are an inevitable part of any software product but a quick response will ensure that customers will be happy and continue to use your product.
In this chapter we will use blueprints to classify bugs and issues raised during the development of the Java Development Tools (JDT) open source project (https://www.eclipse.org/jdt/). The JDT project is a part of the Eclipse foundation which develops the Eclipse Integrated Development Environment (IDE). JDT provides all the functionality needed by software developers to write code using Java in the Eclipse IDE. Users of JDT report bugs and track issues with the tool BugZilla, a popular open source bug tracking software. BugZilla is also used by other open source projects like Mozilla-Firefox and the Eclipse Platform. A dataset containing the bugs for all these projects can be found here (https://github.com/logpai/bugrepo) and we will use the bugs dataset of the JDT project.
The following section loads a csv file that contains the JDT bugs dataset. This dataset contains 45,296 bugs and several features for each bug like the description, date reported and so on. We print a list of all the features reported for a bug and a more detailed description for one of them to see what the bug reports look like.
df=pd.read_csv('../data/jdt-bugs-dataset/eclipse_jdt.csv')(df.columns)df.sample(2,random_state=42)
Index(['Issue_id', 'Priority', 'Component', 'Duplicated_issue', 'Title',
       'Description', 'Status', 'Resolution', 'Version', 'Created_time',
       'Resolved_time'],
      dtype='object')
| Issue_id | Priority | Component | Duplicated_issue | Title | Description | Status | Resolution | Version | Created_time | Resolved_time | |
|---|---|---|---|---|---|---|---|---|---|---|---|
| 38438 | 239715 | P3 | UI | nan | No property tester for TestCaseElement for property projectNature | I20080613-2000; ; Not sure if this belongs to JDT/Debug or Platform/Debug.; ; I saw this error message several times today in my error log but Im not yet sure how to reproduce it.; ; -- Error Details --; Date: Sun Jul 06 16:04:00 CEST 2008; Message: No property tester contributes a property org.eclipse.debug.ui.projectNature to type class org.eclipse.jdt.internal.junit.model.TestCaseElement; Severity: Error; Plugin: org.eclipse.core.expressions | RESOLVED | WORKSFORME | 3.4 | 2008-07-06 10:07:00 -0400 | 2009-04-24 09:09:02 -0400 |
| 44129 | 395007 | P3 | UI | nan | [package explorer] Refresh action not available on Java package folders | M3.; ; F5 (Refresh) is available as a context menu entry for ordinary source folders but not for Java package folders in the e4 Java Package explorer.; ; Please restore the 3.x functionality. | VERIFIED | FIXED | 4.3 | 2012-11-24 10:25:00 -0500 | 2012-12-21 14:44:35 -0500 |
Based on the details we see above, we can see that each bug report contains the following features -
- Issue_id - primary key for the issue used to track the bug
- Priority - varies from P1 (most critical) to P5 (least critical) that defines the severity of the bug (categorical field)
- Component - refers to the specific architectural part of the project where the bug occurs - this could be UI, APT etc. (categorical field)
- Duplicated_issue - contains the Issue_id of another bug which might report the same problem (we drop this in our subsequent analysis since it’s not directly linked to our classification problem)
- Title - a short summary entered by the user that briefly describes the bug (fulltext field)
- Description - a more detailed description of the software behavior that produces the bug and its impact on usage (fulltext field)
- Status - the actions and status for the bug as determined by the development team (categorical)
- Resolution - the type of action taken on the bug report after investigation/fix by the development team and verification by user
- Version - the software version of the JDT in which the bug was found (numerical)
- Created_time - time when the bug was created (time)
- Resolved_time - time when the bug reached its resolution (time)
While creating the bug reports, users follow the guidelines mentioned on the JDT BugZilla website. This describes what information the user needs to provide while raising a bug so that the developer can find a quick resolution. It also includes guidelines that help the user identify what priority should be given for a particular bug. Our blueprint will use these bug reports to develop a supervised learning algorithm that can be used to automatically assign a priority to any bug that is raised in the future.
In the above section we got a high level understanding of the dataset and the various features for each bug report. Let us now explore a single bug report in more detail. We randomly sample a single bug (you can choose a different value for random_state to see a different bug) and transpose the results so that the results can be displayed with more detail. If we do not transpose, the ‘Description’ feature would be shown in a truncated manner whereas now we can see all the contents.
pd.set_option('display.max_colwidth',-1)df.sample(1,random_state=123).T
| 11811 | |
|---|---|
| Issue_id | 33113 |
| Priority | P3 |
| Component | Debug |
| Title | Evaluating for loop suspends in URLClassLoader |
| Description | Debug to a breakpoint in some HelloWorld program. In the DisplayView; highlight and ; Display the following code snippet:; ; for (int i = 0; i < 10; i++) {; System.out.println(i);; }; ; Instead of just reporting No explicit return value; the debugger suspends in the ; URLClassLoader; apparently trying to load the class int. You have hit Resume several ; more times before the evaluation completes. The DebugView does not indicate why it ; has stopped (the thread is just labelled Evaluating). This behavior does not happen if ; you turn of the Suspend on uncaught exceptions preference. |
| Status | VERIFIED |
| Resolution | FIXED |
| Version | 2.1 |
| Created_time | 2003-02-25 15:40:00 -0500 |
| Resolved_time | 2003-03-05 17:11:17 -0500 |
We can see from the above that this bug was raised in the ‘Debug’ component where the program would crash while evaluating a for loop. We can also see that the user has assigned a medium priority (P3) and that this bug was fixed in a week’s time. We can see that the reporter of this bug has followed the guidelines and provided a lot of information which also helps the software developer understand and identify the problem and provide a fix. Most software users are aware that the more information they provide, the easier it would be for a developer to understand the issue and provide a fix. Therefore, we can assume that most bug reports contain enough information for us to create a supervised learning model.
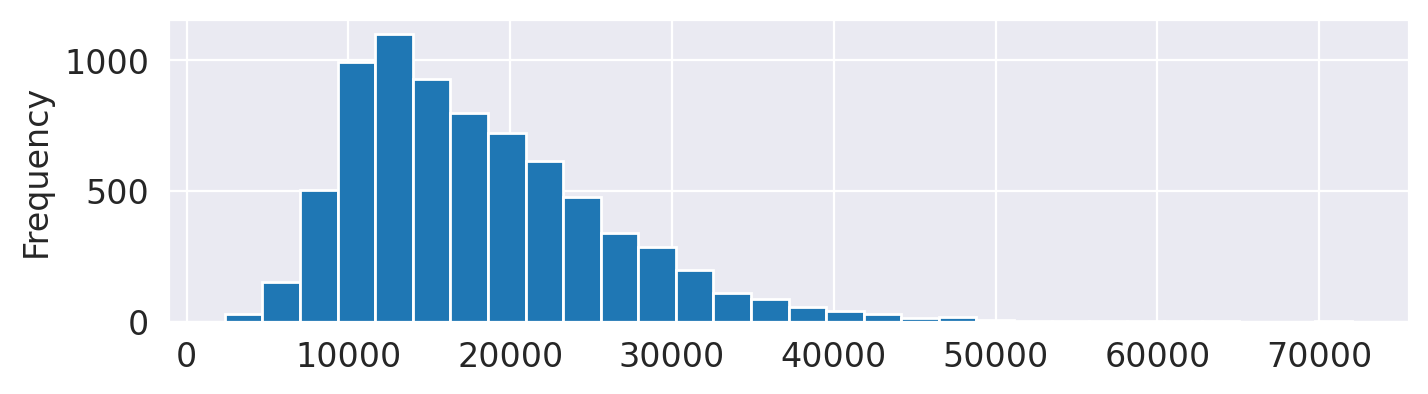
The figure below describes the distribution of bug reports across different priorities. We can see that most bugs have been assigned a level of P3. While this might be because BugZilla assigns P3 as the default option, it is more likely that this reflects the natural tendency of users to pick a medium level for their bug reports. They believe that the bug does not have a high priority P1 and at the same time do not want their bug to not be looked at all by choosing a P5. This is reflected in a lot of real-world phenomena and is generally referred to as the normal distribution where a lot of observations are found at the center or mean with fewer observations at the ends. This can be also visualized as a bell curve as seen below.
df['Priority'].value_counts().sort_index().plot(kind='bar')

The vast difference between the number of bugs with priority P3 versus other priorities is a problem for building a supervised learning model and is referred to as class imbalance. Because the class P3 has an order of magnitude greater number of observations than the other classes, the text classification algorithm will have much more information on P3 bugs than the other priorities - P1, P2, P4 and P5. We will see how the class imbalance of the Priority feature impacts our solution and also attempt to overcome it later in the blueprint. This is similar to learning something as a human. If you have more examples of one outcome, you will “predict” more of the same.
In the snippet below, we can see how many bugs are reported against each component of the JDT. The UI and Core components have a much greater number of bugs than the Doc or APT components. This is expected since some components of a software system are larger and more important than others. The Doc component for example consists of the documentation section of the software and is used by software developers to understand the functionality but is probably not a working component. The Core on the other hand is an important functional component of JDT and therefore has many more bugs assigned to it.
df['Component'].value_counts()
UI       17479
Core     13669
Debug    7542
Text     5901
APT      406
Doc      299
Name: Component, dtype: int64
Blueprint: Building a Text Classification system
We will take a step-by-step approach to building a text classification system, and then combine all of these steps to present a unified blueprint. This Text classification system falls under the broader category of Supervised learning models. Supervised Learning refers to a domain of machine learning algorithms that uses labeled data points as training data in order to learn the relationship between independent variables and the target variable. The process of learning the relationship is also referred to as training a machine learning model. If the target variable is a continuous numeric variable like distance, sales units or transaction amounts, we would train a regression model. However, in our case the target variable (Priority) is a categorical variable like the priority or component and we will choose a classification method to train a supervised learning model. This model will use independent variables like title or description to predict the priority or component of the bug. Mathematically defined, a supervised machine learning method aims to learn the mapping function from input to output variable(s).
where
y is the output or target variable
f is the mapping function
X is the input variable or set of variables
Since we are using data that contains the labeled target variable, this is referred to as supervised learning. A brief illustration of the workflow of a supervised learning model is shown in Figure 3-1 below. There are two phases of the workflow - Training phase and Predicting phase. The training phase starts with the training data that includes the training observations (which could be text data like bug reports) and the associated labels (which is what we would want to predict like priority or software component). While many features of the training observations could be used as is, this alone may not be enough to learn the mapping function and we would like to add domain knowledge to help the model understand the relationship better. For example, we could add a feature that shows on which day of the week the bug was reported since they are likely to be fixed sooner if they are raised earlier in the week. This step is referred to as feature engineering and the result is a set of feature vectors for each document. The training step of a supervised learning model accepts as input the feature vectors and their associated labels and tries to learn the mapping function. At the end of the training step we have the mapping function which is also called the trained model and can be used to generate predictions.
During the prediction phase the model receives a new input observation (e.g. bug report) and transforms the documents in the same way as applied during the training phase to produce the feature vectors. The new feature vectors are fed into the trained model to generate the prediction (e.g. bug priority). In this manner we have achieved an automated way of predicting a label.

Figure 3-1. Workflow of a supervised learning algorithm used for classification
Text classification is an example of a supervised learning algorithm where we use text data and NLP techniques like text vectorization to assign a categorical target variable to a given document. Classification algorithms can be characterized into the following categories -
Binary classification - is actually a special case of multi class classification where an observation can have any one of two values (binary). For example a given email can be marked as spam or not spam. But each observation will only have one label.
Multi class classification - in this type of classification algorithm, each observation is only associated with one label. For example, a bug report can have a single value of priority from any of the five categories P1, P2, P3, P4 or P5. Similarly, when attempting to identify the software component that a bug is reported in, each bug can be in one of six categories (UI, Core, Debug, Text, APT, Doc).
Multi label classification - in this type of classification algorithm each observation can be assigned to multiple labels. For example, a single news article could be tagged with multiple labels like ‘Security', ‘Tech’ & ‘Blockchain’. Several strategies can be used to solve a multi-label classification problem including the use of multiple binary classification models to generate the final result but we will not cover this in our blueprint.
Step 1 - Data Preparation
Before proceeding to build the text classification model we must perform some necessary pre-processing steps to clean the data and format it in a manner that is suitable for the application of machine learning algorithms. Since our objective is to identify the priority of a bug report given its Title and Description, we select only those columns that are relevant for the text classification model. We also remove any rows that contain empty values using the dropna function. Finally, we combine the title and description columns to create a single text value and apply the text cleaning blueprint from [Link to Come] to remove special characters. After removing the special characters, we filter out those observations that have less than 50 characters in the text field. These bug reports have not been filled out correctly and contain very little description of the problem and are not helpful in training the model.
df=df[['Title','Description','Priority']]df=df.dropna()df['text']=df['Title']+' '+df['Description']df=df.drop(columns=['Title','Description'])df.columns
Index(['Priority', 'text'], dtype='object')
df['text']=df['text'].apply(clean)df=df[df['text'].str.len()>50]df.sample(2,random_state=0)
| Priority | text | |
|---|---|---|
| 28311 | P3 | Need to re-run APT on anti-dependencies when files are generated If a generated file satisfies a missing type in another file we should rerun APT on the file which would be fixed by the new type. Currently java compilation does the correct thing but APT does not. Need to keep track of files with missing types and recompile at the end of the round if new types are generated. For good perf need to track the names and only compile those missing types that were generated |
| 25026 | P2 | Externalize String wizard: usability improvements M6 Test pass Since most of the Java developers will not be faces with the Eclipses mode I would move the check box down to the area of the Accessor class. Furthermore the wizard shouldnt provide the option if org.eclipse.osgi.util.NLS isnt present in the workspace. This will avoid that normal Java developers are faces with the option at all |
We can see from the above summary of the text feature for three bug reports that our cleaning steps have removed a lot of special characters, we still have retained a lot of the code structure and statements that form part of the description. This is useful information that the model can use to understand the bug and will have an impact on whether it belongs to a higher priority.
Step 2 - Train-Test Split
During the process of training a supervised learning model we are attempting to learn a function that most closely resembles the real-world behavior. We use the information available in the training data in order to learn this function. Afterwards, it is important to evaluate how close our learned function is to the real-world and we split our entire data into train and test splits in order to achieve this. We split the data, typically using a percentage, with the larger share assigned to the train split. For example, if we have a dataset with 100 observations and apply a train-test split in the ratio of 80-20 then 80 observations will become part of the train split and 20 observations will become part of the test split. The model is now trained on the train split which uses only the 80 observations to learn the function. We will use the test split of 20 observations to evaluate the learned function. An illustration of this is shown in Figure 3-2 below.

Figure 3-2. Illustration of a train-test split in the ratio 80-20
During training phase,
During evaluation,
The model has seen only the 80 observations in the train split and the learned function is now applied on a completely independent and unseen test split to generate the predictions. We know the real values of the target variable in the test split and comparing these with the predictions will give us a true measure of how well the learned function performs and how close it is to real-world behavior.
Evaluating the learned model on the test split provides an unbiased estimate of the error of the text classification model since the observations in the test split have been randomly sampled from the training observations and are not part of the learning process. The test split will be used during model evaluation and there are several metrics that can be used to measure this error which will be discussed in the model evaluation section below.
In order to implement the train-test split we use the sklearn.model_selection.train_test_split function as shown below and provide the argument for the test_size to be 0.2 (denoting 20% of our data as our test split). In addition, we must also specify our independent and target variables and the method returns to us a list of four elements - first two elements are the independent variables split into train and test splits and the next two elements are the target variable splits. One important argument of the function to note is the random_state. This number influences how the rows are sampled and therefore which set of observations goes to the train split and which set of observations goes to the test split. If you provide a different number, the 80-20 split will remain the same but a different selection of observations will go to the train and test splits. It’s important to remember that to reproduce the same results you must choose the same value of the random_state. For example, if you want to check what happens to the model on adding a new independent variable, you must be able to compare the accuracy before and after adding the new variable. Therefore, you must use the same random_state so that you can determine whether a change occurred. The last parameter to take note of is stratify which ensures that the distribution of the target variable is maintained in the train and test splits. If this is not maintained then the training split can have a much higher number of observations of a certain class which does not reflect the distribution in the training data and leads to the model learning an unrealistic function.
X_train,X_test,Y_train,Y_test=train_test_split(df['text'],df['Priority'],test_size=0.2,random_state=42,stratify=df['Priority'])('Size of Training Data ',X_train.shape[0])('Size of Test Data ',X_test.shape[0])
Size of Training Data  36024
Size of Test Data  9006
Step 3 - Training the machine learning model
Our next step in creating the Text classification blueprint is to train a supervised machine learning model using a suitable algorithm. Support Vector Machines (SVM) are one of the popular algorithms used when working with text classification and we will first provide an introduction to the method and then illustrate why it’s well-suited to our task.
Let us consider a set of points in the X-Y plane with each point belonging to one of two classes - cross or circle as represented in Figure 3-3. The SVM works by choosing a line that clearly separates the two classes. Of course, there could be several such lines (shown by the dotted options) and the algorithm chooses the line that provides the maximum separation between the closest cross and circle points (identified with a box around them). These closest cross and circle points are referred to as support vectors. In the illustration we are able to identify a hyperplane that clearly seperates the cross and circle points but in reality it might be difficult to achieve this. For example, there maybe a few circle points that lie on the extreme left and it would be impossible to then generate a hyperplane. The algorithm manages this with the tolerance parameter tol that allows for some flexibility and accepts error in the form of mis-classfied points when deciding a hyperplane.

Figure 3-3. Hyperplane and support vectors in a simple two dimensional classification example
Before proceeding to run the SVM model we must prepare our text data in a suitable format that can be used by the algorithm. This means that we must find a way to represent text data in a numeric format. The simplest way is to count the number of times each word occurs in a bug report and combine the counts of all words to create a numeric representation for each observation. This technique has the disadvantage that commonly occuring words will have large values and could be understood as important features when it is not true. Therefore, we use the preferred option of representing the text using a Term-Frequency Inverse Document Frequency (TF-IDF) vectorization which is explained in more detail in [Link to Come].
tfidf=TfidfVectorizer(min_df=10,ngram_range=(1,2),stop_words="english")X_train_tf=tfidf.fit_transform(X_train)
The TF-IDF vectorization performed in the previous step results in a sparse matrix. The SVM algorithm is preferred when working with text data as they are more suited to work with sparse data compared to other algorithms like Random Forest (https://scikit-learn.org/stable/modules/generated/sklearn.ensemble.RandomForestClassifier.html). They are also better suited to work with input features that are purely numeric (as in our case) while other algorithms are capable of handling a mixture of numeric and categorical input features. For our text classification model we will use the sklearn.svm.LinearSVC module that is provided by the scikit-learn library. SVMs can actually be initialized with different kernel functions and the linear kernel is recommended for use with text data as there are a large number of features that can be considered as linearly separable. It is also faster to fit since it has fewer parameters to optimize. The scikit-learn package provides different implementations of a linear SVM and if you are interested, you can understand the differences between them as described in the sidebar section (SVC vs. LinearSVC vs. SGDClassifier).
In the code below, we initialize the model with a certain random_state and specify a tolerance value of 0.00001. The arguments are specific to the type of model we use and we will show later in this chapter how we can arrive at the optimal parameter values for these arguments. For now we start by specifying some default values and then call the fit method making sure to use the vectorized independent variables that we created in the previous step.
model1=LinearSVC(random_state=0,tol=1e-5)model1.fit(X_train_tf,Y_train)
LinearSVC(C=1.0, class_weight=None, dual=True, fit_intercept=True,
          intercept_scaling=1, loss='squared_hinge', max_iter=1000,
          multi_class='ovr', penalty='l2', random_state=0, tol=1e-05,
          verbose=0)
On executing the code above, we fit a model using the training data and the result shows us the various parameters of the model that was generated. Most of these are the default values since we specified only the random_state and tolerance.
Step 4 - Model Evaluation
We now have a model that can be used to predict the target variable for all the observations in the test split. For these observations, we also know the real target variable and therefore we can calculate the performance of our model. There are many metrics that can be used to quantify the accuracy of our model and we will introduce three of them in this section.
The simplest way to validate our text classification model is accuracy - the ratio of the number of predictions that the model got right to the total number of observations. This can be expressed mathematically as -
In order to measure the accuracy for the model, we use the trained model to generate predictions and compare with the real values. In order to generate the predictions, we must apply the same vectorization to the test split of the independent variable and then call the predict method of the trained model. Once we have the predictions, we can use the accuracy_score method shown below that automatically generates this metric by comparing the true values and the model predictions of the test split.
X_test_tf=tfidf.transform(X_test)
Y_pred=model1.predict(X_test_tf)('Accuracy Score - ',accuracy_score(Y_test,Y_pred))
Accuracy Score - 0.8748612036420165
As you can see above we have achieved a high accuracy score of 87.5% which indicates that we have a good model that is able to predict the priority of bugs accurately. Please note that if you initialized the model with a different random_state, you might not get exactly the same score but it would be similar. It is always a good idea to compare the performance of a trained model with a simple baseline approach which could be based on simple rules of thumb or business knowledge. The objective is to check if the trained model performs better than the baseline and therefore adds value. We can use the sklearn.svm.DummyClassifier module which provides simple strategies like most_frequent where the baseline model always predicts the class with highest frequency or stratified which generates predictions that respect the training data distribution.
clf=DummyClassifier(strategy='most_frequent',random_state=42)clf.fit(X_train,Y_train)Y_pred_baseline=clf.predict(X_test)('Accuracy Score - ',accuracy_score(Y_test,Y_pred_baseline))
Accuracy Score - 0.8769709082833667
We can clearly see that our trained model is not adding any value since it performs just as well as a baseline that always chooses the class P3. Another aspect that we must dig deeper to investigate is how well the model is performing for the different priority levels. Is it better at predicting priority P1 or P5? In order to analyze this we can use another evaluation tool known as the Confusion Matrix. The confusion matrix is a grid that compares the predicted values with the actual values for all the classified observations. The most common representation of a confusion matrix is for a binary classification problem with only two labels.
We can modify our multi-class classification problem to suit this representation by considering one class as P3 and the other class as all of the rest. Let’s look at Figure 3-4, a sample representation of the confusion matrix that only predicts whether a particular bug has a priority P3 or not -

Figure 3-4. Confusion matrix for priority P3 and not P3
The rows depict the predictions and the columns depict the actual values and each slot in the matrix is the count of observations falling in that slot:
- True Positive - count of those observations that were predicted to be positive and are indeed positive
- True Negative - count of those observations that were predicted to be negative and are indeed negative
- False Positive - count of those observations that were predicted to be positive but are actually negative
- False Negative - count of those observations that were predicted to be negative but are actually positive
Based on the above we can automatically derive the accuracy measure using the following equation -
which is nothing but a ratio of all the predictions that were correct and the total number of predictions.
Precision and Recall
The real value of using the confusion matrix is in other measures like Precision and Recall which give us more insight into how the model performs for different classes.
Let’s take the positive (P3) class and consider the Precision -
This metric tells us what proportion of predicted positives is actually positive; or how accurate our model is at predicting the positive class. If we want to be very sure of our positive predictions then this is a metric we must maximize. For example, if we are classifying emails as spam (positive) then we must be very accurate at this otherwise a good email might accidentally be sent to the spam folder.
Another metric that is derived from the confusion matrix is Recall -
This metric tells us what proportion of real positive values is actually identified by our model. A high recall means that our model is able to capture most of the positive classifications in reality. This is especially important when the cost of not identifying a positive case is very high, for example if a patient has cancer but our model does not identify it.
From the above discussion, we can conclude that both precision and recall are important metrics depending on the application of the model. F1 score is a metric that creates a harmonic mean of both of these measures and can also be used as a proxy to evaluate the overall accuracy of the model:
Now that we have developed an understanding of the confusion matrix, let us come back to our blueprint and add the step to evaluate the confusion matrix of the trained model. Note that the above representation was simplified as a binary classification whereas our model is actually a multi-class classification problem and therefore the confusion matrix will change accordingly. For example, the confusion matrix for our model can be generated with the function confusion_matrix -
Y_pred=model1.predict(X_test_tf)confusion_matrix(Y_test,Y_pred)
array([[  17,    6,  195,    5,    0],
       [   7,   14,  579,    7,    0],
       [  21,   43, 7821,   13,    0],
       [   0,    7,  194,   27,    0],
       [   0,    0,   50,    0,    0]])
This can also be visualized in the form of a heatmap by using the plot_confusion_matrix function as below.
plot_confusion_matrix(model1,X_test_tf,Y_test,values_format='d',cmap=plt.cm.Blues)plt.show()
We can define the precision and recall for each category using the same methodology as described above but will now include the count of observations that were incorrectly classified into other categories as well. For example, the precision of the category P3 can be calculated as the ratio of correctly predicted P3 values (7828) and all predicted P3 values (202 + 575 + 7828 + 195 + 50) ->
Precision (P3) = 7828 / 8850 = 0.88
Similarly, the recall for P3 can be calculated as the ratio of correctly predicted P3 values and all actual P3 values (20 + 36 + 7828 + 16 + 0) ->
Recall (P2) = 7828 / 7900 = 0.99
An easier way to determine these measures directly is to use the classification_report function from sklearn that automatically calculates these values for us.
(classification_report(Y_test,Y_pred))
              precision    recall  f1-score   support

          P1       0.38      0.08      0.13       223
          P2       0.20      0.02      0.04       607
          P3       0.88      0.99      0.93      7898
          P4       0.52      0.12      0.19       228
          P5       0.00      0.00      0.00        50

    accuracy                           0.87      9006
   macro avg       0.40      0.24      0.26      9006
weighted avg       0.81      0.87      0.83      9006
Based on our calculations and the above classification report one issue becomes glaringly obvious that while the recall and precision values for the class P3 are quite high, these values for the other classes are very low and even 0 in some cases (P5). The overall accuracy of the model is 88%, but if we hard-coded our prediction to always be P3, this would also be correct 88% of the time. This makes it clear that our model has not learnt much of significance and is merely predicting the majority class. This highlights the fact that during model evaluation we must analyze several metrics and not rely on the accuracy alone.
Class Imbalance
The reason for the model to behave in this manner is due to the class imbalance in the priority classes that we observed earlier. While there were close to 36,000 bugs with a priority of P3, the number of bugs with other priority classes was only about 4000 and even fewer in other cases. This means that when we trained our model it was able to learn the characteristics of the P3 class alone.
There are several techniques we can use to overcome the issue of class imbalance. They belong to two categories of Upsampling and Downsampling techniques. Upsampling techniques refer to methods used to artificially increase the number of observations of the minority class (non P3 classes in our example). These techniques can vary from simply adding multiple copies to generating new observations using a method like SMOTE1. Downsampling techniques refer to methods that are used to reduce the number of observations of the majority class (P3 in our example). We will choose to randomly downsample the P3 class to have similar number of observations as the other classes.
# Filter bug reports with priority P3 and sample 4000 rows from itdf_sampleP3=df[df['Priority']=='P3'].sample(n=4000,random_state=123)# Create a separate dataframe containing all other bug reportsdf_sampleRest=df[df['Priority']!='P3']# Concatenate the two dataframes to create the new balanced bug reports datasetdf_balanced=pd.concat([df_sampleRest,df_sampleP3])# Check the status of the class imbalancedf_balanced['Priority'].value_counts()
P3    4000
P2    3036
P4    1138
P1    1117
P5    252
Name: Priority, dtype: int64
Please note that in performing the downsampling we are losing information and this is not generally a good idea. However whenever we come across a class imbalance problem this prevents our model from learning the right information. By using upsampling and downsampling techniques we try to overcome this but this will always involve a compromise with regards to data quality. While we have chosen a simplistic approach, please go through the note on class imbalance to understand various ways to deal with the situation.
Final Blueprint for Text Classification
We will now combine all the steps we have listed so far to create our blueprint for text classification -
# Loading the balanced dataframedf=df_balanced[['text','Priority']]df=df.dropna()# Step 1 - Data Preparationdf['text']=df['text'].apply(clean)# Step 2 - Train-Test SplitX_train,X_test,Y_train,Y_test=train_test_split(df['text'],df['Priority'],test_size=0.2,random_state=42,stratify=df['Priority'])('Size of Training Data ',X_train.shape[0])('Size of Test Data ',X_test.shape[0])# Step 3 - Training the Machine Learning modeltfidf=TfidfVectorizer(min_df=10,ngram_range=(1,2),stop_words="english")X_train_tf=tfidf.fit_transform(X_train)model1=LinearSVC(random_state=0,tol=1e-5)model1.fit(X_train_tf,Y_train)# Step 4 - Model EvaluationX_test_tf=tfidf.transform(X_test)Y_pred=model1.predict(X_test_tf)('Accuracy Score - ',accuracy_score(Y_test,Y_pred))(classification_report(Y_test,Y_pred))
Size of Training Data  7634
Size of Test Data  1909
Accuracy Score -  0.4903090623363017
              precision    recall  f1-score   support

          P1       0.45      0.29      0.35       224
          P2       0.42      0.47      0.44       607
          P3       0.56      0.65      0.61       800
          P4       0.39      0.29      0.33       228
          P5       0.00      0.00      0.00        50

    accuracy                           0.49      1909
   macro avg       0.37      0.34      0.35      1909
weighted avg       0.47      0.49      0.48      1909
Based on the results we can see that our accuracy is now at 49% which is not good. Analyzing further we can see that precision and recall values have improved for priority P1 and P2 indicating that we are able to better predict bugs with this prioirity. However, it’s also obvious that for bugs with priority P5 this model does not offer anything. We see that this model does perform better than a simple baseline using a stratified strategy as shown below. Even though the earlier model had a higher accuracy, it wasn’t actually a good model because it was ineffective. This model is also not good but at least presents a true picture and informs us that we must not use it for generating predictions.
clf=DummyClassifier(strategy='stratified',random_state=21)clf.fit(X_train,Y_train)Y_pred_baseline=clf.predict(X_test)('Accuracy Score - ',accuracy_score(Y_test,Y_pred_baseline))
Accuracy Score - 0.30434782608695654
Let’s see some examples of where our model predictions for these priorities are accurate -
# Create a dataframe combining the Title and Description,# Actual and Predicted values that we can exploreframe={'text':X_test,'actual':Y_test,'predicted':Y_pred}result=pd.DataFrame(frame)result[((result['actual']=='P1')|(result['actual']=='P2'))&(result['actual']==result['predicted'])].sample(2,random_state=22)
| text | actual | predicted | |
|---|---|---|---|
| 64 | Java launcher: Dont prompt for element to launch if theres only one I went to debug a CU by selecting it and clicking the debug tool item. I was prompted to select a launcher and I also had to select the only available class on the second page. The second step shouldnt be necessary. The next button on the first page should be disabled. NOTES: DW The first time you launch something in your workspace you must go through this pain...This is due to the debugger being pluggable for different lauguages. In this case the launcher selection is generic debug support and the choosing of a class to launch is java specific debug support. To promote lazy plugin loading and to avoid launchers doing exhaustive searching for launchable targets the launcher selection page does not poll the pluggable launch page to see if it can finish with the current selection. Once you have selected a defualt launcher for a project the launcher selection page will not bother you again. Moved to inactive for post-June consideratio | P2 | P2 |
| 5298 | Rapid stepping toString When you do rapid stepping and have an object selected displaying details we get exceptions in the log. This is because the toString attempts an evaluation while a step is in progress. We have to allow stepping during evaluations so this is a tricky timing issue. </log-entr | P1 | P1 |
And some cases where the model prediction is inaccurate -
result[((result['actual']=='P1')|(result['actual']=='P2'))&(result['actual']!=result['predicted'])].sample(2,random_state=33)
| text | actual | predicted | |
|---|---|---|---|
| 4707 | Javadoc wizard: Problems with default package 20020328 1. empty project. create A.java in default package 2. Start export wizard select the default package press Finish 3. Creation fails javadoc: No source files for package A Loading source files for package A... 1 error Dont know if this is a general javadoc probl | P1 | P2 |
| 16976 | Breakpoint condition compiler should not matter about NON-NLS strings Ive a project in which Ive set compiler option usage of non-externalized strings to Warning. When I want to set a condition on a breakpoint which contains a string object.equals for example I break all the time at this point due to a compilation error... Then Im obliged to write my condition as: boolean cond = object.equals //$NON-NLS-1$ return cond to avoid this problem. Wont it be possible that debugger uses a specific compiler which would ignore current project/workspace compiler options but only uses default one | P2 | P3 |
Our model is not accurate and from observing the predictions, it is not clear whether a relationship between description and priority exists. In order to improve the accuracy of our model, we have to perform additional data cleaning steps and perform steps like lemmatization, removing noisy tokens, modifying min_df & max_df, bigrams etc. We would recommend the reader to modify the current clean function with the ‘Extracting NLP Features on a Large Dataset’ blueprint provided in [Link to Come] and check the performance. Another option is also to determine the right hyperparameters for the selected model and in the next section, we will introduce the techniques of Cross-Validation and Grid Search that can help us better understand model performance and arrive at an optimized model.
Cross-Validation
Before training the model, we created a train-test split so that we can accurately evaluate our model. Based on the test split we got an accuracy of 48.7%. However, it is desirable to improve this accuracy. Some of the techniques that we could use include adding additional features like trigrams, additional text cleaning steps, choosing different model parameters and then checking performance on the test split. Our result is always based on a single hold-out dataset that we created using the train-test split. If we go back and change the random_state or shuffle our data then we might get a different test split which might have different accuracy for the same model. Therefore, we rely very heavily on a given test split to determine the accuracy of our model.
Cross-Validation is a technique that allows us to train on different splits of data and validate also on different splits of data in a scaled manner so that the final model that is trained, achieves the right balance between underfitting and overfitting. Underfitting is the phenomenon where our trained model has not learnt the underlying relationship well and makes similar predictions for every observation which are far away from the real value. This is because the chosen model is not complex enough to model the phenomenon (wrong choice of model) or there are insufficient observations from which to learn the relationship. Overfitting is the phenomenon where the chosen model is very complex and has fit the underlying pattern very well during training but produces significant deviations on the test data. This indicates that the trained model does not generalize well to unseen data. By using a cross-validation technique we become aware of these drawbacks by training and testing on multiple splits of the data and can arrive at a more realistic performance of our model.
There are many variants of cross-validation and the most widely used is K-fold cross-validation. The Figure 3-5 demonstrates a K-fold strategy, where we first divide the entire training dataset into K folds. In each iteration, a model is trained on a different set of K-1 folds of the data and validation is performed on the held-out Kth fold. The overall performance is taken to be the average of the performance on all K folds. In this way we are not basing our model accuracy on just one test split but multiple such splits and similarly we are also training the model on multiple splits of the training data. This allows us to use all the observations for training our model as we do not need to have a separate hold out test split. We perform the vectorization step again because we are going to use the entire dataset and not just the train split.

Figure 3-5. Illustration of K-fold cross-validation strategy where a different hold-out set (highlighted above) is chosen each time the model is trained. The rest of the sets form part of the training data.
In order to perform cross-validation, we will use the cross_val_score method from sklearn. This takes as arguments the model that needs to be fit, the training dataset and the number of folds that we want to use. In this case we use a 5 fold cross-validation strategy and depending on the number of training observations and availability of computing infrastrcuture this can vary between 5 and 10. The method returns the validation score for each iteration of the cross-validation and we can calculate the mean value obtained across all validation folds. From the results, we can see that the validation score varies from 36% upto 47%. This indicates that the model accuracy we reported earlier on the test dataset was optimistic and an artifict of the specific way in which the train-test split occured. A more realistic accuracy that we can expect from this model is actually the average score of 44% derived from cross validation. It’s important to perform this exercise to understand the true potential of any model.
# Vectorizationtfidf=TfidfVectorizer(min_df=10,ngram_range=(1,2),stop_words="english")df_tf=tfidf.fit_transform(df['text']).toarray()# Cross Validation with 5 foldsscores=cross_val_score(estimator=model1,X=df_tf,y=df['Priority'],cv=5)("Validation scores from each iteration of the cross validation ",scores)("Mean value across of validation scores ",scores.mean())("Standard deviation of validation scores ",scores.std())
Validation scores from each iteration of the cross validation  [0.47773704 0.47302252 0.45468832 0.44054479 0.3677318 ]
Mean value across of validation scores  0.44274489261393396
Standard deviation of validation scores  0.03978852971586144
Note
Using a cross-validation technique allows us to use all observations and we do not need to create a separate hold-out test split. This gives the model more data to learn from.
Hyperparameter Tuning with Grid Search
Grid search is a useful technique to improve the accuracy of the model by evaluating different parameters that are used as arguments for the model. It does so by trying different combinations of hyperparameters that can maximize a given metric (e.g. accuracy) for the machine learning model. For example, if we use the sklearn.svm.SVC model, it has a parameter named kernel which can take several values - linear, rbf (radial basis function), poly (polynomial) and so on (https://codingmachinelearning.wordpress.com/2016/07/25/support-vector-machines-kernel-explained). Furthermore, by setting up a pre-processing pipeline then we could also test with different values of ngram_range for the TF/IDF vectorization. When we do a grid search, we provide the set of parameter values that we would like to evaluate and combined with the cross-validation method of training a model, this identifies the set of hyperparameters that maximizes model accuracy. The biggest drawback of this technique is that it is CPU and time intensive; in a way we are testing many possible combinations of hyperparameters to arrive at the set of values that perform best.
In order to test the right choice of hyperparameters for our model we first create a training_pipeline where we define the steps that we would like to run. In this case we specify the TF-IDF vectorization and the LinearSVC model training. We then define a set of parameters that we would like to test using the variable grid_param. Since a parameter value is specific to a certain step in the pipeline, we use the name of the step as the prefix when specifying the grid_param. For eg. min_df is a parameter used by the vectorization step and is therefore referred to by tfidf__min_df. Finally, we use the GridSearchCV method which provides the functionality to test multiple versions of the entire pipeline with different sets of hyperparameters and produces the cross-validation scores from which we pick the best performing version.
training_pipeline=Pipeline(steps=[('tfidf',TfidfVectorizer(stop_words="english")),('model',LinearSVC(random_state=21,tol=1e-5))])grid_param=[{'tfidf__min_df':[5,10],'tfidf__ngram_range':[(1,3),(1,6)],'model__penalty':['l2'],'model__loss':['hinge'],'model__max_iter':[10000]},{'tfidf__min_df':[5,10],'tfidf__ngram_range':[(1,3),(1,6)],'model__C':[1,10],'model__tol':[1e-2,1e-3]}]gridSearchProcessor=GridSearchCV(estimator=training_pipeline,param_grid=grid_param,cv=5)gridSearchProcessor.fit(df['text'],df['Priority'])best_params=gridSearchProcessor.best_params_("Best alpha parameter identified by grid search ",best_params)best_result=gridSearchProcessor.best_score_("Best result identified by grid search ",best_result)
Best alpha parameter identified by grid search  {'model__loss': 'hinge', 'model__max_iter': 10000, 'model__penalty': 'l2', 'tfidf__min_df': 10, 'tfidf__ngram_range': (1, 6)}
Best result identified by grid search  0.46390780513357777
We have evaluated two values of min_df and ngram_range with two different set of model parameters. In the first set we tried with the l2 model_penalty and hinge model_loss with a maximum of 1000 iterations. In the second set we tried to vary the value of the regularization parameter C and tolerance values of the model. While we see the parameters of the best model above, we can also check the performance of all other models that were generated to see how the parameter values interact. You can see the top 5 models and their parameter values as below.
gridsearch_results=pd.DataFrame(gridSearchProcessor.cv_results_)gridsearch_results[['rank_test_score','mean_test_score','params']].sort_values(by=['rank_test_score'])[:5]
| rank_test_score | mean_test_score | params | |
|---|---|---|---|
| 3 | 1 | 0.46 | {'model__loss’: ‘hinge', ‘model__max_iter’: 10000, ‘model__penalty’: ‘l2', ‘tfidf__min_df’: 10, ‘tfidf__ngram_range’: (1, 6)} |
| 2 | 2 | 0.46 | {'model__loss’: ‘hinge', ‘model__max_iter’: 10000, ‘model__penalty’: ‘l2', ‘tfidf__min_df’: 10, ‘tfidf__ngram_range’: (1, 3)} |
| 0 | 3 | 0.46 | {'model__loss’: ‘hinge', ‘model__max_iter’: 10000, ‘model__penalty’: ‘l2', ‘tfidf__min_df’: 5, ‘tfidf__ngram_range’: (1, 3)} |
| 1 | 4 | 0.46 | {'model__loss’: ‘hinge', ‘model__max_iter’: 10000, ‘model__penalty’: ‘l2', ‘tfidf__min_df’: 5, ‘tfidf__ngram_range’: (1, 6)} |
| 5 | 5 | 0.45 | {'model__C’: 1, ‘model__tol’: 0.01, ‘tfidf__min_df’: 5, ‘tfidf__ngram_range’: (1, 6)} |
Blueprint recap and conclusion
Let us recap the steps of the blueprint for text classification by applying this to a different classification task. If you recall, we mentioned at the beginning of the chapter that to enable quick bug fixes, we must identify the priority of the bug and also assign it to the right team. The assignment can be done automatically by identifying which part of the software the bug belongs to. We have seen that the bug reports have a feature named ‘Component’ with values including Core, UI, Doc, etc. This can be very helpful in assigning the bug to the right team or individual, leading to a faster resolution. This task is similar to identifying the bug priority and will help us understand how the blueprint can be applied to any other application. We update the blueprint with the following changes -
- additional step to include grid search to identify the best hyperparameters and limited the number of options tested to increase runtime
- additional option to use the
sklearn.svm.SVCfunction to compare performance and try non-linear kernels
# Flag that determines the choice of SVC and LinearSVCrunSVC=True# Loading the dataframedf=pd.read_csv('../data/jdt-bugs-dataset/eclipse_jdt.csv')df=df[['Title','Description','Component']]df=df.dropna()df['text']=df['Title']+df['Description']df=df.drop(columns=['Title','Description'])# Step 1 - Data Preparationdf['text']=df['text'].apply(clean)df=df[df['text'].str.len()>50]if(runSVC):# Sample the data when running SVC to ensure reasonable run-timesdf=df.groupby('Component',as_index=False).apply(pd.DataFrame.sample,random_state=42,frac=.2)# Step 2 - Train-Test SplitX_train,X_test,Y_train,Y_test=train_test_split(df['text'],df['Component'],test_size=0.2,random_state=42,stratify=df['Component'])('Size of Training Data ',X_train.shape[0])('Size of Test Data ',X_test.shape[0])# Step 3 - Training the Machine Learning modeltfidf=TfidfVectorizer(stop_words="english")if(runSVC):model=SVC(random_state=42,probability=True)grid_param=[{'tfidf__min_df':[5,10],'tfidf__ngram_range':[(1,3),(1,6)],'model__C':[1,100],'model__kernel':['linear']}]else:model=LinearSVC(random_state=42,tol=1e-5)grid_param={'tfidf__min_df':[5,10],'tfidf__ngram_range':[(1,3),(1,6)],'model__C':[1,100],'model__loss':['hinge']}training_pipeline=Pipeline(steps=[('tfidf',TfidfVectorizer(stop_words="english")),('model',model)])gridSearchProcessor=GridSearchCV(estimator=training_pipeline,param_grid=grid_param,cv=5)gridSearchProcessor.fit(X_train,Y_train)best_params=gridSearchProcessor.best_params_("Best alpha parameter identified by grid search ",best_params)best_result=gridSearchProcessor.best_score_("Best result identified by grid search ",best_result)best_model=gridSearchProcessor.best_estimator_# Step 4 - Model EvaluationY_pred=best_model.predict(X_test)('Accuracy Score - ',accuracy_score(Y_test,Y_pred))(classification_report(Y_test,Y_pred))
Size of Training Data  7204
Size of Test Data  1801
Best alpha parameter identified by grid search  {'model__C': 1, 'model__kernel': 'linear', 'tfidf__min_df': 5, 'tfidf__ngram_range': (1, 6)}
Best result identified by grid search  0.739867279666898
Accuracy Score -  0.7368128817323709
              precision    recall  f1-score   support

         APT       1.00      0.25      0.40        16
        Core       0.74      0.77      0.75       544
       Debug       0.89      0.77      0.82       300
         Doc       0.50      0.17      0.25        12
        Text       0.61      0.45      0.52       235
          UI       0.71      0.81      0.76       694

    accuracy                           0.74      1801
   macro avg       0.74      0.54      0.58      1801
weighted avg       0.74      0.74      0.73      1801
Based on the accuracy and classification report, we have achieved an accuracy of 73% and we can conclude that this model is able to predict the software component that a bug is referring to more accurately than the priority. While some of the improvement is due to the additional steps of grid search and cross-validation, most of it is simply because there is a relationship that the model could identify between the bug description and the ‘Component’ it refers to. The ‘Component’ feature does not show the same level of the class imbalance problem that we noticed earlier. However, even within ‘Component', we can see the poor results for the software component Doc which has very few observations compared to the other components. Also, comparing with the baseline we can see that this model improves in performance. We can try to balance our data or make an informed business decision that it’s more important for the model to predict those software components that have a larger number of bugs.
clf=DummyClassifier(strategy='most_frequent',random_state=21)clf.fit(X_train,Y_train)Y_pred_baseline=clf.predict(X_test)('Accuracy Score - ',accuracy_score(Y_test,Y_pred_baseline))
Accuracy Score - 0.38534147695724597
Let us also attempt to understand how this model tries to make its predictions by looking at where it works well and where it fails. We will first sample 5 observations where the predictions were accurate -
CreateadataframecombiningtheTitleandDescription,ActualandPredictedvaluesthatwecanexploreframe={'text':X_test,'actual':Y_test,'predicted':Y_pred}result=pd.DataFrame(frame)result[result['actual']==result['predicted']].sample(2,random_state=11)
| text | actual | predicted | |
|---|---|---|---|
| 28225 | Move static initializer lacks atomic undo.When a method is moved the move can be atomically undone with a single Undo command. But when a static initializer is moved it can only be undone with an Undo command issued in both the source and destination files | UI | UI |
| 30592 | Debug view steals focus when breakpoint hitM5 - I20060217-1115 When you debug a program that has breakpoints when the debugger hits a breakpoint pressing Ctrl+Sht+B does not remove the breakpoint even though the line looks like it has the focus. To actually remove the breakpoint one has to click in the editor on the proper line and repress the keys | Debug | Debug |
We can see that when a bug is classified as belonging to the Debug component the description makes use of terms like debugger, breakpoint whereas when a bug is classified in UI we see an indication of Undo and movement. This seems to indicate that the trained model is able to learn associations between words in the description and the corresponding software component. Let us also look at some observations where the predictions were incorrect -
result[result['actual']!=result['predicted']].sample(2,random_state=11)
| text | actual | predicted | |
|---|---|---|---|
| 16138 | Line wrapping on @see tags creates a new warning Invalid parameters declarationIn Eclipce 3.0M5 with the javadoc checking enabled linewrapping will cause a warning Javadoc: Invalid parameters declaration This will cause the warning: /** * @see com.xyz.util.monitoring.MonitoringObserver#monitorSetValue */ where this will not : /** * @see com.xyz.util.monitoring.MonitoringObserver#monitorSetValue * | Text | Core |
| 32903 | After a String array is created eclipse fails to recognize methods for an object.Type these lines in any program. String abc = new String {a b c} System. After System. eclipse wont list all the available methods | Core | UI |
Here, it becomes more difficult to identify reasons for an incorrect classification but we must analyze further if we want to improve the accuracy of our model. After we build a model we must investigate our predictions and understand why the model made these predictions. There are several techniques that we can use to explain model predictions and this will be covered in more detail in the next chapter [Link to Come].
Closing Remarks
In this chapter we presented a blueprint for performing the different steps in building a supervised text classification model. It starts with the data preparation steps including the balancing of classes if required. We then showed the steps for creating train and test splits including the use of cross-validation as the preferred technique to arrive at an accurate measure of model accuracy. We then presented grid search as one of the techniques to validate different settings of hyperparameters to find the most optimal combination. Supervised machine learning is a broad area with multiple applications like loan default prediction, ad-click prediction, etc. This blueprint presents an end to end technique for building a supervised machine learning model and can be extended to problems outside of text classification as well.
Further Reading
- An Idiot’s guide to Support Vector Machines, R Berwick - http://web.mit.edu/6.034/wwwbob/svm-notes-long-08.pdf
- Random Search for Hyper-Parameter Optimization, Bergstra and Bengio - http://www.jmlr.org/papers/volume13/bergstra12a/bergstra12a.pdf
- Model Evaluation, Model Selection, and Algorithm Selection in Machine Learning, Sebastian Raschka - https://arxiv.org/pdf/1811.12808.pdf
- A Study of CrossValidation and Bootstrap for Accuracy Estimation and Model Selection - Ron Kohavi - http://ai.stanford.edu/~ronnyk/accEst.pdf
1 Chawla et al, Synthetic Minority Over-sampling Technique, 2002 - https://arxiv.org/pdf/1106.1813.pdf