
Making Your Mark
Chances are you’ve already tried to draw your favorite subject on your own. If you didn’t get the results you were hoping for—and you most likely didn’t if you bought this book!—your inaccurate (or incomplete) perception of your subject may not be the only culprit. Your technique of putting pencil to paper may take some of the blame. Maybe your rendering was close, but not quite right. That’s okay! The first step is to actually get off your duff and give it a try. From there it’s all about practice.
Before ballet dancers start dancing, they practice their positions. Singers go through pre-concert vocal warm-ups. A writer might start the day with some journaling or maybe a cup of coffee. As an artist, you’re in the same boat—you need to warm up before you cut loose. Consider this chapter your pre-drawing warm-up. It’s designed to get you drawing and using your tools correctly. All the tools, techniques, secrets and ideas won’t help you without some practice, so grab your box of drawing goodies and let’s get going.
Contour Drawing Warm-Up
One excellent warm-up practice is to do a contour drawing. There are two kinds of contour drawings: regular and blind. Both types involve placing your pencil on a piece of paper and not lifting it until the drawing is complete. The idea is that as your eyes are moving across the subject you have chosen, your pencil is moving across the paper in the same manner.
How do these two types of contour drawings differ then? The answer lies in whether or not you look at your hand while in the process of drawing. In a regular contour drawing you have the freedom to look at both the subject and your drawing as you work. But a blind contour drawing, as the name suggests, requires that you lock your gaze on the subject entirely, never looking down at your hand as you draw.
Now, contour drawing may sound stupid or like a waste of your time, but the point is to train your eye and hand to move together at the same time and at the same pace. This ultimately forces your eye to slow down and more carefully observe the object so your hand can keep up. Just give contour drawing a shot—it’ll be fun, I promise!
Reference Photos
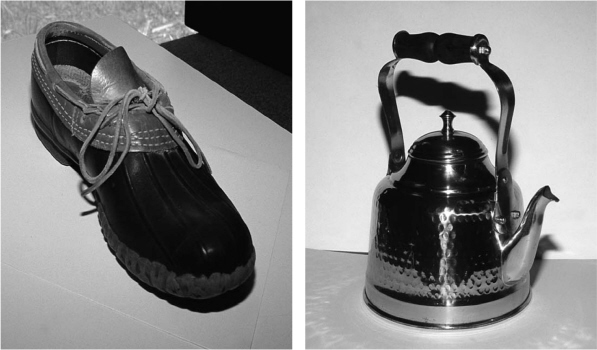
I used this shoe and copper teakettle to complete the contour drawings on the next page. You can practice contour drawing with just about anything you have laying around the house.
 Psssssst!
Contour drawings don’t always have to be of a lone object. You can do a contour drawing of an entire scene or landscape. Though your pencil shouldn’t leave the surface of your paper when you are drawing just one object, it is okay to quickly lift your pencil when drawing multiple objects if there is dead space between them. Only do this when necessary, though: The space between the objects should be significant enough to justify lifting your pencil.

Blind Contour Drawing
Choose a starting point on the object, then place a piece of paper under your drawing hand and put the pencil down on the paper. Turn your body so you can’t peek back at your hand. As you start drawing, your eyes and your hand should be in sync. That is, as your eye moves slowly around the object, your hand should record the exact part of the image on which your eyes are focusing at any given time. Let your eye explore each shape and area of the object as your hand does the same. Don’t lift your pencil from the paper until the drawing is complete—and no peeking at your paper! When you’re finished, you should end up with a scribble that kind of resembles your subject.


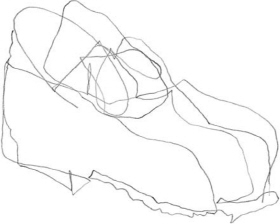
Regular Contour Drawing
Begin this drawing in the same way, only don’t bother turning your body so that you can’t see your hand. This time, you can freely look back and forth from your paper to the subject, but you still can’t lift your pencil from the paper until the drawing is complete. No cheating! Your regular contour drawing will more closely resemble the actual subject.
Pencilling Techniques
Drawing is as simple as placing pencil marks on a piece of paper. The selection of drawing marks available to you is as varied and unique as your own handwriting. There are no correct or incorrect marks, only more or less effective ones in meeting your drawing goal.
This is not a comprehensive list of marks, only the types we will be using for the illustrations in this book. You can use these marks for creating interesting textures and shading, as well as just plain filling in the spaces of your artwork.
Hatching
Hatching involves drawing parallel lines on your paper. These lines should be varied at the points where they begin and end to prevent unwanted hard edges from occurring. Vary the distance between the lines to create lighter or darker areas.
Generally, your lines should follow the form of your subject, indicating roundness—though drawing all the lines in the same direction can be a style choice done purposely for an interesting drawing.

Crosshatching
Crosshatching starts the same way as hatching does, with parallel lines. Once the first set of lines are drawn, a second set is placed over them at an angle. If more depth is needed, a third and fourth layer may be added. The crosshatching may continue for as many layers necessary to create the desired darkness.
 Psssssst!
The techniques of hatching and crosshatching are often used by pen-and-ink artists to create shadows.
PRACTICE BUILDING UP LAYERS
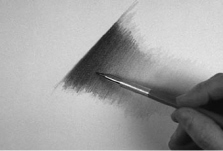
A more challenging technique, but beautiful when completed, is using multiple pencils with different grades of graphite to create shading. You create the changes in lights and darks by gradually and gently lifting your strokes. Although this technique requires more hand control and is rather labor intensive, the advantage is that corrections such as modifying your darks are easier to make.

![]() Start Light
Start Light
Using a 2H pencil, smoothly scribble back and forth over a distance of several inches. Halfway across, start to lighten the pressure on your pencil so that the end strokes are quite light.

![]() Repeat With Darker Lead
Repeat With Darker Lead
Now take an HB pencil and repeat the process going over the 2H scribble, but this time end your strokes at the halfway point of your first scribble, where it began to lighten.
![]() Continue to Darken
Continue to Darken
Now switch to a 2B pencil and repeat the process, again stopping at the halfway point of the previous scribble. You now have a smooth gradation of dark to light.

Putting It All Together
I used hatching and crosshatching extensively in this drawing. The finished work has more texture and is less smooth than what you get with other techniques. In areas such as the shadow under the horse, all the hatching goes in a single direction. In other areas, the hatching and crosshatching define the form of the horse.
![]() Psssssst!
Psssssst!
Whether you prefer to sketch using pencil lines, circular motions, scribble shapes or any other technique, that’s fine. Don’t let someone come along and say it can’t be done using a certain technique. Exploring is how you develop your own personal style of drawing.
Smudging Techniques
To make your drawings look more lifelike, you’ll want to blend your pencil strokes for realistic shading. I call this technique smudging.
I remember taking a composite drawing class a number of years ago with an accomplished and well-known instructor. He paused at my desk and stared in horror as I smudged my drawing, finally grabbing the offending tool from my hand.
“Don’t smudge!” he said. “You’re grinding the graphite into your paper and you’ll never be able to erase it!” He then walked away, taking my stump with him.
He was right. Smudging your drawing does indeed grind the lead into the paper, making it difficult if not impossible to “clean back out” to create the lights. I pondered his reasoning for the rest of the day before seeing the flaw in his point. Then it dawned on me that he was an oil painter, and oil painters work from dark to light. I am a watercolorist, and since watercolorists work from light to dark, we are used to preserving our whites or lightest areas beforehand. It’s not a problem to use the technique of smudging for shading if you remember to keep away from the areas you wish to remain light.
I smudge my shading with some form of blending tool. These tools could be a paper stump, tortillion, chamois cloth or even a makeup sponge or facial tissue. Never, never smudge with your finger. Fingers contain oils that will contaminate your drawing and mess it up.

Small Smudging
Made of rolled paper, a tortillion is designed to be used on its tip, which will mash down if pressed too hard. This tool is meant to be used in small areas. It does not blend larger areas well because too much pressure is placed on too small a tip, creating a streaky appearance.

Large Smudging
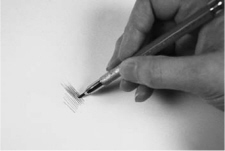
A paper stump is typically used on its side, although you can use the tip for smaller areas. Don’t hold it as you would a pencil, however, when blending large areas. Place the stump across your hand, as shown in the first picture, then turn your hand over to use the tool correctly. This spreads the graphite over a larger area without placing too much pressure on a small area.

Getting Dirty
When you smudge, you are blending your pencil strokes together. The blending tool starts off clean and picks up the graphite from your pencil, smoothing and blending the strokes. You can accelerate this process by scribbling with your 6B pencil on a scrap piece of paper and rubbing your paper stump in the graphite.

Start Neat
If your scribbles are sloppy to begin with, you will still see the sloppy strokes when you are done blending. Smooth, even strokes blend well together.
 Psssssst!
When your paper stump gets dirty and dull from blending, you can clean it up and sharpen it with sandpaper. And if you accidentally mash down the tip of your tortillion, unbend a paper clip and use the wire to push the tip back out.
PRACTICE SMUDGING IN LAYERS
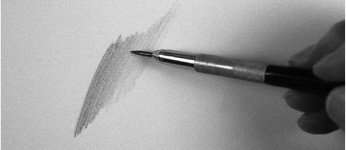
Using a paper stump involves shading in layers. Your goal is to go from darkest dark to light by blending in one direction. The darkest areas of your drawings will take numerous applications of pencil scribbles and smudging.
![]() Gently Scribble
Gently Scribble
Draw a line on a piece of paper. Gently scribble with a soft 4B to 6B pencil next to the line, putting less pressure on your pencil for gradually lighter lines as you work to the right.

![]() Smudge
Smudge
Blend the scribble with your stump, using long strokes in the direction you drew in. Now draw your stump over an area that has no shading. The graphite on your stump will transfer to the drawing.

![]() Repeat
Repeat
It will take several applications of graphite and smudging to adequately develop the darks in your drawing.

Putting It All Together
The darker areas of this horse were blended together with a paper stump. Several applications of graphite built up the desired level of darkness in the darkest areas. No pencil strokes were used on the mid-tones; the shading came entirely from the graphite residue on the paper stump. Some lines were deliberately left showing to indicate hair.
 Psssssst!
Stay away from the “H” leads for smudging purposes. There just isn’t enough graphite transferred to the paper to smudge well. Also, be a bit cautious of your paper stump transferring too much graphite. If it is too dirty, instead of creating a gently blended area, the stump will blob too much darkness onto your drawing. Do a practice smudge on scrap paper with your stump before applying it to your drawing to be sure.
Erasing Techniques
Your eraser is a remarkable tool. Although you’ve been erasing things you have written since at least the first grade, you’ve probably never truly appreciated it. Sure it can correct mistakes, like lightening a too-dark area, but its use can be so much more deliberate than that. In taking away graphite, an eraser can add tremendous interest to your artwork.
My two favorite erasers are the kneaded rubber eraser and the portable electric. If you haven’t yet succumbed to the benefits of the portable electric, I suppose you could use a standard white plastic eraser. We’ll also practice erasing with the help of an eraser shield.

Kneaded Rubber Eraser
The kneaded rubber eraser will clean up mistakes just fine, but I love it because it will lift graphite from a drawing without leaving a harsh, unnatural edge. You use the eraser by dabbing—pushing it straight down, then lifting straight up—not by rubbing it side to side. The more you dab at a spot, the lighter it gets. This works wonderfully for developing the form of your subject (by creating light areas among darker ones) or for lifting out highlights.
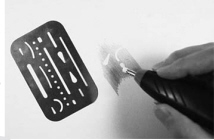
Erasing Shields
Erasing shields are best used as a way to clean up small areas on your drawing. You position the shield so the shape that will best correct the problem is over the troublesome part of your drawing, then erase through it. Erasing shields are also useful for creating new shapes.
Outside the Lines
When I shade by smudging, I use a large erasing shield to clean up the outside edges of the subject. This allows me to make long sweeping strokes with the paper stump, which makes my drawing look smoother.
 Psssssst!
As children, we tended to think of erasers as mistake-fixers. They’re far more than that. In art, we erase as much as we draw, using the eraser to create lights, lighten midtones and make texture (think wispy white hairs or windblown grasses). Look closely and you’ll see that erasers were used extensively in the drawings throughout this book and often share equal billing with the pencils.
Give Templates a Try
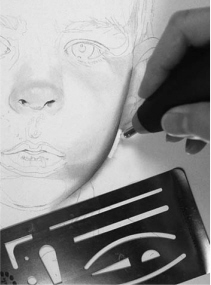
You can create a variety of unique effects by making a custom template. Start with a piece of clear acetate, which you can find as transparency sheets or plastic report covers in just about any office supply store. Take a craft knife and cut out the shapes you desire in the sizes you want. Then you can lay the template on your paper and draw or erase the specific shapes through it. You can reuse these templates again and again for countless drawings.

![]() Create the Shape
Create the Shape
With a craft knife, carefully cut the template into the desired shape. In this case, the shape had a sharp point, so the acetate was reinforced with a piece of tape so it wouldn’t tear.

![]() Draw Through It
Draw Through It
The template may be used to draw through to create a small, sharply defined area. It also could be used to build up a darker area on an already shaded area.

![]() Erase Through It
Erase Through It
You could use the template like a custom erasing shield. It may be placed over areas that have been previously shaded to create layers of values (or lights and darks).

Draw or Erase With Templates
I used a small, curved custom template to draw in this blade of grass over a shaded area, then used the same template to erase a blade away.
 Psssssst!
Custom templates are incredibly useful for the repetitious elements in a drawing. To avoid repetition that’s too predictable (and therefore boring), change things up a little. Cut various sizes of the element on your template, or try flipping the template over and using the reverse image in areas.

Putting It All Together
In this landscape drawing, the cattails, the tips and stems of the cattails and the trunks of the trees in the background were erased using custom templates. Some of the templates were reversed to create matching sides.

Look Closer …
The ripples in the water were also erased through a custom template.
Cheat Sheet
• Contour drawing, in which you don’t lift your pencil from your paper as you draw, trains your eyes and hand to move in sync and forces you to really observe your subject.
• Three common pencilling techniques for filling in your drawing are hatching, crosshatching and building.
• Hatching involves drawing parallel lines of varying lengths. Vary the distance between the lines to create lighter or darker areas.
• To crosshatch, layer sets of parallel lines over each other at different angles until you reach the desired darkness.
• Multiple pencils with different grades of graphite are required for building, a technique in which pencil tones are gradually layered.
• Blending or “smudging” makes your pencil strokes smooth and gives your drawings a finished look.
• You can blend using tortillions (ideal for small areas), paper stumps (best for large areas but usable in smaller ones) or household items like facial tissue, but never with your finger, which can deposit unwanted oils on your drawing.
• In drawing, erasers don’t merely remove mistakes—they are used purposely to lift highlights, soften hard edges and create realistic textures.
• Erasing shields and templates can give you greater control in pencilling in or erasing shapes.
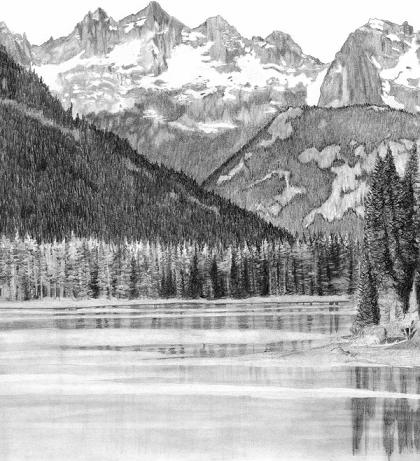
Correct Site Helps Make Your Subject Recognizable
The exact location of each ridge and jagged mountain is not important if you’re just inventing a scene. However, if you desire to draw a specific scene, such as this one of Cooper Lake in the Washington Cascades, you need to know how to properly scale and proportion those areas.
COOPER LAKE, WASHINGTON
Graphite on bristol board
10" x 8" (25cm x 20cm)