
Site
Site refers to the general location of the different elements of your subject on the paper. Tied to this concept is the idea of proportion or scale, which involves making those elements the correct size in relation to each other. For most artists, the drawing starts here. Once you’ve figured out how everything will fit, you can go about the business of developing the details.
Many artists get caught up with using only one technique to find the sites or locations of the parts of their subject. The grid method, for example, is a popular technique in which you divide a photograph of your subject into a grid of equally sized boxes that corresponds with a grid drawn on your paper. Then you re-create what you see in the photo, box by box. Quite frankly, life is too short to use a grid system for every drawing. I have some secrets to share on what works best in different circumstances.
Finding the correct scale and location for the various elements of your drawing often brings out such tricky terms as vanishing points, two-point perspective, horizon line and eye levels. Relax—we’ll achieve all that with the simpler concepts of measuring, optical indexing and flattening.
A Lesson in a Jar
Among my regular activities I’m a professional speaker, and I sometimes use an illustration to make a point in my presentations. I’ll take a clear glass jar and place four or five good-sized stones in it. Then I’ll ask the audience if the jar is full. About half the group will say yes; the other half will stare at me as if I had sprouted horns.
Next I’ll add smaller stones, filling the jar further. I’ll ask the question again: “Is the jar full?” This time seventy-five percent will respond with no, anticipating another clever move on my part, and the remainder will fold their arms and stare at the ceiling. I’ll pour sand into the jar next and repeat the question. Ninety percent will say no, and the remaining ten percent will check their wristwatches. Finally, I’ll pour water into the jar. “Is the jar full?” I ask. By now the entire audience has been snagged by my antics. Yes, they all admit, the jar is finally full.
The point is this: if I don’t put in the big rocks first, they’ll never fit. As a budding artist, you need to get the big stuff down first. Work from the large, overall shapes to smaller, specific details. I can’t emphasize this enough as you continue through the chapter: no amount of spectacular detail can “fix” a drawing whose main shapes aren’t placed correctly.

Don’t Sweat the Small Stuff … Yet
The next time you’re in a hurry to get to the details of a drawing, remember this jar of rocks!
FIRST THINGS FIRST
Graphite on bristol board
14" x 17" (36cm x 43cm)
The Art of Measuring
You already have a basic knowledge of proportion and scale. You know about it because you learned it, and examples of it surround you in your everyday existence. You learned that a cocker spaniel is a very small dog when compared to an Irish wolfhound, but not so small compared to a chihuahua. You learned that you’d better measure the rooms of a new house and all the furniture you’d like to fill them with if you expect everything to fit. You learned that a large milkshake isn’t that much bigger than a small one (that is, until your bathroom scale sets you straight).
So, what did you actually learn? You learned to compare things to other things through measurement, whether by eyeballing it or getting on your hands and knees with a tape measure. This is how we check proportion or scale—the size relationships between objects. In art, you will use measurement to put the proportions within your drawing to the test.
What Can Be Used as a Baseline?
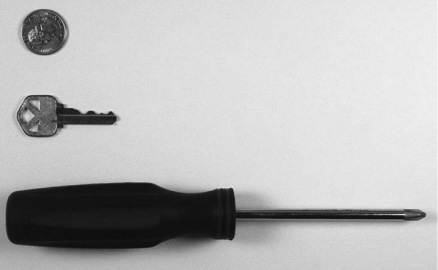
Anything that is smaller than most of the objects in the drawing makes the best baseline. For example, the diameter of the quarter may be compared to the length of the key: the key is about twice a long as the quarter. The diameter of the quarter may also be used to measure the length of the screwdriver.
Baselines and Why You Need Them
In correctly drawing an object to scale, one technique is to establish a baseline and draw from that. A baseline is a common term used to describe the standard to which we compare something. After all, size is relative to what is being compared. A ruler is really a type of baseline, because we use it to measure linear objects.
In drawing, you will compare a baseline in the image in front of you to something else within the same image. For example, the width of a window in your reference photo might be a baseline. The building the window belongs to may then be considered about five windows wide, and the trees surrounding it about two windows wide each. Baselines are especially handy when drawing people. Drawing the width of the face, for instance, is much easier when you think in terms of how many “eyes wide” it is.
Early Lessons in Site
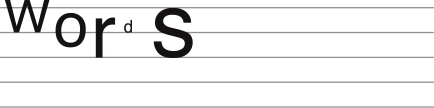
You’ve already had quite a bit of experience evaluating and adjusting proportion and scale. Think back to penmanship class in grade school: You learned there was an appropriate size and location for words on your lined paper.
Simple Measuring and Enlarging With Photos
The easiest way to measure objects with a baseline is to use a photo. Photos are two dimensional and easy to manipulate with your ruler or measuring tool. Measuring the proportions in your reference photo not only helps ensure that your drawing will be accurate, but it allows you to enlarge your drawing with ease.
A simple measuring system works best when the image is, well, simple and consists of mostly straight lines. Take the windows and door of a building, for instance. Since we are dealing with all fairly straight lines, a ruler works just fine for establishing proportions. We might find the window is 2![]() inches wide, so we draw a line on our paper that is 2
inches wide, so we draw a line on our paper that is 2![]() inches wide. The ruler measures it out for us. No big deal. Boring, but not hard.
inches wide. The ruler measures it out for us. No big deal. Boring, but not hard.
But what if you wanted to make your drawing two and a half times bigger than the photo? You could do the math. Let’s see, two and a half times 2![]() equals—well, maybe the math was a bad idea. Sure you could simply round your numbers up or down for easier arithmetic, but do you need to number crunch at all?
equals—well, maybe the math was a bad idea. Sure you could simply round your numbers up or down for easier arithmetic, but do you need to number crunch at all?
There is an easier way, minus the math. All you need besides your reference photo and drawing paper are a thin scrap of bristol board, an HB pencil and a ruler.

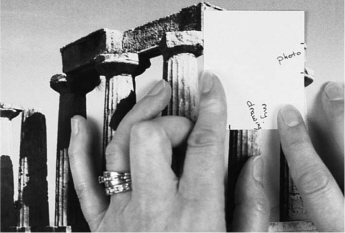
![]() Choose a Baseline From the Photo
Choose a Baseline From the Photo
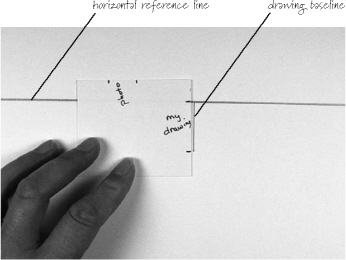
Make a cheat sheet. On the scrap paper, write “photo” on one end and “drawing” on the other. This is to remind you to use the photo measurement to measure the photo and the drawing measurement to measure the drawing. You may think this is overstating the obvious, but you still keep forgetting where you left your car keys, so there’s a remote chance you’ll forget which side measures what. Select a short, straight part on the photo (we’ll use the inner part of the window) and mark that width on the paper.
![]() Create a Baseline for the Drawing
Create a Baseline for the Drawing
You can choose any size for your drawing: a smidgen bigger, smaller, twice as big, whatever. Decide how big you want to draw the image and, on your cheat sheet, mark what will be the width of the window on your drawing.

![]() Compare and Measure as You Draw
Compare and Measure as You Draw
Start your drawing using this as a baseline or standard of measurement. Everything in the picture is either the same size as, smaller than, or larger than your measurement. With your one baseline and piece of paper, it is possible to scale everything in the photo to the size you need it to be for your drawing.
Measuring Curved Subjects
Measuring objects with straight lines is fairly straightforward, but what happens when you must measure something with curves? In my experience I have found that many beginning artists, and a few experienced ones, have a consistent problem drawing curves correctly. Curves can be tough to master. A curve that’s too flattened will make something look incorrectly enlarged. Too rounded a curve will “squish” your drawing. Let’s look at two subjects containing curves and use the same technique to measure both.
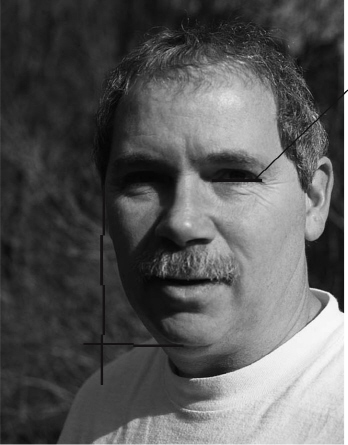
Exercise #1
My brother Scott was very unhappy that his mug didn’t make it into my last book, so we’ll use it in this one. To measure the curve of the side of his face, first select a baseline, which should be a fairly small shape on the face. In this case we’ll use the width of his eye. Mark the width on a piece of paper, then see how many eye widths it takes to get to the side of his face from the curve of his chin (about one and a half eyes). Now turn the paper sideways and see how many “eyes” it takes to get to the widest point on the side of his face (three-and-a-smidgen eyes). The side of his face, therefore, will curve between these two points.
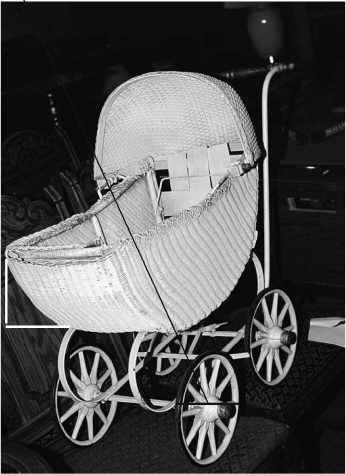
Exercise #2
This time we’ll measure a baby carriage. Take a smaller measurement for the baseline—say, the width of the wheel—and compare it to where the carriage curves around in the front. It’s one “wheel” out and one “wheel” down. That was easy!
 Psssssst!
A small confession here: I draw first and use the measuring system at the end or midway through to check how well I’ve scaled out the drawing. It’s faster than measuring ahead of time and it trains my eye to pay attention to scale.
Getting the Angles Right
This next measurement exercise is a bit more challenging. Our goal is to correctly proportion our drawing of a building structure and have it show the same angles as the reference photograph. It involves the same process of measuring that we used in the previous example, but we have added perspective, the idea that the structure has depth and parts of it appear closer to us or farther away.
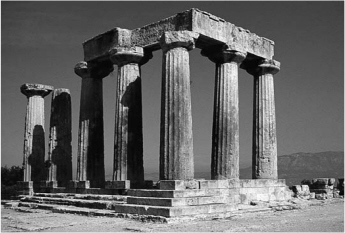
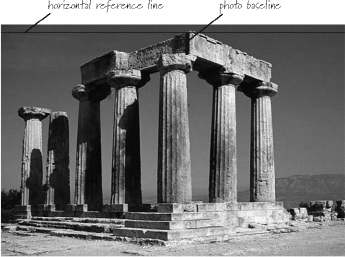
Reference Photo
Let’s figure out how to accurately draw the angles of these ancient columns in Corinth, Greece. When doing this with one of your own photos, work on a photocopy instead of marking it up.
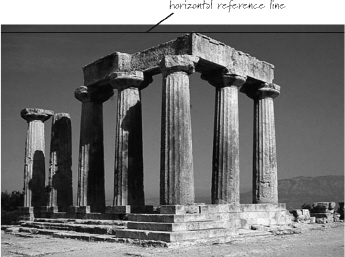
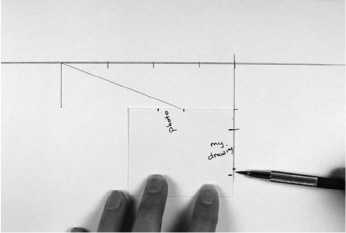
![]() Draw a Reference Line
Draw a Reference Line
Using your ruler, draw a line across the top of the structure on the photo. This line touches the highest point of the columns and runs from one side of the photo to the other. This gives us a reference line from which to measure. Lightly draw a corresponding line across your drawing paper. We will be erasing this guideline later.
![]() Establish Your Baseline
Establish Your Baseline
We need to select a baseline measurement from the columns—a short, straight area that we can use to measure the entire drawing. I chose the height of the near corner as shown. Mark a piece of scrap paper with this measurement.
 Psssssst!
A straight line is an artist’s best friend. It provides a concrete reference point that assists our eyes in recognizing even the most subtle angles and curves of our subject.
![]() Decide the Size of Your Drawing
Decide the Size of Your Drawing
If you want your drawing to be the same size as the photo, simply transfer the measurement to your paper. If you want it to be larger, make the baseline slightly larger when you transfer it, as I did here. If you want to make your drawing smaller … you get the drift.
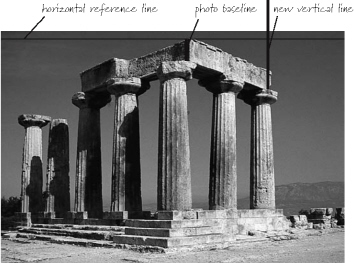
![]() Add a New Vertical Line
Add a New Vertical Line
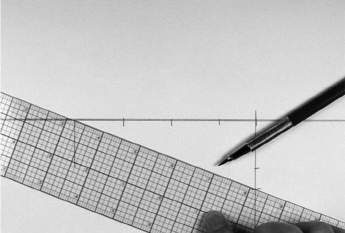
Draw a vertical line at the end of the columns on the photo. Make sure it is parallel to the photo baseline. The correct angle of the columns is now bracketed between the lines. Measure the distance over and down on the photo; that is, from the top of the photo baseline (at the near corner of the structure) straight across to the new vertical line at the far corner, then from this point down to the top of the far corner. The horizontal distance is almost four baselines, and the vertical is about one and a half baselines.

![]() Measure Your Drawing
Measure Your Drawing
Using the drawing baseline, measure the same amount of baselines over and down on your drawing. Make a mark at almost four baselines over and one and a half baselines down, and you have the correct reference point for your angle.
![]() Transfer the Angle to Your Drawing
Transfer the Angle to Your Drawing
Use a ruler to connect the points and form the correct angle. The stone in the photo is not a perfectly straight line, but for now a ruler gets us in the ballpark.
![]() Don’t Assume
Don’t Assume
Don’t assume that the far corner of the entablature (the block held up by the columns) is the same height as the corner nearer to the camera. Measure. When I did a comparison measurement, the far corner was slightly smaller—which makes sense, since things appear to be smaller the farther they are from you.
![]() Compare and Mark
Compare and Mark
Measure your drawing with a slightly shorter mark than the drawing baseline to indicate the height of the block.

![]() Finish the Angle
Finish the Angle
Connect the dots and voila! You have correctly recreated the angle in the picture for your drawing. Now the entire drawing may be scaled by using your baselines and measuring.
 Psssssst!
Any baselines or other lines of reference should be drawn very lightly. Seeing these guidelines in your finished work is kind of like noticing someone’s wearing a beautiful new shirt, then seeing that they forgot to remove the price tag!
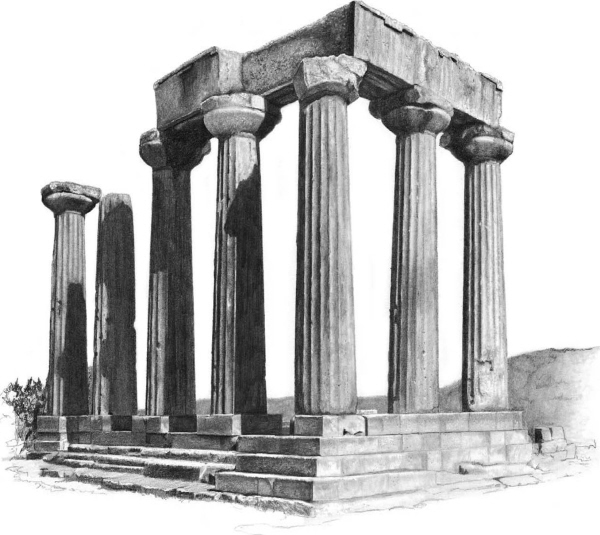
Then a Miracle Happens …
Okay, so a couple of lines on a piece of paper does not suddenly morph into a drawing like this. It’s a good start, though. If you can get the angles and proportions correct, you’ve achieved the first step and laid an excellent foundation for your finished drawing. We’ll work on honing your eye, clarifying your drawing and creating realistic shading as we progress through the rest of this book.
CORINTH, GREECE
Graphite on bristol board
14" x 17" (36cm x 43cm)
Flattening
Having just shown you how to measure something on a two-dimensional photo, let’s touch on measuring something “on the hoof” as it were. The next site technique we’ll look at is flattening.
What if a fantastic elk stepped out in front of you while you happened to be on a nature hike with your sketchbook? This very accommodating elk strikes a pose and holds it long enough for you to sketch him at your leisure. Okay, this scenario may seem a little far-fetched, but you need to know how to work out the proportions in a three-dimensional situation no matter what your subject is.
Working out proportion in three dimensions is a lot like working in two dimensions. Two-dimensional objects have height and width. What is a three-dimensional object? One with depth. How do you perceive depth? By looking at something with both eyes. But when you are drawing something on a two-dimensional piece of paper, you don’t want that depth perception. So what do you do?
Close one eye. One eye on its own will not perceive depth. Closing one eye will flatten the world around you and help you draw a three-dimensional object on your two-dimensional paper.
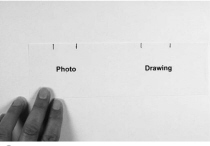
Don’t believe me? Try this: Open both your eyes and place your finger in front of your face. Look beyond your finger at the background. Your eyes will actually see two fingers, and you can’t see both your finger and the background at the same time. Now try the same thing with one eye closed. Aha! One finger and a background.
Let’s look at how to establish a baseline on that three-dimensional, ever-so-patient elk.

![]() Select a Baseline on the Subject
Select a Baseline on the Subject
Choose a portion of the subject to use as your baseline. Remember, it should be a fairly small line, either vertical or horizontal, because a smaller line will be easier to compare to everything else in your drawing.

![]() Measure the Baseline
Measure the Baseline
We’ll select the height of one antler as our baseline. Extend your arm fully and straight out in front of you and close one eye. Hold your pencil so that it’s parallel to your body. Use the tip of the pencil to mark the top of the antler. Use your thumb to mark the bottom of the antler. This measurement is your baseline.

![]() Compare the Baseline Measurement to the Subject
Compare the Baseline Measurement to the Subject
Using the measurement of the tip of the pencil to your thumb, you can now compare the antler baseline to any other part of the elk. For example, you may discover that, compared to the antler, the elk is about four baselines long.
Optical Indexing
Optical indexing is a fancy way of saying things line up. The idea is that if you have one object in your drawing placed correctly, you can use this as a point of reference to check the locations of everything else in your drawing. If certain parts of your drawing line up or are spaced appropriately according to your drawing reference, then you have a correctly proportioned piece of artwork.
Many artists use either a few simple horizontal or vertical lines or a more thorough grid system to check the alignment of the elements within their drawings. Both methods make it easy to spot mistakes in placement and proportion. Some artists begin their drawings with these guidelines to prevent problems from the get-go; others pull them out when they are in the middle of a line drawing that’s not quite right. How you decide to use them is entirely up to you.
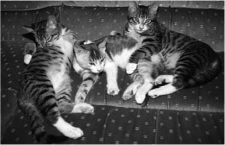
Bring On the Grid
Many artists use grids, but they are labor intensive and not needed unless it is a complex image you desire to draw. This pile of cats is a complicated series of shapes. This is a good time to use a grid system.

Draw the Squares
Place a grid of equal-size squares over the reference photo, or draw one directly on a copy of the photo. Then draw a grid of equal-size squares on your drawing paper. If you use a grid of one inch by one inch (3cm x 3cm) squares on your photo and the same on your drawing, the drawing will be the same size as your photo. For a larger drawing, make a larger grid on your paper.
Fill In the Squares
Draw the shapes you see within each square. Keep your finger (or other marker of some kind) on the reference-photo square you’re currently working on so you don’t get lost. (It may sound silly, but there are kitty paws and tiger stripes going in all directions.) Once you have the shapes drawn in, carefully erase your grid. Looking at the various parts of a complex subject in this way makes drawing them much more manageable.
 Psssssst!
You can make a reusable grid in a variety of different ways:
• Create a grid on a computer and print it on a sheet of clear acetate.
• Draw a grid with a permanent marker on a sheet of clear acetate.
• Draw a grid on regular paper, run it through a copier and make copies on acetate.
• Make a grid on a clear insert or folder, and slide your photo into the insert.
Reading Between the Lines
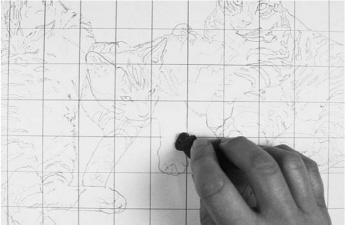
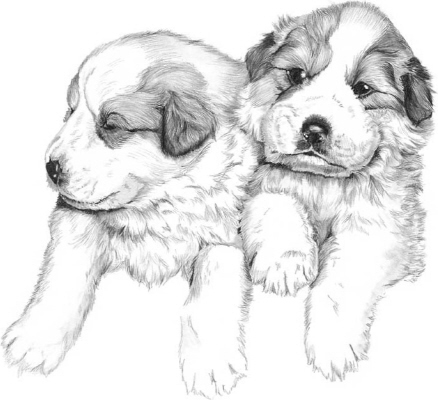
These two Great Pyrenees puppies are much less complex than the pile of kittens. A grid could be used, but often just a few lines are necessary to measure the distances between elements to make sure you’re in the ballpark. Try drawing these puppies first, then take a ruler and see what lines up in your drawing compared to mine.
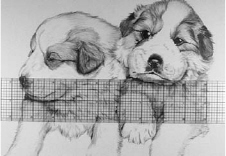
Check Locations
For example, when I place a horizontal ruler under the jaw of the puppy on the right, it lines up with the top of the left puppy’s nose.

What Lines Up?
Here we find that the inside corner of the right puppy’s eye lines up with the edge of his nose. Choosing a few different features or parts of your subject to spot check is usually enough measuring to make sure your drawing is in correct proportion.
Cheat Sheet
• No amount of spectacular detail can “fix” a drawing whose site, or location of shapes, is incorrect.
• Every drawing needs a baseline or standard of measurement to which all the other parts of the drawing are compared. This ensures correct proportion.
• Measuring elements according to a baseline is easiest to do with a photo because it is two dimensional.
• Establishing two baselines—one for your reference and one for your drawing—makes it easy to enlarge or reduce the elements for a larger or smaller drawing.
• Make a horizontal reference line to help you check angles for accuracy.
• To measure a three-dimensional subject, “flatten” it by looking at it with one eye closed, extending your arm straight out in front of you, and measuring a baseline with your finger.
• If certain parts of your drawing line up or are spaced appropriately according to your drawing reference, then the drawing is in proportion.
• Use a complete grid or just a few horizontal and vertical guidelines to check how the elements in your drawing line up.

Think Shapes, Not “Stuff”
The feathers in this drawing of a Moluccan cockatoo were not thought of as feathers, but rather as shaded curves. You may think you can’t draw feathers, but curves are simple.
HOGAN
Graphite on bristol board
17" x 14" (43cm x 36cm)