
Shape
We tend to see shapes around us without really paying attention to them. For example, you use the ability to recognize shapes in order to read and write. Of course, because our mind isn’t really paying attention as we read and write, at least not to the shape of the letters, we’re not aware of the automatic processing going on. Instead we are focusing on the thoughts and ideas expressed by the words.
In a sense, it’s the same with drawing. We see the subject—a landscape, a face, a group of flowers—but we are focused on the ideas the image suggests. The nostalgia of the place, the love of the person, the beauty of the garden. As artists, we must push away, at least for the moment, our ideas and thoughts about the subject and focus on the mechanics of the subject.
Shapes are recorded in our subconscious, but to draw those shapes, we need to bring them into our conscious mind. Doing this takes concentration and focus. You must make your brain slow down and pay attention. In our fast-paced, high-speed, drive-through society, this is a foreign concept. The world is rich in information, and we are on data overload. The tools presented in this chapter will assist you in training your mind to slow down and pay attention. Use one or more of these tools (more is better!) to help identify and draw the shapes around you.
Seek to Simplify
Most children find they have the ability to make simple drawings that satisfy them. Popular with this young set are cartoon characters. They often graduate from drawing such animated friends as the Little Mermaid to the exaggerated comic book superheroes. Then … nothing. Their art interest often drops off. What happened? It could be that football, girls, boys, dances, music and life in general takes over, and they simply move on to other new and exciting pursuits. I suspect that is often the case, but I also think that once their interest in comic-strip characters wanes and the budding artist wants to try drawing something else, it proves to be difficult and they simply give up.
It was easy for the untrained eye to find the well-inked outlines of the cartoon characters and comic book images. The black-inked edges made the shapes of objects easy to see. Unfortunately, the world around us is not outlined in black. It’s more subtle and the shapes are harder to see. When something is more demanding, many move on to other subjects or interests.
Artists continue to seek those same simple shapes. It’s really not so hard, because no matter how “decorated” they are, shapes are basically either straight or curved.

Humble Beginnings
When we were children, most of us at least made an attempt to draw our favorite cartoon characters. We grabbed a crayon or marker and started drawing lines, imitating what we saw.

Artistically Advanced
Winnie has no hard edges and certainly no black outlines. In fact, she’s actually somewhat outlined in white. The basic shapes in both the cartoon drawing and this one are essentially the same, even though they aren’t quite as obvious to the eye in Winnie.
WINNIE
Pastel pencil on toned paper
20" x 16" (51cm x 41cm)
Rename What You See
It’s really not enough to say you see a shape such as those clearly shown in these pictures. Artists think of the objects they are drawing in terms of shape. They think about drawing circles, curves, straight lines and so on. If you asked them to say aloud what they were thinking as they drew, it would be phrased in terms of the shape, not the subject itself. Changing the way you think and name something will help you see it better for the purposes of drawing.
Take your camera out and record some of the shapes around you, or dig through your old pile of reference photos. Select a photo and draw its shapes—and only the main shapes, not all the details. The contour drawing exercises you learned in chapter three are perfect for training you to see and draw the shapes of things.
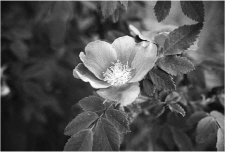

Everyday Shapes
Look at the simple shapes found in this photo. Don’t think “flower” as you draw; think straight and curvy lines, round and angular shapes.
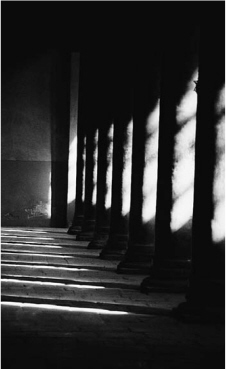

Seeing Patterns, Not Things
Photos like these are exceptionally good for helping you understand how to look past subject matter and see only shapes. An artist is more interested in the patterns in these pictures than the fact that they show columns and palm fronds.
 Psssssst!
Don’t fall into the rut of drawing all trees, rocks, flowers and so on the same when they are not. To help avoid this, describe what you are drawing in terms of its shape. This will help you recognize the things that make it unique, which will in turn make for more realistic drawings.
Isolate Parts of the Whole
Just as a musician may practice a portion of a melody and a dancer may practice the same movement over and over, an artist often breaks up a subject such as a human figure and draws just the hands, feet or facial expression.
Isolating and studying shapes is very important. I don’t know how many times I’ve looked at a drawing or painting that was well shaded and fairly well proportioned, but the trees were badly rendered on a landscape, the eyes were incorrectly drawn on a portrait or the nose of a dog looked like a double train tunnel. Take apart the subject you wish to draw and look at its parts. Separate them and draw them in individual sketches. Make it a habit to carry your sketchbook with you and work on these little studies to improve your overall drawing.

Where Do I Start?
One look at this cat and many beginning artists would be too overwhelmed to even consider drawing it.
Psssssst!
Cut a square out of the center of a piece of white paper and place it over your reference photo. Move the paper around the photo to force your eyes to focus on the shapes in the particular area shown.

There, Now That’s Not So Bad …
The cat seems manageable when you try drawing just an eye or the nose before attempting to render the entire head with all its features and fur patterns. Along with the view shown in the full drawing are views of the cat’s left eye and nose from slightly different angles. Isolating the cat’s features like this helps you recognize the subtle differences these different points of view create.
Recognize How Shapes Relate
The dictionary defines “relate” as bringing into logical or natural association for a reference. We have been using a form of relating every time we draw a line next to the subject. We relate the subject to that line.
I came to realize that I was using another technique similar to drawing a line for reference—I was also using a circle for reference. A circle has certain properties that I can count on, much like a line. I can use these properties to help me see to draw.
You can use any circular shape in your subject to help you see the correct placement of other shapes. Using a circle as a point of reference can help you draw better.

Looking Round
It’s pretty easy to determine the midpoint of a circle. If I were to fill in this circle to the halfway point, I would simply fill in to the fattest part.

Lines and Circles
Stay with me on this one—we’re going somewhere. If I see a line that crosses the circle, I can determine where to place that line in a drawing by using the properties of the circle. A line through the center is easiest to duplicate because the line crosses at the fattest part. Lines in the top third area, bottom fifth area and so on cross the parts where the circle is getting smaller or larger, respectively.
Psssssst!
Any completely round shape may be used as a reference point to figure out the proper placement of other items in a drawing. For example, a tire, a wheel or an orange may be used to establish the location of the rest of the car, wagon or bowl of fruit.
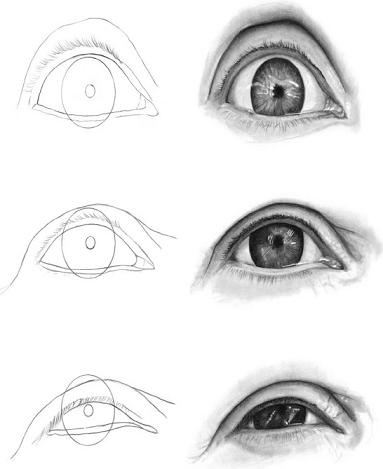
The Eyes Have It
Let’s apply what we’ve learned to a familiar object. I find using a circle for reference most useful when drawing eyes. When I look at an eye, I look at the perfectly round iris (the colored part) to determine where the eyelid should go. The location of the lid gives the eyes their expression, and if it’s located at the wrong spot, the look is off.
Compare by Measuring
We addressed measuring in the last chapter where we looked at how something can be compared to something else. The same holds true of measuring and comparing the shapes within a subject. Once again, if it is in front of you, whether in a photo or in person, you can measure it. All you need is to choose a baseline, a standard measurement by which all else is measured. Pick something fairly small, with a clearly defined beginning and end, that can be measured with a straight line.
Remember, Everything’s Relative
Learning to draw is a process of training your eye to see the things in front of you. Okay, so I’m repeating myself, but there is an important word in this sentence: process. It doesn’t happen overnight. You can’t go to bed with a drawing book under your pillow and expect to draw well the next day any more than you can put a diet book under your pillow and wake up thin. I know, I’ve tried it!
There is a subtlety to angles that takes a practiced and trained eye to see. We need clues to tell us that something is not exactly level in front of us. Think about hanging a painting or photo on the wall. How do you know if it’s straight or not? The blankness of the empty wall around the painting provides no feedback. To guide us, we look at the line where the ceiling and wall join, or the level of the floor, and determine the level of the art. I’ll admit some folks actually use a leveling gizmo to help, but for the rest of us, it’s the old comparison system. We step back, eyeball the painting, compare the top edge to the ceiling and adjust.
It’s the same concept in drawing. It’s easier to make a relative judgment about something than an absolute judgment. It’s easier to say a work of art is level compared to the ceiling than by just looking at it. It’s easier to describe something’s exact color, say red, as compared to a red shirt that someone is wearing than to describe a shade of red without a starting reference.

A Baseline for the Face
The eye is a good choice. Its width is usually clearly seen, can be measured from inside corner to outside corner, and is small enough to be used to measure the different parts of the face.
As I focus in on smaller details, I can choose another baseline to delineate more information on the drawing. For example, the width of the iris (the colored part of the eye) may be compared to the width of the entire eye.
ETHAN STUART
Graphite on bristol board
17" x 14" (43cm x 36cm)
Ask Questions
I discovered this tool coming home on a long plane trip. A young boy, about ten years old, sat next to me, drawing pictures on a sketchpad. I asked him if he wanted a drawing lesson. He agreed, so I took the magazine I had been reading and found a photo of a lady walking on a windy day. I placed my finger on her head and asked the young man, “What shape is this?”
“Oval,” was his rather smart response.
“Draw an oval,” I said, and he sketched the oval. I placed my finger on the edge of the lady’s neck and said, “What is this?”
“It’s a straight line,” he replied.
“Is it straight to the bottom of the page?”
“No, it stops and goes in a different direction.”
“Where does it change direction?”
“Across from the bottom of her chin.”
I continued moving my finger around the woman’s outline while the boy verbally identified the direction and length of each edge before drawing it. When we were done, the creditable drawing was completed.
Several things happened in this exchange. My finger on the photo helped him “keep his place” on the image, much like small children will place their finger on the words of a story as they read. Secondly, I was training his eye to see the relationship of shapes without drawing lines. When he told me the neck of the woman started at a particular point on the head and ended at the chin, he had successfully identified the length of the neck by using another part of the head. Additionally, he was forced to articulate the drawing, which made him focus, concentrate and understand what was happening.
Now, most artists don’t sit at their sketchpads muttering, “Okay, now the line goes down and to the left and …” while they trace the image with their finger. Their eye naturally finds the relationships and keeps its place, just as most adults no longer use their finger and move their lips when they read. For those just learning to draw, however, this technique may help you draw better.
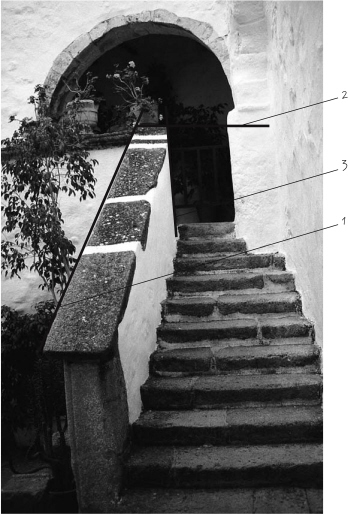
Articulate Out Loud What’s Happening
I started at the bottom of the stairway wall for no particular reason. This edge goes up and at an angle. It does not go off the paper; it stops and something else happens. Ask yourself what happened (the edge ended), what else is going on at this point (the ledge at the top of the steps begins) and in what direction does something occur (a horizontal edge begins). Does the new horizontal line go on forever? No, it too ends when it begins the edge of the third line, which now goes straight down. This internal conversation causes you to really analyze, in terms of the formed shapes of the subject, what you are drawing.
Be Aware of Negative Space
No, this is not a New Age reference to a place with bad vibes. Negative space is the area around and between the positive shapes that you tend to devote most of your attention to when you draw. If I’m drawing my hand, for example, the hand is the positive shape and the spaces between my fingers and around my hand are the negative spaces.
Negative space and positive space work together to form the whole of the image. I’ll admit that sounds like the most obvious thing in the world. I stated it because what it means is that if I observe and draw the negative space, the positive shapes will be correct as a result. They don’t have a choice. Aha! That means by concentrating on the negative space when I draw something complicated, the positive will be correctly drawn and properly proportioned.
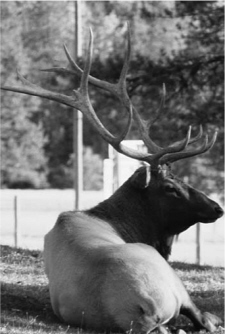

Think Negative, Not Positive
The negative space around this elk does much to define its form.
Psssssst!
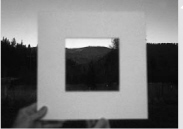
One tool that helps artists more easily identify negative space is the viewfinder. A viewfinder is a square piece of cardboard with an open middle, or you can make an adjustable one with two L-shaped pieces. Viewfinders help you define edges and see relationships.
Invert Your Drawing
Whenever I teach my drawing classes, I position the students in a “U” shape and I stand in the middle of the “U.” This means whenever I assist a student in her drawing, I’m looking at it upside down. Students are initially convinced that I’m a supremely gifted artist because I can immediately spot the problem in their sketch, despite the view. What they don’t realize is that it’s often much easier to see something more accurately when it’s inverted, or upside down.
You’re thinking, sure, right, whatever you say. It’s true, though: When something is upside down, it looks weird (profound thought). If it looks weird, your brain can’t make assumptions, place preconceived patterns and otherwise shut out the reality of what you are viewing. In a sense, you are slowing down your brain and forcing yourself to focus on what is really in front of your eyes, not what you merely think is in front of your eyes.
If the inversion tool is so eye-opening, why not just use it from the beginning and make your line drawing upside down? The answer is because it is hard—very hard and frustrating. You can get pretty lost when trying to draw from an upside-down photo. Inverting something to draw it works better if you are attempting to copy a line drawing like the one on this page as opposed to a photo. However, the best time to use this tool is after you’ve made your drawing. Once something is drawn using a reference photo, inverting both the drawing and photo helps us see the corrections we might need to make.

Reference Photo

A Whole New View
Turning a line drawing upside down like this will help you see your subject as a bunch of shapes rather than the familiar image. Try recreating this line drawing upside down as shown here to see what I mean.
Compare by Tracing
We have a cat named Big Fat Kitty. She doesn’t seem to mind the name, which she earned because she is, well, a big fat kitty. This is not a subjective judgment. Objectively, Big Fat Kitty, when compared to the other cats residing with us, is at least ten pounds heavier.
It’s not unusual for us to compare one thing to another. We use many comparison systems in art as well. Let me share another comparison technique that will help you draw better.
Often your brain has trouble pulling one particular feature out of a complicated background. Have you ever despaired over not being able to draw the lips correctly on a portrait, or get the angle of a building’s roof just right? If for a moment you can look at the lips apart from the rest of the face, or study the roof apart from the remaining structural elements, your task will be easier.
You’ve probably always been told that it was cheating to trace something. Tracing the shape, however, allows you to see that shape in its simplest expression, separate from its busy surroundings. To try this technique, you’ll need a piece of tracing paper, the original photo you’re trying to draw and your somewhat-completed drawing.

![]() Trace Over the Photo
Trace Over the Photo
Place a piece of tracing paper directly over the photo and trace the troublesome shape.

![]() Trace Over the Drawing
Trace Over the Drawing
Cover the shape you’ve just traced with your hand. No peeking! Place the same piece of tracing paper over the pesky problem area in your drawing. Trace it so that the two tracings will end up side by side.

![]() Compare the Tracings
Compare the Tracings
Look at the two tracings. Subtle differences in shapes become very apparent when simplified into a line drawing and removed from the busy background.
Psssssst!
Tracing paper is a fantastic multi-tasker. Not only can it help you work out problematic shapes, but if you place it beneath your hand as you draw, it will keep you from inadvertently smudging those shapes in your finished drawing.
Flatten the Three Dimensional
In chapter four you learned how to visually flatten a three-dimensional image to make it easier to draw on your two-dimensional paper. This technique is helpful whether you’re sketching the overall scene or focusing on one particular part or shape.

Visual Flattening for Easier Drawing
We can visually flatten three-dimensional objects in front of us to make them easier to draw. Even though a bottle before you may be rounded, by closing one eye and extending your arm, you can do two things: Flatten the curve of the top and bottom, and measure it.
Cheat Sheet
• Seek the simplest expression of a shape in the form of straight or curved lines.
• Label or name the subject you are drawing in terms of its shape, not what you know it to be.
• Break up your subject into parts and practice drawing those parts before you tackle the entire thing.
• Ask yourself questions about what it is that you are actually seeing so that you truly understand what you’re drawing.
• Measure a smaller shape in your drawing and compare it to other larger shapes to help keep your shapes in proportion.
• You can use any circular shape in your subject, similar to how you would use a line, to help you correctly place the other shapes.
• To better see the positive shapes of your subject, pay attention to the negative space around and between them.
• Turn a line drawing upside down to help you see shapes and spot problems more easily.
• When you can’t get a particular shape right, compare a tracing of that shape from the reference photo to a tracing of your drawn attempt.
• Close one eye to flatten a three-dimensional object into two dimensions for measuring purposes and to check for angles and curves.
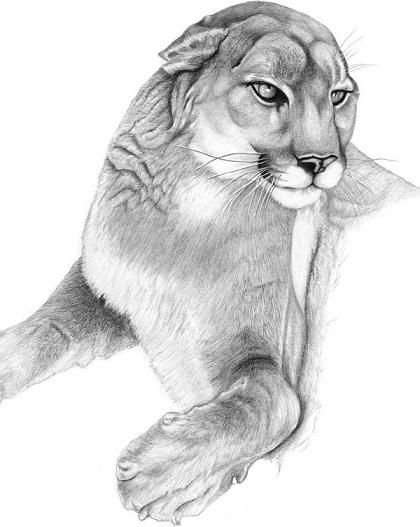
Shading With Pencil Strokes
This cougar was shaded with the pencil rather than smudged to create the different values. Whether you choose to smudge, hatch, crosshatch or build layers of graphite, your shading becomes like your handwriting—your own unique style and expression.
DAVE’S COUGAR
Graphite on bristol board
17" x 14" (43cm x 36cm)