

Drawing Practice
If you want to produce realistic drawings such as the ones you see in this book, you will need to practice. And practice. And practice some more. The demonstrations in this chapter will help you do that. Please, however, don't think that loosely sketched drawings, drawings with exaggerated features or studies in lights and darks are in any way wrong, unacceptable or anything less than wonderful in their own right. You'll need to do many drawings in many styles and under various circumstances to improve as an artist. You're on a journey with lots of side trips.
Rendering Hair on a Mountain Goat
This fellow was lying in the dappled shade along the path at the top of Logan Pass at Glacier National Park in Montana. We will use a number of different pencilling, blending and erasing techniques to not only accurately draw the goat, but also to render the light effects on its body.

Reference Photo

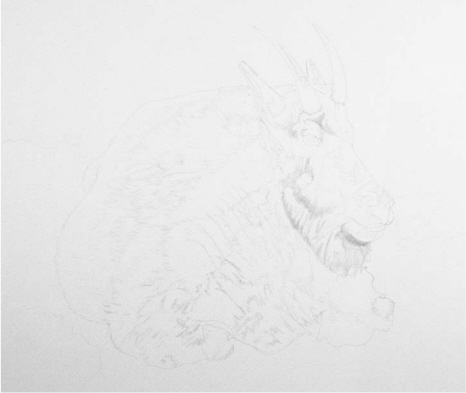
![]() Make a Line Drawing
Make a Line Drawing
Make a line drawing from the photo, or copy this one. This drawing was rendered extremely light and may be hard to see. You’ll want to keep your drawing as light as possible at first. Erase any guidelines that you use.
 Psssssst!
Before you can begin to shade your drawing, erase all the guidelines, marks, aids and notes that you used to get the image right. I know, it sounds like a reminder of the obvious, but it’s easy to forget and almost impossible to remove them once the shading process has begun.
![]() Add Some Midtones
Add Some Midtones
There’s no rule that says a particular area of your subject needs to be drawn first. Just select a midtone and jump right in. There is a secret, though, to drawing fur: “Comb” the fur with your pencil. That is, your pencil strokes should go in the same direction as the fur or hair.

![]() Add Darks
Add Darks
Pencil in those darks so the range of values is in front of you. A 6B pencil is a good choice for this. Don’t be shy—remember when we looked at drawings that weren’t interesting because the value range wasn’t present?

![]() Adjust Values and Continue to Darken
Adjust Values and Continue to Darken
Now that the darks are in place, we can adjust and reshade to correct the values.
![]() Blend
Blend
With a paper stump, blend your strokes together to create the shadows. This will lighten the drawing and you’ll lose some of the fur-like look. Don’t worry, though; we’ll come back and fix it.

![]() Comb the Fur Again
Comb the Fur Again
Take an HB or 2B (very sharp) pencil and recomb the fur to provide the correct texture and reestablish the direction of the hair. Darken the areas that got lighter when you smudged.
![]() Erase
Erase
Erase the dappled sunlight back out. If you are using an electric eraser, place it on a somewhat rough surface, turn it on and create a point in your eraser. Use it like a pencil and comb white hairs in the fur. You’ll lose the point as you go on, so you’ll need to repoint the tip as you erase. If you’re using a white plastic eraser, simply take a craft knife and whittle a sharp edge to do this.

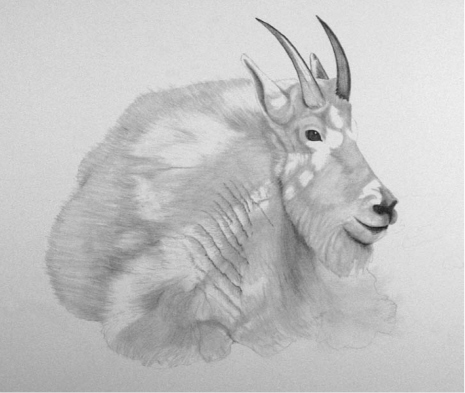
![]() Adjust
Adjust
The eraser is not hair-fine, so go back to those erased “fat” hairs and use your pencil to thin the hairs and break up the whites. Soften the highlights and adjust the values yet again. Ground the goat using a soft graphite pencil in short strokes to add grass.
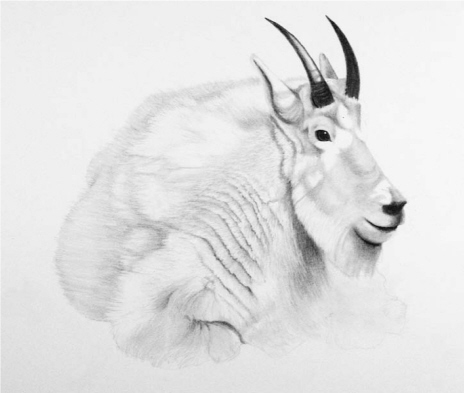
GLACIER MOUNTAIN GOAT
Graphite on bristol board
14" x 17" (36cm x 43cm)
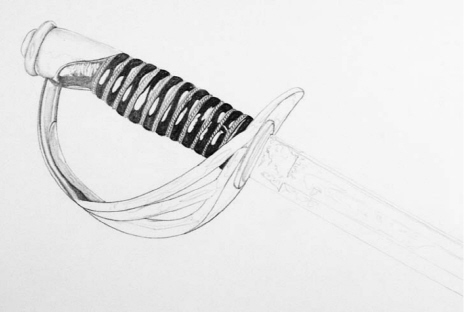
Drawing a Detailed Sword Handle
This is an 1864 light calvary saber with several unique drawing challenges. The man-made shapes need to be rendered with some type of mechanical assistance if the finished drawing is to be realistic. That’s not to say it can’t be drawn freehand and kept more sketchy, but if you choose to make it as real as possible, French curves and rulers are recommended. The different metallic surfaces, some shiny and some matte finished, are also a challenge and require different pencil strokes.
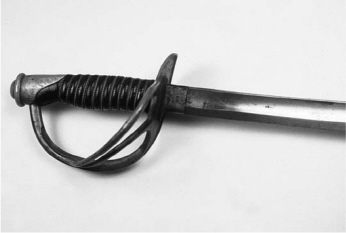
Reference Photo

![]() Make a Line Drawing
Make a Line Drawing
The sword was drawn freehand and the guidelines erased. Copy this drawing. Remember to not push too hard if you’re using a harder lead, as those lines will score or gouge your paper. Some of the areas that will later be shaded are outlined or marked.

![]() Mechanically Clean Up the Drawing
Mechanically Clean Up the Drawing
We learned earlier in the book about the use of mechanical aids. This is a drawing of a mechanical, manmade object, so the use of French curves renders a more precise drawing. Go back over the initial handle and make it more mechanically perfect. Use an HB pencil to darken the links.

Detail
The French curve allows for greater control and smoother lines when you’re drawing the curved handle.
![]() Establish the Range of Values
Establish the Range of Values
In this first shading, establish the darkest areas, some midtones and the lights. This provides the full range of tones that will be present in the finished drawing. The darkness in the handle should be shaded away from the highlights and to the outlined edge. Darken the details of the chain-like shapes.

![]() Adjust Values and Eliminate Outlines
Adjust Values and Eliminate Outlines
Using the pencil only—no smudging at this point—adjust the tones of gray (the values) over the entire sword. The goal at this point is to eliminate the lines originally used to sketch the outline of the sword by absorbing them into the various values.

Detail
Notice that the pencil strokes are smooth, even in tone and very close together.
![]() Blend
Blend
Using a paper stump, blend the strokes together and smudge the highlights.

Detail
Now the handle begins to look truly realistic.

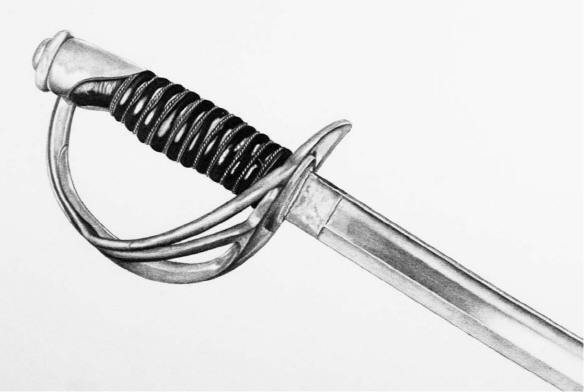
![]() Erase Highlights
Erase Highlights
Using an electric eraser, restore the highlights to white. Use a kneaded rubber eraser to add texture by pushing it straight down, then lifting straight up.
SWORD
Graphite on bristol board
14" x 17" (36cm x 43cm)
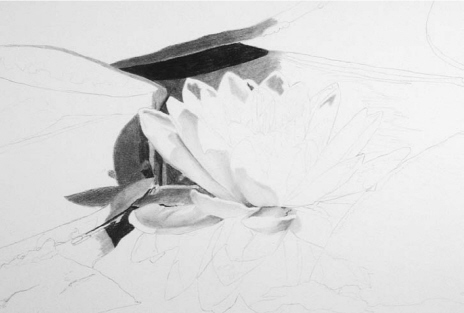
Building the Values of a Water Lily
Our dear friends Dave and Andrea Kramer have their own personal lake complete with a picturesque corner of water lillies. I’ve painted them many times in watercolor, but never drawn them in pencil. There were several challenges in this subject, including the numerous values of gray and rendering the petals so they appear to be underwater. I started the drawing without first creating a black and white version. That was a bad idea. I originally shaded based on color changes, not value changes.

Reference Photo

![]() Make a Line Drawing
Make a Line Drawing
Make a line drawing based on the photo. If you use guidelines or a complete grid, erase them completely before moving on to the shading.


![]() Place a Midtone
Place a Midtone
Find a middle value in the photo and shade that area of your drawing. Check it by using a value scale.


![]() Establish a Range
Establish a Range
Now find a good dark area and a good light area and establish the range of values that will appear in your drawing. The variations in values may be rather subtle in some places as you develop the rest of the drawing, so check to see that everything isn’t ending up looking the same. Keep returning to areas and adding the darks so your eye always has a range of darks in front of it.
![]() Think Shapes, Not Stuff
Think Shapes, Not Stuff
Earlier in the book we talked about how the mind can form a filter and prevent us from drawing well. At this stage in the drawing when you’re developing the shading, it’s important not to fall into thinking, “Ah, that’s a petal! And that’s a leaf!” Instead, think, “That’s a square of mid-gray under that white thing, with a black line on the one edge.” I even put my finger on the spot so I don’t lose my place. If it is drawn correctly, the shading will resolve itself.

Details
I originally left a white area between two shaded areas. When I blended the two midtone values on either side, I just ran the blending tool over the white and it formed the proper value with just the graphite on the blending tool.

Detail
Every time you add graphite, you make something darker and a bit rougher. If you blend after adding the pencil, you smooth and lighten. You may go back and forth between shading with your pencil and blending with your paper stump many times.

![]() Work Over the Whole
Work Over the Whole
As you continue to shade and adjust and the flower starts to emerge, look more at the overall picture and less at the little puzzle pieces.

![]() Place Big Darks Carefully
Place Big Darks Carefully
I usually don’t put in a really big dark until I’m well into the drawing, because I might smudge it on the rest of the work. Proceed with caution!

![]() Keep Going
Keep Going
Keep building values all over the drawing. Do the leaf shading by using the random built-up graphite on the paper stump and drawing it across the leaf in the direction the shading is indicated.
Take some breaks and check your work after the break. It may look fine when you leave, but you may notice it needs adjustment when you return.

![]() Darken, Adjust and Clarify
Darken, Adjust and Clarify
See? The drawing needed to be darkened some more and the shading smoothed again. The leaf on the left of the flower is further defined with values. Use a sharpened electric eraser to clean up the slivers of white highlight on the flower.

Detail

DAVE AND ANDREA’S POND (WATER LILY)
Graphite on bristol board 14" x 17" (36xcm x 43cm)
Psssssst!
This isn’t a book on design, but design is part of art. Design and composition are often used interchangeably. It refers to the way the objects on the work of art are handled: Line, color, space, texture, value and a host of other factors join together to add to the design of a work of art. In a book as basic as this, our goal is to make the drawing look interesting and deliberate, not like an accident.
Here are a few suggestions to help you:
• Try to keep your drawing from having a single object in the center (the bull’s-eye look).
• Think about connecting your drawing to the edges of the paper, but don’t look like you ran out of paper.
• Divide the objects or elements of your subject into groupings that provide variety.
• Pay attention to what you see first when you look at the drawing. Do your eyes bounce back and forth between two equal (and therefore competing) objects, or do they flow from one object to the next?
• When in doubt, cut the paper to better frame the drawing.
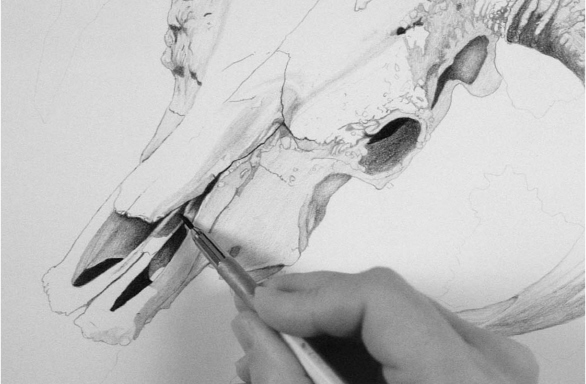
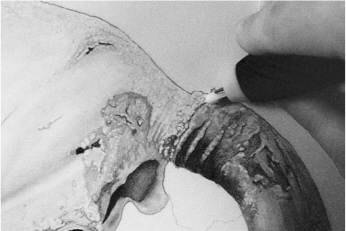
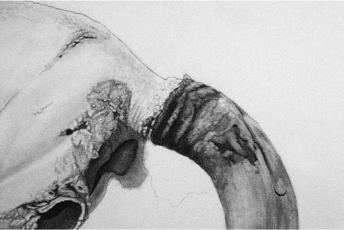
Capturing the Values in a Skull
We’ve talked about becoming a shutterbug and taking pictures of everything around you for possible artwork. This skull was part of the decorations in the rustic lodge at Busterback Ranch in the Stanley Basin in Idaho. This photograph was taken more than fifteen years ago. Subtle as well as dramatic shading will be required to render it in pencil.
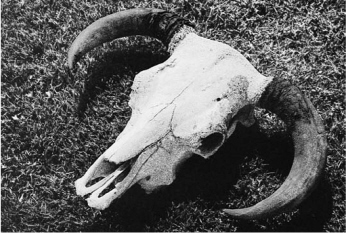
Reference Photo

![]() Make a Line Drawing and Begin Light Shading
Make a Line Drawing and Begin Light Shading
Make a line drawing from the photo and compare it to the line drawing shown. Don’t forget to erase any guidelines you use. This particular subject has many complex areas of lights, midtones and darks. Rather than sketch the edges or outlines of where the different values come together, we look at these areas as shapes and lightly shade them in. Otherwise we’d have to mark them or somehow note to ourselves, “Ah, this little area shaped like Florida is a midtone.”

![]() Establish Some Darks
Establish Some Darks
Find a dark area and really darken it with your pencil so the full range of darkest darks to lightest lights is now in front of you. With a 2B to 6B pencil, go over the entire sketch and reassess the values, adjusting them so the range of lights to darks more closely matches the photo.
Detail
![]() Blend
Blend
Using the side of your paper stump, blend the pencil strokes together for a smooth appearance. This will lighten the dark areas of the drawing somewhat as you are lifting the graphite, but don’t worry about it; we’ll go back and re-adjust later. Work your stump evenly over the areas that will be considered white in the finished drawing, adding a light tone to these areas.

Detail

![]() Erase Out Your Whites
Erase Out Your Whites
Go back to the areas that were originally white and blended to a light value in step three. With a sharpened electric eraser, or a white plastic eraser with a sharp edge, erase out the white areas.
Detail
An electric eraser is incredibly useful for erasing out the most intricate whites, which will result in true-to-life texture.

Detail
The whites were established around the eye sockets, among other areas.

![]() Re-Darken
Re-Darken
Using a 6B pencil, go back to the areas that were originally your darkest darks and re-darken them, emphasizing the lighter areas. This is where you can fuss your little heart out over the itty-bitty details.
Detail

Detail

![]() Finish
Finish
The lines that originally went around the skull have now been eliminated by the shadow or erased. A few more areas were erased and texture placed by lifting those areas with a kneaded eraser.
SKULL—STANLEY BASIN, IDAHO
Graphite on bristol board
14" x 17" (36cm x 43cm)
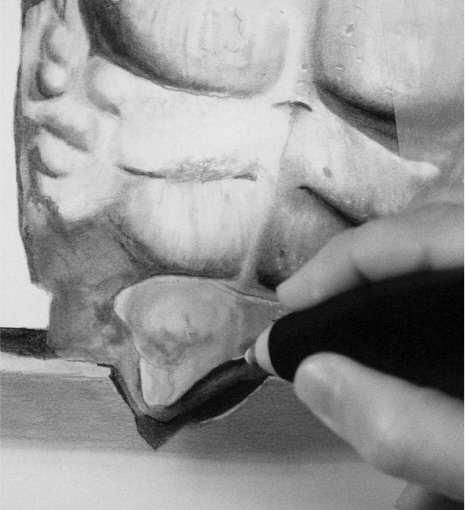
Fine-Tuning the Shading on a Greek Torso
This drawing is from a photo we took of one of the Greek sculptures at the Parthenon. I did the initial shading, then turned it over to Rick to fine-tune it. He worked on just one side, the right, so the difference would be abundantly clear. This demonstration shows just how realistic you can make your drawings if you take the time to refine the details.

![]() In the Beginning …
In the Beginning …
This was the original drawing I gave to Rick. I thought it looked pretty good. Watch Rick work his magic with the pencil, stump and eraser to make it even better.

![]() Darken With Pencil
Darken With Pencil
The first thing Rick did was to go over the right half of the drawing with a pencil, darkening my shadows but keeping the textures in place.
Psssssst!
It doesn’t matter what technique you choose to use for shading. The technique, whether it’s hatching, crosshatching, smudging or a combination, is a matter of personal taste, skill and the statement you want to make with your drawing.

![]() Blend
Blend
He now blends his strokes together, smoothing out some areas where the stone is smooth and using short, random strokes to create the rougher parts of the stone.

Detail

![]() Back to the Pencil
Back to the Pencil
The blending step will take some of the more linear texture out of the drawing, so the pencil is again used to reestablish the cracks and smaller roughened areas.

![]() Lift Texture
Lift Texture
Using a kneaded rubber eraser, some of the uniform dark areas are lifted. This creates the naturally uneven look of stone.
![]() Erase
Erase
Fine white areas are erased with the electric eraser, which has been sharpened to a point. If you lift too large an area, you can come back in with a pencil. Remember, you also learned how to create a template if you need to make a very fine line.
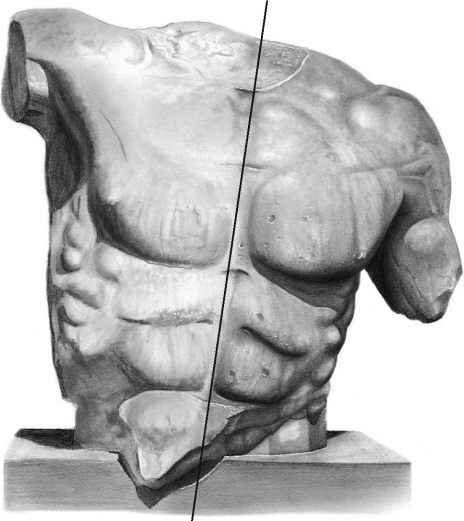
Finished Drawing (Well, Almost Finished)
Wow! What a difference the fine-tuning makes when you compare the improved right side to the original left. There’s no limit to how realistic you can make your drawings if you have the right tools, practice, and, of course, a little time.
Psssssst!
Never let your brain convince you that you’re not learning anything. Instead, outsmart your control panel by tracking your progress. You can do this simply by choosing a single image to draw at various points in the learning process. Be sure to pick something you like since you’ll be drawing it over and over again! Once you’ve settled on an image, sit down and begin your first drawing. Don’t tear it up whatever you do, even if it’s awful. Just hide it somewhere and save it for later. When you come back to it two dozen drawings and several months later, you’ll notice the marked improvement and quiet your fears.

Almost Too Real for Reality
A slide of this drawing was sent to an art show and rejected due to “bad photography.” What the show organizers didn’t realize is that the taped edges and tag are actually part of the drawing! Now that’s realism.
THE ILLUSION OF A YARD SALE PHOTOGRAPH
Matt Tucker
Graphite on 300-lb. (640gsm) cold-pressed
illustration board
24" x 18" (61cm x 46cm)