Chapter 7. Integration in Remote Access VPN Solutions
This chapter covers the following topics:
• How Remote Access Solutions Use PKI as a Service
• Cisco ASA IPsec VPN Remote Access
• Cisco VPN Client Using Digital Certificates
• Cisco ASA SSL VPN Remote Access
Remote access to central office resources is highly critical for remote workers’ productivity, and there is an increasing demand to provide the remote workers with the same user experience as if they were located at the main office. There is also a major shift in corporate deployment of centralized resources and services. All these factors drive the need to provide highly secure, available remote access for telecommuters, “road warriors,” and mobile workers.
The Cisco remote access solution provides highly secure and available remote access for remote workers. The Cisco Easy VPN and SSL VPN address the remote access solution, but the strength of these solutions is dependent on having a strong authentication mechanism between the clients and the servers. Digital certificates provide a highly reliable service for remote access VPN solutions. This chapter discusses how these remote access solutions use PKI as a service for authentication.
Cisco IPsec VPN Remote Access
The Cisco IPsec VPN remote access solution leverages IKE protocol for key negotiation between the clients and the gateways. As previously discussed, there are two methods in which both client and gateway authenticate with each other before deriving the keys: preshared keys or digital certificates. For remote access, you cannot have a preshared key for every user because the headend does not know the identity of the user (the IP address in most situations). Therefore, the remote users use a group-based preshared key for authentication.
However, the disadvantage of using group-based authentication is that whenever an individual needs to be removed from the group, the key can’t be changed because there are other members in the group who are still using the same key. Therefore, having PKI would solve the problem because each individual has a certificate, and when revoked that particular individual is removed from the group without affecting the other members. To make remote access solution more secure, gateways must enable x-auth. This feature would also provide additional authentication of the users in addition to PKI. Therefore, to enhance better authentication, the remote users should use digital certificates and x-auth for per-user authentication. The discussion on using PKI as a service for remote access solutions begins with an overview of Easy VPN.
Easy VPN Overview
The Easy VPN is a Cisco Solution to provide VPN access for remote devices. The two components of this solution are Easy VPN Server and Easy VPN client.
The Easy VPN Server feature enables Cisco IOS routers and Cisco Adaptive Security Appliances (ASA) to act as headend devices in site-to-site or remote-access VPNs. The feature pushes security policies defined at the central site to the remote device so that it has up-to-date policies in place before a connection is established. It can also terminate VPN tunnels initiated by remote workers running the Cisco VPN Client software on PCs. This flexibility enables mobile and remote workers to access critical data and applications on their corporate intranet.
Deploying IPsec VPN Remote Access on the ASA
Deployment of a remote access solution using ASA as a VPN gateway for remote clients is described next. Figure 7-1 illustrates the topology used for the example.
Figure 7-1 Remote Access VPN Solution Diagram

Following are some of the design considerations for the topology in Figure 7-1:
• The subordinate CAs should be reachable by a WAN, which is the Internet in the current example. This enables the remote clients to obtain their certificates.
• The subordinate CAs and ASAs can be reachable via an internal network or through the Internet. This design assumes that they would reach through the Internet.
• The ASAs are used as VPN gateways and are configured in active/standby mode.
Certificate Chaining
As explained in Chapter 5, “Generic PKI Designs,” a layer of separation is between the actual clients, the root CA, and the layer of separation (sub-ca). Therefore, root CA signs the certificate of subordinate CA (ra-subca in this example), and the sub-ca signs the certificates of the actual users (ASA-remote, SSL Client, and Cisco VPN client). Figure 7-2 illustrates this chain.
Figure 7-2 Certificate Chaining

The end clients such as Cisco VPN client, SSL client, and ASA VPN gateway use certificates for authentication. As mentioned in the previous chapter, we also use hierarchical design for remote access integration. However, there is a key difference between the behavior of ASA and the IOS routers. The hierarchical design does not enforce that all the devices should have both the root CA and subordinate CA certificates. If the clients require a root CA certificate, the hierarchical design provides it to them, but it is not mandatory. However, ASA requires certificate chaining to be operational. Hence, we need to obtain a root CA certificate in addition to the subordinate CA certificate.
The root CA certificate can be obtained through several methods such as SCEP, manual enrollment, and TFTP. Obtaining the root CA certificate using SECP is easiest, but it means that the root CA certificate must be online and reachable, and that can raise security concerns. Therefore, obtaining the root CA certificate using manual enrollment is the best method to alleviate security concerns. Example 7-1 illustrates how to obtain root CA certificate:
To obtain a root CA certificate using manual enrollment, follow these steps:
Step 1. Configure the trust point on the ASA, and specify that the enrollment method is by a terminal:
ASA-remote1(config)# crypto ca trustpoint root
ASA-remote1(config-ca-trustpoint)# enrollment terminal
Step 2. Obtain the root CA certificate from the root CA server by cutting it from the root CA server and pasting it to the ASA. The root CA certificate is then displayed on the server:


Table 7-1 illustrates the difference in the configuration for IOS devices and the ASA.
Table 7-1 Differences in Enrollment Between IOS Devices and ASA

Figure 7-3 shows how the certificate hierarchy displays on a Windows machine.
Figure 7-3 Certificate Hierarchy

As illustrated in Figure 7-3, the root CA signs the subordinate CA, and the subordinate CA signs the VPN gateway.
The ASA enrolls with the sub-CAs and obtains the root CA certificate.
After the enrollment, the remote clients establish the VPN session using the certificates obtained earlier as the source of Identity.
As a reminder, you need three key steps enrollment:
1. Verify NTP is present, which ensures the device has the right clock.
2. Generate rsa keys.
3. Configure, authenticate, and enroll with the trustpoint.
Enrollment can be accomplished using different methods, such as SCEP and manual enrollment. Example 7-1 illustrates how to perform this enrollment using SCEP; however, if you do want to use manual enrollment, refer to Chapter 3, “PKI Processes and Procedures.”
The following configurations show these enrollment steps on ASA.
Example 7-1 Configuration of Enrollment on the ASA


Because the scope of this book is primarily on PKI, the relevant configuration of the EzVPN server is shown in Example 7-2 only as a description of how EzVPN uses PKI as service for authentication.
Example 7-2 Configuration of the ASA

Note
Descriptions of the various components of remote access configuration, including tunnel groups, are beyond the scope of this book. For more information on tunnel groups, visit http://www.cisco.com/en/US/docs/security/asa/asa80/configuration/guide/vpnrmote.html.
Most of the previous configuration is straightforward. The creation of a certificate map, which is one of the keys in a remote access solution, is where a VPN gateway server maps the incoming user to the right tunnel interface. The previous configuration created a certificate map called REMOTE_VPN_MAP, which looks at the issuer id of the certificate (ra-subca in the example) and maps it to the tunnel group testgroup. The second consideration is a configuration of the trustpoint with the tunnel group, which can provide with ASA the right trustpoint to be used for authentication. With this configuration, the ASA is in a position to accept the remote access sessions initiated by the remote clients.
Note
To obtain more information about certificate maps, go to http://www.cisco.com/en/US/docs/security/asa/asa80/configuration/guide/cert_cfg.html#wp1046987.
Cisco VPN Client Using Digital Certificates
Cisco VPN client is software that enables customers to establish secure, end-to-end encrypted tunnels to any Cisco Easy VPN server. Following are the main benefits of the Cisco VPN client:
• Support for multiple operating systems
• Intelligent peer availability detection (DPD)
• Simple certificate enrollment protocol (SCEP)
The following steps are required to configure the Cisco VPN client to enroll with the subordinate CA and obtain its certificate:
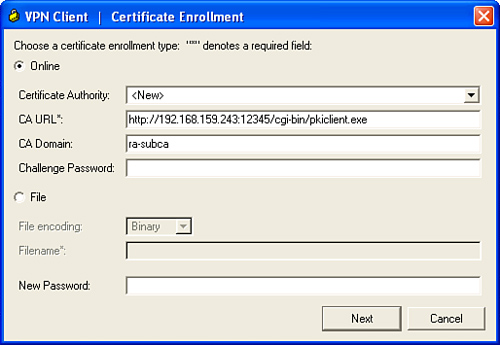
Step 1. Configure the VP client for enrolling a certificate, as shown in Figure 7-4.
Figure 7-4 Configuring VPN Enrollment
Step 2. Enter the remote client details, as shown in Figure 7-5.
Figure 7-5 Configuring Certificate Fields

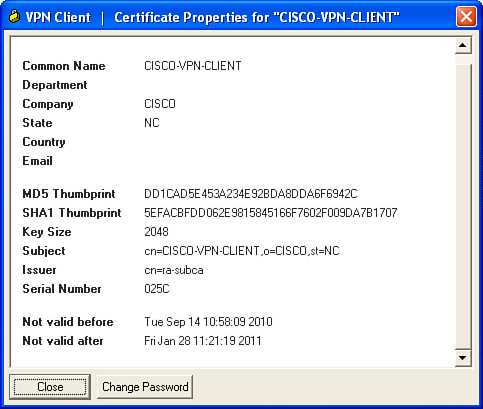
Step 3. Select enroll; the Cisco-VPN client enrolls with ra-subca. Figure 7-6 shows a successful enrollment with ra-subca.
Figure 7-6 Cisco VPN Client Certificate Details
The preceding steps enable the remote VPN client to obtain its certificate and also the subordinate CA certificate. However, to validate the certificate of the subordinate CA, it also needs the root CA certificate. To obtain the root CA certificate for validation purposes, follow these steps:
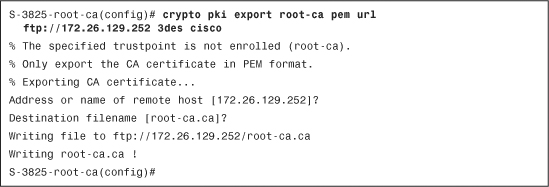
Step 1. Export the root CA certificate to a place in which the clients can access them. In Example 7-3, the root CA exports the certificate using the PEM format.
Example 7-3 Exporting the root-ca Certificate to an ftp Server
Step 2. Import the root CA certificate, as shown in Figure 7-7.
Figure 7-7 Importing the root-ca certificate

Step 3. Specify the location of the certificate, as shown in Figure 7-8.
Figure 7-8 Specify the Location of Certificate
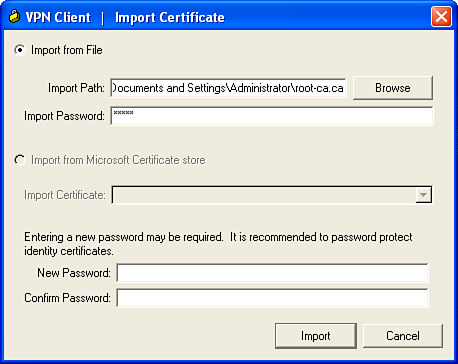
Step 4. Import the certificate, as shown in Figure 7-9.
Figure 7-9 Import the Certificate

Step 5. Validate the ra-subca certificate using the root certificate present, as shown in Figure 7-10.
Figure 7-10 Validate the Certificate

Both the remote VPN client and the VPN gateway have now obtained their certificates. Next, use these certificates as a means of digital authentication to establish the EzVPN session.
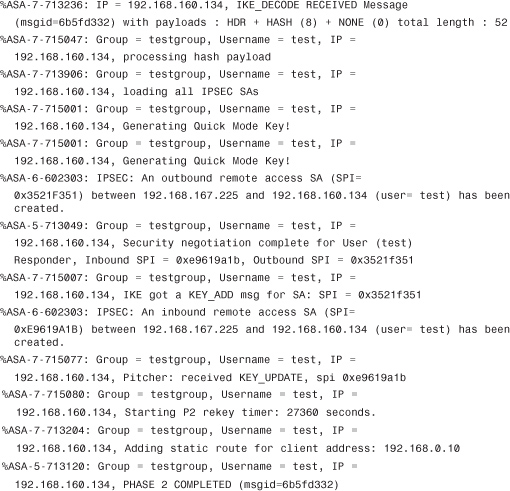
Example 7-4 shows the right output when a remote client initiates a session to the VPN gateway.
Example 7-4 Debug Output on the ASA Firewall
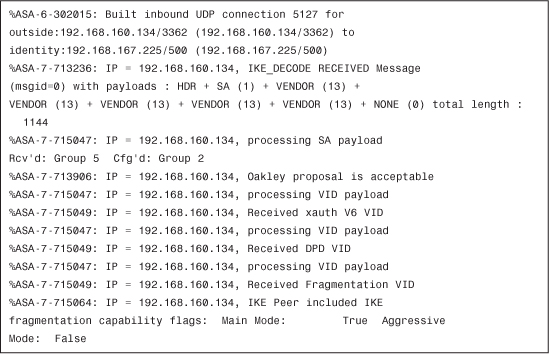
This is a major difference between the preshared key method and digital certificate method. The Aggressive mode is used in the preshared method, whereas the Main mode is used in digital certificates:
The IKE SA proposal is acceptable to both client and server. Phase I is over, and Phase II begins. In this phase, the Diffie Hellman key exchange takes place:


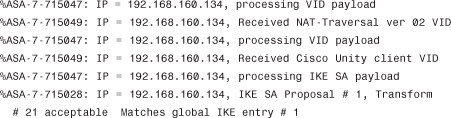
The Easy VPN server asks the client to send its certificate:

The Easy VPN server parses the certificate details of the client. It looks at the identity of the certificate details of the subject names, which are username, organization, group, state, and country.

The Easy VPN server also processes the signature of the certificate:

The NAT-ID payloads detect that the client is not behind a NAT device:

The Easy VPN server tries to match the tunnel based on the subject name details of the client:

The Easy VPN server successfully finds the tunnel testgroup:
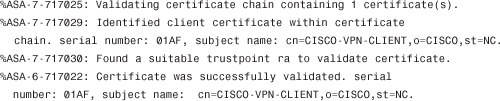
The Client certificate is validated with the trust point ra:

The server has validated the client’s certificate. It is now the server’s turn to send its certificate to the client:

The server sends its certificate, identity, signature, and the rest of the fields to the client. With this, the main mode negotiation steps are finished. Because it is a remote access, you need to perform x-auth to have a second factor of authentication with the client:
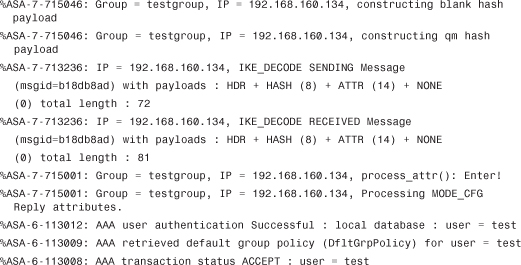
The server has authenticated the x-auth replies from the client (username and password).

The Default Group policy was used in this case because no specific group policy was created. The attributes for different values such as DNS, WINS, Split-tunneling policy, and Browser proxy-settings are constructed for these users:
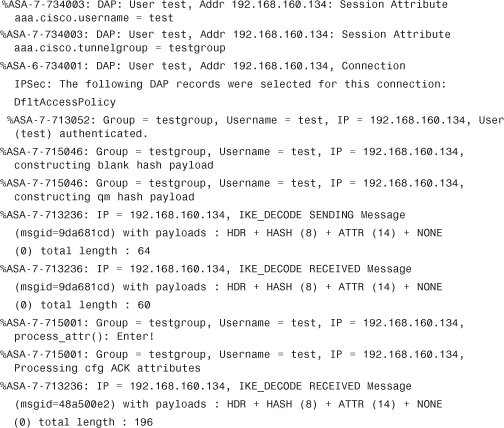
In remote access solutions, it is most common to push configuration information such as the IP address, DNS server’s IP address, split-tunnel list, and other pertinent information to the client. To enable this VPN gateway, use the Mode-Configuration (MODECFG) feature. The next few lines show what kind of information is passed by the VPN gateway to the client:
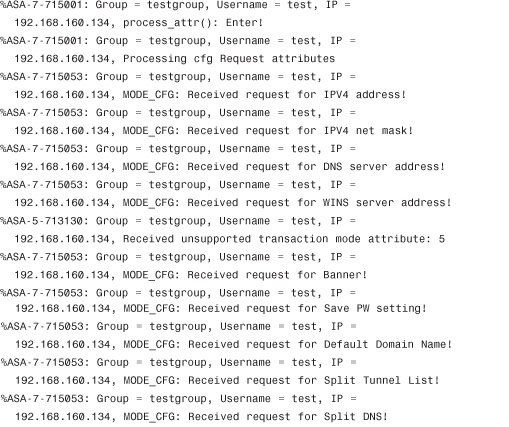
The client requests several pieces of information such as the IPV4 address, mask, DNS, WINS, and other pieces of information.
![]()
The client is assigned an IP address from the pool:

Phase I is completed, and Phase II begins:

The primary unit initiates the first exchange in Phase II negotiation:
![]()
Because you have active-standby units, the active unit informs the stand-by unit about the current session:

The server processes the response to the first exchange it has sent to the client:

Both the server and client agree to the acceptable security association for Phase II negotiation:

The server sends the important exchange, which has its ID along with Security Association (SA):
The Phase II exchange is completed, and the SA is established:

The Server sends the keep alive of type R-U-There, and the client responds to R-U-THERE-ACK, which confirms the establishment of IPSec connection.
SSL VPN Access
SSL VPN clients can also use digital certificates as an authentication mechanism. The process and configuration are detailed next.
SSL VPN Overview
The Secure Sockets Layer (SSL) Handshake Protocol was developed by Netscape Communications Corporation to provide security and privacy over the Internet using web browsers. This protocol runs over TCP and is treated as a user process for an operating system. It requires that all the applications talk directly to SSL rather than TCP. Applications willing to use SSL as a transport must be modified to talk to SSL; however, TCP/IP does not require alteration. The current version for SSL is v3 and is the basis for the IETF standard TLS v1.0.
The SSL protocol helps protect application data through encryption and authentication. The protocol supports server and client authentication. The SSL protocol can negotiate encryption keys and authenticate the server before data is exchanged by the higher-level application. The SSL protocol maintains the confidentiality and integrity of the transmission channel by using encryption and authentication algorithms.
The Cisco SSL VPN solution comes in two flavors: Clientless VPN and AnyConnect. The Clientless solution is based on a Java/Active-x applet downloaded to the remote browser when the remote user connects to the SSL gateway. AnyConnect is a client dynamically installed on the remote desktop when the session is established.
Figure 7-11 and the following steps show the main steps to establish the AnyConnect solution:
1. The client initiates the session to the gateway using the browser.
2. The gateway sends its certificate chain, root CA, and certificate issued by the subordinate CA (ra-subca in the example). If the browser does not know the issuer of the certificate, it may report an error. This can happen when corporate deploys CAs, which is mainly used within a corporate set up. In those circumstances, the certificate needs to be imported to move forward with the session. Figure 7-12 shows an error that might be displayed on a client’s browser.
3. The Client validates the certificate and might import the root CA and the ASA certificate. Figure 7-13 shows the browser when it accepts the root CA certificate.
4. The client and gateway perform negotiation for cipher suites and keys.
5. The gateway sends an initial login screen, as shown in Figure 7-14.
6. The user selects the group and enters credentials. The browser initiates the AnyConnect client installation on the user computer, as shown in Figure 7-15.
Figure 7-11 AnyConnect Solution Overview
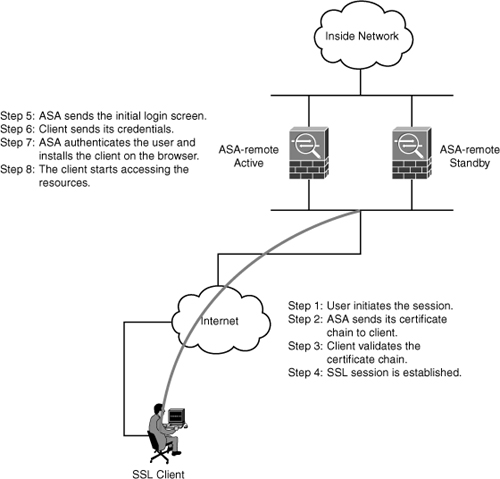
Figure 7-12 Error of the Certificate

Figure 7-13 Importing Root CA Certificate


Figure 7-15 AnyConnect Client Installation

Figure 7-16 shows the AnyConnect client installed.
Figure 7-16 AnyConnect Client Installed on the Computer

Example 7-5 illustrates the configuration of the ASA gateway for accepting AnyConnect sessions.
Example 7-5 Configuration of ASA Firewall

After the AnyConnect session is established, you can use the following command to verify the session, as shown in Example 7-6.
Example 7-6 Verifying the AnyConnect Session on the ASA

Troubleshooting the AnyConnect Solution
Example 7-7 shows the debug output on ASA when the user does not accept the Gateway certificate.
Example 7-7 Debugging Output on ASA

Example 7-8 shows the debug for a session that is established correctly.
Example 7-8 Debug Output for a Session That Is Established Correctly


Summary
In this chapter, you looked at how to use PKI as a service for the two most popular remote access solutions: IPsec VPN, and SSL VPN. You looked at practical examples on how to deploy and use certificates for these VPN technologies. ASA was mainly used as a VPN gateway, and the clients were Cisco VPN client, SSL clientless, and AnyConnect client.
For Cisco IPsec remote access solution, the VPN gateway looks at the client’s certificate, selects the appropriate tunnel interface, and then uses that tunnel to establish the session. The Cisco VPN client enrolls with the subordinate CA and also obtains the root CA certificate so that it can authenticate the VPN gateway.
The Cisco SSL VPN solution is available as Clientless VPN and AnyConnect. The Clientless solution is based on Java/Active-x applet downloaded to the remote browser when the remote user connects to the SSL gateway. AnyConnect is a client dynamically installed on the remote desktop when the session is established. Both the clientless and AnyConnect client would validate the VPN gateway certificate, and then the session is established.