
Chapter 6. Building a user interface with view templates
This chapter covers
- Introducing type-safe template engines
- Creating templates
- The template syntax
- Structuring larger templates into reusable pieces
- Internationalization support
Chances are, you’re building a web application that’s going to be used by humans. Even though the web is increasingly a place where applications talk to each other via APIs, and many web applications only exist as back ends for applications on mobile devices, it’s probably safe to say that the majority of web applications interact with humans via a web browser.
Browsers interpret HTML, and with it you can create the shiny interfaces that users expect, using your application to present the HTML front end to the user. Your Play application can generate this HTML on the server and send it to the browser, or the HTML can be generated by JavaScript on the client. A hybrid model is also possible, where parts of the page’s HTML are generated on the server, and other parts are filled with HTML generated in the browser.
This chapter will focus on generating HTML on the server, in your Play application.
6.1. The why of a template engine
You might imagine that you could use plain Scala to generate HTML on the server. After all, Scala has a rich string-manipulation library and built-in XML support, which could be put to good use here. That’s not ideal, though. You’d need a lot of boilerplate code, and it would be difficult for designers that don’t know Scala to work with.
Scala is expressive and fast, which is why Play includes a template engine that’s based on Scala. Play’s Scala templates are compact and easy to understand or adapt by people who don’t know Scala. Instead of writing Scala code that emits HTML, you write HTML files interspersed with Scala-like snippets. This gives greater productivity than using plain Scala to write templates.
Templates are usually rendered from the controller, after all the other work of the action is done. Figure 6.1 shows you how a template fits into Play’s request-response cycle.
Figure 6.1. Templates in the request lifecycle

Templates allow you to reuse pieces of your HTML when you need them, such as a header and a footer section that are the same or similar on every page. You can build a single template for this, and reuse that template on multiple pages. The same thing also works for smaller fragments of HTML. For example, a shopping cart application may have a template that shows a list of articles, which you can reuse on any page that features a list of articles.
Another reason to use templates is because they help you to separate business logic from presentation logic; separating these two concerns has several advantages. Maintenance and refactoring are easier if business logic and presentation logic aren’t entangled but cleanly separated. It’s also easier to change the presentation of your application without accidentally affecting business logic. This also makes it easier for multiple people to work on various parts of the system at the same time.
In this chapter, you’ll learn how to leverage Play’s template engine to generate HTML and how to separate business logic from presentation logic.
6.2. Type safety of a template engine
Play Scala templates are HTML files containing snippets of Scala code, which are compiled into plain Scala code before your application is started. Play templates are type-safe, which isn’t common among web frameworks.
In most frameworks, templates aren’t type-safe and are evaluated at runtime, which means that problems in a template only show up when that particular template is rendered. These frameworks don’t help you detect errors early, and this causes fragility in your application. In this section, we’ll compare a regular template engine that’s not type-safe with Play’s type-safe template engine.
As an example, we’ll build a catalog application. The main page will be a list of all the articles in the catalog, and every article on this page will have a hyperlink to a details page for that article, where more information about that article is shown. We’ll first show how this is done with the Play 1.x template engine and then compare it with the type-safe template engine in Play 2. This will allow us to illustrate some of the weaknesses of a template engine that’s not type-safe, which will let you appreciate the type safety of Play 2’s templates even more.
6.2.1. A not type-safe template engine
For our catalog application, we have a controller, Articles, with two action methods: index, which renders a list of all articles in the database, and show, which shows the details page for one article. The index action gets a list of all articles from the database and renders a template.
The template is shown in listing 6.1.
Listing 6.1. Play 1 Groovy template

This is a Groovy template, which is the default template type in Play 1.x. Let’s dissect this sample to see how it works.
First, this template needs a parameter, articles. We use a Play 1 construct named a list tag to iterate over all the articles in the list:
#{list articles, as:'article'}
For each element in the articles list, this tag assigns that element to the variable specified by the as attribute, and it prints the body of the tag, which ends at #{/list}.
Inside the body, we use the li tag to create a list element. The line,
${article.name}
prints the name field of the object in the article variable. In the next line, we generate a link to the Articles controller’s show action:
<a href="@{Articles.show(article.id)}">details</a>
The @ indicates that we want to use reverse routing (see section 4.5 if you need a refresher on reverse routing) to generate a URL that corresponds to a given action. Both Play 1 and Play 2 provide reverse routing to decouple the routes from the templates, so you can safely change your URL scheme, and the templates will keep working. In this case, it’ll return something like /articles/show/123.
This template can be rendered from a controller using the code in listing 6.2.
Listing 6.2. Play 1.x with Java controller example

There are two magic things going on when rendering templates in Play 1, and you may be able to detect them from the code. The first one is selection of the template: we never mention which template should be rendered; we just invoke the render method. Behind the curtains, Play determines the proper template based on the name of the action method.
The second magic thing is that we never explicitly give the template engine the map of key value pairs that it needs. The render method has the signature protected static void render(java.lang.Object... args). If this were regular Java, the render method wouldn’t know that the parameter that’s passed in is called articles. But Play 1 contains some magic to look up the names of template parameters if they’re local variables of the action method that renders the template. This mechanism causes the articles list to be available by that name in the template.
Although this works fine, a lot of things can go wrong. Let’s look at the code in listing 6.3 again, but we’ll focus on the potential problems:
Listing 6.3. Play 1.x Groovy template

The articles variable that’s used at ![]() isn’t explicitly declared, so we have to inspect the template to figure out what parameters it needs. In
isn’t explicitly declared, so we have to inspect the template to figure out what parameters it needs. In ![]() , the template variable isn’t type-safe. Whether the object in the article variable has a name field is only determined at runtime, and it will only fail at runtime if it doesn’t. In
, the template variable isn’t type-safe. Whether the object in the article variable has a name field is only determined at runtime, and it will only fail at runtime if it doesn’t. In ![]() , the Play 1.x router will generate a route, whether show actually accepts a parameter of the same type as article.id or not. Again, if you make a mistake, it’ll only break at runtime.
, the Play 1.x router will generate a route, whether show actually accepts a parameter of the same type as article.id or not. Again, if you make a mistake, it’ll only break at runtime.
In the next section, we’ll look at the same example, but written for a type-safe template engine.
6.2.2. A type-safe template engine
Now let’s rebuild our catalog application in Play 2 with Scala templates. The new template is shown in listing 6.4.
Listing 6.4. Play 2 Scala template

In this example, the articles parameter is explicitly declared at ![]() . You can easily determine the parameters that this template takes and their types, and so can your IDE. The article at
. You can easily determine the parameters that this template takes and their types, and so can your IDE. The article at ![]() is type-safe, so if name isn’t a valid field of Article, this won’t compile. At
is type-safe, so if name isn’t a valid field of Article, this won’t compile. At ![]() , the reverse routing won’t compile if the show route doesn’t take a parameter of the same type as article.id.
, the reverse routing won’t compile if the show route doesn’t take a parameter of the same type as article.id.
With Scala templates, you have to define the template parameters on the first line. Here, we define that this template uses a single parameter, named articles of type Seq[Article], which is a sequence of articles. The template compiler compiles this template into a function index that takes the same parameters, to be used in a controller, as shown in listing 6.5.
Listing 6.5. Play 2 with Scala controller example

The most important difference from the Play 1.x example is that, in this case, the signature of the method to render the template is def index(articles: Seq[models.Article]): Html.[1] Unlike the Play 1.x example, we explicitly declare that this template has a single parameter named articles and that the template returns an object of type Html. This allows an IDE to assist you when you’re using this template.
1 Actually, the method name is apply, but it’s defined in an object index, so you can call it using index(articles).
Now, let’s see how the different mistakes you can make will be handled by Play 2. The first potential issue we saw in Play 1.x, changing the name of the variable in the controller, isn’t a problem at all in Play 2. As rendering a template is a regular method call, the template itself defines the formal parameter name. The first actual parameter you give will be known as articles in the template. This means that you can safely refactor your controller code without breaking templates, because they don’t depend on the names of variables in the controller. This cleanly decouples the template and the action method.
The second potential issue was passing a parameter of the wrong type to the template. This isn’t a problem with Play 2 because you’ll get an error at compile time, as in figure 6.2.
Figure 6.2. Type error

You don’t have to visit this specific page to see this error. This error will be shown regardless of the URL you visit, because your application won’t start when it has encountered a compilation error. This is extremely useful for detecting errors in unexpected places.
The third potential issue with the Play 1.x example was that the reverse router would generate a URL regardless of whether the parameters for the action method made sense. For example, if we changed the parameter that the show action method accepts from a Long id to a String barcode, the template would still render and the reverse routing would still generate a link, but it wouldn’t work. In Play 2 with Scala templates, if you change the parameters of the show action in the same way, your application won’t compile, and Play will show an error indicating that the type of the parameter that you’re using in reverse routing doesn’t match the type that the action method accepts.
6.2.3. Comparing type-safe and not type-safe templates
Now that we’ve written our example template both for a type-safe and a not type-safe template engine, we can compare them. Tables 6.1 and 6.2 compare type-safe template engines with template engines that aren’t type-safe.
Table 6.1. Template engines that are not type-safe
|
Advantages |
Disadvantages |
|---|---|
|
|
Table 6.2. Type-safe template engines
|
Advantages |
Disadvantages |
|---|---|
|
|
Play’s type-safe template engine will help you build a more robust application. Both your IDE and Play itself will warn you when a refactoring causes type errors, even before you render the template. This eases maintenance and helps you feel secure that you aren’t accidentally breaking things when you refactor your code. The templates’ explicit interface conveys the template designer’s intentions and makes them easier to use, both by humans and IDEs.
6.3. Template basics and common structures
In this section, we’ll quickly go over the essential syntax and basic structures in templates. After reading this section, you’ll know enough about Scala templates to start building your views with them.
6.3.1. @, the special character
If you’ve read the previous section, you’ve probably noticed that the @ character is special. In Scala templates, the @ character marks the start of a Scala expression. Unlike many other template languages, there’s no explicit marker that indicates the end of a Scala expression. Instead, the template compiler infers this from what follows the @. It parses a single Scala expression, and then reverts to normal mode.
This makes it extremely concise to write simple expressions:
Hello @name!
Your age is @user.age.
On the first line of the preceding example, name is a Scala expression. On the second line, user.age is a Scala expression. Now suppose that we want to make a somewhat larger expression and calculate the user’s age next year:
Next year, your age will be @user.age + 1
This doesn’t work. As in the previous example, only user.age is processed as Scala code, so the output would be something like this:
Next year, your age will be 27 + 1
For this to work as intended, you’ll have to add brackets around the Scala expression:
Next year, your age will be @(user.age + 1)
Sometimes, you’ll even want to use multiple statements in an expression. For that, you’ll have to use curly braces:
Next year, your age will be
@{val ageNextYear = user.age + 1; ageNextYear}
Inside these multistatement blocks, you can use any Scala code you want.
Sometimes you need to output a literal @. In that case, you can use another @ as an escape character:
username@@example.com
You can add comments to your views by wrapping them between @* and *@:
@* This won't be output *@
The template compiler doesn’t output these comments in the resulting compiled template function, so comments have no runtime impact at all.
6.3.2. Expressions
In section 6.2.2, we were working on an example template to display a list of articles. We’ll continue with that example here. This is how it looks so far:
@(articles: Seq[models.Article])
<h1>Articles</h1>
<ul>
@for(article <- articles) {
  <li>
    @article.name -
    <a href="@controllers.routes.Articles.show(article.id)">details</a>
  </li>
}
</ul>
Now suppose that we want to display the name of each article in all capital letters; how should we proceed? The name property of every article is just a Scala string, and because a Scala String is a Java String, we can use Java’s toUpperCase method:
@article.name.toUpperCase
Easy as this is, it’s unlikely that we actually want to perform this transformation. It’s more generally useful to capitalize the first letter of the name, so that the string regular steel paperclips becomes Regular steel paperclips. A method to do that isn’t available on a Scala String itself, but it is available on the scala.collection.immutable.StringOps class, and an implicit conversion between String and StringOps is always imported by Scala. You use this to capitalize the name of each article:
@article.name.capitalize
Besides capitalize, StringOps offers many more methods that are useful when writing templates.
Play also imports various things into the scope of your templates. The following are automatically imported by Play:
- models._
- controllers._
- play.api.i18n._
- play.api.mvc._
- play.api.data._
- views.%format%._
The models._ and controllers._ imports make sure that your models and controllers are available in your templates. Play.api.i18n_ contains tools for internationalization, which we’ll come to later. Play.api.mvc._ makes MVC components available. Play.api.data_ contains tools for dealing with forms and validation. Finally, the %format% substring in views.%format%._ is replaced by the template format that you’re using. When you’re writing HTML templates with a filename that ends in .scala.html, the format is html. This package has some tools that are specific for the template format. In the case of html, it contains helpers to generate form elements.
6.3.3. Displaying collections
Collections are at the heart of many web applications: you’ll often find yourself displaying collections of users, articles, products, categories, or tags on your web page. Just like in Scala, there are various ways to handle collections, and we’ll show them in this section. We’ll also show some other useful constructs for handling collections in your templates.
Collection basics
We’ve already mentioned that Scala has a powerful collections library that we can use in templates. For example, you can use map to show the elements of a collection:
<ul>
@articles.map { article =>
  <li>@article.name</li>
}
</ul>
You can also use a for comprehension, but with a slight difference from plain Scala. The template compiler automatically adds the yield keyword, because that’s virtually always what you want in a template. Without the yield keyword, the for comprehension wouldn’t produce any output, which doesn’t make much sense in a template. So, in your templates, you have to omit the yield keyword and you can use this:
<ul>
@for(article <- articles) {
  <li>@article.name</li>
}
</ul>
Whether you should use comprehensions or combinations of forfilter, map, and flatMap is a matter of personal preference.
If you’re aware of Scala’s XML literals, you might be inclined to think that they’re what’s being used here. It seems reasonable that the entire thing starting with for and ending in the closing curly brace at the end of the example is processed as a Scala expression. That might have worked for that specific example, but what about this one:
@for(article <- articles) {
  Article name: @article.name
}
Surely, Article name: @article.name isn’t a valid Scala expression, but this will work fine in a template. How can that be? It’s because we didn’t use XML literal syntax in the previous snippets. Instead, the template parser first parses for(article <- articles) and then a block. This block is a template parser concept: it consists of block parameters and then several mixed objects, where mixed means everything that is allowed in a template, such as strings, template expressions, and comments.
What this boils down to is that the body of a for expression is a template itself. This is also the case for match and case expressions, and even for method calls where you use curly braces around a parameter list. This makes the boundary between Scala code and template code very natural.
Use the source
If you’re interested in the details of the template engine, you can take a look at the file ScalaTemplateCompiler.scala in the Play framework source. This is where the template syntax is defined with parser combinators.
Adding the index of the element
Suppose that we want to list the best sellers in our application, and for each one indicate their rank, like in figure 6.3.
Figure 6.3. List of best sellers

If you’re familiar with Play 1.x, you may remember that the #{list} tag that you use in Play 1.x to iterate over the elements of a list provides you with _index, _isFirst, _isLast, and _parity values that you can use in the body of the tag to determine which element you’re currently processing, whether it’s the first or the last one, and whether its index is even or odd. No such thing is provided in Play 2; we’ll use Scala methods to get the same functionality.
We first need to get an index value in the body of the loop. If we have this, it’s easy to determine whether we’re processing the first or the last element, and whether it’s odd or even. Someone unfamiliar with Scala might try something like the following example as an approach:
<ul>
@{var index = 0}
@articles.map { article =>
  @{index = index + 1}
  <li>@index: @article.name</li>
}
</ul>
Ignoring whether this is good style, it looks like it could work. That’s not the case, though, because the template parser encloses all template expressions in curly braces when outputting the resulting Scala file. This means that the index variable that’s defined in @{var index = 0} is only in scope in this expression. This example will give an error not found: value index on the line @{index = i + 1}.
Apart from this example not working, it’s not considered good form to use variables instead of values, or to use functions with side effects without a good reason. In this case, the parameter to map would’ve had a side effect: changing the value of the external variable index.
The proper way to do this is to use Scala’s zipWithIndex method. This method transforms a list into a new list where each element and its index in the list are combined into a tuple. For example, the code List("apple", "banana", "pear").zipWithIndex would result in List((apple,0), (banana,1), (pear,2)). We can use this in our template:
<ul>
@for((article, index) <- articles.zipWithIndex) {
  <li>Best seller number @(index + 1): @article.name</li>
}
</ul>
Now that the index is available, it’s straightforward to derive the remaining values:
<ul>
@for((article, index) <- articles.zipWithIndex) {
  <li class="@if(index == 0){first}
    @if(index == articles.length - 1){last}">
  Best seller number @(index + 1): @article.name</li>
}
</ul>
Finding the first and last elements
Now suppose that we want to emphasize the first element in our list. After all, it’s the best seller in our web shop, so it deserves some extra attention. That would change the code to the following:
<ul>
@for((article, index) <- articles.zipWithIndex) {
  <li class="@if(index == 0){first}
    @if(index == articles.length - 1){last}">
    @if(index == 0){<em>}
    Best seller number @(index + 1): @article.name
    @if(index == 0){</em>}
  </li>
}
</ul>
This accomplishes our goal, but we’ve created a fair amount of code duplication. The index == 0 check is used three times. We can improve on this by creating a value for it in the for comprehension:
<ul>
@for((article, index) <- articles.zipWithIndex;
    rank = index + 1;

    first = index == 0;
    last = index == articles.length - 1) {
  <li class="@if(first){first} @if(last){last}">
    @if(first){<em>}
    Best seller number @rank: @article.name
    @if(first){</em>}
  </li>
}
</ul>
Now we’ve cleanly extracted the computations from the HTML and labeled them. This simplifies the remaining Scala expressions in the HTML.
Some Scala programmers prefer to use curly braces with for comprehensions, which removes the need for semicolons, but that syntax is not valid in templates.
Use CSS selectors
You don’t actually need the em tag, because you’ve already added a class to the li that you can use for proper styling. Depending on the browsers that you need to support, it’s often possible to use CSS selectors like :first-child and :last-child to accomplish these and other selections from a stylesheet. This simplifies both your template and the HTML and better separates the markup from the styling of your document.
Iterating over other iterables, like Maps, works similarly:
<ul>
@for((articleCode, article) <- articlesMap) {
  <li>Article code @articleCode: @article.name</li>
}
</ul>
The Map articlesMap is accessed as a sequence of key-value tuples.
6.3.4. Security and escaping
An application developer must always keep security in mind, and when dealing with templates, avoiding cross-site scripting vulnerabilities is especially relevant. In this section we’ll briefly explain what they are and how Play helps you to avoid them.
Cross-site scripting vulnerabilities
Suppose that you allow visitors of your web application to post reviews on the products that you sell, and that the comments are persisted in a database and then shown on the product page. If your application displayed the comments as is, a visitor could inject HTML code into your website.
HTML injection could lead to minor annoyances, like broken markup and invalid HTML documents, but much more serious problems arise when a malicious user inserts scripts in your web page. These scripts could, for example, steal other visitors’ cookies when they use your application, and send these cookies to a server under the attacker’s control. These problems are known as cross-site scripting (XSS) vulnerabilities. Figure 6.4 shows an example of an XSS attack.
Figure 6.4. Cross-site scripting attack

It’s vital that you prevent untrusted users from adding unescaped HTML to your pages. Luckily, Play’s template engine prevents XSS vulnerabilities by default.
Escaping
To Play’s template engine, not all values are equal. Suppose that we have the Scala String <b>banana</b>. If we want to output this string in an HTML document, we have to decide whether this is a snippet of HTML, or if it’s a regular string containing text. If this is a snippet of HTML, it should be written to the output as <b>banana</b>. If it’s not a snippet of HTML, but a regular string of text, we should escape the < and > characters, because they’re special characters in HTML. In that case, we must output <b>banana</b>, because < is the HTML entity for < and > is the one for >. After a browser has rendered that, it again looks like <b>banana</b> for the person viewing it.
If you or Play get confused about whether a String contains HTML or regular text, a potential XSS vulnerability is born. Luckily, Play deals with this in a sane and simple way.
Everything that you write literally in a template is considered HTML by Play, and is output unescaped. This HTML is always written by the template author, so it’s considered safe. Play keeps track of this and outputs the literal parts of the templates raw, meaning that they’re not escaped. But all Scala expressions are escaped.
Suppose that we have the following template:
@(review: Review)

<h1>Review</h1>
<p>By: @review.author</p>
<p>@review.content</p>
val review = Review("John Doe", "This article is <b>awesome!</b>")
Ok(views.html.basicconstructs.escaping(review))
The output will look like figure 6.5.
Figure 6.5. Rendering text in a safe way

This is precisely what we want, because we don’t want this user-generated content to be able to use HTML tags.
Figure 6.6 shows how the template compiler escapes the various parts of the template.
Figure 6.6. Escaping in templates
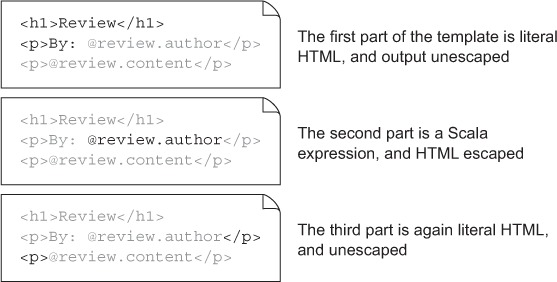
So, even if you don’t think about escaping, you’ll be fine. The template engine lets the HTML that you write be HTML, and everything else is escaped.
Outputting raw HTML
Play’s behavior of automatically escaping does pose a problem for the rare occasions when you’re positive that you do want to output a value as HTML, without escaping. This can happen when you have trusted HTML in a database, or if you use a piece of Scala code outside a template to generate a complex HTML structure.
Let’s imagine that for some of the products in our web shop, we want to embed a promotional video. We could do this by storing an embed code in our database. A typical YouTube embed code looks like this:
<iframe width="560" height="315"
  src="http://www.youtube.com/embed/someid" frameborder="0"
  allowfullscreen></iframe>
If we have a value embeddedVideo of type Option[String] on our Product class, we could do something like this in the template:
@article.embeddedVideo.map { embedCode =>
  <h3>Product video</h3>
  @embedCode
}
As you should expect by now, this would give the output shown in figure 6.7.
Figure 6.7. Escaped output

To fix this, we must indicate to the template engine that embedCode is not just regular text, but that it contains HTML. For that, we wrap it in an Html instance:
@article.embeddedVideo.map { embedCode =>
  <h3>Product video</h3>
  @Html(embedCode)
}
Now the video embed is properly shown. You might recall from earlier in this chapter that Html is also the return type of a template itself. That is why in a template you can include other templates without having to explicitly mark that their content shouldn’t be escaped.
Of course, we can also choose to keep the information about the type of the content in the object itself. Instead of having an embeddedVideo of type Option[String], we could have one of type Option[Html]. In that case, we can output it as @embeddedVideo in our template. In practice, this isn’t often useful; it’s harder to work with in your Scala code, and it’s not as easily mapped to a database if you’re persisting it, for example.
6.3.5. Using plain Scala
As shown earlier, you can use plain Scala if you create a block with @() or @{}. By default, the output is escaped. If you want to prevent this, wrap the result in an Html.
There’s another way to construct HTML for your templates that’s sometimes useful: using Scala’s XML library. Any scala.xml.NodeSeq is also rendered unescaped, so you can use the following code:
@{
  <b>hello</b>
}
Here, the <b>hello</b> won’t be escaped.
Sometimes you need to evaluate an expensive or just really long expression, the result of which you want to use multiple times in your template:
<h3>This article has been reviewed @(article.countReviews()) times</h3>
<p>@(article.countPositiveReviews()) out of these
  @(article.countReviews()) reviews were positive!</p>
If you want to avoid having to call article.countReviews() twice, you can make a local definition of it, with @defining:
@defining(article.countReview()) { total =>
  <h3>This article has been reviewed @total times</h3>
  <p>@(article.countPositiveReviews()) out of these
    @total reviews were positive!</p>
}
This creates a new scope with a new value, total, which contains the value of article.countReview().
Play’s template engine uses Scala’s parser combinator library to parse each template and compile it into a regular Scala source file with a Scala object inside that represents the template. The Scala source file is stored in the Play project’s managed_src directory. Like all Scala source files, the source file is compiled to bytecode by Play, which makes the template object available for the Scala code in your application. This object has an apply method with the parameter list copied from the parameter declaration in the template. As Scala allows you to call an object that has an apply method directly, omitting the apply method name, you can call this template object as if it were a method.
All template objects are in a subpackage of the views package. Templates are grouped into packages first by their extension, and then by the parts of their filename. For example, a template file views/main.scala.html gets compiled into the object views.html.main. A template views/robots.scala.txt gets compiled into the object views.txt.robots, and a template views/users/profilepage/avatar.scala.html gets compiled into the object views.html.users.profilepage.avatar.
6.4. Structuring pages: template composition
Just like your regular code, your pages are compositions of smaller pieces that are in turn often composed of even smaller pieces. Many of these pieces are reusable on other pages: some are used on all of your pages, whereas some are specific to a particular page. There’s nothing special about these pieces: they’re just templates by themselves. In this section we’ll show you how to construct pages using reusable smaller templates.
6.4.1. Includes
So far, we’ve only shown you snippets of HTML, and never a full page. Let’s add the remaining code to create a proper HTML document for the catalog page that lists the products in our catalog, like in figure 6.8.
Figure 6.8. Our web shop catalog

We could create an action catalog in our Products controller:
def catalog() = Action {
  val products = ProductDAO.list
  Ok(views.html.shop.catalog(products))
}
We can also create a template file in app/views/products/catalog.scala.html, like in listing 6.6:
Listing 6.6. Full HTML for the catalog page
@(products: Seq[Product])
<!DOCTYPE html>
<html>
  <head>
    <title>paperclips.example.com</title>
    <link href="@routes.Assets.at("stylesheets/main.css")"
      rel="stylesheet">
  </head>
  <body>

    <div id="header">
      <h1>Products</h1>
    </div>
    <div id="navigation">
      <ul>
        <li><a href="@routes.Application.home">Home</a></li>
        <li><a href="@routes.Shop.catalog">Products</a></li>
        <li><a href="@routes.Application.contact">Contact</a></li>
      </ul>
    </div>
    <div id="content">
      <h2>Products</h2>
      <ul class="products">
      @for(product <- products) {
        <li>
          <h3>@product.name</h3>
          <p class="description">@product.description</p>
        </li>
      }
      </ul>
    </div>
    <footer>
      <p>Copyright paperclips.example.com</p>
    </footer>
  </body>
</html>
Now we have a proper HTML document that lists the products in our catalog, but we did add a lot of markup that isn’t the responsibility of the catalog action. The catalog action doesn’t need to know what the navigation menu looks like. Modularity has suffered here, and reusability as well.
In general, the action method that’s invoked for the request is only responsible for part of the content of the resulting page. On many websites, the page header, footer, and navigation are shared between pages, as shown in the wireframe in figure 6.9.
Figure 6.9. Composition of a web page

Here, the boxes Header, Navigation, and Footer will hardly change, if at all, between pages on this website. On the other hand, the content box in the middle will be different for every page.
In this section and the next, we’ll show you some techniques that you can use to break up your templates into more maintainable, reusable pieces.
The HTML fragment that renders the navigation area lends itself well to being extracted from the main template, and into a separate template file. From the main template then, we can include this navigation template. We’ll start by creating the file views/navigation.scala.html:
@()
<div id="navigation">
  <ul>
    <li><a href="@routes.Application.home">Home</a></li>
    <li><a href="@routes.Shop.catalog">Catalog</a></li>
    <li><a href="@routes.Application.contact">Contact</a></li>
  </ul>
</div>
Now we can include this template from the main template with @navigation(). Because it lives in the same package as the main template (views.html), we can use just the name of the template and omit the views.html qualifier:
Listing 6.7. Catalog page with navigation extracted

This makes our template better, because the catalog template now no longer needs to know how to render the navigation. This pattern of extracting parts of a template into a separate template that’s reusable is called includes, where the extracted template is called the include.
6.4.2. Layouts
The include that we used in the previous section made our template better, but we can still improve on it. As it stands, the catalog page still renders a whole lot of HTML that it shouldn’t need to, such as the HTML DOCTYPE declaration, the head, and the header and the footer, which are on every page.
In fact, in listing 6.7, only the part inside the <div id="content"> is the responsibility of the catalog action:
<h2>Products</h2>
<ul class="products">
@for(product <- products) {
  <li>
    <h3>@product.name</h3>
    <p class="description">@product.description</p>
  </li>
}
</ul>
Everything else should be factored out of the template for the catalog action.
We could use the includes technique, but it’s not ideal here because we need to extract some HTML that’s above the content, and some HTML that’s below the content. If we were to use includes, we’d need to extract two new templates. One would hold all HTML before the content; the other one everything after the content. This isn’t good, because that HTML belongs together. We want to avoid having an HTML start tag in one template and the corresponding end tag in another template. That would break coherence in our template.
Luckily, using the compositional power of Scala, Play allows us to extract all this code into a single, coherent template. From the catalog.scala.html template, we extract all HTML that shouldn’t be the responsibility of the catalog template, as shown in listing 6.8.
Listing 6.8. Extracted page layout

What we extracted is a fragment of HTML that just needs the body of the <div id="content"> to become a complete page. If that sounds exactly like a template, it’s because it’s exactly like a regular template. What we do is make a new template and store it in app/views/main.scala.html, with a single parameter named content of type Html, like in listing 6.9:
Listing 6.9. The extracted main template

Now we have a new template that we can render with views.html.main(content). At first, this may not seem very usable. How would we call this from the catalog template? We don’t have a content value available that we can pass in. On the contrary, we intend to create the content in that template. We can solve this problem with a Scala trick: in Scala you can also use curly braces for a parameter block, so this is also valid: views.html.main { content }. With this, we can now return to the template for the catalog action and update it to look like listing 6.10:
Listing 6.10. Refactored catalog template
@(products: Seq[Product])
@main {
  <h2>Products</h2>
  <ul class="products">
  @for(product <- products) {
    <li>
      <h3>@product.name</h3>
      <p class="description">@product.description</p>

    </li>
  }
  </ul>
}
We wrapped all the HTML that this template constructed in a call to the main template. Now the single thing that this template does is call the main template, giving the proper content parameter. This is called the layout pattern in Play.
We can add more than just the content parameter to the main.scala.html template, but we’ll add a new parameter list for the next parameter because you can only use curly braces around a parameter list with a single parameter. Suppose that we also want to make the title of the page a parameter. Then we could update the first part of the main template from this,
@(content: Html)
<html>
  <head>
    <title>Paper-clip web shop</title>
to this:
@(title: String)(content: Html)
<html>
  <head>
    <title>@title</title>
Now we can call this template from another template as follows:
@main("Products") {
  // content here
}
It’s useful to give the title parameter of main.scala.html a default value so that we can optionally skip it when we call the method:
@(title="paperclips.example.com")(content: Html)
If we want to call this template and are happy with the default title, we can call it like this:
@main() {
  // Content here
}
Note that we still need the parentheses for the first parameter list; we can’t skip it altogether.
6.4.3. Tags
If you’ve been using Play 1.x, or one of several other template engines, you may wonder what happened to tags. Tags are a way to write and use reusable components for view templates and they’re a cornerstone of Play 1.x’s Groovy template engine. In Play 2, tags are gone. Now that templates are regular Scala functions, there’s no need for anything special to allow reusing HTML. You can just write templates and use them as tags, or write normal Scala functions that return Html.
Let’s see an example, using our catalog page’s products list. It’s likely that we’ll have many more pages that show products, so we can reuse the code that renders the list of products if we extract it from the catalog template. In Play 1, we’d write a tag for this, but in Play 2, we just create another template. Let’s create a file views/products/tags/productlist.scala.html, and put the product list in it:
Listing 6.11. Extracted product list
@(products: Seq[Product])
<ul class="products">
@for(product <- products) {
  <li>
    <h3>@product.name</h3>
    <p class="description">@product.description</p>
  </li>
}
</ul>
We can call it from our catalog.scala.html template as follows:
@(products: Seq[Product])
@main {
  <h2>Products</h2>
  @views.html.products.tags.productlist(products)
}
No special package name needed
We’ve put our template in a tags package. This is for our convenience and has no special meaning. You can organize your templates any way you like.
As you can see, with a little effort we can break large templates into more maintainable, and reusable, parts.
In this section, we’ve assumed that the page header and footer are static; that they’re the same on all pages. In practice, there are often some dynamic elements in these static parts of the site as well. In the next chapter, we’ll look at how you can accomplish this.
6.5. Reducing repetition with implicit parameters
Let’s continue with our web shop example. This time we’ll assume that we want to maintain a shopping cart on the website, and in the top-right corner of every page we want to show the number of items the visitor has in their shopping cart, as shown in figure 6.10.
Figure 6.10. Web shop catalog with cart item count in top-right corner

Because we want to show this cart status on every page, we’ll add it to the main.scala.html template, as in listing 6.12.
Listing 6.12. main template with cart summary
@(cart: Cart)(content: Html)
<html>
  <head>
    <title>Paper-clip web shop</title>
    <link href="@routes.Assets.at("stylesheets/main.css")"
      rel="stylesheet">
  </head>
  <body>
    <div id="header">
      <h1>Paper-clip web shop</h1>
      <div id="cartSummary">
        <p>@cart.productCount match {
          case 0 => {
            Your shopping cart is empty.
          }

          case n => {
            You have @n items in your shopping cart.
          }
        }</p>
      </div>
    </div>
    @navigation()
    <div id="content">
      @content
    </div>
    <div id="footer">
      <p>Copyright paperclips.example.com</p>
    </div>
  </body>
</html>
This template now takes a Cart parameter, which has a productCount method. We use pattern matching to determine what we want to display, depending on the number of items in the cart.
Now that the main template needs a Cart parameter, we’ll have to pass one to it, which means adapting our catalog template. But this template doesn’t have a reference to a Cart object, so it’ll need to take one as a parameter as well:
@(products: Seq[Product], cart: Cart)

@main(cart) {

  <h2>Catalog</h2>
  @views.html.products.tags.productlist(products)

}
We’ll also have to pass a Cart from the action:
def catalog() = Action { request =>
  val products = ProductDAO.list
  Ok(views.html.shop.catalog(products, cart(request)))
}

def cart(request: Request) = {
  // Get cart from session
}
Here we assume that we have a cart method that will retrieve a Cart instance for us from a RequestHeader.
Of course, because the main template now needs a Cart parameter, we’ll have to change every action method in our web application to pass this parameter. This gets tedious quickly. Luckily, we can overcome this by using Scala’s implicit parameters.
We can use an implicit parameter to change the method signature of our catalog template as follows:
@(products: Seq[Product])(implicit cart: Cart)
We’ve moved the Cart parameter to a second parameter list and made it implicit, so we can apply this template and omit the second parameter list if an implicit Cart is available on the calling side. Now we can change our controller to provide that, as shown in listing 6.13:
Listing 6.13. Providing an implicit cart
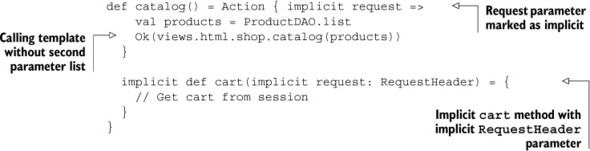
Now we’ve declared the cart method as implicit. In addition, we’ve declared the RequestHeader parameter of both our action and the cart method as implicit. If we now call the views.html.shop.catalog template and omit the Cart parameter, the Scala compiler will look for an implicit Cart in scope. It’ll find the cart method, which requires a RequestHeader parameter that’s also declared as implicit, but that’s also available.
We can make our newly created cart method reusable, by moving it into a trait:
trait WithCart {
  implicit def cart(implicit request: RequestHeader) = {
    // Get cart from session
  }
}
We can now mix this trait into every controller where we need access to our implicit Cart.
Implicit conversions in Controllers
If you have an implicit Request in scope in your controller, you also have an implicit RequestHeader, Session, Flash, and Lang in scope, because the Controller trait defines implicit conversions for these types.
It’s often necessary to pass multiple values from your controller into your main template. Even with implicit parameters, it would be a hassle to have to add another one each time, because you’d still have to add the implicit parameter to all of the template definitions. One straightforward solution is to create a single class that contains all the objects you need in your template, and pass an instance of that. If you want to add a value to it, you only need to adapt the template where you use it, and the method that constructs it.
It’s common to pass the RequestHeader or Request to templates, as we’ll see in section 6.7.2. Play provides a WrappedRequest class, which wraps a Request and implements the interface itself as well, so it’s usable as if it were a regular Request. But by extending WrappedRequest, you can add other fields:
case class UserDataRequest[A](val user: User, val cart: Cart,
  request: Request[A]) extends WrappedRequest(request)
If you pass an instance of this UserDataRequest to your template, you have a reference to the Request, User, and Cart.
6.6. Using LESS and CoffeeScript: the asset pipeline
Browsers process HTML with CSS and JavaScript, so your web application must output these formats for browsers to understand them. But these languages aren’t always the choice of developers. Many developers prefer newer versions of these technologies, like LESS and CoffeeScript over CSS and JavaScript. LESS is a stylesheet language that’s transformed to CSS by a LESS interpreter or compiler, whereas CoffeeScript is a scripting language that’s transformed into JavaScript by a CoffeeScript compiler.
Play integrates LESS and CoffeeScript compilers. Though we won’t teach you these technologies, we’ll show you how you can use them in a Play application.
6.6.1. LESS
LESS (http://lesscss.org) gives you many advantages over plain CSS. LESS supports variables, mixins, nesting, and some other constructs that make a web developer’s life easier. Consider the following example of plain CSS, where we set the background color of a header and a footer element to a green color. Additionally, we use a bold font for link elements in the footer:
.header {
  background-color: #0b5c20;
}

.footer {
  background-color: #0b5c20;
}

.footer a {
  font-weight: bold;
}
This example shows some of the weaknesses of CSS. We have to repeat the color code and we have to repeat the .footer selector if we want to select an a element inside a footer. With LESS, you can write the following instead:
@green: #0b5c20;

.header {
  background-color: @green;
}

.footer {
  background-color: @green;

  a {
    font-weight: bold;
  }

}
We’ve declared a variable to hold the color using a descriptive name, so the value can now be changed in one place. We’ve also used nesting for the .footer a selector by moving the a selector inside the .footer selector. This makes the code easier to read and maintain.
6.6.2. CoffeeScript
CoffeeScript (http://coffeescript.org) is a language that compiles to JavaScript, consisting mainly of syntactic improvements over JavaScript. Instead of curly braces, CoffeeScript uses indentation and has a very short function literal notation. Consider the following example in JavaScript:
math = {
  root: Math.sqrt,
  square: square,
  cube: function(x) {
    return x * square(x);
  }
};
In CoffeeScript, you’d write this as follows:
math =
  root:   Math.sqrt
  square: square
  cube:   (x) -> x * square x
No curly braces are used around the object, and the function definition is more concise. If you want to learn CoffeeScript, visit http://coffeescript.org, or get the book CoffeeScript in Action by Patrick Lee (Manning).
6.6.3. The asset pipeline
There are various ways to use CoffeeScript and LESS. For both languages, command-line tools are available that transform files to their regular JavaScript or CSS equivalents. For both there are also JavaScript interpreters that allow you to use these files in a browser directly.
Play supports automatic build-time CoffeeScript and LESS compilation, and it shows compilation errors in the familiar Play error page. This highlights the offending lines of code when you have syntactical errors in your CoffeeScript or LESS code.
Using LESS or CoffeeScript is trivial. You place the files in the app/assets directory, or a subdirectory of that. Give CoffeeScript files a .coffee extension and LESS files a .less extension, and Play will automatically compile them to JavaScript and CSS files and make them available in the public folder.
For example, if you place a CoffeeScript file in app/assets/javascripts/application.coffee, you can reference it from a template like this:
<script src="@routes.Assets.at("javascripts/application.js")"></script>
You can also use an automatically generated minified version of your JavaScript file by changing application.js to application.min.js.
Compiled file location
Although you can reference the compiled files as if they reside in the public directory, Play actually keeps them in the resources_managed directory in the target directory. The assets controller will look there as well when it receives a request for a file.
Apart from LESS and CoffeeScript, Play also supports the Google Closure Compiler. This is a JavaScript compiler that compiles JavaScript to better, faster JavaScript. Any file that ends in .js is automatically compiled by the Closure compiler.
There are occasions when you don’t want a file to be automatically compiled. Suppose that you have a LESS file a.less that defines a variable @x and includes b.less, which references the variable. On its own, b.less won’t compile, because @x is undefined. Even though you never intended to call b.less directly, Play tries to compile it and throws an error. To avoid this, rename b.less to _b.less. Any .less, .coffee or .js file that starts with an underscore is not compiled.
Configure compilation includes and excludes
Sometimes it’s not convenient to exclude only files that start with an underscore, such as when you use an existing LESS library that comes with a bunch of files that are included but don’t start with an underscore. Luckily, it’s possible to configure the behavior of Play regarding which files it should compile. See the Play documentation for more details.
Now that we’ve shown you how to use the asset pipeline, we’ll continue in the next section with adapting our application for multiple languages.
6.7. Internationalization
Users of your application may come from different countries and may use different languages, as well as different rules for properly formatting numbers, dates, and times. As you saw in chapter 2, Play has some tools to help you accommodate this.
The combination of language and formatting rules is called a locale, and the adaptation of a program to different locales is called internationalization and localization. Because these words are so insanely long and are often used together, which makes it even worse, they’re often abbreviated as I18N and L10N respectively, where the number between the first and last letter is the number of replaced letters. In this section, we’ll demonstrate the tools Play provides to help you with internationalization.
Although it’s easy to mix them up, internationalization and localization are two different things. Internationalization is a refactoring to remove locale-specific code from your application. Localization is making a locale-specific version of an application. In an internationalized web application, this means having one or more selectable locale-specific versions. In practice, the two steps go together: you usually both internationalize and localize one part of an application at a time.
In this section, we’ll only discuss internationalizing the static parts of your application—things that you’d normally hardcode in your templates or your error messages, for example. We won’t cover internationalizing dynamic content, so presenting the content of your web application in multiple languages isn’t included.
6.7.1. Configuration and message files
Building a localized application in Play is mostly about text and involves writing message files, like we saw in section 2.1.3. Instead of putting literal strings like “Log in,” “Thank you for your order,” or “Email is required” in your application, you create a file where message keys are mapped to these strings.
For each language that our application supports, we’ll write a messages file that looks like this:
welcome = Welcome!
users.login = Log in
shop.thanks = Thank you for your order
Here you see how the message keys are mapped to the actual messages. The dots in the keys have no meaning, but you can use them for logical grouping.
To get started, we must configure Play so that it knows which languages are supported. In the application.conf file, we list the languages that we support:
application.langs="en,en-US,nl"
This is a comma-separated list of languages, where each language consists of an ISO 639-2 language code, optionally followed by a hyphen and an ISO 3166-1 alpha-2 country code.
Then, for each of these languages, we must create a messages file in the conf directory, with the filename messages.LANG, where LANG should be replaced by the language. A French messages file would be stored in conf/messages.fr, with the following content:
welcome=Bienvenue!
Additionally, we can create a messages file without an extension, which serves as the default and fallback language. If a message isn’t translated in the message file for the language you’re using, the message from this messages file will be used.
To deal with messages in your application, it’s recommended that you start with a messages file and make sure that it’s complete. If you later decide to add more languages, you can easily create additional message files. When you forget to add a key to another language’s message file, or when you don’t have the translation for that message, the default message file will be used instead.
6.7.2. Using messages in your application
To use messages in your application, you can use the apply method on the Messages object:
Messages("users.login")(Lang("en"))
This method has two parameter lists. The first one takes the message and message parameters; the second one takes a Lang value. The second parameter list is implicit, and Play provides an implicit Lang by default, based on the locale of the machine that Play is running on.
Play provides an implicit conversion from a Request to a Lang, which is more useful: if you have an implicit Request in scope, there will also be an implicit Lang available, based on the Accept-Language header in the request. Suppose that you have the following action method:
def welcome() = Action { implicit request =>
  Ok(Messages("welcome"))
}
Here the language is determined by Play from the request header. If the header says it accepts multiple languages, they’re tried in order; the first one to be supported by the Play application is used.
If no language from the header matches a language of the application, the first language as configured by the application.langs setting in application.conf is used.
Of course, you can use messages from your templates the same way:
@()

<h1>@Messages("welcome")</h1>
Just be aware that if you want to use the automatic Lang from the request, you have to add an implicit request to the template parameter:
@(implicit request: Request)

<h1>@Messages("welcome")</h1>
Messages aren’t just simple strings; they’re patterns formatted using java.text.MessageFormat. This means that you can use parameters in your messages:
validation.required={0} is required
You can substitute these by specifying more parameters to the call to Messages:
Messages("validation.required", "email")
This will result in the string email is required. MessageFormat gives you more options.
Suppose that we want to vary our message slightly, depending on the parameters. Suppose also that we’re showing the number of items in our shopping cart, and we want to display either “Your cart is empty”, “Your cart has one item”, or “Your cart has 42 items”, depending on the number of items in the cart. We can use the following pattern for that:
shop.basketcount=Your cart {0,choice,0#is empty|1#has one item
  |1< has {0} items}.
Now, if we use the following in a template,
<p>@Messages("shop.basketcount", 0)</p>
<p>@Messages("shop.basketcount", 1)</p>
<p>@Messages("shop.basketcount", 10)</p>
we get the following output:
Your cart is empty.
Your cart has one item.
Your cart has 10 items.
Using this, you can achieve advanced formatting that can be different for each language, decoupled from your application logic. For more possibilities with MessageFormat, consult the Java SE API documentation.
Play’s internationalization tools are basic, but they’re sufficient for many applications. Message files help you to easily translate an application to a different language, and decouple presentation logic from your application logic.
6.8. Summary
In this chapter, we’ve seen that Play ships a type-safe template engine, based on Scala. This type-safe template engine helps you write more robust templates that give you more confidence that everything will still work as intended after you refactor. On top of that, the template engine is faster than conventional alternatives that aren’t type-safe.
The template syntax is concise; the @ character is the only special character. Because the values that you add to templates are plain Scala values, you can call all Scala methods on them. Similarly, you can use Scala’s collections library to process collections in templates. By default, Play replaces dangerous characters in templates with their equivalent HTML entities, so you’re protected against cross-site scripting attacks.
Templates are compiled to Scala functions, and we’ve seen how to compose complex pages from reusable smaller pieces by leveraging function composition. Implicit parameters and methods help us prevent a lot of boilerplate code.
With the asset pipeline, we can effortlessly use LESS and CoffeeScript instead of CSS and JavaScript, and we can also compile JavaScript into better JavaScript with the Google Closure compiler.
Finally, although the internationalization functionality of Play is basic, it’s powerful and often sufficient to make your application available in multiple languages.
This chapter dealt with how your application presents data to the user. In the next chapter, you’ll learn how Play helps you validate and process data that the user sends to your application.