Chapter 2. Your first Play application
This chapter covers
- Planning an example Play application
- Getting started with coding a Play application
- Creating the initial model, view templates, controllers, and routes
- Generating bar code images
- Validating form data
Now that you’ve seen how to download and install Play, and how to greet the world in traditional fashion, you’ll want to start writing some proper code, or at least read some. This chapter introduces a sample application that shows how a basic Play application fits together from a code perspective.
Although we’ll tell you what all of the code does, we’ll save most of the details and discussion until later chapters. We want you to have lots of questions as you read this chapter, but we’re not going to be able to answer all of them straight away.
This chapter will also help you understand the code samples in later chapters, which will be based on the same example.
Our example application is a prototype for a web-based product catalog, with information about different kinds of paperclips. We’ll assume it’s part of a larger warehouse management system, used for managing a supply chain. This may be less glamorous than unique web applications such as Twitter or Facebook, but then you’re more likely to be a commercial software developer building business applications than a member of Twitter’s core engineering team.[1]
1 Apart from anything else, this is the kind of business domain we work in.
We’ll start by creating a new application and then add one feature at a time, so you can get a feel for what it’s like to build a Play application. But before we do that, let’s see what we’re going to build.
2.1. The product list page
We’ll start with a simple list of products, each of which has a name and a description, shown in figure 2.1. This is a prototype, with a small number of products, so there isn’t any functionality for filtering, sorting, or paging the list.
Figure 2.1. The main page, showing a list of products

To make the product list page work, we’ll need a combination of the following:
- A view template— A template that generates HTML
- A controller action— A Scala function that renders the view
- Route configuration— Configuration to map the URL to the action
- The model— Scala code that defines the product structure, and some test data
These components work together to produce the list page, as shown in figure 2.2.
Figure 2.2. The application’s model-view-controller structure

2.1.1. Getting started
To get started, we need to create the new application and remove files that we’re not going to use. Then we can configure languages.
If you haven’t already downloaded and installed Play, refer to the instructions in section 1.5.1.
As in the previous chapter’s Hello World example, use the play command to create a new application.
play new products
Before going any further, you can delete a couple of files that we’re not going to use for this prototype:
rm products/public/images/favicon.png
rm products/public/javascripts/jquery-1.7.1.min.js
Now run the application to check that your environment works:
cd products
play run
http://localhost:9000/ should show the same Play welcome page as in section 1.5.4.
2.1.2. Stylesheets
If you’re especially observant, you may have wondered why the product list page screenshot at the start of this section had a formatted title bar, background color, and styled product list. As with any web application, we want to use stylesheets to make sure our user interface isn’t inconsistent (or ugly). This means that we need some CSS. For this sample application, we’re going to use Twitter Bootstrap (http://twitter.github.io/bootstrap/) for the look-and-feel.
This just means downloading the Twitter Bootstrap distribution (we’re using version 2.0.2) and copying docs/assets/css/bootstrap.css to our application’s public/stylesheets directory, so we can link to this stylesheet from the templates we’ll create. Also copy glyphicons-halflings-white.png and glyphicons-halflings.png to public/img.
These examples also use a custom stylesheet (shown in listing 2.1 as public/stylesheets/main.css) that overrides some of the Twitter Bootstrap styling for the screenshots in the book.
Listing 2.1. Override Twitter Bootstrap—public/stylesheets/main.css
body { color:black; }
body, p, label { font-size:15px; }
.label { font-size:13px; line-height:16px; }
.alert-info { border-color:transparent; background-color:#3A87AD;
    color:white; font-weight:bold; }
div.screenshot { width: 800px; margin:20px; background-color:#D0E7EF; }
.navbar-fixed-top .navbar-inner { padding-left:20px; }
.navbar .nav > li > a { color:#bbb; }

.screenshot > .container { width: 760px; padding: 20px; }
.navbar-fixed-top, .navbar-fixed-bottom { position:relative; }
h1 { font-size:125%; }
table { border-collapse: collapse; width:100%; }
th, td { text-align:left; padding: 0.3em 0;
    border-bottom: 1px solid white; }
tr.odd td { }
form { float:left; margin-right: 1em; }
legend { border: none; }
fieldset > div { margin: 12px 0; }
.help-block { display: inline; vertical-align: middle; }
.error .help-block { display: none; }
.error .help-inline { padding-left: 9px; color: #B94A48; }
footer { clear: both; text-align: right; }
dl.products { margin-top: 0; }
dt { clear: right; }
.barcode { float:right; margin-bottom: 10px; border: 4px solid white; }
You can see the result of using Twitter Bootstrap with this stylesheet in this chapter’s screenshots.
2.1.3. Language localization configuration
This is a good time to configure our application. Not that there’s much to do: we only need to configure which languages we’re going to use. For everything else, there are default values.
First open conf/application.conf in an editor and delete all of the lines except the ones that define application.secret and application.langs near the top. You should be left with something like this:
application.secret="Wd5HkNoRKdJP[kZJ@OV;HGa^<4tDvgSfqn2PJeJnx4l0s77NTl"
application.langs="en"
Most of what you just deleted were commented-out example configuration values, which you’re not going to need. You won’t be using logging in this prototype either, so you don’t need to worry about the log level configuration.
Remove configuration file cruft
Once you’ve created a new Play application, edit the conf/application.conf and delete all of the commented lines that don’t apply to your application so you can see your whole configuration at a glance. If you later want to copy entries from the default application.conf file, you can find it in $PLAY_HOME/framework/skeletons/scala-skel/conf/.
The value of the application.secret configuration property will be something else: this is a random string that Play uses in various places to generate cryptographic signatures, most notably the session cookie. You should always leave this generated property in your application configuration. The “secret” in application.secret suggests that it should be kept secret. Be sure to use a different secret for your production environment and never check that into your source code repository.
The application.langs value indicates that the application supports English. Because supply chains (and Play) are international,[2] our prototype will support additional languages. To indicate additional support for Dutch, Spanish, and French, change the line to
2 Not to mention the authors: Peter is English, Erik is Dutch, and Francisco is Spanish.
application.langs="en,es,fr,nl"
We’ll use this configuration to access application user-interface text, which we’ll define in a messages file for each language:
- conf/messages— Default messages for all languages, for messages not localized for a particular language
- conf/messages.es— Spanish (which is called Español in Spanish)
- conf/messages.fr— French (Français in French)
- conf/messages.nl— Dutch (Nederlands in Dutch)
Note that unlike Java properties files, these files must use UTF-8 encoding.
Although we haven’t started on the user interface yet, you can make a start by localizing the name of the application. Create the messages files with the contents shown in listings 2.2 through 2.5:
Listing 2.2. conf/messages
application.name = Product catalog
Listing 2.3. conf/messages.es
application.name = Catálogo de productos
Listing 2.4. conf/messages.fr
application.name = Catalogue des produits
Listing 2.5. conf/messages.nl
application.name = Productencatalogus
Now we’re ready to start adding functionality to our application, starting with a list of products.
2.1.4. Adding the model
We’ll start the application with the model, which encapsulates the application’s data about products in the catalog. We don’t have to start with the model, but it’s convenient to do so because it doesn’t depend on the code that we’re going to add later.
To start with, we need to include three things in the example application’s model, which we’ll extend later:
- A model class— The definition of the product and its attributes
- A data access object (DAO)— Code that provides access to product data
- Test data— A set of product objects
We can put all of these in the same file, with the contents of listing 2.6.
Listing 2.6. The model—app/models/Product.scala
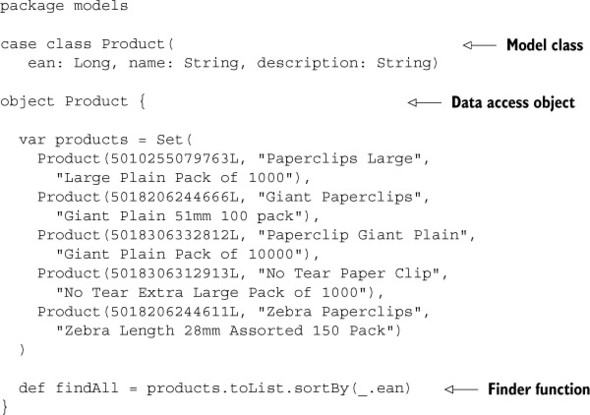
Note that the Product case class has a companion object, which acts as the data access object for the product class. For this prototype, the data access object contains static test data and won’t actually have any persistent storage. In chapter 5, we’ll show you how to use a database instead.
The data access object includes a findAll finder function that returns a list of products, sorted by EAN code.
The EAN identifier is an international article number (previously known as a European Article Number, hence the abbreviation), which you typically see as a 13-digit bar code on a product. This system incorporates the Universal Product Code (UPC) numbers used in the U.S. and Japanese Article Number (JAN) numbers. This kind of externally defined identifier is a better choice than a system’s internal identifier, such as a database table primary key, because it’s not dependent on a specific software installation.
2.1.5. Product list page
Next, we need a view template, which will render HTML output using data from the model—a list of products in this case.
We’ll put the product templates in the views.html.products package. For now, we only need a list page, so create the new file shown in listing 2.7.
Listing 2.7. The list page template—app/views/products/list.scala.html
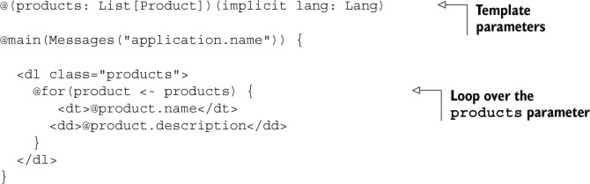
This is a Scala template: an HTML document with embedded Scala statements, which start with an @ character. You’ll learn more about the template syntax in section 6.3.
For now, there are two things worth noticing about the template. First, it starts with parameter lists, like a Scala function. Second, the products parameter is used in a for loop to generate an HTML definition list of products.
The implicit Lang parameter is used for the localized message lookup performed by the Messages object. This looks up the page title, which is the message with the key application.name.
The page title and the HTML block are both passed as parameters to main, which is another template: the layout template.
2.1.6. Layout template
The layout template is just another template, with its own parameter lists, as listing 2.8 shows.
Listing 2.8. The layout template—app/views/main.scala.html

The main purpose of this template is to provide a reusable structure for HTML pages in the application, with a common layout. The dynamic page-specific parts are where the page title and page contents are output.
Most of the contents of this template are taken up by the HTML structure for Twitter Bootstrap, which we’ll use to style the output.
2.1.7. Controller action method
Now that we have model code that provides data and a template that renders this data as HTML, we need to add the code that will coordinate the two. This is the role of a controller, and the code looks like listing 2.9.
Listing 2.9. The products controller—app/controllers/Products.scala

This controller is responsible for handling incoming HTTP requests and generating responses, using the model and views. Controllers are explained further in section 4.2.
We’re almost ready to view the result in the web browser, but first we have to configure the HTTP interface by adding a route to the new controller action.
2.1.8. Adding a routes configuration
The routes configuration specifies the mapping from HTTP to the Scala code in our controllers. To make the products list page work, we need to map the /products URL to the controllers.Products.list action. This means adding a new line in the conf/routes file, as listing 2.10 shows.
Listing 2.10. Routes configuration file—conf/routes

As you can see, the syntax is relatively simple. There are two other routes in the file, for the default welcome page, and for public assets. You can read more about serving assets in section 3.6.
Now that we’ve added the HTTP route to the new products list, you should be able to see it in your web browser at http://localhost:9000/products.
2.1.9. Replacing the welcome page with a redirect
If you open http://localhost:9000/, you’ll still see the welcome page, which you don’t need any more. You can replace it with an HTTP redirect to the products list by changing the controller action in app/controllers/Application.scala (see listing 2.11) to return an HTTP redirect response instead of rendering the default template.
Listing 2.11. The default controller—app/controllers/Application.scala

Now delete the unused app/views/index.scala.html template.
Next we’ll add some debugging information to see how language selection works, among other things.
2.1.10. Checking the language localizations
Although we now have a basic products list, we haven’t checked the application localizations. First, let’s look at how the language is selected.
Play sets the application language if the language configuration in the HTTP request matches one of the configured languages. For example, if you configure your web browser’s language settings to indicate that you prefer Spanish, this will be included with HTTP requests and the application language will be Spanish.
To check the setting, let’s add some debugging information to the page footer. Create a new template for the footer, in app/views/debug.scala.html, as shown in listing 2.12. While we’re adding debug information, we’ll include the server user name and timestamp.
Listing 2.12. Debug information template—app/views/debug.scala.html
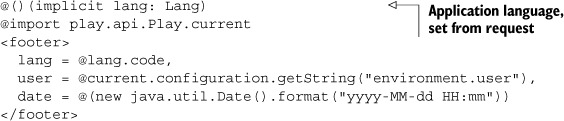
The user name comes from a configuration property, so add the following line to conf/application.conf:
environment.user=${USER}
The ${ ... } syntax is a configuration property reference. This means that USER will be looked up as another configuration property or as an environment variable if it can’t be found. For more details about the configuration file syntax, see section 3.2. Note that on Windows, the environment variable is USERNAME, so set the value to ${USERNAME} instead of ${USER}.
Finally, we need to add the footer to the main page template. Rendering one template from another is like calling a Scala function, so we add @debug() to the main layout template, as listing 2.13 shows.
Listing 2.13. Page footer to the layout template—app/views/main.scala.html

Now we can load the page with the web browser’s preferred language set to Spanish, and see the page with a Spanish heading and the es language code in the footer, as figure 2.3 shows.
Figure 2.3. The product list page, with the language set to Spanish (es)

2.2. Details page
The next page is a details page for a particular product. The page’s URL, for example /products/5010255079763, includes the EAN code, which is also used to generate a bar code image, as figure 2.4 shows.
Figure 2.4. The product details page, including a generated bar code

To finish the details page, we’ll need several more things:
- A new finder method— To fetch one specific product
- A view template— To show this details page
- An HTTP routing configuration— For a URL with a parameter
- A bar code image— To display on the page
We’ll also need to add a third-party library that generates the bar code, and add another URL for the bitmap image. Let’s start with the finder method.
2.2.1. Model finder method
The new finder method, which will find a product by its EAN, is a short one. Add the following to app/models/Product.scala:
object Product {
  var products = Set(
...
  def findByEan(ean: Long) = products.find(_.ean == ean)
}
This method takes the object’s Set of products (products) and calls its find method to get the requested product. Let’s look at the template.
2.2.2. Details page template
The new template will show the details of the requested product, along with the EAN as a bar code. Because we’ll want to show the bar code in other templates, in later versions of the application, we’ll make a separate template for it. Now we have all that we need for a template that will show a product’s details (see listing 2.14).
Listing 2.14. Product-details—app/views/products/details.scala.html

There’s not much new in this template, except for the bar code tag that we’re including: the template won’t compile until you add it. If you’re familiar with Play 1, you’ll know that Play 1’s templates were actually Groovy templates and that you could write your own tags to use in them.
Scala templates don’t really have tags. You may recall that Scala templates become functions that you can call (like any other function) from within your templates. This is all that our bar code “tag” is—we’re just calling it a tag because that’s an idea we’re used to working with. We also have a convention to put small or frequently used templates in a tags package.
Let’s make the bar code tag, so that the template compiles, by adding a new file shown in listing 2.15.
Listing 2.15. The bar code tag—app/views/tags/barcode.scala.html
@(ean: Long)
<img class="barcode" alt="@ean" src="@routes.Barcodes.barcode(ean)">
2.2.3. Additional message localizations
Our product-details template uses some additional internationalized messages, so we need to update the message files, as listings 2.16 through 2.19 show:
Listing 2.16. Additional details page messages—conf/messages
ean = EAN
name = Name
description = Description

products.details = Product: {0}
Listing 2.17. Additional details page messages—conf/messages.es
ean = EAN
name = Nombre
description = Descripción

products.details = Producto: {0}
Listing 2.18. Additional details page messages—conf/messages.fr
ean = EAN
name = Nom
description = Descriptif

products.details = Produit: {0}
Listing 2.19. Additional details page messages—conf/messages.nl
ean = EAN
name = Naam
description = Omschrijving

products.details = Product: {0}
A couple of things are still missing; let’s add the action that will be responsible for finding the requested product and rendering its details page.
2.2.4. Adding a parameter to a controller action
Because our new action needs to know which product to show, we’ll give it a parameter whose value will be the requested product’s EAN code. The action will use the EAN to find the right product and have it rendered, or return a 404 error if no product with that EAN was found. Listing 2.20 shows what it looks like.
Listing 2.20. Details page controller action—app/controllers/Products.scala

Our new action makes use of the fact that findByEan returns the product wrapped in an Option, so that we can call the Option.map method to transform it into an Option containing a page that shows the product details. This rendered page is then returned as the action’s result by the call to getOrElse. In the case that the product wasn’t found, findByEan will have returned a None whose map will return another None whose getOrElse returns its parameter—NotFound in this case.
Now that we have an action that takes a parameter, we need a way to pass the parameter to the action from the request. Let’s look at how to add parameters to routes.
2.2.5. Adding a parameter to a route
We want to put the EAN in the path of the request, rather than as a URL parameter. In Play, you can do this by putting the name of the parameter in the path of your URL with a colon (:) in front of it, as listing 2.21 shows. This part of the path will then be extracted from the request and used as the parameter for the method, as specified by the route mapping.
Listing 2.21. Details page route—conf/routes
![]()
Now we can add the bits for generating the bar code.
2.2.6. Generating a bar code image
To add the bar code to the details page, we need a separate URL that returns a bitmap image. This means that we need a new controller action to generate the image, and a new route to define the URL.
First, we’ll add barcode4j to our project’s external dependencies, to make the library available. In project/Build.scala, add an entry to the appDependencies list:
val appDependencies = Seq(
  "net.sf.barcode4j" % "barcode4j" % "2.0"
)
Note that you’ll have to restart the Play console or issue its reload command before it notices the new dependency, as well as rerun the idea or eclipse commands so that your IDE knows about it.
Next, we’ll add a new Barcodes controller object that defines two functions. One is an ean13BarCode helper function that generates an EAN 13 bar code for the given EAN code, and returns the result as a byte array containing a PNG image. The other is the barcode action that uses the ean13BarCode helper function to generate the bar code and return the response to the web browser. The Barcodes controller is shown in listing 2.22.
Listing 2.22. Barcodes controller—app/controllers/Barcodes.scala


Next, we’ll add a route for the controller action that will generate the bar code:
GET /barcode/:ean controllers.Barcodes.barcode(ean: Long)
Finally, request http://localhost:9000/barcode/5010255079763 in a web browser to check that our application can render bar codes. Now we can request the details page of a product and see the generated bar code next to its other details.
We added a method to our DAO, two new actions (for the details page and bar code image), their corresponding routes, and some templates to build some new functionality.
2.3. Adding a new product
The third page in the application is a form for adding a new product, with model constraints and input validation, as figure 2.5 shows. See chapter 7 for more detailed information about forms.
Figure 2.5. The form for adding a new product
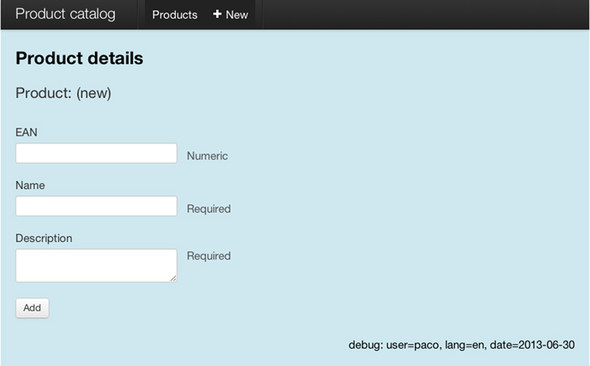
To implement the form, we’ll need to capture the form data that the browser sends when a user fills it in and submits it. But before we do that, we’ll add the new messages we’re going to need.
2.3.1. Additional message localizations
The messages for adding a product illustrate the functionality that we’re going to add. They include text for a form submit button, the name of the form’s “command,” and status messages for success and validation failure. See listings 2.23 through 2.26.
Listing 2.23. conf/messages
products.form = Product details
products.new = (new)
products.new.command = New

products.new.submit = Add
products.new.success = Successfully added product {0}.

validation.errors = Please correct the errors in the form.
validation.ean.duplicate = A product with this EAN code already exists
Listing 2.24. conf/messages.es
products.form = Detalles del producto
products.new = (nuevo)
products.new.command = Añadir
products.new.submit = Añadir
products.new.success = Producto {0} añadido.

validation.errors = Corrija los errores en el formulario.
validation.ean.duplicate = Ya existe un producto con este EAN
Listing 2.25. conf/messages.fr
products.form = Dètails du produit
products.new = (nouveau)
products.new.command = Ajouter
products.new.submit = Ajouter
products.new.success = Produit {0} ajouté.

validation.errors = Veuillez corriger les erreurs sur le formulaire
validation.ean.duplicate = Un produit avec ce code EAN existe déjà
Listing 2.26. conf/messages.nl
products.form = Productdetails
products.new = (nieuw)
products.new.command = Toevoegen
products.new.submit = Toevoegen
products.new.success = Product {0} toegevoegd.

validation.errors = Corrigeer de fouten in het formulier
validation.ean.duplicate = Er bestaat al een product met dit EAN
Now we can return to the data processing: the next step is the server-side code that will capture data from the HTML form.
2.3.2. Form object
In Play, we use a play.api.data.Form object to help us move data between the web browser and the server-side application. This form encapsulates information about a collection of fields and how they’re to be validated.
To create our form, we need some extra imports in our controller. Add the following to app/controllers/Products.scala:
import play.api.data.Form
import play.api.data.Forms.{mapping, longNumber, nonEmptyText}
import play.api.i18n.Messages
The imports mentioned here are all we need for this specific form. play.api.data and play.api.data.Forms contain more useful things to help you deal with forms, so you might prefer to use wildcard imports (...data._ and ...data.Forms._).
We’ll be using our form in several action methods in the Products controller, so we’ll add it to the class as a field (shown in listing 2.27), instead of making it a local variable inside one particular action method.
Listing 2.27. Product form—app/controllers/Products.scala
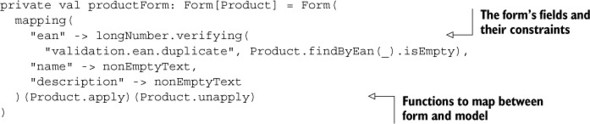
This code shows how a form consists of a mapping together with two functions that the form can use to map between itself and an instance of our Product model class.
The first part of the mapping specifies the fields and how to validate them. There are several different validations, and you can easily add your own.
The second and third parts of the mapping are the functions the form will use to create a Product model instance from the contents of the form and fill the form from an existing Product, respectively. Our form’s fields map directly to the Product class’s fields, so we simply use the apply and unapply methods that the Scala compiler generates for case classes. If you’re not using case classes or there’s no one-to-one mapping between the case class and the form, you’ll have to supply your own functions here.
2.3.3. Form template
Now that we have a form object, we can use it in our template. But first we want to be able to show messages to the user, so we’ll have to make some changes to the main template first, as listing 2.28 shows.
Listing 2.28. New main template—app/views/main.scala.html


The new parts of the template use the flash scope to show one-time messages to the user. The main template now expects an implicit Flash to be in scope, so we have to change the parameter list of all the templates that use it. Just add it to the second parameter list on the first line of the main template, in app/views/products/details.scala.html. We also want to add an Add button to our list view (shown in listing 2.29), for navigating to the Add Product page.
Most modern web frameworks have a flash scope. Like the session scope, it’s meant to keep data, related to the client, outside of the context of a single request. The difference is that the flash scope is kept for the next request only, after which it’s removed. This takes some effort away from you, as the developer, because you don’t have to write code that clears things like one-time messages from the session.
Play implements this in the form of a cookie that’s cleared on every response, except for the response that sets it. The reason for using a cookie is scalability. If the flash scope isn’t stored on the server, each one of a client’s requests can be handled by a different server, without having to synchronize between servers. The session is kept in a cookie for exactly the same reason.
This makes setting up a cluster a lot simpler. You don’t need to send a particular client’s request to the same server; you can simply hand out requests to servers on a round-robin basis.
Listing 2.29. Add product button—app/views/products/list.scala.html
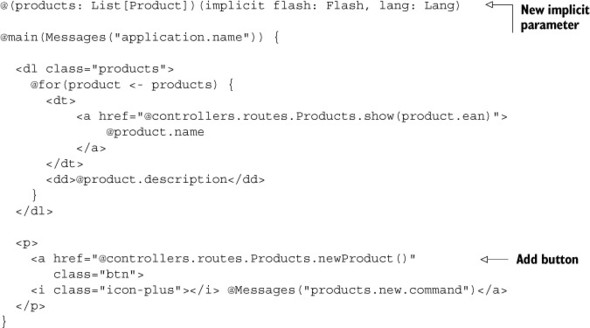
We’ll explain how the flash is filled in section 2.3.5. Listing 2.30 is a template that allows a user to enter a new product’s details.
Listing 2.30. New-product—app/views/products/editProduct.scala.html

This template’s first parameter is a Form[Product], which is the type of the form we defined earlier. We’ll use this form parameter in our template to populate the HTML form.
Initially, the form we present to the user will be empty, but if validation fails and the page is rerendered, it’ll contain the user’s input and some validation errors. We can use this data to redisplay the invalid input and the errors, so that the user can correct the mistakes. We’ll show you how validation works in the next section.
The @helper.form method renders an HTML form element with the correct action and method attributes—the action to submit the form to, and the HTTP method, which will be POST in this case. These values come from the routes configuration, which we’ll add in section 2.3.6.
The input helper methods (@helper.inputText and @helper.textarea) render input elements, complete with associated label elements. The label text is retrieved from the messages file using the input field name (for example, “ean”).
The twitterBootstrap import makes sure that the helpers output all the necessary scaffolding that Twitter Bootstrap requires.
Now that we have an HTML form in the web browser and a form object on the server, let’s look at how we can use them together to save a new product.
2.3.4. Saving the new product
To save a new product, we need code in our controller to provide the interface with the HTTP form data, as well as code in our data access layer that saves the new product. Let’s start with listing 2.31 and add an add method in our DAO.
Listing 2.31. Save a new product—app/models/Product.scala

Because we don’t have a real persistence layer in this version of the application, the save method simply adds the product to the product list. This doesn’t matter much, because by encapsulating the data operations in the Product DAO, we can easily modify the implementation later to use persistent storage. This also means that any products added here will be lost every time Play reloads the application.
Next we’ll move back to the HTTP interface. Before we can save a new product, we have to validate it.
2.3.5. Validating the user input
When we use the form that we defined in the controller, our goal is to collect the product details that the user entered in the HTML form and convert them to an instance of our Product model class. This is only possible if the data is valid; if not, then we can’t construct a valid Product instance, and we’ll want to display validation errors instead.
We’ve already shown you how to create a form and specify its constraints; listing 2.32 shows how to validate a form and act on the results.
Listing 2.32. Validate and save—app/controllers/Products.scala

The bindFromRequest method searches the request parameters for ones named after the form’s fields and uses them as those fields’ values. The form helpers we talked about in listing 2.30 made sure to give the input elements (and therefore, the request parameters) the correct names.
Validation happens at binding time. This makes validation as easy as calling bindFromRequest and then fold to transform the form into the right kind of response. In Scala, fold is often used as the name of a method that collapses (or folds) multiple possible values into a single value. In this case, we’re attempting to fold either a form with validation errors or one that validates correctly into a response. The fold method takes two parameters, both of which are functions. The first parameter (hasErrors) is called if validation failed; the other (success) if the form validated without errors. This is analogous to Scala’s Either type. This is exactly what our save action does.
But we’re not done here. When we redirect back to the new-product page—due to validation errors—the page will be rendered with an empty form and no indication to the user about what went wrong. One solution would be to render the editProduct template from the hasErrors function. We’d rather not do this because we’d be rendering a page in response to a POST and making things difficult for the users if they try to use the Back button. Remember, Play is about embracing HTTP, not fighting it. What we want to do is redirect the user back to the new-product page and somehow make the form data (including the validation errors) available to the next request. Let’s do that in listing 2.33, which shows an improved version of our save action.
Listing 2.33. Validate and save 2—app/controllers/Products.scala

We’re calling the flashing method in SimpleResult (which is the supertype of what Redirect and its brethren, like Ok and NotFound, return) to pass information to the next request. In both cases we set a message to be displayed to the user on the next request, and in the case of validation errors, we also add the user’s input.
The reason we add the user’s input to the flash scope is so that the new-product page can fill the rendered form with the user’s input. This allows users to correct their mistakes, as opposed to having to retype everything. Listing 2.34 shows the new-product action.
Listing 2.34. New-product action—app/controllers/Products.scala
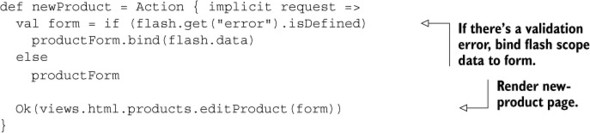
We’re using the presence of an error message as a signal to render the new-product page with the user’s input and associated error messages. We bind the form with the data in the flash scope. When this form is rendered by the template, the form helpers (which we discussed earlier) will also render the error messages. Figure 2.6 shows what it looks like.
Figure 2.6. The product form, showing validation errors

When the new-product page is rendered initially—when the user clicks the new-product button—no error message is displayed and the action renders an empty form. You could fill the form with default values by passing a suitably initialized instance of Product to its fill method. When you’re rendering a form for editing, you use the same procedure with a product instance from your database.
Now we only have to add the routes to make it all work.
2.3.6. Adding the routes for saving products
We need two routes: one for the new-product page and one for the save action. Add the following to conf/routes:
POST /products      controllers.Products.save
GET  /products/new  controllers.Products.newProduct
Because Play routes that come first in the file have higher priority, you have to be careful here and make sure the /products/new route comes before the /products/:ean route. Otherwise a request for the former will be interpreted as a request for the latter with an EAN of new—which will lead to an error message, because new can’t be parsed as an integer.
A version of the sample application is available that also has functionality to update a product. Any additional features are left as an exercise for the reader. You’ll see how to do t--hat and more in later chapters.
2.4. Summary
To build a Play application, you start with a new application skeleton and then assemble a variety of components. The application in this chapter includes:
- CSS stylesheets
- Application configuration
- Localized message files
- A Scala model and an application controller
- HTTP routes configuration
- Several view templates
- An external library
Although this was only a basic application, it shows what a Play application looks like. A complete implementation of our product catalog idea would have more code, address more details, and use more techniques, but the structure would be the same.
Perhaps the most important part of understanding Play at this stage is to get a sense of which different kinds of code you have, as well as how little code you have to write to get things done. If you built the application or modified the code samples, as well as read the chapter, you should also have a sense of what Play’s developer experience feels like.
In the next chapter, you’ll see how the various application components fit together as part of a model-view-controller (MVC) architecture, and learn more details about each part of a Play application.