Chapter 4. Work items
- Work-item cards
- Design principles for work-item cards
- What to keep on work-item cards and how to use this information to gain better knowledge about how your work works
Work in the software business is often not visible. Most of the work takes place in our heads or inside the computer. In order to get a better overview of who’s working on what and the status of the work, you visualize the work—thereby making information visible that previously wasn’t.
By far the most common way to track work items is to create a small card that represents the work that is being done. It can be an index card or a sticky note[1]: anything that is easy to work with and move around on a board, such as a white board. Cards on a board are a simple yet powerful way to see progress, bottlenecks, and queues happening in your workflow—and to make it in-your-face apparent to everyone what is happening.
1 For example, a Post-it® Note.
Using a physical card gives you some advantages over an electronic representation. A physical card can easily be annotated and customized with avatars, blockers, progress bars, tracking IDs, and other things that we’ll look into in this chapter. Also, because cards are tactile, they’re easy to use for collaboration, to move around, and even to take with you if needed.

This tactile concept holds some other secrets. By moving stickies on a board, you involve more of your senses in the process and thereby create a stronger connection between you and the work items. It’s more likely you’ll remember that you took responsibility for an item that you moved with your hands from one column to another.
This chapter is dedicated solely to those cards. What goes on them? How do you show that a work item is blocked? Who’s working on this item? These questions and more will be answered in this chapter. As always, don’t limit yourself to only our suggestions; you should probably not use all of them at once, and there are probably other things that could go on a card that we haven’t thought of.
Use your imagination to solve workflow issues, and use our suggestions as inspirations to improve on. The topics we discuss in this chapter are common ways of visualizing the basic information of a work item. Make sure your card contains all the information needed to help your team make decisions regarding each work item.
Yes, this might be the geekiest sidebar in history.
But it’s here to protect you from a plague that haunts a lot of teams using stickies as work-item trackers. Picture the scene: you enter the office and see a board with a lot of stickies lying on the floor beneath it. You happily realize that it’s not your board; your stickies are securely attached, thanks to this sidebar. With a wry smile on your face, you visit the poor team whose board is missing its stickies to educate them in the noble art of “how to remove a sticky correctly.”

The trick is to be careful that the sticky part doesn’t curl. Slide your finger under the note up to the sticky area, and then lift it from right to left, slowly but firmly. That will make the sticky part straight and nice, and thereby increase the sticky area of the note.
Now you know and can pester all your friends with the proper way to remove a sticky. Not only is this a geeky party trick, but it will also, more seriously, save you problems with work items falling off your board.
Instead of a physical work-item card, you can use electronic systems that represent the work. There’s nothing wrong with that, and many of the systems nowadays are great, especially for gathering data and reporting metrics. But remember that you’re giving up some of the benefits of a physical, tactile card. When in doubt, start physical and then move to an electronic version later if you see the need. Or even better—use both!
4.1. Design principles for creating your cards
The work-item card can be represented in a lot of different ways, and we’ll soon dive into some of the common patterns for doing so. You will undoubtedly find other ways that suit your needs better, so please change and elaborate as needed. But there are a couple of design principles that you should keep in mind when you’re deciding what to put on your cards and what to annotate them with. Let’s take a look at some design goals for creating work-item cards.
4.1.1. Facilitate decision making
First and foremost, you want the design and information on the card to facilitate decision making in the team. Strive to help yourselves self-organize. You want to avoid situations in which the team doesn’t know what to do next and they have to ask someone in order to continue. Equally bad is a team in which people respond differently to the same situation because of lack of information. This is one of the main reasons for having explicit policies and clear ways of working in the first place.
These goals are easy to state, but it might take some time before the team knows them by heart. Meanwhile, strive for simple, obvious rules, and make them visually apparent to everyone on the card. An example could be to show with an avatar who is working on an item so that you know who to talk to for more information or which items don’t yet have someone working on them.
4.1.2. Help team members optimize outcomes
The design of the card should also help team members optimize the outcome when it comes to matters such as risk, customer satisfaction, and economics. If a work item is high risk, you need some way to show that to the team members, so that risky actions can easily be avoided. An example of a high-risk work item is one with an explicit deadline for when a new law goes into effect. Missing this sort of deadline could be associated with a fine of some sort. Therefore, you want to make sure you all know about the deadline and prioritize accordingly.
The same goes for customer satisfaction or economics; make it apparent if one (type of) customer is more important than another. An example of this is a work item with new functionality that greatly benefits new users. Maybe you want to complete that before any maintenance work items.
How to treat the work item is governed by policies (explicitly articulated or not) and often associated with the type (for example, normal features, defects, and maintenance work items) and class (for example, work items that are particularly urgent or have a fixed delivery date) of work. We’ll be talking more about work-item types in section 4.3 and in chapter 8. Help the team to follow the policies by clearly showing what type and class of work they’re picking up.
As you can see, there’s quite a lot to think about, but let the guiding star be simplicity. There’s no use adding too much on the sticky, if you stand the risk of forgetting what it was about. Start simple, and experiment with more information as you see the need. You want the information that the work item is radiating to be easy to see and understand. Along those lines you also want changes and smells (see the sidebar “Process smells”) to be apparent and clear. You want to act on things that are outside of normal operation, and it must be easy to spot them as they happen.
We borrow the smell concept from Kent Beck and Martin Fowler, who talk about code smells (Refactoring: Improving the Design of Existing Code, Addison-Wesley Professional, 1999, http://amzn.com/0201485672). A smell could mean trouble, but it isn’t necessarily trouble because it smells. Much like the smell from a toddler’s diaper, if it smells, you should at least check it, but it doesn’t mean you’ll always find something there.
If one of your stickies has a smell to it—for example, that it has been sitting idle in a column for a couple of days—you should check on it. It might be that you need to take action. But there might be perfectly natural reasons for it to be stuck there.
A Word from the Coach

Keep these design goals in mind as you read the patterns on work-item design, and see if you can come up with other ways of articulating the goals in your team and on your board.

As you soon will see, there can be quite a lot of information on a work-item card. Be sure to choose a card size that allows you to fit all the information you need on the card. Stickies come in different sizes, so experiment with sizes that suit you.
We’ve also seen a lot of teams that create cards of their own with custom-made structure and form. Here you can see a refined work-item card;[a] the team has laminated the card in plastic so that it can be wiped clean and reused over and over:
a One of Marcus’s clients, Tradera (Swedish eBay branch), had these cards on a board when Marcus visited. They’re some of the most elaborate cards we’ve seen.

There’s no right or wrong. Just pick a size and form that suits your needs, and change it as your needs change.
4.2. Work-item cards
A lot of things can be on a card, and in the following sections we’ll examine some common attributes, starting with the most obvious one: the description of the work item.
4.2.1. Work-item description

To many of you, this might sound like a no-brainer; of course the work item has a description. But this is one area in which we see that many teams have room for improvement. We can’t count the number of times we have seen teams argue over what an item is about because the description on the card is inadequate.
In order to more easily talk about the item and its content, the description needs to be terse, to the point, and easy for everyone on the team to understand. What does that mean in practice?
User story
A user story is an example of a description that is short and terse and can prove useful.[2] It says what, for whom, and why the work item is being worked on.
2 Beware of relying too much on the user-story template format and its merits. It’s just a way to structure your description of the work at hand and not a silver bullet that always works. Some (including Joakim) have been known to call them an antipattern from time to time.
We won’t dwell on the user-story subject here, because it’s not in the scope of this book.[3] For now, we can simply say that it’s a Card with a little text that is a reminder of a Conversation you’re going to have later. In the conversation, you’ll flesh out the details and write down your Confirmation as acceptance criteria. That can easily be remembered with the acronym CCC: Card, Conversation, and Confirmation.
3 See more in the excellent book User Stories Applied by Mike Cohn (Addison-Wesley Professional, 2004, http://amzn.com/0321205685).

A common template for a user story is
As a [role], I want [feature], so that [benefit]
Or maybe
In order to [benefit], as a [role] I want [feature]
Use a format that feels natural to you, but make sure to include the Why (benefit), the Who (role), and the What (feature) in the description.
Title
If the description tends to be longer than you care to repeat every time you talk about the work-item card, you could benefit from adding a title to the card. A short sentence that is easy to remember and to refer back to can help you remember what the work item is all about.
“The one where ...”
User stories are one way to write descriptions, but sometimes they don’t sit right with the team for the item at hand (like bugs, for example). You still need to have a good description, and a simple mnemonic that we’ve used is the Friends naming convention: in your mind, put “The one where” before the description on the card. (All the titles of the episodes of Friends started this way, such as “The one where Ross and Rachel think they’re in/out of love again.”)
Using this little reminder will put the focus back on why this work item is up on the board in the first place. Make the title easy to refer to in a conversation, like these work items, for example:
- (The one where) the name field allowed too many characters
- (The one where) you were missing the administration rights, if you logged in as administrator
A Word from the Coach
Remember that “The one where” doesn’t need to go on the card. It’s a little lead-in, there to get you focusing on the real reason behind the work item.

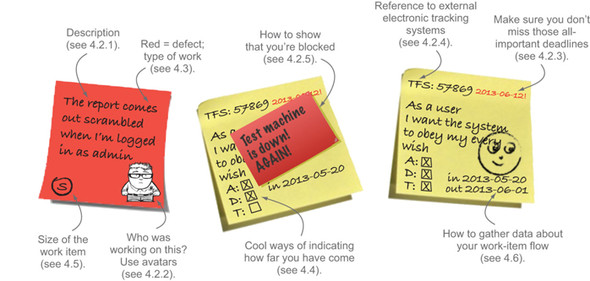
Here are a few good (and some bad) examples of what to put on your card as a description:

After learning what the work item is all about, the next problem to address is probably who is working on it now. Let’s check out a common solution to this problem.
4.2.2. Avatars
You want information about who is responsible for a work item to be as clear as day, so you know where to go with your questions, suggestions, and praise. Many teams indicate who is working on what by attaching an avatar to the work-item card. In this context (see the sidebar “What’s an avatar, anyway?” for the real meaning of the word), it’s a clear indication of who is working on what.
The reason many people use pictures, cartoons, or drawings of themselves is because it’s easier to identify a person using pattern matching. It creates an instant connection if you compare an image to a person, as opposed to looking at a scribbled name or signature that might need some translation to read and then to associate with the right face.

This means you should use avatars that resemble your team members or are caricatures with features that are easily recognized. Of course, you could add a key or legend on the side of the board, but that means people would have to look up which avatar belongs to whom. With avatars that resemble the team members, you don’t have to do that lookup.
In computing, an avatar is the graphical representation of the user or the user’s alter ego or character. It may take either a three-dimensional form, as in games or virtual worlds, or a two-dimensional form, as in an icon in internet forums and other online communities. It can also refer to a text construct found on early systems such as MUDs. It’s an object representing the user. The term avatar can also refer to the personality connected to the screen name, or handle, of an internet user, such as the user icons on Facebook, Twitter, and other social media sites.
Some teams use avatars to limit the work in process for each person. This can be an effective self-constraint for hoarders[4] who have a habit of being involved in every item on the board. For example, giving each person three avatars to put in play on the board is a visual and effective way to make sure no one takes on too much work.
4 Nickname for people who often end up collecting a lot of stickies.
A Word from the Coach
You might think having cute animals or cool cartoons as avatars is the thing and will spice up your board. Our experience tells us you’re probably wrong. One team that Joakim coached decided to use dog avatars. This caused confusion when they had to try to remember who the poodle was, why the Dalmatian had not completed those tests yet, and what on Earth the schnauzer was doing with that analyzing task all that time. Use avatars that at least resemble the person in question!

By using avatars, you can easily see who’s working on the item in question. We now turn our attention to deadlines, which help you know when the work item is due to be completed.
4.2.3. Deadlines
Deadlines can exist for a number of reasons; there can be features that need to be done for a campaign, a new law kicking in on a certain date, or a new customer coming to the office next week, for example.
To clearly show the date when the work needs to be done, you write it directly on the work-item card, maybe even with another color that stands out. Deadlines are risk-management information and help the team prioritize and self-organize; you don’t want to miss seeing them, so make sure they’re clearly visible.

Some teams even use different colors of stickies for fixed-date-delivery types of work items in combination with the deadline date. Make sure you use the same visualization every time to create a pattern or habit. Always use the upper-right corner of the sticky for deadlines, for example.

There—you now have deadlines on the work item too. They’re another piece of important information. Continuing down this road, putting all information on the card, you’ll soon run out of space. What do you do about information that you cannot fit on the card? That’s the subject of the next section.
4.2.4. Tracking IDs
We have talked a lot about the good things that a physical board with work-item cards on it brings, but there are some things that such a setup doesn’t do well. The limited space[5] on a sticky might not hold all the information needed in order to complete a feature. There might be a lot of other documentation that simply isn’t feasible to try to attach to the sticky or keep near the board. Or you might be required to track your work, the number of hours, and the progress in an electronic system.
5 Limited space can be a good thing, forcing you to work with smaller items and divide larger items into many smaller ones. This is the reasoning behind writing user stories on a small card, for example. If you feel that a big index card is too small to hold your information, try an even smaller one to force yourself to express it briefly.

In these cases—and there are surely other cases too—you need to easily know which item in the electronic system represents the one on the board. You can think of it as a “more information here” link.
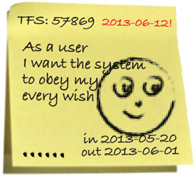
A simple solution to this is to write down the electronic tracking ID in a corner of the sticky. Similar to the deadline, make sure to use the same corner on every sticky, which creates a good habit. Or you can prefix the tracking ID with, for example, JIRA:, TFS:, or Git: to make sure it’s not confused with other numbers that might be on the note.
Warning

Beware of falling into the trap of putting all the information about the sticky into the electronic tracking system, regressing back to work-item cards with no easily understandable description (see section 4.2.1).
Astute readers will now begin to worry about the “double bookkeeping” this will make you do and how to keep the board and the electronic system synchronized. To handle that, you could first decide on a master—preferably the physical board, because it’s “out there” and the one on which your work is most visible.

In the electronic system, you can then make a simplified version of the workflow: Not Done, and Done, for example. This will make the updating much more lightweight and not create a lot of extra work. Also, on the work item in the electronic system you can now attach documents and links to other important resources.
Of course, you can go the other way around and use the electronic system as the master; but then we recommend that you try to get a projector. Or why not use a large touch-screen display and a board-like plug-in for the system in question?[6]
6 There are loads of these plug-ins, but a few that we like are Kanban for TFS, JIRA Agile, and HuBoard for GitHub.

Until now, we have considered the evenly paved road of success. That’s not the road we all travel in reality. What happens when things don’t work out as planned? Let’s investigate that next.
4.2.5. Blockers
Even though the goal is that your work flows quickly and smoothly through your workflow, sometimes things happen: you have to wait for someone else to complete their work, someone is sick, or you run into questions that hinder the work from being completed.
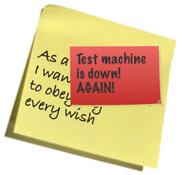
Blocked items
In these cases, you want the item to stand out and show that it’s blocked from further progress. When you do so, you get a signal and a reason to focus on the blocker (at your daily standup, for example). Eyes are drawn to the items that are different from the normal items, and this helps you to focus on those deviations. A blocked item should be a visual smell, to use the terminology we introduced earlier (see section 4.1.2).
To accomplish this, many teams attach another sticky on top of the blocked work item. This is a good idea because you also can write the reason why the item is blocked on the blocker sticky. In this way, you get not only a signal that the work is blocked, but also some information about why it’s blocked, which in turn helps the team focus on resolving the blockage.
There are many other common alternatives to signal that an item is blocked: magnets put on top of the blocked work item, turning the work item on its side, or moving it into a blocked “parking lot” on a separate part of the board. If you decide to move the card, make sure you have some way of remembering its previous location, so you can move it back there once the blockage has been resolved.
A Word from the Coach
Although keeping a separate “parking lot” for blocked items might seem like a good idea, we advise against it. It’s basically the same thing as saying that it’s OK to be blocked—“Look, we even have a dedicated area on the board for it!” Keeping the blocked item in its column keeps it in your face, affects your amount of WIP, and forces you to constantly have to consider it during standups.
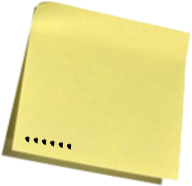
Blockage progress
Some teams also write a simple form of progress indicator (see section 4.4) on the blocker sticky, to put further focus on resolving it rather than to leave the item blocked. For example, a blocked work item with three dots on it means the sticky has been blocked for three days, and that needs your attention, right? Some teams use more elaborate policies for this: for example, after three days they contact the person or team blocking them in person, and after five days they escalate to management or another support function.

When choosing which blocker design works the best for your team, remember that you want the item to stand out from normal work items and preferably radiate some information about why and for how long the item has been blocked.
During the Lean Kanban North America conference in Chicago 2013, we learned about a team that has taken visualizations and smells to the next level. Instead of adding a small sticky to the work item to indicate that it was blocked, this team staples a real banana peel to the index card.[a] As the days go by and the blocker isn’t removed, the banana peel gets darker and darker, and an unpleasant smell starts to spread. That’s a call to action for you!
a Image courtesy of Gualberto107/FreeDigitalPhotos.net.

Their next idea was to use actual bugs to indicate software bugs. We don’t know about you, but we would certainly beef up our code quality to avoid having to nail real bugs to the board.
Some teams love to get creative with these things. If you’re in a team like that, you should by all means go bananas with the visualizations ...
With blockers, you can now handle situations in which the work doesn’t flow as planned.

Up to now we have used the generic term work item, but work items are of different kinds or types. Let’s see how you can visualize that.
4.3. Types of work
Work items can be of different types, such as bugs, technical items, or maintenance or feature requests. Work of different types should often be handled and prioritized in different ways. You want the team to be able to easily distinguish different types of work from each other and be able to prioritize work items on their own.
To help the team self-organize around how work should be handled and prioritized, a common practice is to let each type of work have its own color. In this way it becomes easy to distinguish a defect from a normal feature, for example. These types can also be used to set up policies on how work should be treated, commonly referred to as classes of service (see chapter 8).
Here are a few common examples of types of work. Some of the colors used here have grown into a convention in the kanban community. But, as always, make sure the colors make sense to you and your team. (Although the stickies are shades of gray in the printed book, they’re green, yellow, and red in the eBook and on the kanban board.)

The choice is up to you, but you should take care to make sure that not everything on the board looks the same. You don’t want to end up in the yellow sea of stickies, which makes it hard to know how to prioritize between different types of work items or to see any kind of patterns.
Making work of different types apparent—by using different-colored stickies, for example—can help you see what’s going on. Simply by glancing over the board, you can get a feeling for the overall status of the team. For example:
- If you see a lot of red stickies (bugs and defects), you can see a problem with quality in your system. You should probably make an effort to improve quality.
- When you note that there are no green (maintenance, technical) items on your board, you might not be paying off your technical debt as needed, which makes it harder to maintain the system over time.
- No yellow items (features) means you’re not adding new features to your system. This might be what you want, or not. The board gives you a simple visual signal that tells you how it is, either way.
If you only used yellow items, you would have to read each and every one of the notes to know the overall status of all the items on your board.
Warning
Don’t fall into lazy mode and grab any colored pad of stickies you have lying around. Mixing colors of stickies on the board for no reason causes confusion. The best thing is to pick a limited number of common types of work, assign each one a color, and then use that color all the time for that type.
If you have a hard time remembering what type of work each color means, a legend can be posted on the board to rule out any misunderstandings. This can also be helpful for stakeholders and others who don’t work with the board on a daily basis.


Let’s now turn our attention to seeing how far you have come. In the next section, you’ll get a simple tool that will help you track that.
4.4. Progress indicators
A card in a column on the board is a great visual cue and gives you a lot of information, but the history of the work item isn’t as easily tracked. For how long has this card been sitting here? Is this a normal lead time for the development stage? Questions like these aren’t easily answered by looking at the card where it’s sitting today.
A progress indicator is a simple tool that helps you track this information and shows “how much done” the item is. It can be as simple as marking each sticky in the workflow with a dot for each day it’s been worked on. If you’re a bit more advanced, you might use different colors of dots for different states in your workflow.
In teams we’ve coached, we have also seen the expected timeline drawn as boxes, which are filled in as the work progresses. This gives you a hint as to how you’re doing compared to what you usually do or the expected outcome. You could even talk about using a simple form of service-level agreement (SLA) here: “You can expect items that you classify as ‘small’ will be done within three days.”

For items that don’t follow a linear flow,[7] each state in the workflow could have its own box to tick when work there is done, and that will show what’s left to do.
7 Where the process doesn’t follow a natural sequence of steps, so that the steps to complete the work for the work item can be run in any order.
Going goofy: counting down
Instead of counting the number of days you’ve spent, you can instead count down by tracking the number of days left before the item needs to be completed, based on its deadline, for example. Then at the daily standup you can update this figure to reflect the number of days that still remain. If you have been doing Scrum, you know this is a common way to track progress against the estimate on a burn-down chart.

By using progress indicators, you’ve now started to collect and track data around how your process is working. In order to do that with any accuracy, you’ll soon need to know how much effort goes into each work item. Let’s take a look at one way of doing that.
4.5. Work-item size
The size of a work item can provide valuable information to help you manage the work item on the board. The only problem is that the exact size of work in your business is often not known until you’re done.
We’ll talk more about estimation later (see chapter 9), but briefly, we can say that giving a number for how many hours a certain item will take is hard and often ends up being wrong. A much more compelling approach is to instead compare that work item to other work items. The question is then, does work-item A require more or less work to complete than work-item B?

By doing this for all of your tasks at hand, you can assign equally sized work items a number—what are known as story points—or even T-shirt sizes (S, M, or L). These numbers only show your relative estimates of how much effort is needed to complete the task. This approach isn’t exact, but it’s probably more useful anyway, because exact measurements (104 hours, for example) are also guesses.

However you have come up with your estimate, you want to write it clearly on the work-item card, so that it’s plain and easy for everyone to see.
4.6. Gathering workflow data
The last few sections have talked about adding information to the work item that can help you collect good data about how your workflow is behaving. This can be useful information for improving your process going forward. Let’s take a closer look.
4.6.1. Gathering workflow metrics
When the workflow is set up in a detailed way, you have an excellent opportunity to gather data about how well your work flows and to measure and track trends in your work. In short, you can learn even more about how your work works.
Some of these metrics can be captured quite easily at almost any time, and others must be done as the work progresses through the flow because some of the data cannot be captured in hindsight. Many teams track a couple of easy-to-get metrics, such as the lead time of each work item and throughput (number of items completed per week, for example), in order to learn about their work. In chapter 1, you saw the Kanbaneros setting up such metrics for their process with a few simple steps.
This section isn’t about metrics and how to use them. You can read more about metrics in chapter 11. Here we want to suggest a couple of simple ways that you can customize your cards to catch metrics.
In the simplest form, you can “stamp” the card with the date it enters the board and the date it enters the final stage of the workflow. This will help you track the lead time for that item.

Stamping the arrival date for each new column (that is, each new step in your workflow) can extend this idea. You can now start to see trends in cycle time for each step of the workflow, where your bottlenecks are, and where work often is waiting. You need data like this to build more advanced diagrams (see chapter 11).

Combined with the work-item size we talked about before (see section 4.5), you can now start to make some predictions, such as these:
- “If you put a small work item into the inbox, it will be out the door in three days, tops.”
- “A medium work item will be handled in five to eight days, in 9 cases out of 10. We have statistical evidence to back that up.”
Remember—you’re gathering this data for the team to approve. Don’t overdo it. Start with a metric that is simple to track, and then make it more advanced as the need arises. You don’t want to add a lot of extra work to catch and handle the metrics. Just jot down a simple date on the card—that’s about it. Change it when that simple metric doesn’t suffice anymore.

This section talked about gathering hard data about how your work items move through your workflow. We’ll end this section with a softer and cozier tone: talking about emotions.
4.6.2. Gathering emotions
Some teams use the work items to keep track of how happy the team is with the work they’re doing. You can too; simply draw an icon, such as a smiley, an angry face, an indifferent face, or something else indicative of your emotion with regard to the work, on the sticky when you finish it. This little icon indicates how you felt at the time.
Because the card is about to be moved off the board, you don’t have to worry about messing up the sticky. Just draw the icon over the existing information as a quick reminder of how you were feeling.
Anyone on the team can capture the “emotion” of the card as it moves off the board. One way to do it is to have a quick vote at the morning meeting. You could also decide that the last team member that touched the work-item decides. In teams in which one or a pair of developers moves the work item through the entire chain, they decide the status at the end.
At regular intervals, you examine the data together to see if it tells you anything about the team and the work. Can you see any trends or patterns? Maybe work of a certain type, or for a certain customer, seems to make the team sadder than other types of work. Could you do anything about that? Examining the data can be triggered by having a certain number of finished items (for example, after every 10 items); or it can be scheduled with a particular cadence, such as every two weeks; or it can be done in retrospective meetings if you have such meetings (see chapter 10).
We have heard about a lot of other practices—too many to list them all in this book. But here are two practices that are fun and a bit different that you may find useful and that might inspire you to try something different:[a]
a If you do, please tell us about it.
- Split an item in two parts (literally, with scissors) when you have concurrent activities/parallel lanes that merge together again. For example, a work item goes to security and software review in parallel, and each has its own workflow/column before they come together again
- Use different-sized work items for different sizes of work, so that large is a really big sticky (the roughly A5-sized ones), medium is a rectangular sticky, and small is a square one, for example. You could even have physical WIP limits (by width and height on the board) for these instead of a number.
4.7. Creating your own work-item cards
Now you’ve seen a lot of tips about what could be on the card. It’s time to get practical and start thinking about what your work items should look like.
We suggest that you do this as a team exercise. Start small and simple, and expand as the need arises. Here are a few things your team can discuss:
- What information is needed for you to know what to do with the work items? Remember the design goals from section 4.1.
- What information may be interesting to other people who aren’t working with the work items every day?
- Do you have different types of work? Do you benefit from distinguishing between different kinds of work?
- Do you need blockers? If you do, what are your policies around that? What should happen with items that are marked as blocked? Who is responsible for unblocking them?
As a final little fun exercise, create your own personal avatars. Remember not to go completely overboard with creativity, though; you want avatars that at least resemble yourselves.
4.8. Summary
This chapter was all about the work-item card and the information it radiates (communicates) to you as it sits on the board. A work item should contain all the information the team needs to be able to know how to work with it. We discussed the following:
- A description— So you know what the work is about
- An avatar or other marker— So you know who is working on the item
- Deadlines and other important dates— So you know when you need to have the item done
- Tracking IDs or other references to an external system— So you know where to find more information
- Blockers— So you can pick out items that are blocked and therefore hindered from further progress
- Type of work— So you know the type of work for each item, which is important so you can prioritize the work items against each other if needed
- Progress indicators— So you know how much of the work you have done so far
- Size— So you can see the differences in size and effort
- Flow data, emotions, and other data accumulated during the flow through the board— So you know how the work behaved and how the team felt about it
If you find this list daunting—stop! Don’t do all of it; we haven’t met a single team that does all these things at the same time. Start with what fits your current needs, and don’t overdo it. Add features as needed.
If you find that something is missing from this list, you’re probably right, and that’s how it should be. Don’t limit your work-item cards to this list alone. This is a starting point. Feel free to elaborate with your creativity and come up with amazing things.
Here are examples of work-item cards that use some, but not all, of the features we’ve talked about:

Now you have the tools you need to create a lot of work items; but you shouldn’t. You should create small amounts of work. This is the topic of the next chapter.