Chapter 6. Limiting work in process
This chapter covers
- Principles for finding suitable WIP limits
- Common ways that teams limit WIP
- Common ways to visualize WIP limits
- Answers to some frequently asked questions regarding WIP limits
From the previous chapter, we hope we have now convinced you that a lot of good things come from limiting your work in process (WIP). By now you’re probably full of questions: What is the right limit for you? How do you go about finding the WIP limit? Are there some good starting points that can guide you?
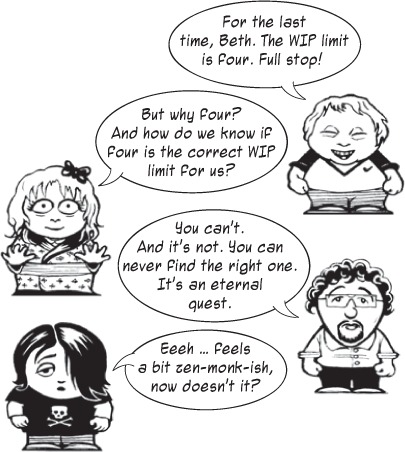
As you soon will find, there are no hard rules here. Finding a suitable WIP limit is not only contextual and dependent on what you want to achieve, but also like hitting a moving target. The WIP limits can and should change. At the outset of this chapter, we can already reveal a secret: the goal is not to limit WIP. WIP limits are only a means to drive you to improve. Improve to achieve a better flow, which is the theme of the next chapter.
That’s why you’ll see a lot of “It depends” and “You can do this, that, or the other” in this chapter. It’s not a sign of us not knowing; it’s that you need to find what works best for you and your team.
No need to worry, though; we have packed this chapter full of guidance and principles for finding a suitable WIP limit, as well as practical ways many teams go about visualizing and setting their WIP limits. Let’s dive in and see how you can reason your way to finding a WIP limit for your team.
6.1. The search for WIP limits
Searching for a suitable WIP limit for your team can be tricky business. What is right for you and your team right now? The answer is the old-favorite answer of consultants worldwide: “It depends.”
And it does. It depends on
- How much pressure there is to continuously improve the organization
- The number of people on the team and their availability
- The shape and size of the work items you’re working with
And the list goes on.
To find a WIP limit for your team, here are few basic rules of thumb, but be prepared to change the WIP limits as you learn more:
- Lower is better than higher.
- People idle or work idle.
- No limits is not the answer.
Let’s examine these approaches in detail.
6.1.1. Lower is better than higher
A lower WIP limit is generally better than a higher one because you want to limit the number of items you work on as much as possible. This will give you better lead times and faster feedback and force you to remove impediments. These are all things that help you improve the flow of work items in your process.
Setting the WIP limit too low, however, could make your process come to a grinding halt, because it will quickly bring out any problems in the process. Imagine that your entire team is working on a single work item, and all of a sudden you need an answer from a customer in order to continue. Because that work item is the only thing you were doing, you have come to a complete stop.
Problems are symptoms of things that will have to be changed in your process to improve your flow. Finding many problems can quickly become a painful experience for teams that aren’t equipped to handle a lot of issues like these at once. Instead of feeling encouraged to improve and solve their problems, a common reaction is to give up and stop caring that they’re breaking the WIP limit on a regular basis.
You want to search for a low WIP limit, but not too low. There are signals to guide you, as you’ll see in the next section.
6.1.2. People idle or work idle
Tuning the WIP limit can easily become something that is talked about forever: striving to find the one true limit can result in a lot of discussions in which no one is able to decide what is best. This isn’t time well spent; it’s better to try something and then adjust.
A simple method to help you adjust the WIP limit up or down is the following:

If your WIP limit is too high, work will become idle. There will be work items that no one is responsible for. This might be a good time to lower the WIP limit.
With a WIP limit that is too low, people will become idle. All items are being worked on, and there are people without work. You can now collaborate to get items done or raise the WIP limit.
6.1.3. No limits is not the answer
Be sure not to fall into the trap of not setting a WIP limit at all! This is one of the most common mistakes we see in teams starting with kanban. Kanban involves three simple principles; don’t remove one of them too soon.
The risk is that you’ll end up with a board flooded with work, as you see in the figure to the right, showing your inefficiencies and your failure to move work through your process. Eventually, the board will end up not being used, because you can’t see the work items for all the work on the board.

Office spaces around the world have unused boards covered with stickies. Don’t add your board to that sad bunch; instead, make the board a tool that helps you improve.
Also, as we’ll discuss further in chapter 7, removing the WIP limit will remove your incentive to improve. With no WIP limit, nothing pushes people to do better. If you allow an unlimited number of items on your board, nothing will force you to complete the ones on there before starting new work.
This is because (if you remember from chapter 5 about work in process) the more stuff you have going on at the same time, the longer the lead time will be for all the work in your process. You want a constraint that pushes you toward finishing work and toward improvements in your process. We’ll dive much deeper into this in chapter 7.
Let’s turn our attention to some principles of how to decide on a suitable WIP limit.
6.2. Principles for setting limits
Finding your WIP limit depends on your context and particular situation. In this section, we’ll take a look at some common ways that teams we’ve coached and heard about have agreed on their limits.
Remember that it’s not so much about finding the WIP limit, but rather, visualizing your current WIP limit; it’s the best so far. You should change it as often as needed. Embrace change; it’s good for you.
As always, use the examples here as inspiration, and expand on them to suit your needs. Let’s start with a simple principle, one that might already be stuck in your head from previous chapters: stop starting, start finishing.
6.2.1. Stop starting, start finishing
A simple yet powerful starting point to limit your work in process is agreeing to strive to complete current work before starting anything new. This will keep your WIP low, because you only start new work when something else is finished.
An easy way to begin doing this is to adopt this slogan for your team:

Yes, you have to think hard when saying it the first few times, but then it sticks. A good idea might be to put this statement above your board, where you’ll meet each morning; or why not use it as the opening or closing phrase of your daily standups?
To beat that sound bite into your head, you could use the Hill Street Blues roll-call ending. As people leave the standup, say:
“Oh, one more thing. Stop starting, start finishing, everyone.”
Wait a second. And then add the famous ending:
“And let’s be careful out there.”
By using a reference to Hill Street Blues, we have probably dated ourselves pretty well. It was a police series in the 1980s that was a big hit in Sweden. Every person who has seen it remembers the ending of the morning roll calls at the police station; everyone rose, and the sergeant called out, “One more thing ... let’s be careful out there.”
There is great power in this simple slogan, because it pushes you to a lower WIP. It also sums up a basic pattern of kanban: to prefer to finish work before starting something new. Doing so will help you not only to limit the number of work items you work on at the same time, but also to shorten lead times, take work through the whole value chain, get feedback, and improve your process.
Let’s finish this section with an inspirational quote to help you remember what’s important:
It’s not “the more you start, the more you finish,” it’s “the more you finish, the more you finish.”
David P. Joyce
Soon you may need a bit more control over your WIP limit, and at that point this principle might be too coarse grained. But it’s a great start to emphasize a principle.
6.2.2. One is not the answer
Striving for a low WIP limit is desirable because it gives you better flow (see chapter 7), but setting it too low will probably be too disruptive for your flow. For example, if you have a WIP limit of one, any disturbance in the flow—such as handoffs, people out of the office, and so on—will cause all work to stop. Most organizations aren’t ready to handle all those improvement opportunities (you remember that’s what we call problems, right?) at once, so you probably should go with a WIP limit higher than one item.
Mob programming is an interesting and novel approach to system development pioneered by a team coached by Woody Zuill. The basic concept of mob programming is simple: the entire team works as a team together on one task at a time. That means: one team, one (active) keyboard, one screen (projector of course). It’s just like doing full-team pair programming.
A team doing mob programming has a WIP limit of one. That’s very effective when it comes to completing the work being worked on as fast as possible. Any question, any problem, will be tackled immediately; and all the people needed to solve the problem are present in the room and have time to solve any issues right away.
But this approach is very inefficient when it comes to utilizing the people on the team to the fullest. Not every person on the team is actively typing code.
The question is, are you selling keystrokes or completed features?
For many organizations, mob programming is too extreme; a WIP limit of one is probably not suitable for everyone. But for the organizations that can handle it, work flows very fast indeed.

Summing up this section on guidance for setting your WIP limits, we can say that in most cases, setting the WIP limit to one isn’t a good idea. You should strive for a low number, but not necessarily one.
By now you’re probably longing for some practical advice on how to set WIP limits using common practices, visualizations, and methods that other teams have found helpful. Well, let’s get to it. You’ll start by setting a single WIP limit for the entire team.
6.3. Whole board, whole team approach
In this section, we’ll take a look at a couple of ways to limit the total number of work items on the board for the whole team. This can be a simple way to get started and may be all that’s needed for your team.
Remember that there is no true WIP limit to be found. WIP limits are tools that you use to improve. You might ask questions like “Will this WIP limit help our work to flow better or make our flow worse? Will this WIP limit render a lot of people idle? Will a lot of work be idle? Is that a problem, and what can we do to resolve it?”
6.3.1. Take one! Take two!
Many teams that we have coached have gone through a similar journey to reach a suitable WIP limit. Their experience illustrates the kind of reasoning that we think is necessary concerning WIP limits, and we want to relate that reasoning here. Learn from this, and then pick a limit that suits you.
Let’s assume you have a five-person team. You could, for example, start out boldly and decide on a WIP limit of one per person, making the total WIP limit equal to the number of people on the team.

Pretty soon, you’ll find out that this approach creates some problems; if you become blocked, you can’t pick up new work without breaking the WIP limit, for example. You may decide it seems more reasonable to allow for a maximum of two items each, so people have something to do if one item is blocked. That makes the total WIP limit equal to the team size times two.

But that setup might not be reasonable either, because it allows for situations in which every person on the team can be blocked on one item and still keep working on another without breaking the WIP limit. That’s a perfectly valid situation with a WIP limit setup like that, but in many instances this isn’t pushing the team enough. You want the WIP limits to push you into resolving problems, not allow you to work without noticing them.
To push the team, you can back off from a WIP limit of 10 items and decide on maybe 8. If all team members are now blocked on one item, you’ll start to break the WIP limit if everyone picks up another one to work with. You get a gentle nudge to do something about the blockage, because you exceed the WIP limit earlier with 8 items than you would with 10 items. If you want to get this warning even earlier, lower the WIP limit a bit more.

Note that the numbers in our examples aren’t that important, but the reasoning (what happens if you’re all blocked, will this improve flow, and so on) to find your WIP limits is. Remember—there is no right WIP limit that can be calculated. You must find the one that suits your team and your situation the best. The most rational thing is to try a WIP limit and then change it as needed.
Also, think about what kind of behavior you want the WIP limit to drive. It’s the mechanism that drives improvements.
6.3.2. Come together
The previous section allowed every person to have at least one item going on at the same time. If your team is using collaboration practices like pair programming, you should probably lower the WIP limit even more. In such cases, you could set the WIP limit to a number lower than the number of people in the team. You could take the number of people on the team divided by 1.5 (or some other number you see fit) to yield a low WIP limit.
For our example five-person team, this will add up to roughly three items total to work on.

With a WIP limit of three for a five-person team, people will quickly end up with nothing to do, if everyone works alone. To be able to handle a WIP limit of three and still engage people in the process, the team members will have to cooperate on items to finish them by using pair programming, writing the specifications together, or testing in pairs: exactly the kind of collaboration that agile teams seek. As a nice side effect, the work items will move fast across the board.
This might be a big change for some teams that aren’t used to collaborating closely. As always, don’t set the WIP limit too low to start, but rather lower it little by little and improve your process at the same time.
6.3.3. Drop down and give me 20
One technique to set a suitable WIP limit was introduced by Don Reinertsen.[1] He proposed that you first observe what a normal level is in an unconstrained system. That means: what is the normal load of work items in your system? Start where you are: visualize the work items, and count them to learn what your current WIP is.
1 Presented at a keynote at the Lean Kanban Central Europe conference 2012. See www.lean-kanban.eu/sessions/reinertsen/ for more information.
Then double that amount of WIP and use that number as the limit, allowing for twice as much WIP as you have normally. You double the WIP limit because it can be statistically deduced that with normal variation, almost no teams will reach the limit. It’s safe to say that this limit will have no effect at all to start with—everyone should be able to pull it off. From this new limit, you can then incrementally go down by 20–30% decrements—say, every month or every two weeks—until you start to experience problems, queues build up, or you see people idle between tasks.

Let’s see this in practice. Say that a team usually has roughly four to five items going on at once. Following Mr. Reinertsen’s reasoning, you should start by allowing for 10 items on the board. You then back off that number by 20% at regular intervals. The first iteration you’re down to 8 items, and then 6, and then 5, and so on.
As you do this, you’re not only lowering the WIP limit, which will flow items through your system faster. You’re also starting a trend of continuous striving to improve: a mindset that characterizes Lean thinking.
This approach puts the focus on an important aspect of WIP limits; they’re cheap to implement. You pick the number and don’t take on more work than that. If that doesn’t work out for you, if too many work items are idle, you can go back up to the level you had before. This makes WIP limits excellent for use in experiments.
What happens if you lower the limit by 20%? Try it and see; if it doesn’t work out, go back and think about what happened. What would you have to do differently to be able to lower the WIP and still keep items flowing through your system?
This approach teaches the team to continuously evaluate the limit to improve the flow. Because the initial WIP limit is high, decreasing it the first couple of times won’t cause any big problems. This helps the team get into the habit of evaluating and changing their limits regularly.
Although we used a whole-team WIP limit approach in this example, it makes perfect sense to apply the same thinking with a column-based WIP limit approach (as discussed in section 6.4). You could stop decreasing the limits for the columns where you feel pain and keep decreasing them for other columns.
6.3.4. Pick a number, and dance
If you don’t know what a suitable WIP limit could be, pick a number out of the blue. Yes—you read it correctly. Pick any old number!
Or rather, make an educated guess of what could be smart, but don’t think too much. This number, as we’ve said many times, could and should be changed as you progress and as you see fit.

Use the principles for finding a good limit, as described in section 6.1, to guide you toward setting your WIP limit.

Until now we have considered WIP limits for the whole board and whole team. Doing this, you don’t concern yourself with how the work is distributed among the steps in your workflow (the columns on your board). Setting one single WIP limit, like the examples we’ve considered up to now, is sometimes referred to as a system with a constant WIP (also known as CONWIP).
Let’s now take a look at some other approaches for how to limit WIP. Could you limit WIP for only parts of your workflow? Why would you do that? And how could that be visualized?
6.4. Limiting WIP based on columns
Most teams that we have worked with set WIP limits per column instead of for the entire team. This gives them a bit more fine-grained control over how their work flows and an opportunity to handle bottlenecks and uneven flow. That said, setting a WIP for the entire board could still be useful and, if you don’t know where to start, provides a good starting point.
In this section, we’ll dive deeper into common ways of limiting WIP per column, some things to consider when doing so, and what you can gain from a WIP-per-column approach.
6.4.1. Start from the bottleneck
All workflows always have a bottleneck somewhere, which sets the pace for the entire workflow. Increasing throughput upstream from the bottleneck will just pile up work in a queue in front of it, and trying to increase throughput downstream from the bottleneck is futile because there won’t be enough input to work on. If you can identify the bottleneck in your workflow, it makes sense to use WIP limits to help resolve it. For more on bottlenecks and how to discover and manage them, see section 7.5.
Let’s look at an example, in the board to the right. Here we have a workflow where work items are piling up in a queue in front of a bottleneck: the Test column. If you do nothing, work will keep piling up, and WIP and lead times will increase. If you instead put a WIP limit of, say, 3 on the whole Development column, the developers will have to stop doing Development work when the queue starts to build. What should they do instead? They could help the testers finish their work. Whatever they do, they shouldn’t pull in new work, because that will only build more WIP.

As you can see, putting a WIP limit on the step feeding the bottleneck will stop the bottleneck from being flooded and drive behavior to resolve the bottleneck, thus improving the entire flow.

6.4.2. Pick a column that will help you improve
Why did you buy this book? What is the reason you think kanban will help you improve? Most teams already have a pretty good idea about where (some of) their problems lie. A common scenario is to use kanban in order to collaborate together on fewer work items in order to complete them faster. In a team of mostly developers, it might make sense to put a challenging WIP limit on the Development column, where most of the active work is being done, in order to drive collaboration.
Many teams start with one of the “whole team, whole board” approaches described in section 6.3 and distribute numbers over different columns. You can also apply the total to just one column: for example, putting 1.5 times the number of developers as a WIP limit on the Development column.
6.4.3. A limited story, please
There are as many ways to limit WIP as there are teams in the world, but we’ll mention one that sometimes comes up as a question: can you limit your work in process based on estimated size of the work item—for example, by using story points?[2] (You can read more about story points in chapter 9.)
2 Story points are a way to estimate effort for a team, using relative measures; they’re used in many agile methods such as Scrum and Extreme Programming (XP).
As we’ve said, you’ll probably have to experiment to find a WIP limit that is suitable for your team. Start with your gut feeling and adjust the limit up or down, as described in section 6.1. This goes for estimated effort size of your work item (for example, in story points) as well as for work items. Many teams using Scrum do this already, because when they’re planning their next iteration, they look at how many story points they typically finish and pull that amount of new work into the iteration.
Limiting WIP by estimated size means you only pull new work as long as it keeps you under an agreed-on limit: for example, under 10 story points. The next figure shows an example of a simple board where the developers have a WIP limit of 10 story points.

This WIP-limiting approach is often more suitable to decide per column, rather than for an entire team, because the size of a work item may change the more you work with it. For example, when you start analyzing an item, you might find that it will take less effort to implement than you first anticipated.

6.4.4. How to visualize WIP limits
Column-based WIP limits are often visualized by drawing them above each column of the board. But variants of this are plentiful.

Some things we’ve seen while working with teams are as follows:
- Boxes for each work item— This will make it apparent when you break the limit, because you have to put your work item outside of a box or on top of another work item.
- Plastic folders or other physical placeholders for each allowed work-item card— This is similar to the drawn boxes and is also a good visual indicator that helps you to keep track of how you’re doing against the established WIP limit.

What you use is up to your imagination and what suits your team. Don’t be afraid to experiment. Try something new, and fail, instead of being content with a suboptimal setup.
As you can see, there are lots of ways to use WIP limits on the columns on your board to help you find problems, bottlenecks, and other things that slow down flow in your process. What will work best for you is left as an empirical exercise: experiment. Try something, and change to improve.

Let’s now turn our attention to another way of limiting WIP: by person.
6.5. Limiting WIP based on people
Some teams might have a situation where people take work from start to finish, and it’s not common or feasible to hand over the work to someone else. The workflow can still be a sequence of steps that the work goes through. In fact, this can be valuable to show what state the work is in right now, even though the same person is doing the work throughout the process.
A typical example of a team like this is in first-line support, in which you get a case from a customer in dire straits and you stay on it until it’s solved. Such a case might go through the following phases: finding a workaround for the customer, filing a bug, testing a new release of the system with the bug fix, and finally closing the case. All these stages are probably handled by a single person on a support team.
This calls for another strategy: some teams choose to limit the number of work items for each person. You focus not so much on optimizing for flow through the workflow, but rather on ensuring that no one takes on too much work and that everyone has things to do.
Another situation where limiting WIP per person is suitable is for fighting multitasking on all levels in the team. In this case, a WIP limit per person can help visualize that some people are involved in many work items,[3] which might be a driver behind the whole team having too much WIP. You can have conversations about how to prevent that, with a limit per person made explicit.
3 Such people are known as hoarders (see the next sidebar for a real-life example).
6.5.1. Common ways to limit WIP per person
We’ll now take a closer look at some common ways to visualize people-based WIP limits.
This board isn’t big enough for all these avatars

If you’re using avatars to indicate who is working on what, a simple measure is to limit the number of avatars each person can have “in play” at the same time. You could, for example, print three avatars for each person, effectively setting the WIP limit per person to three. Now it’s easy to see who’s doing what and how many items each person is working with right now.
On one team that Marcus coached, there was this guy: let’s call him Sean. Sean had been involved with this application since before you were born. He practically built it himself. Every decision was in one way or another routed through him. You have probably met Sean a couple of times, or at least his type of person.
This slowed the team down considerably, because the team was quite big (eight people) and every work item had to be routed through Sean in order to be completed. When we created the kanban system, we printed only three avatars per team member to put a finger on this pain point.
And indeed, the first morning meeting took about 35 minutes, most of them spent waiting for Sean to place the three (“Only three? Can I have five more? Please?”) stickies with what he should work on during the day.
After letting him sweat for a while, we had a discussion about the problems this situation caused for the team and the flow of items. To Sean’s big surprise, it turned out that when he was on vacation or was sick, the team still got stuff out the door.
Maybe there were work items in which Sean didn’t have to be involved? Maybe not having Sean involved in everything could increase the feeling of autonomy and mastery for other people on the team? Maybe that could free up Sean’s time to do the complex stuff that he, in fact, was the only one on the team who knew?
It all ended well, but it was a bit shocking to poor Sean at first.
Swim in your own lane, please!
Another common way to limit WIP per person is to give each person a swim lane through the process. Then you can decide on a WIP limit for each swim lane, effectively allowing a certain number of items in any column of the board for that swim lane.
This approach can also be used to limit work per team on a multiteam board or for teamlets (parts of a team).

Warning

Remember that these strategies focus on making sure every person has enough to do; they don’t help you much to get the work flowing to a finished state. You could start like this, but it’s worth questioning the effectiveness of this approach to limiting WIP. After all, your customers seldom care if you’re kept busy; they only want you to deliver stuff.

We have now given you a lot of principles, ideas, and practical tips for how to go about setting your WIP limit. The main point is that this is contextual and depends on your needs and situation. There are often a lot of questions around setting WIP limits, and we’ll address some of the more common ones next.
6.6. Frequently asked questions
It’s not strange that WIP limits trigger some questions, because the limit you select is something that depends on what you need and your situation. Sometimes, when WIP limits are described, they come across as something definitive; this adds to the confusion, because WIP limits should be moving targets.
6.6.1. Work items or tasks—what are you limiting?
Quite often, teams split up work items into tasks for certain steps in their workflow. For Development, it could be tasks like “implement data access,” “write HTML page,” and “complete business logic.” In a Testing column, they could be tasks like “prepare test data,” “write report,” and “perform manual tests.” Tasks are part of a work item and can be thought of as all the things you need to do to complete the work item in a given column.
Not until every task is completed in Development are the work items moved to the next step of the workflow. Some teams even divide the columns into subcolumns, forming a mini-board for the tasks.
Here you can see two work items going on (one in each row), and each work item has been split up into several tasks. The team counts the WIP limit against the work item, not the tasks that compose the work item.

Most teams seem to work this way, counting their WIP limits against the work items. The tasks are only for tracking what you need to do in order to complete the work item and often aren’t delivering customer value. It doesn’t really matter how fast they flow across the board, if the customers still have to wait for anything useful to be delivered.
There could be times when, in certain columns, you might want to limit the number of tasks. For example, you may want to limit the level of multitasking or make sure you’re always cooperating on certain tasks.
6.6.2. Should you count queues against the WIP limit?
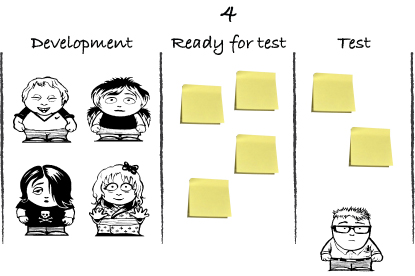
Queues are often visualized as a column within another column. Ready for Test in the Test column is an example that we have used before.
In the figure at right, you can see a WIP limit of 4 for the Development column. The column is then split into two sections: Doing and Done. The developers are working on one item and have three items completed, which keeps them at their WIP limit.
Another way of visualizing this queue could be to have a Ready to Test queue column in the Test column instead. That would then count against the WIP limit of the testing step.

How you visualize this on your team depends on what you want to achieve: that is, on who should “own” the tickets that wait to be tested. Does it help the team if the developers get the signal in their area, or is it more useful for the testers to count the items in the queue against their WIP limit? The choice is something that needs to be discussed with the team, but the practical function of the queue column is the same in either case: items stuck there will stall and hinder the flow, and people can’t pull new work into columns before the queue. With this setup, you can easily see which items are done and which items the developers are still working on.
Finally, if you remember, back in section 6.4.1 we showed another way of doing this, where the queue column is a column by itself with its own WIP limit, as shown at right. In this case, the column has a WIP limit of its own, and it’s not counted against anyone’s limit. Maybe this is another technique that can help your team. The limit doesn’t “steal” capacity from “your” column, but, again, the function of the queue is the same.
That way of visualizing the queue prevents the bottleneck that the single tester has become. A buffer is built before him to make sure he doesn’t get flooded and yet always has work to do, which he can pick from the buffer (the testing queue) in front of him.
There are times when a queue should be counted against the WIP limit or even is the WIP limit itself (as in section 6.4.1 with the standalone queue column, for example). At other times, the distinction made between a queue and an execution column is a way to visualize detailed steps.
The answer to this section’s question, “Should we count queues against the WIP limit?” is also, “It depends.” For example, let’s say you have noticed that testing is a bottleneck.[4] A queue might be a great way to ensure that the tester always has work that is ready to test. A WIP limit on the queue helps you make sure the queue doesn’t get too long. With a WIP limit in place, you won’t be able to flood the queue with work without breaking the WIP limit. When you see a queue filled to its WIP limit, it’s time to discuss how to clear the blockage that is building up.
4 Discovering and managing bottlenecks deserves a complete book on its own. But briefly, you might have a bottleneck if you see work accumulated before the bottleneck and if steps after the bottleneck are starved for work.
6.7. Exercise: WIP it, WIP it real good
The time has come for you to start discussing WIP limits. Again, this should be a team effort. Remember that there’s no optimal WIP limit for your team; it’s a tool that you can use to help you improve your work.
If you don’t have an obvious WIP limit that you can come up with, first discuss the points in sections 6.3, 6.4, and 6.5. Here are some questions you can focus on:
- Should you have a single WIP limit for the complete board? Why would that be good for you?
- Can you start by limiting work in some columns? Which ones? Why?
- If you limit work per person, what kind of behavior would that drive or give you?
- Would swim lanes with WIP limits per lane help you in your situation?
If you don’t know how to answer these questions, you should try something that seems appropriate, pay attention to what happens, and learn from that. When you come up with a good strategy and a number, start to discuss how this policy should be treated in your daily work:
- What kind of behavior are you encouraging by the way you’ve set up your limit?
- What should you do when you end up in a situation in which you’re breaking the WIP limit?
- Should you count blocked/queued items against the limit?
As always, strive to start simple and make your approach more advanced as you see the need.
6.8. Summary
In this chapter we talked about finding and visualizing good WIP limits:
- There’s no one right WIP limit for you and your team.
- Limiting WIP isn’t the goal; improving flow is. WIP limits are merely a tool that helps find problems that hinder a better flow.
- A lower WIP limit will move your work faster and also bring problems to your attention more quickly. You want a low WIP limit, but not too low.
- When setting out to find a WIP limit, start simple—maybe as simple as the slogan “Stop starting, start finishing.”
- You can limit the WIP for the whole team/workflow:
- This approach can help you improve collaboration.
- It helps you keep focus on finishing work items before taking on new ones.
- You can limit WIP based on column:
- This puts focus on flowing items through the workflow.
- It can help to manage bottlenecks.
- Maybe you already have a hunch about what you need to improve and can start limiting WIP for that column.
- Work can also be limited by estimated size (story points, for example).
- You can limit WIP based on people:
- Limiting the number of avatars that can be in play is one way to easily accomplish this.
- Using swim lanes is another.
- This can help you prevent too much multitasking and people being involved in every item on the board.
- Most teams have a WIP limit on the work-item level, not the task level.
WIP limits are ways to improve the flow of your workflow, but what is that? It’s one of the main concepts of Lean that we haven’t yet talked about. And it’s the topic of the next chapter.