
CHAPTER 5
Your First Batch of Cider

While the fall is often thought of as cidermaking season, you can start your cider project any time you have all the necessary ingredients and equipment on hand, a warm space for starting fermentation, and a cool place for storing the cider during fermentation. (See chapter 4.)
The method outlined in this chapter is the one used to produce Farnum Hill’s still cider. The whole process will take about one month—or longer if you choose to let your first batch of cider mature.
As always, it begins with the apples. Find the best fresh, sweet, pure apple juice you can buy, and get started. See page 67 for more information on finding high-quality apple juice.
Timeline for First-Batch
In Advance
• Purchase the necessary equipment and ingredients.
Day 1
• Purchase the best apple juice you can, transfer it to the carboy, and add sulfur dioxide.
• Taste the juice and test the pH and specific gravity.
Day 2
• Pitch the yeast and place the open carboy in a warm space.
About Day 3 to Day 7
• Wait and watch as the fermentation process begins.
• When fermentation is underway, move the open carboy to a cool space.
About Week 2
• Add the bored bung when any frothing has stopped.
• Add the airlock when fermentation is less vigorous.
• Add yeast nutrients, if using.
About Week 2 to Week 4
• Wait and watch as the fermentation process slows.
• Test the pH of the cider.
• Continue to wait until fermentation stops and sediment falls out of the cider.
• Rack the cider and add sulphur dioxide.
Month 2 and Beyond
• Let the cider mature.
• Bottle the cider.
ADDING SULFUR DIOXIDE
As soon as you get your juice into the carboy, you should add sulfur dioxide (S02) most likely in the form of Campden tablets. At this point in the process, sulfur dioxide acts primarily as an antimicrobial agent, suppressing unwanted yeasts and other organisms in preparation for your addition of yeast. Follow the instructions on the Campden tablets package to add 50 parts per million of sulfur dioxide to the juice.
Wait twenty-four hours before pitching the yeast. This ensures that the sulfur dioxide has time to disperse and do its work. You may see the juice lighten somewhat in color during this waiting period, because sulfur dioxide also helps to prevent oxidation.

TESTING
It is helpful to know the pH and specific gravity of the juice you are starting with to give yourself a better understanding of the cider you are making. You also want to taste the juice and record your tasting notes, so you can assess how those flavors and characteristics change in the cidermaking process. (See chapter 2.)
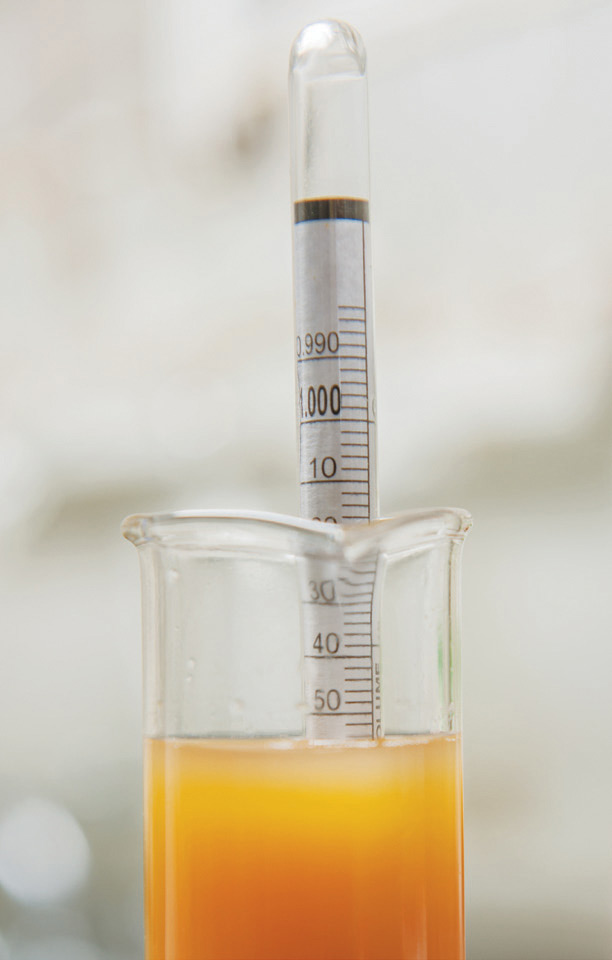
Following the instructions on the package of the litmus paper, test and record the pH of the juice. A juice’s pH is a measure of the strength of the juice’s acidity. You are looking for a pH below 3.7, which is acidic enough to prevent the growth of many microbes and allow for the effective use of sulfur dioxide in the form of Campden tablets, another antimicrobial measure.
Measure the temperature of the juice, and then, following the package instructions for the hydrometer, test and record the specific gravity of the juice. The hydrometer measures the soluble solids in the juice, essentially measuring its fermentable sugar. The specific gravity of the juice will give you a sense of the amount of alcohol that will be present in the finished cider.
 CIDERMAKING TIP
Specific Gravity and Potential Alcohol
Specific Gravity of Juice (S.G.) |
Potential Alcohol by Volume of Cider (ABV) |
1.040 |
5.1 |
1.045 |
5.8 |
1.050 |
6.5 |
1.055 |
7.2 |
1.060 |
7.8 |
1.065 |
8.6 |
1.070 |
9.2 |
1.075 |
9.9 |
1.080 |
10.6 |
1.085 |
11.3 |
1.090 |
12 |
PITCHING THE YEAST
Begin by removing about one gallon (4 L) of the juice from the carboy into a clean jug or other convenient container.

Following the package instructions, hydrate the yeast in a container of warm water, stirring to combine, and let the mixture stand for twenty minutes to proof. The yeast will be frothing. Then feed the yeast with a small amount of juice from the gallon jug and allow it to continue to froth for about ten more minutes. This step makes the yeast stronger and may acclimate it to the sulfur dioxide present. Pour the frothing yeast mixture into the carboy, making sure you get all the yeast into the carboy. Rinse the yeast container with some juice from the gallon (4 L) jug into the carboy. Then return enough of the remaining juice to the carboy to leave a small amount of headspace below the neck.
Place the open carboy—without a bung or airlock—in a warm place to encourage fermentation. The ideal temperature is a consistent 65°F to 70°F (18°C to 21°C). Placing the carboy in a sturdy milk crate is a good idea because you will move it during the fermentation process; the milk crate will make the carboy easier to carry. As fermentation progresses, the carboy may expel a frothy mixture that will drip down the sides of the container. A cookie sheet or tray under the carboy will protect the floor or furniture.
WAITING
Fermentation will start slowly. You can check on the process each day to watch the progress. At first, it will look like nothing is happening. Then small bubbles will appear. Then the juice will begin bubbling vigorously and may spew froth out of the mouth of the carboy. This can take several days or as long as a week, depending on factors such as the temperature. If the carboy is frothing, you can use a wet cloth to clean the outside of the container. Don’t use soap or other cleaning agents that could contaminate the cider. Otherwise, leave the carboy undisturbed.
MOVING THE CARBOY
When vigorous fermentation is underway, you should move the carboy to a cooler place if available. The ideal temperature is a consistent 40°F to 60°F (4°C to 16°C). At this point in the process, you must be careful not to introduce air into the cider. Move the carboy with a minimal amount of sloshing or agitation.
ADDING THE BORED BUNG
The carboy is still open. It needs to remain open until the fermentation has slowed—you’ll see strong streams of bubbles, but any frothing will have stopped. If you put the bung in before fermentation has slowed, the pressure building up inside the carboy will, at best, expel it. At worst, it will shatter the carboy. When the fermentation has slowed down, place the bored bung loosely in the mouth of the carboy. Don’t add the airlock yet. The bung is a test. If, after a day, the bung remains in place without any frothing, you can push the bung fully into the mouth. If the bung is soon expelled or covered in froth, remove the bung, clean it, and wait a day to try again.

ADDING THE AIRLOCK
After you have secured the bored bung, wait a day before adding the airlock. The fermentation process is still producing enough carbon dioxide to create positive pressure and prevent damaging air from entering the carboy through the hole in the bung.
When you are ready to add the airlock, add water to the airlock and insert it into the bung. If the bubbles are rising rapidly in the airlock, remove it. It’s too soon. You can test the airlock again the next day. If the bubbles are regular but not rapid, leave the airlock in place.


FEEDING THE YEAST
At this stage, you can consider feeding the yeast a bit. Use the minimum amount (or even less) that the package recommends and follow the instructions for adding the nutrients to the carboy. The key is to add the nutrients to the fermenting liquid very slowly. The nutrients are more soluble than carbon dioxide and will drive some of the carbon dioxide out of solution in your carboy. If you just dump the nutrients in, expect a frothy volcano and be ready to mop your floor. If you add it gently and slowly, expect to see the liquid get a bit excited, then settle back down to a happy fermentation. When it has, replace the airlock.
WAITING
Once the airlock is in place, you should leave the fermenting cider undisturbed. Just watch the progress. You will see the rapid fermentation slow and then, over the course of several weeks, come to a near stop.
Lees, which is made up of solids from the juice and expired yeast, will have built up at the bottom of the carboy during the fermentation process. Even after the fermentation has finished, the lees will continue to fall to the bottom and the cider will become clearer.
TESTING
When the fermentation has nearly stopped and you see only the occasional rising bubbles, it’s time to test the cider.
Working quickly to minimize the cider’s exposure to air, remove the bung and airlock from the carboy and start by smelling the cider. The cider should smell pleasant. If you detect rotten eggs, compost, decay, cabbage, or garlic, your cider may be in trouble. (See chapter 6 for some potential solutions.)
Use the plastic tubing to siphon a small amount of the cider for your evaluation. Taste it. It may taste a little harsh. That’s fine. The flavor typically mellows as the cider matures. Then, using the litmus paper, test the pH of the cider. The pH level will have risen some during the fermentation process, but that change will not be clearly detectable on narrow-range litmus paper. (If it is noticeable, see chapter 6.) You can also test the specific gravity using the hydrometer to confirm that the fermentation is completed. Fully fermented cider will have a specific gravity of 1.00 or lower.
Replace the bung and airlock and wait until fermentation has stopped completely.
RACKING
When there are no bubbles visible, fermentation has stopped completely.

If all has gone well with the fermentation—there were no unpleasant odors or a dramatic increase in pH when you tested—you can leave the cider on its lees for a week or two without seeing any change beyond increasing clarity. If these flaws are apparent, see chapter 6 for some potential solutions. More time on the lees could exacerbate the problems.
“Racking” is simply transferring the cider from the carboy in which it fermented into the second carboy, where it will mature. You’ll do this by siphoning the cider through the plastic tubing, leaving the lees behind. This is also the time to add more sulfur dioxide, this time primarily to prevent oxidation and malolactic fermentation (in which a bacteria converts malic acid to lactic acid) or other bacterial activity.
CIDERMAKING TIP
Equipment for Racking
• Full carboy
• Campden tablets
• Empty carboy
• Plastic tubing
• Utility tape
• Scissors
• Glass for your first taste of cider
• Extra clean container for excess cider
• Dry cider, neutral white wine, or distilled water, as needed
• Solid carboy bung
Read these instructions for racking carefully and collect all the necessary equipment before beginning the process. It is important to work efficiently to minimize the amount of time that the cider is in contact with the air.
Begin by moving the full carboy to a table, being careful not to agitate the liquid and disperse the lees. The full carboy needs to be at a higher level than the second, receiving carboy to siphon the liquid. Allow the full carboy to sit undisturbed for twenty-four hours so the lees can settle after the move.
When you are ready to rack, place the empty carboy near and below the full carboy. Follow the instructions on the package of the Campden tablets to prepare 30 to 35 parts per million of sulfur dioxide, which will be added later in the racking process.
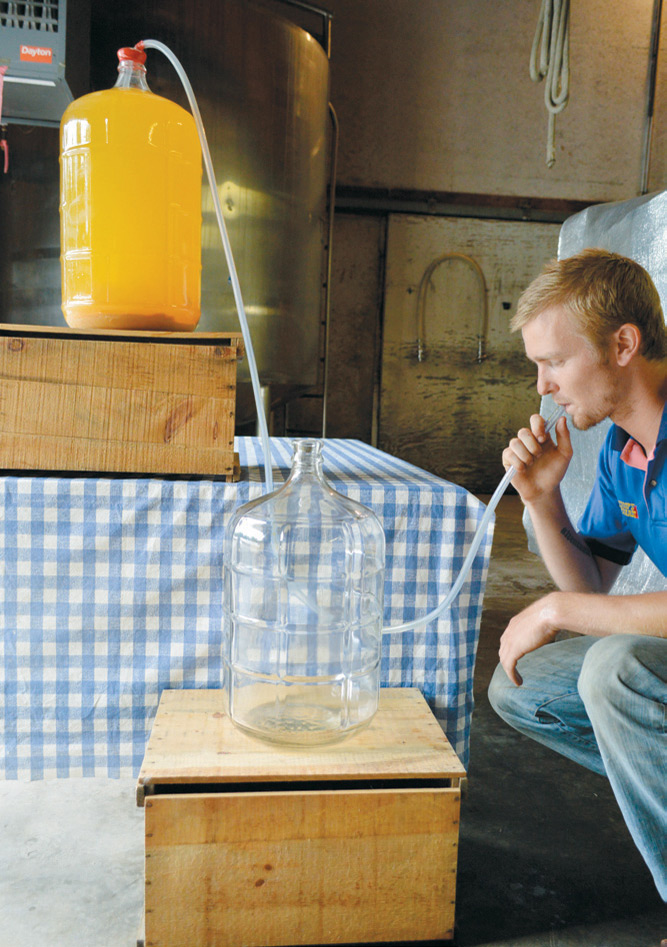
Remove the bung and airlock from the full carboy and lower the plastic tubing into the cider until it is an inch (2.5 cm) above the lees, with the mouth of the tubing against the side of the carboy. You can secure the tubing in place at the neck of the carboy with utility tape to prevent it from dropping into the lees. It’s important not to disturb the lees, which will make the cider cloudy again.
Place the other end of the plastic tubing near the empty carboy and use your mouth to create suction, drawing the cider into the tubing. As the cider begins to flow, siphon a small amount of cider into a glass and then insert the tube into the receiving carboy, resting the mouth of the tubing at the bottom of the container to minimize the amount of air introduced into the mixture. (Some unwanted aromas can be treated with a “splashy” racking, which intentionally introduces air. See chapter 6.)
When the receiving carboy is about half full, add the prepared Campden tablets.
Be cautious again when you near the end of the siphoning process. You don’t want the receiving carboy to overflow, so have an extra clean container on hand for excess cider. And you don’t want to suck lees or air into the carboy. Leave some cider behind if necessary.
You need to fill the receiving carboy completely, into the neck and within a half-inch (1.3 cm) of the bung, to reduce the surface exposed to the air. You will likely have more than enough cider, but if you don’t you can use dry cider, neutral white wine, or even water to top off the carboy.
Close the full carboy with a solid bung.


If necessary, top off the carboy with dry cider, neutral white wine, or water before adding the bung.
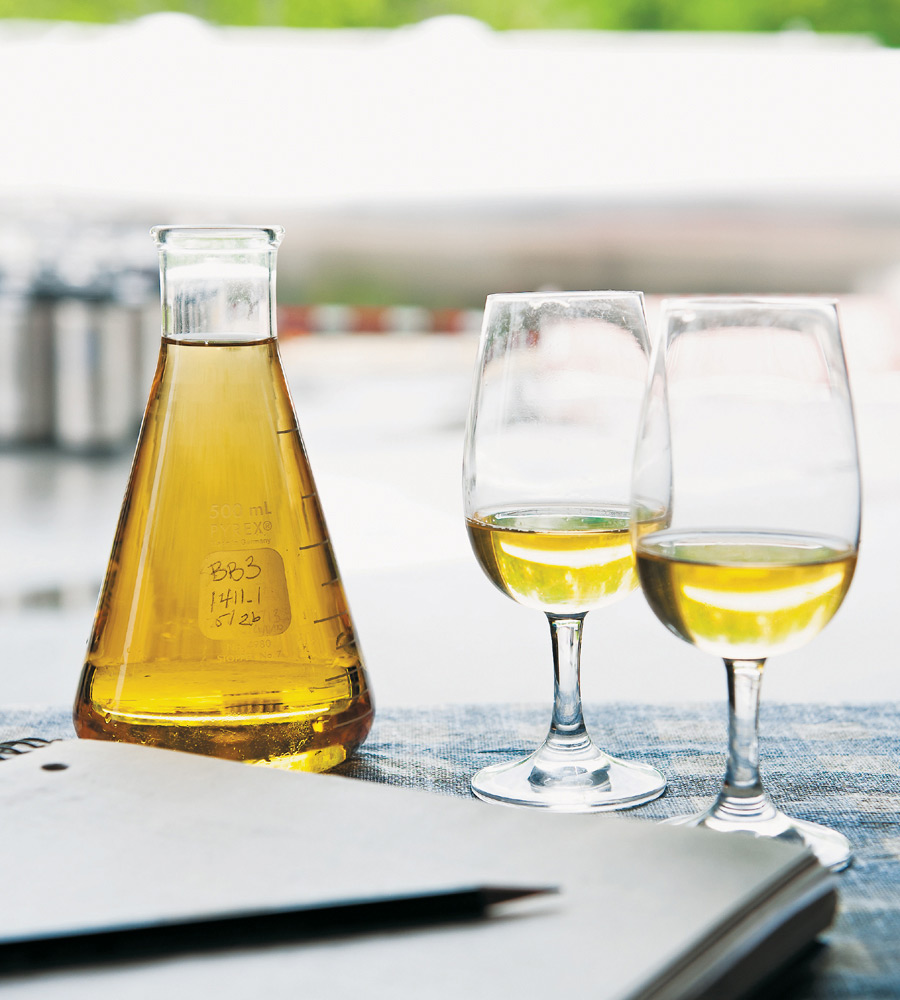
TASTING
This is your first taste of your first batch of cider. The first question is: Do you like it? Now taste the cider the same way you tasted the juice, making notes about the aromas, flavors, and other characteristics you detect in the cider. (See chapter 2.)
If you love the cider and want to drink it now, it’s time to bottle it. But most ciders made from tannic and acidic apples benefit from some time to mature. Your cider will change over time, and those changes are more reliable and positive in a larger container than in a smaller container. (If you find off-aromas or other flaws in the cider, see chapter 6 to diagnose the problem and find troubleshooting techniques.)
MATURING
If you’ve chosen to mature your cider, you can taste the change over weeks or months or even years. Wait a month between tastings. (Always top the cider off with dry cider, neutral white wine, or water to fill the carboy after tasting.) Typically, over time, the tannins in the cider round out, becoming less astringent, and acids soften, becoming less harsh. Often as these changes occur, other attractive aromas and flavors develop.
Store the cider in a cool place as it matures. Leave it undisturbed.
BOTTLING
The bottling process is very similar to the racking process. If you’ve allowed the cider to mature, you may find a thin layer of lees at the bottom of the carboy. Follow the same procedure of inserting the tubing and siphoning the cider into the selected bottles. The key here is to fill the containers completely and seal them tightly.
Congratulations! You’ve completed your first batch of cider. Enjoy it.

 NOTES FROM THE CIDERY, STEVE WOOD
Our First Ciders
In the days when we were growers, packers, and shippers of McIntosh, Cortland, and Red and Golden Delicious, and Farnum Hill Ciders didn’t even exist, we often put a barrel of cider down to ferment. We did it the way other folks in New England did in those days—we filled a used whiskey barrel with indifferent sweet cider, added a few raisins and some brown sugar, put the barrel somewhere it wouldn’t freeze, and made an airlock with a bung, some wax, a piece of fuel line, and a jug of water. Sometimes it froze, and sometimes it didn’t. So sometimes we made rough hard cider, and other times we inadvertently made apple booze. We usually bottled it in late winter or early spring. It was fun and made for rowdy parties, but was always a reliable headache in a glass.
But, when we started grubbing out our old dessert orchards and replanting them with real cider fruit, we had to get serious about learning to make good cider. We knew we wanted it to be delicious and to reflect the fruit and the land where it grew, but we didn’t know much else. We studied all we could find on the subject, in the United States and in Europe. When our orchards finally started to produce a few good cider apples, we filled dozens of carboys and fermented them wherever we could (a walk-in cooler in the barn, the basement of a house, and so on). We made hundreds of gallons of perfectly horrid stuff.
We had unfathomable (to us) fermentation problems, yeast problems, acidity problems, and all manner of other problems, producing a lot of cider that took a lot of self-delusion to like. The main thing we learned in those days was that it’s very easy to persuade yourself that the cider you’ve worked so hard to make must be delicious and to try to choke it down, but that if it’s really worse than a cheap six pack or jug of wine, you should probably admit the truth, dump out the cider, find something else to drink, and try again. That’s as true today as it was then.
Happily, after a few years, we began to get the hang of it (with generous help from cidermakers and winemakers around the world). A couple of barrels even tasted genuinely good to us. In 1995, we finally became a bonded winery and started selling a few cases of cider. The cider we sold in those first years wouldn’t stand up to our standards today. We didn’t yet know what sort of cider we wanted to (or were able to) make from these unfamiliar apples, but at least those early ciders had pleasing bittersweet character and good acid and fruit.
We’ve learned a lot since we put those first carboys in our basement. There’s no reason for you to wander through the same tortuous learning adventure. If you follow the directions in this chapter, your first carboy will be a thousand times better than our first ones were.