
Chapter 6
A Gentle Touch
Ingredients
- 1 Arduino Uno
- 1 Arduino USB cable
- Your computer
- 1 LED
- 3 jumper wires
- 1 resistor, with the highest resistance you have
- 1 square of aluminum foil, about the size of a cracker
- A piece of tape
When you tap a “button” on a smartphone’s screen you obviously aren’t pushing a button. The phone is detecting your finger on the glass. The same principles working on that screen to sense a finger can be used to make a touch-sensitive “button” with no moving parts!
Concepts: Detecting Touch, Capacitance Sensing, Arduino Libraries
The secret to the phone screen—and to this project—is the property known as capacitance. Capacitance is an object’s ability to hold an electric charge, no matter how small.
Humans exhibit a fair amount of capacitance, as you can experience by shuffling your feet across a carpet and then touching a doorknob—the spark that jumps from your finger contains thousands of volts of electricity, which had been stored in your body!
Our devices can detect our body’s little glow of electricity by noting a change in capacitance at the point where someone touches something.
There’s a more complete description of capacitance if you search the Internet, but for the purposes of this project, just know that we will be sensing that electrical charge in the human body.
All of the items in this project, besides the aluminum foil and tape, should be available in any Arduino starter kit, and if you’ve completed any of the previous projects, you’re all set for ingredients. For links to the parts, and to a variety of starter kits, visit http://keefe.cc/gentle-touch.
For the resistor, use the highest value you have. Note that with resistor values, M means million, k means thousand, and Ω means “ohms,” the units of resistance. So 10MΩ is higher than 10kΩ, which is higher than 10Ω. Anything above a 50kΩ resistor should work, though higher is better.
The colored bands on static resistors indicate their resistance value. For a great decoder table, visit http://worrydream.com/ResistorDecoder/.
Steps
Wire Up the Parts
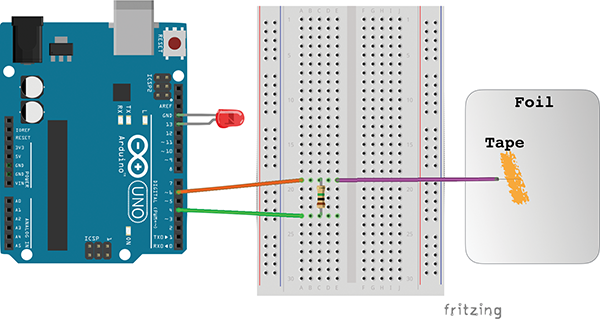
Figure 6-1: Wiring up the “Gentle Touch” project, with aluminum foil and tape.
Here it is in words:
- Insert the longer leg of the LED in the Arduino’s Digital Pin
13. - Insert the shorter leg of the LED into the next-door
GNDpin. - Put one leg of the resistor into a numbered row on your breadboard.
- Into the same numbered row, insert one end of a jumper wire.
- Put the other end of that jumper wire into Digital Pin
6of the Arduino. - Into that same numbered row on the breadboard, insert one end of a second jumper wire.
- Tape the other end of that jumper wire to the aluminum foil, making sure the metal end of the wire is stuck to the foil.
- Back at the breadboard, put the second leg of the resistor into a different numbered row.
- Grab a third jumper wire and insert one end into this same row.
- Attach the other end of the third jumper wire to the Arduino’s Digital Pin
4(not the one markedA4, which is an analog pin).
You’re ready to go.
Load Up the Code
The Arduino’s brain is pretty tiny, and the list of commands it knows is small. So sometimes we need to add to its knowledge. For this, we turn to a library.
In programming, a “library” isn’t as comprehensive as it sounds. It is a little bit of code containing commands specific to a particular task, such as sensing capacitance.
The Arduino software comes with a lot of libraries, but often you have to add one from the Internet. That’s what we need to do now. So it’s a good time to learn how to add libraries, and it’s not hard. We’ll be adding a library provided by Paul Stoffregen at https://github.com/PaulStoffregen/CapacitiveSensor.
- Download the “CapacitiveSensor” library by putting this short link to Paul’s library into a browser like Safari, Chrome or Firefox: http://j.mp/touch-sense.
- That link should make your browser download a compressed file called
CapacitiveSensor-master.zip, which is likely in your “Downloads” folder. We’ll use this file in its compressed “.zip” form—so don’t open it manually. Doing so will decompress it!
- Start your Arduino software (if it’s not running already).
- From the menu bar, select Sketch → Include Library → Add .ZIP Library . . .

Figure 6-2: Adding a downloaded library on a Mac (it’s in the same spot in the Windows version)
- Navigate to the place your browser saved
CapacitiveSensor-master.zip(it’s very likely in your “Downloads” folder). - Select
CapacitiveSensor-master.zipand click the “Choose” button. - Great! Now quit your Arduino software and restart it.
Now that the library is in your Arduino’s collection, we’re ready to load in the project code. As outlined earlier, there are three ways to do that:
From the Web
To get the “Gentle Touch” code from this book’s companion website:
- Use a web browser to visit http://keefe.cc/gentle-touch.
- Click the “Copy Code to Clipboard” button.
- Switch back to your Arduino software.
- Start a new Arduino sketch using File → New.
- You’ll get a mostly blank sketch window. Delete the little code that’s there.
- Click anywhere inside the blank window.
- Paste the code you copied from the website using Edit → Paste from the menu.
- Save your work using File → Save.
From the Bundle
If you don’t already have the bundle, the steps for getting it are outlined at the beginning of Appendix B. (It’s free!) Once you have the bundle . . .
- Find your
family-projects-sketches-masterfolder, and double-click it to open it. - Click on the
gentle_touchfolder. - Inside, you’ll see
gentle_touch.ino. It’ll have a blue Arduino icon. - To use it, just double-click the file name and it should open in your Arduino software.
From the Back of This Book
The code for this project is printed in the back of the book in Appendix B—and it’s short enough to type. Hand-typing code is a good way to learn about what’s going on. So feel free to enter it by hand, being certain to type it exactly as written and paying attention special attention the semicolons at the ends of some lines. Also watch the use of capital letters. Case matters, and this program uses both CapacitiveSensor and capacitiveSensor, which represent two different things!
If you’re reading an electronic version of the book on your computer, you may be able to simply copy it from Appendix B and paste it into your Arduino software.
So the steps here are:
- On your computer, start up your Arduino software and start a new sketch from the menu bar: File → New.
- Delete what’s in the window that pops up.
- Either type the code exactly as it appears in Appendix B or, if you have an electronic version of this book on your computer, copy-and-paste the entire code block for this chapter.
No matter how you got the project code into your Arduino software, save your work, using File → Save.
Make It Go
Upload the code to your Arduino by pressing the arrow button at the top of the blue window or using Sketch → Upload. Then open the Serial Monitor using File → Tools → Serial Monitor. You should see numbers scrolling by.
Now touch the foil. What happens? Do the numbers jump? They should! The bigger the resistor you used, the higher the numbers will jump.
Can you detect a change in values by getting really close to the foil without touching it?
The LED should light up when you touch the foil, too. If it doesn’t, we have a fix for that.
Fixes
If your LED isn’t lighting when you touch the foil, your sensor might not be sensitive enough. (Or if it’s stuck on, it could be too sensitive.)
The “if-then” action part of the code currently reads, in English, “If the sensor reading is greater than 100, send high power to the LED. Otherwise (else), send low power.”
Here it is in Arduino:
if (sensor_reading > 100) {
 digitalWrite(LED, HIGH);
} else {
 digitalWrite(LED, LOW);
}
The sensor readings are the same values you saw scrolling past in the Serial Monitor, so pick a value that represents a “touch” for your sensor. Type that number in the code instead of the 100.
Once you change the value, don’t forget to re-upload the code to your Arduino (Sketch → Upload or use the arrow button at the top of the blue coding window).
If you’re getting “0” readings in the Serial Monitor, you may need a stronger resistor. Use the highest value you have. The stripes on the resistor indicate its value. A great resource for decoding them is here: http://worrydream.com/ResistorDecoder/.
What’s Going On?
The instructions tell the Arduino to keep checking the capacitance levels on Pin 6, which is where we’ve attached our foil. The “if-then” section turns those numbers into actions.
Code Corner
It’s super common in coding to use additional libraries to add features you don’t have and that someone has already figured out. Once you added the CapacitiveSensor library to your Arduino software collection, it gets used in the project code with a simple line at the top of the program:
#include <CapacitiveSensor.h>Then, on the next printed line, we put those extra smarts to use:
CapacitiveSensor cs_4_6 = CapacitiveSensor(4,6);This assigns the variable cs_4_6 to a new CapacitiveSensor skill, or function, from the library. To use that function, we insert 4,6 between the parentheses, which lets the library know what Arduino pins we’re using to read the sensor. The value of the sensor then gets put into the cs_4_6 variable as a number. Cool, right?
Taking It Further
Instead of foil, you could use conductive fabric like copper taffeta. It’s super fun to play with—and that it even exists just makes me smile. Some people who make wearable electronics use conductive fabric together with capacitive sensing to sew functioning “buttons” right onto their clothing!
For links to conductive fabric sellers, and examples that wire conductive patches to sewable Arduinos, visit http://keefe.cc/gentle-touch.