Chapter 12
Send Email with a Button
Ingredients
- 1 Arduino
- 1 Arduino USB cable
- 1 breadboard
- 1 push button
- 1 10k-ohm (10kΩ) resistor, which has a brown-black-orange stripe pattern
- 3 jumper wires
- Your computer
- A home wifi network and the password for it
- A web browser
- An email address
Special Items
- Your assembled SparkFun WiFi Shield, from the chapter “Get Your Arduino Online”
Optional Item
- 1 Arduino power supply
If making a computer say “Hello, world” is the first step of programming, and making an LED blink is the “Hello, world” of do-it-yourself smart objects, it’s quite possible that making an “Internet Button” is the “Hello, world” of things that do things on the Internet. The idea is that you push a button in the physical world and something happens in the Internet world. In our case, we’re going to send an email—to you!
Concepts: Triggering Things Online, Using IFTTT
For a few projects in a row, we’ve taught an Arduino to take information from the Internet and do something with it. Now we going to send information to the Internet, where we’ll do something with it.
Our information is going to be a “trigger” signal, which we’ll send with the push of a button.
That signal will go to a free service called IFTTT, which stands for “If This Then That.” In our case: “If you get a signal from my Arduino, then send me an email!”
First, let’s put the button and the rest of the ingredients together.
Steps
Wire Up the Parts
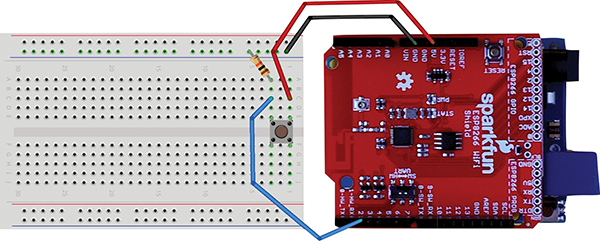
Figure 12-1: Wiring diagram for the email button project
- Attach the wifi shield you assembled in “Get Your Arduino Online” to the top of the Arduino, being careful to make sure all of the metal pins go into the corresponding holes.
- Connect the square-ish end of your Arduino USB cable to your Arduino.
- Connect the flat-ish end of your Arduino USB cable to your computer.
- Remember that the LED has a longer leg and a shorter leg. Insert the longer leg of the LED into Pin
13on the wifi board. - Insert the shorter leg of the LED into the hole right next door marked GND.
- Attach the push button to the breadboard so that:
- It straddles the breadboard’s center canal.
- One of the legs is in the hole in Row 1, Column e.
- Insert one end of a (preferably red) jumper wire into the Arduino’s
5Vpin, and the other end into the breadboard’s Row 1 at Column c. - Insert one end of another jumper wire (it can be any color; I used blue) into the Arduino’s Pin
2, and the other end into the breadboard’s Row 3 at Column c. - Insert one end of a (preferably black) jumper wire into any of the Arduino’s
GNDpins, and the other end into the breadboard anywhere along the blue “–” rail on the left side, closest to Column a. - Insert one leg of the resistor into the breadboard’s Row 3 at Column a.
- Insert the other leg of the resistor into the breadboard anywhere along the same blue “–” rail on the left side.
It should look like this:
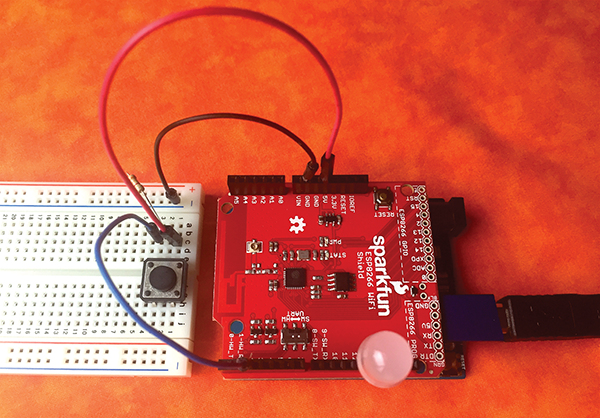
Figure 12-2: The email button project assembled and ready to send mail
Load Up the Code
You’re surely an expert at getting project code by now, but here are the details for this chapter:
From the Web
- Use a web browser to visit http://keefe.cc/email-button.
- Follow the same instructions as in previous chapters.
From the Bundle
- Find your
family-projects-sketches-masterfolder, and double-click it to open it. - Click on the
email_buttonfolder. - Follow the same instructions as in previous chapters.
From the Back of This Book
If you’re reading this on a computer:
- Highlight the entire code block for this chapter in Appendix B.
- Follow the same instructions as in previous chapters.
No matter how you got the project code into your Arduino software, be sure to save your work, using File → Save.
Enter Your WiFi Information
As you did for previous chapters, look for this section and replace YourWiFiNetworkNameGoesHere with your wifi’s name and YourWiFiPasswordGoesHere with its password:
//////////////////////////////
// WiFi Network Definitions //
//////////////////////////////
const char mySSID[] = "YourWiFiNetworkNameGoesHere";
const char myPSK[] = "YourWiFiPasswordGoesHere";
Getting Started with IFTTT
All right. The button is ready to send the trigger signal. Now we need to set up IFTTT to receive the signal. That requires a free IFTTT account. Here are the steps for making one:
- On your computer, open a web browser and go to https://ifttt.com/.
- Click the “Sign Up” button in the upper-right corner of the screen.
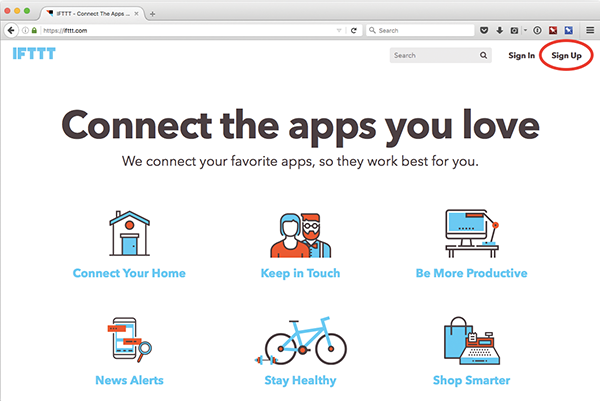
Figure 12-3: The IFTTT home page, with the sign-up link highlighted
- Enter your email address.
- Pick a password.
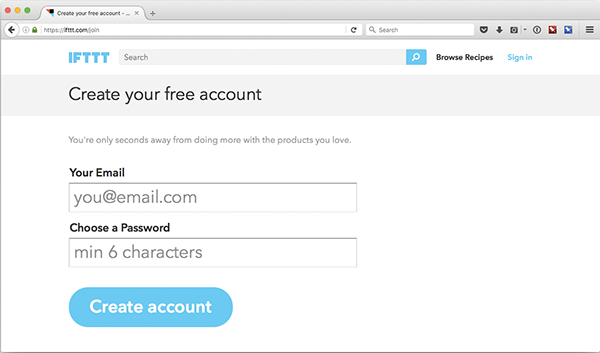
Figure 12-4: Pick your email and password for IFTTT. The accounts are free.
Account made! Now, IFTTT takes you on a little tour. Let’s get through that.
- Click the big “This” link.
- Click the big “That” link.
- Click the “Continue” button.
- Click the next “Continue” button.
- Click three icons that interest you (it doesn’t matter which ones at this point).
- Click “Continue.”
Eventually you’ll get to a page with this toolbar at the top:

Figure 12-5: The IFTTT toolbar, with your name at the far right.
That’s where you want to be! There are a bunch of steps below, but they’re really straightforward and will only take a couple of minutes.
- Click on your name in the upper-right corner (if it’s not your name, it’s part of your email address).
- Choose “Create.”

Figure 12-6: The (slightly hidden) IFTTT recipe “Create” link
- Click the big “This” link.
- You’ll see a page that asks you to choose a “Trigger Channel.” Either scroll down or use the search box for the “Maker” channel, which has a big “M” logo.
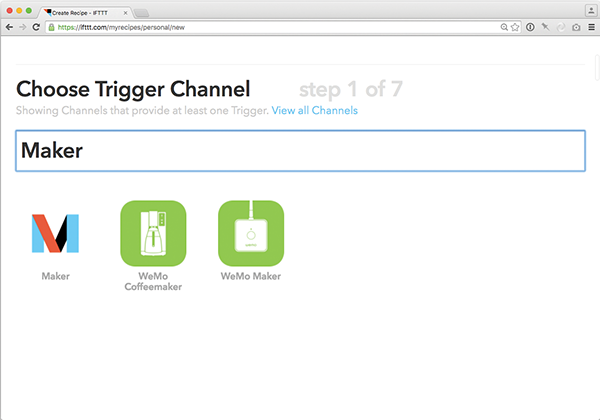
Figure 12-7: Searching for the “Maker” channel, which is the big “M” on the left
- Click the big “M” logo.
- Click the “Connect” button.
- Click “Done.”
- Click “Continue to the Next Step.”
- You only have one option—“Receive a web request”—so pick that one.
- You’ll be asked to enter an Event Name. Enter “button_pressed” here.
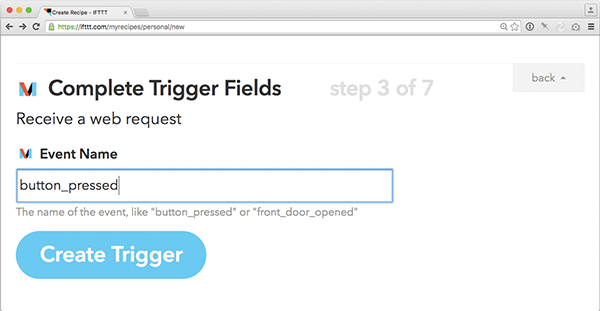
Figure 12-8: Enter “button_pressed” as your IFTTT trigger.
- Click “Create Trigger.”
- Now click the big “That” link.
- When you get to “Choose Action Channel,” enter “email” into the search box.
- Click the plain “Email” icon.

Figure 12-9: Searching for the IFTTT “Email” channel. You want the plain Email icon on the left.
- For “Choose an Action,” select “Send me an email.”
- When you see “Complete Action Fields,” just leave everything as it is and click the “Create Action” button.
- At “Create and Connect,” press the “Create Recipe” button.
OK! Recipe made. Now we have to get a little bit of information from IFTTT to complete the process.
Get Your Maker Channel Info
We’re about to get a little key from IFTTT that we’re going to put into our program.
- In your browser, go to http://ifttt.com/maker.
- On this page you’ll see a section that says, “Your key is:” with a jumble of letters and numbers.
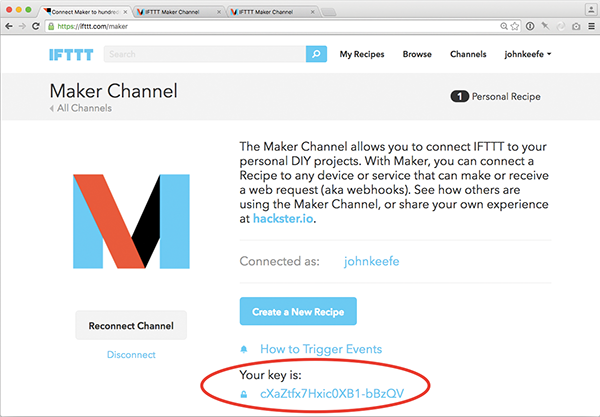
Figure 12-10: Finding your “Maker Key” on IFTTT. It’s the jumble of characters at the bottom (yours will be different than mine).
- Copy that jumble by highlighting it, making sure you get all the characters, using Edit → Copy.
- Switch to your Arduino software.
- Near the top of the program, find this section:
//////////////////// // IFTTT Variable // //////////////////// const String maker_key = "YourMakerKeyGoesHere"; - Delete the phrase
YourMakerKeyGoesHereand replace it with the key from the IFTTT page by pasting the key between the quote marks, using Edit → Paste. - Save your program using File → Save.
Sweet. You are good to go.
Make It Go
- Upload the code to your Arduino by pressing the arrow button at the top of the blue window or using Sketch → Upload.
- Open the Serial Monitor using Tools → Serial Monitor just to make sure everything is working. (Opening the Serial Monitor isn’t necessary for this program to work, but it lets you see what’s happening and helps for troubleshooting.)
- Wait a full minute. This lets the wifi card get established. The LED will glow during this time.
- The LED will go dark when everything is ready to send.
- Push the button!
- Check your email!
Did you get an email? If not, check out “Fixes” below.
Important note: I’ve written the program so you have to wait again for a full minute to send another email. This way, if something is amiss, you don’t accidentally send yourself hundreds of emails right away (and irritate the servers along the way). The LED will go dark when a minute is over.
Fixes
The best way to troubleshoot this program is to watch two things: the little blue LED on the SparkFun board and the Serial Monitor.
The little blue light needs to be steady and stable. If it isn’t, there’s a problem staying on the wifi network. One thing that I found helps is to make certain the USB cable is firmly in the computer. Sometimes it slides out even a little, and that seems to cause problems.
The Serial Monitor should look like this:

Figure 12-11: What things should look like in the Serial Monitor if your button-push is successful
If it doesn’t, check out the error solutions below.
Looping Forever
If you get the “looping forever” error, that means the connection between the Arduino and the wifi board didn’t work. Unplug the USB cable from the computer, count to five, and put it back in firmly. There’s a chance this was because of a soldering issue, but more likely it is just being flakey.
Failed to Connect to Server
This I got a lot. The key seems to be that once you press the reset button, you need to wait for a good minute or two. Waiting allows the board to get connected to the Internet.
Again, make sure the USB cable is firmly in both your computer and your Arduino. That matters.
Posting to IFTTT . . . but nothing
If the script says it’s posting to IFTTT, but you see nothing else, be sure your maker_key has been copied into your code correctly.
What’s Going On?
The Arduino is actually doing something incredibly simple: When you push the button, it essentially visits a web page at IFTTT—and when IFTTT sees the “visit” it triggers the email. You can test this with a web browser, too. Copy this link into your browser . . .
https://maker.ifttt.com/trigger/button_pressed/with/key/YourMakerKeyGoesHere
. . . and before you press Enter, change YourMakerKeyGoesHere to your unique Maker key, putting it right after the last slash at key/. Then hit Enter and you should get an email!
Code Corner
The core of this sketch is definitely the void sendTrigger() section. That’s what actually sends a signal to the IFTTT website. In this section, the communication action happens anywhere you see client, such as:
client.print(httpHeader);
client.println();
With every instance of client, the sketch is communicating with the wifi board. Those two lines actually “print” the website information to the wifi board, causing it to visit the IFTTT website and trigger the Maker part of the recipe.
Taking It Further
Untethering Your Button
You don’t need to keep your Arduino tethered to your computer for this program to work. Simply unplug the USB cable from your Arduino and power it instead with your Arduino power supply. Your program will be active and running a few moments after your Arduino powers up.
Customizing the Email
The email you get is a little robotic, and not particularly friendly.

Figure 12-12: The generic email IFTTT sends
But you can customize it!
- Go to IFTTT in your web browser.
- Click “My Recipes” in the toolbar.
- Pick your Maker + Email recipe.
- Change the “Subject” to anything you want, like “Someone pushed the button!”
- Change the “Body” to anything you want, too.
- When you’re in one of the two boxes, you’ll see a blue bottle icon that gives you the extra values you can include, such as when it happened.
Trigger Something Else
There are dozens of things you can make your button do besides send email. By activating new channels in IFTTT, you can change the “then” part of “If the button is pressed, then . . .” Here are some possibilities:
- Call your phone and tell you(!) the button was pushed (using the Phone Call channel)
- Post a tweet on Twitter (using the Twitter channel)
- Add a row to a Google spreadsheet (using the Google Drive channel)
- Send a notification to your smartphone (using the IF Notifications channel and the IF app on your phone)
In most cases, you’ll need to activate the channel, which may include verifying your information (like your phone number) or getting your permission to use another service (like Google).
There are lots of other channels, many attached to brands and companies that sell Internet-connected devices, such as lamps and appliances. If you have one, you can trigger it with your new button!