In this last and final chapter, we are going to look at the database and framework support that PyCharm provides out of the box. PyCharm allows you to connect almost any kind of database, and will automatically download JDBC drivers for you to act as an interface. It also has support for multiple web frameworks such as Flask, Django, Pyramid, and GAE. This chapter introduces you to some of the best tools that PyCharm has to offer for web development. However, this chapter does not go into great depth; instead it opts to showcase the most useful features. Here is an outline of what we're going to cover:
- Database tools: This section will deal with connecting to databases and using PyCharm as a complete interface to the database. Please note that, for now, PyCharm only supports RDBMSes.
- Web frameworks: This section will look into the different web frameworks that PyCharm supports, starting with common tools and then eventually heading off to framework-specific subtopics.
PyCharm supports interfacing with almost any database. Once you give PyCharm a created database, it can give you the schema of the database, generate a diagram of all the tables and how they are connected, and provide you with SQL writing tools that have code completion.
In PyCharm you cannot create databases, but provides facilities to manage and query them. Once you are granted access to a certain database, you can configure one or more data sources within PyCharm that reflect the structure of the database and store the database access credentials.
Adding an existing database is a simple process of configuring the hostname and port and providing the authentication details required for the connection. It might take a while to initially configure the database since PyCharm will need to download JDBC drivers in order to do so. To add a database, we must first select a type.

In this case, we are going to connect to an existing PostgreSQL database.

When adding a database, we can set its scope. When we set the scope to Project [1], we tell PyCharm that this database is only relevant for this particular project. If we set it to IDE, the database will be available on every single project in our database panel.
[2] is the name of the database we want to connect to and [3] will be generated automatically as the connection URL. The reason that we cannot test the connection using [4] is because PyCharm does not have the downloaded drivers; we can fix this by just clicking on the link in [5].
Once we download the files, we should be able to see that PyCharm is using the PostgreSQL drivers in the Driver files subsection.

After installing the drivers and setting the credentials, we should now be able to test our connection.

Using the SQL console in PyCharm gives us many features, including code completion, error detection, diagram generation, and much more. Let's start by firing up the console for the newly added database.

The console allows us to input SQL into the database, and the first thing we are going to do is create a schema called demo.

Once we run the SQL, we should expect to see the changes reflected in the database panel on the right-hand side since the statement was executed as shown in [2]. Our first point of call might be to synchronize using [1], but even that will not solve the problem because PyCharm offers you better code completion by only taking into consideration the schemas that you want considered.
The solution is to change the list of schemas that PyCharm does take into consideration using [3], which will allow us to once again configure our database.

Underneath the Schemas & Tables tab, we must enable the postgres.demo schema. Once enabled, we can set the schema as our default schema. If we disable all the other schemas except for the demo schema, PyCharm will only provide us with code completion from the demo schema. This makes code completion a lot faster, and as a result, makes PyCharm a lot more responsive. This feature also extends to tables.

We can now begin creating a table called students under the demo schema.

Note how PyCharm offers us possible types in [1]. We can also see that there are a few snippets available to us in [2]. PyCharm also provides table-specific completions and catches silly mistakes.

In [1], we forgot to add a name for the constraint, and in [2], we are provided with age as a possible completion. Note that other completions such as function calls are also suggested.
The complete schema looks similar to this:
CREATE TABLE students (
  id    SERIAL PRIMARY KEY,
  fname VARCHAR(255),
  lname VARCHAR(255),
  age   INTEGER CONSTRAINT minimum_age CHECK (age > 4)
);
It is a very simple table, but with it, we can illustrate a few points. First, the console only allows you to execute one selection or a statement at a time. This means we have to select the SQL we want to execute or place our cursor on a statement; otherwise, the green button will remain grayed out and Ctrl + Enter will result in nothing happening.
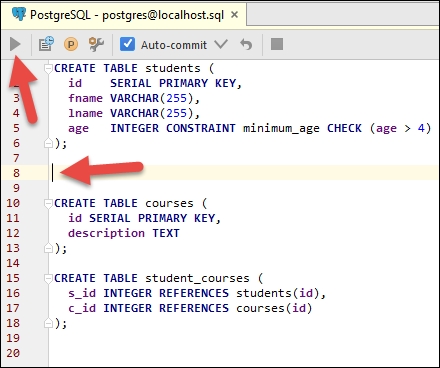
This means that if we have multiple statements as in the preceding screenshot, we need to select all of them; otherwise, only the statement we currently have our cursor on will execute. Once we have selected the statements we want to be executed, the results will appear in the console.

PyCharm allows us to reuse statements using parameters, and is particularly useful when we want to enter a sequence of statements. In this case, we want to create three students, so we are going to parameterize the statement using question marks:

Opening up the parameters window (indicated by the red arrow) will allow us to enter different values for the three parameters. Please note that this window might pop up on the right-hand side as an attachment to the database console.

We can reuse any of the statements we've entered into a console session. The console sessions are saved for each project; so even if we were to close PyCharm, the history would remain intact.
If we want a bird's eye view of how the tables in a certain schema are related to each other, we can use PyCharm's database visualization tools.

In the preceding screenshot, we first selected the schema and then we visualized the tables in the schema; if we wanted to see the relationships between just a subset of the tables in the schema, we could just select those tables and then visualize only those tables in the selection in addition to the tables that they're taking a reference from. So, if we were to visualize student_courses, we would get a visualization of all three tables, because student_courses is related to the other two tables as well.
PyCharm allows us to export pretty much anything from a database, ranging from the contents to a single table in JSON or CSV to the DDL required to construct all the tables in a schema. There are so many options here that we can only dive into a few, and talk about some of the unexpected behavior we see.
DDLs allow you to recreate tables. If we were to select a schema, table, or a subset of tables in a schema, PyCharm would be able to generate the DDL required to create all the tables that fall under the schema or our selection of tables. So, for example, if we copy the DDL for our courses: table, we simply select the courses as our table and copy the DDL.

The resulting DDL will be the following:
CREATE TABLE courses (
    id SERIAL PRIMARY KEY NOT NULL,
    description VARCHAR NOT NULL );
We can do the same thing by selecting a schema, table, or a set of tables within a schema. However, note that the SQL generated may differ from what was originally entered.

We can export the data in our tables in a myriad of ways. As shown in the preceding screenshot, we can export pretty much every file type imaginable from CSV to JSON. Furthermore, we can customize how we export CSVs, TSVs, and HTML tables in configure extractors.

We can even configure new formats of export (based on the current formats that already exist) as separate options using the + icon indicated by the red arrow.
