
As hinted at the end of the previous chapter, there is some more work to be done before we can claim to have fully implemented IaC.
The first step was to describe the hardware side of our infrastructure in code; now it is time to look at the software or configuration aspect of it.
Let us say we have provisioned a few EC2 nodes and would like to have certain packages installed on them, and relevant configuration files updated. Prior to Configuration Management (CM) tools gaining popularity, such tasks would have been performed manually by an engineer either following a checklist, running a collection of shell scripts, or both. As you can imagine, such methods do not scale well as they generally imply one engineer setting up one server at a time.
In addition, checklists or scripts:
- Are hard to write when it comes to configuring a host plus a full application stack running on it
- Are usually targeted at a given host or application and are not very portable
- Get progressively harder to comprehend the further you get from the person who originally wrote them
- Build scripts tend to get executed only once, usually at the time a host is provisioned, thus configuration starts to drift from that moment on
Fortunately, not many people use these nowadays, as Configuration Management has become a common practice. Let us examine some of the benefits:
- CM allows us to declare the desired state of a machine once and then reproduce that state as often as necessary
- Powerful abstraction takes care of specifics such as environment, hardware, and OS type, allowing us to write reusable CM code
- The declared machine state code is easy to read, comprehend, and collaborate on.
- A CM deployment can be performed on tens, hundreds, or thousands of machines simultaneously
In this age of DevOps, there are a variety of CM tools to choose from. You might have already heard of Puppet, Chef, Ansible, OpsWorks, or the one we are going to use-SaltStack (the Salt Open project).
All of these are well developed, sophisticated CM solutions with active communities behind them. I find it hard to justify any reported claims of one being better than the rest as they all do the job pretty well, each with its own set of strengths and weaknesses. So which one you use, as is often the case, is up to personal preference.
Regardless of the tool you end up using, I would like to stress the importance of two points: naming conventions and code reusability.
Following naming conventions when writing code is an obvious win as it guarantees other people will be able to understand your work with less effort. In addition to writing code however, CM involves executing it against your nodes and this is where naming also becomes important. Imagine you had four servers: leonardo, donatello, michelangelo, and raphael. Two of those are your frontend layer and two the backend, so you sit down and write your Configuration Management manifests respectively: webserver-node and database-node. So far, so good, given the number of hosts you can launch your CM tool and easily tell it to run the relevant manifest against each of them.
Now imagine 50, then 100 hosts, within a similar flat-naming schema, and you start to see the problem. As the size and complexity of your infrastructure grows, you will need a host-naming convention that naturally forms a hierarchy. Hostnames such as webserver-{0..10}, db-{0..5} and cache-{0..5} can be further grouped into frontend and backend and then represented in a structured, hierarchical way. Such a way of grouping nodes based on role or other properties is extremely useful when applying Configuration Management.
Code reusability should already be on your mind when you start writing CM code (manifests). You will find that there are generally two ways of approaching this task. You could write a large, say, web server piece which contains instructions on how to set up the firewall, some CLI tools, NGINX, and PHP on a node, or you could break it down into smaller parts like iptables, utils, NGINX, PHP, and so on.
In my opinion, the latter design adds some overhead when writing the manifests, but the benefit of reusability is substantial. Instead of writing large sets of declarations dedicated to each server type, you maintain a collection of generic, small ones and cherry-pick from them to suit the machine in question.
To illustrate:
manifests: everything_a_websrv_needs, everything_for_a_db, cache_main
nodes: web01, db01, cache01
CM_execution: web01=(everything_a_websrv_needs), db01=(everything_for_a_db), cache01=(cache_main)
Or better:
manifests: iptables, utils, nginx, postgresql, redis, php
nodes: web01, db01, cache01
CM_execution: web01=(iptables,utils,nginx,php), db01=(iptables,utils,postgresql), cache01=(iptables,utils,redis)
SaltStack (see https://saltstack.com/), first released in 2011, is an automation suite which offers Configuration Management plus standard and/or event-driven orchestration. It is commonly used in a master-minion setup, where a master node provides centralized control across a compute estate. It is known for its speed and scalability thanks to the fast and lightweight message bus (ZeroMQ) used for communication between the salt-master and minions. It can also be used in an agentless fashion, where the minions are controlled over SSH, similarly to how Ansible operates.
SaltStack is written in Python and is easily extensible. You can write your own modules for it, attach long-running processes to its event bus, and inject raw Python code in unusual places.
The master-minion model is quite powerful, offers a lot of flexibility, and is the recommended approach if you are looking after anything more than a few dev nodes and want to take advantage of all the features SaltStack has to offer.
Note
More on how to get a salt-master up and running can be found here: https://docs.saltstack.com/en/latest/topics/configuration/index.html
In our case, we are going to explore the power of Configuration Management using SaltStack in a standalone or masterless mode. We will reuse parts of the Terraform template from the previous chapter to launch a set of EC2 resources, bootstrap a SaltStack minion and have it configure itself to serve a web application.
Provided all goes well, we should end up with a fully configured web server (EC2 node) behind a load-balancer (EC2 ELB).
Here is our task-list:
- Prepare our SaltStack development environment.
- Write the configuration that we would like SaltStack to apply to our node(s).
- Compose the Terraform template describing our infrastructure.
- Deploy the infrastructure via Terraform and let SaltStack configure it.
SaltStack Configuration Management is performed using the following main components:
- States are the files which describe the desired state of a machine. Here we write instructions for installing packages, modifying files, updating permissions, and so on.
- Pillars are the files in which we define variables to help make States more portable and flexible.
- Grains are pieces of information gathered on the minion host itself. These include details about the OS, environment, the hardware platform, and others.
- The Salt File Server stores any files, scripts, or other artifacts which may be referenced in the States.
- The Salt Top file(s) are used to map States and/or Pillars to minions.
In a master-minion setup, all of these components except the Grains would be hosted on and made available to the minions by the salt-master (other backends are also supported).
We are planning to run Salt in masterless mode however, meaning that we will need a way to transfer any States, Pillars, and related files from our local environment to the minion. Git? Good idea. We will write all Salt code locally, push it to a Git repository, and then have it checked out onto each minion at boot time.
As for choosing a Git hosting solution, Github or Bitbucket are excellent services, but giving our minion EC2 nodes access to these will involve some key handling. In comparison, CodeCommit (the AWS Git solution) offers a much smoother integration with EC2 instances via IAM Roles.
Let us start by creating a new IAM user and a CodeCommit Git repository. We will be using the user's access keys to create the repository and a SSH key to clone and work with it:
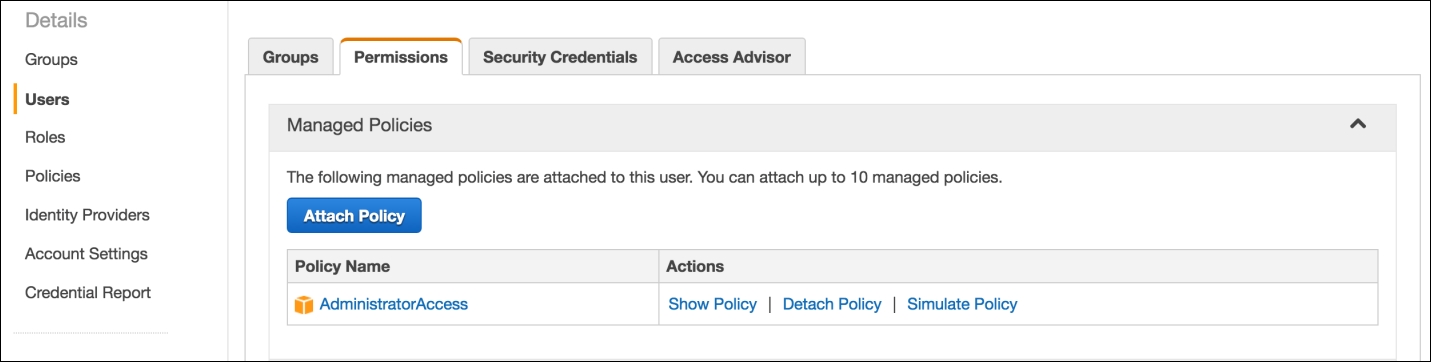
- In the AWS Console, create an IAM user (write down the generated access keys) and attach the AWSCodeCommitFullAccess built-in / Managed IAM policy to it as shown in the following screenshot:
- On the same page, switch to the Security Credentials tab and click on the Upload SSH public key as shown in the following screenshot:

- Configure
awscli:$ export AWS_ACCESS_KEY_ID='AKIAHNPFB9EXAMPLEKEY' $ export AWS_SECRET_ACCESS_KEY= 'rLdrfHJvfJUHY/B7GRFTY/VYSRwezaEXAMPLEKEY' $ export AWS_DEFAULT_REGION='us-east-1'
- Create a repository:
$ aws codecommit create-repository --repository-name salt
      --repository-description "SaltStack repo"
{
"repositoryMetadata": {
"repositoryName": "salt",
"cloneUrlSsh": "ssh://git-codecommit.us-
     east-1.amazonaws.com/v1/repos/salt",
"lastModifiedDate": 1465728037.589,
"repositoryDescription": "SaltStack repo",
"cloneUrlHttp":
    "https://git-codecommit.us-east-1.amazonaws.com/v1/repos/salt",
"creationDate": 1465728037.589,
"repositoryId": "d0628373-d9a8-44ab-942a-xxxxxx",
"Arn": "arn:aws:codecommit:us-east-1:xxxxxx:salt",
"accountId": "xxxxxx"
}
}
- Clone the new repository locally:
$ git clone ssh://[email protected]
     east-1.amazonaws.com/v1/repos/salt
Cloning into 'salt'...
warning: You appear to have cloned an empty repository.
Checking connectivity... done.
Here, SSH_KEY_ID is the one we saw after uploading a public key in step 2.
Note
For more options on connecting to CodeCommit see http://docs.aws.amazon.com/codecommit/latest/userguide/setting-up.html
We are ready to start populating our empty, new Salt repository.